
SDA 370 B1 - Food Dehydrator SILVERCREST - Free user manual and instructions
Find the device manual for free SDA 370 B1 SILVERCREST in PDF.

User questions about SDA 370 B1 SILVERCREST
0 question about this device. Answer the ones you know or ask your own.
Ask a new question about this device
Download the instructions for your Food Dehydrator in PDF format for free! Find your manual SDA 370 B1 - SILVERCREST and take your electronic device back in hand. On this page are published all the documents necessary for the use of your device. SDA 370 B1 by SILVERCREST.
USER MANUAL SDA 370 B1 SILVERCREST
natural_image
Close-up of a stainless steel steamer with clear lid and control panel (no visible text or symbols)FOOD DEHYDRATOR / DÖRRAUTOMAT DÉSHYDRATEUR ALIMENTAIRE SDA 370 BI
TARGA GMBH
Coesterweg 45
1943 SOB GERMANY
Operating instructions and safety/instructions
M
DROOGAUTOMAAT
Handelding en voiligheidsamwilzingen
(27)
C2
SUSICKAPOTRAVIN
Navi
(8)
DESHIDRATADOR DE ALIMENTOS
natural_image
Simple icon of a lightbulb inside a circle with radiating lines, no text or symbols present.Wechselspannung

natural_image
Technical line drawing of a curved mechanical component with internal grid structure (no text or symbols)Normaler Abstand
natural_image
Technical line drawing of a multi-layer mechanical component with internal channels and a central dashed line (no text or symbols)Höherer Abstand
https://www.targa.gmbh/downloads/conformity/482201_2410.pdf
-
Intended use 20
-
Package contents ...... 20
-
Overview ......21
-
Technical specifications....21
-
Safety instructions....21
-
Before you start.... 25
6.1 Some information about dehydrating 25
- Getting started 25
7.1 Initial operation 25
- Using the dehydrator 26
8.1 Preparing food for dehydration....26
8.2 Setting up the dehydrator ....26
8.3 Filling and installing the drying racks 27
8.4 Switching on and programming the dehydrator....27
8.5 Tips for good dehydration results....28
-
Cleaning 31
-
Storage when not in use....31
-
Troubleshooting....31
-
Environmental regulations and disposal information....31
-
Food-grade use 32
-
Conformity notes....33
-
Warranty and Service Information.... 33
Congratulations!
By purchasing the SilverCrest SDA 370 BI dehydrator, hereinafter referred to as the dehydrator, you have chosen a high-quality product.
Before first using it, familiarise yourself with the way the dehydrator works and read these operating instructions through carefully. Be careful to follow the safety instructions and only use the dehydrator as described in the operating instructions and for the applications given.
Keep these operating instructions in a safe place. Please also hand over all documents when passing on the dehydrator to third parties.
1. Intended use
This dehydrator is designed exclusively for drying food. The dehydrator has not been designed for corporate or commercial applications. Use the dehydrator for private purposes only. Any use other than that mentioned above does not correspond to the intended use. The dehydrator may also not be used outdoors or in tropical climates. This dehydrator fulfils all relevant norms and standards relating to CE conformity. In the event of any modification to the dehydrator that was not approved by the manufacturer, compliance with these standards is no longer guaranteed. The manufacturer accepts no liability for any damage or malfunctions resulting from this.
Observe the regulations and laws in the respective country of use.
2. Package contents
- Dehydrator
• These operating instructions
3. Overview
These operating instructions have a fold-out cover. On the inside of the cover, the dehydrator is illustrated with all parts numbered. The meanings of the numbers are as follows:
1 Lid
2 Top drying rack
3 Drying racks
4 Base
5 Display
6 Button [change temperature/time setting]
7 — Button [decrease value]
8 + Button (increase value)
9 Button [press briefly: start/pause the drying process; press and hold: cancel drying process]
10 Power cable
11 Opening (drying rack centres)
12 Closed cover on top drying rack centre
4. Technical specifications
| Model SDA 370 B1 | |
| Power supply 220-240 V | -,50-60 Hz |
| Protection class II / | |
| Power consumption 370W |
The technical data and design may be changed without prior notice.
5. Safety instructions
Before using the dehydrator for the first time, read the following instructions carefully and observe all warnings, even if you are familiar with the handling of electronic devices. Keep these operating instructions in a safe place for future reference. If you sell the dehydrator or give it away, pass on the operating instructions at the same time. They are an integral part of the product.
Explanation of the symbols used

DANGER! This signal word indicates a danger with a high risk, which will lead to death or major injuries if not avoided.

WARNING! This signal word indicates a danger with a moderate risk, which can lead to death or major injuries if not avoided.

CAUTION! This signal word indicates important instructions to protect against damage to property.
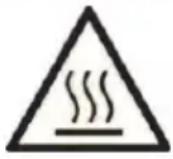
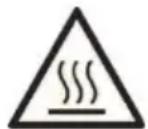
DANGER! Warning, hot surfaces! This symbol denotes the risk of injuries or burns from hot surfaces on the dehydrator.

natural_image
Simple line drawing of a light bulb inside a circle with a curved line above it (no text or symbols)AC voltage

This symbol denotes further information on the topic.
Manufacturer's address
WARNING!

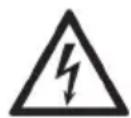
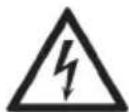
DANGER OF ELECTRIC SHOCK!
DO NOT OPEN THE DEVICE!

DANGER! General safety instructions
- This dehydrator may be used by children of 8 years or over or by persons with physical, sensory or mental impairments or those with no knowledge or experience, providing they are supervised or they have been given instructions on the proper use of the device and they understand the associated risks. This device is not a toy. Cleaning and user maintenance must not be carried out by children unless they are older than 8 years old and supervised. Keep children younger than 8 years away from the device and its power cable [10].
- Small parts can represent choking hazards. Keep the packaging materials out of the reach of children. There is a risk of suffocation.
- Do not use the dehydrator if its is damaged or malfunctioning, as this could cause further damage. Get customer services or a qualified person to check the dehydrator and repair it if necessary.

DANGER! Risk of fire!
- The dehydrator is not designed for use with an external timer or a separate remote control system.
- Do not place the dehydrator on painted surfaces or on textiles such as a tablecloth.
- Never place the dehydrator under or directly next to flammable items such as curtains or drapes.
- Maintain a clearance of at least 50 cm around the device to flammable and combustible materials.
- Ensure that there is unimpeded air circulation. Leave sufficient space around the dehydrator and at least 1 metre above the device.
- Do not cover the dehydrator.
- Never block the ventilation holes on the underside of the base (4) or cover them with cloth.
- Do not place any paper, aluminium foil, fabric or other objects on the drying racks [2, 3].
- Place the dehydrator only on an even, sturdy and fireproof surface protected against spray water.
DANGER! Risk of electric shock!
- The housing of the dehydrator must not be damaged. If the housing is damaged, there is a risk of electric shock.
- Always plug the mains plug into an easily accessible mains socket. Only operate the dehydrator at the voltage indicated on the rating plate! The rating plate can be found on the underside of the dehydrator. No action is required by the user to set the product to 50 or 60Hz . The product automatically adjusts to 50 and 60Hz .
- The dehydrator, the power cable [10] and the mains plug must not be immersed in water or other liquids.
- Never touch the power cable [10] or dehydrator with wet hands.
- The dehydrator must not be operated in the immediate vicinity of a basin, a bathtub, a shower or a swimming pool. If the dehydrator has fallen into water, unplug the mains plug immediately and only then remove the dehydrator from the water.
- To disconnect properly from the mains, the mains plug must be pulled out of the socket. Never pull the power cable [10] to disconnect the mains plug from the mains socket. Always pull on the mains plug itself.
- Unplug the mains plug from the mains socket if the dehydrator is not working properly, not in use, before assembling or disassembling it, during thunderstorms and before cleaning.
- Make sure that the power cable (10) cannot be damaged by sharp edges or hot spots.
- Make sure that the power cable (10) cannot become crushed or squashed.
- If the power cable (10) is damaged, it must be replaced by the manufacturer, its customer service or a similarly qualified person, in order to avoid any possible danger. Never use adapter plugs or extension cables and do not tamper with the power cable (10)!
DANGER! Risk of getting burnt!
- The lid (1), the drying racks (2, 3), the base (4) and the food to be dried become very hot during operation. These also remain hot after the device is switched off. Therefore, be careful not to burn yourself.
- Allow the dehydrator and all accessories to cool down completely before cleaning, transporting or storing them.

WARNING! Risk of injury
- If you notice any smoke, unusual noises or strange smells, immediately unplug the mains plug from the socket. If this occurs, the dehydrator should no longer be used until it has been inspected by authorised service personnel. Never inhale smoke from a possible device fire. If you do inadvertently inhale smoke, seek medical attention. Smoke inhalation can be damaging to your health.
- Do not use the dehydrator until it is correctly and completely assembled.
- Lay the power cable (10) so it does not present a trip hazard.

CAUTION! Damage to equipment
- Do not use any abrasive or astringent detergents.
- Only operate the dehydrator with the original accessories supplied.
- Do not place any objects on the dehydrator or the drying racks [2, 3].
- Protect the dehydrator from humidity, drips and splashes.
- Do not place the dehydrator in direct sunlight.
- Do not expose the dehydrator to extremely high or low temperatures.
- Do not subject the dehydrator to excessive shocks or vibrations.
6. Before you start
Remove the dehydrator from the packaging. Remove all packaging material and check that all parts are complete and undamaged. If you find anything missing or damaged, please contact the manufacturer.
6.1 Some information about dehydrating
Dehydration is a process for air-drying foodstuffs in order to extend their shelf life. This avoids the use of frequently used preservatives such as sulphur, high nitrogen concentrations, etc. In the dehydration process, as much water as possible is removed from the food, in order to remove the basis for life of micro-organisms responsible for spoiling of the food (moulds, bacteria, etc.). Most bacteria need a water content of at least 35%. Moulds are still active up to a water content of approx. 15%.
In your dehydrator, warm, dry air flows over the surface of the pieces of food. This causes water on the surface of the food pieces to evaporate. The water that then flows out from within the pieces of food also evaporates. This continues to occur until the water content inside the pieces of food is so low that no more water can flow out.
This shows that foods containing water (e.g. apricots) require longer drying times than relatively dry foods (e.g. carrots).
Vitamins, fibre, and minerals are preserved in the dehydration process. Because the water evaporates and the volume of food is reduced, not only vitamins and minerals, but also the flavour is concentrated. Dehydrated foods are more flavoursome and have a more intense taste.
7. Getting started
7.1 Initial operation
When you use it for the first time, smells or slight smoke may develop. This is normal and perfectly safe. Open a window to ensure sufficient ventilation. Operate the device without food to be dried and with all 5 drying racks [2, 3] and the lid [1] at 70 °C for approx. 30 minutes. The procedure is as follows:
- Clean the dehydrator before using it for the first time, please refer to the "Cleaning" chapter.
- Place the base unit [4] on an even, non-slip, dry and fireproof surface.
- Place all four drying racks [3], the top drying rack [2] and the lid [1] on the base [4].
- Plug the mains plug into an easily accessible mains socket.
An acoustic signal can be heard and the "00:00" flashes on the display [5]. - Use the - [7] or + [8] buttons to set the time to "01:00".
- Press the button [6]. The temperature display shows "55C" then flashes.
• Use the - [7] or + [8] buttons to set the temperature to "70C". - Briefly press the ⏻ button (9) to switch on the dehydrator.
The display [5] alternates between the time remaining until switch-off and the set temperature. The dehydrator switches off automatically after the countdown has ended. An acoustic signal sounds and "0000" appears on the display [5] .

This first heating process can be cancelled after 30 minutes by pressing and holding the button [9] until "0000" appears on the display [5].
- Unplug the power cable plug from the mains socket.
- Allow the dehydrator to cool down completely.
- Clean the dehydrator as described in the "Cleaning" chapter. The device is then ready for normal use.
8. Using the dehydrator
8.1 Preparing food for dehydration
The following section provides some tips to help you achieve good dehydration results for improved preservation and maximum taste.
- Do not dehydrate any food containing fat or oil (such as fatty meat or meat soaked in a marinade that contained oil). Fat and oil becomes rancid during dehydration. Cream, milk and butter have similar effects - please also avoid using them in marinades.
- Wash all food well before dehydrating.
- If you want to dehydrate fruit, remove the stones. The fruit should also be ripe, but not over-ripe.
- Only dehydrate food that is in undamaged condition, and generously cut out any spoiled sections.
- Cut the food into evenly sized pieces where possible to achieve homogeneous dehydration results. Although thin slices dehydrate more quickly, they may become very small after dehydration.
- Do not cut food into pieces that are too small. Dehydration causes the pieces to shrink even further and they could fall through the holes in the drying racks [2, 3].
- Place unpeeled fruit on the drying racks [2, 3] with the skin facing down [cut side up].
- Once food is prepared, it should be dehydrated immediately.
- Do not overfill the drying racks [2, 3]. Otherwise, the air cannot circulate sufficiently and the food is not sufficiently dried.
- Do not interrupt the dehydration process.
- Before dehydration, dip the cut surfaces of fruit into lemon juice to prevent them from turning brown.
8.2 Setting up the dehydrator
Place the base unit [4] on an even, non-slip, dry and fireproof surface.
8.3 Filling and installing the drying racks
Depending on the quantity of food to be dehydrated, you can place between 1 and 5 drying racks [2, 3] on the base [4].
To install the drying racks [2, 3]:
- Place the prepared food to be dried on the drying racks [2, 3].
- Insert all the drying racks [3] that you have prepared with food to be dried and the top drying rack [2] on the base [4].
- Place the lid (1) on the top drying rack (2).

The space between the drying racks [2, 3] can be increased if larger items are to be dried.
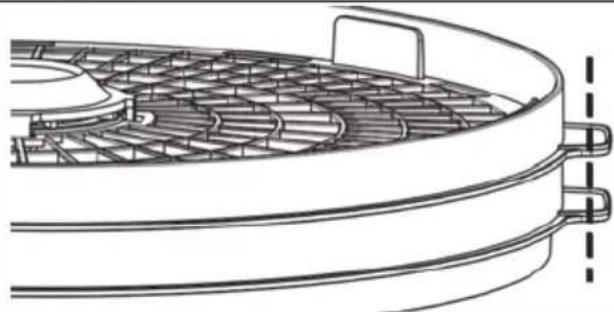
natural_image
Technical line drawing of a curved mechanical component with internal grid structure (no text or symbols)Normal distance
Place the drying racks [2, 3] on top of each other so that the handles are exactly aligned on top of each other.
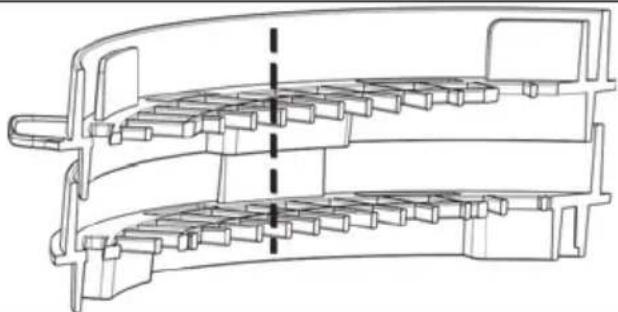
natural_image
Technical line drawing of a mechanical component with internal channels and a central dashed line (no text or symbols)Increased distance
Place the drying racks [2, 3] on top of each other so that the narrow and wide bars are exactly aligned on top of each other.
8.4 Switching on and programming the dehydrator
After you have prepared and set up the dehydrator as described in the previous sections, you can dehydrate your food. The procedure is as follows:
- Plug the mains plug into an easily accessible mains socket.
An acoustic signal can be heard and "00:00" flashes on the display [5]. - Use the - [7] or + [8] buttons to set the desired drying time (see recommendations in the chapter "Tips for good dehydration results").
- Press the button [6]. The temperature display "55C" then flashes.
- Use the - [7] or + [8] buttons to set the desired temperature (see recommendations in the chapter "Tips for good dehydration results").
- Briefly press the ⏻ button [9] to start the dehydrating process.
The display [5] alternates between the time remaining until switch-off and the set temperature. The dehydrator switches off automatically after the countdown has ended. An acoustic signal sounds and "0000" appears on the display [5].
- If necessary, you can adjust the temperature and drying time without switching off the device.
Press the ☐ button (6) to set the temperature and press the ☐ button (6) again to adjust the drying time. Use the - (7) and + (8) buttons to set the desired value while it is flashing on the display (5).
- You can pause the drying process at any time by briefly pressing the ⏻ button [9]. "PA" appears on the display [5]. Briefly press the ⏻ button [9] again to continue the dehydrating process.
- If necessary, check after a few hours whether the dehydration result is satisfactory. Perform a touch test (see the recommended firmness in the chapter "Tips on good dehydration results") to determine whether the food is already sufficiently dehydrated. Turn over if necessary and continue the drying process.
- You can also end the drying process early. To do this, press and hold the ⏻ button [9] until "0000" appears on the display [5]. You will then hear a beep.
- Unplug the power cable plug from the mains socket.
- Allow the dehydrator to cool down completely.
- Pack the cooled dehydrated food. Ideally, use empty preserving jars or resealable jars that you may have around the house. You can also shrink-wrap or vacuum-pack the food. The use of plastic bags is not recommended. You can store your dehydrated food at any room temperature but it will be preserved for longest if stored in a cool, dry and dark place.
- Clean the dehydrator as described in the "Cleaning" chapter.
8.5 Tips for good dehydration results
The dehydration times provided in the following are guideline values. They may vary depending on the quantity of food to be dehydrated, its thickness and size, etc. Carry out the recommended drying test from time to time to check whether the product has dried sufficiently. If it is not sufficiently dehydrated, continue dehydrating for a while longer.
Fruit
You can use dehydrated fruit as snacks or as ingredients for creative recipes. The fruit can be chopped into small pieces, ground, or re-soaked.
If you are preparing fruit as snacks, do not dehydrate it for too long, otherwise it will become difficult to chew.
Dehydrated fruit can be combined with nuts and cereals to create wonderful fruit muesli or yoghurt.


Before dehydration, dip the cut surfaces of fruit into lemon juice to prevent them from turning brown.
To dehydrate stoned fruit, we recommend that you first dehydrate for approx. 2/3 of the recommended time with the stone, and then remove the stone and separate the fruit for the remaining dehydration time. Pre-drying makes it easier to remove the core.
| Food | Preparation | Dehydration temperature [°C] | Dehydration time (hours) | Touch test |
| Pineapple Cut into slices approx. 8 mm thick | 70 10 - 12 Easily flexible | |||
| Apple Cut into slices approx. 8mm thick or chunks approx. 15mm thick | 70 8 - 10 Easily flexible | |||
| Apricots Unpeeled, halved, skin facing downwards | 70 10 - 12 Flexible | ||
| Cut into slices approx. 8 mm thick | 70 10 - 12 Flexible | ||
| Banana approx. 8-10 mm thick slices | 70 8 - 10 Flexible | ||
| Pear Cut into slices approx. 3 mm thick | 70 8 - 10 Flexible | ||
| Halved, skin facing downwards | 70 14 - 18 Flexible | ||
| Strawberries halved or approx. 8 mm thick slices | 70 8 - 10 Hard | ||
| Figs Halved, skin facing downwards | 70 8 - 10 Dry | ||
| Cherry Hole, deseeded 70 10 - 12 Leathery | |||
| Plums Halved, skin facing downwards | 70 10 - 12 Flexible | ||
| Grapes Halved, skin facing downwards | 70 12 - 14 Easily flexible |
Vegetables
Blanch vegetables before dehydrating.
Dehydrated vegetables must be soaked before cooking. They can also be ground in a dehydrated state (e.g. peppers or chilli peppers) and stored in an airtight jar for use as a spice.
Dehydrated mushrooms can be re-soaked and used in the same way as fresh mushrooms. Alternatively, they can be ground and the spicy mushroom powder can be used for soups and sauces.
| Food | Preparation | Dehydration temperature [°C] | Dehydration time (hours) | Touch test |
| Beans Whole, | blanched 70 6 - 8 Brittle | |||
| Peas Shelled, | blanched 50 | 6 - 8 Hard | ||
| Gherkin | Unpeeled, cut into slices approx. 1 cm thick | 50 | 6 - 8 Hard | |
| Carrot | Peeled, cut into slices approx. 8 mm thick | 70 6 - 8 Hard | ||
| Leek | Halved, cut into pieces approx. 6 - 8 cm long, blanched | 70 6 - 10 Brittle | ||
| Pepper | Approx. 6 - 8 cm strips | 70 9 - 10 Flexible | ||
| Mushrooms | Wash well, small mushrooms whole, large mushrooms sliced | 50 4-6 Tough | ||
| Celery Peeled | cut into slices approx. 8 mm thick | 70 6-10 Hard | ||
| Tomato approx | 6-8 mm thick slices | 70 7-8 Hard | ||
| Courgette Unpeeled | cut into slices approx. 8 mm thick | 70 9-10 Hard |
Herbs
Herbs should be dehydrated gently at a low temperature. If an intensive smell is produced during the dehydration process, turn the temperature down. Dehydrating herbs for too long can lead to a loss of taste.
Place the dehydrated herbs into resealable jars. Make sure that there are no hard or large stalks, as these are annoying to find when eating later.
| Food | Preparation | Dehydration temperature [°C] | Dehydration time (hours) | Touch test |
| Basil, thyme, dill, tarragon, parsley, rosemary, sage, chives, etc. | washed, dehydrated whole | 40 2 - 4 Brittle |
Meat
Only use fresh meat!
Remove sinews, fat, and bones, and rinse the meat thoroughly. Lean meat should be salted or marinated prior to dehydration. The salt in the salting or marinating process withdraws some moisture from the meat in advance, while also adding some flavour. Cut the meat into thin slices before dehydration. Dehydrate for approx. 10 to 12 hours at 60^ C.
Fish
Only use fresh fish!
Remove the bones and skin and rinse the fish thoroughly. Fish should be marinated prior to dehydration. Baste the fish with lemon juice and place it in salted water for approx. 30 minutes. Cut the fish into thin slices before dehydration. Dehydrate for approx. 10 to 12 hours at 60°C.
Dehydrated fish must be rehydrated prior to cooking.
9. Cleaning

DANGER! Unplug the mains plug from the mains socket before you start to clean, there is the risk of electric shock!

DANGER! Wait until the dehydrator has cooled down. Otherwise there is risk of burn injury!

DANGER! Never immerse the base [4] in water, there is a risk of electric shock!
To clean the casing, use a slightly damp cloth. Never use any solvents or cleaners that may damage the plastic. For stubborn dirt, add a little detergent to the damp cloth.
Clean the lid (1) and the drying racks (2, 3) in a bowl of warm water with washing-up liquid. Rinse all parts with clean water and dry them well.

The lid [1] and the dehydrator racks [2, 3] can also be cleaned in the dishwasher.
10. Storage when not in use
When you do not wish to use the dehydrator, disconnect the mains plug from the mains socket. Store the cleaned dehydrator in a clean, dry place out of direct sunlight.
11. Troubleshooting
The dehydrator does not work.
- Check that the mains plug is correctly inserted into the mains socket.
- Please check if the dehydrator is switched on.
The dehydrator switches itself off automatically.
- Check whether the preset drying time has elapsed. Set a longer dehydration time if necessary.
12. Environmental regulations and disposal information
 | Devices marked with this symbol are subject to the European Directive 2012/19/EU. All electrical and electronic devices must be disposed of separately from household waste at official disposal centres. Avoid damage to the environment and risks to your personal health by disposing of the device properly. For further information about proper disposal, contact your local government, disposal bodies or the shop where you bought the device. |
 | Dispose of all packaging in an environmentally friendly manner. Cardboard packaging can be taken to paper recycling centres or public collection points for recycling. Any film or plastic contained in the packaging should be taken to your public collection points for disposal. |
 | |
| ES/PT |
Only relevant for France:

FR
ÉLÉMENTS D'EMBALLAGE


FR


The product, the accessories, the printed material and the packaging are recyclable. They are subject to enhanced manufacturer responsibility and are sorted and collected separately.
Only relevant for Spain and Portugal:
Please separate the packaging material and dispose of it in the relevant collection containers in accordance with the symbols on the packaging:


Please note the markings on the packaging material when disposing of it, it is labelled with abbreviations (a) and numbers (b), the meanings of which are as follows:
1-7: plastic / 20–22: paper and cardboard / 80-98: composite materials.
| Symbol | Material | Contained in the following packaging elements for this product |
 | High density polyethylene Plastic bag in the packaging | |
 | Polypropylene Sticker to seal the packaging | |
 | Corrugated cardboard Packaging, inside box |
13. Food-grade use

This symbol designates products whose physical and chemical composition has been tested and found to be non-hazardous to health when used in contact with food in accordance with the requirements of Regulation EU 1935/2004.
14. Conformity notes

The product complies with the requirements of the applicable European and national directives. Evidence of conformity has been provided. The manufacturer has the relevant declarations and documentation.
The product complies with the requirements of the applicable national directives of the Republic of Serbia.
The complete EU Declaration of Conformity and any other conformity declaration [where applicable] are available for download from this link:
https://www.targa.gmbh/downloads/conformity/482201_2410.pdf
Contact address in accordance with 2023/988 Product Safety Regulation: ce@targa.de
15. Warranty and Service Information
Warranty of TARGA GmbH
Dear Customer,
This device is sold with three years warranty from the date of purchase. In the event of product defects, you have legal rights towards the seller. These statutory rights are not restricted by our warranty as described below.
Warranty conditions
The warranty period commences upon the date of purchase. Please keep the original receipt in a safe place as it is required as proof of purchase. If any material or manufacturing faults occur within three years of purchase of this product, we will repair or replace the product free of charge as we deem appropriate.
Warranty period and legal warranty rights
The warranty period is not extended in the event of a warranty claim. This also applies to replaced and repaired parts. Any damage or defects discovered upon purchase must be reported immediately when the product has been unpacked. Any repairs required after the warranty period will be subject to charge.
Scope of warranty
The device was carefully manufactured in compliance with stringent quality guidelines and subjected to thorough testing before it left the works. The warranty applies to material and manufacturing faults. This warranty does not cover product components which are subject to normal wear and which can therefore be regarded as wearing parts, or damage to fragile components such as switches, rechargeable batteries or components made of glass. This warranty is void if the product is damaged, incorrectly used or serviced. To ensure correct use of the product, always comply fully with all instructions contained in the user manual. The warnings and recommendations in the user manual regarding correct and incorrect use and handling of the product must always be observed and complied with. The product is solely designed for private use and is not suitable for commercial applications. The warranty is rendered void in the event of incorrect handling and misuse, if it is subjected to force, and also if any person other than our authorised service technicians interfere with the device. No new warranty period commences if the product is repaired or replaced.
Submitting warranty claims
To ensure speedy handling of your complaint, please note the following:
Before using your product for the first time, please read the enclosed documentation carefully. Should any problems arise which cannot be solved in this way, please call our hotline.
- Always have your receipt, the product article number as well as the serial number (if available) to hand as proof of purchase.
- If it is not possible to solve the problem on the phone, our hotline support staff will initiate further servicing procedures depending on the fault.
- You can find this and many more manuals, product videos and installation software available for download at www.lidl-service.com. This QR code takes you directly to the LIDL service page (www.lidl-service.com). There, you can enter the item number (IAN) to access your operating manual.


Service

Phone: 0800 404 7657
E-Mail: targa@lidl.co.uk

Phone: 1800 101010
E-Mail: targa@lidl.ie

Phone: 800 62230
E-Mail: targa@lidl.com.mt

Phone: 8009 4241
E-Mail: targa@lidl.com.cy
IAN: 482201_2410

Manufacturer
Please note that the following address is not a service address. First contact the service point stated above.
TARGA GmbH
Coesterweg 45
59494 Soest
GERMANY
Table des matières
natural_image
Technical line drawing of a curved mechanical component with internal grid structure (no text or symbols)Distance normale
natural_image
Technical line drawing of a mechanical component with internal channels and a central dashed line (no text or symbols)https://www.targa.gmbh/downloads/conformity/482201_2410.pdf
Cher client, chère cliente,
Cher client, chère cliente,
natural_image
Simple line drawing of a light bulb inside a circle with a curved line above it (no text or symbols)Wisselspanning

WAARSCHUWING! Risico op letsel
https://www.targa.gmbh/downloads/conformity/482201_2410.pdf
Contactadres overeenkomstig Verordening 2023/988 inzake productveiligheid: ce@targa.de
natural_image
Simple icon showing a lightbulb inside a circle with a factory silhouette below (no text or symbols)Napięcie przemienne
natural_image
Technical line drawing of a curved mechanical component with internal grid structure (no text or symbols)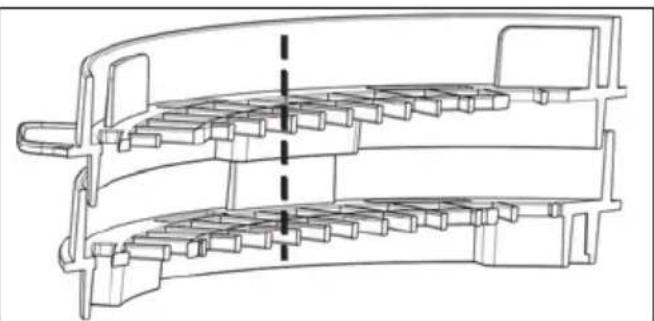
natural_image
Technical line drawing of a mechanical component with internal channels and a central dashed line (no text or symbols)Normalna odległość
https://www.targa.gmbh/downloads/conformity/482201_2410.pdf
natural_image
Simple icon of a light bulb inside a circle with a curved line above it (no text or symbols)Střídavé napětí

natural_image
Technical line drawing of a curved mechanical component with internal grid structure (no text or symbols)Normální vzdálenost
natural_image
Technical line drawing of a mechanical component with internal channels and a central dashed line (no text or symbols)https://www.targa.gmbh/downloads/conformity/482201_2410.pdf
natural_image
Simple line drawing of a light bulb inside a circle with a curved line above it (no text or symbols)Striedavé napätie

https://www.targa.gmbh/downloads/conformity/482201_2410.pdf
natural_image
Simple icon showing a lightbulb inside a circle with rays, and a factory silhouette below (no text or symbols)Corriente alterna
natural_image
Technical line drawing of a curved mechanical component with internal grid structure (no text or symbols)Distancia normal
natural_image
Technical line drawing of a mechanical component with internal channels and a central dashed line (no text or symbols)https://www.targa.gmbh/downloads/conformity/482201_2410.pdf
natural_image
Simple icon of a lightbulb with rays inside, enclosed in a circle and above a wavy line (no text or symbols)Vekselspænding

natural_image
Technical line drawing of a curved mechanical component with internal grid structure (no text or symbols)Normal afstand
natural_image
Technical line drawing of a mechanical component with internal channels and a dashed centerline (no text or symbols)∅get afstand
https://www.targa.gmbh/downloads/conformity/482201_2410.pdf
natural_image
Technical line drawing of a curved mechanical component with internal grid structure (no text or symbols)Distanza normale
natural_image
Technical line drawing of a multi-layer mechanical component with internal channels and a central dashed line (no text or symbols)https://www.targa.gmbh/downloads/conformity/482201_2410.pdf
natural_image
Simple line drawing of a lightbulb inside a circle with radiating lines, no text or symbols present.https://www.targa.gmbh/downloads/conformity/482201_2410.pdf
