
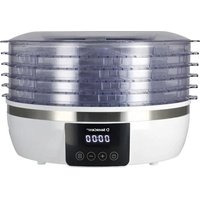
SDA 350 A1 - Food Dehydrator SILVERCREST - Free user manual and instructions
Find the device manual for free SDA 350 A1 SILVERCREST in PDF.


| Product type | Food dehydrator |
| Brand | SilverCrest |
| Model | SDA 350 A1 |
| Dimensions (nested trays) | 30.5 × 32 × 29.5 cm (L × D × H) |
| Dimensions (stacked trays) | 30.5 × 32 × 38.5 cm (L × D × H) |
| Total weight | Approx. 2,495 g |
| Weight of base unit | Approx. 1,255 g |
| Weight of lid | Approx. 250 g |
| Weight of one tray | Approx. 198 g |
| Power supply | 230 V – 240 V ~, 50 Hz, 230 – 260 W |
| Power cord length | 120 cm |
| Temperature range | 35 °C to 70 °C, adjustable in 5 °C increments |
| Timer range | 30 minutes to 22 hours, in 30-minute increments |
| Number of trays included | 5 |
| Tray spacing (nested) | Approx. 2.6 cm |
| Tray spacing (stacked) | Approx. 4.7 cm |
| Protection class | II |
| Safety | Tested by TÜV Rheinland |
| Care and cleaning | Wash trays and lid with hot water and dish soap; wipe base unit with a damp cloth |
| Storage | Fully assembled, nested trays, in a dry and dust-free place (1 – 40 °C) |
| Warranty | 3 years |
Frequently Asked Questions - SDA 350 A1 SILVERCREST
User questions about SDA 350 A1 SILVERCREST
0 question about this device. Answer the ones you know or ask your own.
Ask a new question about this device
Download the instructions for your Food Dehydrator in PDF format for free! Find your manual SDA 350 A1 - SILVERCREST and take your electronic device back in hand. On this page are published all the documents necessary for the use of your device. SDA 350 A1 by SILVERCREST.
USER MANUAL SDA 350 A1 SILVERCREST
natural_image
Black-and-white photo of a modern digital kitchen appliance with a pineapple, fruit, and lemon nearby (no visible text or symbols)DÖRRAUTOMAT SDA 260 A1
TARGA GMBH
Cooling 45
59496 SOEST DEUTSCHLAND / GERMANY
User manual and service information
IAN 111549
IAN 111549
IE 47 CH
Deutsch....2
Français....25
Italiano....51
English 75
Inhalt
Einleitung 3
natural_image
Line drawing of a portable electric stove with control panel and power plug (no text or symbols)natural_image
Technical line drawing of a circular mechanical component with internal grating and mounting holes (no text or symbols)
natural_image
Technical line drawing of a mechanical component with concentric rings and a central shaft (no text or symbols)natural_image
Pure diagram of a cylindrical object with horizontal bands and a central vertical bar (no text or symbols)natural_image
Pure diagram of a cylindrical object with horizontal bands and internal vertical lines, no text or symbols present.natural_image
Pure diagram of a cylindrical container with internal vertical lines and shaded areas, no text or symbols present.natural_image
Symbol of a trash bin crossed with no text or numbers, representing waste sorting or disposal (no text present)natural_image
Line drawing of a portable electric heater with control panel and power plug, shown from two different angles (no text or symbols)natural_image
Technical line drawing of a mechanical component with concentric rings and a central shaft (no text or symbols)natural_image
Pure diagram of a cylindrical object with horizontal bands and a central vertical bar (no text or symbols)natural_image
Pure diagram of a cylindrical object with horizontal bands and internal vertical lines, no text or symbols present.natural_image
Pure diagram of a cylindrical container with internal vertical lines and shaded sections (no text or symbols)natural_image
Symbol of a trash bin crossed with no text or numbers, representing waste sorting or disposal (no text present)Cher client, chère cliente,
natural_image
Line drawing of a portable electric heater with control panel and power plug, shown from two different angles (no text or symbols)natural_image
Technical line drawing of a mechanical component with concentric rings and a central shaft (no text or symbols)natural_image
Pure diagram of a cylindrical object with horizontal bands and a central vertical bar (no text or symbols)natural_image
Pure diagram of a cylindrical object with horizontal bands and internal vertical lines, no text or symbols present.natural_image
Pure diagram of a cylindrical container with internal vertical lines and a shaded section (no text or symbols)natural_image
Symbol of a trash bin with crossed lines indicating no waste or restriction, and a solid black rectangle below (no text or labels)Technical specifications 78
Safety instructions 78
Before you start 84
General information about dehydrating....84
Getting started 85
Using the appliance for the first time....85
Using the dehydrator 86
Preparing food for dehydration....86
Setting up the dehydrator 87
Filling and installing the dehydration trays 87
Switching on and programming the dehydrator 88
Tips for good dehydration results....89
Maintenance/cleaning....92
Storing the dehydrator 93
Troubleshooting 94
Environmental regulations and disposal information 94
Conformity 94
Warranty information 95
Introduction
Thank you for buying a SilverCrest product.
The SilverCrest SDA 260 A1 dehydrator, hereinafter referred to as the dehydrator, can be used for dehydrating food (e.g. fruit and vegetables) in the home. The digital control panel simplifies timer programming which means that the dehydration process is fully automatic.
Intended use
This dehydrator is only intended for the dehydration of foodstuffs in the home and is not intended for commercial use. The dehydrator may only be used indoors. Not suitable for outdoor use. Always make sure the dehydrator is on a stable surface.
The appliance fulfils all relevant norms and standards relating to CE conformity. Any modifications to the appliance other than recommended changes by the manufacturer may result in these standards no longer being met.
Predictable misuse
- Do not use the dehydrator outdoors.
- Do not use the dehydrator as a heater.
- The dehydrator is not intended for heating food or keeping food warm.
- The dehydrator is not designed for use with an external timer or a separate remote control system.
Package contents

natural_image
Line drawing of a portable electric heater with control panel and power plug, shown from two different angles (no text or symbols)Base unit with power cable 5x dehydration trays

natural_image
Technical line drawing of a mechanical component with concentric rings and a central shaft (no text or symbols)Lid These operating instructions
(line-art illustration)
Controls and displays
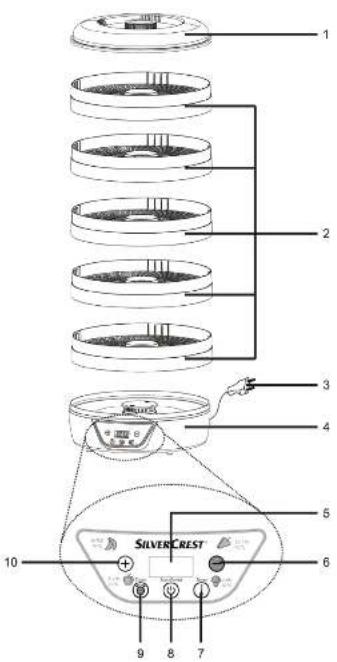
These operating instructions have a fold-out cover. On the inside of the cover, the dehydrator is shown with a numbered key. The meanings of the numbers are as follows:
1 Lid
2 Dehydration trays
3 Power cable
4 Base unit
5 Display
6 - button: Decrease value
7 Temp button: Sets the dehydration temperature
8 Start/Reset button: Switches the dehydrator on/off, cancels the current dehydration process
9 Timer button: Sets the dehydration time
10 + button: Increase value
Technical specifications
Manufacturer: TARGA GmbH
Model: SilverCrest SDA 260 A1
Operating voltage: 230 V to 240 V AC, 50 Hz
Power: 230 W to 260 W
Power cable length: 120 cm
Operation: Digital control panel with display
Dehydration temperature: 35irc C to 70irc C, adjustable in increments of 5irc C
Dehydration time: 00:30 hours to 22:00 hours, adjustable in increments of 00:30
hours
Dimensions: Dehydration trays nested within each other:
approx. 30.5 × 32 × 29.5 cm (W x D x H)
Dehydration trays stacked on top of each other:
approx. 30.5 × 32 × 38.5 cm (W x D x H)
Spacing of dehydration trays: Dehydration trays nested within each other: approx. 2.6 cm
Dehydration trays stacked on top of each other: approx. 4.7 cm
Environmental conditions: Operating temperature 10 to 35 °C
Storage temperature: 1 to 40 °C
Weight:
approx. 2,495 g
Lid approx. 250 g
Dehydration tray approx. 198 g
Base unit approx. 1,255 g
TÜV Rheinland: Tested safety
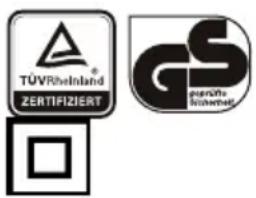
Protection Class II:
Safety instructions
Before you use this appliance for the first time, please read the following notes in this manual and heed all warnings, even if you
are familiar with handling electronic devices and household appliances. Keep these operating instructions in a safe place for future reference. If you sell the appliance or give it away, pass on the user manual at the same time. It forms parts of the product.
Explanation of symbols
In this user manual, warnings are used as follows.

Risk of electric shock!
This symbol warns of risks which could, if left unheeded, cause damage to life and limb through electric shock.

Risk of burns!
This symbol warns of hot surfaces.

WARNING!
This symbol denotes important information for the safe operation of the product and user safety. It warns against risks which could, if left unheeded, cause danger to life and limb, injuries or material damage.

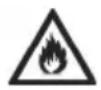
Risk of fire!
This symbol warns that fires could start if the warning is left unheeded.

This symbol denotes further information on the topic.
Children and persons with disabilities
This appliance may be used by children over the age of 8 and by persons with reduced physical, sensory, or intellectual abilities or
with limited experience or knowledge, if under supervision or if they have been instructed in the safe use of the device and have understood the resulting dangers. Do not allow children to play with the appliance. Children may clean and perform maintenance on the appliance only under supervision.
Children under the age of 8 must be kept away from the appliance and the power cable.

WARNING of suffocation!
Packaging material is not a toy. Do not allow children to play with plastic bags. There is a risk of suffocation.
Keep the appliance out of the reach of children.
General safety instructions

Risk of electric shock!
- The base unit housing (4) of the dehydrator and the power cable (3) must not be damaged. Never replace a damaged power cord, instead contact our hotline (see "Warranty information" on page 95). If the base unit housing (4) or power cable (3) is damaged, there is a risk of electric shock. Therefore, ensure that all accessories of the dehydration unit are undamaged before each use.
- Do not open the base unit housing (4), it contains no serviceable parts. Opening the base unit housing (4) can expose you to the risk of electric shock.
- If you notice any smoke, unusual noises or strange smells, switch off the appliance immediately and remove the plug from the wall outlet. If this occurs, do not continue to use the device and have it checked out by an expert. Never inhale smoke from a possible appliance fire. If you do inadvertently inhale smoke, seek medical attention. Smoke inhalation can be damaging to your health.
- Make sure that the power cable (3) cannot be damaged by sharp edges or hot spots.
- Make sure that the power cord (3) cannot become crushed or squashed.
- The appliance must always be disconnected from the mains when left unsupervised and before assembly, disassembly or cleaning.
- Even when switched off, the dehydrator is not fully disconnected from the mains. To disconnect the dehydrator completely from the mains, remove the mains plug from the wall outlet.
- When disconnecting the power supply from the mains socket, always pull on the mains plug and never on the cable itself.
- If you notice visible damage to the dehydrator or the power cable (3), switch the appliance off, disconnect the mains plug from the wall outlet and contact customer
service (see "Warranty information" on page 95).
- Only connect the dehydrator to a properly installed, easily accessible wall outlet whose mains voltage corresponds to that on the rating plate. After connecting the appliance, the wall outlet must still be easily accessible so that you can remove the mains plug quickly in the event of an emergency.
- Never immerse the base unit (4), the power cable (3) or the mains plug in water or other liquids. If liquid does penetrate the base unit (4), disconnect the mains plug from the wall outlet immediately and contact customer service (see "Warranty Information" on page 95).
Risk of fire!
- Do not place the dehydrator on painted surfaces or on textiles such as a tablecloth.
- Never place the dehydrator under or directly next to flammable items such as curtains or drapes.
- Maintain a clearance of at least 50 cm around the appliance to flammable and combustible materials.
- Ensure that there is unimpeded air circulation. Leave sufficient space around the dehydrator and at least 1m clearance above the device.
-
Never block the ventilation holes on the underside of the base unit or cover these with cloth. This can cause the dehydrator to overheat and cause a fire.
-
Do not place any paper, cloth, or other objects on top of the dehydration trays.
- Do not place the dehydrator close to heat sources such as radiators, ovens or other appliances that emit heat (including amplifiers).

Risk of burns!
- The lid (1), dehydration trays (2), base unit (4), and the dehydrated food become very hot during operation. These also remain hot after the appliance is switched off. Therefore, be careful not to burn yourself.
- Allow the dehydrator and all accessories to cool down completely before cleaning or transportation.

Warning about property damage
- Do not place any objects on top of the dehydrator or the dehydration trays (2).
- Place the dehydrator only on an even, sturdy and fireproof surface protected against spray water.
- Do not expose the dehydrator to extremely high or low temperatures.
- Do not use the dehydrator for longer than 72 hours at a time. Otherwise, the service life of the heating unit may be reduced.
- The dehydration trays (2) are not suitable for bearing weight. Do not place heavy food or any other objects on
top of the dehydration trays (2).

Power cord
Unplug the power cable holding the mains plug and never pull on the cable itself. Never place the device, pieces of furniture or other heavy objects on the cable and take care that this does not become trapped. Never tie knots in the power cable (3) and do not tie it to other cables. All cables must be laid so that nobody can trip over them or be obstructed by them. Never use adapter plugs or extension cables that do not comply with the safety regulations applicable in your country, and do not modify the power cable (3) yourself. A damaged power cable must only be replaced by the manufacturer or authorised customer service, in order to avoid risks.
- The dehydrator is not designed for use with an external timer or a separate remote control system.
Before you start
Unpack the appliance. First check whether all the parts are complete and undamaged (see "Package contents" on page 77). If any items are missing or damaged, please phone our hotline (see "Warranty information" on page 95). Keep the packaging material away from children and dispose of appropriately.
General information about dehydrating
Dehydration is a process for air-drying foodstuffs in order to extend their shelf life. This avoids the use of frequently used preservatives such as sulphur, high nitrogen concentrations, etc. In the dehydration process, as much water as possible is removed from the food, in order to remove the basis for life of micro-organisms responsible for spoiling of the food (moulds, bacteria, etc.) Most bacteria need a water content of at least 35%. Moulds are still active up to a water content of approx. 15%.
In your dehydrator, warm, dry air flows over the surface of the pieces of food. This causes water on the surface of the food pieces to evaporate. The water that then flows out from within the pieces of food also
evaporates. This continues to occur until the water content inside the pieces of food is so low that no more water can flow out.
As you might expect, foods with a high water content (e.g. apricots) require longer dehydration times than foods that are already relatively dry (e.g. carrots).
Vitamins, fibre, and minerals are preserved in the dehydration process. Because the water evaporates and the volume of food is reduced, not only vitamins and minerals, but also the flavour is concentrated. Dehydrated foods are more flavoursome and have a more intense taste.
Getting started

Risk of fire!
- Do not place the dehydrator on textile surfaces such as a tablecloth.
- Never place the dehydrator under or directly next to flammable items such as curtains or drapes.
- Maintain a clearance of at least 50 cm around the appliance to flammable and combustible materials.
- Ensure that there is unimpeded air circulation. Leave sufficient space around the dehydrator and at least 1m clearance above the device.
- Never block the ventilation holes on the underside of the base unit or cover these with cloth. This can cause the dehydrator to overheat and cause a fire.
- Do not place any paper, cloth, or other objects on top of the dehydration trays.
Place the dehydrator in a position where it is not in the way. Remember that the dehydration process takes several hours.
Using the appliance for the first time
On first use, you may notice a slight smell from the appliance. Therefore, prior to use, wash and thoroughly dry the lid (1) and the dehydration trays (2), wipe the base unit (4) with a damp cloth and dry thoroughly, and then operate the appliance for 30 minutes at 70 °C without food and with all 5 dehydration trays (2) and the lid (1) in place. The procedure is as follows:
- Place the base unit (4) on an even, non-slip and dry surface.
- Place the dehydration trays (2) and the lid (1) on the base unit (4).
- Plug the power cable (3) into a wall outlet.
You will then hear a short acoustic signal and "-- : --" flashes on the display (5). - Press the Start/Reset button (8). The default time "10:00" is shown on the display (5).
-
Press the Timer button (9). The time display flashes.
-
Press the - button (6) or the + button (10) repeatedly until the time is set to "00:30". After approx. 2 seconds, the selected value is set.
- Press the Temp button (7). The temperature display flashes. The default setting should already be 70\ °C . If not, press the - button (6) or the + button (10) repeatedly until the temperature is set to "70C". After approx. 2 seconds, the selected value is set.

During operation, a fan runs that creates the air flow in the dehydration trays (2). You may hear an occasional clicking sound during operation. This is caused by the temperature changes and the heating unit switching on/off. These noises are not caused by a malfunction.
The display (5) now shows the remaining time until the appliance switches off. After the countdown has completed, the appliance switches off. You will then hear five short acoustic signals and "-- : --" flashes on the display (5).

Risk of burns!
The lid (1), dehydration trays (2), and the base unit (4) become very hot during operation. These also remain hot after the appliance is switched off. Therefore, be careful not to burn yourself.
- Allow the dehydrator to cool down completely, and wipe all dehydration trays (2) once again with a damp cloth. The appliance is then ready for normal use.
Using the dehydrator
Preparing food for dehydration
The following section provides some tips to help you achieve good dehydration results for improved preservation and maximum taste.

Do not dehydrate any food containing fat or oil (such as fatty meat or meat soaked in a marinade that contained oil). Fat and oil becomes rancid during dehydration. Cream, milk and butter have similar effects - please also avoid using them for marinades.
- Wash all food thoroughly before dehydrating.
- If you want to dehydrate fruit, remove the stones. The fruit should also be ripe, but not over-ripe.
- Only dehydrate food that is in undamaged condition, and generously cut out any spoiled sections.
- Cut the food into evenly sized pieces where possible to achieve homogeneous dehydration results. Although thin slices dehydrate more quickly, they may become very small after dehydration.
- Do not cut food into pieces that are too small. Dehydration causes the pieces to shrink even further and they may fall through the sieve holes in the dehydration trays.
- Place unpeeled fruit on the dehydration trays with the skin facing downwards (i.e. the cut surface facing upwards).
• Once food is prepared, it should be dehydrated immediately.
- Do not overfill the dehydration trays (2). Otherwise, the air cannot circulate sufficiently and the food is not sufficiently dried.
- Do not interrupt the dehydration process.
- Before dehydration, dip the cut surfaces of fruit into lemon juice to prevent them from turning brown.
Setting up the dehydrator

The first time you use the appliance, operate the dehydrator with all 5 dehydration trays and the lid but without food, for approx. 30 minutes at 70 °C. Refer to the section "Using the dehydrator for the first time" on page 85.
- Clean the lid (1) and the dehydration trays (2) with warm water and washing-up liquid, and dry thoroughly.
- Place the base unit (4) on an even, non-slip and dry surface.
Filling and installing the dehydration trays
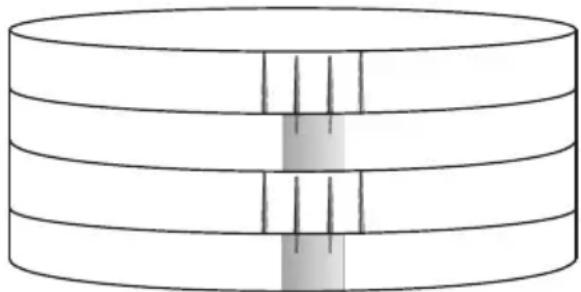
Depending on the quantity of food to be dehydrated, you can place between 1 and 5 dehydration trays (2) on the base unit (4). The dehydration trays (2) can be stacked with a clearance of 2.6cm or 4.7cm, and are therefore adjustable to the thickness of the food to be dehydrated.

If you stack two dehydration trays (2) inside each other and you notice that the top dehydration tray (2) is touching the food below, move the upper dehydration tray (2) to a higher position (see diagram below).
Dehydration trays (2) in higher position Dehydration trays (2)
nested within each other
natural_image
Pure diagram of a cylindrical object with horizontal bands and a central vertical bar (no text or symbols)Align the plastic tabs on the inside of the bottom edge of the dehydration trays (2) with the 4 vertical plastic catches.

natural_image
Pure diagram of a cylindrical object with internal vertical lines and shaded sections, no text or symbols present.Rotate the dehydration trays (2) so that the plastic tabs on the lower edge of the dehydration trays (2) are positioned next to the 4 vertical plastic catches.
To install the dehydration trays (2), proceed as follows:
- Place the prepared food on the dehydration tray (2).
- Place the first dehydration tray (2) on the base unit (4).
- If you have filled further dehydration trays (2) with food, place the second dehydration tray (2) on top of the first. Repeat this process with all additional dehydration trays (2) that you have prepared with food.
- Place the lid (1) on the top dehydration tray (2).
- Check that all dehydration trays (2) are seated correctly on each other and have not slipped out of place. Otherwise, they may tip over or affect the results of the dehydration process.
- Start the dehydration process. Refer to the following section "Switching on and programming the dehydrator".
Switching on and programming the dehydrator
After you have prepared and set up the dehydrator as described in the previous sections, you can dehydrate your food. The procedure is as follows:
- Plug the power cable (3) into a wall outlet.
You will then hear a short acoustic signal and "-- : --" flashes on the display (5).
- Press the Start/Reset button (8). The default time "10:00" is shown on the display.
- Press the Timer button (9). The time display flashes.
- Press the - (6) button and + button (10) repeatedly until the required dehydration time is set (see the recommendations on page 89). After approx. 2 seconds, the selected value is set.
- Press the Temp button (7). The temperature display flashes. Press the - (6) button and + button (10) repeatedly until the required dehydration temperature is set (see the recommendations on page 89). After approx. 2 seconds, the selected value is set.

During operation, a fan runs that creates the air flow in the dehydration trays (2). You may hear an occasional clicking sound during operation. This is caused by the temperature changes and the heating unit switching on/off. These noises are not caused by a malfunction.
The display (5) now shows the remaining time until the appliance switches off. After the countdown has completed, the appliance switches off. You will then hear five short acoustic signals and "-- : --" flashes on the display (5).

- If necessary, you can subsequently adjust the dehydration temperature and time without having to switch off the appliance. To do this, press the Temp button (7) or Timer button (9) followed by the - button (6) or + button (10) until the required value is set.
- You can stop the dehydration process at any time. To do this, press the Start/Reset button (8) and hold for approx. 5 seconds. You will then hear a short acoustic signal and "-:-" flashes on the display (5).
- If necessary, check after a few hours whether the dehydration result is satisfactory. Perform a touch test (see the recommended firmness in the tables from page 89) to determine whether the food is already sufficiently dehydrated. If necessary, turn the food and continue the dehydration process.

Risk of burns!
The lid (1), dehydration trays (2), and the base unit (4) become very hot during operation. These also remain hot after the appliance is switched off. Therefore, be careful not to burn yourself.
- Pack the cooled dehydrated food. Ideally, use empty preserving jars or resealable jars that you may have around the house. You can also shrink-wrap or vacuum-pack the food. The use of plastic bags is not recommended. In theory, you can store your dehydrated food at any room temperature. However, they will be preserved for longest if stored in a cool, dry and dark place.
- Clean the dehydrator as described in the section "Maintenance/cleaning" on page 92.
Tips for good dehydration results

Do not dehydrate any food containing fat or oil (such as fatty meat or meat soaked in a marinade that contained oil). Fat and oil becomes rancid during dehydration. Cream, milk and butter have similar effects - please also avoid using them for marinades.
The dehydration times provided in the following are guideline values. The times may differ depending on the quantity of dehydrated food, its thickness and size, etc.. At regular intervals, perform the recommended touch test to determine whether the food is sufficiently dehydrated. If it is not sufficiently dehydrated, continue dehydrating for a while longer.
Fruit
You can use dehydrated fruit as snacks or as ingredients for creative recipes. The fruit can be chopped into small pieces, ground, or re-soaked.
If you are preparing fruit as snacks, do not dehydrate it for too long, otherwise it will become difficult to chew.
Dehydrated fruit can be combined with nuts and cereals to create wonderful fruit muesli or yoghurt.

- Before dehydration, dip the cut surfaces of fruit into lemon juice to prevent them from turning brown.
- To dehydrate stoned fruit, we recommend that you first dehydrate for approx. 2/3 of the recommended time with the stone, and then remove the stone and separate the fruit for the remaining dehydration time. Beginning the dehydration process makes it easier to remove the stone.
| Food | Preparation | Dehydration temperature (°C) | Dehydration time (hours) | Touch test |
| Pineapple Cut into slices approx. 8 mm thick | 70 | 10-12 | Easily flexible | |
| Apple Cut into slices approx. 8mm thick or chunks approx. 15mm thick | 70 | 8-10 | Easily flexible | |
| Apricots | Unpeeled, halved, skin facing downwards | 70 | 10-12 | Flexible |
| Banana | Peeled, halved/quartered | 70 | 8-10 | Crispy |
| Pear Cut into slices approx. 3 mm thick Halved, skin facing downwards | 70 | 8-10 | Flexible | |
| 70 | 14-18 | Flexible | ||
| Strawberries Halved or whole 70 8-10 Hard | ||||
| Figs Halved, skin facing downwards | 70 | 8-10 | Dry | |
| Cherry | Hole, deseeded | 70 | 10-12 | Leathery |
| Plums | Halved, skin facing downwards | 70 | 10-12 | Flexible |
| Grapes | Halved, skin facing downwards | 70 | 12-14 | Easily flexible |
Vegetables
Blanch vegetables before dehydrating.
Dehydrated vegetables must be soaked before cooking. They can also be ground in a dehydrated state (e.g. peppers or chilli peppers) and stored in an airtight jar for use as a spice.
Dehydrated mushrooms can be re-soaked and used in the same way as fresh mushrooms. Alternatively, they can be ground and the spicy mushroom powder can be used for soups and sauces.
| Food | Preparation | Dehydration temperature (°C) | Dehydration time (hours) | Touch test |
| Beans | Whole, blanched | 70 | 6-8 Britti | |
| Peas | Shelled, blanched | 50 | 6-8 | |
| Gherkin | Unpeeled, cut slices approx. 1 cm thick | 50 into | 6-8 | Hard |
| Carrot Peeled, cut into slices approx. 8 mm thick | 70 | 6-8 | Hard | |
| Leek | Halved, cut pieces approx. 6-8 cm long, blanched | 70 into | 6-10 | Brittle |
| Pepper Approx. 6-8 cm strips | 60 | 6-8 | Flexible | |
| Mushrooms Wash well, small mushrooms whole, large mushrooms sliced | 50 | 4-6 | Tough | |
| Celery | Peeled, cut into slices approx. 8 mm thick | 70 | 6-10 | Hard |
| Tomato | Halved, skin facing downwardsCut into slices approx. 6 mm thick | 7070 | 12-147-10 | FlexibleHard |
| Aubergine | Unpeeled, cut into slices approx. 8 mm thick | 60 | 6-8 | Hard |
Herbs
Herbs should be dehydrated gently at a low temperature. If an intensive smell is produced during the dehydration process, turn the temperature down. Dehydrating herbs for too long can lead to a loss of taste.
Place the dehydrated herbs into resealable jars. Ensure that no hard or large stalks are mixed in with the herbs, as these may interfere during later eating.
| Food | Preparation | Dehydration temperature (°C) | Dehydration time (hours) | Touch test |
| Basil, savory, dill, tarragon, parsley, rosemary, sage, chives, etc. | Washed, dehydrate whole | 40 | 2-4 | Brittle |
Meat
Only use fresh meat!
Remove sinews, fat, and bones, and rinse the meat thoroughly. Lean meat should be salted or marinated prior to dehydration. The salt in the salting or marinating process withdraws some moisture from the meat in advance, while also adding some flavour. Cut the meat into thin slices before dehydration. Dehydrate for approx. 10 to 12 hours at 60irc C.
Fish
Only use fresh fish!
Remove the bones and skin and rinse the fish thoroughly. Fish should be marinated prior to dehydration. Baste the fish with lemon juice and place it in salted water for approx. 30 minutes. Cut the fish into thin slices before dehydration. Dehydrate for approx. 10 to 12 hours at 60°C.
Dehydrated fish must be rehydrated prior to cooking.
Maintenance/cleaning
The dehydrator must be cleaned before and after each use.

Risk of burns!
Wait until the dehydrator is completely cool before cleaning it. Otherwise you could get burnt.

Warning about property damage
Do not use abrasive or astringent detergents or tools which could scratch the surface (e.g. metal sponges). These could damage the dehydrator.
- Switch off the dehydrator, pull the power cable plug (3) out of the wall outlet and allow the dehydrator to cool completely.
- Remove the lid (1) and the dehydration trays (2).
- Rinse the lid (1) and dehydration trays (2) with warm water and some washing-up liquid.
- Clean the base unit (4) with a slightly moistened cloth.
Storing the dehydrator
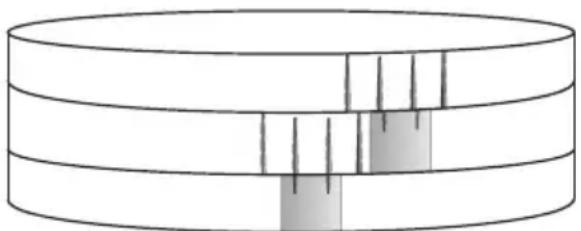
When storing the dehydrator, it is best to leave it assembled to protect it. The dehydration trays (2) must be nested within each other (see diagram below) to reduce the space between them. This means that the appliance takes up less space and the dehydration trays cannot accidentally fall off.
- Rotate the dehydration trays (2) so that the plastic tabs on the lower edge of the dehydration trays (2) are positioned next to the 4 vertical plastic catches.
natural_image
Diagram of a cylindrical container with internal structures and vertical lines, no text or symbols presentDehydration trays nested within each other for storage
- Store the dehydrator in a dry, dust-free place.
Storage temperature: 1 to 40 °C
Troubleshooting
If your dehydrator does not work as normal, follow the instructions below to try to solve the problem. If working through the tips below does not fix the fault, please contact our hotline (see "Warranty information" on page 95).
| Problem | Possible causes | yRemed |
| The dehydrator doesn't work. | Power cable not connected. Connect the power cable (3) to a live mains socket. | |
| Dehydrator not switched on Press the Start/Reset button (8) to switch the device on. | ||
| The dehydrator switches itself off. | Preset dehydration time has expired | Set a longer dehydration time if necessary. |
Environmental regulations and disposal information
natural_image
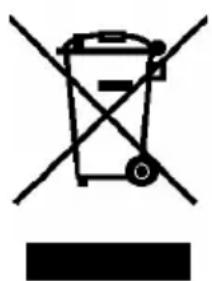
Symbol of a trash bin crossed out by two crossed lines, with no text or numbers present.A symbol depicting a crossed-out rubbish bin on a product means it is subject to European Directive 2012/19/EU. All electrical and electronic devices must be disposed of separately from household waste at official disposal centres.
Do not dispose of the appliance in household waste or bulky waste collections. Information on collection points and pick-up times can be obtained from your local council or waste disposal company.
Dispose of all packaging in an environmentally friendly manner. Cardboard packaging can be taken to paper recycling centres or public collection points for recycling. Any film or plastic contained in the packaging should be taken to your public collection points for disposal.
Conformity

This device complies with the basic and other relevant requirements of the EMC Directive 2004/108/EC, the Low-voltage Directive 2006/95/EC, the ErP Directive 2009/125/EC and the RoHS Directive 2011/65/EU. The corresponding Declaration of Conformity can be found at the end of this User Manual.
Warranty information
Dear Customer,
This device is sold with three years warranty from the date of purchase. In the event of product defects, you have legal rights towards the seller. These statutory rights are not restricted by our warranty as described below.
Warranty conditions
The warranty period commences upon the date of purchase. Please keep the original receipt in a safe place as it is required as proof of purchase. If any material or manufacturing faults occur within three years of purchase of this product, we will repair or replace the product free of charge as we deem appropriate.
Warranty period and legal warranty rights
The warranty period is not extended in the event of a warranty claim. This also applies to replaced and repaired parts. Any damage or defects discovered upon purchase must be reported immediately when the product has been unpacked. Any repairs required after the warranty period will be subject to charge.
Scope of warranty
The device was carefully manufactured in compliance with stringent quality guidelines and subjected to thorough testing before it left the works. The warranty applies to material and manufacturing faults. This warranty does not cover product components which are subject to normal wear and which can therefore be regarded as wearing parts, or damage to fragile components such as switches, rechargeable batteries or components made of glass. This warranty is void if the product is damaged, incorrectly used or serviced. To ensure correct use of the product, always comply fully with all instructions contained in the user manual. The warnings and recommendations in the user manual regarding correct and incorrect use and handling of the product must always be observed and complied with. The product is solely designed for private use and is not suitable for commercial applications. The warranty is rendered void in the event of incorrect handling and misuse, if it is subjected to force, and also if any person other than our authorised service technicians interfere with the device. No new warranty period commences if the product is repaired or replaced.
Submitting warranty claims
To ensure speedy handling of your complaint, please note the following:
- Before using your product for the first time, please read the enclosed documentation carefully. Should any problems arise which cannot be solved in this way, please call our hotline.
- Always have your receipt, the product article number as well as the serial number (if available) to hand as proof of purchase.
- If it is not possible to solve the problem on the phone, our hotline support staff will initiate further servicing procedures depending on the fault.

Service

Phone: 0207 - 36 50 744
E-Mail: service.GB@targa-online.com
Phone: 01 - 242 15 83
E-Mail: service.IE@targa-online.com

Phone: 800 - 62 175
E-Mail: service.MT@targa-online.com
Phone: 800 - 92 496
E-Mail: service.CY@targa-online.com
IAN: 111549

Manufacturer
Please note that the following address is not a service address. First contact the service point stated above.
TARGA
GmbH
Coesterweg 45
59494 SOEST
GERMANY
CE
EU Declaration of Conformity
We, Taïrga GmbH, Coesterweg 45, 59494 Soest, declare on our own responsibility that
Product:
Dehydra tor
Model:
SilverCrest SDA 260 A1
Identification number:
IAN 111549
meets all the provisions of the governing EU regulations which applies to it.
2004/108/EC
Electromagnetic Compatibility
2006/95/EC
Low Voltage
2009/125/EC
Energy Related Products
2011/65/EU
The object of the declaration described above is in conformity with Directive 2011/65/EU of the European Parliament and of the Council of 8 June 2011 on the restriction of use of certain hazardous substances in electrical and electronic equipment.
Compliance was proved by the application of the following standards:
EMC:
EN 55014-1: 2006 +A1: 2009 +A2: 2011
EN 55014-2: 1997 + A1: 2001 + A2: 2008
EN 61000-3-2: 2006+A1: 2009 + A2: 2009
EN 61000-3-3: 2008
Safety:
EN 60335-2-9: 2003 + A1: 2004 + A2: 2006
+A12: 21007 +A13: 2010
EN 60335-1: 2012 +A11:2014
EN 62233: 2008
ErP:
EN 50564: 2011 with Regulation 1275/2008
RoHS:
EN 62321: 2009
Year of CE marking:
15
Soest, 31st of March 2015
Matthia s Klauke, Managing Director
- DÖRRAUTOMAT SDA 260 A1
- Inhalt
- Introduction
- Intended use
- Predictable misuse
- Package contents
- Controls and displays
- Technical specifications
- Safety instructions
- Explanation of symbols
- Risk of electric shock!
- Risk of burns!
- WARNING!
- Risk of fire!
- Children and persons with disabilities
- WARNING of suffocation!
- General safety instructions
- Warning about property damage
- Power cord
- Before you start
- General information about dehydrating
- Getting started
- Using the appliance for the first time
- Using the dehydrator
- Preparing food for dehydration
- Setting up the dehydrator
- Filling and installing the dehydration trays
- Dehydration trays (2) in higher position Dehydration trays (2)
- Switching on and programming the dehydrator
- Tips for good dehydration results
- Fruit
- Vegetables
- Herbs
- Meat
- Fish
- Maintenance/cleaning
- Storing the dehydrator
- Troubleshooting
- Environmental regulations and disposal information
- Conformity
- Warranty information
- Warranty conditions
- Warranty period and legal warranty rights
- Scope of warranty
- Submitting warranty claims
- Service
- Manufacturer
- CE
- EU Declaration of Conformity
Brand : SILVERCREST
Model : SDA 350 A1
Category : Food Dehydrator