273777 - Food Warmers Hendi - Free user manual and instructions
Find the device manual for free 273777 Hendi in PDF.

| Product type | Food warmer (suspended heating lamp) |
| Brand | Hendi |
| Model | 273777 |
| Intended use | Keeping food warm in professional environments (restaurant kitchens, canteens, bars) |
| Power supply | Direct electrical connection, protection class I, mandatory grounding |
| Voltage / Frequency | According to device label |
| Maximum bulb power | 250 W |
| Compatible bulb type | Incandescent bulb R40 or BR40 (1 bulb included, reference 919200 v.02 / 919217 v.02) |
| Power cord length | Approximately 150 cm, retractable and adjustable |
| Minimum safety distance | 30 cm between the bulb and food or surfaces |
| Distance between multiple units | 40 cm between centers of lampshades |
| Ambient operating temperature | 15 °C to 30 °C |
| Material | Not specified (likely metal and heat-resistant plastic) |
| Dimensions | Not specified |
| Weight | Not specified |
| Installation | By a qualified electrician; mounting support with hook not supplied |
| Height adjustment | Via rotary knob on the retractable cord |
| Controls | On (I) / Off (O) switch |
| Maintenance | Clean exterior with a damp cloth and mild soap; do not immerse; do not use steam cleaner |
| Bulb replacement | By the user, always unplug and let cool before |
| Repairability | Internal repairs reserved for qualified technician |
| Warranty | 1 year from date of purchase |
| Safety standards | Do not use with external timer or remote control; do not cover; hot surface |
| Availability of spare parts | Replacement bulb available through manufacturer |
Frequently Asked Questions - 273777 Hendi
User questions about 273777 Hendi
0 question about this device. Answer the ones you know or ask your own.
Ask a new question about this device
Download the instructions for your Food Warmers in PDF format for free! Find your manual 273777 - Hendi and take your electronic device back in hand. On this page are published all the documents necessary for the use of your device. 273777 by Hendi.
USER MANUAL 273777 Hendi
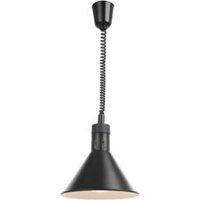
RISE AND FALL HEAT LAMP
273869 v.02, 273876 v.02, 273883 v.02, 273890 v.02, 273845 v.02, 273852 v.02
| GB:User manual | 8 | LV:Lietotāja rokasgrāmata | 50 |
| DE:Benutzerhandbuch | 11 | LT:Naudojimo instrukcija | 53 |
| NL:Gebruikershandleiding | 14 | PT:Manual do utilizador | 56 |
| PL:Instrukcja obstugi | 18 | ES:Manual del usuario | 59 |
| FR:Manuel de l'utilisateur | 21 | SK:Použivateľská príručka | 62 |
| IT:Manuale utente | 24 | DK:Brugervejledning | 65 |
| RO:Manual de utilizare | 28 | FI:Käyttöopas | 68 |
| GR:Eyxepiðio xpoňotn | 31 | NO:Brukerhândbok | 71 |
| HR:Korisnički príručník | 34 | SI:Navodila za uporabo | 74 |
| CZ:Uživatelská příručka | 37 | SE:Ánvándarhandbok | 77 |
| HU:Felhasználói kézikönyv | 40 | BG:Přkovodство за потребителя | 80 |
| UA:Посібник користувача | 43 | RU:Руководство пользователя | 84 |
| EE:Kasutusjuhend | 47 |
RISE AND FALL HEAT LAMP
LAMPA PENTRU INCALZIRE
GB: Read user manual and keep this with the appliance.
GB: For indoor use only.
GB: NOTE: This manual is translated from original English manual using AI and machine translations.
| P 919200 919217* (not included) | |
| Q 200° | |
| R **Warm white ***Red | |
| S 0 mg | |
P: GB: Item no. / DE: Art.-Nr. / NL: Artikelnr. / PL: Nr pozycji / FR: N° d'article / IT: N. articolo / RO: Nr. articolului/ GR: Ap. etbouç / HR: Broj stavke / CZ: Položka č. / HU: Cikkszám / UA: Homer elementa / EE: Artikli nr / LV: Vienums Nr. / LT: Prekès Nr. / PT: Item n.o / ES: N.o de artículo / SK: Č. položky / DK: Varenr. / FI: Kohteen nro / NO: Varenr. / SI: Št. izdelka / SE: Art.nr / BG: Homer na element / RU: Homer posizioni
*GB: (not included) / DE: (nicht enthalten) / NL: (niet inbegrepen) / PL: (brak w zestawie) / FR: (non inclus) / IT: (non incluso) / RO: (nu este inclus) / GR: (đev neprišačovetai) / HR: (nije uključeno) / CZ: (není součástí balení) / HU: (nincs mellékelve) / UA: (ne vключeno) / EE: (ei kuulu komplekti) / LV: (nav ieklauts) / LT: (nejtrauktas) / PT: (não incluído) / ES: (no incluído) / SK: (nie je súčasťou balenia) / DK: (ikke inkluderet) / FI: (ei sisälly toimitukseen) / NO: (ikke inkludert) / SI: (ni vključeno) / SE: [ingár ej] / BG: (ne e vключeno) / RU: (ne vходит в комплект)
Q: GB: Beam angle / DE: Strahlwinkel / NL: Balkhoek / PL: Kąt wiązki / FR: Angle du faisceau / IT: Angolo del fascio / RO: Unghiul fasciculului / GR: Γωνία δέσμης / HR: Kut zrake / CZ: Úhel paprsku / HU: Sugár szöge / UA: Кут променя / EE: Beami nurk / LV: Stara lenkis / LT: Spindulio kampas / PT: Ângulo do feixe / ES: Ângulo del haz / SK: Uhol lúča / DK: Bjælkevinkel / FI: Säteen kulma / NO: Bjelkevinkel / SI: Kot žarka / SE: Balkvinkel / BG: ۷gъл на лъча / RU: Угол пучка
R: GB: Light colour / DE: Helle Farbe / NL: Lichte kleur / PL: Kolor jasny / FR: Couleur claire / IT: Colore chiaro / RO: Culoare deschisă / GR: Avoixto хрówμα / HR: Svijetla boja / CZ: Světlá barva / HU: Világos szín / UA: Kolip світла / EE: Hele värv / LV: Gaiša krāsa / LT: Šviesi spalva / PT: Cor clara / ES: Color claro / SK: Farba svetla / DK: Lysfarve / FI: Vaalea väri / NO: Lysfarge / SI: Barva svetlobe / SE: Ljus färg / BG: Светъл цвят / RU: Светлый цвет
**GB: Warm white / DE: Warmweiß / NL: warm wit / PL: ciepty biaty / FR: Blancchaud / IT: Biancocaldo / RO: alb cald / GR: Zeoró leukó / HR: topla bijela / CZ: hřejivá bílá / HU: meleg fehér / UA: темно-білий / EE: Soe valge / LV: silti balta / LT: šilta balta / PT: brancoquente / ES: blanco cálido / SK: teplá biela / DK: varm hvid / FI: Lämmin valkoinen / NO: varm hvit / SI: toplo bela / SE: varm vit / BG: топъл бял / RU: теплый белый
***GB: Red / DE: Rot / NL: rood / PL: czerwony / FR: Rouge / IT: Rosso / RO: roşu / GR: Kökkivo / HR: crvena / CZ: červená / HU: piros / UA: червоний / EE: punane / LV: sarkana / LT: raudona / PT: vermelho / ES: rojo / SK: červená / DK: rød / FI: punainen / NO: rød / SI: rdeča / SE: röd / BG: червен / RU: красный
S: GB: Mercury content (mg) / DE: Quecksilbergehalt (mg) / NL: Kwikgehalte (mg) / PL: Zawartość rteci (mg) / FR: Teneur en mer-cure (mg) / IT: Contenuto di mercurio (mg) / RO: Continut de mercur (mg) / GR: Перектикотнта ое одр่างуро (mg) / HR: Sadržaj žive (mg) / CZ: Obsah rtuti (mg) / HU: Higanytartalom (mg) / UA: Вміст ртути (мг) / EE: Elavhôbedasisaldus (mg) / LV: Dzīvsudraba saturs (mg) / LT: Gyvsidabrio kiekis (mg) / PT: Teor de mercúrio (mg) / ES: Contenido de mercurio (mg) / SK: Obsah ortuti (mg) / DK: Kviksølvindhold (mg) / FI: Elohopeapitoisuus (mg) / NO: Kvikksølvinnhold (mg) / SI: Vsebnost živega srebra (mg) / SE: Kvicksilverhalt (mg) / BG: Съдържание на живак (mg) / RU: Содержание ртути (мг)
GB: Remark: Technical specification is subjected to change without prior notification.
DE: Anmerkung: Die technische Spezifikation kann ohne vorherige Ankündigung geändert werden.
NL: Opmerking: De technische specificatie zijn onderworpen aan wijzigingen zonder voorafgaande kennisgeving.
PL: Uwaga: Specyfikacja techniczna może zostać zmieniona bez powiadomienia.
FR: Remarque: La spécification technique peut être modifiée sans notification préalable.
IT: Osservazione: Le specifiche tecniche sono soggette a modifiche senza preavviso.
RO: Observatie: Specificația tehnică se poate modifica fără notificare prealabilă.
GR: Σημείωση: Οι τεχνικές προδιαγραφές μπορούν να αλλάξουν χωρίς προειδοποίηση.
HR: Napomena: Tehničke specifikacije podložne su promjenama bez prethodne obavijesti.
CZ: Poznámka: Technická specifikace se může změnit bez předchozího upozornění.
HU: Megjegyzés: A műszaki adatok előzetes értesítés nélkül változhatnak.
UA: Зауваження: Технічні характеристики можуть змінюватися без попереднього повідомлення.
EE: Märkus: Tehnilisi andmeid võidakse muuta ilma eelneva teavitamiseta.
LV: Piezīme: Tehniskās specifikācijas var tikt mainītas bez iepriekšēja brīdinājuma.
LT: Pastaba: Techninė specifikacija gali būti keičiama be išankstinio įspėjimo.
PT: Observação: As especificações técnicas estão sujeitas a alterações sem notificação prévia.
ES: Observación: Las especificaciones técnicas están sujetas a cambios sin previo aviso.
SK: Poznámka: Technické špecifikácie podliehajú zmenám bez predchádzajúceho oznámenia.
DK: Bemærkning: Tekniske specifikationer kan ændres uden forudgående varsel.
FI: Huomautus: Teknisiä tietoja voidaan muuttaa ilman ennakkoilmoitusta.
NO: Merknad: Teknisk spesifikasjon kan endres uten forhåndsvarsel.
SI: Opomba: Tehnične specifikacije se lahko spremenijo brez predhodnega obvestila.
SE: Anmärkning: Tekniska specifikationer kan ändras utan föregående meddelande.
BG: Забележка: Техническите спецификации подлежат на промяна без предварително уведомление.
RU: Примечание. Технические характеристики могут быть изменены без предварительного уведомления.
Dear Customer,
Thank you for purchasing this HENDI appliance. Read this user manual carefully, paying particular attention to the safety regulations outlined below, before installing and using this appliance for the first time.
Safety instructions
- Only use the appliance for the intended purpose it was designed for, as described in this manual.
- The manufacturer is not liable for any damage caused by incorrect operation and improper use.
• DANGER! RISK OF ELECTRIC SHOCK! Do not attempt to repair the appliance by yourself. Do not immerse the electrical parts of the appliance in water or other liquids. Never hold the appliance under running water.
- NEVER USE A DAMAGED APPLIANCE! Check the electrical connections and cord regularly for any damage. When damaged, disconnect the appliance from the power supply. Any repairs should only be carried out by a supplier or qualified person to avoid danger or injury.
- WARNING! When positioning the appliance, route the power cable safely if necessary to avoid unintentional pulling, being damaged, coming into contact with the heating surface, or causing a tripping hazard.
- WARNING! As long as the plug is in the socket the appliance is connected to the power supply.
- WARNING! ALWAYS switch off the appliance before disconnecting from the power supply, cleaning, maintenance or storage.
- Only connect the appliance to an electrical outlet with the voltage and frequency mentioned on the appliance label.
- Do not touch the plug/electrical connections with wet or damp hands.
- Keep the appliance and electrical plug/connections away from water and other liquids. If the appliance falls into water, remove the power supply connections immediately. Do not use the appliance until it has been checked by a certified technician. Failure to follow these instructions will cause life threatening risks.
- Connect the power supply into an easily accessible electrical outlet so you can disconnect the appliance immediately in case of emergency.
- Make sure the cord does not come in contact with sharp or hot objects and keep it away from open fire. Never pull the power cord to unplug it from the socket, always pull the plug instead.
- Never carry the appliance by its cord.
- Never try to open the housing of the appliance yourself.
- Do not insert objects into the housing of the appliance.
- Never leave the appliance unattended during use.
- This appliance should be operated by trained personnel in kitchen of the restaurant, canteens or bar staff, etc.
- This appliance should not be operated by persons with reduced physical, sensory or mental capabilities, or persons that have a lack of experience and knowledge.
- This appliance should, under any circumstances, not be used by children.
- Keep the appliance and its electrical connections out of reach of children.
- Never use accessories or any extra devices other than those supplied with the appliance or recommended by the manufacturer. Failure to do so could pose a safety risk to the user and could damage the appliance. Only use original parts and accessories.
- Do not operate this appliance by means of an external timer or remote-control system.
- Do not place the appliance on a heating object (gasoline, electric, charcoal cooker, etc.).
- Do not cover the appliance in operation.
- Do not place any objects on top of the appliance.
- Do not use the appliance near any open flames, explosive or flammable materials. Always operate the appliance on a horizontal, stable, clean, heat-resistant and dry surface.
- The appliance is not suitable for installation in an area where a water jet could be used.
- Leave a space of at least 20 cm around the appliance for ventilation during use.
- WARNING! Keep all ventilation openings on the appliance free from obstruction.
Special safety instructions
• This appliance is intended for commercial use.
- CAUTION! RISK OF BURNS! HOT SURFACES! The temperature of the accessible surfaces are very high during use. Touch only the control panel, handles, switches, timer control knobs or temperature control knobs.
- If the supply cord is damaged, it must be replaced by the manufacturer, its service agent or similarly qualified persons in order to avoid a hazard.
- ATTENTION! This appliance is only suitable for use with R40 or BR40 types of incandescent light bulbs (1 light bulbs included, to be ordered as spare part: article number 919200 v.02 / 919217 v.02).
- The appliance is not suitable for household room illumination.
- 0.3 Keep at least 0.3m distance from the light-ed source.
- CAUTION! Shut off the power circuit & switch OFF the appliance before starting installation work. Installation work should be carried out by qualified electrician. Contact local authority for advice. DO NOT attempt to install, repair and maintenance the appliance yourself.
- This appliance is suitable use for an ambient temperature from 15^ 30^ .
- Do not install light bulbs with a power level greater than 250 Watts.
Intended use
- This appliance is intended to be used in household and similar applications such as:
- staff kitchen areas in shops, offices and others working environment;
- farm houses;
- by clients in hotels, motels and other residential type environment;
- bed and breakfast type environment.
- The appliance is designed for keeping food warm, and not for illuminate. Any other use may lead to damage of the appliance or personal injury.
- Operating the appliance for any other purpose shall be
deemed a misuse of the device. The user shall be solely liable for improper use of the device.
Grounding installation
This appliance is classified as protection class I and must be connected to a protective ground. Grounding reduces the risk of electric shock by providing an escape wire for the electric current.
This appliance is fitted with a power cord with grounding plug or electrical connections with grounding wire. The connections must be properly installed and grounded.
Main parts of the product
(Fig.1 on page 3)
- Internal wires of power cord: Connection with the electrical wires from the power system
- Hooking hole: Hanging the lamp to the ceiling
- Rotating knob: Adjusting the power cord length
- Cap cover: Fix the length of the power cord after setting
- ON (I) / OFF (0) switch: Switch ON / OFF the lamp
- Lamp shade: Control the direction of the light
Remark: The content of this manual applies for all listed items unless specified otherwise. The appearance may vary from the shown illustrations.
Preparation before use
- Remove all protective packaging and wrapping.
- Check that the device is in good condition and with all accessories. In case of incomplete or damaged delivery, please contact the supplier immediately. In this case, do not use the device.
- Clean the accessories and the appliance before use (See ==> Cleaning & Maintenance).
- Make sure the appliance is completely dry.
- Keep the packaging if you intend to store your appliance in the future.
- Keep the user manual for future reference.
NOTE! Due to manufacturing residues, the appliance may emit a light odor during the first few uses. This is normal and does not indicate any defect or hazard. Make sure the appliance is well ventilated.
- Multiple installations of the lamps must have a minimum distance of 40~cm between centre of the shade of each unit.
Preparation before installation
CAUTION! Before installation, check the appliance to make sure there is no damage. CLOSE the electrical power circuit system & switch OFF the appliance before starting installation work.
ATTENTION! Installation work should be carried out by qualified electrician. Contact your local authority for advice if have question. DO NOT attempt to install, repair and maintenance by yourself.
- Verify prior to installation that the ceiling can safely support the appliance.
- Make sure that no electrical wires, water pipes, gas pipes or other lines are located around the installation location.
- Consult a qualified contractor for assistance about the structure of the ceiling. This is to ensure that the installation is carried out properly and safely.
- Switch OFF the appliance by pressing the ON (I) / OFF (O)
switch on the appliance at the "0" position.
ATTENTION! Before starting the installation, make sure you have all the tools such as screwdriver, electric drills, measuring tape, marking pencil, wall anchors, wiring nuts, mounting bracket with hook, etc. (All are not supplied) and make sure they are well functioning.
Instruction for installation
ATTENTION! Make sure again all the electrical power system circuit is CLOSED and the ON (1) / OFF (0) switch of the appliance is at the OFF (0) position.
A) Installation of the mounting bracket with hook (Not included).
- Secure the mounting bracket with screws and wall anchors provided.
- Feed the electrical wires from the ceiling through opening of the mounting bracket.
B) Assemble the appliance with the hook.
- You can extend the power cord by twisting the cap cover if the internal wires of power cord are too short for connection.
-
Please make sure the wires are connected to the corresponding wires terminal of the power circuit system. The wires of the power cord are coloured as below:
a) Blue = Neutral (N)
b) Brown = Live (L)
c) Green and yellow = Earth (E) -
Wrap the connected wires together with the electrical insulation tape or wiring nuts (Both are not included).
- Hang the hole of the appliance with the hook as provided on the mounting bracket. (Not supplied).
IMPORTANT! Please make sure the appliance is secure and correctly connected after installation.
Operating instructions
ATTENTION! Make sure the electrical power system circuit of ceiling is CLOSED and switch OFF the hanging lamp at the "0" position.
- First, screw in clockwise direction the shatterproof lamp (supplied) securely inside the lamp holder.
- This appliance has a retractable power cord to about 150 cm that allows the lamp height to be adjusted. Rotate the rotating knob to set the length of the power cord as desired.
- Then, pull gently straight down on the shade to extend the cord until the desired height is reached.
- Next, open the electrical power system circuit and switch ON the appliance by pressing the ON (I) / OFF (O) switch to the "I" position.
- Now, the lamp is light up and keep food warm process is started.
- CAUTION! RISK OF BURNS! HOT SURFACE! The lamp shade surface is very hot during use. Do not touch it. Switch OFF the lamp & cool down before setting the cord length.
- IMPORTANT! Remember to keep at least 30cm distance from the lighted bulb.
Cleaning & maintenance
- ATTENTION! Always disconnect the appliance from the power supply and cool down before storage, cleaning & maintenance.
- Do not use water jet or steam cleaner for cleaning and do not push the appliance under the water as the parts will get wet and electric shock might be resulted.
- If the appliance is not kept in a good state of cleanliness, this can adversely affect the life of the appliance and result in a dangerous situation.
Replacing the defective light
- ATTENTION! Always disconnect the appliance from the power supply before replacement.
- Remove the old light and replace with a new one of the same type (not included).
- If you do not sure how to replace, contact the supplier/service provider. (See ==> Warranty)
Cleaning
- Clean the cooled exterior surface with a cloth or sponge slightly dampened with a mild soap solution.
- For reasons of hygiene, the appliance should be cleaned before and after use.
- Avoid water contacting the electrical components.
- Never immerse the appliance in water or other liquids.
- Never use aggressive cleaning agents, abrasive sponges, or cleaning agents containing chlorine. Do not use steel wool, metallic utensils, or any sharp or pointed objects for cleaning. Do not use petrol or solvents!
- No parts are dishwasher safe.
Maintenance
- Check the operation of the appliance regularly to prevent serious accidents.
- If you see that the appliance is not working properly or that there is a problem, stop using it, switch it off and contact the supplier.
- All maintenance, installation and repair work must be carried out by specialised and authorised technicians, or recommended by the manufacturer.
Transportation and Storage
- Before storage, always make sure that the appliance has been disconnected from the power supply and completely cooled down.
- Store the appliance in a cool, clean and dry place.
- Never place heavy objects on the appliance as this could damage it.
- Do not move the appliance while it is under operation. Disconnect the appliance from power supply when moving and hold it at the bottom.
Troubleshooting
If the appliance does not function properly, please check the below table for the solution. If you are still unable to solve the problem, please contact the supplier/service provider.
| Problem Possible cause | Possible solution | |
| The wires of the appliance are connected to power circuit system but not working at all. | The internal wires are not connected properly to the electrical power circuit system. | Check again to make sure it is connected properly. |
| Appliance not turned on. | Turn on the appliance by pressing the switch at the "I" position. | |
| ON / OFF switch defective | Contact the supplier. | |
| Lamp bulb has burned out. | Replaced the bulb with the same types and same rating. | |
| The appliance is turned on but there is no light. | No power to the appliance | Check the circuit breaker and reset as necessary of the system by qualified technician. |
| ON / OFF switch defective | Contact the supplier. | |
| Lamp bulb has burned out. | Replaced the bulb with the same type and same rating. | |
| Heat is inadequate | The appliance is mounted too high to the target area. | Lower the mounting height to closer to the heated area. |
| Incorrect lamp bulb wattage. | Verify lamp bulb and replace with the correct wattage bulb. Do not exceed maximum lamp bulb wattage. | |
| Heat is excessive | The appliance is mounted too close to the target area. | Increase the mounting height if too close. |
| Lamp bulb wattage is too high. | Check the bulb wattage and replace with lower wattage bulb. |
Warranty
Any defect affecting the functionality of the appliance which becomes apparent within one year after purchase will be repaired by free repair or replacement provided the appliance has been used and maintained in accordance with the instructions and has not been abused or misused in any way. Your statutory rights are not affected. If the appliance is claimed under warranty, state where and when it was purchased and include proof of purchase (e.g. receipt).
In line with our policy of continuous product development we reserve the right to change the product, packaging and documentation specifications without notice.
Discarding & Environment
When decommissioning the appliance, the product must not be disposed of with other household waste. Instead, it is your responsibility to dispose to your waste equipment by handing it over to a designated collection point. Failure to follow this rule may be penalized in accordance with applicable regulations on waste disposal. The separate collection and recycling of your waste equipment at the time of disposal will help conserve natural resources and ensure that it is recycled in a manner that protects human health and the environment.
For more information about where you can drop off your waste for recycling, please contact your local waste collection company. The manufacturers and importers do not take responsibility for recycling, treatment and ecological disposal, either directly or through a public system.
DEUTSCH
a) Blau = Neutral (N)
b) Braun = Live (L)
a) Plavo = neutralno (N)
b) Smeđa = Živa (L)
c) Zelena i žuta = Zemlja (E)
- Omotajte spojene žice zajedno s električnom izolacijskom trakom ili žičanim maticama (oba nisu uključena).
a) Kék = Semleges (N)
b) Barna = Élő (L)
Ohutusalased erijuhised
a) Azul = Neutro (N)
a) Azul = Neutro (N)
a) Blå = Neutral (N)
b) Brun = Live (L)
39100 Bolzano (BZ), Italy
Tel: +39 800 727 438
Email: office.italy@hendi.eu
HENDI GmbH
Ehring 15
1201, 12/F Exchange Tower
33 Wang Chiu Road, Kowloon Bay, Hong Kong
Tel: +852 2154 2618
Email: info-hk@hendi.eu
HENDI Romania S.R.L.
https://www.linkedin.com/company/hendi-tools-for-chefs/
www.youtube.com/HendiEquipment
GB: Changes, printing and typesetting errors reserved.