
FRILLESBO 906.002.86 - Oven IKEA - Free user manual and instructions
Find the device manual for free FRILLESBO 906.002.86 IKEA in PDF.

User questions about FRILLESBO 906.002.86 IKEA
0 question about this device. Answer the ones you know or ask your own.
Ask a new question about this device
Download the instructions for your Oven in PDF format for free! Find your manual FRILLESBO 906.002.86 - IKEA and take your electronic device back in hand. On this page are published all the documents necessary for the use of your device. FRILLESBO 906.002.86 by IKEA.
USER MANUAL FRILLESBO 906.002.86 IKEA
Please refer to the last page of this manual for the full list of IKEA appointed After Sales Service Provider and relative national phone numbers.
SUOMI
natural_image
Illustration of a hand placing objects into a bed, enclosed in a circle with an upward arrow (no text or symbols)natural_image
Technical line drawing of a mechanical assembly with a screw and bracket (no text or symbols)Daglig brug

ADVARSEL! Se kapitlerne om sikkerhed.
Ovnfunktioner
STANDARD
natural_image
Technical line drawing of a mechanical component with two circular inset views showing internal features (no text or symbols)natural_image
Pure technical line drawing of a mechanical component or bracket (no text or symbols)natural_image
Technical line drawing of a metal grating or rack structure with no visible text or symbolsSæt AirFry risten på tredje ovnribbe. Anbring bagepladen nedenunder.
natural_image
Line drawing of a fish inside a container with an attached hook, showing motion direction (no text or symbols)Gryderetter
natural_image
Illustration of a cylindrical device connected to a wire with a probe, and a beaker with a probe inserted into liquid (no text or symbols)natural_image
Technical diagram showing a mechanical assembly with an inset close-up of a component (no text or symbols present)natural_image
Technical line drawing of a mechanical assembly with an arrow indicating rotation (no text or symbols present)natural_image
Illustration of a hand holding a folded document or scroll with arrows indicating rotation (no text or symbols present)-
Læg lågen på en blød klud på et stabilt underlag.
-
Hold i begge sider af lågelisten Bi lågens overkant, og tryk indad, indtil låsehagen slipper.
natural_image
Diagram of a hand pressing a curved arrow on a layered rectangular object (no text or symbols)natural_image
Illustration of a person using a device to interact with a laptop (no text or symbols present)natural_image
Technical line drawing of a screwdriver tool inserted into a bracket, with no visible text or symbolsDagelijks gebruik

natural_image
Technical line drawing of a mechanical component with two circular inset views showing internal structure (no text or symbols)natural_image
Pure technical line drawing of a mechanical component or bracket (no text or symbols)natural_image
Technical line drawing of a meshed metal tray or rack structure (no text or symbols)natural_image
Line drawing of a fish being lifted by a crane hook inside a container (no text or symbols)Stoofschotel
natural_image
Illustration of a cylindrical device connected to a wire with a probe, and a beaker with a probe inserted into liquid (no text or symbols)natural_image
Technical diagram showing a mechanical assembly with an inset close-up of a component being inserted (no text or symbols present)- Til de vergrendelingen op en trek eraan totdat ze klikken.

natural_image
Technical line drawing of a mechanical assembly with a rotating component (no text or symbols)natural_image
Illustration of a hand holding a folded document or scroll with directional arrows indicating rotation (no text or symbols present)natural_image
Diagram of a hand pressing a curved arrow on a layered rectangular object (no text or symbols)| Safety information 61 | Using the accessories 74 | |
| Safety instructions 63 | Hints and tips 76 | |
| Installation 66 | Care and cleaning 79 | |
| Product description 67 | Troubleshooting 81 | |
| Control panel 67 | Technical data 83 | |
| Before first use 68 | Energy efficiency 83 | |
| Daily use 69 | Environmental concerns | 85 |
| Additional functions 72 | IKEA guarantee | 85 |
| Clock functions 73 |
Subject to change without notice.
⚠️ Safety information
Before the installation and use of the appliance, carefully read the supplied instructions. The manufacturer is not responsible if an incorrect installation and use causes injuries and damage. Always keep the instructions with the appliance for future reference.
Children and vulnerable people safety
- This appliance can be used by children aged from 8 years and above and persons with reduced physical, sensory or mental capabilities or lack of experience and knowledge if they have been given supervision or instruction concerning the use of the appliance in a safe way and understand the hazards involved. Children of less than 8 years of age and persons with very extensive and complex disabilities shall be kept away from the appliance unless continuously supervised.
- Children should be supervised to ensure that they do not play with the appliance.
-
Keep all packaging away from children and dispose of it appropriately.
-
WARNING: The appliance and its accessible parts become hot during use. Keep children and pets away from the appliance when in use and when cooling down.
- If the appliance has a child safety device, it should be activated.
- Children shall not carry out cleaning and user maintenance of the appliance without supervision.
General safety
• This appliance is for cooking purposes only.
- This appliance is designed for single household domestic use in an indoor environment.
- This appliance may be used in offices, hotel guest rooms, bed & breakfast guest rooms, farm guest houses and other similar accommodation where such use does not exceed (average) domestic usage levels.
- Only a qualified person can install this appliance and replace the cable.
- WARNING: The appliance and its accessible parts become hot during use. Care should be taken to avoid touching heating elements.
- Always use oven gloves to remove or insert accessories or ovenware.
• Before any maintenance, cut the power supply.
- WARNING: Ensure that the appliance is switched off before replacing the lamp to avoid the possibility of electric shock.
- Do not use the appliance before installing it in the built-in structure.
- Do not use a steam cleaner to clean the appliance.
- Do not use harsh abrasive cleaners or sharp metal scrapers to clean the glass door since they can scratch the surface, which may result in shattering of the glass.
- If the mains power supply cable is damaged, it must be replaced by the manufacturer, its Authorised Service Centre or similarly qualified persons to avoid an electrical hazard.
- Before pyrolytic cleaning, remove all accessories and excessive deposits/spills from the appliance cavity.
- To remove the shelf supports first pull the front of the shelf support and then the rear end away from the side walls. Install the shelf supports in the opposite sequence.
- Use only the food sensor recommended for this appliance.
Safety instructions
Installation

Warning! Only a qualified person must install this appliance.
- Remove all the packaging.
- Do not install or use a damaged appliance.
- Follow the installation instructions supplied with the appliance.
• Always take care when moving the appliance as it is heavy. Always use safety gloves and enclosed footwear. - Do not pull the appliance by the handle.
- Install the appliance in a safe and suitable place that meets installation requirements.
- Keep the minimum distance from other appliances and units.
- Before mounting the appliance, check if the oven door opens without restraint.
- The appliance is equipped with an electric cooling system. It must be operated with the electric power supply.
Electrical connection

Warning! Risk of fire and electric shock.
- All electrical connections should be made by a qualified electrician.
-
The appliance must be earthed.
-
Make sure that the parameters on the rating plate are compatible with the electrical ratings of the mains power supply.
• Always use a correctly installed shockproof socket. - Do not use multi-plug adapters and extension cables.
- Make sure not to cause damage to the mains plug and to the mains cable. Should the mains cable need to be replaced, this must be carried out by our Authorised Service Centre.
- Do not let mains cables touch or come near the appliance door or the niche below the appliance, especially when it operates or the door is hot.
- The shock protection of live and insulated parts must be fastened in such a way that it cannot be removed without tools.
- Connect the mains plug to the mains socket only at the end of the installation. Make sure that there is access to the mains plug after the installation.
- If the mains socket is loose, do not connect the mains plug.
- Do not pull the mains cable to disconnect the appliance. Always pull the mains plug.
-
Use only correct isolation devices: line protecting cut-outs, fuses (screw type fuses removed from the holder), earth leakage trips and contactors.
-
The electrical installation must have an isolation device which lets you disconnect the appliance from the mains at all poles. The isolation device must have a contact opening width of minimum 3 mm.
- Fully close the appliance door before you connect the mains plug to the mains socket.
Use

Warning! Risk of injury, burns and electric shock or explosion.
- Do not change the specification of this appliance.
- Make sure that the ventilation openings are not blocked.
- Do not let the appliance stay unattended during operation.
- Deactivate the appliance after each use.
- Be careful when you open the appliance door while the appliance is in operation. Hot air can be released.
- Do not operate the appliance with wet hands or when it comes in contact with water.
- Do not apply pressure on the open door.
- Do not use the appliance as a work surface or as a storage surface.
- Open the appliance door carefully. The use of ingredients with alcohol can cause a mixture of alcohol and air.
- Do not let sparks or open flames to come in contact with the appliance when you open the door.
• Always use glass and jars approved for preserving purposes. - Do not put flammable products or items moistened with flammable products in, near or on the appliance.

Warning! Risk of damage to the appliance.
• To prevent damage or discolouration to the enamel:
- do not put ovenware or other objects directly on the bottom of the appliance's cavity.
- do not put aluminium foil directly on the bottom of cavity of the appliance.
- do not put water directly into the hot appliance.
- do not keep moist dishes and food in the appliance after you finish the cooking.
- be careful when you remove or install the accessories.
- Discolouration of the enamel or stainless steel has no effect on the performance of the appliance.
- Use a deep pan for moist cakes. Fruit juices cause stains that can be permanent.
- Use only accessories supplied with this appliance or recommended by the manufacturer.
• Always cook with the appliance door closed.
- If the appliance is installed behind a furniture panel (e.g. a door) make sure the door is never closed when the appliance operates. Heat and moisture can build up behind a closed furniture panel and cause subsequent damage to the appliance, the housing unit or the floor. Do not close the furniture panel until the appliance has cooled down completely after use.
Care and Cleaning

Warning! Risk of injury, fire, or damage to the appliance.
- Before maintenance, deactivate the appliance and disconnect the mains plug from the mains socket.
- Make sure the appliance is cold. There is a risk that the glass panels can break.
- Replace door glass panels immediately when they are damaged. Contact the Authorised Service Centre.
- Be careful when you remove the door from the appliance. The door is heavy!
- Clean the appliance regularly to prevent the deterioration of the surface material.
- Fat and food remaining in the appliance can cause fire.
- If you use an oven spray, follow the safety instructions on the packaging.
Pyrolytic cleaning

Warning! Risk of injury / fires / chemical emissions (fumes) during the pyrolytic mode.
- During pyrolytic cleaning, fumes are released that are not harmful to humans, including infants or persons with medical conditions.
- Unlike all humans, some birds and reptiles can be extremely sensitive to potential fumes emitted during the cleaning process of all pyrolytic ovens. Small pets can also be highly sensitive to the localized temperature changes in the vicinity of all pyrolytic ovens when the pyrolytic self-cleaning program is in operation.
- Before carrying out a pyrolytic self-cleaning function remove from the oven cavity:
- any excess food residues, oil or grease spills / deposits.
- any removable objects (including shelves, side rails / telescopic runners, etc. provided with the product) particularly any non-stick pots, pans, trays, utensils etc.
- Non-stick surfaces on pots, pans, trays, utensils, etc., can be damaged by the high temperature pyrolytic cleaning operation of all pyrolytic ovens and can be also a source for low level harmful fumes.
- Read carefully all the instructions for pyrolytic cleaning.
- Keep children away from the appliance while the pyrolytic cleaning is in operation. The appliance becomes very hot and hot air is released from the front cooling vents.
- Pyrolytic cleaning and first maximum temperature use are high temperature operations that can release fumes from cooking residues and construction materials, as such consumers are strongly advised to:
- Provide good ventilation during and after each pyrolytic cleaning.
- Provide good ventilation during and after the first use at maximum temperature operation.
- Ensure that any pets (especially birds) are taken as far as possible from the vicinity of the appliance location during and after the pyrolytic cleaning and first use maximum temperature operation. Keeping them in a different room would be the preferred option during the pyrolytic cycle and until appliance has cooled down again to room temperature. Good ventilation has to be provided during and after (till appliance cools down) operations of the pyrolytic cycle and first maximum temperature use cycle.
Internal lighting

Warning! Risk of electric shock.
- Concerning the lamp(s) inside this product and spare part lamps sold separately: These lamps are intended to withstand extreme physical conditions in household appliances, such as temperature, vibration, humidity, or are intended to signal information about the operational status of the appliance. They are not intended to be used in other applications and are not suitable for household room illumination.
- This product contains a light source of energy efficiency class G.
- Use only lamps with the same specifications.
Service
• To repair the appliance contact the Authorised Service Centre.
- Use original spare parts only.
Disposal

Warning! Risk of injury or suffocation.
- Contact your municipal authority for information on how to discard the appliance correctly.
- Disconnect the appliance from the mains supply.
- Cut off the mains electrical cable close to the appliance and dispose of it.
- Remove the door to prevent children and pets from getting trapped inside the appliance.
- Packaging material:
The packaging material is recyclable. Plastic parts are marked with international abbreviations such as PE, PS, etc. Dispose of the packaging material in the containers provided for this purpose at your local waste management facility.
Installation

Warning! Refer to Safety chapters.
Assembly

Refer to the Assembly Instructions for the installation.
Electrical installation

Warning! Only a qualified person must do the electrical installation.

The manufacturer is not responsible if you do not follow the safety precautions from the Safety chapters.
This oven is only supplied with a main cable.
Cable
Cable types applicable for installation or replacement:
H07 RN-F, H05 RN-F, H05 RRF, H05 VV-F, H05 V2V2-F (T90), H05 BB-F
For the section of the cable refer to the total power on the rating plate. You can also refer to the table:
| Total power (W) Section of the cable (mm2) | |
| maximum 1380 3 x 0.75 | |
| maximum 2300 3 x 1 | |
| maximum 3680 3 x 1.5 | |
The earth cord (green / yellow cable) must be 2 cm longer than the brown phase and blue neutral cables.
Product description
General overview

1 Control panel
2 Display
3 Socket for the food sensor
4 Heating element
5 Lamp
6 Fan
7 Shelf support, removable
8 Shelf positions
Accessories
- Wire shelf x 1
For cookware, cake tins, roasts.
- Baking tray × 1
For cakes and biscuits.
- Grill- / Roasting pan x 1
To bake and roast or as pan to collect fat.
• AirFry: Wire shelf x 1
To fry food with less oil or without baking paper.
Maximum load: 5 kg.
- Food Sensor x 1
To measure how far the food is cooked.
• Telescopic runners x 1 set
For shelves and trays.
Control panel
Control panel overview
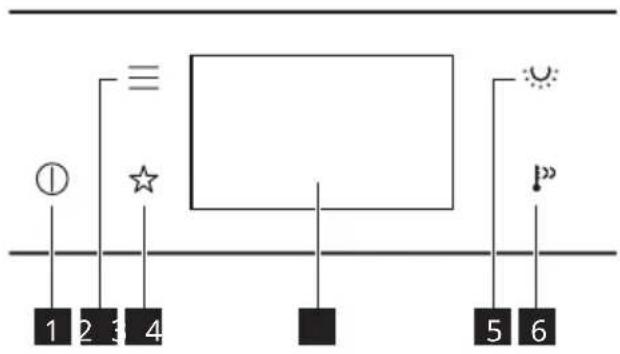
| 1 | ON / OFFPress and hold to turn the appli-ance on and off. |
| 2 | MenuLists the appliance options and setting functions. |
| 3 | FavouritesLists the favourite settings. |
| 4 | DisplayShows the current settings of the appliance. |
| 5 | Lamp switchTo turn the lamp on and off. |
| 6 | Fast Heat UpTo turn on and off the function:Fast Heat Up. |
Display
Display with key functions set.
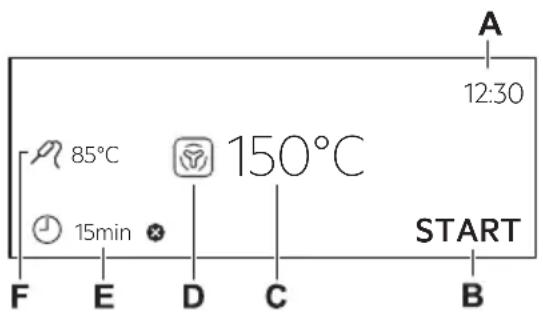
A. Time of Day
B. START / STOP
C. Temperature
D. Heating functions
E. Timer
F. Food Sensor (selected models only)
| Display indicators | |
| OK | To confirm the selection / setting. |
| < | To go one level back in the menu. |
| → | To undo the last action. |
| Display indicators | |
| To turn the options on and off. | |
| The appliance is locked. | |
| The sound alarm function is activated. | |
| The sound alarm and stop cooking function is activated. | |
| Pop up message only is activated. | |
| Delayed start function is activated. | |
| To cancel the setting. | |
The display shows various messages. When a message window appears, press the display to continue.
Before first use

Warning! Refer to Safety chapters.
First connection
The display shows welcome message after the first connection.
You have to set: Language, Display Brightness, Key Tones, Buzzer Volume, Time of Day.
Initial preheating and cleaning
Preheat the empty appliance before the first use and contact with food. The appliance can emit unpleasant smell and smoke. Ventilate the room during preheating.
- Remove all accessories and removable shelf supports from the appliance.
-
Set the function . Set the maximum temperature. Refer to Daily use. Let the appliance operate for 1 h.
-
Set the function . Set the maximum temperature. Let the appliance operate for 15 min.
- Set the function .Set the maximum temperature. Let the appliance operate for 15 min.
- Turn off the appliance and wait until it is cold.
- Clean the appliance and the accessories only with a microfibre cloth, warm water and a mild detergent.
- Put the accessories and removable shelf supports back to their initial position.
Mechanical child lock
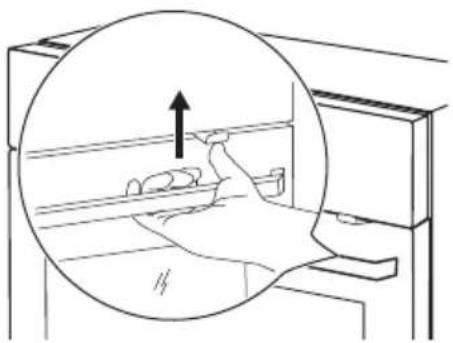
The oven has the mechanical child lock installed. It is the door lock on the right side of the oven, below the control panel.
To open the oven door with the child lock:
- Push and hold up the child lock.
- Pull the door handle to open the door. Close the oven door without pushing the child lock.
natural_image
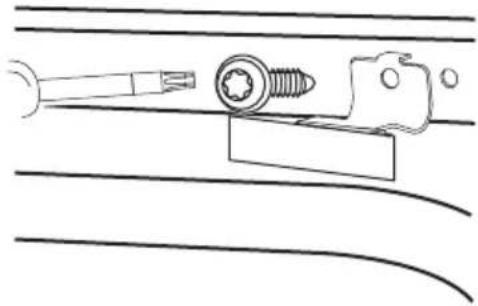
Line drawing of a hand holding a small object inside a cabinet, with an arrow indicating upward motion (no text or symbols)To remove the child lock:
- Open the door and remove the child lock with the torx key supplied with the oven.
- Fix the screw back after removing the child lock.
natural_image
Technical line drawing of a mechanical assembly with a screw and bracket (no text or symbols)Daily use

Warning! Refer to Safety chapters.
Heating functions
STANDARD
| GrillTo grill thin pieces of food and to toast bread. | |
| Turbo GrillingTo roast large meat joints or poultry with bones on one shelf position. To bake gratins and to brown. | |
| True Fan CookingTo roast meat and bake cakes. Set a lower temperature than for Conventional Cooking as the fan distributes heat evenly in the oven interior. | |
| Frozen FoodsPerfect for ready meals (e.g. french fries, croquettes or spring rolls). |
| Conventional CookingTo bake and roast food on one shelf position. | |
| Pizza FunctionTo bake pizza and other dishes that require more heat from below. | |
| AirFryFrying food with less oil and without baking paper | |
| Bottom HeatChoose this function after a cooking process to brown the food more on the bottom if needed.Use the lowest shelf level. | |
| Bread BakingTo bake bread. | |
| Dough ProvingTo speed up the rising of the yeast dough. Cover the surface of the dough to prevent from drying. |

The lamp may turn off automatically at a temperature below 80^ C during some heating functions.
SPECIALS
| PreservingTo preserve vegetables and fruits, place canning jars in a baking tray filled with water, using heat-resistant jars with bayonet or screw caps of the same size. Use the lowest shelf position. | |
| DehydratingTo dry sliced fruit, vegetables and mushrooms. To allow the moisture-saturated air to escape and the fruit to dry better, it is advisable to open the oven door occasionally during the drying process. | |
| Plate WarmingTo preheat plates for serving. | |
| DefrostTo defrost food (vegetables and fruit). The defrosting time depends on the amount and size of the frozen food. | |
| Au GratinFor dishes such as lasagna or potato gratin. To bake gratins and to brown. | |
| Slow CookingLow temperature cooking process. It's perfect to cook delicate food (e.g., beef, veal or lamb). | |
| Keep WarmTo keep food warm. Please note that some dishes may continue to cook and dry out while being kept warm. Cover the dishes if necessary. |

Moist Fan Baking
This function is designed to save energy during cooking. When you use this function, the temperature inside the appliance may differ from the set temperature. The residual heat is used. The heating power may be reduced. For more information refer to Daily use, Notes on: Moist Fan Baking.
Notes on: Moist Fan Baking
This function was used to comply with the energy efficiency class and ecodesign requirements (according to EU 65/2014 and EU 66/2014). Tests according to: IEC/EN 60350-1.
The oven door should be closed during cooking so that the function is not interrupted and the oven operates with the highest energy efficiency possible.
When you use this function the lamp automatically turns off after 30 sec.
For the cooking instructions refer to Hints and tips, Moist Fan Baking.
Setting: Heating functions
- Turn on the appliance. The display shows the default heating function and the temperature.
- Press the symbol of the heating function to enter the submenu.
- Select the heating function and press OK.
- Set the temperature. Press .OK
- Press . START
Food Sensor - you can plug the sensor at any time before or during cooking. Refer to Using the accessories, Food sensor. -
- press to turn off the heating function.
- Turn off the appliance.
Menu
Press to enter the menu.
| Menu item Description | |
| Assisted Cooking Lists | automatic programmes. |
| Cleaning Lists cleaning | pro-grammes. |
| Favourites Lists the favourite settings. | |
| Options To set the appli-ance configuration. | |
| Settings Setup To set the appli-ance configuration. | |
| Service Shows the software version and config-uration. | |
Submenu for: Cleaning
| Submenu | Description |
| Pyrolytic cleaning, quick | Duration: 1 h. |
| Pyrolytic cleaning, normal | Duration: 1 h 30 min. |
| Pyrolytic cleaning, intense | Duration: 2 h 30 min. |
Submenu for: Options
| Submenu | Description |
| Light Turns | the lamp on and off. |
| Child Lock P | Prevents accidental activation of the appliance. |
| Fast Heat Up | Shortens the heat up time. It is available only for some of the heating functions. |
| Submenu Description | |
| Cleaning Reminder | Turns the reminder on and off. |
| Digital Clock Style | Changes the format of the displayed time indication. |
Submenu for: Settings
Setup
| Submenu Description | |
| Language Sets the appliance language. | |
| Display Brightness | Sets the display brightness. |
| Key Tones Turns the tone of the touch fields on and off. It is not possible to mute the tone for ➊ | |
| Buzzer Volume | Sets the volume of key tones and signals. |
| Time of Day | Sets the current time and date. |
Service
| Submenu | Description |
| Software Version | Information about software version. |
| Reset All Settings | Restores factory settings. |
Setting: Assisted Cooking
Assisted Cooking submenu consists of a set of additional functions and programs that are designed for dedicated dishes. Each dish in this submenu is provided with a suitable setting. You can adjust the time and the temperature during cooking.
For some of the dishes you can also cook with Food Sensor. The degree to which a dish is cooked:
- Rare
- Medium
- Well Done
For some of the dishes you can also cook with Weight Automatic.
- Turn on the appliance.
- Press .
- Press . Enter Assisted Cooking.
Additional functions
Favourites ☆
You can save up to 3 of your favourite settings, such as heating function and cooking time.
- Turn on the appliance.
- Select the preferred setting.
- Press .
- Select: Favourites / Save current settings.
-
Press + to add the setting to the list of: Favourites.
-
Press .OK
- press to reset the setting.
✗ - press to cancel the setting.
Function lock
This function prevents an accidental change of the appliance function.
- Turn on the appliance.
- Set a heating function.
- , △ press at the same time to turn on the function.
☆, ⚠»press at the same time to turn off the function.
Child Lock
This function prevents accidental activation of the appliance.
- Turn on the appliance.
- Press .
- Select Options / Child Lock.
-
Press the code letters in an alphabetical order.
-
Choose a dish or a food type.
- Place the food inside the appliance and press START
When the function ends, check if the food is ready. Extend the cooking time, if needed.
5. Turn off the appliance.
Child Lock is activated.
Access to: Timer and lamp is available. The door is locked when the appliance is turned off.
To enable the use of the appliance, press the code letters in an alphabetical order.
To deactivate this function repeat the above steps.
Automatic switch-off
For safety reasons, if the heating function is active and no settings are changed, the appliance will turn off automatically after a certain period of time.
| (°C) (h) | ! |
| 30 - 115 12.5 | |
| 120 - 195 8.5 | |
| 200 - 245 5.5 | |
| 250 - maximum 3 |
If you intend to run a heating function for a duration exceeding the automatic switch-off time, set the cooking time. Refer to Clock functions.
The Automatic switch-off does not work with the functions: Light, Food Sensor, End time.
Cooling fan
When the appliance operates, the cooling fan turns on automatically to keep the surfaces of the appliance cool. If you turn off
the appliance, the cooling fan can continue to operate until the appliance cools down.
Clock functions
Clock functions description
| Function | Description |
| Timer To set the length of cooking.Maximum is 23 h 59 min.You can set what happens when the time is up by setting the preferred: End Action. | |
| End Action | Sound Alarm - when the time is up the signal sounds. You can set this function at any time, even when the appliance is turned off. |
| Sound Alarm and stop cooking - when the time is up the signal sounds and the heating function turns off. | |
| Pop up message only - when the time is up the message appears on the display. You can set this function at any time, even when the appliance is turned off. | |
| Delayed start | To postpone the start and / or end of cooking. |
| Time Extension | To extend the cooking time. |
| Uptimer To show how long the appliance operates. Maximum is 23 h 59 min. You can turn the function on and off. This function has no effect on the operation of the appliance. | |
Setting: Time of Day
- Turn on the appliance.
- Press: Time of Day.
- Set the time.
- Press .OK
Setting: Timer
- Choose the heating function and set the temperature.
- Press . ⏱
- Set the time.
You can select the preferred End action by
pressing : - Press . Repeat the action until the display shows the main screen.
When 10% of cooking time is left and the food does not seem to be ready, you can extend cooking time. You can also change the heating function. Press +1min to extend the cooking time.
Setting: Delayed start
- Set the heating function and the temperature.
- Press . ⏱
- Set the cooking time.
- Press .
- Press: Delayed start.
- Choose the desired start time.
- Press . Repeat the action until the display shows the main screen.
Setting: Uptimer
- Press . ⏱
- Press . . . .
- Press: Uptimer.
- Slide or press to show the running time on the main screen.
- Press . Repeat the action until the display shows the main screen.
Changing timer settings
You can change the set time during cooking at any time.
-
Press . ⏱
-
Set the timer value.
-
Press .OK
Using the accessories

Warning! Refer to Safety chapters.
Inserting accessories
A small indentation at the top increases safety and provides tilt protection. The indentations are also anti-tip devices. The rim around the shelf prevents cookware from slipping off the shelf.
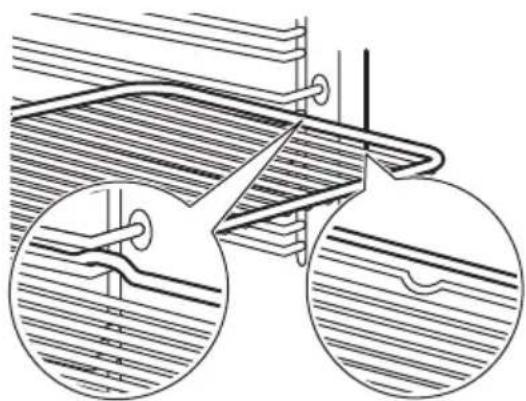
Wire shelf
natural_image
Technical line drawing of a mechanical assembly with two circular insets showing internal components (no text or symbols)Insert the shelf between the guide bars of the shelf support and make sure that the feet point down. Make sure that the shelf touches the back of the oven interior.
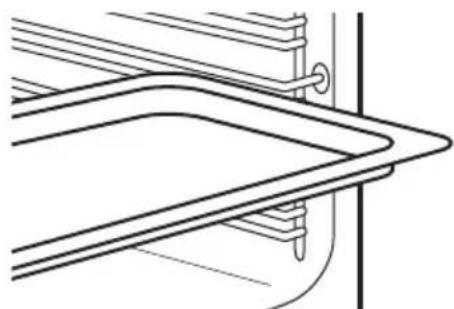
Baking tray / Deep pan
natural_image
Pure technical line drawing of a mechanical component or bracket (no text or symbols)Push the tray between the guide bars of the shelf support. Place the baking tray with the slope towards the back of the oven interior.
AirFry: Wire shelf
natural_image
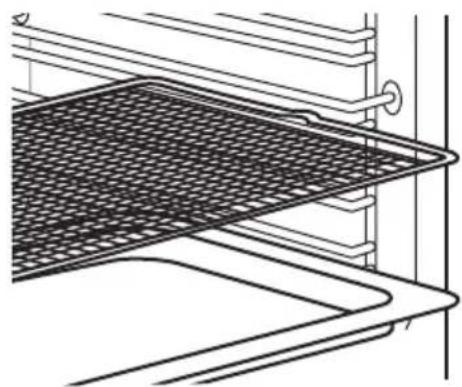
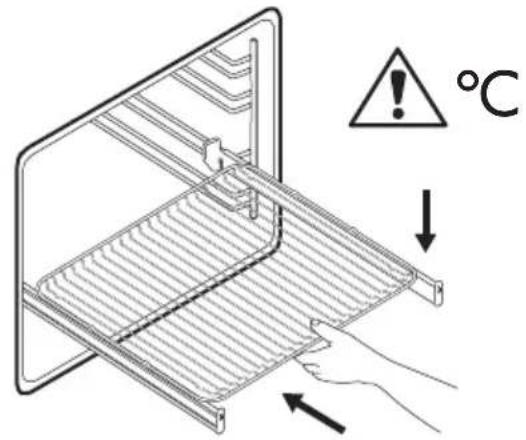
Technical line drawing of a meshed metal tray or rack structure (no text or symbols)Place the AirFry wire shelf on the third shelf position. Place the baking tray underneath.
Do not use the AirFry wire shelf with the telescopic runners as the oil could make their surface slippery and reduce the wire shelf stability.
Food Sensor
It measures the temperature inside the food. You can use it with every heating function.
There are two temperatures to be set:
-
- the temperature inside the appliance. It should be at least 25^ C higher than the food core temperature.
- the food core temperature. Recommendations:
- Ingredients should be at room temperature.
- Do not use it for liquid dishes.
- During cooking the needle of the food sensor must be fully inserted in the dish. The appliance calculates an approximate end of cooking time. It depends on the quantity of food, the heating function and the temperature.
Cooking with: Food Sensor

Warning! There is a risk of burns as Food Sensor and shelf supports become hot. Do not touch Food Sensor handle with bare hands. Always use oven gloves.
- Turn on the appliance.
- Set a heating function or a dish and, if necessary, the oven temperature.
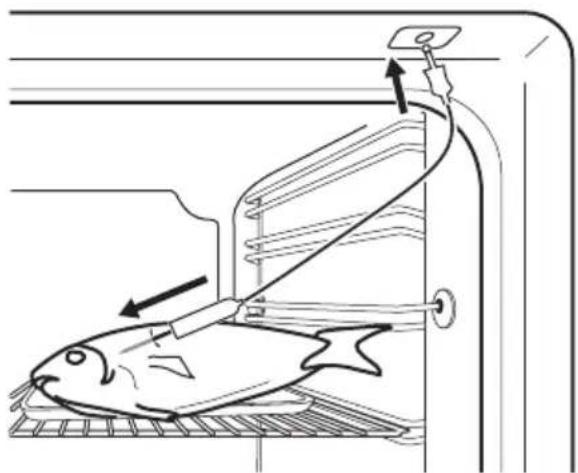
- Insert Food Sensor inside the dish: Meat, poultry and fish
Insert the entire needle of the Food Sensor into the meat or fish at its thickest part.
natural_image
Line drawing of a fish being lifted by a rack-mounted device, showing structural components and airflow direction (no text or symbols)Casserole
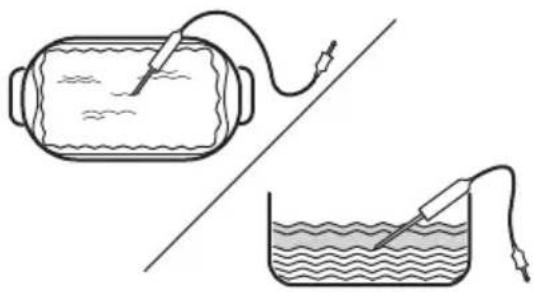
Insert the tip of Food Sensor exactly in the centre of the casserole. Food Sensor should be stabilized in one place during cooking. Use a solid ingredient to achieve that. Use the rim of the baking dish to support the silicone handle of Food Sensor. The tip of Food Sensor should not touch the bottom of a baking dish.
natural_image
Illustration of a cylindrical device connected to a wire with a probe, and a beaker with a probe inserted into liquid (no text or symbols)- Plug Food Sensor into the socket located inside the appliance. Refer to Product description.
The display shows the current temperature of Food Sensor.
-
-press to set the core temperature of the sensor.
-
- press to set the preferred option:
• Sound Alarm - when food reaches the core temperature, the signal sounds.
- Sound Alarm and stop cooking - when food reaches the core temperature, the signal sounds and the cooking stops.
-
Select the option and repeatedly press OK to go to main screen.
-
Press . START
-
When the food reaches the set temperature, the signal sounds. Check if the food is ready. Extend the cooking time, if needed.
-
Remove Food Sensor plug from the socket and remove the dish from the appliance.
Using: Telescopic runners

Keep the installation instructions for the telescopic runners for future use.
With telescopic runners you can put in and remove wire shelves and trays easily.

Caution! Do not clean the telescopic runners in the dishwasher. Do not lubricate the telescopic runners.
- Pull out the right and left hand telescopic runners.
- Put the wire shelf on the telescopic runners and carefully push them into the
oven. Make sure you push back the telescopic runners fully in the oven before you close the oven door.
Hints and tips
Cooking recommendations
The temperature and cooking times in the tables are for guidance only. They depend on the recipes, quality and quantity of the ingredients used.
Your appliance may bake or roast differently than your previous appliance. The hints below show recommended settings for temperature, cooking time and shelf position for specific types of food.
Count the shelf positions from the bottom of the oven floor.
If you cannot find the settings for a specific recipe, look for a similar one.
For energy saving tips refer to Energy efficiency.
Symbols used in the tables:
| Food type | |
| Heating function | |
| °C | Temperature |
| Accessory | |
| Shelf position | |
| Cooking time (min) |
Moist Fan Baking - recommended accessories
Use dark and non-reflective tins and containers. They have better heat absorption than light colour and reflective dishes.
- Pizza pan - dark, non-reflective, diameter 28 cm
- Baking dish - dark, non-reflective, diameter 26 cm
- Ramekins - ceramic, diameter 8 cm, height 5 cm
- Flan base tin - dark, non-reflective, diameter 28 cm
Moist Fan Baking
For the best results follow suggestions listed in the table below.
| °C | 日 | 1 | ||
| Sweet rolls, 16 pieces | baking tray or dripping pan | 180 2 20 - 30 | ||
| Rolls, 9 pieces baking pan | tray or dripping | 180 2 30 - 40 | ||
| Pizza, frozen, 0.35 kg | wire shelf 220 2 10 - 15 | |||
| Swiss Roll baking tray or dripping pan | 170 2 25 - 35 | |||
| Brownie baking tray or dripping pan | 175 3 25 - 30 | |||
| Soufflè, 6 pieces cer | ramic ramekins on wire shelf | 200 3 25 - 30 | ||
| Sponge flan base fl | an base tin on wire shelf | 180 2 15 - 25 | ||
| Victoria sandwich b | baking dish on wire shelf 170 2 40 - 50 | |||
| Poached fish, 0.3 kg | baking tray or dripping pan | 180 3 20 - 25 | ||
| Whole fish, 0.2 kg | baking tray or dripping pan | 180 3 25 - 35 | ||
| Fish fillet, 0.3 kg | pizza pan on wire shelf | 180 | 3 | 25 - 30 |
| Poached meat, 0.25 kg | baking tray or dripping pan | 200 3 35 - 45 | ||
| Shashlik, 0.5 kg | baking tray or dripping pan | 200 3 25 - 30 | ||
| Cookies, 16 pieces | baking tray or dripping pan | 180 2 20 - 30 | ||
| Macaroons, 24 pieces | baking tray or dripping pan | 180 2 25 - 35 | ||
| Muffins, 12 pieces | baking tray or dripping pan | 170 2 30 - 40 | ||
| Savory pastry, 20 pieces | baking tray or dripping pan | 180 2 25 - 30 | ||
| Short crust biscuits, 20 pieces | baking tray or dripping pan | 150 2 25 - 35°C | ||
| Tartlets, 8 pieces baking tray or dripping pan | 170 2 20 - 30 | |||
| Vegetables, poached, 0.4 kg | baking tray or dripping pan | 180 3 35 - 45 | ||
| Vegetarian omelette | pizza pan on wire shelf 200 3 25 - 30 | |||
| Mediterranean vegetables, 0.7 kg | baking tray or dripping pan | 180 4 25 - 30 | ||
Information for test institutes
Tests according to IEC 60350-1.
1) Preheat the appliance for 10 minutes.
| °C | |||||
| Small cakes, 20 per tray | Conventional Cook-ing | Baking tray | 3 170 20 - 35 | ||
| Small cakes, 20 per tray | True Fan Cooking Baking tray | 3 150 - 160 20 - 35 | |||
| Small cakes, 20 per tray | True Fan Cooking Baking tray | 2 and 4 150 - 160 20 - 35 | |||
| Apple pie, 2 tins ∅20 cm | Conventional Cook-ing | Wire shelf 2 180 70 - 90 | |||
| Apple pie, 2 tins ∅20 cm | True Fan Cooking Wire shelf 2 160 70 - 90 | ||||
| Fatless sponge cake, cake mould ∅26 cm 1) | Conventional Cook-ing | Wire shelf 2 170 40 - 50 | |||
| Fatless sponge cake, cake mould ∅26 cm 1) | True Fan Cooking Wire shelf 2 160 40 - 50 | ||||
| Fatless sponge cake, cake mould ∅26 cm 1) | True Fan Cooking Wire shelf 2 and 4 160 40 - 60 | ||||
| Shortbread | True Fan Cooking Baking tray | 3 140 - 150 20 - 40 | |||
| Shortbread | True Fan Cooking Baking tray | 2 and 4 140 - 150 25 - 45 | |||
| Shortbread | Conventional Cook-ing | Baking tray | 3 140 - 150 25 - 45 | ||
| Toast 1) | Grill Wire shelf 4 max. 1 - 5 | ||||
Care and cleaning

Warning! Refer to Safety chapters.
Notes on cleaning
Cleaning agents
- Clean the front of the appliance only with a microfibre cloth with warm water and a mild detergent.
- Use a cleaning solution to clean metal surfaces.
- Clean stains with a mild detergent.
Everyday use
- Clean the interior of the appliance after each use. Fat accumulation or other residue may cause fire.
- Moisture can condense in the appliance or on the door glass panels. To decrease the condensation, let the appliance work for 10 minutes before cooking. Do not store food in the appliance for longer than 20 minutes. Dry the interior of the appliance only with a microfibre cloth after each use.
Accessories
- Clean all accessories after each use and let them dry. Use only a microfibre cloth with warm water and a mild detergent. Do not clean the accessories in a dishwasher.
- Do not clean the non-stick accessories using abrasive cleaner or sharp-edged objects.
Removing the shelf supports
Remove the shelf supports to clean the appliance.
-
Turn off the appliance and wait until it is cold.
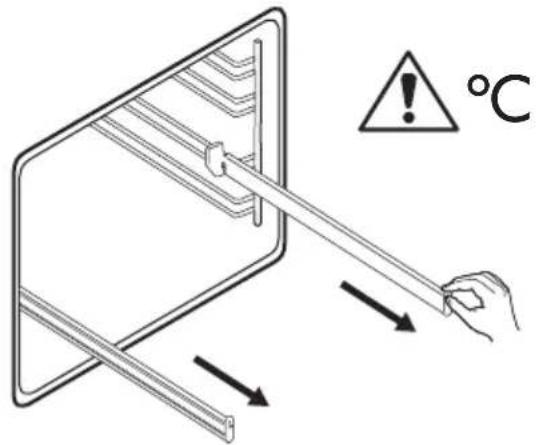
-
Pull the front of the shelf support away from the side wall.
- Pull the rear end of the shelf support away from the side wall and remove it.
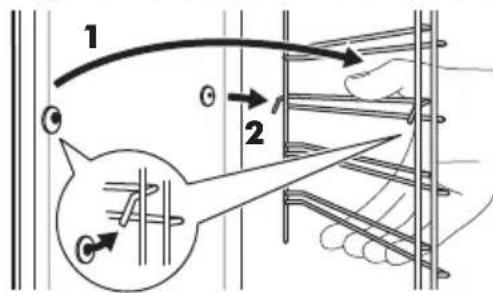
- Put the shelf supports back to the initial position. Repeat the steps in the reverse order.
If the telescopic runners are supplied, its retaining pins must point to the front.
Pyrolytic Cleaning
Use it to clean the appliance and burn off the residues.

Warning! There is a risk of burns.

Caution! If there are other appliances installed in the same cabinet, do not use them at the same time as this function. It can cause damage to the oven.
Do not start the function if you did not fully close the oven door.
- Make sure the appliance is cold.
- Remove all accessories.
- Clean the oven interior and the inner door glass with warm water, a soft cloth and a mild detergent.
- Turn on the appliance.
- Press /Cleaning.
- Select the cleaning mode.
When the cleaning starts, the oven door is locked and the lamp is off. The cooling fan works at a higher speed.
STOP - press to stop the cleaning before it is completed.
Do not use the appliance until the door lock symbol disappears from the display.
-
When the cleaning ends, turn off the appliance and wait until it is cold.
-
Clean the oven interior with a soft cloth. Remove the residue from the bottom of the oven.
Cleaning Reminder
When the reminder appears, cleaning is recommended.
Use the function: Pyrolytic Cleaning.
Removing and installing door
The oven door has three glass panels. You can remove the oven door and the internal glass panels to clean them. Read the whole "Removing and installing door" instruction before you remove the glass panels.

Caution! Do not use the appliance without the glass panels.
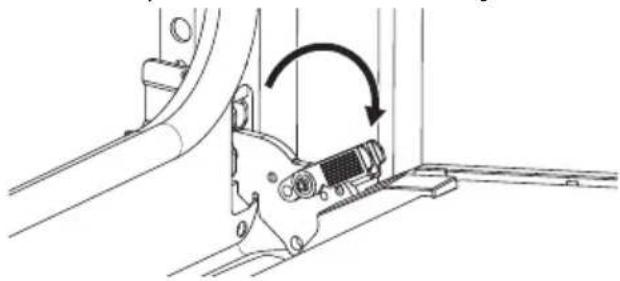
- Open the door fully and hold both hinges.

natural_image
Technical diagram showing a mechanical assembly with an inset close-up of a component (no text or symbols present)- Lift and pull the latches until they click.
natural_image
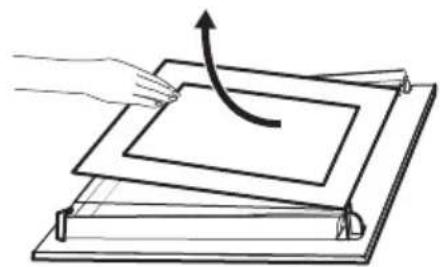
Technical line drawing of a mechanical assembly with a rotating component (no text or symbols)- Close the oven door halfway to the first opening position. Then lift and pull to remove the door from its seat.
natural_image
Illustration of a hand holding a curved object with directional arrows indicating rotation (no text or symbols)-
Put the door on a soft cloth on a stable surface.
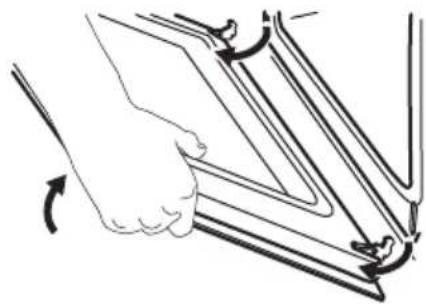
-
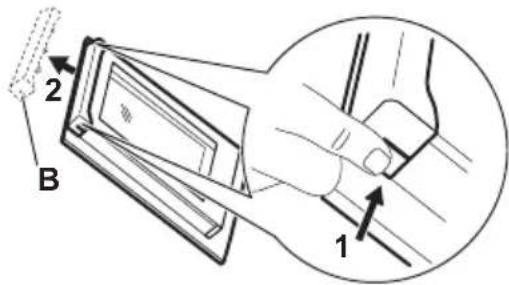
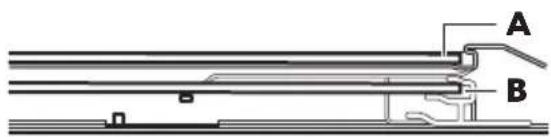
Hold the door trim Bn the top edge of the door at the two sides and push inwards to release the clip seal.

-
Pull the door trim to the front to remove it.
-
Hold the door glass panels by their top edge and carefully pull them out one by one. Start from the top panel. Make sure the glass slides out of the supports completely.
natural_image
Diagram of a hand pressing a curved arrow on a layered rectangular object (no text or symbols)-
Clean the glass panels with water and soap. Dry the glass panels carefully. Do not clean the glass panels in the dishwasher.
-
After cleaning, install the glass panels, the door trim and the oven door, close the latches on the both hinges. If the door is installed correctly, you will hear a click when closing the latches.
Make sure that you put the glass panels (A and B) back in the correct sequence. Check for the symbol / printing on the side of the glass panel. Each of the glass panels looks different to make the disassembly and assembly easier.
The screen-printing zone must face the inner side of the door. Make sure that after the installation the surface of the glass panel frame on the screen-printing zones is not rough when you touch it.
When installed correctly, the door trim clicks.
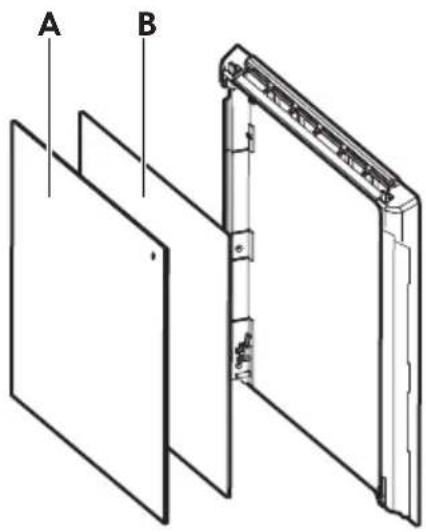
Make sure that you install the middle glass panel in the seats correctly.
Replacing the lamp

Warning! Risk of electric shock. The lamp can be hot.
- Turn off the appliance and wait until it is cold.
- Disconnect the appliance from the mains.
- Place the cloth on the oven floor.

Caution! Always hold the halogen lamp with a cloth to prevent grease residue from burning on the lamp.
Back lamp
- Turn the glass cover to remove it.
- Clean the glass cover.
- Replace the lamp with a suitable 300^ C heat-resistant lamp.
- Install the glass cover.
Troubleshooting

Warning! Refer to Safety chapters.
What to do if...
| Problem description Cause and remedy | |
| You cannot activate or operate the appliance. | The appliance is not connected to an electrical supply or it is connected incorrectly. |
| The appliance does not heat up. | The clock is not set.To set the clock refer to Clock functions. |
| The door is not closed correctly. | |
| The fuse is blown.Make sure the fuse is the cause of the problem. If the problem recurs, contact a qualified electrician. | |
| Child Lock is activated. | |
| The lamp is turned off. The lamp is burnt out. Replace the lamp.For details refer to Care and cleaning. | |
| i Power cut always stops cleaning. Repeat cleaning if it's interrupted by power failure. | |
Error codes
When the software error occurs, the display shows error message. You will find the list of problems in the table below. When the following error message continues to appear on the display, it means a faulty subsystem may have been disabled. In such a case contact your dealer or an Authorized Service Centre.
| Code and description | Remedy |
| F102 - the door is not fully closed or the door lock is broken. | Close the door.Turn the appliance off and on. |
| F111 - Food Sensor is not correctly inserted into the socket. | Fully plug Food Sensor into the socket. |
| F240, F439 - the touch fields on the display do not work properly. | Clean the surface of the display. Make sure there is no dirt on the touch fields. |
| F908 - the appliance system cannot connect with the control panel. | Turn the appliance off and on. |
Service data
If you cannot find a solution to the problem yourself, contact an Authorised Service Centre.
The necessary data for the service centre is on the rating plate. The rating plate is located on the front frame of the appliance. It is visible when you open the door. Do not remove the rating plate from the appliance.
We recommend that you write the data here:
| Model (MOD.): | |
| Product number (PNC): | |
| Serial number (S.N.): |
Technical data
Technical data
| Dimensions (internal) | WidthHeightDepth | 480 mm361 mm416 mm |
| Area of baking tray 1438 cm2 | ||
| Top heating element 2300 W | ||
| Bottom heating element 1000 W | ||
| Grill 2300 W | ||
| Ring 2400 W | ||
| Total rating 3490 W | ||
| Voltage 220 - 240 V | ||
| Frequency 50 - 60 Hz | ||
| Number of functions 18 | ||
Energy efficiency
Product information sheet and product information according to EU energy labelling and ecodesign regulations
| Supplier's name IKEA | |
| Model identification FRILLESBO 906.002.86 | |
| Energy efficiency index 81.2 | |
| Energy efficiency class A+ | |
| Energy consumption with a standard load, conventional mode | 0.93 kWh/cycle |
| Energy consumption with a standard load, fan-forced mode | 0.69 kWh/cycle |
| Number of cavities 1 | |
| Heat source | Electricity |
| Volume | 72 l |
| Type of oven Built-in oven | |
| Mass 34.7 kg | |
| IEC/EN 60350-1 - Household electric cooking appliances - Part 1: Ranges, ovens, steam ovens and grills - Methods for measuring performance. | |
Product information for power consumption and maximum time to reach applicable low power mode
| Power consumption in standby 0.8 W | |
| Maximum time needed for the equipment to automatically reach the applicable low power mode | 20 min |
Energy saving tips
Following tips below will help you save energy when using your appliance.
Make sure that the appliance door is closed when the appliance operates. Do not open the appliance door too often during cooking. Keep the door gasket clean and make sure it is well fixed in its position.
Use metal cookware and dark, non-reflective tins and containers to improve energy saving.
Do not preheat the appliance before cooking unless specifically recommended.
Keep breaks between baking as short as possible when you prepare a few dishes at one time.
Cooking with fan
When possible, use the cooking functions with fan to save energy.
Residual heat
When the cooking duration is longer than 30 min, reduce the appliance temperature to minimum 3 - 10 min before the end of cooking. The residual heat inside the appliance will continue to cook.
Use the residual heat to keep the food warm or warm up other dishes.
When you turn off the appliance, the display shows the residual heat or temperature.
If a programme with Duration is activated and the cooking time is longer than 30 min, the heating elements automatically turn off earlier in some appliance functions.
Keep food warm
Choose the lowest possible temperature setting to use residual heat and keep the food warm. The residual heat indicator or temperature appears on the display.
Cooking with the lamp off
Turn off the lamp during cooking. Turn it on only when you need it.
Moist Fan Baking
Function designed to save energy during cooking.
When you use this function the lamp automatically turns off after 30 sec. You may turn on the lamp again but this action will reduce the expected energy savings.
Environmental concerns
Recycle materials with the symbol Put the packaging in relevant containers to recycle it. Help protect the environment and human health by recycling waste of electrical and electronic appliances. Do not dispose of
appliances marked with the symbol with the household waste. Return the product to your local recycling facility or contact your municipal office.
IKEA guarantee
How long is the IKEA guarantee valid?
This guarantee is valid for 5 years from the original date of purchase of your appliance at IKEA. The original sales receipt is required as proof of purchase. If service work is carried out under guarantee, this will not extend the guarantee period for the appliance.
Who will execute the service?
IKEA service provider will provide the service through its own service operations or authorized service partner network.
What does this guarantee cover?
The guarantee covers faults of the appliance, which have been caused by faulty construction or material faults from the date of purchase from IKEA. This guarantee applies to domestic use only. The exceptions are specified under the headline “What is not covered under this guarantee?” Within the guarantee period, the costs to remedy the fault e.g. repairs, parts, labour and travel will be covered, provided that the appliance is accessible for repair without special expenditure. On these conditions the EU guidelines (Nr. 99/44/EG) and the respective local regulations are applicable. Replaced parts become the property of IKEA.
What will IKEA do to correct the problem?
IKEA appointed service provider will examine the product and decide, at its sole discretion, if it is covered under this guarantee. If considered covered, IKEA service provider or its authorized service partner through its
own service operations, will then, at its sole discretion, either repair the defective product or replace it with the same or a comparable product.
What is not covered under this guarantee?
• Normal wear and tear.
- Deliberate or negligent damage, damage caused by failure to observe operating instructions, incorrect installation or by connection to the wrong voltage, damage caused by chemical or electro-chemical reaction, rust, corrosion or water damage including but not limited to damage caused by excessive lime in the water supply, damage caused by abnormal environmental conditions.
- Consumable parts including batteries and lamps.
• Non-functional and decorative parts which do not affect normal use of the appliance, including any scratches and possible color differences.
- Accidental damage caused by foreign objects or substances and cleaning or unblocking of filters, drainage systems or soap drawers.
- Damage to the following parts: ceramic glass, accessories, crockery and cutlery baskets, feed and drainage pipes, seals, lamps and lamp covers, screens, knobs, casings and parts of casings. Unless such damages can be proved to have been caused by production faults.
- Cases where no fault could be found during a technician's visit.
- Repairs not carried out by our appointed service providers and/or an authorized service contractual partner or where non-original parts have been used.
- Repairs caused by installation which is faulty or not according to specification.
- The use of the appliance in a non-domestic environment i.e. professional use.
- Transportation damages. If a customer transports the product to their home or other address, IKEA is not liable for any damage that may occur during transport. However, if IKEA delivers the product to the customer's delivery address, then damage to the product that occurs during this delivery will be covered by this guarantee.
- Cost for carrying out the initial installation of the IKEA appliance. However, if an IKEA service provider or its authorized service partner repairs or replaces the appliance under the terms of this guarantee, the service provider or its authorized service partner will re-install the repaired appliance or install the replacement, if necessary.
This restriction do not apply to fault-free work carried out by a qualified specialist using our original parts in order to adapt the appliance to the technical safety specifications of another EU country.
How country law applies?
The IKEA guarantee gives you specific legal rights, which covers or exceed local demands. However these conditions do not limit in any way consumer rights described in the local legislation.
Area of validity
For appliances which are purchased in one EU country and taken to another EU country, the services will be provided in the framework of the guarantee conditions normal in the new country. An obligation to carry out services in the framework of the guarantee exists only if the appliance complies and is installed in accordance with:
- the technical specifications of the country in which the guarantee claim is made;
- the Assembly Instructions and User Manual Safety Information;
The dedicated After Sales Service for IKEA appliances:
Please do not hesitate to contact IKEA After Sales Service to:
- make a service request under this guarantee;
-
ask for clarification on installation of the IKEA appliance in the dedicated IKEA kitchen furniture. The service won't provide clarifications related to:
-
the overall IKEA kitchen installation;
-
connections to electricity (if machine comes without plug and cable), to water and to gas since they have to be executed by an authorized service engineer.
-
ask for clarification on user manual contents and specifications of the IKEA appliance.
To ensure that we provide you with the best assistance, please read carefully the Assembly Instructions and/or the User Manual section of this booklet before contacting us.
How to reach us if you need our service?

Please refer to the last page of this manual for the full list of IKEA appointed contacts and relative national phone numbers.
In order to provide you with a quicker service, we recommend that you use the specific phone numbers listed at the end of this manual. Always refer to the numbers listed in the booklet of the specific appliance you need an assistance for. Before calling us, assure that you have to hand the IKEA article number (8 digit code) and the Serial Number (8 digit code that can be found on the rating plate) for the appliance of which you need our assistance.
i SAVE THE SALES RECEIPT! It is your proof of purchase and required for the guarantee to apply. Note that the receipt reports also the IKEA article name and number (8 digit code) for each of the appliances you have purchased.
Do you need extra help?
For any additional questions not related to After Sales of your appliances, please contact our nearest IKEA store call centre. We recommend you read the appliance documentation carefully before contacting us.
Sisältö
natural_image
Line drawing of a hand holding a device inside a bed, enclosed in a circle with an upward arrow (no text or symbols)natural_image
Technical line drawing of a mechanical assembly with a screw and bracket (no text or symbols)Päivittäinen käyttö

natural_image
Technical line drawing of a mechanical component with two circular inset views showing internal structure (no text or symbols)natural_image
Pure technical line drawing of a mechanical component or bracket (no text or symbols)natural_image
Technical line drawing of a metal grate or grating structure with layered plates (no text or symbols)natural_image
Line drawing of a fish being lifted by a rack, showing structural components and an arrow indicating motion (no text or symbols)Padat/paistokset
natural_image
Illustration of a cylindrical device connected to a wire and connected to a beaker with a probe (no text or symbols present)natural_image
Technical diagram showing a mechanical assembly with an inset close-up of a component being inserted (no text or symbols present)natural_image
Technical line drawing of a mechanical assembly with a rotating component (no text or symbols)natural_image
Illustration of a hand holding a U-shaped object with rotational arrows indicating movement (no text or symbols)natural_image
Diagram of a hand pressing a curved arrow on a layered platform (no text or symbols)natural_image
Illustration of a hand inserting a device into a rack, with an arrow indicating the direction (no text or symbols present)natural_image
Technical line drawing of a mechanical assembly with a screw and bracket (no text or symbols)natural_image
Technical diagram showing two circular views of a mechanical component with hatched patterns and internal channels (no text or symbols)natural_image
Pure technical line drawing of a mechanical component or bracket (no text or symbols)natural_image
Technical line drawing of a meshed metal tray or rack structure (no text or symbols)natural_image
Line drawing of a fish being lifted by a rack, showing structural components and an arrow indicating motion (no text or symbols)Ragoût
natural_image
Illustration of a cylindrical device connected to a wire and submerged in a beaker with a probe (no text or symbols)natural_image
Technical line drawing of a mechanical assembly with an inset showing a component detail (no text or symbols)natural_image
Technical line drawing of a mechanical assembly with an arrow indicating rotation (no text or symbols present)natural_image
Illustration of a hand holding a folded document or folder with arrows indicating rotation (no text or symbols present)natural_image
Diagram of a hand pressing a curved arrow on a layered rectangular object (no text or symbols)GARANTIE IKEA - FRANCE
CONTRAT DE GARANTIE ET DE SERVICE APRES-VENTE IKEA
natural_image
Line drawing of a hand pressing down on a bed, enclosed in a circle with an upward arrow (no text or symbols)natural_image
Technical line drawing of a mechanical assembly with a screw and nut, no text or symbols presentTäglicher Gebrauch

natural_image
Technical line drawing of a mechanical assembly with two circular insets showing internal components (no text or symbols)natural_image
Pure technical line drawing of a mechanical component or bracket (no text or symbols)natural_image
Technical line drawing of a metal grating or rack structure with no visible text or symbolsnatural_image
Line drawing of a fish being lifted by a curved tube into a rack (no text or symbols)Auflauf
natural_image
Illustration of a battery and its water displacement setup with probes (no text or symbols)natural_image
Technical diagram showing a mechanical assembly with an inset close-up of a component being inserted (no text or symbols present)natural_image
Technical line drawing of a mechanical assembly with an arrow indicating rotation (no text or symbols present)natural_image
Illustration of a hand holding a folded or folded object with directional arrows indicating rotation (no text or symbols)natural_image
Diagram of a hand pressing a curved arrow on a layered platform (no text or symbols)natural_image
Symbol of a trash bin crossed with a diagonal line, representing no waste or discharge (no text or labels)natural_image
Recycling symbol with three arrows forming a triangle (no text or labels)natural_image
Line drawing of a hand holding a device inside a cabinet, with an arrow indicating upward motion (no text or symbols)natural_image
Technical line drawing of a mechanical assembly with a screw, nut, and bracket (no text or symbols)Καθημερινή χρήση

natural_image
Technical diagram showing two views of a mechanical component with hinged parts and a central rod (no text or symbols present)natural_image
Pure technical line drawing of a mechanical component or bracket (no text or symbols)natural_image
Technical line drawing of a metal grating or rack structure with no visible text or symbolsnatural_image
Line drawing of a fish inside a container with an attached hook, showing motion direction (no text or symbols)Γάστρα
natural_image
Illustration of a cylindrical device connected to a wire and connected to a beaker with a probe (no text or symbols present)natural_image
Technical line drawing of a mechanical assembly with an inset showing a bracket component (no text or symbols)natural_image
Mechanical assembly diagram showing a lever mechanism with a curved arrow indicating rotational motion (no text or symbols present)natural_image
Illustration of a hand holding a curved object with directional arrows indicating rotation (no text or symbols)natural_image
Diagram of a hand pressing a curved arrow on a layered rectangular object (no text or symbols)natural_image
Line drawing of a person using a computer in a library, enclosed in a circle with an upward arrow (no text or symbols)natural_image
Technical line drawing of a mechanical assembly with a screw and bracket (no text or symbols)Dagleg notkun

natural_image
Technical line drawing of a mechanical component with two circular inset views showing internal structure (no text or symbols)natural_image
Pure technical line drawing of a mechanical component or bracket (no text or symbols)natural_image
Technical line drawing of a meshed metal tray or rack structure (no text or symbols)natural_image
Line drawing of a fish inside a container with an attached hook, showing motion direction (no text or symbols)Pottréttur
natural_image
Illustration of a cylindrical device connected to a wire with a probe, and a beaker with a probe inserted into liquid (no text or symbols)natural_image
Technical diagram showing a mechanical assembly with an inset close-up of a component (no text or symbols present)natural_image
Technical line drawing of a mechanical assembly with a curved arrow indicating rotation (no text or symbols)natural_image
Illustration of a hand holding a folded paper or sheet with curved arrows indicating rotation (no text or symbols)natural_image
Diagram of a hand pressing a curved arrow on a layered rectangular object (no text or symbols)natural_image
Line drawing of a person using a device in a storage cabinet, enclosed in a circle with an upward arrow (no text or symbols)natural_image
Technical line drawing of a mechanical assembly with a screw and bracket (no text or symbols)Uso quotidiano

natural_image
Technical diagram showing two views of a mechanical component with hatched patterns and internal features (no text or symbols)natural_image
Pure technical line drawing of a mechanical component or bracket (no text or symbols)natural_image
Technical line drawing of a metal grate or grating structure with layered plates (no text or symbols)natural_image
Line drawing of a fish being lifted by a rack, showing structural components and an arrow indicating motion (no text or symbols)Sformato
natural_image
Illustration of a cylindrical device connected to a wire and connected to a beaker with a probe (no text or symbols present)natural_image
Technical line drawing of a mechanical assembly with an inset showing a hand holding a component (no text or symbols present)natural_image
Technical line drawing of a mechanical assembly with an arrow indicating rotation (no text or symbols present)natural_image
Illustration of a hand holding a folded document or folder with arrows indicating rotation (no text or symbols present)natural_image
Diagram of a hand pressing a curved arrow on a layered rectangular object (no text or symbols)natural_image
Diagram showing a hand holding a device inside a storage unit with an arrow indicating upward motion (no text or symbols present)natural_image
Technical line drawing of a mechanical assembly with a screw, nut, and bracket (no text or symbols)The Ground Truth image displays a single, solid horizontal line. According to Rule 2 (UNDERSCORE & LINE RULES), this is a stylistic or background line, not a placeholder underscore. Therefore, the OCR result must ignore it and output nothing or only meaningful text. The provided OCR content is "\_\_\_\_", which consists of four underscores. This is an incorrect interpretation of the line as a placeholder, violating the rule that stylistic lines must be ignored. The OCR has hallucinated placeholder underscores where none should exist in the GT. This violates the rule that stylistic lines must be ignored. Therefore, the OCR result is inconsistent with the Ground Truth.
Varmefunksjoner
STANDARD
Undermeny for: Oppsett
Oppsett
Innstilling: Utsatt start
natural_image
Technical line drawing of a mechanical component with two circular inset views showing internal structure (no text or symbols)natural_image
Pure technical line drawing of a mechanical component or bracket (no text or symbols)natural_image
Technical line drawing of a meshed metal tray or rack structure (no text or symbols)natural_image
Line drawing of a fish being lifted by a rack-mounted device (no text or symbols)Gryterett
natural_image
Illustration of a cylindrical device connected to a wire with a probe, and a beaker with a probe inserted into liquid (no text or symbols)- Plugg steketermometeret inn i kontakten som befinner seg på sideveggen inne i produktet. Se Produktbeskrivelse.
Displayet viser den aktuelle temperaturen i steketermometeret. - -trykk for å angi kjernetemperaturen til steketermometeret.
-
-trykk for å angi foretrukket alternativ:
-
Lydsignal – när retten när den angitte kjernetemperaturen, hører du et lydsignal.
-
Lydalarm ved endt tilberedning – när maten oppnår kjernetemperaturen hører du en lydalarm, og ovnen slår seg av.
-
Velg alternativet og trykk gjentatte ganger på før å gå til hovedskjermbildet.
-
Trykk på .START
- Når retten när den angitte temperaturen, hører du et lydsignal. Sjekk om maten er klar. Forleng tilberedningstiden etter behov.
- Ta pluggen til steketermometeret ut av kontakten og ta ut retten.
natural_image
Technical diagram showing a mechanical assembly with an inset close-up of a component being inserted (no text or symbols present)natural_image
Technical line drawing of a mechanical assembly with a curved arrow indicating rotation (no text or symbols)natural_image
Illustration of a hand holding a folded metal sheet with directional arrows indicating rotation (no text or symbols)natural_image
Diagram of a hand pressing a curved arrow on a layered rectangular object (no text or symbols)natural_image
Diagram showing a hand adjusting a bed with an arrow indicating upward motion (no text or symbols present)natural_image
Technical line drawing of a mechanical assembly with a screw and bracket (no text or symbols)Utilização diária

natural_image
Technical diagram showing two views of a mechanical component with hatched patterns and internal channels (no text or symbols)natural_image
Pure technical line drawing of a mechanical component or bracket (no text or symbols)natural_image
Technical line drawing of a mesh grating or rack structure with no visible text or symbolsnatural_image
Line drawing of a fish inside a container with an arrow indicating direction (no text or symbols)Caçarola
natural_image
Illustration of a cylindrical device connected to a wire and connected to a beaker with a probe (no text or symbols present)natural_image
Technical line drawing of a mechanical assembly with an inset showing a close-up of a component (no text or symbols present)natural_image
Technical line drawing of a mechanical assembly with a curved arrow indicating rotation (no text or symbols)natural_image
Illustration of a hand holding a folded paper or sheet with arrows indicating rotation (no text or symbols)natural_image
Diagram of a hand pressing down on a layered rectangular object with an arrow indicating motion (no text or symbols)natural_image
Line drawing of a hand holding a device inside a storage cabinet, with an arrow indicating upward motion (no text or symbols)natural_image
Technical line drawing of a mechanical assembly with a screw and bracket (no text or symbols)Uso diario

natural_image
Technical line drawing of a mechanical assembly with two circular insets showing internal components (no text or symbols)natural_image
Pure technical line drawing of a mechanical component or bracket (no text or symbols)natural_image
Technical line drawing of a metal grating or rack structure with no visible text or symbolsnatural_image
Line drawing of a fish being lifted by a net inside a container (no text or symbols)Estofado
natural_image
Illustration of a cylindrical device connected to a wire and connected to a beaker with liquid, no text or symbols present.natural_image
Technical diagram showing a mechanical assembly with an inset close-up of a component (no text or symbols present)natural_image
Mechanical assembly diagram showing a rotating component with an arrow indicating rotation (no text or symbols present)natural_image
Illustration of a hand holding a U-shaped object with arrows indicating rotation (no text or symbols)natural_image
Diagram of a hand pressing a curved arrow on a tilted rectangular object (no text or symbols)natural_image
Diagram showing a hand inserting a device into a storage cabinet, with an arrow indicating upward motion (no text or symbols present)natural_image
Technical line drawing of a mechanical assembly with a screw and bracket (no text or symbols)Daglig användning

- Rare
- Medium
- Well Done