
FRAMTID DOV4-1 - Oven IKEA - Free user manual and instructions
Find the device manual for free FRAMTID DOV4-1 IKEA in PDF.


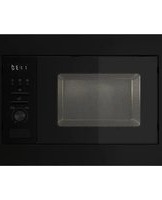
| Product Type | Electric Built-in Oven |
| Brand | IKEA |
| Model | FRAMTID DOV4-1 |
| Installation Type | Built-in |
| Energy Source | Electric |
| Energy Efficiency Class | A |
| Net Volume | 71 L |
| Dimensions (H x W x D) | 59.5 x 59.5 x 54.8 cm |
| Weight | 38 kg |
| Voltage | 230 V / 50 Hz |
| Power Consumption (max) | 3000 W |
| Main Cooking Functions | Convection, Grill, Bake, Defrost, Pizza, Bottom Heat |
| Temperature Range | 50°C – 250°C |
| Display Type | LED digital |
| Control Type | Rotary knobs + touch |
| Cleaning Type | Manual (easy-clean enamel interior) |
| Cooling System | Cool-touch door and automatic ventilation |
| Safety Features | Child lock, auto shut-off, overheat protection |
| Spare Parts Availability | Yes, through IKEA service centers |
| Repairability Index | 7.5/10 |
| Warranty | 5 years (subject to terms) |
| Accessories Included | 1 baking tray, 1 wire shelf, 1 grill rack |
Frequently Asked Questions - FRAMTID DOV4-1 IKEA
User questions about FRAMTID DOV4-1 IKEA
0 question about this device. Answer the ones you know or ask your own.
Ask a new question about this device
Download the instructions for your Oven in PDF format for free! Find your manual FRAMTID DOV4-1 - IKEA and take your electronic device back in hand. On this page are published all the documents necessary for the use of your device. FRAMTID DOV4-1 by IKEA.
USER MANUAL FRAMTID DOV4-1 IKEA
INSTRUCTIONS FOR USE

SAFEGUARDING THE ENVIRONMENT
IMPORTANT NOTES
TROUBLESHOOTING GUIDE
AFTER SALES SERVICE
To make the most of your new oven, read the user's instructions carefully and keep them on hand for consultation in the future.


SAFEGUARDING THE ENVIRONMENT
Disposal of packaging materials
• The packaging material is 100% recyclable and is marked with the recycle symbol. Packing materials should therefore not be thrown away with household rubbish but disposed of as directed by local authorities.

Disposal of old appliances
This appliance is marked according to the European directive 2002/96/EC on Waste Electrical and Electronic Equipment (WEEE).
By ensuring this product is disposed of correctly, you will help prevent potential negative consequences for the environment and human health, which could otherwise be caused by inappropriate waste handling of this product.
IMPORTANT NOTES
Warning:
- Accessible parts will become hot when in use. To avoid burns and scalds children should be kept away. • Not intended for use by unsupervised young children and infirm persons. • Make sure young children are not allowed to play with the appliance.
- This oven is designed solely for use as a household appliance for cooking food. Any other use is prohibited. The manufacturer declines all liability for damage caused by improper or incorrect use.
- Any repairs or servicing must be carried out exclusively by a qualified technician.
- Never expose the oven to atmospheric agents.
- Do not put heavy objects on the doors because they could damage the oven cavities and hinges. Do not cling to the doors.
- Never hang anything heavy on the oven door handles.
- Do not cover the bottom of the ovens with aluminium foil or other objects. • The oven doors must close properly. The door
The symbol on the product, or on the documents accompanying the product, indicates that this appliance may not be treated as household waste. Instead it shall be handed over to the applicable collection point for the recycling of electrical and electronic equipment. Disposal must be carried out in accordance with local environmental regulations for waste disposal. For more detailed information about treatment, recovery and recycling of this product, please contact your local city office, your household waste disposal service or the shop where you purchased the product.
Energy saving
- Only pre-heat the ovens if specified in the cooking table of the Product Description Sheet or in your recipe.
- Use dark, black enamelled baking moulds as they absorb heat very well.
seals must be kept clean.
- Do not pour water directly into the inside of a hot oven. This could damage the enamel coating.
- Fruit juice drippings from the baking tray may leave permanent stains. We recommend the ovens be cleaned before being used again.
- Never drag pots and pans across the bottom of the ovens as this could scratch the coating.
- Residual condensation from cooking could damage the ovens and surrounding kitchen units over time. We recommend that you:
- set the lowest temperature;
- cover food;
- do not store food in the oven;
- dry any wet parts when the oven is cool.
- The front panel and the handle of the oven doors heat up when the appliance is switched on for a long time at high temperatures.
- Never touch the oven with any wet part of the body and do not operate it with bare feet.
- Do not pull the appliance or the power supply cable to disconnect them from the electrical supply.


Keep children away from the following elements as they are sources of danger:
- The oven and its controls, especially when in operation and immediately afterwards to avoid injury.
- Packaging (bags, polystyrene, metal parts, etc.).
- An oven to be scrapped.
☐ Make sure that the electrical cables of other appliances used near the oven do not touch hot parts and are not trapped in the oven doors. Some oven models are equipped with an air cooling system to prevent the front of the oven and cabinet cavity from reaching excessively high temperatures.
Attention: Steam and smoke are vented through two openings located between the control panel and the top oven door and between the two doors. Do not obstruct the vent openings.
Do not place inflammable material in the ovens or nearby: a fire may break out if the appliance is inadvertently switched on. Use oven gloves to remove pans and accessories, when the ovens are hot.
During cooking steam will form in the oven cavity. Please take special care when opening the door. If alcoholic beverages are added when roasting or cooking cakes and sweets (for example, rum, cognac, wine, etc.) bear in mind that alcohol evaporates at high temperatures. Vapours released by the alcohol can catch fire upon coming into contact with the electric heating element. Do not heat sealed containers in the ovens (except for packages specifically designed for this purpose; see the manufacturer's instructions). The pressure that develops inside the packaging might cause it to explode, damaging the appliance. Do not use containers made of synthetic material for cooking (except for packages specifically designed for this purpose; see the manufacturer's instructions). They could melt at high temperatures. Keep an eye on the oven if you are using a lot of fat or oil. Oil and fat can overheat and catch fire! Never pull out fully loaded shelves. Use extreme caution.
Remove the accessories from the ovens and heat them 200°C for about an hour to eliminate the smell of the protective grease and insulating materials. Keep the kitchen window open during this operation.
Before using the oven, remove:
- Stickers on the front and oven doors, except for the rating plate;
- protective cardboard and protective plastic film from the front panel controls and other parts of the appliance;
- any sticky labels from the accessories (for example, under the drip tray).
INSTALLATION
Technical information for the installer
After removing the oven from its packaging, before making the connections place it on the polystyrene foam base to protect it from damage.
Oven installation requires two people. Do not attempt to lift the oven by the door handle. Lift by means of the handles on the side of the oven.
Check that the appliance has not been damaged in transit.
Oven dimensions and kitchen unit dimensions are shown in the figure opposite.
Any adjacent kitchen units must be heat resistant (80°C min). If plastic laminates or cement are not sufficiently heat-resistant, warping, bubbling or detachment of the finish may result. Install the oven in the housing, lifting it by the sides, taking care not to trap the wires of the power supply cable.
For correct ventilation, observe the ventilation opening directions shown in the figure (500 min x 80 mm and 500 min x 50 mm inside the cabinet).
Secure the oven to the kitchen unit with screws (A) as shown.
During oven installation, care must be taken to ensure that the sides do not touch the front edges of the housing or adjacent drawers and doors (see picture).
- Important: do not connect to the power supply until you have finished connecting the oven and cooktop.
- Make sure the appliance is installed and connected to the power supply by a qualified technician in accordance with the manufacturer's instructions and in compliance with local regulations.
- The installer is responsible for the correct electrical connection of the appliances and the observance of the relative safety recommendations.
- The appliance must be connected to the power supply by means of an all-pole disconnect switch with minimum contact gap of 3 mm.
• The law requires that the appliance be earthed.
- Do not use multiple plug adapters or extension leads.
• After the oven has been installed, the electrical components must be concealed.
Make sure that the voltage shown on the rating plate is the same as the domestic power supply voltage.
The rating plate is on the front edge of the oven cavity (visible with oven door open).


Fumes vent
OVEN ACCESSORIES
Accessories supplied depend on the model. The accessories provided with the oven are listed in the Product Description Sheet provided separately (under Accessories).
Drip tray (I)
The drip tray is designed to collect fat and food particles when it is positioned under the grid or as a plate, such as when cooking meat, chicken and fish with or without vegetables. Pour a little water into the drip tray to prevent spatters of fat and smoke.
Baking tray (2)
For cooking biscuits, cakes and pizzas.
Grid (3)
The grid can be used to grill food or as a support for baking trays, cake tins and other cooking receptacles. It can be placed on any of the runners in the ovens. The grid can be inserted with its curved side facing upwards or downwards.
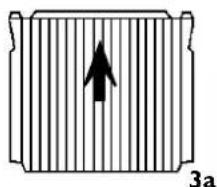
Grid (3a) for Australia only
The grid rear tray guard must be positioned up-right and to the rear of the oven. Follow the arrow indication when inserting in the oven.
Side catalytic panels (4)
The catalytic panels have a special microporous enamel coating that absorbs fat spatters. We recommend an automatic cleaning cycle after cooking particularly fatty food (see "Care and Maintenance").
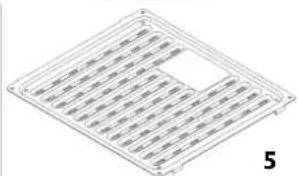
Meat tray (5)
Position the meat tray above the drip tray with the opening positioned towards the door.
Pour some water on the drip tray which can be used from time to time to pour on the meat.
Kit "Grill Pan Set" (6)
The set comprises a grid (6a), an enamel drip tray (6b) and one handle (6c).
This set must be placed on the grid (3) and used with the Grill function.




BOTTOM OVEN FUNCTIONS

Off

Oven light

STATIC
Use when all the food is on the same runner level.
- Pre-heat the oven to the required cooking temperature and place the food inside as soon as the red thermostat indicator light switches off.
- Ideally, the shelf should be on the second runner level when using the static function.

PASTRY/FAN
Use this function when cooking on two different levels.
- Oven preheating is not necessary (except for pizzas and focaccia).
- Switch the position of the dishes in the oven 10 minutes before the end of cooking time.
- Remove the cooked dish and, if necessary, continue cooking the other one for as long as required.

GRILL
Use the grill function to cook small pieces of meat (steaks, sausages) and for making toasts.
- The oven door must be closed during the cooking cycle.
- Preheat the grill for about 5 minutes.
- Arrange the meat on the grid with the drip tray underneath. Pour water in the drip tray to cover the bottom to reduce smoke and fat spatters.
- Turn over the meat about half-way through cooking time.

TURBOGRILL
Ideal for large joints, pork, chicken and roast beef.
- The oven door must be closed during the cooking cycle.
- Place the meat on the grid with the drip tray underneath. Pour water in the drip tray to cover the bottom to reduce smoke and fat spatters.
- Turn over the meat about half-way through cooking time.

DEFROST FUNCTION
Ideal for thawing frozen food to room temperature.
- The food should be inserted in the oven in its wrapping to prevent it from drying out

TURBOFAN
This function is ideal for:
- large fruitcakes
- timbales
- stuffed vegetables
- pizza
- poultry (more than 3 kg)
Oven preheating is not necessary (except for pizzas and focaccia).

FAN/THERMOVENTILED
Use this function when cooking food on more than one level (e.g.: fish, vegetables, pasta).
- Choose foods that require the same cooking temperature.
- Oven preheating is not necessary.
- Remove the cooked dish and, if necessary, continue cooking the other one for as long as required.

BOTTOM HEATING FUNCTION
Use:
- To finish baking fruitcakes or cheesecakes.
- To thicken sauces. Use the lower heating function for the last 10 or 15 minutes of cooking time.




TOP OVEN FUNCTIONS
The functions actually available depend on the model (see the Product Description Sheet supplied separately).
STATIC

Use when all the food is on the same shelf.
Preheat the oven to the required cooking temperature and place the food inside as soon as thermostat indicator light switches off. Ideally, the shelf should be on the second shelf from the bottom when using the static function.
BOTTOM HEATING ELEMENT

To finish cooking fruit or cheese cakes or to thicken sauce.
Use this function for the last 10/15 minutes of cooking time.
GRILL
These functions are ideal for grilling meat (bacon, sausages, steak) and for toasting bread.
Before use, preheat the grill for 5 minutes approx.
Pour some water into the drip tray to reduce smoke and grease spatters and position it into the oven.
Place food on the meat tray or grid.
Turn the meat over about half-way through cooking time.
During cooking leave the oven door open.
The power can be set according to the positions available.
Use this function to grill small pieces of meat (steaks, sausages) and for making toasts.
DUAL VARIABLE GRILL

The power can be set according to the positions available.
Use this function to grill large quantities of food and toast.
CARE AND MAINTENANCE
Important: Do not use water pressure cleaners or steam cleaners.
When you finish cooking; wait for the oven to cool and then clean it to prevent the build-up of baked-on residues.
Exterior of the oven
- Clean with a damp cloth. If it is very dirty, add a few drops of washing up detergent to the water. Wipe with a dry cloth.
- Do not use corrosive or abrasive detergents, which dull the surface. In the event one of these products comes into contact with the oven, immediately clean it using a damp cloth.
- Slight differences in colour on the front of the appliance are determined by the different materials used, such as glass, plastic and metal.
Ovens with aluminium front panel
- Clean using a mild detergent and a soft window cleaning cloth or a microfibre cloth that does not leave fibres on the surface. Wipe horizontally, without exerting pressure.
- Do not use corrosive products, hard sponges or rough cloths. Clean the aluminium surfaces with a dry cloth.
Accessories
- Soak the accessories in water with washing up detergent immediately after use. Food residues can be easily removed using a brush or sponge.
Oven cavity
- Do not use abrasive cleaners or pan scourers. Use special oven cleaners and follow the manufacturer's instructions. • After every use, wait for the oven to cool then clean it to prevent the build-up of baked-on food residues.
- With long cooking times or when cooking on several shelves, especially food with a high water content (pizzas, stuffed vegetables, etc.) condensation may form on the inside of the door and the seal. When the oven is cool, dry the inside of the door with a cloth or sponge.
- Clean the glass of the door with a suitable liquid detergent.
- The oven door may be removed to facilitate cleaning. To clean the upper part of the oven the grill heating element can be lowered (only on some models).
Self-cleaning catalytic side panels and rear cavity (if provided) - Cleaning cycle
- Heat the oven to 200°C when empty and maintain this temperature for about an hour.
- At the end of the cycle and when the oven has cooled, use a damp sponge to remove any food residues.
- Never clean the self-cleaning catalytic panels and rear cavity with abrasive products, rough brushes, pan scourers, or oven cleaner sprays, as they will lose their automatic cleaning properties.



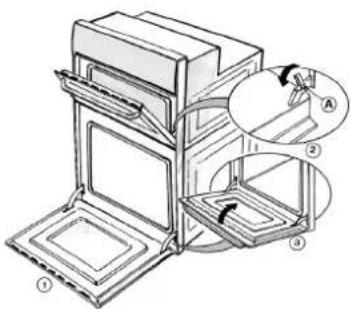
Attention: When carrying out the following operations it is advisable to wear protective gloves. These instructions should be followed carefully both to prevent injury and in order to avoid damaging the oven door or hinges.
How to remove the oven door:
- Open the oven door fully (see fig. 1).
- Lift the two catches and push them forwards as far as they go (see fig. 2).
- Remove the door by closing it partially and lifting it upwards (see fig. 3).
To refit the door:
- Insert the hinges into their grooves and lower the door fully.
- Lower the two catches.
- Close the oven door fully.
Attention: These instructions should be followed carefully both to prevent injury and in order to avoid damaging the oven door or hinges.
Lowering the top oven grill element to clean the oven roof Lowering the bottom oven grill element to clean the oven roof (depending on the model)
- Do not attempt to clean the oven until it is cool.
- To clean the oven roof, pull out the grill element and lower it as far as it will go.
- Clean the oven roof and then return the grill element to its original position.
HOW TO REPLACE THE OVEN LAMP
- Switch off electricity at the mains.
- Unscrew the lamp cover.
- Replace the bulb.
- Refit the lamp cover.
- Switch on the power again at the mains. Note: Use only a replacement bulb of 25 Watts 230 V, Type E-14, T300°C, available from our After Sales Service. Important: Do not use the oven until the lamp cover has been repositioned.


TROUBLESHOOTING GUIDE
Oven not working:
- Check there is mains power and that the oven is connected to the power supply.
- Switch the oven off and then back on again to see if the fault persists.
IMPORTANT:
- Check that the oven control knob is not turned to "0" or to the "lamp" symbol.
- If the electronic programmer (depending on model) display presents the message "5. press the button 2 to reset the oven and then set the clock (see the Programmer Description Sheet supplied separately).
- If the electronic programmer (depending on the model) presents the message "F XX", contact the nearest After Sales Service. Specify in this case the number that follows the letter "F".
- Check that the mechanical programmer (if provided) is turned to "manual".
AFTER SALES SERVICE
Before contacting After Sales Service:
- Try to solve the problem yourself following the points described in "Troubleshooting Guide".
- Switch the appliance off and then back on again to see if the fault persists.
If after the above checks the oven or cooktop are still not working properly, contact the nearest After Sales Service.
Please give:
• A short description of the fault; • the oven type and model; • the service number (number after the word Service on the rating plate), located on the right hand edge of the oven cavity (visible when the oven door is open). The service number is also indicated on the guarantee booklet; • your full address; • your phone number.
SERVICE
0000 000 00000

In the event the oven must be repaired, contact an authorised After Sales Service, (use of original replacement parts and proper repair is guaranteed).
Failure to comply with these instructions may compromise the safety and quality of the product.
DECLARATION OF CONFORMITY CE
• These appliances are intended to come into contact with foodstuffs and they are constructed in compliance with Directive 89/109/EEC. • This appliance is designed to be used for cooking only. Any other use (for example, for room heating) is considered as improper use and potentially dangerous. • The appliance was designed, manufactured and sold in compliance with: - The safety requirements of "Low Voltage" Directive 73/23/EEC; - the protection requirements of EMC Directive 89/336/EEC - the requirements of Directive 93/68/EEC.





- INSTRUCTIONS FOR USE
- SAFEGUARDING THE ENVIRONMENT
- IMPORTANT NOTES
- TROUBLESHOOTING GUIDE
- AFTER SALES SERVICE
- DISPOSAL OF PACKAGING MATERIALS
- DISPOSAL OF OLD APPLIANCES
- WARNING
- ENERGY SAVING
- INSTALLATION
- TECHNICAL INFORMATION FOR THE INSTALLER
- OVEN ACCESSORIES
- BOTTOM OVEN FUNCTIONS
- STATIC
- PASTRY/FAN
- GRILL
- TURBOGRILL
- DEFROST FUNCTION
- TURBOFAN
- FAN/THERMOVENTILED
- BOTTOM HEATING FUNCTION
- TOP OVEN FUNCTIONS
- BOTTOM HEATING ELEMENT
- DUAL VARIABLE GRILL
- CARE AND MAINTENANCE
- EXTERIOR OF THE OVEN
- OVENS WITH ALUMINIUM FRONT PANEL
- ACCESSORIES
- OVEN CAVITY
- SELF-CLEANING CATALYTIC SIDE PANELS AND REAR CAVITY (IF PROVIDED) - CLEANING CYCLE
- HOW TO REMOVE THE OVEN DOOR
- TO REFIT THE DOOR
- HOW TO REPLACE THE OVEN LAMP
- OVEN NOT WORKING
- IMPORTANT
- BEFORE CONTACTING AFTER SALES SERVICE
- DECLARATION OF CONFORMITY CE
Brand : IKEA
Model : FRAMTID DOV4-1
Category : Oven