ZK-RY-10 - Tent Vevor - Free user manual and instructions
Find the device manual for free ZK-RY-10 Vevor in PDF.

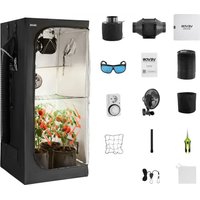
| Product type | Foldable LED Light Studio Box (Studio Tent) |
| Brand | Vevor |
| Model | ZK-RY-10 |
| Power Supply | AC 110-240 V, 50/60 Hz |
| Power | 2-80 W adjustable |
| Color Temperature | 5600 K |
| Color Rendering Index (CRI) | ≥95 |
| Illuminance | 50-10000 Lux |
| Cabinet Dimensions (approx.) | 100 × 100 × 100 cm |
| Frame Material | Metal tubes with plastic connectors |
| Tent Fabric | Silver interior, black exterior |
| Number of LED Panels | 2 |
| Brightness Dimmer | Yes, rotary (clockwise to increase) |
| Included Color Backdrops | 3 canvases (varied colors) |
| Cable Opening | Yes, upper right side |
| Compliance | FCC Part 15, European Directive 2012/19/EC |
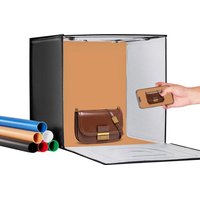
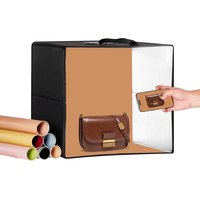
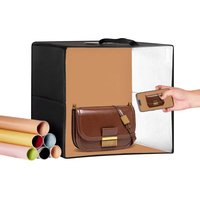
| Recommended Use | Product photography, portable studio |
| Included Accessories | Frame (12 tubes, 8 corners), tent, 2 LED panels, adapter, 3 backdrops |
| Safety | Do not look directly at LEDs; use only the original adapter |
| Maintenance | Clean with a soft dry cloth; avoid moisture |
Frequently Asked Questions - ZK-RY-10 Vevor
User questions about ZK-RY-10 Vevor
0 question about this device. Answer the ones you know or ask your own.
Ask a new question about this device
Download the instructions for your Tent in PDF format for free! Find your manual ZK-RY-10 - Vevor and take your electronic device back in hand. On this page are published all the documents necessary for the use of your device. ZK-RY-10 by Vevor.
USER MANUAL ZK-RY-10 Vevor
Technical Support and E-Warranty Certificate
www.vevor.com/support
Foldable LED Ring Light studio Box USER MANUAL
MODEL: ZK-RY-10
We continue to be committed to provide you tools with competitive price. "Save Half", "Half Price" or any other similar expressions used by us only represent of savings you might benefit from buying certain tools with us compared top brands and does not necessarily mean to cover all categories of tools offered are kindly reminded to verify carefully when you are placing an order with us actually saving half in comparison with the top major brands.
MODEL:ZK-RY-10
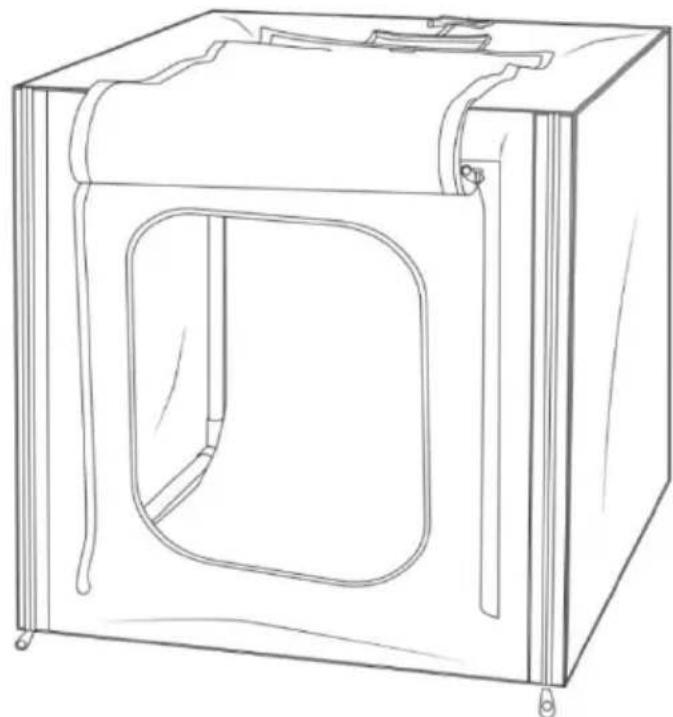
natural_image
Line drawing of a simple rectangular box with a recessed opening and side supports (no text or symbols)(The picture is for reference only, please refer to the actual obje
NEED HELP? CONTACT US!
Have product questions? Need technical support? Please feel fr contact us:
Technical Support and E-Warranty Certificate www.vevor.com/support
This is the original instruction, please read all manual instruction carefully before operating. VEVOR reserves a clear interpretation user manual. The appearance of the product shall be subject to product you received. Please forgive us that we won't inform you there are any technology or software updates on our product.
 | Warning-To reduce the risk of injury, user must read in manual carefully. |
 | This device complies with Part 15 of the FCC Rules. (1) This device is subject to the following two conditions: (1) This device cause harmful interference, and (2) this device must accept interference received, including interference that may cause undesired operation. |
 | This product is subject to the provision of European Di 2012/19/EC. The symbol showing a wheelie bin crossed through indicates that the product requires separate refuse collection in the European Union. This applies to the product and all accessories marked with this symbol. Products are such may not be discarded with normal domestic waste must be taken to a collection point for recycling electric electronic devices |
Thank you very much for choosing Studio Box. Please read this m before using the product as it may contain some information you don know. If you have any questions, please feel free to send us email th amazon.

A. Studio Tent *1
B. Cary Bag *1
C. Corner Pieces *10
D. LED Light Panel *3
E. Power Supply *1
F. Frame Tube *12
G. Backdrop *5
H. Soft Background *1
I. Instructions *1
STUDIO BOX ASSEMBLY
A. Frame Assembly:
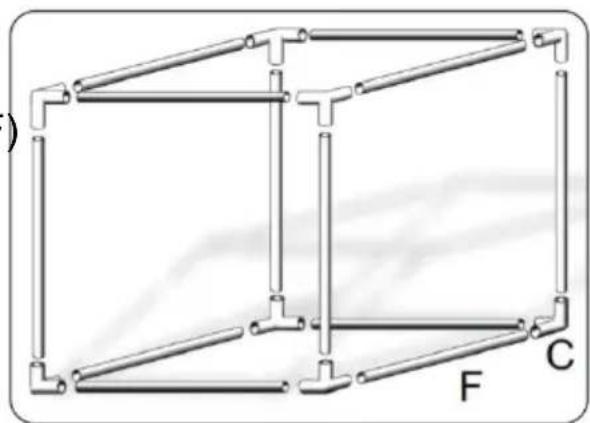
(1)Use 12 pcs frame tubes and 8corner pieces (C) as shown in Figure1 to assemble the studio box.
(F)
natural_image
Pure structural diagram of a 3D frame with labeled points F and C, no text or symbols presentFigure 1
(2) Ensure all of the frame tubes are completely seated into the corne pieces as it will be critical in order for the studio tent to fit over properly. See Figure 2.
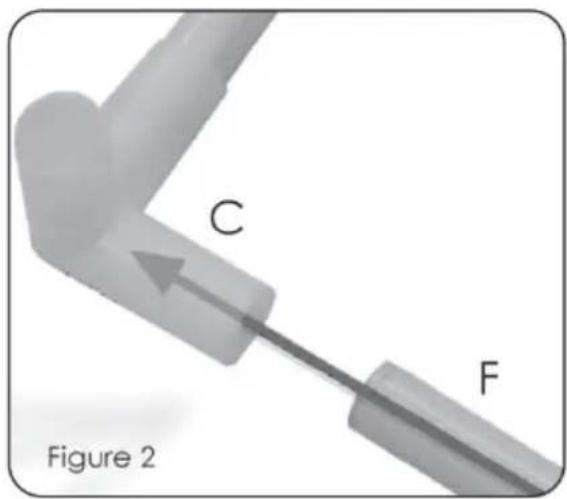
Note: F must be installed in the innermost part of the C. if the installation is not in place, the tent will not fit into the bracket assembling
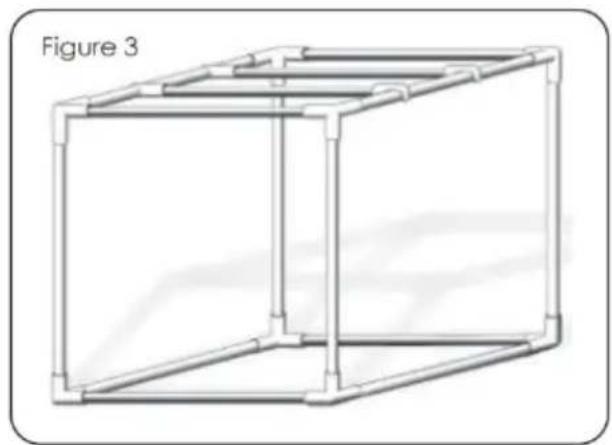
(3)When the framework is finished, it should look like figure 3. it is ready to be covered with the tent.
natural_image
Line drawing of a 3D rectangular frame structure with vertical supports and horizontal connectors (no text or symbols)B. Studio Tent Assembly.
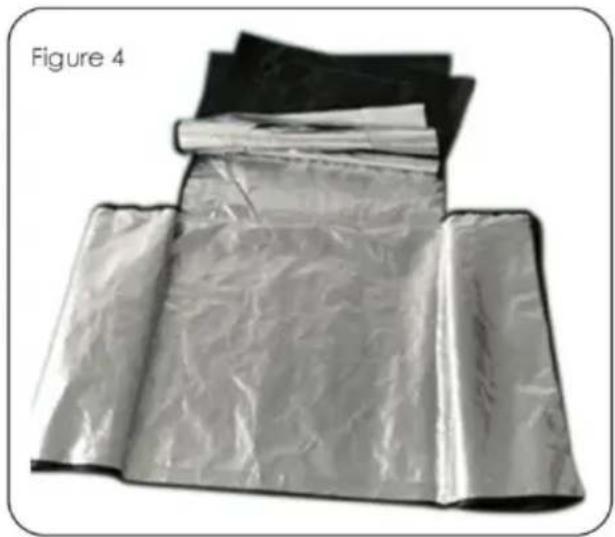
(1)Take out the tent from the bag and spread it out, then you can see and distinguish the front and back, left and right, as well as t and lower parts of the tent. But need to remind you: the inside is the outside is black. (see Figure 4).
natural_image
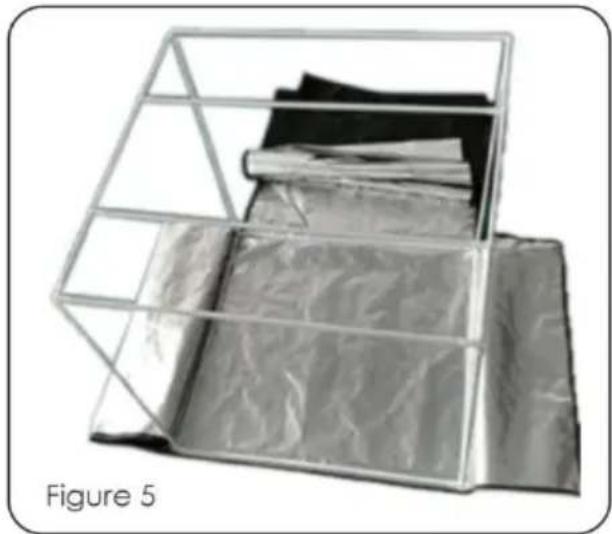
Folded plastic sheet with black and silver bands, labeled Figure 4 (no text or symbols on the sheets themselves)(2) Distinguish the direction of the bracket and place it in the middle tent cloth (figure 3). Notice that the bracket must be stuck in the right place, otherwise the zipper will not be pulled. (as shown in Figure below).
natural_image
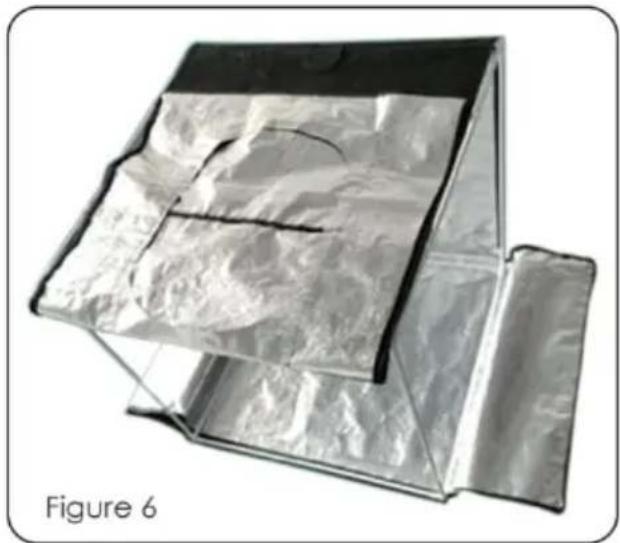
Metallic paper cage with folded sheets inside, labeled Figure 5 (no text or symbols on the diagram itself)(3)Lay the material evenly and flat on the brackets (Figure 6).
natural_image
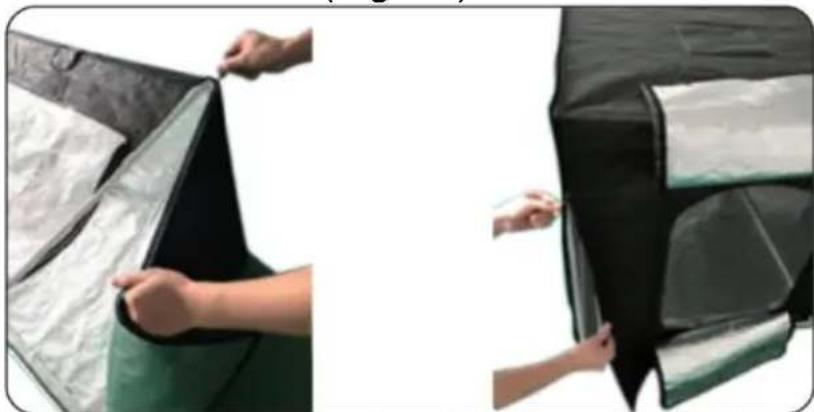
3D rendering of a transparent cube with reflective surface, labeled Figure 6 (no text or symbols on the diagram itself)(4)Connect all the surfaces of the tent through a zipper. The zipper be separated from the left and right sides, pull the zipper complete the bottom of the back (Fig. 7).
natural_image
Two-panel image showing hands installing or adjusting a black-and-white shipping container (no text or symbols visible)Figure 7
C. LED Light Panel Assemble.
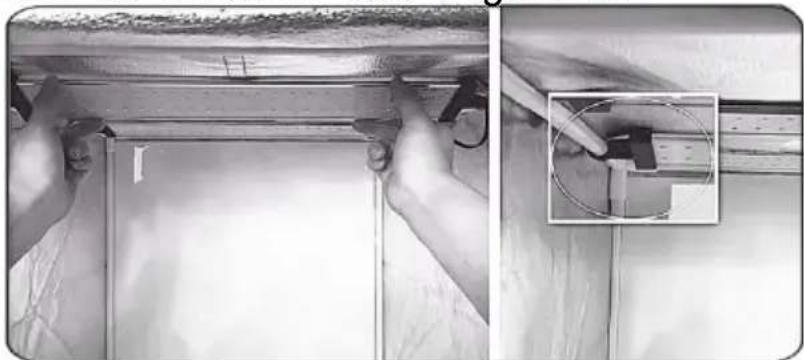
(1) Use two T-shaped (J) separately to clip onto the (D) piece, then use the appropriate position of the (F) tube, then you can adjust the a bit of its illumination at random. See Figure 8.
natural_image
Two-panel black-and-white photo showing hands installing or adjusting a wooden beam, with an inset close-up of a mechanical component (no text or symbols visible)Figure 8.
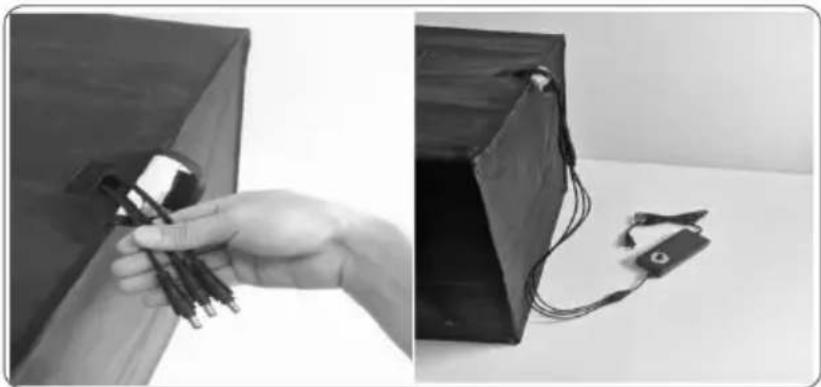
(2)Feed the power cord of the LED Light panel through the small ho the right hand top side of the tent, see Figure 9. Pull as much o power cord through the opening as possible in order to minimize th possibility of having cord visible in your pictures.
natural_image
Two black-and-white photos showing a hand holding a small electronic device and a close-up of a connected electrical component (no text or symbols visible)Figure 9
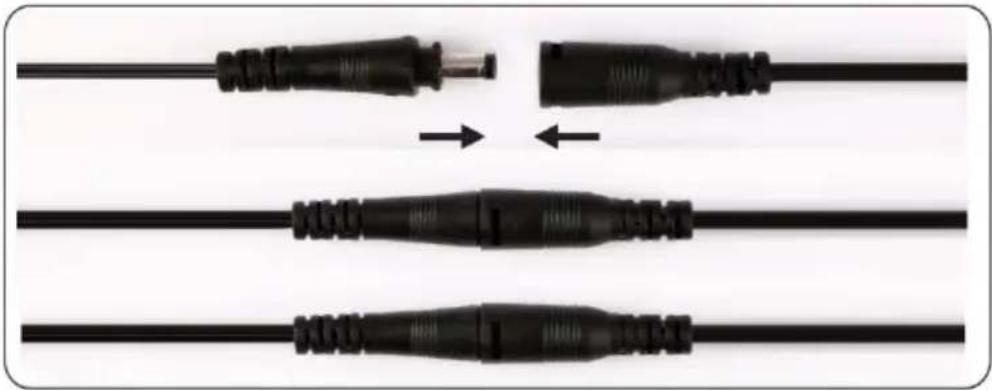
(3)Once the wires are fished through the tent's opening, it is time to connect with the power supply. Connect both LED light panels (D) to power supply (E). Ensure that the connectors are seated completely ensure proper operation. See Figure 10.
natural_image
Three black electrical plug wires with connectors, shown in different orientations (no text or symbols visible)Figure 10
(4)You may now plug the power pack into a power outlet. The lights controlled by the ON/OFF switch on the power cord. See Figure 1'
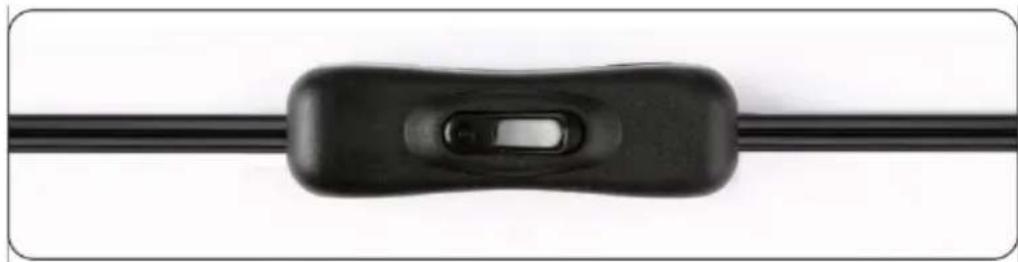
natural_image
Close-up of a black electrical plug connector with a handle and switch (no text or symbols visible)Figure 11
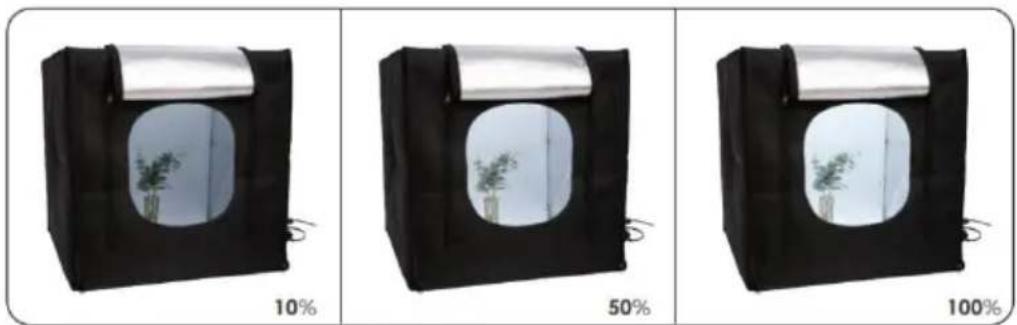
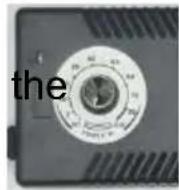
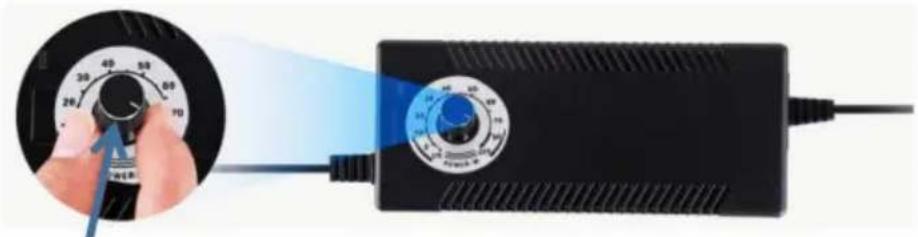
(5)Adjustable Brightness: You can adjust brightness gradually and steady with the dimmer switch, which helps you to take professional picture and photos of small to large sized objects. Figure 12

natural_image
Close-up of a hand holding a rotary dial next to a black electronic device with blue light beam (no visible text or symbols)Brightness adjustable switch Figure 12
●Brightness adjustable switch: Turn off the LED light by turning it
counterclockwise to the end.
●Brightness adjustable switch: Rotate clockwise to end for maximum brightness.
Caution: The light panels are very bright. Do not look directly at illuminated light panel for long time when the light panel is lit.
Note: The factory power adapter must be used, if you use a non-factory power adapter, it will cause damage to the LED light; severe cases, it may cause a fire.
D. Install the Backdrop.
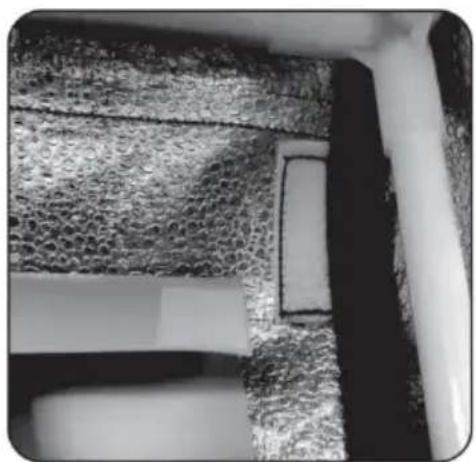
(1)The bag contains 3 kinds of color background (G). Choose a suite product background, tear the Velcro protective film. See Figure 13.
natural_image
Close-up of a textured metallic surface with a rectangular cutout, possibly indicating a mechanical or architectural component (no visible text or symbols)Figure 13
(2) Fit the backdrop under the frame tube to hold it in place (Figure
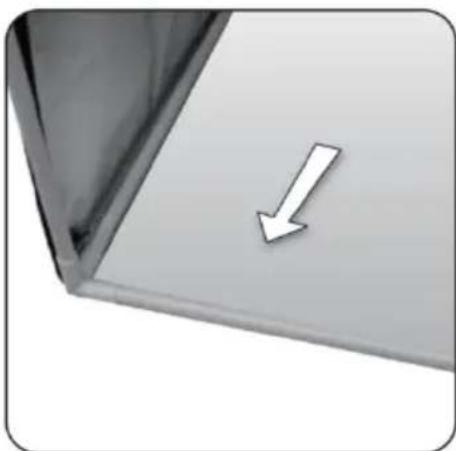
natural_image
Close-up of a white arrow pointing downward on a metallic panel or shelf (no text or symbols visible)Figure 14
E: Using Your Studio Box.
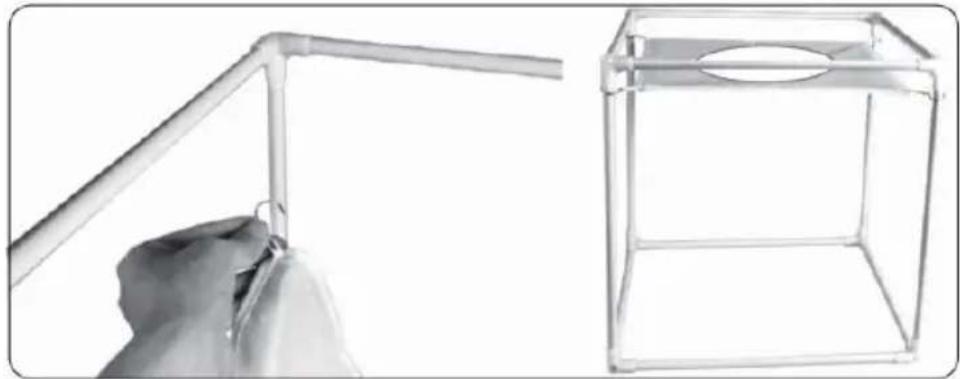
Your studio box comes with a soft background that will clip to the tube, offering you a soft background option, or if draped over the LE will diffuse the light, giving you even more lighting options. See Figur
natural_image
Hand holding a plastic pipe next to a wireframe cube with a circular hole (no text or symbols visible)Figure 15
F: The studio box is now completely assembled and ready to start ta pictures!

natural_image
Black rectangular device with a white recessed opening and a gray top (no text or symbols visible)Specifications
| Enter the power supply | AC110-240V 50/60Hz |
| Actual Power | 2-80W adjustable |
| Illuminance | 50-10000 LM |
| Color Temperature | 5600K |
| Color rendering index | ≥95 |
| Lightbox size | 39FT(100cm) |
- What causes the flickering light?
a. Whether the power adapter is not a factory accessory.
b.Environmental temperature is too high, it may have over temperature protection.
c. Air environment is too humid.
d. There was a problem with the power adapter.
- What may cause weak light?
a. Adjust the dimmer switch to 80% rotation.
b. Whether the power adapter is not a factory accessory.
c. If there are other light sources around.
d. There was a problem with the power adapter.
Manufacturer: Shanghaimuxinmuyeyouxiangongsi
Address: Shuangchenglu 803nong11hao1602A-1609shi, baoshanqu, shanghai 200000 CN.
Imported to AUS: SIHAO PTY LTD, 1 ROKEVA STREETEASTWOOD NS 2122 Australia
Imported to USA: Sanven Technology Ltd., Suite 250, 9166 Anaheim Pla Rancho Cucamonga, CA 91730
| EC | REP |
E-CrossStu GmbH
Mainzer Landstr.69, 60329 Frankfurt am Ma
| UK | REP |
YH CONSULTING LIMITED.
C/O YH Consulting Limited Office 147, Centurion H
London Road, Staines-upon-Thames, Surrey, TW18 4
VEVOR®
TOUGH TOOLS, HALF PRICE
Technical Support and E-Warranty Certificate www.vevor.com/support
VEVOR®
TOUGH TOOLS, HALF PRICE
natural_image
Line drawing of a simple rectangular box with a rounded bottom opening and a side panel, no text or symbols present.A. Tente de studio *1
B. Sac de transport * 1
C. Pièces d'angle *10
D. Panneau lumineux LED
*3 E. Alimentation *1 F.
Tube de cadre *12
G. Toile de fond *5
H. Fond doux *1 I.
Instructions *1
ASSEMBLAGE DE LA BOÎTE DE STUDIO
natural_image
Pure structural diagram of a 3D cube with labeled faces F and C, no text or symbols presentFigure 1
natural_image
Line drawing of a 3D cube structure with visible internal framework (no text or symbols)B. Assemblage de la tente de studio.
natural_image
Folded plastic sheet with crumpled material, labeled as Figure 4 (no text or symbols on the sheet itself)natural_image
Metallic paper cage with folded sheets inside, labeled Figure 5 (no text or symbols on the diagram itself)natural_image
3D rendering of a transparent cube with metallic panels and a curved surface, labeled 'Figure 6' (no text or symbols on the diagram itself)natural_image
Two-panel image showing hands installing or adjusting a black shipping container on a green surface (no text or symbols visible)Figure 7
natural_image
Two-panel image showing hands installing or adjusting a metal panel on a wall, with an inset close-up of a component detail (no text or symbols visible)Figure 8.
natural_image
Two black-and-white photos showing a hand holding wires next to a device and a small electronic device (no visible text or symbols)Figure 9
natural_image
Three black electrical plug wires with connectors, shown in sequence and assembly (no text or symbols)Figure 10
natural_image
Close-up of a black electrical plug connector with a handle and switch (no text or symbols visible)Figure 11
natural_image
Close-up of a textured metallic surface with a rectangular cutout, possibly indicating a repair or inspection (no text or symbols visible)Figure 13
natural_image
Close-up of a white arrow pointing downward on a gray surface, no text or symbols presentFigure 14
natural_image
Two technical diagrams: one showing a hand holding a bent pipe, the other showing a wireframe box with a circular cutout (no text or symbols)Figure 15
natural_image
Black rectangular device with a white square cutout and a light blue top (no text or symbols visible)Caractéristiques
C/O YH Consulting Limited Bureau 147, Centurion House, London Road, Staines-upon-Thames, Surrey, TW18 4AX
VEVOR®
TOUGH TOOLS, HALF PRICE
www.vevor.com/support
natural_image
Line drawing of a simple rectangular box with a rounded bottom opening and a side panel, no text or symbols present.natural_image
Pure structural diagram of a 3D cube with labeled faces F and C (no text or symbols beyond labels)Figure 1
natural_image
Line drawing of a 3D cube structure with visible internal framework (no text or symbols)natural_image
Folded metal foil material with crumpled texture, labeled Figure 4 (no text or symbols on the material itself)natural_image
Metallic paper holder with folded sheets inside, labeled Figure 5 (no text or symbols on the diagram itself)natural_image
3D rendering of a transparent cube with metallic panels and a folded panel, labeled 'Figure 6' (no text or symbols on the diagram itself)natural_image
Two-panel image showing hands installing or adjusting a black shipping container on a green surface (no text or symbols visible)Figure 7
natural_image
Two-panel black-and-white photo showing hands installing or adjusting a ceiling panel, with an inset close-up of a small mechanical component (no visible text or symbols)Abbildung 8.
natural_image
Two black-and-white photos showing a hand holding wires next to a device and a small electronic device (no visible text or symbols)Abbildung 9
natural_image
Three black electrical plug connectors with connector ends, shown in sequence from left to right (no text or symbols)Abbildung 10
natural_image
Close-up of a black electrical plug connector with a handle and switch (no text or symbols visible)Abbildung
natural_image
Close-up of a hand holding a rotary dial next to a black power supply device with blue light beam (no text or symbols visible)natural_image
Close-up of a textured metallic surface with a rectangular cutout, possibly indicating a repair or inspection (no text or symbols visible)Abbildung 13
natural_image
Close-up of a white arrow pointing downward on a gray surface, no text or symbols presentAbbildung 14
natural_image
Two technical illustrations: one showing a hand holding a metal bracket, the other showing a transparent wire cage with a circular cutout (no text or symbols)Abbildung 15
natural_image
Black rectangular device with a white square cutout and a light blue top (no text or symbols visible)Spezifikationen
YH CONSULTING LIMITED. C/O YH Consulting Limited Office 147, Centurion House, London Road, Staines-upon-Thames, Surrey, TW18 4AX
VEVOR®
TOUGH TOOLS, HALF PRICE
elettronica www.vevor.com/support
natural_image
Line drawing of a simple rectangular box with a rounded cutout and side connectors (no text or symbols)natural_image
Pure structural diagram of a 3D cube with labeled faces F and C, no text or symbols presentFigure 1
natural_image
Line drawing of a 3D cube structure with vertical supports and horizontal edges, labeled 'Figure 3' (no text or symbols on the diagram itself)natural_image
Folded plastic sheet with crumpled material, labeled as Figure 4 (no text or symbols on the sheet itself)natural_image
Metallic paper cage with folded sheets inside, labeled Figure 5 (no text or symbols on the diagram itself)natural_image
3D rendering of a transparent cube with metallic panels and a curved surface, labeled 'Figure 6' (no text or symbols on the diagram itself)natural_image
Two-panel image showing hands installing or adjusting a black cover on a green surface, no text or symbols visibleFigure 7
natural_image
Two-panel black-and-white photo showing hands installing or adjusting a ceiling panel; one magnified inset shows a close-up of a component (no text or symbols visible)Figura 8.
natural_image
Two black-and-white photos showing a hand holding wires next to a device and a connected electrical plug (no text or symbols visible)Figura 9
natural_image
Three black electrical plug wires with connectors, shown in sequence and assembly (no text or symbols)Figura 10 (4)
natural_image
Close-up of a black electrical plug connector with a handle and switch (no text or symbols visible)Figura 11
natural_image
Close-up of a textured metallic surface with a rectangular cutout and a small rectangular hole (no text or symbols visible)Figura 13
natural_image
Close-up of a white arrow pointing downward on a gray surface, no text or symbols presentFigura 14
natural_image
Two views of a wire fence structure: one with a hand holding the angle, the other with a circular opening (no text or symbols)Figura 15
natural_image
Black rectangular device with a white recessed opening and a gray top (no text or symbols visible)Specifiche
Importato in AUS: SIHAO PTY LTD, 1 ROKEVA STREETEASTWOOD NSW 2122 Australia
C/O YH Consulting Limited Ufficio 147, Centurion House, London Road, Staines-upon-Thames, Surrey, TW18 4AX
VEVOR®
TOUGH TOOLS, HALF PRICE
natural_image
Line drawing of a simple rectangular box with a rounded bottom opening and side connectors (no text or symbols)natural_image
Pure structural diagram of a 3D cube with labeled faces F and C (no text or symbols beyond labels)Figure 1
natural_image
Line drawing of a 3D rectangular frame structure labeled 'Figure 3' (no text or symbols on the diagram itself)natural_image
Folded plastic sheet with crumpled material, labeled as Figure 4 (no text or symbols on the sheet itself)natural_image
Metallic paper cage with folded sheets inside, labeled Figure 5 (no text or symbols on the diagram itself)natural_image
3D rendering of a transparent cube with metallic panels and a curved surface, labeled 'Figure 6' (no text or symbols on the diagram itself)natural_image
Two-panel image showing hands installing or adjusting a black shipping container on a green surface (no text or symbols visible)Figure 7
natural_image
Two-panel black-and-white photo showing hands installing or adjusting a ceiling panel, with an inset close-up of a small mechanical component (no visible text or symbols)Figura 8.
natural_image
Two black-and-white photos showing a hand holding wires next to a device and a small electronic device (no visible text or symbols)Figura 9
natural_image
Three black electrical connectors with connector ends, shown in sequence from left to right (no text or symbols)Figura 10
natural_image
Close-up of a black electrical plug connector with a handle and switch (no text or symbols visible)Figura 11
Interruptor ajustable de brillo Figura 12
natural_image
Close-up of a textured metallic surface with a rectangular cutout and a small rectangular hole (no text or symbols visible)Figura 13
natural_image
Close-up of a white arrow pointing downward on a gray surface, no text or symbols presentFigura 14
natural_image
Two technical diagrams showing a hand holding a metal bracket and a wireframe box with a circular cutout (no text or symbols)Figura 15
natural_image
Black rectangular device with a white recessed opening and a light blue top (no text or symbols visible)Especificaciones
Importado a AUS: SIHAO PTY LTD, 1 ROKEVA STREETEASTWOOD NSW 2122 Australia
Importado a EE. UU.: Sanven Technology Ltd., Suite 250, 9166 Anaheim Place, Rancho Cucamonga, CA 91730

E-CrossStu GmbH
C/O YH Consulting Limited Oficina 147, Centurion House, London Road, Staines upon Thames, Surrey, TW18 4AX
VEVOR®
TOUGH TOOLS, HALF PRICE
natural_image
Line drawing of a simple rectangular box with a rounded bottom opening and a side panel, no text or symbols present.natural_image
Pure structural diagram of a 3D cube with labeled faces F and C (no text or symbols beyond labels)Figure 1
natural_image
Line drawing of a 3D cube structure with vertical supports and horizontal edges, labeled 'Figure 3' (no text or symbols on the diagram itself)natural_image
Folded plastic sheet with crumpled material, labeled as Figure 4 (no text or symbols on the sheet itself)natural_image
Metallic paper cage with folded sheets inside, labeled Figure 5 (no text or symbols on the diagram itself)natural_image
3D rendering of a transparent cube with metallic panels and a curved surface, labeled 'Figure 6' (no text or symbols on the diagram itself)natural_image
Two-panel image showing hands installing or adjusting a black shipping container on a green surface (no text or symbols visible)Figure 7
natural_image
Two-panel black-and-white photo showing hands installing or adjusting a ceiling panel; one magnified inset shows a close-up of a cable installation detail (no text or symbols visible)Cyfra 8.
natural_image
Two black-and-white photos showing a hand holding wires next to a device and a small electrical clamp (no text or symbols visible)Rysunek 9
natural_image
Three black electrical plug connectors with connector ends, shown in sequence from left to right (no text or symbols)Rysunek 10
natural_image
Close-up of a black electrical plug connector with a handle and switch (no text or symbols visible)Rysunek 11
natural_image
Close-up of a textured metallic surface with a rectangular cutout and a small rectangular hole (no text or symbols visible)Rysunek 13
natural_image
Close-up of a white arrow pointing downward on a gray surface, no text or symbols presentRysunek 14
natural_image
Two views of a wire fence structure: one with a hand holding the angle, the other with a circular opening (no text or symbols)Rysunek 15
natural_image
Black rectangular device with a white recessed opening and a gray top (no text or symbols visible)Dane techniczne
Import do AUS: SIHAO PTY LTD, 1 ROKEVA STREETEASTWOOD NSW 2122 Australii
Import do USA: Sanven Technology Ltd., Suite 250, 9166 Anaheim Place, Rancho Cucamonga, CA 91730
| REPREZENT KE |
C/O YH Consulting Limited Office 147, Centurion House, London Road, Staines-upon-Thames, Surrey, TW18 4AX
VEVOR®
TOUGH TOOLS, HALF PRICE
www.vevor.com/support
VEVOR®
TOUGH TOOLS, HALF PRICE
www.vevor.com/support
Opvouwbare LED-ringlichtstudiobox HANDLEIDING
MODEL: ZK-RY-10
natural_image
Line drawing of a simple rectangular box with a rounded cutout and side connectors (no text or symbols)HULP NODIG? NEEM CONTACT MET ONS OP!
natural_image
Pure structural diagram of a 3D cube with labeled faces F and C, no text or symbols presentFigure 1
natural_image
Line drawing of a 3D cube structure with visible internal framework (no text or symbols)natural_image
Folded metal foil material with crumpled texture, labeled Figure 4 (no text or symbols on the material itself)natural_image
Metallic paper holder with folded sheets inside, labeled Figure 5 (no text or symbols on the main diagram)natural_image
3D rendering of a transparent cube with metallic panels and a folded panel, labeled 'Figure 6' (no text or symbols on the diagram itself)natural_image
Two-panel image showing hands installing or adjusting a black shipping container on a green surface (no text or symbols visible)Figure 7
natural_image
Two-panel black-and-white photo showing hands installing or adjusting a ceiling panel; one magnified inset shows a close-up of a cable installation detail (no text or symbols visible)Figuur 8.
natural_image
Two black-and-white photos showing a hand holding wires next to a device and a small electrical clamp (no text or symbols visible)Figuur 9
natural_image
Three black electrical plug connectors with connector ends, shown in sequence from left to right (no text or symbols)Figuur 10
natural_image
Close-up of a black electrical plug connector with a handle and switch (no text or symbols visible)Afbeelding
natural_image
Close-up of a textured metallic surface with a rectangular cutout, possibly indicating a repair or inspection (no text or symbols visible)Figuur 13
natural_image
Close-up of a white arrow pointing downward on a gray surface, no text or symbols presentFiguur 14
natural_image
Two views of a wire fence structure: one with a hand holding the angle, the other a simple 3D wireframe box (no text or symbols)Figuur 15
natural_image
Black rectangular device with a white square cutout and a light blue top (no text or symbols visible)Specifications
C/O YH Consulting Limited Kantoor 147, Centurion House, London Road, Staines-upon-Thames, Surrey, TW18 4AX
VEVOR®
TOUGH TOOLS, HALF PRICE
Technische ondersteuning en e-garantiecertificaat www.vevor.com/support
VEVOR®
TOUGH TOOLS, HALF PRICE
www.vevor.com/support
Vikbar LED-ringljus studiobox ANVÄNDARMANUAL
MODELL: ZK-RY-10
natural_image
Line drawing of a simple rectangular box with a rounded bottom opening and a side panel, no text or symbols present.natural_image
Pure structural diagram of a 3D cube with labeled faces F and C, no text or symbols presentFigure 1
natural_image
Line drawing of a 3D cube structure with visible internal framework (no text or symbols)natural_image
Folded plastic sheet with crumpled material, labeled as Figure 4 (no text or symbols on the sheet itself)natural_image
Metallic paper cage with folded sheets inside, labeled Figure 5 (no text or symbols on the diagram itself)natural_image
3D rendering of a transparent cube with metallic panels and a curved surface, labeled 'Figure 6' (no text or symbols on the diagram itself)natural_image
Two-panel image showing hands installing or adjusting a black shipping container on a green surface, no text or symbols visible.Figure 7
C. Montering av LED-ljuspanel.
natural_image
Two-panel black-and-white photo showing hands installing or adjusting a ceiling panel, with an inset close-up of a cable being inserted (no visible text or symbols)Figur 8.
natural_image
Two black-and-white photos showing a hand holding wires next to a device; no visible text or symbols.Bild 9
natural_image
Three black electrical plug wires with connectors, shown in different configurations (no text or symbols visible)Figur 10
natural_image
Close-up of a black electrical plug connector with a handle and switch (no text or symbols visible)Figur 11
natural_image
Close-up of textured fabric or stone surface with a rectangular cutout, no visible text or symbolsBild 13
natural_image
Close-up of a white arrow pointing downward on a gray surface, no text or symbols presentBild 14
natural_image
Two technical diagrams showing a hand holding a metal bracket and a wireframe box with a circular cutout (no text or symbols)Bild 15
natural_image
Black rectangular device with a white recessed opening and a light blue top (no text or symbols visible)Specifikationer
C/O YH Consulting Limited Office 147, Centurion House,
London Road, Staines-upon-Thames, Surrey, TW18 4AX
VEVOR®
TOUGH TOOLS, HALF PRICE