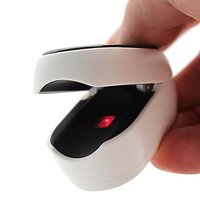
Oxy One - Measuring equipment Geratherm - Free user manual and instructions
Find the device manual for free Oxy One Geratherm in PDF.


| Product Type | Pulse Oximeter |
| Brand | Geratherm |
| Model | Oxy One |
| Indication | Measurement of oxygen saturation (SpO₂) and pulse rate |
| Measurement Technology | Dual-wavelength photoplethysmography (red 660 nm, infrared 905 nm) |
| Display | LED screen with pulse bar graph display |
| SpO₂ Measurement Range | 0% - 100% (display 35% - 100%) |
| SpO₂ Accuracy | ±2% (70% - 100%) |
| Pulse Measurement Range | 25 - 250 bpm |
| Pulse Accuracy | ±2 bpm |
| Low Battery Indicator | Yes |
| Auto Shutdown | After 30 seconds without signal |
| Power Supply | 2 AAA alkaline batteries (1.5 V) |
| Battery Life | Approximately 24 hours (with 600 mAh batteries) |
| Weight (without batteries) | 43 g |
| Sensor Material | Medical silicone |
| Cleaning | 70% ethanol on exterior surfaces and sensor |
| Maintenance | Remove batteries if unused for long; do not immerse |
| IP Classification | IP22 |
| Operating Conditions | Temperature 10°C - 40°C, humidity 15% - 95% |
| Storage Conditions | Temperature -20°C - 50°C, humidity 10% - 95% |
| Warranty / Lifespan | 2 years |
| Included Accessories | Strap, 2 AAA batteries, user manual |
| Safety | Compliant with IEC60601-1-2, ISO10993; do not use with MRI or defibrillator |
| Spare Parts / Repairability | No user-serviceable parts; contact customer service |
Frequently Asked Questions - Oxy One Geratherm
User questions about Oxy One Geratherm
0 question about this device. Answer the ones you know or ask your own.
Ask a new question about this device
Download the instructions for your Measuring equipment in PDF format for free! Find your manual Oxy One - Geratherm and take your electronic device back in hand. On this page are published all the documents necessary for the use of your device. Oxy One by Geratherm.
USER MANUAL Oxy One Geratherm
Instructions for Use
Mode d'emploi
Note: The illustration used in this manual may differ slightly from the appearance of the actual product.
Anmerkungen:
Pulse oximeter for measuring oxygen saturation
CONTENTS
Brief Description of Front Panel.... 23
General Description 23
Declaration 23
Measurement Principle 23
Safety Information 23
Contraindications 26
Components 26
Product Features 27
Intended Purpose 27
Operation Instructions 27
Product Accessories 27
Battery Installation 28
Installing the Lanyard 28
Cleaning and Disinfection 28
Maintenance and Storage 29
Specification 30
Graphical Plots of Data Points.... 31
Assessing the Validity of a SpO2 Reading 33
Troubleshooting 34
Appendix 1 EMC Information.... 35
Possible Problems and Resolutions 39

BRIEF DESCRIPTION OF FRONT PANEL
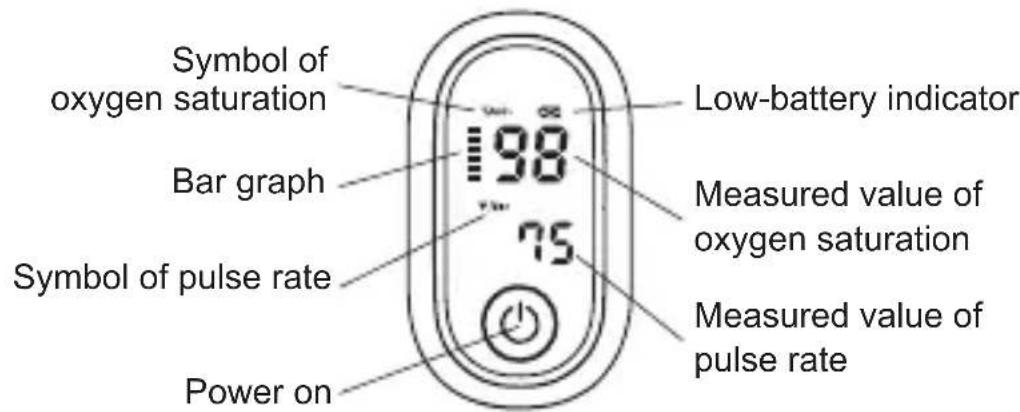
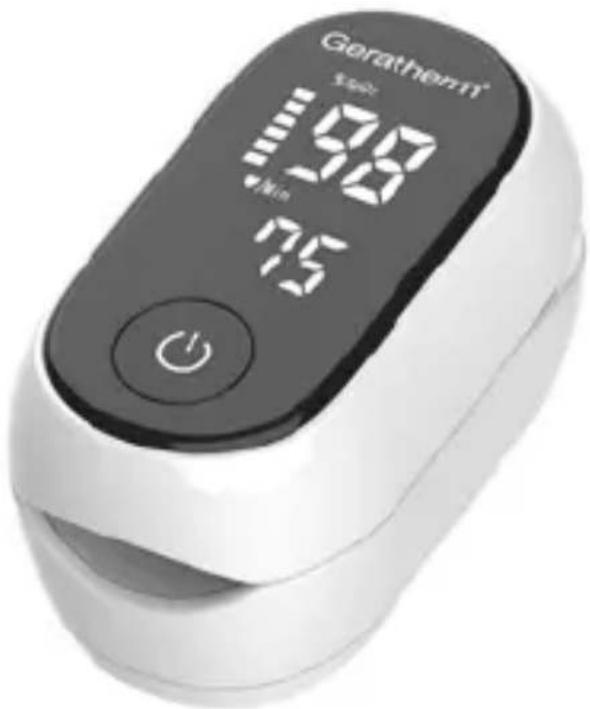
The pulse bar graph displays corresponding with the user's pulse beat. The height of the bar graph shows the user's pulse strength.
GENERAL DESCRIPTION
SpO2 stands for peripheral capillary oxygen saturation. Oxygen saturation is defined as the ratio of oxyhemoglobin (HbO2) to the total concentration of hemoglobin (i.e. Oxyhemoglobin + reduced hemoglobin) present in the blood. It is an important physiological parameter involved in respiration and circulation. The Pulse Oximeter feature herein is small, portable, non-invasive and easy to use. The user only needs to insert a finger into the chamber to measure his/her SpO2 and pulse rate. The oximeter is suitable for home health monitoring.

DECLARATION
EMC of this product complies with IEC60601-1-2 standard. The materials which the user can come into contact with have no toxicity and no action on tissues comply with ISO10993-1, ISO10993-5 and ISO10993-10.
MEASUREMENT PRINCIPLE
Oxygenated blood absorbs light preferentially at 905nm (near infrared light), whereas deoxygenated blood absorbs light preferentially at 660nm (red light). A pulse oximeter works by passing a beam of red and infrared light through a pulsating capillary bed and then measure the amount of red and infrared light emerging from the tissues via a sensor. To improve accuracy, the Oximeter uses a proprietary algorithm to collect data from
pulsatile arterial blood and excludes local noise from the tissues. The relative absorption of light by oxyhemoglobin (HbO 2 ) and deoxyhemoglobin is then calculated according to the Beer-Lambert's law and a quantitative measurement of the users' oxyhemoglobin status i.e. oxygen saturation level (SpO 2 ) is derived.
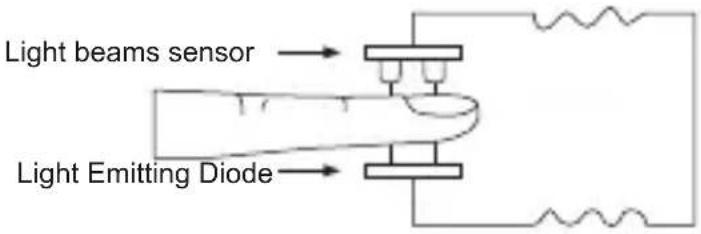
Due to the sensitivity of the pulse oximeter, finger should be kept stationary during measurement. It is recommended that you use this device for measurement before or after sports. Do not use for continuous monitoring.
SAFETY INFORMATION
DANGER
Indicates an imminent hazard that, if not avoided, will result in death or serious injury.
WARNING
Indicates a potential hazard or unsafe practice that, if not avoided, will result in death or serious injury.
Warnings
- Federal (U.S.) law restricts this device to sale by or on the order of a physician.
- Explosive hazard - DO NOT use the equipment in the environment with tinder such as anesthetic.
- DO NOT use the equipment while the patient is being scanned by MRI or CT.
- Don't near active HF surgical equipment and the RFshielded room of an ME system for magnetic resonance imaging, where the intensity of EM disturbances is high.
- Use of this equipment adjacent to or stacked with other equipment should be avoided because it could result in improper operation. If such use is necessary, this equipment and the other equipment should be observed to verify that they are operating normally.

SAFETY INFORMATION
-
Portable RF communications equipment (including peripherals such as antenna cables and external antennas) should be used no closer than 30 cm (12 inches) to any part of the equipment, including cables specified by the manufacturer. Otherwise, degradation of the performance of this equipment could result.
-
The equipment is NOT intended for neonate and infant, and the patient's finger thickness should between 8 to 25.4 mm.
-
It is recommended that the equipment should be inspected before use, when there is obvious damage, stop using the equipment.
-
Discomfort or pain may appear if using the equipment ceaselessly, especially for microcirculation barrier patients, it is recommended that the equipment should not be used on the same finger more than 10 minutes.
-
Please do not insert injured fingers into the pulse oximeter.
-
The equipment is just a clinical diagnosis auxiliary equipment. The physiological data displayed on the equipment are for reference only and cannot be directly used for diagnostic interpretation.
-
It is not recommended to use the equipment in high frequency environment such as electrosurgical equipment.
-
Do not have the equipment immersed in liquid.
-
Prevent children from swallowing the equipment or its accessories. Children must be accompanied by adult guardian when using the device.
-
Please follow local ordinances and recycling instructions regarding disposal or recycling of the equipment and batteries.
-
No maintenance or servicing the device when using.
-
Users are NOT permitted to repair the equipment by themselves.
-
There are NO replaceable components in the equipment
CAUTION
Indicates a potential hazard or unsafe practice that, if not avoided, could result in minor personal injury or product/property damage.

SAFETY INFORMATION
Cautions
- The equipment is designed to measure the percentage of arterial oxygen saturation of functional hemoglobin. Factors that may degrade pulse oximeter performance or affect the accuracy of the measurement include the following:
• Excessive light, such as sunlight or direct home lighting
• Moisture in the equipment
• Finger is beyond recommended size range
• Poor pulse quality
• Venous pulsations
• Anemia or lowhemoglobin concentrations
• Cardio green and other intravascular dyes
• Carboxyhemoglobin
- Methemoglobin
• Dysfunctional hemoglobin
• Artificial nails or fingernail polish
- The light (the infrared is invisible) emitted from the equipment is harmful to the eyes so the user and the maintenance man should not look at the light.
- When the performance changes (such as inaccurate measurement or abnormal display), please stop using it immediately and contact the after-sales service personnel in time.
NOTE: Follow local ordinances and recycling instructions regarding disposal or recycling of the device and device components, including batteries.
CONTRAINDICATIONS
It is not intended to be used when the following happens: pulse oximeter should not be fixed on the tissue injury site; Not used for blood oxygen monitoring in hyperkinetic patients; Not used for blood oxygen measurement under hypoperfusion.
COMPONENTS
The oximeter consists of sensor, electronic circuits, display and plastic enclosures.
NOTES
• The sensor is placed in the middle of the device to which the finger insert.
• The sensor is the Applied Part of the equipment.

PRODUCT FEATURES
• Lightweight, portable and easy to use.
• LED screen shows pulse rate, SpO2
• Large font display.
• Low battery indicator.
• Auto shut down if no signal is detected within 30 seconds.
INTENDED PURPOSE
The pulse oximeter is a reusable device and intended for spot-checking of oxygen saturation and pulse rate for use with the finger of adult patients.
OPERATION INSTRUCTIONS
- Install two AAA batteries into battery compartment correctly.
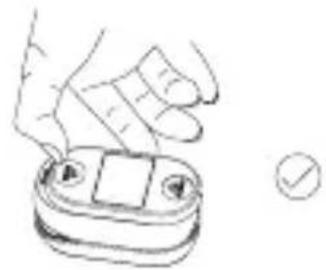
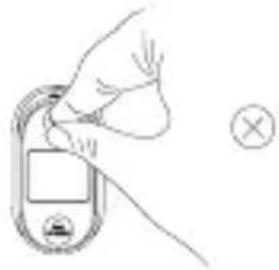
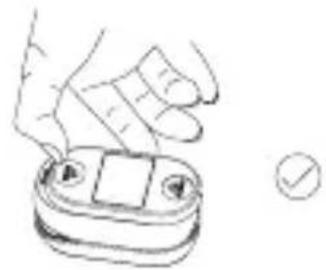
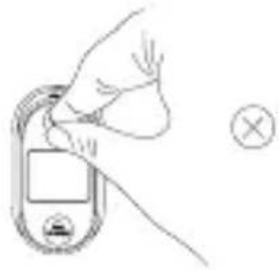
- Insert one of your fingers into the finger chamber of the pulse oximeter.
Note: The fingernail should be facing the top chamber (which contains the sensor). Finger should also be inserted completely into the chamber. Otherwise, measurement will be inaccurate. - Press the power-on button to turn on the pulse oximeter.
- Finger and body should not tremble during measuring.
- Read correct data from displayed screen.
- The sound will alert the users when the blood oxygen levels fall below the 94 % threshold.
Notes:
- When your finger is inserted into the oximeter, your nail surface must be upward.
- The results may be wrong if you do not place your finger thoroughly in the oximeter.
- Please use medical alcohol to clean the silicon which touches the finger inside of oximeter, and use alcohol to clean the test finger before and after each test. (The silicon inside of the oximeter belongs to medical silicon, which has no toxins and does no harm to the skin).
- The sound function is only used to remind the user to check their blood oxygen level and is not used for any alarm purposes. Any time users have doubts about their blood oxygen saturation, they should check their blood oxygen measurement in time.
PRODUCT ACCESSORIES
- Pulse oximeter* 1 pc 3. Batteries* 2 pc
- User manual* 1 pc
- Lanyard* 1 pc

BATTERY INSTALLATION
Put the two AAA batteries into battery compartment in correct polarities.
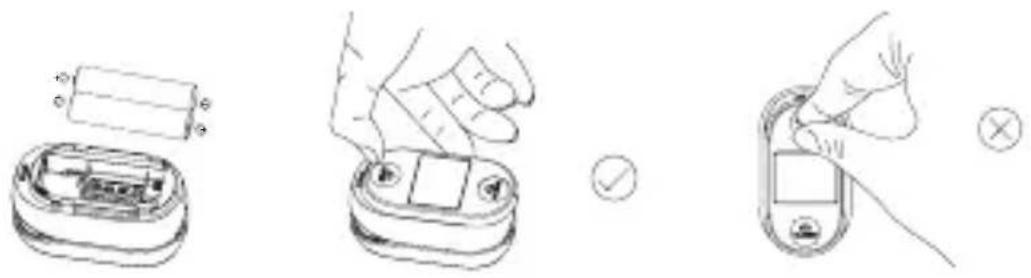
Notes:
- Battery polarities should be correctly installed. Otherwise, damage may be caused to the device.
- Please remove the batteries if the Oximeter will not be used for a long time.
- This product should be kept away from children, because small parts such as battery cases, lanyards can cause children to choke.
INSTALLING THE LANYARD
Thread the thin end of the lanyard through the lanyard hole, and thread the coarse end of the lanyard through the thin end of the Lanyard, and tighten the lanyard.

NOTE
• Do not hang the oximeter on the cable.
CLEANING AND DISINFECTION
1. Cleaning
Your equipment should be cleaned on a regular basis. If there is heavy pollution or lots of dust and sand in your place, the equipment should be cleaned more frequently. Recommended cleaning agents are:
- Ethanol (70 %)
To clean your equipment, follow these rules:
• Shut down the pulse oximeter.
- Clean the display screen using a soft, clean cloth dampened with a glass cleaner.
CLEANING AND DISINFECTION
- Clean the exterior surface of the equipment and probe using a soft cloth dampened with the cleaner.
- Wipe off all the cleaning solution with a dry cloth after cleaning if necessary.
• Dry your equipment in a ventilated and cool place.
To avoid damage to the equipment, follow these rules:
CAUTIONS
• Always dilute according the manufacturer's instructions or use lowest possible concentration.
• Do not immerse the equipment in liquid.
• Do not pour liquid onto the equipment or accessories.
- Never use abrasive materials (such as steel wool or silver polish), or erosive cleaners (such as acetone or acetone-based cleaners).
- If you spill liquid onto the equipment, contact us or your service personnel.
2. Disinfection
Clean the pulse oximeter before disinfecting it. The recommended disinfectant is ethanol 70 %. Disinfection steps are the same as cleaning. Do not disinfect the instrument by using high-temperature/high-pressure disinfecting gas.
⚠️ Never use ETO or formaldehyde for disinfection.

MAINTENANCE AND STORAGE
- Replace the batteries in time when low battery indicator flashes.
- Clean the surface of the fingertip oximeter before use.
- Remove the batteries inside the battery cassette if the oximeter will not be operated for a long time.
- It is best to preserve the product in a place where the ambient temperatures is -20°C - 50°C and relative humidity is 10% - 95%
- It is recommended that the product should be kept in a dry environment anytime. A wet ambient might affect its lifetime and even might damage the product.
- Avoid exposure to direct sunlight.
- Avoid excessive radioactive infrared rays or ultraviolet rays.
- Please follow the law of the local government to deal with used battery.
SPECIFICATION
- Display Type: LED
- SpO2 :
Measurement range: 0 % - 100 %
Display range: 35 % - 100 %
Resolution: 1 %
Accuracy: ±2 % for 70 % - 100 %; less than 70 % is unspecified.
- Pulse Rate:
Measurement range: 25 bpm - 250 bpm
Resolution: 1 bpm
Accuracy: ±2 bpm
Pulse Intensity: Bar graph indicator
- Power Requirements:
Two AAA alkaline Batteries
Power consumption: 30 mA (Normal)
Low battery indication: When the battery voltage is 1.9 V ± 0.2 V , the oximeter will shut down.
Battery Life: Two AAA 1.5 V, 600 mAh alkaline batteries could be continuously operated as long as 24 hours.
- Dimension: 63.5 mm (L) X 36 mm (W) X 34 mm (H)
Weight: 43 g (without battery)
- Environment Requirements: Temperature: 10 °C - 40 °C
Humidity (non-condensing): 15% – 95%
Atmospheric pressure: 70 kPa-106 kPa
- Storage/transportation conditions
Temperature: -20 °C - 50 °C
Humidity (non-condensing): 10% - 95%
Atmospheric pressure: 70 kPa - 106 kPa
-
Measurement Performance in Low Perfusion Condition: 0.3%
-
Safety Classification
Type of protection against electric shock: Internally powered equipment
Degree of protection against electric shock:
Type BF-Applied part (non-defibrillation proof)
Operating mode: Spot checking
Protection Against Harmful Ingress of Water or Particular Matter: IP22

SPECIFICATION
- Range of the peak wave lengths: RED: 660 nm/IR: 905 nm
- Maximum optical output power: 1.2 mW
- Use-life: Two years
Note:
- SpO2 and pulse rate accuracy are the essential requirements.
- There is no alarm that includes the capability to detect an Sp2Cor pulse rate physiological alarm condition is available.
- Data update duration is not applicable since it is not intended to be connected with other device to display the reading
- The oximeter is for spot checking, frequency of use is not applicable.
- There will be no reading if the oximeter is not well fitted.
GRAPHICAL PLOTS OF DATA POINTS
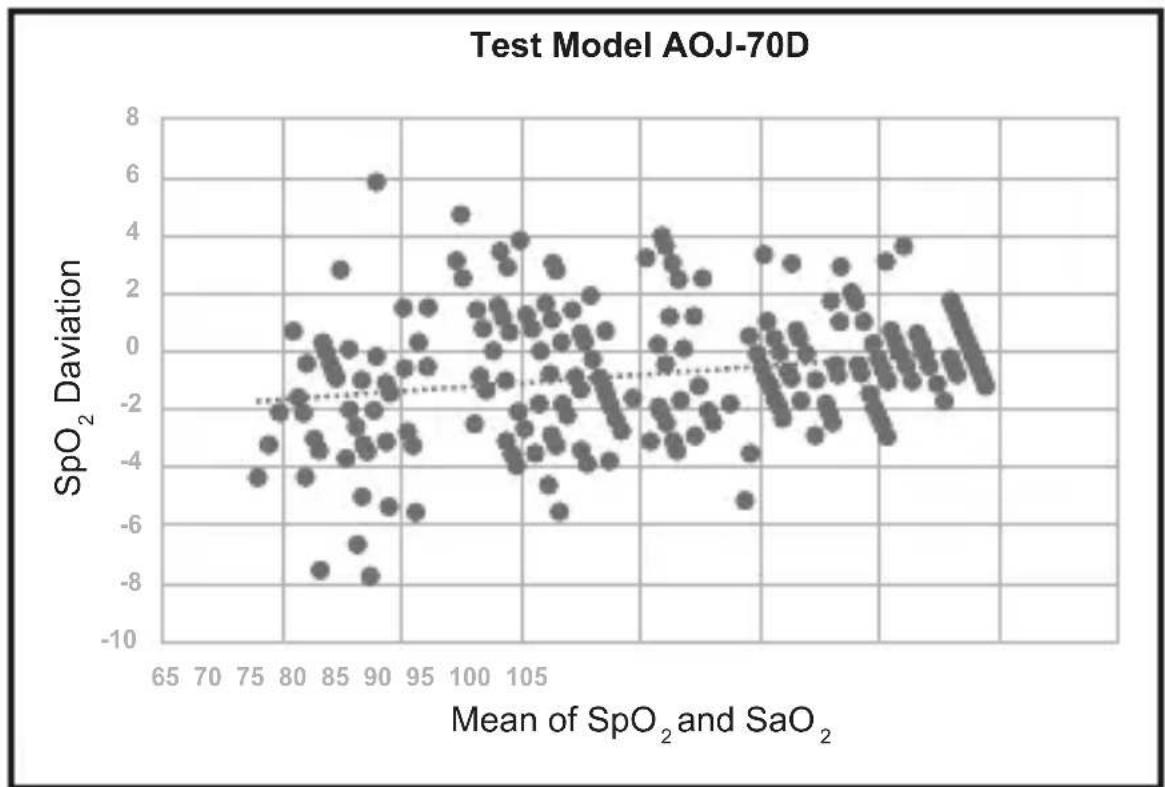
Bland-Altman graph for SpO2-SaO2

GRAPHICAL PLOTS OF DATA POINTS
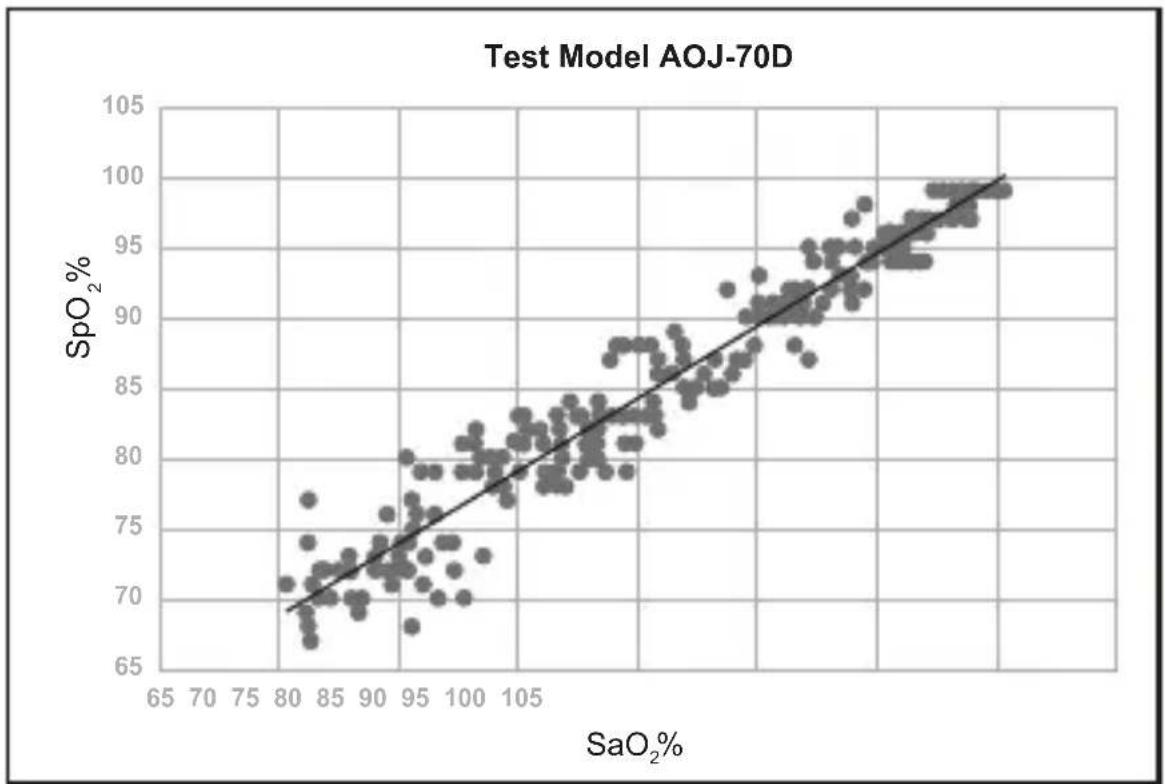
The regression line of the measured data

ASSESSING THE VALIDITY OF A SPO 2 READING
You can check the quality of the bar graph and the stability of the SpO2 values on the Patient Monitor to assess whether the sensor functions properly and whether the SpO2 readings are valid. Always use these two indications simultaneously to assess the validity of a SpO2 reading.
NOTE:
- The SpO2 accuracy has been validated in human studies against arterial blood sample reference measured with a CO-oximeter. Pulse oximeter measurements are statistically distributed, only about two-thirds of the measurements can be expected to fall within the specified accuracy compared to CO-oximeter measurements. The volunteer population in the studies composed of local healthy men and women from age 18 to 46, with variations of skin pigmentations. And the accuracy cannot be assessed by a function tester.
- The pulse rate accuracy is obtained by comparison to the pulse rate generated with an arterial oxygen simulator (also an electronic pulse simulator).
- Generally, the quality of the pulse rate bar graph reflects the quality of the light signals obtained by the sensor. A bar graph of poor quality manifests a decline of the signal validity. On the other hand, the stability of the SpO2 values also reflects the signal quality. Different from varying SpO2 readings caused by physiological factors, unstable SpO2 readings are resulted from the sensor's receiving signals with interference. The problems mentioned above may be caused by patient movement, wrong sensor placement or sensor malfunction. To obtain valid SpO2 readings, try to limit patient movement.

TROUBLESHOOTING
| Trouble Possible Reason Solution | ||
| The equipment can't be turned on. | The battery is drained away or almost drained away. | Please replace battery. |
| The battery installation is incorrect. | Install the battery over again. | |
| The malfunction of the equipment. | Please contact the service personnel. | |
| The display is off suddenly. | The equipment is set to shut down automatically in 30 seconds without any operations. | Normal |
| The battery is almost drained away. | Please replace battery. | |
| The SpO2 and Pulse Rate are not displayed stably. | The thoroughfare from photo detector to light emitting diode was sheltered by some objects. | Check and clean the inside of the probe especially the two windows of sensors. |
| The finger is shacking or the user is moving. | The user needs to keep still. | |
| The finger is not placed inside deep enough. | Place the finger properly and try again. | |
| The finger's size is too big or too small. | Select the correct size finger to measure. | |
| Excessive ambient light. Avoid the excessive ambient light irradiation. | ||
| Cyclical fluctuations in pulse rate values. | If the measurement is proper, the user might has arrhythmia. Please consult with the doctor. | |
| The SpO2 and Pulse Rate can't be displayed normally. | The finger is not properly positioned. | Place the finger properly and try again. |
| The patient's SpO2 is too low to be detected. | Try again, go to a hospital for a diagnosis if you are sure the equipment works all right. | |

APPENDIX 1 EMC INFORMATION
| Guidance and manufacturer's declaration-Electromagnetic emission | ||
| Pulse Oximeter is intended for use in the electromagnetic environment speci-fied below. The customer or the user of the Model AOJ-70D should assure that it is used in such an environment. | ||
| Emissions Compliance | Electromagnetic | environment - guidance |
| RF emissions CISPR 11 | Group 1 The Pulse | se Oximeter uses RF energy only for its internal func-tion. Therefore, its RF emissions are very low and are not likely to cause any interference in nearby electronic equipment. |
| RF emissions CISPR 11 | Class B The Pulse | Oximeter is suitable for use in all establishments, includ-ing domestic establishments and those directly connected to the public low-voltage power supply network that supplies buildings used for domestic purposes. |
| Harmonic emissions IEC61000-3-2 | N.A. N.A. | |
| Voltage fluctuations/flicker emissions IEC61000-3-3 | N.A. | |


| Guidance and manufacturer's declaration - electromagnetic Immunity | ||||||||
| The Pulse Oximeter is intended for use in the electromagnetic environment specified below. The customer or the user of Pulse Oximeter should assure that it is used in such an environment. | ||||||||
| Radiated RF IEC 61000-4-3 (Test specifications for ENCLOSURE PORT IMMUNITY to RF wireless communications equipment) | Test Frequency (MHz) | Band (MHz) | Service | Modulation | Maximum Power (W) | Distance (m) | IEC 60601-1-2 Test Level (V/m) | Compliance level (V/m) |
| 385 380 | - 390 TETRA | 400 | Pulse modulation 18 Hz | 1.8 0 | 3 27 27 | |||
| 450 430 | - 470 | GMRS 460, FRS 460 | FM ± 5 kHz devi-ation on 1 kHz sine | 2 0.3 | 28 28 | |||
| 710 | 704 - 787 LTE Band 13, 17 | Pulse modulation 217 Hz | 0.2 0 | 3 9 9 | ||||
| 745 | ||||||||
| 780 | ||||||||
| 810 | 800 - 960 | GSM 800/900, TETRA 800, iDEN 820, CDMA 850, LTE-Band 5 | Pulse modulation 18 Hz | 2 0.3 | 28 28 | |||
| 870 | ||||||||
| 930 | ||||||||
APPENDIX 1 EMC INFORMATION
| Radiated RF IEC 61000-4-3 (Test specifications for ENCLOSURE PORT IMMUNITY to RF wireless communications equipment) | 1720 | 1700 - 1990 | GSM 1800;CDMA 1900;GSM 1900;DECT;LTE Band 1, 3, 4, 25;UMTS | Pulse modulation217 Hz | 2 0.3 | 28 28 | ||
| 1845 | ||||||||
| 1970 | ||||||||
| 2450 | 2400 - 2570 | Bluetooth,WLAN,802.11 b/g/n,RFID 2450,LTE Band 7 | Pulse modulation217 Hz | 2 0.3 | 28 28 | |||
| 5240 | 5100 - 5800 | WLAN 802.11 a/n | Pulse modulation217 Hz | 0.2 0 | 3 9 955 | 00 | ||
| 5785 |

APPENDIX 1 EMC INFORMATION
| Guidance and manufacturer's declaration - Electromagnetic immunity | |||
| The Pulse Oximeter is intended for use in the electromagnetic environment specified below. The customer or the user of Pulse Oximeter should assure that it is used in such an environment. | |||
| Immunity test IEC 60601 test level | Compliance level | Electromagnetic environ-ment-guidance | |
| Electrostatic discharge (ESD) IEC 61000-4-2 | ±8 kV contact ±2 kV, ±4 kV, ±8 kV, ±15 kV air | ±8 kV contact ±2 kV, ±4 kV, ±8 kV, ±15 kV air | Floors should be wood, concrete or ceramic tile. If floors are covered with synthetic material, the relative humidity should be at least 30 %. |
| Electrical fast transient/burst IEC 61000-4-4 | Not appli-cable | Not appli-cable | |
| Surge IEC 61000-4-5 | Not appli-cable | Not appli-cable | |
| Voltage dips, short interruptions and voltage variations on power supply input lines IEC 61000-4-11 | Not appli-cable | Not appli-cable | |
| Power frequency magnetic field IEC 61000-4-8 | 30 A/m 30 A/m 50Hz/60Hz | Power frequency 50Hz/60Hz | magnetic fields should be at levels characteristic of a typical location in a typical commercial or hospital environment. |
| Conducted RF IEC 61000-4-6 | Not appli-cable | Not appli-cable | |
| Radiated RF IEC 61000-4-3 | 10 V/m 80 MHz – 2.7 GHz 80 % AM at 1 kHz | 10 V/m 80 MHz – 2.7 GHz 80 % AM at 1 kHz | |
| NOTE: UT is the a.c. mains voltage prior to application of the test level | |||

POSSIBLE PROBLEMS AND RESOLUTIONS
| Problems Possible Reason Solution | ||
| The Oximeter fails to display the blood oxygen saturation levels and/or pulse rate. | 1. The finger is not placed between the sensor and the Light Emitting Diode.2. The user's blood oxygen is too low to be detected. | 1. Make sure that the finger is placed right in between the sensor and the Light Emitting Diode.2. Make sure nothing is restricting your blood flow. |
| SpO2 or PR is shown unstably placed between the | 1. The finger is not sensor and the Light Emitting Diode.2. The user is moving his/her finger and/or body. | 1. Make sure that the finger is placed right in between the sensor and the Light Emitting Diode.2. Try to stay still during measurement. |
| The oximeter can not be powered on. | 1. The batteries are drained.2. The batteries are incorrectly installed.3. The Oximeter is defective and/or damaged. | 1. Replace the batteries.2. Install the battery correctly.3. Contact the distributor. |
| The screen is suddenly off. | 1. Without use, the oximeter will be automatically shut down within 30 seconds.2. The batteries are drained. | 1. This is normal.Just turn on the pulse oximeter again.2. Replace the batteries. |
There are no user-serviceable parts inside the oximeter. The cover should only be removed by qualified service personnel. Do not spray, pour, or spill any liquid on the oximeter, its accessories, connectors, switches, or openings in the enclosure as this may damage the oximeter.

Geratherm®
oxy one
MODE D'EMPLOI

CARACTÉRISTIQUES DU PRODUIT
ACCESSOIRES POUR PRODUITS
REMARQUE
- Dimension : 63,5 mm (L) X 36mm (L) X 34mm (H)
Nota:
63.5 mm (L) × 36 mm (L) × 34 mm (H)
MANUAL DE INSTRUÇÕES
POSSÍVEIS PROBLEMAS E RESOLUÇÕES
Notes:
Shenzhen AOJ Medical Technology Co., Ltd.
Room 301&4F, Block A, Building A,
Jingfa Intelligent Manufacturing Park,
Xiaweiyuan, Gushu Community, Xixiang Street,
Bao'an District, 518126
Shenzhen
China

Share Info GmbH
Heerdter Lohweg 83,
40549 Düsseldorf
Germany

3rd Floor, Office C, Townend House, Park Street, Walsall,
West Midlands, WS1 1NS
United Kingdom

Geratherm Medical GERMANY GmbH
Fahrenheitstraße 1
99331 Geratal
Germany
Phone: +49 36205 980
www.geratherm.com
PUOMOO0004V02
2025-07


- ANMERKUNGEN
- PULSE OXIMETER FOR MEASURING OXYGEN SATURATION
- CONTENTS
- BRIEF DESCRIPTION OF FRONT PANEL
- GENERAL DESCRIPTION
- DECLARATION
- MEASUREMENT PRINCIPLE
- SAFETY INFORMATION
- DANGER
- WARNING
- WARNINGS
- CAUTION
- CAUTIONS
- CONTRAINDICATIONS
- COMPONENTS
- NOTES
- PRODUCT FEATURES
- INTENDED PURPOSE
- OPERATION INSTRUCTIONS
- PRODUCT ACCESSORIES
- BATTERY INSTALLATION
- INSTALLING THE LANYARD
- NOTE
- CLEANING AND DISINFECTION
- CLEANING
- DISINFECTION
- MAINTENANCE AND STORAGE
- SPECIFICATION
- GRAPHICAL PLOTS OF DATA POINTS
- ASSESSING THE VALIDITY OF A SPO 2 READING
- GERATHERM®
- OXY ONE
- CARACTÉRISTIQUES DU PRODUIT
- ACCESSOIRES POUR PRODUITS
- REMARQUE
- NOTA
- MANUAL DE INSTRUÇÕES
Brand : Geratherm
Model : Oxy One
Category : Measuring equipment