M1K-ZK5-100 - Milling machine Vevor - Free user manual and instructions
Find the device manual for free M1K-ZK5-100 Vevor in PDF.

User questions about M1K-ZK5-100 Vevor
0 question about this device. Answer the ones you know or ask your own.
Ask a new question about this device
Download the instructions for your Milling machine in PDF format for free! Find your manual M1K-ZK5-100 - Vevor and take your electronic device back in hand. On this page are published all the documents necessary for the use of your device. M1K-ZK5-100 by Vevor.
USER MANUAL M1K-ZK5-100 Vevor
Affordable. Reliable. Home Improvement.
Biscuit Joiner
Model:M1K-ZK5-100


Please scan the QR code to see a video on how to use it.
VEVOR
Affordable. Reliable. Home Improvement.
Biscuit Joiner
MODEL: M1K-ZK5-100

natural_image
Exterior view of a power tool with metal frame and blade (no text or symbols visible)This is the original instruction, please read all manual instructions carefully before operating. VEVOR reserves a clear interpretation of our user manu The appearance of the product shall be subject to the product you rece Please forgive us that we won't inform you again if there are any techr or software updates on our product.
 | Warning-To reduce the risk of injury, user must read instructions manual carefully. |
 | This device complies with Part 15 of the FCC Rules. is subject to the following two conditions:(1)This device not cause harmful interference, and (2)this device must any interference received, including interference that may cause undesired operation. |
 | This product is subject to the provision of European D 2012/19/EC. The symbol showing a wheelie bin crossed through indicates that the product requires separate refu collection in the European Union. This applies to the p and all accessories marked with this symbol. Products as such may not be discarded with normal domestic w must be taken to a collection point for recycling electri electronic devices |
When using electric machines always observe the safety regulation applicable in your country to reduce the risk of fire, electric shock and personal injury.
Read the following safety instructions. Keep these instructions in safe place.
Sawdust and splinters must not be removed while the machine is running.
Do not use cutting discs or circular saw blades in the machine.
Protect saw blades against shocks and impacts.
Only use properly sharpened blades, otherwise increased cutting force will shatter the workpiece.
Before use, inspect the saw blade for any damage. Do not use sa blades which are cracked, ripped, or otherwise damaged.
Make sure that the workpiece is sufficiently supported or clamped. your hands away from the surface to be cut.
Use the machine only with the auxiliary handle.
When saw blades have to be mounted on the thread of the spindle make sure that the spindle has sufficient thread.
Make sure that the saw blade has been mounted and fastened pro Do not use reducing rings or adapters to make the saw blade fit pro
Apply the machine to the work piece only when the machine is sw on.
When working with the machine always hold the machine firmly with both hands and provide for a secure stance.
Persons under 16 years of age are not permitted to operate this machine.
Always wear safety goggles and hearing protection. If desired or required also use another protection for example an apron or helmet.
Always disconnect the plug from the socket before carrying out any work on the machine. Only plug in when the machine is switched of
Keep mains lead clear from working range of the machine. Always the cable away behind you.
Do not stop the blade by hand after switching off.
Lowering and raising the blade must be a smooth operation.
ELECTRIC SAFETY
Always check that the power supply corresponds to the voltage on rating plate.
Your machine is double insulated in accordance with EN 50144; therefore no earth wire is required.
Replacing cables or plugs
Immediate throw away old cables or plugs when they have been replaced by new ones. It is dangerous to insert the plug of a loose the wall socket.
Using extension cables
Only use an approved extension cable suitable for the power input machine. The minimum cable size is 1.5 mm^2 .
When using a cable reel always unwind the reel completely.
PRODUCT INFORMATION
The Biscuit Jointer is suitable for cutting grooves for biscuit dowel joints wood, plywood, chipboard, fiberboard, plexiglass, and artificial marble.
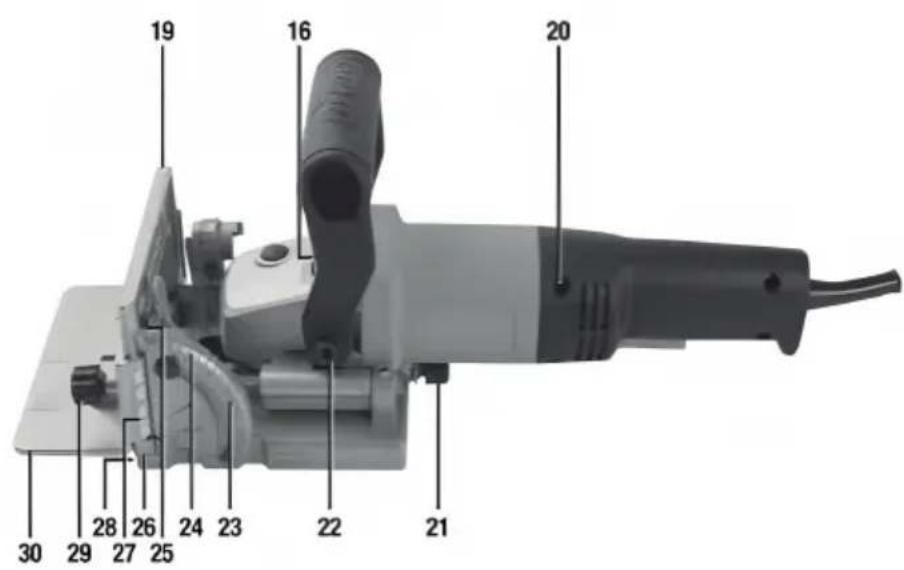
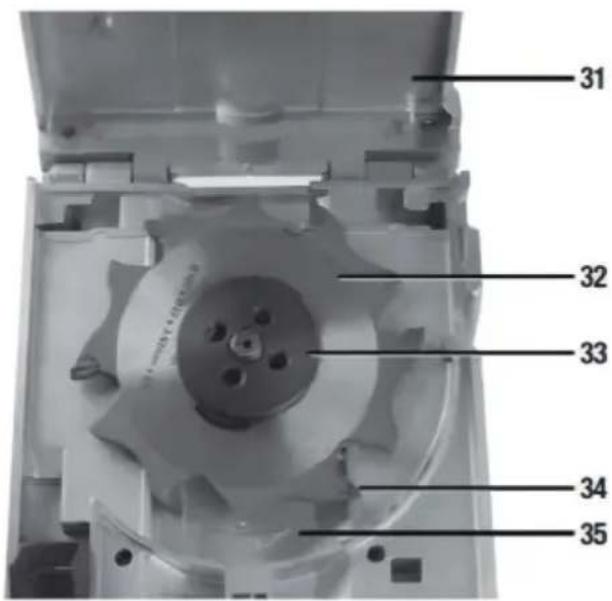
| 1. Auxiliary Handle2. Spindle Lock Button3. Direction Indicator4. Angle Lock5. Face Centre Indicator6. Fence Biscuit Edge Indicator7. Fence Blade Centre Indicator8. Fence Biscuit Edge Indicator9. Non-Slip Pad10. Depth Indicator11. Turret Stop12. Base13. Depth Stop14. Depth Stop Locking Nut15. Dust Port16. Motor Vent17. On/Off Trigger Switch18. Main Handle | 19. Face20. Handle Screws (x 4)21. Blade Access Knob22. Auxiliary Handle Bolt (x 2)23. Click Stop (0°,45° & 90°)24. Angle Scale25. Angle Indicator26. Centre Blade Indicator27. Fence Height Scale28. Blade Slot29. Fence Locking Knob30. Fence31. Base Lid32. Saw Blade33. Threaded Blade Flange34. Blade Tooth Tip35. Direction Indicator |
Intended Use
Portable hand-held mains-operated power tool with a small circular saw blade cuts slots into wood to create joints suitable for inserting various sizes of wo biscuits.


Unpacking Your Tool
- Carefully unpack and inspect your tool. Fully familiarise yourself with all its features and functions
- Ensure that all parts of the tool are present and in good condition. If any missing or damaged, have such parts replaced before attempting to use this
Before Use
WARNING: Always disconnect this tool from the power supply before attaching removing accessories, or making any adjustments.
IMPORTANT: Ensure the blade is securely fitted before first use. See ‘Chang the saw blade’
Auxiliary Handle
• Fit the Auxiliary Handle (1) using the supplied Auxiliary Handle Bolts (22)
- Adjust the Auxiliary Handle (1) angle position by loosening the 2 Auxiliary Bolts, adjusting and re-tightening the bolts
Dust extraction
- This tool should be connected to a workshop dust extraction system or vac cleaner via its Dust Port (15)
- If both are unavailable, the supplied dust bag needs to be fitted, by pushi onto the Dust Port.
Note: If using the dust bag, remove and clean out on a regular basis. Ideal empty the dust
bag when it is half full.
Adjusting the depth of cut
The tool features a Turret Stop (11) with 6 depth positions (0, 10, 20, S, D and supports a wide range of biscuit dowels or plates. See Biscuit guide be It is recommended to calibrate the tool using the size of biscuit you will ma using. A typical biscuit size is #10.
- Select position ‘10’ by rotating the Turret Stop (11) until ‘10’ is indicated Depth Indicator (10)
- Push forward on the Auxiliary Handle (1) until the Depth Stop (13) contact Turret Stop (Image B) and measure the length of the exposed blade protrud
from the Blade Slot (28). Ensure one Blade Tooth Tip (34) is at the maximum distance from the slot by rotating the Saw Blade (32) so a Blade Tooth Tip middle then measure from this tip to the surface of the Blade Slot
- The measurement should be 10mm for #10 as indicated in the chart belo different loosen the Depth Stop Locking Nut (14) and adjust the Depth Stop reduce or extend its length to the required 10mm blade depth
- Once correctly set tighten the Depth Stop Locking Nut
WARNING: Failure to correctly adjust the cutting depth could cause damage to workpiece.
Note: The other depth positions on the Turret Stop will now be correctly set the most accurate being the position used for calibration.
Note: Always make a trial cut on scrap material to confirm the settings
Adjusting the cutting height
Note: The groove for the biscuit dowel is normally in the middle of the work edge so the cutting height needs to be adjusted to half the thickness of the material.
- The cutting height with the fitted Fence (30) can be adjusted from 0 - 40
- Release the Fence Locking Knob (29)
- Position the Fence at the required height using the Fence Height Scale (2
- Tighten the Fence Locking Knob to lock at the height required
Setting the fence angle
The Fence (30) has 90^ of angle adjustment, with click-stops for quick and esettings of 0^ , 45^ and 90^ for angled cuts (image C). To set the angle rec
- Release the Angle Lock (4) by pulling it away from the Face (19)
- Adjust the Face to the required angle using the Angle Scale (24) and Ar Indicator (25)
- Tighten the Angle Lock so that the Fence is secured at the required angle. Note: Check the Fence is securely locked in position before cutting; failure to may result in damage to the workpiece or the machine if it moves during use.
Note: The Angle Scale is approximate only; use additional angle measuring equipment if necessary, to check the fence angle
Operation
IMPORTANT: It is recommended to use two hands where possible when open the tool. Hold the Main Handle (18) of the jointer in one hand, with a finger comfortably on the On/Off Trigger Switch (17) and with the other hand hold Auxiliary Handle (1) so the tool is securely held.
IMPORTANT: Check the guard mechanism is operating smoothly and correctly before actual use.
Switching on and off
- To start the tool squeeze the On/Off Trigger Switch (17)
- Release the On/Off Trigger Switch to turn off
| Marking | Thickness of material | Biscuit Dowel | Cutting depth in m |
| 0 | 8-12mm | No.0 | 8.0 |
| 10 | 12-15mm | No.10 | 10.0 |
| 20 | >15mm | No.20 | 12.3 |
| S | Simplex | 13 | |
| D | Duplex | 14.7 | |
| Max | 18 |
Carbon Brushes
When the carbon brushes wear out, the router will spark and/or stop. Discontinue use as soon as this happens. They should be replaced precommencing use of the router. Carbon brushes are a wearing component of the router and therefore not covered under warranty.
Continuing to use the router when carbon brushes need to be replaced, may cause permanent damage to the router. Carbon brushes will wear after many uses but when the carbon brushes need to be replaced, the router to an electrician or a power tool repairer for a quick and replacement. Always replace both carbon brushes at the same time.

natural_image
Simple line drawing of two spring-loaded objects with no text or symbolsManufacturer: Zhejiang Jinyi Electric Tools Co., Ltd.
Address: XiaoShun Town, Jinhua, Zhejiang, CHINA
Imported to AUS: SIHAO PTY LTD. 1 ROKEVA STREETEASTWOOD NSW 2122 Australia
Imported to USA: Sanven Technology Ltd. Suite 250, 9166 Anaheim Place, Rancho Cucamonga, CA 91730
| UK | REP |
YH CONSULTING LIMITED. C/O YH Consultin
Limited Office 147, Centurion House, London
Road, Staines-upon-Thames, Surrey, TW18 4A>
| EC | REP |
E-CrossStu GmbH
Mainzer Landstr.69,
60329 Frankfurt am Main.

VEVOR
Affordable. Reliable. Home Improvement.
Biscuiteuse

Affordable. Reliable. Home Improvement.
Biscuit Joiner
MODÈLE: M1K-ZK5-100

natural_image
Exterior view of a power tool with metal frame and blade (no text or symbols visible)INFORMATIONS SUR LE PRODUIT
natural_image
Simple line drawing of two spring-loaded objects (no text or symbols)Fabricant : Zhejiang Jinyi Electric Tools Co., Ltd.
Lieu, Rancho Cucamonga, CA 91730
| UK | REP |
YH CONSULTING LIMITED. C/O YH Consultin Limited Office 147, Centurion House, London Road, Staines-upon-Thames, Surrey, TW18 4A>
| EC | REP |
Affordable. Reliable. Home Improvement.
Lamellenfräse
Modell: M1K-ZK5-100


natural_image
Exterior view of a power tool with metal frame and blade (no text or symbols visible)natural_image
Simple line drawing of two spring-loaded objects with no text or symbolsHersteller: Zhejiang Jinyi Electric Tools Co., Ltd.
Adresse: XiaoShun Town, Jinhua, Zhejiang, CHINA
YH CONSULTING LIMITED. C/O YH Consultin Limited Office 147, Centurion House, London Road, Staines-upon-Thames, Surrey, TW18 4A>
| EC | REP |
Affordable. Reliable. Home Improvement.
Biscuit Joiner
Model:M1K-ZK5-100


Please scan the QR code to see a video on how to use it.
VEVOR
Affordable. Reliable. Home Improvement.
Biscuit Joiner
MODEL: M1K-ZK5-100

natural_image
Exterior view of a power tool with metal frame and blade (no text or symbols visible)This is the original instruction, please read all manual instructions carefully before operating. VEVOR reserves a clear interpretation of our user manu The appearance of the product shall be subject to the product you rece Please forgive us that we won't inform you again if there are any techr or software updates on our product.
| Warning-To reduce the risk of injury, user must read instructions manual carefully. |
| This device complies with Part 15 of the FCC Rules. is subject to the following two conditions:(1)This device not cause harmful interference, and (2)this device must any interference received, including interference that may cause undesired operation. |
| This product is subject to the provision of European D 2012/19/EC. The symbol showing a wheelie bin crossed through indicates that the product requires separate refu collection in the European Union. This applies to the p and all accessories marked with this symbol. Products as such may not be discarded with normal domestic w must be taken to a collection point for recycling electri electronic devices |
When using electric machines always observe the safety regulation applicable in your country to reduce the risk of fire, electric shock and personal injury.
Read the following safety instructions. Keep these instructions in safe place.
Sawdust and splinters must not be removed while the machine is running.
Do not use cutting discs or circular saw blades in the machine.
Protect saw blades against shocks and impacts.
Only use properly sharpened blades, otherwise increased cutting force will shatter the workpiece.
Before use, inspect the saw blade for any damage. Do not use sa blades which are cracked, ripped, or otherwise damaged.
Make sure that the workpiece is sufficiently supported or clamped. your hands away from the surface to be cut.
Use the machine only with the auxiliary handle.
When saw blades have to be mounted on the thread of the spindle make sure that the spindle has sufficient thread.
Make sure that the saw blade has been mounted and fastened pro Do not use reducing rings or adapters to make the saw blade fit pro
Apply the machine to the work piece only when the machine is sw on.
When working with the machine always hold the machine firmly with both hands and provide for a secure stance.
Persons under 16 years of age are not permitted to operate this machine.
Always wear safety goggles and hearing protection. If desired or required also use another protection for example an apron or helmet.
Always disconnect the plug from the socket before carrying out any work on the machine. Only plug in when the machine is switched of
Keep mains lead clear from working range of the machine. Always the cable away behind you.
Do not stop the blade by hand after switching off.
Lowering and raising the blade must be a smooth operation.
ELECTRIC SAFETY
Always check that the power supply corresponds to the voltage on rating plate.
Your machine is double insulated in accordance with EN 50144; therefore no earth wire is required.
Replacing cables or plugs
Immediate throw away old cables or plugs when they have been replaced by new ones. It is dangerous to insert the plug of a loose the wall socket.
Using extension cables
Only use an approved extension cable suitable for the power input machine. The minimum cable size is 1.5 mm^2 .
When using a cable reel always unwind the reel completely.
PRODUCT INFORMATION
The Biscuit Jointer is suitable for cutting grooves for biscuit dowel joints wood, plywood, chipboard, fiberboard, plexiglass, and artificial marble.
| 1. Auxiliary Handle2. Spindle Lock Button3. Direction Indicator4. Angle Lock5. Face Centre Indicator6. Fence Biscuit Edge Indicator7. Fence Blade Centre Indicator8. Fence Biscuit Edge Indicator9. Non-Slip Pad10. Depth Indicator11. Turret Stop12. Base13. Depth Stop14. Depth Stop Locking Nut15. Dust Port16. Motor Vent17. On/Off Trigger Switch18. Main Handle | 19. Face20. Handle Screws (x 4)21. Blade Access Knob22. Auxiliary Handle Bolt (x 2)23. Click Stop (0°,45° & 90°)24. Angle Scale25. Angle Indicator26. Centre Blade Indicator27. Fence Height Scale28. Blade Slot29. Fence Locking Knob30. Fence31. Base Lid32. Saw Blade33. Threaded Blade Flange34. Blade Tooth Tip35. Direction Indicator |
Intended Use
Portable hand-held mains-operated power tool with a small circular saw blade cuts slots into wood to create joints suitable for inserting various sizes of wo biscuits.

Unpacking Your Tool
- Carefully unpack and inspect your tool. Fully familiarise yourself with all its features and functions
- Ensure that all parts of the tool are present and in good condition. If any missing or damaged, have such parts replaced before attempting to use this
Before Use
WARNING: Always disconnect this tool from the power supply before attaching removing accessories, or making any adjustments.
IMPORTANT: Ensure the blade is securely fitted before first use. See ‘Chang the saw blade’
Auxiliary Handle
• Fit the Auxiliary Handle (1) using the supplied Auxiliary Handle Bolts (22)
- Adjust the Auxiliary Handle (1) angle position by loosening the 2 Auxiliary Bolts, adjusting and re-tightening the bolts
Dust extraction
- This tool should be connected to a workshop dust extraction system or vac cleaner via its Dust Port (15)
- If both are unavailable, the supplied dust bag needs to be fitted, by pushi onto the Dust Port.
Note: If using the dust bag, remove and clean out on a regular basis. Ideal empty the dust
bag when it is half full.
Adjusting the depth of cut
The tool features a Turret Stop (11) with 6 depth positions (0, 10, 20, S, D and supports a wide range of biscuit dowels or plates. See Biscuit guide be It is recommended to calibrate the tool using the size of biscuit you will ma using. A typical biscuit size is #10.
- Select position ‘10’ by rotating the Turret Stop (11) until ‘10’ is indicated Depth Indicator (10)
- Push forward on the Auxiliary Handle (1) until the Depth Stop (13) contact Turret Stop (Image B) and measure the length of the exposed blade protrud
from the Blade Slot (28). Ensure one Blade Tooth Tip (34) is at the maximum distance from the slot by rotating the Saw Blade (32) so a Blade Tooth Tip middle then measure from this tip to the surface of the Blade Slot
- The measurement should be 10mm for #10 as indicated in the chart belo different loosen the Depth Stop Locking Nut (14) and adjust the Depth Stop reduce or extend its length to the required 10mm blade depth
- Once correctly set tighten the Depth Stop Locking Nut
WARNING: Failure to correctly adjust the cutting depth could cause damage to workpiece.
Note: The other depth positions on the Turret Stop will now be correctly set the most accurate being the position used for calibration.
Note: Always make a trial cut on scrap material to confirm the settings
Adjusting the cutting height
Note: The groove for the biscuit dowel is normally in the middle of the work edge so the cutting height needs to be adjusted to half the thickness of the material.
- The cutting height with the fitted Fence (30) can be adjusted from 0 - 40
- Release the Fence Locking Knob (29)
- Position the Fence at the required height using the Fence Height Scale (2
- Tighten the Fence Locking Knob to lock at the height required
Setting the fence angle
The Fence (30) has 90^ of angle adjustment, with click-stops for quick and esettings of 0^ , 45^ and 90^ for angled cuts (image C). To set the angle rec
- Release the Angle Lock (4) by pulling it away from the Face (19)
- Adjust the Face to the required angle using the Angle Scale (24) and Ar Indicator (25)
- Tighten the Angle Lock so that the Fence is secured at the required angle. Note: Check the Fence is securely locked in position before cutting; failure to may result in damage to the workpiece or the machine if it moves during use.
Note: The Angle Scale is approximate only; use additional angle measuring equipment if necessary, to check the fence angle
Operation
IMPORTANT: It is recommended to use two hands where possible when open the tool. Hold the Main Handle (18) of the jointer in one hand, with a finger comfortably on the On/Off Trigger Switch (17) and with the other hand hold Auxiliary Handle (1) so the tool is securely held.
IMPORTANT: Check the guard mechanism is operating smoothly and correctly before actual use.
Switching on and off
- To start the tool squeeze the On/Off Trigger Switch (17)
- Release the On/Off Trigger Switch to turn off
| Marking | Thickness of material | Biscuit Dowel | Cutting depth in m |
| 0 | 8-12mm | No.0 | 8.0 |
| 10 | 12-15mm | No.10 | 10.0 |
| 20 | >15mm | No.20 | 12.3 |
| S | Simplex | 13 | |
| D | Duplex | 14.7 | |
| Max | 18 |
Carbon Brushes
When the carbon brushes wear out, the router will spark and/or stop. Discontinue use as soon as this happens. They should be replaced precommencing use of the router. Carbon brushes are a wearing component of the router and therefore not covered under warranty.
Continuing to use the router when carbon brushes need to be replaced, may cause permanent damage to the router. Carbon brushes will wear after many uses but when the carbon brushes need to be replaced, the router to an electrician or a power tool repairer for a quick and replacement. Always replace both carbon brushes at the same time.
natural_image
Simple line drawing of two spring-loaded objects with no text or symbolsManufacturer: Zhejiang Jinyi Electric Tools Co., Ltd.
Address: XiaoShun Town, Jinhua, Zhejiang, CHINA
Imported to AUS: SIHAO PTY LTD. 1 ROKEVA STREETEASTWOOD NSW 2122 Australia
Imported to USA: Sanven Technology Ltd. Suite 250, 9166 Anaheim Place, Rancho Cucamonga, CA 91730
| UK | REP |
YH CONSULTING LIMITED. C/O YH Consultin
Limited Office 147, Centurion House, London
Road, Staines-upon-Thames, Surrey, TW18 4A>
| EC | REP |
E-CrossStu GmbH
Mainzer Landstr.69,
60329 Frankfurt am Main.

VEVOR
Affordable. Reliable. Home Improvement.

Affordable. Reliable. Home Improvement.
Biscuit Joiner
MODELO: M1K-ZK5-100

natural_image
Exterior view of a power tool with metal frame and blade (no text or symbols visible)natural_image
Simple line drawing of two spring-loaded objects (no text or symbols)Fabricante: Zhejiang Jinyi Electric Tools Co., Ltd.
YH CONSULTING LIMITED. C/O YH Consultin Limited Office 147, Centurion House, London Road, Staines-upon-Thames, Surrey, TW18 4A>
| EC | REP |
Affordable. Reliable. Home Improvement.
Łącznik ciasteczek
Modele:M1K-ZK5-100


Affordable. Reliable. Home Improvement.
Biscuit Joiner
MODEL: M1K-ZK5-100

natural_image
Exterior view of a power tool with metal frame and blade (no text or symbols visible)natural_image
Simple line drawing of two blocks with coiled springs, no text or symbols presentProducent: Zhejiang Jinyi Electric Tools Co., Ltd.
Adres: miasto XiaoShun, Jinhua, Zhejiang, CHINY
Importowane do AUS: SIHAO PTY LTD. 1 ROKEVA
STREETEASTWOOD
NSW 2122 Australia
Importowane do USA: Sanven Technology Ltd. Suite 250, 9166 Anar
YH CONSULTING LIMITED. C/O YH Consultin Limited Office 147, Centurion House, London Road, Staines-upon-Thames, Surrey, TW18 4A>
| EC | REP |
Affordable. Reliable. Home Improvement.
Biscuitvoeger
Model: M1K-ZK5-100


Scan de QR-code om
Affordable. Reliable. Home Improvement.
Biscuit Joiner
MODEL: M1K-ZK5-100

natural_image
Exterior view of a power tool with metal frame and blade (no text or symbols visible)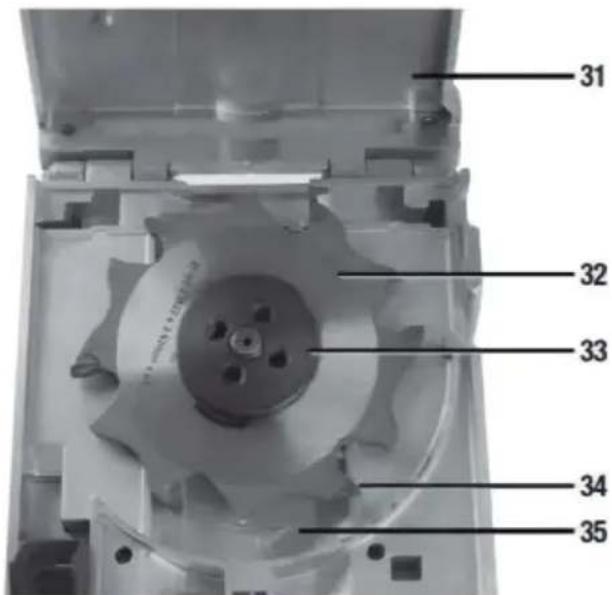
natural_image
Simple line drawing of two spring-loaded objects (no text or symbols)Fabrikant: Zhejiang Jinyi Electric Tools Co., Ltd.
Adres: XiaoShun Town, Jinhua, Zhejiang, CHINA
YH CONSULTING LIMITED. C/O YH Consultin
Limited Office 147, Centurion House, London
Road, Staines-upon-Thames, Surrey, TW18 4A>
| EC | REP |
E-CrossStu GmbH
Mainzer Landstr.69,
60329 Frankfurt am Main.

VEVOR
Affordable. Reliable. Home Improvement.
Kexfogare
Modell: M1K-ZK5-100


Affordable. Reliable. Home Improvement.
Biscuit Joiner
MODELL: M1K-ZK5-100

natural_image
Exterior view of a power tool with metal frame and blade (no text or symbols visible)natural_image
Simple line drawing of two spring-loaded objects with no text or symbolsTillverkare: Zhejiang Jinyi Electric Tools Co., Ltd.
Adress: XiaoShun Town, Jinhua, Zhejiang, KINA
Importerad till Australien: SIHAO PTY LTD. 1 ROKEVA
STREETEASTWOOD
NSW 2122 Australien
Importerad till USA: Sanven Technology Ltd. Suite 250, 9166 Anaheim
Plats, Rancho Cucamonga, Kalifornien 91730
| UK | REP |
YH CONSULTING LIMITED. C/O YH Consultin Limited Office 147, Centurion House, London Road, Staines-upon-Thames, Surrey, TW18 4A>
| EC | REP |