YAM0186 - Laser level Vevor - Free user manual and instructions
Find the device manual for free YAM0186 Vevor in PDF.

| Product Type | Line Laser Level Receiver |
| Model | YAM0186 |
| Brand | Vevor |
| Dimensions (approx.) | 150 x 70 x 30 mm |
| Weight (approx.) | 200 g |
| Power Supply | 2 AA batteries (not included) |
| Battery Life | Approx. 20 hours continuous use |
| Display | LCD with backlight |
| Detection Accuracy | High and low accuracy (selectable) |
| Sound Volume | Loud, soft, silent (adjustable) |
| Detection Range | Up to 100 m with laser source |
| Reception Angle | 40° left to right |
| Auto Shutdown | After 10 minutes without detection |
| Mounting | Clamp for measuring rod or pole |
| Built-in Bubble Level | Yes, to keep horizontal plane |
| Maintenance | Clean with a soft, dry cloth |
| Safety | Complies with FCC Part 15; does not contain laser |
| Spare Parts | Not provided; contact support |
| Repairability | Repair by manufacturer only |
| Warranty | Electronic warranty at www.vevor.com/support |
| Included Accessories | Mounting clamp, user manual |
Frequently Asked Questions - YAM0186 Vevor
User questions about YAM0186 Vevor
0 question about this device. Answer the ones you know or ask your own.
Ask a new question about this device
Download the instructions for your Laser level in PDF format for free! Find your manual YAM0186 - Vevor and take your electronic device back in hand. On this page are published all the documents necessary for the use of your device. YAM0186 by Vevor.
USER MANUAL YAM0186 Vevor
Technical Support and E-Warranty Certificate www.vevor.com/support
LINE LIGHT RECEIVER
MODEL:YAM0186
We continue to be committed to provide you tools with competitive price. "Save Half", "Half Price" or any other similar expressions used by us only represent estimate of savings you might benefit from buying certain tools with us compared top brands and doses not necessarily mean to cover all categories of tools offered are kindly reminded to verify carefully when you are placing an order with us actually saving half in comparison with the top major brands.
VEVOR®
TOUGH TOOLS, HALF PRICE
LINE LIGHT RECEIVER
MODEL:YAM0186
NEED HELP? CONTACT US!
Have product questions? Need technical support? Please feel fr contact us:

CustomerService@vevor.com
This is the original instruction, please read all manual instructions carefully before operating. VEVOR reserves a clear interpretation of user manual. The appearance of the product shall be subject to product you received. Please forgive us that we won't inform your use, there are any technology or software updates on our product.
 | Warning-To reduce the risk of injury, users must read instr manual carefully. |
 | Warning- Be sure to wear eye protectors when using this |
 | This symbol, placed before a safety comment, indicates a precaution, warning, or danger. Ignoring this warning may le accident. To reduce the risk of injury, fire, or electrocu please follow the recommendation below. |
 | FCC statement:This device complies with Part 15 of the FCC Rules. Op subject to the following two conditions:(1)This device may n harmful interference, and (2)this device must accept any inte received, including interference that may cause undesired op |
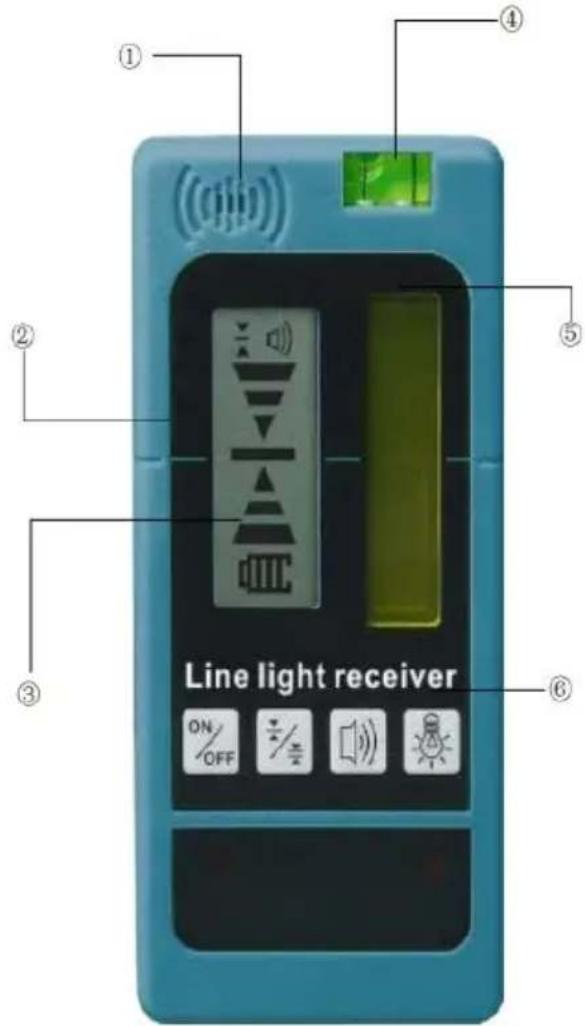
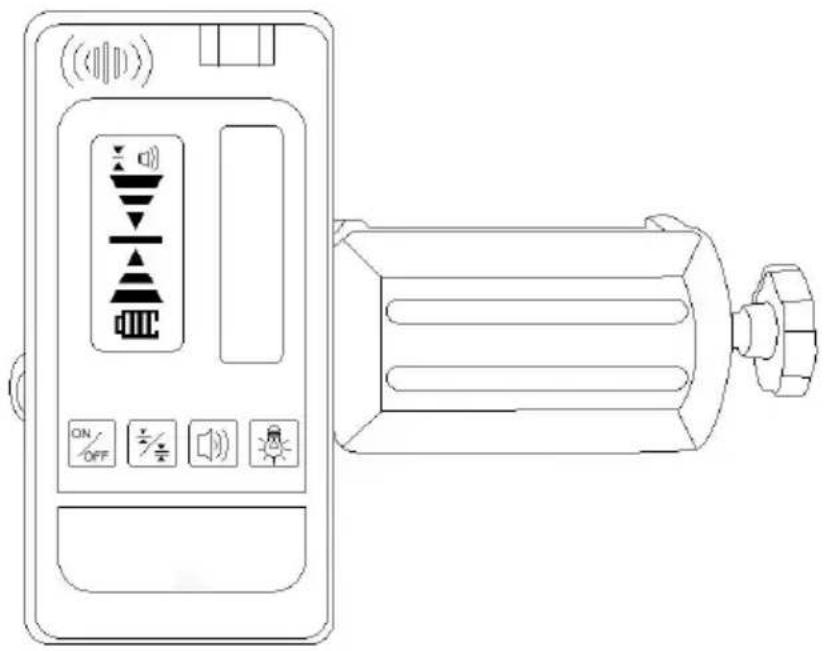
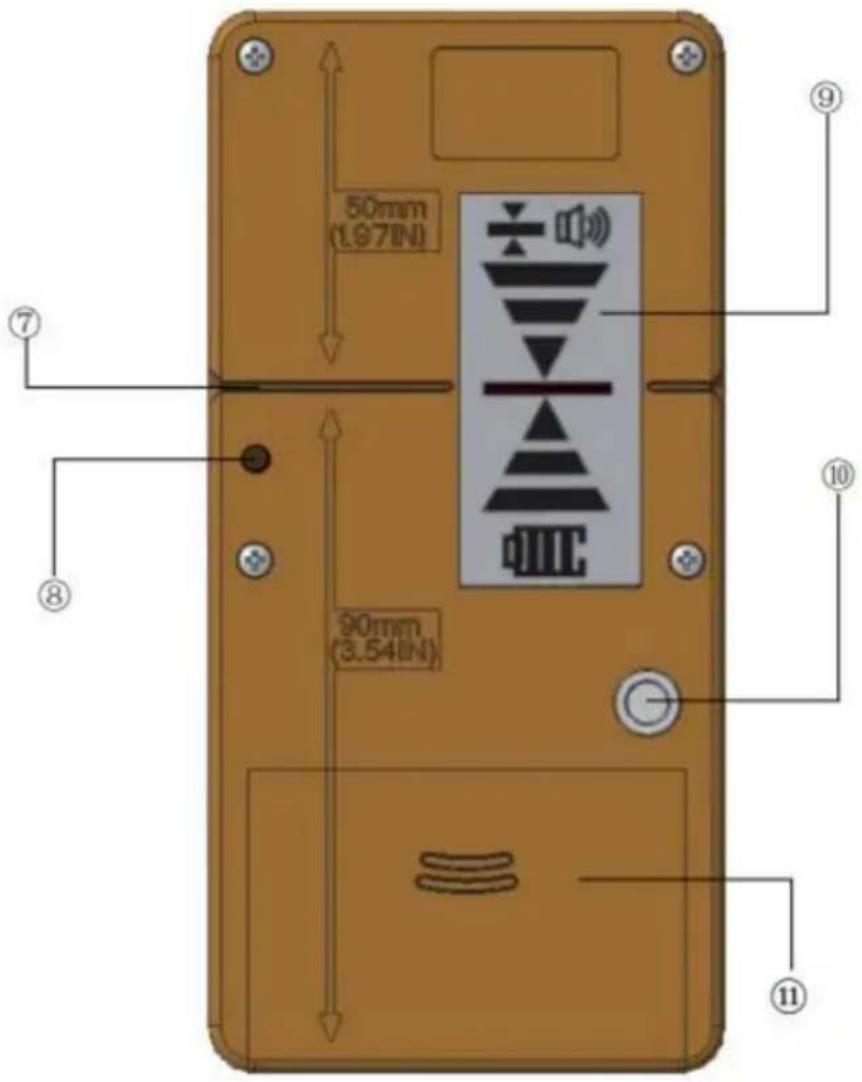
Product Overview
- Speaker 7. Rear Datum Line
- Front Datum Line 8. Alignment Hole
- Front LCD Display 9. Rear LCD Display
- Bubble Vial 10. Thread Mount
- Laser Reception Window 11. Battery Compartment
- Keypad
Keypad and LCD Icons
Keypad

Power ON / OFF Key

High / Low Accuracy Key

Speaker Volume Key

Illumination ON / OFF Key
LCD Icons
Laser Detected-datum Higher than Laser Beam. Move the Detector the Direction Shown (Down)
Laser Detected-datum Lower than Laser Beam. Move the Detector the Direction Shown (Up)
- Laser Detected - Datum In Line with Laser Beam
Buzzer Volume-loud / Soft / Mute
÷ Low Accuracy Setting
High Accuracy Setting
Battery Power-solid Approximate Battery Life as Shown
Battery Power-blinking Batteries Need to be Changed
Battery Installation / Removal
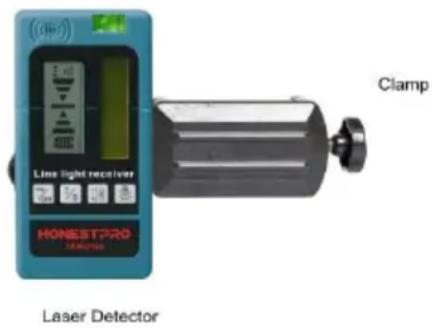
Detector
Open battery compartment by flipping open battery cover.
Install /Remove batteries Orient batteries correctly when placing into laser unit. Securely close and lock battery compartment cover.
WARNING:
Pay close attention to the battery holders (+) and (-) markings for prop insertions. Batteries must be of same type and capacity. Do not use a comb of batteries with different capacities remaining
Set Up
Detector can be used in hand or with clamp to mount the detector to a merod, pole, or similar object.
To mount clamp onto detector:
Guide the clamp towards the detector using the alignment hole.
Tighten the fixing screw.
To mount clamp onto measuring rod, pole, or similar object:
Loosen tightening knob.
Place onto measuring rod, pole, or similar object.
Tighten knob to secure the clamp.
When locating reference level loosen clamp to allow for up / down positioning. When reference level is found, tighten knob again to secure.
Operation
Power
Press to turn detector ON
When powered ON, the entire LCD will momentarily display all icons (this a check to ensure that LCD is functioning correctly)
Press again to turn detector OFF
NOTE:
The detector will automatically power OFF after 10 minutes of not detecting a beam to conserve battery to power ON again.
Press ON/OFF
Illuminate LCD
When ON, press to turn ON / OFF LCD illumination.
Accuracy
When powered ON, press to toggle accuracy setting between HIGH and LO When powered ON, the default accuracy setting is set to HIGH
NOTE:
Only select LOW accuracy setting in times where HIGH accuracy is not needed and / or when a stable reference level cannot be obtained due to slight vibration at or near the work site
If the point to be measured is at a longer distance the LOW accuracy setting may be necessary due to heat waves or slight vibrations that may interfere with obtaining a stable reference level.
Speaker Volume
When powered ON, press to toggle through the volume settings (LOUD / SOFT / MUTE).
When powered ON, the default volume setting is set to LOUD.
Detecting Reference Level
With detector ON, position within the general area where the laserbeam be referenced is being projected towards.
Use the bubble vial to maintain a level plane with the detector.
Be sure laser reception window is facing the direction of the laser beam source.
Move detector as indicated on the LCD to align datum with laser beam. If speaker volume is ON (LOUD / SOFT), an audible tone will sound to assist in communicating the positioning of the detector.
A beeping tone signals that the laser beam has been detected. A fast beeping tone signals the detector must be moved down. A slower Beeping tone signals the detector must be moved up. Again, the LCD also indicates the direction the detector must be moved.
A steady tone indicates that the laser beam is aligned with the datumne on detector.
NOTE:
When detecting the reference level the laser reception window must face to wave the laser source within a 40^ range from left to right
Marking
Once the reference level has been detected, the position can be marked at datum line
NOTE:
Be sure to reference the back of the detector for the measurement compensation value (distance from top to datum) if the top of the detector was used as a marking location
Reading the Staff
Once the reference level has been detected read the position shown at the edge of the clamp
NOTE:
When finding the reference level using a measuring rod, slightly loosen the tightening knob to allow the detector to be moved up or down more easily. When reference level has been found securely tighten the to ensure the detector remains stationary on the rod
Safety
This product does not contain a laser. However, when working withser too obey the safety instructions for that particular instrument.
WARNING:
Carefully read the Safety Instructions.
WARNING:
Carefully read the Safety Instructions and Product Manual before
using this product. The person responsible for the instrument must ensure that users understand and adhere to these instructions.
CAUTION:
While a laser tool operates, avoid exposing your eyes to the emitting laser light (red light source). Exposure to a laser beam for an extended time may be hazardous to your eyes. Retain all sections of the manual for future reference
Made In China
VEVOR®
TOUGH TOOLS, HALF PRICE
Technical Support and E-Warranty Certificate
www.vevor.com/support
VEVOR®
TOUGH TOOLS, HALF PRICE
BESOIN D'AIDE? CONTACTEZ-NOUS!
Laser Detector
Opération
Pouvoir
Presse

Kundenservice@vevor.com
Produktübersicht
www.vevor.com/support
VEVOR®
TOUGH TOOLS, HALF PRICE

elettronica www.vevor.com/support
VEVOR®
TOUGH TOOLS, HALF PRICE
Laser Detector
Operación
Fuerza
Prensa

POTRZEBUJESZ POMOCY? SKONTAKTUJ SIĘ Z NAMI!

Przegląd produktu
Laser Detector
Działanie
Moc
HULP NODIG? NEEM CONTACT MET ONS OP!
Klantenservice@vevor.com
Productoverzicht
Bediening
Stroom
Pers detector AAN zetten
garantiecertificaat www.vevor.com/support
VEVOR®
TOUGH TOOLS, HALF PRICE
BEHÖVER HJÄLP? KONTAKTA OSS!
Produktöversikt
Drift
Driva
www.vevor.com/support