CS350-40Li - Saw SCHEPPACH - Free user manual and instructions
Find the device manual for free CS350-40Li SCHEPPACH in PDF.


User questions about CS350-40Li SCHEPPACH
0 question about this device. Answer the ones you know or ask your own.
Ask a new question about this device
Download the instructions for your Saw in PDF format for free! Find your manual CS350-40Li - SCHEPPACH and take your electronic device back in hand. On this page are published all the documents necessary for the use of your device. CS350-40Li by SCHEPPACH.
USER MANUAL CS350-40Li SCHEPPACH
text_image
Schpeppach SCHNELESS LIVE ADJOCACK OREGON DOUBLE GUARD® https://www.scheppach.com/de/service scheppachCS350-40Li
| DE | Akku-KettensägeOriginalbetriebsanleitung | 5 - 18 |
| GB | Cordless Chain SawTranslation of the original instruction manual | 19 - 31 |
| FR | Tronçonneuse fonctionnant sur batterieTraduction des instructions d'origine | 32 - 45 |
| CZ | Akumulátorová řetězová pilaPřeklad originálního návodu k obsluze | 46 - 58 |
| PL | Akumulatorowa piła łańcuchowaTłumaczenie oryginalnej instrukcji obsługi | 59 - 72 |
| SK | Akumulátorová ret'azová pílaPreklad originálu návodu na obsluhu | 73 - 85 |
| HU | Akkumulátoros láncfúrészAz eredeti használati útmutató fordítása | 86 - 99 |


natural_image
Hand holding a black plastic component with a curved handle, next to a directional arrow indicating rotation (no text or symbols)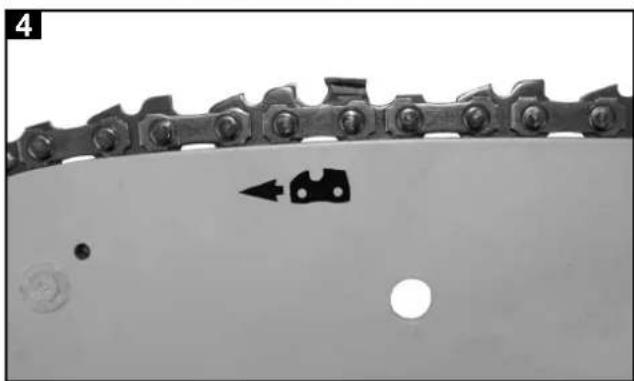
natural_image
Close-up of a chain-link metal structure with circular holes and a black arrow pointing to a specific feature (no text or symbols)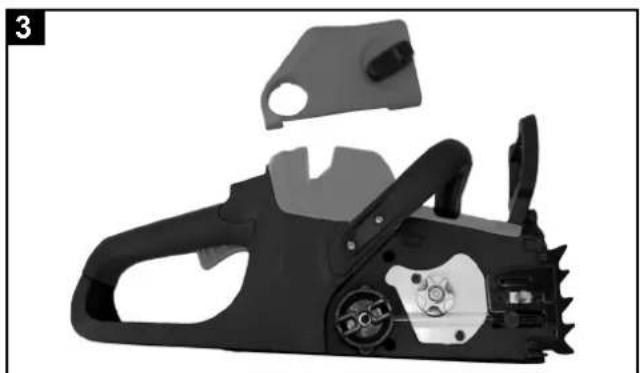
natural_image
Black and white cutaway view of a mechanical chainings device showing internal components and mounting holes (no text or symbols visible)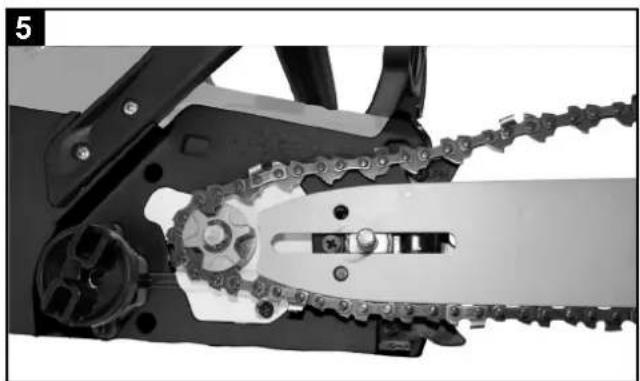
natural_image
Close-up of a mechanical chain-linking device with gear and chains (no visible text or symbols)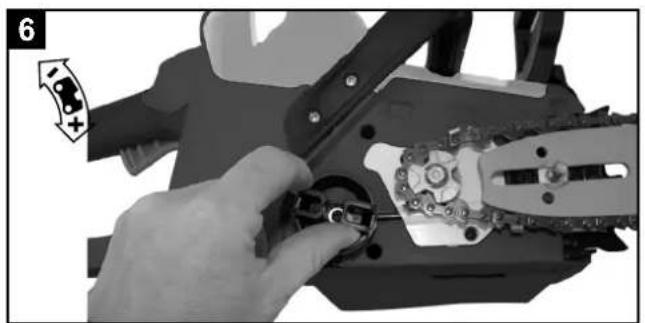
natural_image
Close-up of a hand using a mechanical tool to adjust or install a chain (no visible text or symbols)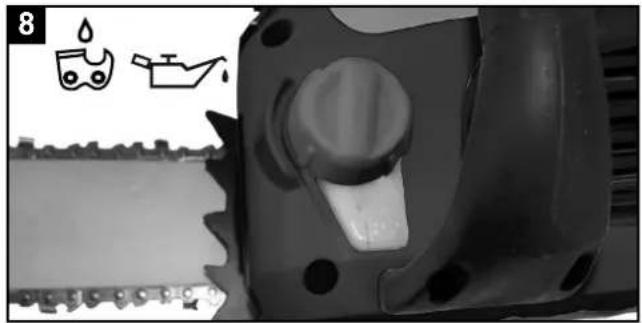
natural_image
Close-up of a mechanical component with a water drop icon and a side view showing a tank (no text or symbols)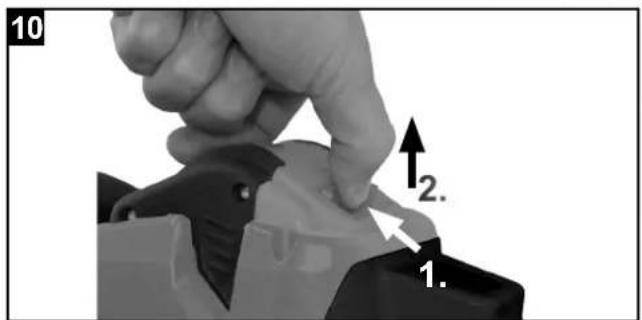
text_image
10 2. 1.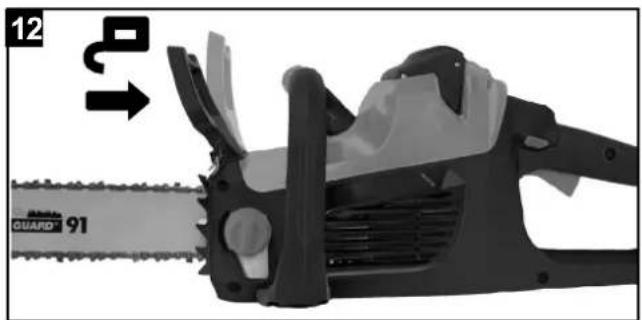
natural_image
Close-up of a chainsaw with visible blade and gear (no text or symbols)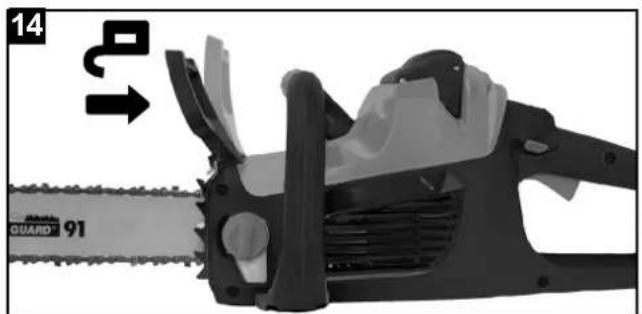
natural_image
Close-up of a chainsaw with visible blades and jaw, no text or symbols present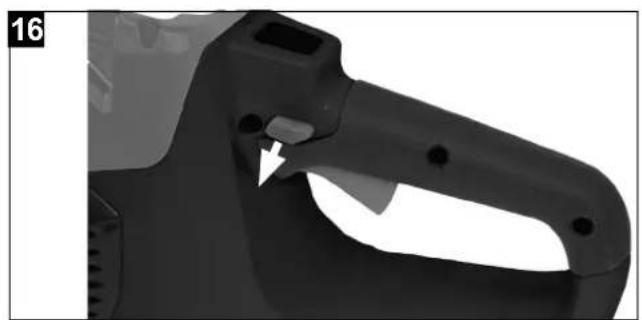
natural_image
Close-up of a black plastic mechanical component with a white arrow pointing to a cutout (no text or symbols visible)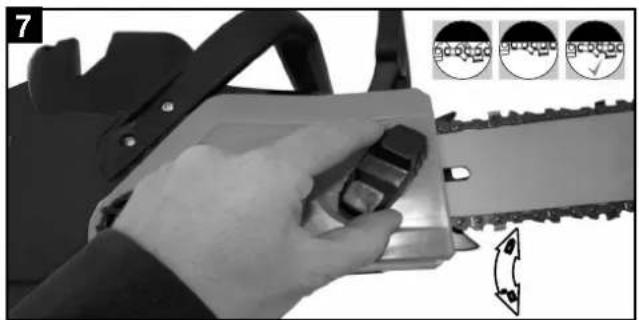
natural_image
Close-up of a hand using a chain-linking tool to cut a metal sheet, with three inset circular diagrams showing different machining states (no text or symbols visible)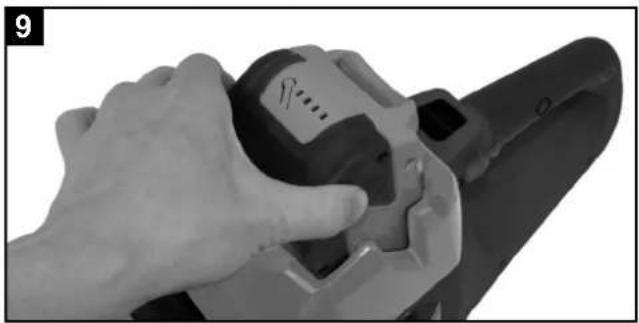
natural_image
Close-up of a hand using a power tool to adjust or install a mechanical component (no visible text or symbols)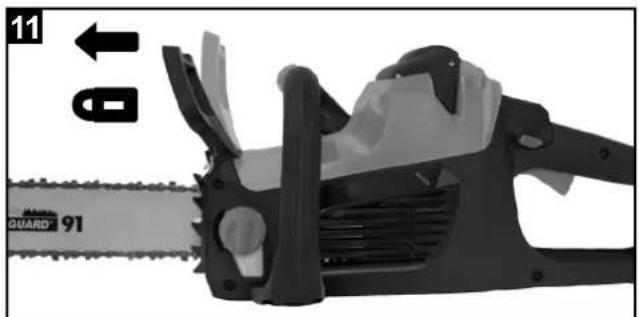
natural_image
Close-up of a chainsaw with visible blades and jaw, no text or symbols present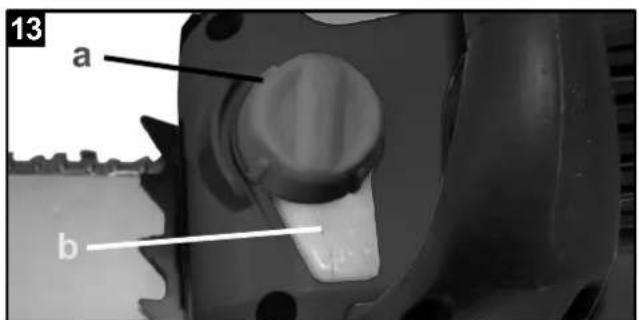
text_image
13 a b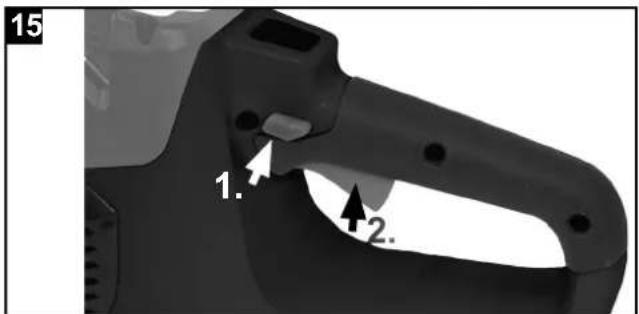
text_image
15 1. 2.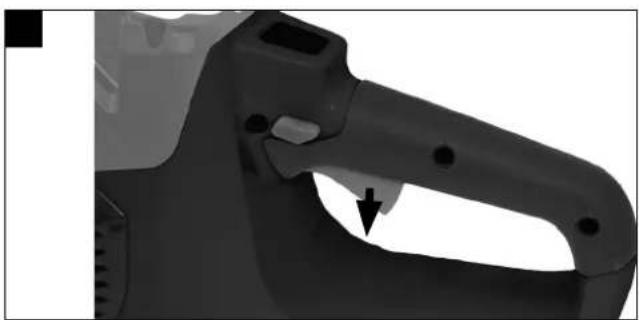
natural_image
Close-up of a black mechanical component with a pointed tip and mounting holes (no visible text or symbols)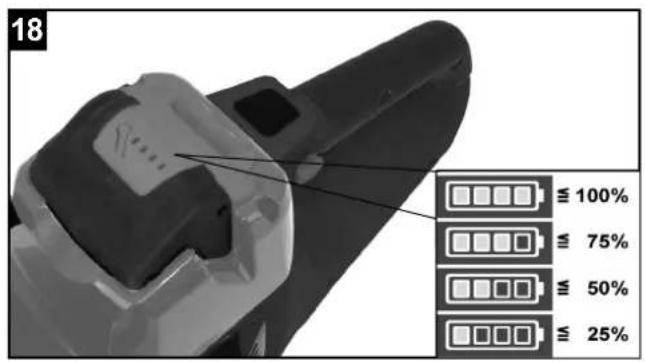
text_image
18 ≡ 100% ≡ 75% ≡ 50% ≡ 25%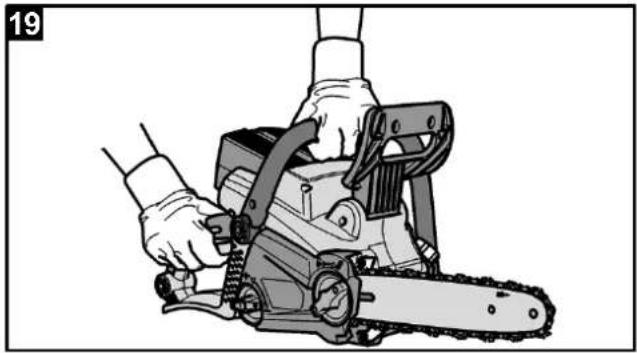
natural_image
Illustration of hands operating a chain-linking machine (no text or symbols visible)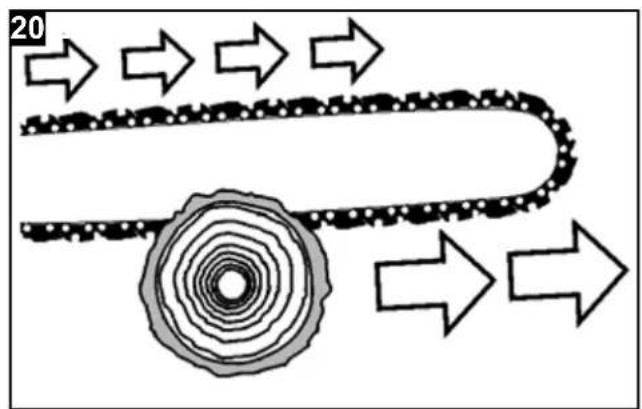
text_image
20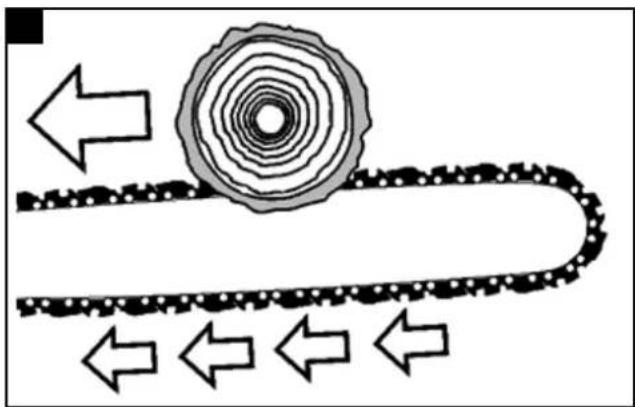
natural_image
Diagram of a mechanical conveyor belt system with directional arrows indicating flow or movement (no text or symbols)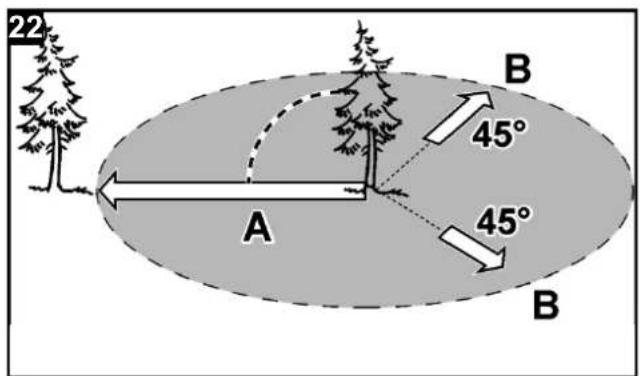
text_image
22 A B 45° 45° B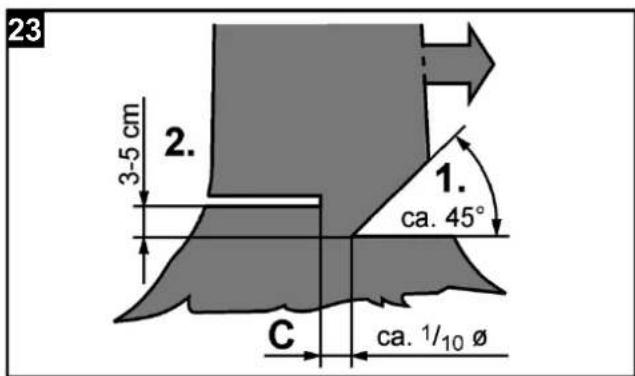
text_image
23 3-5 cm 2. ca. 45° 1. ca. 1/10 Ø C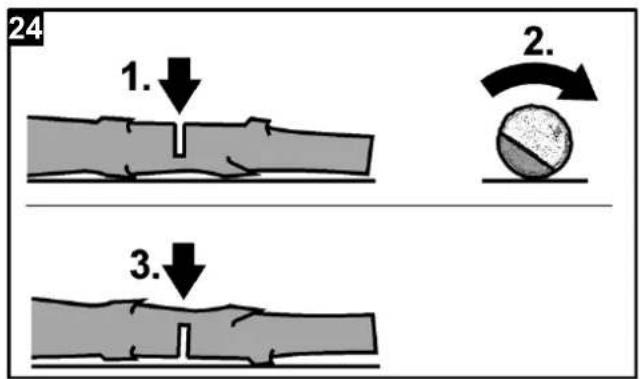
text_image
24 1. 2. 3.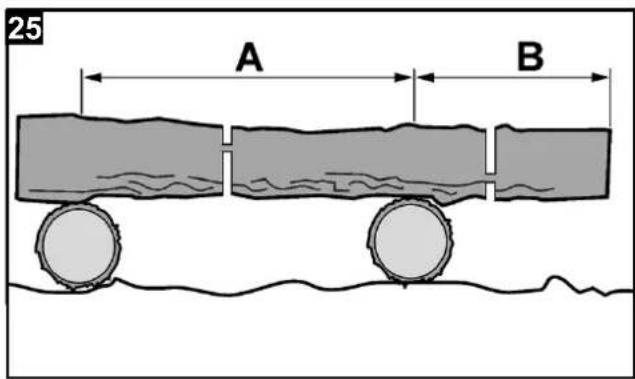
text_image
25 A B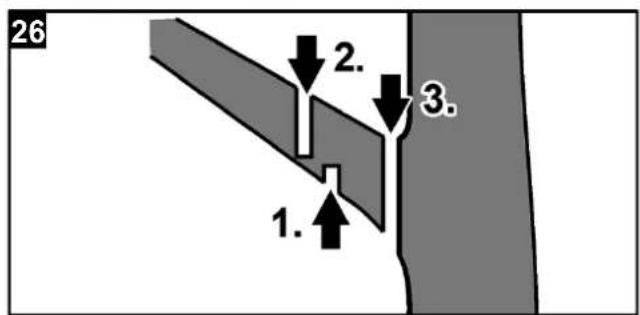
text_image
26 1. 2. 3.Günzburger Straße 69
D-89335 Ichenhausen
VEREHRTER KUNDE,
text_image
Labeled diagram of a chain-linking tool showing numbered components and partsTable of contents: Page:
- Introduction......21
- Layoutitems supplied (Fig. 1)......21
- Items supplied 21
- Proper use....22
- Safety instructions....22
- Technical data 26
- Before starting the equipment 26
- Operation....28
- Cleaning and maintenance....29
- Storage....30
- Disposal and recycling 30
- Troubleshooting guide 31
Explanation of the symbols on the equipment
 | Warning! Disregard results in a risk of death or injury, or damage to the tool! |
 | Caution - Read the operating instructions to reduce the risk of inquiry! |
 | Wear eye protective goggles and protective helmet! |
 | Wear ear protectors! |
 | Wear protective gloves! |
 | Wear safety shoes! |
 | Only for two-handed operation |
 | Protect the device from rain and do not leave outdoors in the rain! |
 | Attention! Kickback |
 | Wear cut-proof protective clothing |
 | Filling hole for chainsaw oil. / Chainsaw oil quantity |
 | Guide bar lenght |
 | Release chain brake |
 | Apply chain brake |
 | Chain cover locking/unlocking |
 | Prescribed running direction of the saw chain |
 | Increase/reduce the chain tensiong |
 | Keep a distance from bystanders |
 | Always remove the rechargeable battery pack from the electrical tool before performing maintenance and service work! |
 | Guaranteed sound power |
 | The product complies with the applicable European directives and an evaluation method of conformity for this directives was done. |
1. Introduction
MANUFACTURER:
scheppach
Günzburger Straße 69
D-89335 Ichenhausen
DEAR CUSTOMER,
We hope your new tool brings you much enjoyment and success.
NOTE:
According to the applicable product liability laws, the manufacturer of the device does not assume liability for damages to the product or damages caused by the product that occurs due to:
- Improper handling,
• Non-compliance of the operating instructions, - Repairs by third parties, not by authorized service technicians,
- Installation and replacement of non-original spare parts,
• Application other than specified,
- A breakdown of the electrical system that occurs due to the non-compliance of the electric regulations and VDE regulations 0100, DIN 57113 / VDE0113.
WE RECOMMEND:
Read through the complete text in the operating instructions before installing and commissioning the device. The operating instructions are intended to help the user to become familiar with the machine and take advantage of its application possibilities in accordance with the recommendations. The operating instructions contain important information on how to operate the machine safely, professionally and economically, how to avoid danger, costly repairs, reduce downtimes and how to increase reliability and service life of the machine.
In addition to the safety regulations in the operating instructions, you have to meet the applicable regulations that apply for the operation of the machine in your country. Keep the operating instructions package with the machine at all times and store it in a plastic cover to protect it from dirt and moisture. Read the instruction manual each time before operating the machine and carefully follow its information. The machine can only be operated by persons who were instructed concerning the operation of the machine and who are informed about the associated dangers. The minimum age requirement must be complied with.
In addition to the safety requirements in these operating instructions and your country's applicable regulations, you should observe the generally recognized technical rules concerning the operation of woodworking machines.
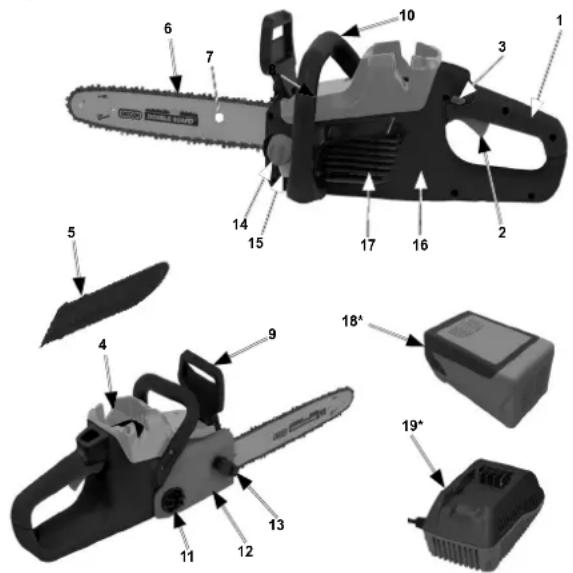
2. Layoutitems supplied (Fig. 1)
- Rear handle
- On/off switch
- Switch lock
- Battery slot
- Protective cover
- Saw chain
- Guide bar
- Claw stop
- Hand guard/chain brake
- Bow-type handle
- Chain tensioning wheel
- Chain cover
- Hand wheel
- Oil tank plug
- Oil tank with level indicator
- Housing
- Ventilation openings
- Battery*
- Charging unit*
3. Items supplied
Fig. 1 (1-19)
text_image
Exploded view diagram of a chain drive with numbered parts and labeled components*not included
Unpacking
- Open the packaging and remove the device carefully.
- Remove the packaging material as well as the packaging and transport bracing (if available).
- Check that the delivery is complete.
- Check the device and accessory parts for transport damage.
- If possible, store the packaging until the warranty period has expired.
ATTENTION
The device and packaging materials are not toys! Children must not be allowed to play with plastic bags, film and small parts! There is a risk of swallowing and suffocation!
4. Proper use
This device is specifically
intended for sawing wood and felling trees in private areas,
unsuitable for sawing plastic, masonry or construction materials that are not made of wood, intended for use in accordance with the descriptions and safety instructions in this operating manual.
The equipment is to be used only for its prescribed purpose. Any other use is deemed to be a case of misuse. The user / operator and not the manufacturer will be liable for any damage or injuries of any kind caused as a result of this.
Please note that our equipment has not been designed for use in commercial, trade or industrial applications. Our warranty will be voided if the machine is used in commercial, trade or industrial businesses or for equivalent purposes.
5. Safety instructions
General Power Tool Safety Warnings
WARNING
Read all safety warnings and all instructions.
Failure to follow the warnings and instructions may result in electric shock, fire and/or serious injury.
Save all warnings and instructions for future reference.
The term „power tool“ in the warnings refers to your mains-operated (cordepower tool or battery-operated (cordless) power tool.
1. Work area safety
- Keep work area clean and well lit. Cluttered or dark areas invite accidents.
- Do not operate power tools in explosive atmospheres, such as in the presence of flammable liquids, gases or dust. Power tools create sparks which may ignite the dust or fumes
- Keep children and bystanders away while operating a power tool. Distractions can cause you to lose control.
2. Electrical safety
- The electrical tool's connection plug must fit into the socket. The plug may not be modified in any way. Do not use an adaptor plug together with earthed electric tools. Unmodified plugs and suitable sockets reduce the risk of an electric shock
- Avoid body contact with earthed surfaces, such as pipes, heaters, ovens and refrigerators. There is an increased risk of electric shock if your body is earthed.
-
Keep electric tools away from rain and moisture. Water entering an electric tool increases the risk of an electric shock.
-
Do not use the cable for another purpose, for example, carrying or hanging the electric tool or pulling the plug out of the socket. Keep the cable away from heat, oil, sharp edges or moving device parts. Damaged or coiled cables increase the risk of an electric shock.
- If you work with an electric tool outdoors, only use extension cables that are also suitable for outdoor use. Using an extension cable suitable for outdoor use reduces the risk of an electric shock.
- If you cannot avoid using the electrical tool in a wet environment, use a fault-current circuit breaker. Using a fault-current circuit breaker reduces the risk of an electric shock.
3. Personal safety
- Be alert, be careful what you are doing, and use common sense when operating a power tool. Do not use a power tool while you are tired or under the influence of drugs, alcohol or medication. A moment of inattention while operating power tools may result in serious personal injury.
- Use personal protective equipment. Always wear eye protection. Protective equipment such as dust mask, non-skid safety shoes, hard hat, or hearing protection used for appropriate conditions will reduce personal injuries.
- Prevent unintentional starting. Ensure the switch is in the off-position before connecting to power source and/or battery pack, picking up or carrying the tool. Carrying power tools with your finger on the switch or energising power tools that have the switch on invites accidents.
- Remove any adjusting key or wrench before turning the power tool on. A wrench or a key left attached to a rotating part of the power tool may result in personal injury.
- Do not overreach. Keep proper footing and balance at all times. This enables better control of the power tool in unexpected situations.
- Dress properly. Do not wear loose clothing or jewellery. Keep your hair, clothing and gloves away from moving parts. Loose clothes, jewellery or long hair can be caught in moving parts.
- If dust extraction and collection devices can be mounted, make sure that they are connected and used properly. Using a dust extraction unit can reduce hazards caused by dust.
4. Power tool use and care
- Do not force the power tool. Use the correct power tool for your application. The correct power tool will do the job better and safer at the rate for which it was designed.
- Do not use the power tool if the switch does not turn it on and off. Any power tool that cannot be controlled with the switch is dangerous and must be repaired.
- Disconnect the plug from the power source and/
or the battery pack from the power tool before making any adjustments, changing accessories, or storing power tools. Such preventive safety measures reduce the risk of starting the power tool accidentally.
- Store idle power tools out of the reach of children and do not allow persons unfamiliar with the power tool or these instructions to operate the power tool. Power tools are dangerous in the hands of untrained users.
- Treat electric tools carefully. Check whether the moving parts work perfectly and do not drag, whether not broken or damaged to such an extent that functioning of electric tools could be affected. Have any damaged parts repaired before using the machine. Many accidents are caused by poorly maintained power tools.
- Keep cutting tools sharp and clean. Properly maintained cutting tools with sharp cutting edges are less likely to bind and are easier to control.
- Use the power tool, accessories and tool bits etc. in accordance with these instructions, taking into account the working conditions and the work to be performed. Use of the power tool for operations different from those intended could result in a hazardous situation.
- Ensure that all handles and safety equipment are installed when using the electrical tool. Never attempt to use an incomplete electrical tool or one with an impermissible modification.
- Always familiarise yourself with your environment and pay attention to possible hazards that you may not hear due to the noise from the electrical tool.
- Avoid using the electrical tool if people, and especially children, are in the vicinity.
5. Using and treatment of cordless tools.
- Charge the batteries only in chargers recommended by the manufacturer. Risk of fire for a charger suitable only for a certain type of batteries or, as appropriate, accumulators, if used for other accumulators.
- Use only such accumulators in this electric appliance that have been designed for this appliance. Use of other accumulators may lead to injuries and risk of fire.
- Do not leave an accumulator not being used near office clips, coins, keys, nails, screws or other small metal items that could cause contact bridging. Short circuit between accumulator contacts may result in burns or fire.
- Liquid may leak from an accumulator if used improperly. Prevent contact with such liquid. Rinse an affected body part with water in case of accidental contact. If liquid gets to your eye, seek medical advice. Liquid leaking from a battery may cause skin irritation or burns.
- Observe the operating manual and the safety instructions enclosed with the rechargeable battery or charging unit.
6. Service
- Have your power tool serviced by a qualified repair person using only identical replacement parts. This ensures that the safety of the device is maintained.
Safety instructions for chainsaw
Keep all parts of your body in safe distance from the saw when running. Before starting the saw, make sure the saw chain does not touch anything. A moment of inattention when working with the chainsaw is able to cause the saw chain to catch your clothes or parts of your body.
Always hold the chainsaw with your right hand on the rear handle and your left hand on the front handle. Holding the chainsaw using the opposite grip increases the risk of injuries and must be avoided.
Hold the power tools by the insulated handles as the cutting knife may come into contact with hidden cables/lines. Contact of the cutting knife with a live conductor may bring the metal parts of the appliance under voltage and cause electric shock.
Wear protective glasses and ear protectors. Further, wearing head, hand and leg protection equipment is recommended. Suitable protective clothing minimises the risk of injury by thrown-away wood chips and possible contact with the saw chain. Do not work on trees with the chainsaw. There is a risk of injury when working on a tree.
Provide safe posture at all times and use the chainsaw only when standing on a solid, safe and level surface. A slippery or unstable surface, such as ladder, may lead to loss of balance or loss of control over the chainsaw.
Do not work with this chainsaw on a tree unless you are especially trained for this. In the event of improper use of a chainsaw on a tree, there is a risk of injury.
When cutting a tense branch, be sure to know that the branch will bounce back. If tension in the wood fibres gets released, the tense branch may hit the operator and/or cause a loss of control over the chainsaw.
When cutting a tense branch, be sure to know that the branch will bounce back. If tension in the wood fibres gets released, the tense branch may hit the operator and/or cause a loss of control over the chainsaw.
Be especially careful when cutting scrubs and saplings. Thin material may get caught in the chain-saw and hit you or you may lose your balance.
Carry the chainsaw by the front handle in a switched-off condition and the saw chain must be deflected from your body. Fit a protection cover on the chainsaw whenever it is transported or stored. Careful chainsaw treatment reduces the likelihood of an accidental contact with the running saw chain.
Follow the instructions for lubrication, chain tensioning and replacing accessories. An improperly tensioned or lubricated chain can break and increase the risk of kickback.
Keep the handles dry, clean and free of oil and grease. Greasy, oily handles are slippery and result in a loss of control.
Only saw wood. Do not use the branch chainsaw for work for which it is not intended. Example: Do not use the branch chainsaw to saw plastic, brickwork or building materials other than wood. Using the branch chainsaw for unintended work can cause dangerous situations.
Causes and avoidance of kickback
Kickback can arise if the tip of the guide rail touches an object or if the wood bends and the saw chain jams in the cut.
Touching with the rail tip can sometimes lead to an unexpected backward reaction, whereby the guide rail whips up and in the direction of the operator. If the saw chain jams on the top edge of the guide rail, the rail can jerk back in the direction of the operator suddenly.
Each of these reactions can lead to you losing control of the saw and possibly suffering a serious injury. Never rely solely on the safety equipment integrated in the chainsaw. As the chainsaw operator, you should implement various measures to work without a risk of accidents and injuries.
Kickback is the result of incorrect or deficient use of the electrical tool. It can be prevented by suitable precautionary measures, as described in the following:
- Hold the saw firmly with both hands, with the thumbs and fingers enclosing the chainsaw handles. Bring your body and arms into a position in which you can absorb the kickback forces. If suitable measures are implemented, the operator will be able to withstand the kickback forces. Never let go of the chainsaw.
- Avoid an unusual body stance and never saw above shoulder height. This will help to avoid unintentional contact with the rail tip, and enable improved control of the chainsaw in unexpected situations.
- Always use replacement guide rails and saw chains prescribed by the manufacturer. Incorrect replacement rails and saw chains may cause the chain to break and/or lead to kickback.
- Adhere to the instructions of the manufacturer
when sharpening and maintaining the chain-saw. If the depth limiter is too low, this increases the tendency towards kickback.
Additional safety instructions
- Familiarise yourself with the chainsaw sawing technique in detail before use. Information can be found in specialist literature. We recommend attending a suitable training course.
- This device is not designed to be operated by persons (including children) with impaired physical, sensory or mental capabilities, or who have insufficient experience and/or insufficient knowledge, unless they are being supervised by a person who is responsible for their safety or they are receiving instructions about how this device is to be used. Children should not be left unattended, to ensure they do not play with the device.
-
Under the following conditions, switch the device off and remove the battery:
-
if the device is left unattended;
- before checking, cleaning or other work on the device;
-
if the device starts to vibrate excessively.
-
When sawing, make sure that no persons (in particular children) or animals are inside the working areas.
- Check the area in which the device is to be used and remove any stones and wires that could be caught and ejected by the chainsaw, to avoid any danger to persons and device wear.
- Ensure that the saw chain does not come into contact with the ground or other objects.
- Wait until the electrical tool has come to a standstill before setting it down.
- During interruptions to work, never leave the device unattended and store it in a safe location.
- Always switch off the chainsaw when transporting it to another site of work.
- Ensure that all protective equipment and handles are fitted before using the device. Never attempt to put a device into operation if it is not fully assembled, or if unapproved modifications have been made to it.
- Only operate the device in the technical condition specified and as supplied by the manufacturer. Any liability of the manufacturer for damages resulting from unauthorised changes to the device is excluded.
- Spare parts must comply with the requirements specified by the manufacturer. Therefore only use original spare parts or spare parts approved by the manufacturer. When replacing parts, please observe the installation instructions provided and remove the battery beforehand.
- When working with the device, hold it firmly with both hands and hold it away from your body. Before starting the device, make sure that the cutting device is not touching anything. Hold the device by the insulated surfaces of the handles because the cut-
ting device can come into contact with exposed live cables. Make sure the device is switched off before you insert the battery. The on/off switch and safety switch must not be locked.
Other safety instructions
Keep children and other persons including animals in a safe distance when using the appliance. Minimum safe distance is 10 m.
Provide adequate lighting or good lighting conditions when working with the machine.
Wear suitable protective clothing such as sturdy shoes with non-slip sole, robust long trousers, gloves, safety glasses and hearing protection!
Do not wear loose clothing or jewels. Hear, clothing and gloves must be out of reach of moving parts as they could get caught by the rotating parts. Do not use the appliance when barefooted or in open sandals.
Electrical hazard, keep at least 10 m distance away from electrical power lines.
During appliance operation, it is necessary to take a safe and firm posture, especially when steps or a ladder are being used.
⚠ Be careful when going backwards – risk of tripping!
Immediately remove cut branches/knots from the work area to prevent injuries.
Walk! Do not run! As soon as a branch being cut off starts cracking and falling down, move to the side immediately and keep safe distance from the falling wood as it can hurl back up and cause injuries.
Switch the appliance immediately off and remove the replaceable battery from the appliance when the saw chain gets blocked. Remove the blocked object.
When working, keep the appliance firmly with both hands and with a distance from your body.
Before starting the device, ensure that the cutting unit is not touching anything.
Before starting the device, ensure that the cutting unit is not touching anything.
Make sure the appliance is off before inserting a battery. The ON/OFF switch and safety switch must not be locked.
⚠ Before using, check the tightness and proper seating of all screwed and socket joints and protective equipment and if all moving parts are moving smoothly.
△ It is strictly prohibited to demount, adjust and alienate the protective equipment on the machine or put other protective equipment on the machine.
Do not use the appliance if damaged or the safety equipment is defective. Replace any worn and damaged parts.
Do not use the device near flammable liquids or gases. Risk of fire and explosion in case of short circuit.
⚠ Warning! This electric tool generates an electromagnetic field during operation. This field can impair active or passive medical implants under certain conditions. In order to prevent the risk of serious or deadly injuries, we recommend that persons with medical implants consult with their physician and the manufacturer of the medical implant prior to operating the electric tool.
Battery
Vapours may leak out in case of unauthorised use or when using a damaged accumulator. Bring fresh air and seek medical advice if experiencing difficulties. Vapours may irritate the respiratory system.
⚠️ Risk of fire! Risk of explosion!
Never use damaged, defective or deformed accumulators. Never open or damage the accumulator or let it fall on the ground.
Never charge the battery in an environment with acids and easily flammable materials.
Protect the battery against heat and fire.
Battery to be used at the ambient temperatures between 10^ C and +40^ C only.
Never put the battery on heaters and do not expose it to strong sunlight for a long time.
After being subject to heavy load, let the battery cool down first.
Short circuit - do not bridge the accumulator contacts with metal parts.
The accumulator must be packaged (plastic bag, box) or accumulator contacts must be sealed up for accumulator disposal, transport or storage.
Residual risks
Even when the device is used properly and all safety regulations are complied with, there still may be some residual risks.
- Cutting injury
- Hearing damage
A longer stay in the immediate vicinity of the running unit may cause hearing damage. Wear ear protectors!
- Damage to health arising from vibrations to hand and arms if the device is used for a long time or if the device is not guided and evaluated properly.
- Vibration dampening systems do not guarantee protection against Raynaud syndrome or carpal tunnel syndrome. For this reason, the condition of the fingers and the wrist must be thoroughly monitored in case of regular, continuous use of the device.
If symptoms of the illnesses indicated above occur, contact a doctor immediately. To reduce the risk of Raynaud syndrome, keep your hands warm while working and take breaks at regular intervals.
Despite the observance of the operating instructions there still may be some hidden residual risks.
6. Technical data
| Nominal voltage 40V DC | |
| Battery type | Li-Ion 40V4,0 Ah / 2,5 Ah |
| Cutting Length 34 cm | |
| Chain bar type | Oregon144MLEA041 |
| Length of chain bar 14" (35,5 cm) | |
| Saw chain type Oregon 90PX052X | |
| Chain Division | (3/8"), 9.525 mm |
| Chain Thickness | (0.043"), 1.1 mm |
| Number of drive links | 52 |
| Chain Speed Max 11 m/s | |
| Toothing sprocket | 6 teeth x 9.525 mm |
| Chain oil tank capacity | 180 cm^3 |
| Weight without bar, chain and battery | 3,0 kg |
Sound and vibration
Sound and vibration values were measured in accordance with ISO 22868.
| L_pA sound pressure level | 88,9 dB(A) |
| L_WA sound power level measured | 102,7 dB(A) |
| L_WA sound power level guaranteed | 106 dB(A) |
| K_WA uncertainty | 3,0 dB(A) |
| Vibration emission value a_h | 2,5 m/s ^2 |
| K uncertainty | 1,5 m/s ^2 |
Wear ear-muffs.
The impact of noise can cause damage to hearing. Total vibration values (vector sum of three directions) determined in accordance with ISO 22867.
The specified vibration value was established in accordance with a standardized testing method. It may change according to how the electric equipment is used and may exceed the specified value in exceptional circumstances.
The specified vibration value can be used to compare the equipment with other electric power tools. The specified vibration value can be used for initial assessment of a harmful effect.
Keep the noise emissions and vibrations to a minimum.
- Only use appliances which are in perfect working order.
• Service and clean the appliance regularly. - Adapt your working style to suit the appliance.
- Do not overload the appliance.
- Have the appliance serviced whenever necessary.
- Switch the appliance off when it is not in use.
- Wear protective gloves.
7. Before starting the equipment
Caution! Do not fit the battery until the equipment has been fully assembled and all the settings have been actuated. Always wear protective gloves when working on the equipment to protect yourself against injury. Carefully unpack all parts and check that they are complete.
Installation
Installing the guide bar and saw chain
WARNING!
- The teeth of the saw chain are very sharp! Protective gloves must be worn during all work on the chain. Risk of injury!
- An incorrectly installed saw chain leads to uncontrolled cutting behaviour by the device! When fitting the chain, observe the prescribed running direction!
- Place the chainsaw on a level surface.
Fig.2:
- Release the handwheel (1) and take off the chain cover (2).
Fig.3:
- Turn the chain tensioning wheel clockwise to move the guide bar as close to the chain wheel as possible.
Fig.4
- Place the saw chain around the guide bar, starting at the top section of the bar. Insert the saw chain in the circumferential groove. When inserting the chain, observe the correct running direction of the chain
Fig.5
- Place the guide bar with the elongated hole on the stud bolt and guide bolt on the chainsaw.
- Run the saw chain around the chain wheel.
Fig.6
- Turn the chain tensioning wheel anticlockwise, to tension the chain. The saw chain must not sag, although it should be possible to pull it 1-2 millimetres away from the guide bar in the centre of the guide bar.
Fig.7
- Turn the saw chain by hand, to check it runs freely. It must glide freely in the rail.
- Fit the chain cover. Tighten the handwheel for fastening the rail and chain cover.
NOTE
The tension of a new chain must be checked after a few minutes in operation, and adjusted if necessary. To do so switch the device off, remove the battery and apply the chain brake.
Filling with chain oil
CAUTION!
- Only add environmentally friendly, good quality chain lubricating oil (per RAL-UZ 48) to the chain saw.
- Do not add used oil. Used oil can cause skin cancer with extended and repeated skin contact, and is damaging to the environment! Used oil does not have the necessary lubricating characteristics and is unsuitable for chain lubrication.
- An oil other than the recommended oil can cause damage to the rail, chain and lubrication system.
• Make sure that no dirt gets into the oil tank. - Avoid oil spillages. Always wipe up spilled oil.
Fig. 8
- Unscrew the oil tank cap (a).
- Carefully add the chain lubricating oil until it reaches the top mark on the oil level indicator (b). Oil tank capacity: max. 180 ml
- Screw the oil tank cap (a) on tightly by hand.
Inserting/replacing the battery
(Fig. 9)
- Charge the battery as described in the operating manual for the charge unit.
- Press the charged battery into the electrical tool until it latches fully.
(Fig. 10)
To remove, press the unlock button (1) and remove the battery (2).
⚠ CAUTION! When not in use, protect the battery contacts. Loose metal parts could short-circuit the battery, which results in a risk of explosion and fire!
Commissioning
Chain brake
⚠ WARNING!
Always check that the chain brake is working properly before use. If not, do not use the chainsaw and have it repaired by a qualified specialist or a specialist workshop.
The chain saw is equipped with protective equipment activated by a chain brake, which brings the chain to a standstill within a fraction of a second in the event of kickback. With kickback, the chain brake will be triggered automatically through the contact of the hand guard with the left hand.
Therefore, always hold the chainsaw tight in both hands.
Manual activation of the chain brake (Fig.11)
- Tilt the hand guard in the direction of the guide bar tip.
Releasing the chain brake (Fig.12)
- Draw the hand guard in the direction of the bow-type handle.
Checking the chain brake
- Set the chainsaw down on a firm surface.
- Release the chain brake.
- Hold the chainsaw tight in both hands.
- Switch the chainsaw on. The chainsaw starts running.
- Tilt the hand guard in the direction of the guide bar tip. The chain must come to an immediate standstill! If not, do not use the chainsaw and have it repaired by a qualified specialist or a specialist workshop.
• After work, regularly clean the visible mechanisms of the chain brake to remove chips and sawing residues.
Chain lubrication
CAUTION!
The device must only be operated with sufficient chain lubricating oil. Insufficient lubrication reduces the service life of the device.
- Check the oil level on the basis of the oil level indicator.
Refilling the chain oil
CAUTION!
- Only add environmentally friendly, good quality chain lubricating oil (per RAL-UZ 48) to the chain saw.
- Do not add used oil. Used oil can cause skin cancer with extended and repeated skin contact, and is damaging to the environment! Used oil does not have the necessary lubricating characteristics and is unsuitable for chain lubrication.
- An oil other than the recommended oil can cause damage to the rail, chain and lubrication system.
- Make sure that no dirt gets into the oil tank.
- Avoid oil spillages. Always wipe up spilled oil.
(Fig.13)
- Check the oil level indicator (b) to make sure sufficient chain oil is available for lubrication.
- Unscrew the oil tank cap (a). Before opening, clean the tank cover and filling nozzle if necessary.
- Carefully add the chain lubricating oil until it reaches the top mark on the oil level indicator (b).
Checking the chain lubrication
- Start the device (see section "Switching on and off").
- Hold the running saw chain approx. 15 cm above a suitable surface for a short time. With sufficient chain lubrication, a light track will appear due to the oil sprayed from the saw chain.
Switching on the device
⚠ WARNING!
Make sure the saw chain is not yet applied to the cut and that no other objects are touched. Risk of injury!
- Hold the chainsaw firmly with both hands and make sure that no persons (in particular children) or animals are in the immediate vicinity.
- Make sure that the chain brake is released before starting the chainsaw. To do so, draw the hand guard back in the direction of the bow-type handle. (Fig.14)
Fig.15:
- Press and hold down the switch lock (1).
- Press the on/off switch (2). The chainsaw starts running.
Fig.16:
- Release the switch lock again.
Switching off the device
- Release the on/off switch. (Fig.17)
Displaying the charge level
- By pressing the button on the battery it is possible to check the charge level with the battery charge indicator LED. (Fig.18)
The light goes out after 5 seconds. If the LED flashes, the battery must be charged. If no LED lights up when the button is pressed, the battery is defective and must be replaced.
8. Operation
Please note that the statutory regulations governing noise abatement may differ from one location to another.
Make sure the chain saw is in a correct and prescribed working position before starting the motor.
ATTENTION!
Do not operate the chainsaw with a defective or badly worn cutting device.
⚠ WARNING!
Familiarise yourself with the chainsaw sawing technique in detail before use (see "Basic working technique").
Risk of injury!
Never allow children to operate the chainsaw. Do not allow persons to use the chainsaw, if they have not read the operating manual or received appropriate instructions for the safe and correct use of the chainsaw.
We recommend attending a suitable training course.
The information provided here is for supplementary purposes only!
Before every use
- Check all parts are secure and inspect for visible defects.
- Check the device for correct chain tension.
- Test the function of the chain brake.
- Check chain lubrication.
- Check for any leaks.
Holding the device correctly
⚠️ Risk of injury!
- Never work on unstable ground!
- Never work above shoulder height!
- Never work when standing on ladders!
- Do not bend too far when working!
- Only use the device when the weather and terrain conditions are favourable!
- Stand with both legs firmly on the ground.
- Be aware of obstacles in the working area.
- During work, always hold the device tight in both hands!
- Hold the device (Fig.19):
- with the left hand on the bow-type handle.
- with the left hand on the handle.
- whilst balanced in a stable stance.
How to saw correctly!
- Scan the working area and remove any interfering objects.
- At the start of work, check that the device is safe.
- Hold the device in both hands as prescribed.
- Switch on the chainsaw before applying it to the cut.
- Exert regular pressure on the device and do not apply excessive force.
- If possible, apply the device to the branch you wish to saw with the claw stop.
ATTENTION!
If the cutting device touches a foreign body, or the operating noise intensifies, or the electrical device vibrates unusually heavily, switch off the motor and allow the electrical device to come to a halt. Remove the battery and implement the following measures:
- check for damage
- check for loose parts and fasten all parts
- replace damaged parts with equivalent parts or have them repaired.
After use
⚠️ Risk of injury!
Always switch off the motor before setting the device down! The saw chain will run on for a short time after the on/off switch is released.
- Stop the motor.
- Wait until all moving parts have come to a complete standstill.
- Remove battery.
- Place the protective sheath on the cutting unit.
- Apply chain brake.
- Leave the device to cool down.
Basic working technique
⚠️ Risk of injury!
This section examines the basic working technique for using the device. The information provided here does not replace the many years of training and experience of a specialist. Avoid any work that you are not adequately qualified for! Careless use of the device can lead to serious injuries and even death!
Sawing technique
Pull sawing (Fig. 20)
With this technique, sawing takes place with the underside of the guide bar from top to bottom.
The saw chain pulls the device forwards and away from the user. With this action, the front edge of the device forms a support, which absorbs the forces that arise on the tree trunk during sawing. With pull sawing, the user has significantly greater control over the device and is able to better avoid kickbacks. This sawing technique should therefore be used if possible.
Push sawing (Fig. 21)
With this technology, sawing takes place with the top side of the guide bar from bottom to top. The saw chain pushes the device backwards, towards the user.
⚠ WARNING!
If the guide bar tilts, the device may be jerked towards the user with great force. If the user does not balance the backward force of the saw chain with their body strength, there is a risk that only the tip of the guide bar will remain in contact with the wood and kickback will occur.
Risk of death or serious injuries!
Felling a tree
⚠️ Risk of injury!
Felling and branch removal work may only be performed by trained personnel! There is a risk of life-threatening injuries!
Fig. 22
Before starting felling work, make sure that:
- no bystanders or animals are in the felling area (A).
- a clear evacuation route, free of obstacles, is available to all participants. Withdrawal (B) takes place at an oblique angle to the felling direction.
- the area around the trunk is clear of obstacles (risk of tripping!).
- the nearest workplace is at least 2 12 trunk lengths away. Before felling, check the felling direction of the tree and make sure that no obstacles, persons or animals are within a distance of 2 12 tree lengths.
Fig. 23
Tree felling takes place in two steps:
- Saw a felling sink in the trunk of around one third of its diameter, on the side of the felling direction (1).
- On the opposite side (2) make the felling cut, which must be slightly higher than the felling sink (approx. 3–5 cm).
Risk of injury!
Never saw fully through the trunk. The area (C) serves as a "hinge" and ensures the correct felling direction. During felling, only stand to the side of the tree you intend to fell! There is a risk of life-threatening injuries!
Trunks lying flat on the ground (Fig. 24)
- Cut around halfway through the trunk, then turn it over and saw through the other side.
⚠ Damage to the device!
Ensure that the guide bar does not come into contact with the ground when sawing through a tree trunk!
Fallen trunks (Fig. 25)
We recommend supporting trunks on a sawhorse when sawing through them. If this is not possible, the trunk should be lifted with the aid of supporting boughs or with support blocks and supported.
- In area A first cut around one third of the trunk diameter from top to bottom, and then make the subsequent cut from bottom to top.
- In area B first cut around one third of the trunk diameter from bottom to top, and then saw through from the top.
⚠️ Risk of injury!
Do not saw trunks that are strained! Splitting wood or a tilted guide bar can result in serious injuries!
Removing branches (Fig. 26)
- Always work on the side opposite the respective branch.
- Start at the bottom of the branch and work up.
- Saw into the branch 10–15 cm from the branch base from bottom to top, to 1/3 of the branch diameter (1).
- Saw through the branch slightly further out from top to bottom (2).
- Perform a cut tightly against the trunk (3). Make the cut from top to bottom.
- During delimbing always saw off the branches that project freely in the air first. Only lop off support limbs once the branches have been sawn along their length.
⚠️ Risk of injury!
With branches that are supported or strained, the saw chain can wedge in the wood!
9. Cleaning and maintenance
WARNING!
Always remove the battery from the device before all work on the electrical tool. Danger of injury due to the sharp cutting teeth! Wear safety gloves.
⚠ In the interest of your safety!
Only perform the maintenance work described here yourself. All other work - in particular motor maintenance and repairs - must be performed by a qualified specialist. Unprofessional work can lead to device damage and therefore also to injuries.
Cleaning and maintenance overview
After every use
- Clean the device.
Regularly, depending on the conditions of use
• Retighten the saw chain.
- Clean guide bar oil guide groove.
- Sharpen the saw chain.
- Check the saw chain oil level, top up if necessary.
Cleaning
⚠ WARNING!
Do not use water or liquid cleaning products.
CAUTION!
Clean the device after every use.
An unclean device will lead to material damage and malfunctions.
- Use a damp cloth and a soft brush to clean the device.
- Take off the chain cover and then remove deposits on the guide rail, saw chain, chain wheel and chain cover with a soft brush.
- Keep the ventilation slots clean and free of dust.
Maintenance
Re-tightening the saw chain
The saw chain must not sag, although it should be possible to pull it 1-2 millimetres away from the guide bar in the centre of the guide bar.
- Turn the handwheel anticlockwise, sufficiently that the guide bar can be moved by hand.
- Turn the chain tensioning wheel anticlockwise, so that the chain is tensioned.
- Turn the saw chain by hand, to check it runs freely. It must glide freely in the rail.
- Tighten the handwheel for fastening the rail and chain cover.
NOTE
The tension of a new chain must be checked after a few minutes in operation, and adjusted if necessary. To do so switch the device off, remove the battery and apply the chain brake.
Cleaning the guide bar oil guide groove
- Dismantle the guide bar.
- Clean the oil guide groove of dirt with a suitable tool. Use a plastic spatula, do not use steel tools!
- Refit the guide bar.
Sharpening the saw chain
Special tools are required to sharpen the saw chain; these ensure that the chain cutting edges are sharpened at the correct angle and to the correct depth. We recommend having the saw chain sharpened by a specialist.
Service information
Please note that the following parts of this product are subject to normal or natural wear and that the following parts are therefore also required for use as consumables.
Wear parts*: Saw chain, guide rail, chain oil, carbon brushes, claw stop, chain trap, chain oil filter
* Not necessarily included in the scope of delivery!
10. Storage
- Store the device in a dry and frost-free (10-25 °C) place.
- Store the battery and the device separately from each other.
- Charge the battery before storing it for the winter.
- In case of longer breaks between use, always drain the chain lubricating oil from the device.
- Place the protective sheath on the cutting unit.
- Keep the device, and its plastic components in particular, away from brake fluid, petrol, products containing oil, penetrating oil etc. They contain chemical substances that may damage or destroy the plastic parts of the device.
- Fertilisers and other garden chemicals contain substances which can have a heavily corrosive effect on metal parts. Do not store the device close to these substances.
11. Disposal and recycling

The equipment is supplied in packaging to prevent it from being damaged in transit. The raw materials in this packaging can be reused or recycled. The equipment and its accessories are made of various types of material, such as metal and plastic. Defective components must be disposed of as special waste.
Ask your dealer or your local council.
Old devices must not be disposed of with household waste!

This symbol indicates that this product must not be disposed of together with domestic waste in compliance with the Directive (2012/19/EU) pertaining to waste electrical and electronic equipment (WEEE). This product must be disposed of at a designated collection point. This can occur, for example, by handing it in at an authorised collecting point for the recycling of waste electrical and electronic equipment. Improper handling of waste equipment may have negative consequences for the environment and human health due to potentially hazardous substances that are often contained in electrical and electronic equipment. By properly disposing of this product, you are also contributing to the effective use of natural resources. You can obtain information on collection points for waste equipment from your municipal administration, public waste disposal authority, an authorised body for the disposal of waste electrical and electronic equipment or your waste disposal company.
Batteries and rechargeable batteries do not belong in the household waste!

As the consumer you are required by law to bring all batteries and rechargeable batteries, regardless whether they contain harmful substances* or not, to a collection point run by the local authority or to a retailer, so that they can be disposed of in an environmentally friendly manner.
*labelled with: Cd = cadmium, Hg = mercury, Pb = lead
- Remove the batteries from the laser before disposing of the machine and the batteries.
12. Troubleshooting guide
| Fault Possible cause Remedy | ||
| The equipment does not work | Battery empty Charge battery | |
| Battery is not correctly inserted | Remove battery and insert again | |
| Equipment operates intermittently | Loose connection (external) | Consult a specialist workshop. Loose connection (internal) |
| ON/OFF switch defective | ||
| Saw chain is dry | No oil in the tank Top up with oil | |
| Vent in the oil tank cap is blocked | Clean the oil tank cap | |
| Oil outlet is blocked Clear the oil outlet | ||
| Chain/guide bar is hot | No oil in the tank Top up with oil | |
| Vent in the oil tank cap is blocked | Clean the oil tank cap | |
| Oil outlet is blocked Clear the oil outlet | ||
| Chain is blunt Re-sharpen or replace the chain | ||
| Chain is overtensioned Check the chain tension | ||
| Chainsaw judders, vibrates or does not saw properly | Chain is undertensioned Adjust the chain tension | |
| Chain is blunt Re-sharpen or replace the chain | ||
| Chain is worn | Replace the chain | |
| Saw teeth point in the wrong direction | Refit the chain with the teeth facing in the correct direction | |
Table des matières: Page:
Günzburger Straße 69
D-89335 Ichenhausen
CHER CLIENT,
text_image
Exploded view diagram of a chain-linking tool with numbered parts and labeled components*non inclus
Günzburger Straße 69
D-89335 Ichenhausen
VÁŽENÝ ZÁKAZNÍKU,
text_image
Exploded view diagram of a chain-linking tool with numbered parts and labeled featuresGünzburger Straße 69
D-89335 Ichenhausen
SZANOWNY KLIENCIE!
text_image
Labeled diagram of a chain-linking device showing parts numbered 1 to 19 with annotations for each part.* nieuwzględnione
Rozpakowywanie
Günzburger Straße 69
D-89335 Ichenhausen
VÁŽENÝ ZÁKAZNÍK,
text_image
Labeled diagram of a chain-linking tool showing numbered components and partsGünzburger Straße 69
D-89335 Ichenhausen
TISZTELT VÁSÁRLÓ!
text_image
Exploded view diagram of a chain drive with numbered parts and labeled componentstext_image
Exploded view diagram of a mechanical device with numbered parts for identification and assembly reference.CE - Declaration of Conformity
Standard references:
Standard references: EN 60745-2-13:2009+A1:2010; EN 60745-1:2009+A11:2010; EN 55014-1; EN 55014-2; EN 61000-3-2; EN 61000-3-3
This declaration of conformity is issued under the sole responsibility of the manufacturer.
The object of the declaration described above fulfils the regulations of the directive 2011/65/EU of the European Parliament and Council from 8th June 2011, on the restriction of the use of certain hazardous substances in electrical and electronic equipment.
Subject to change without notice
Documents registar: Stefan Hartinger
Günzburger Str. 69, D-89335 Ichenhausen
Garantiebedingungen
text_image
https://www.scheppach.com/de/service scheppachApparent defects must be notified within 8 days from the receipt of the goods. Otherwise, the buyeris rights of claim due to such defects are invalidated. We guarantee for our machines in case of proper treatment for the time of the statutory warranty period from delivery in such a way that we replace any machine part free of charge which provably becomes unusable due to faulty material or defects of fabrication within such
period of time. With respect to parts not manufactured by us we only warrant insofar as we are entitled to warranty claims against the upstream suppliers. The costs for the installation of the new parts shall be borne by the buyer. The cancellation of sale or the reduction of purchase price as well as any other claims for damages shall be excluded.