2402-UV18 - Air purifier Vevor - Free user manual and instructions
Find the device manual for free 2402-UV18 Vevor in PDF.

| Product Type | Air Purifier for HVAC System |
| Brand | Vevor |
| Model | 2402-UV18 |
| Power | 18 W |
| UV Tube Length | 356 mm |
| UV Wavelength | 254 nm |
| UV Tube Lifespan | 8,000 hours |
| Number of Tubes Included | 1 |
| US Input Voltage | AC 120 V, 60 Hz |
| EU Input Voltage | AC 230 V, 50 Hz |
| Effective Area | 700 sq ft (≈ 65 m²) |
| Mounting Type | In HVAC Duct (magnetic or screw mount) |
| Main Functions | Air purification by UV-C radiation, elimination of microorganisms |
| Maintenance | Clean the bulb with a soft cloth dampened with glass cleaner; replace the bulb after 8,000 hours |
| Safety | UV rays harmful to eyes and skin; disconnect before any intervention; do not look at the light; gloves recommended |
| Spare Parts Available | UV tube (ref. not specified), magnetic bracket, screws ST4×25, bolts M5×12, nuts M5 |
| Repairability | User replaceable bulb; ballast fixed with screws |
| Warranty | Electronic warranty certificate at www.vevor.com/support |
| Installation Environment | Do not install in a kitchen, wet area, or with flammable/acidic gases |
| Transport Precautions | Keep the package upright, avoid shocks and vibrations |
Frequently Asked Questions - 2402-UV18 Vevor
User questions about 2402-UV18 Vevor
0 question about this device. Answer the ones you know or ask your own.
Ask a new question about this device
Download the instructions for your Air purifier in PDF format for free! Find your manual 2402-UV18 - Vevor and take your electronic device back in hand. On this page are published all the documents necessary for the use of your device. 2402-UV18 by Vevor.
USER MANUAL 2402-UV18 Vevor
Technical Support and E-Warranty Certificate www.vevor.com/support
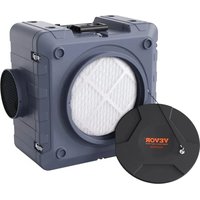
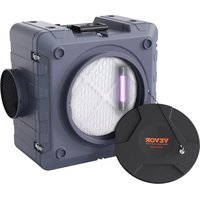
HVAC AIR PURIFIER
MODEL:2402-UV18/2402-UV25
We continue to be committed to provide you tools with competitive price. "Save Half", "Half Price" or any other similar expressions used by us only represents an estimate of savings you might benefit from buying certain tools with us compared to the major top brands and does not necessarily mean to co all categories of tools offered by us. You are kindly reminded to verify carefully when you are placing an order with us if you are actually Saving Half in comparison with the top major brands.
VEVOR®
TOUGH TOOLS, HALF PRICE
HVAC AIR PURIFIER
Model:2402-UV18/2402-UV25
natural_image
Technical line drawing of a mechanical assembly with no visible text or symbolsNEED HELP? CONTACT US!
Have product questions? Need technical support? Please feel free to contact us:
Technical Support and E-Warranty Certificate www.vevor.com/support
This is the original instruction, please read all manual instructions carefully before operating. VEVOR reserves a clear interpretation of o user manual. The appearance of the product shall be subject to the product you received. Please forgive us that we won't inform you ag there are any technology or software updates on our product.
SAFETY INSTRUCTIONS
- Please read and understand this manual carefully before using the Air Purifier.
- The installation should be done by an adult, and children should not it without supervision.
- UV lights are harmful to exposed skin and eyes, causing temporary permanent blindness. Never look straight at the UV light.
- Disconnect the power before installing or replacing the UV bulb, otherwise may cause shock and death.
- Please wear gloves and install the HVAC Air Purifier to avoid cuts installation.
- Transportation Attention : During transportation, the package should be upright, handled with care, prevent strong impact, vibration, extrusion.
- Do not modify the unit in any way. Any modification could damage device or render it dangerous to others.
- Repair or maintenance should only be carried out by a qualified pe
- Only the rated voltage specified in this manual can be used.
- Do not use this product in the kitchen, where the oily fume may the lifetime of the lamps.
- Do not use this product in acidic, alkaline or other organic gas are where may cause fire.
- Do not use this product in flammable and explosive places, other will cause fire.
- The product can only be disassembled after the product is closed minutes.
- The lamp tube contains mercury and must be properly handled.
- Do not clean up the broken lamps with a vacuum cleaner.
- The product is not waterproof, can not be the product to be insta humidifier or other wet environment.
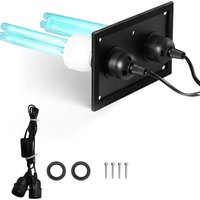
List of kit parts
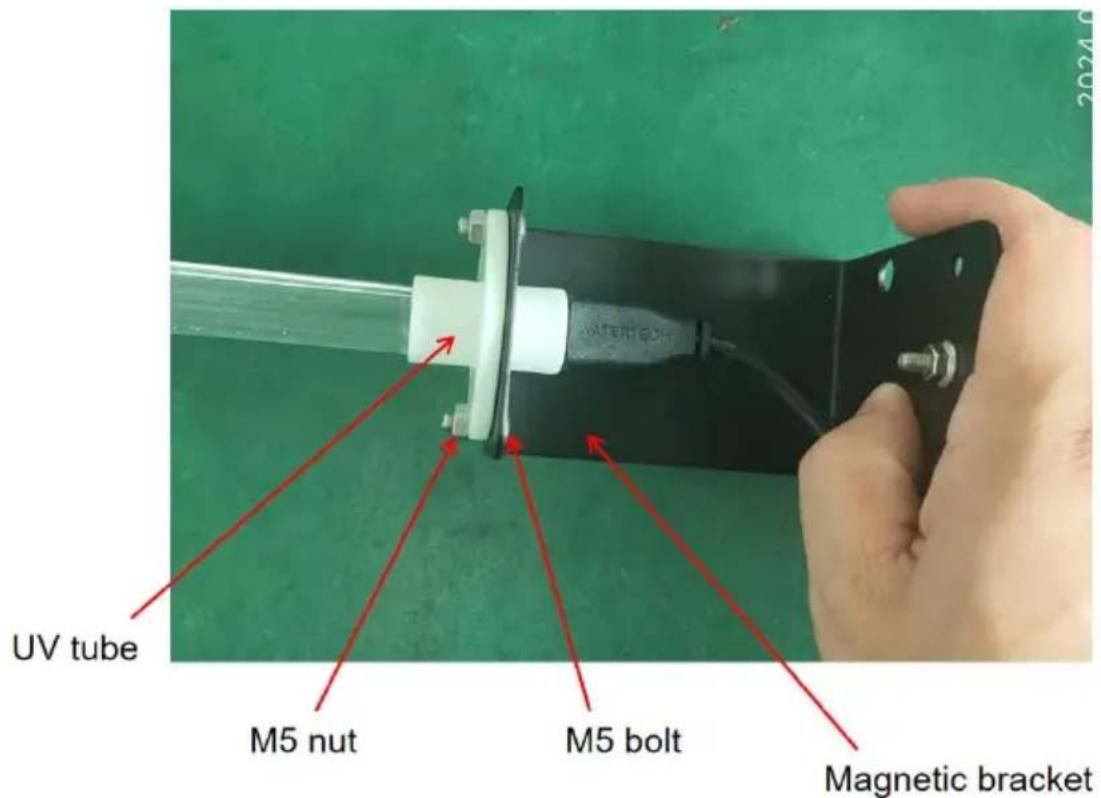
 UV Unit *1pc UV Unit *1pc | 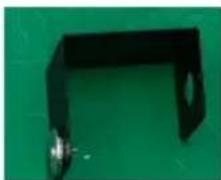 Magnetic bracket*1pc Magnetic bracket*1pc | 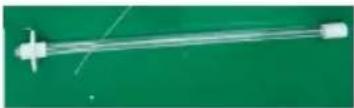 UV tube*1pc UV tube*1pc |
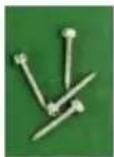 ST4*25 screw *4pcs ST4*25 screw *4pcs | 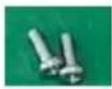 M5*12 bolt*2pcs M5*12 bolt*2pcs |  M5 nut*2pcs M5 nut*2pcs |
PARAMETER LIST
| Model | 2402-UV18 | 2402-UV25 |
| Power | 18W | 25W |
| Lights tube length | 356mm | 436mm |
| Light wavelength | 254nm | 254nm |
| UV lifetime | 8000hours | 8000hours |
| Assembly lamp tube | 1pc | 1pcs |
| American-Standard Input | AC120V 60Hz | AC120V 60Hz |
| European version Input | AC230V 50Hz | AC23V0 50Hz |
| US Power line leng | 3m | 3m |
| European Power line length | 2m | 2m |
| Effective area | 700 ft ^2 | 1100 ft ^2 |
Note: Each model of rated power supply has AC120V and AC230V. I the voltage and frequency information on the product nameplate.
Product size
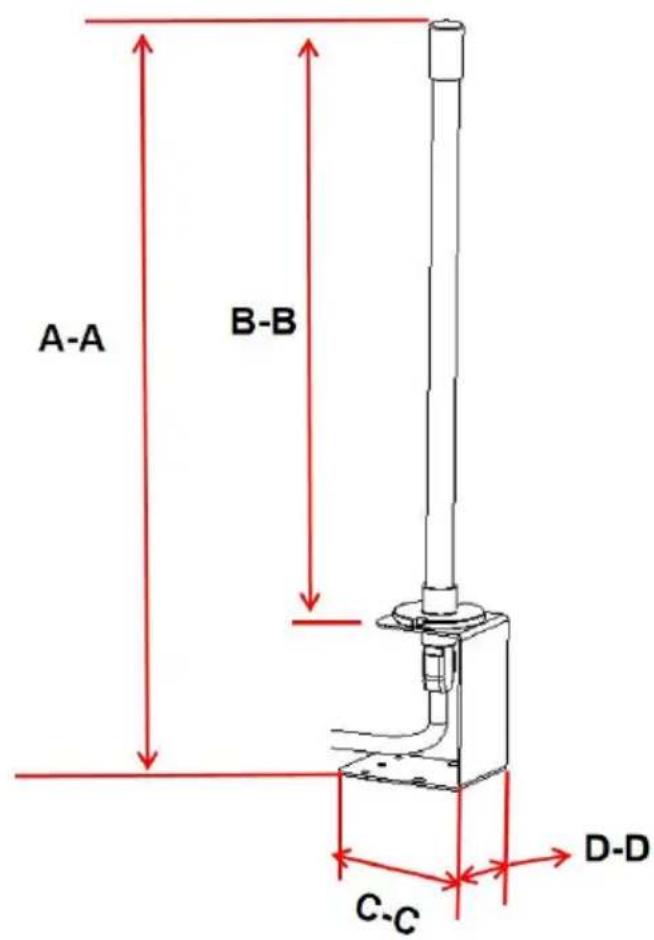
| Model | 2402-UV18 | 2402-UV25 |
| A-A | 435mm | 515mm |
| B-B | About 345mm | About 425mm |
| C-C | 80mm | 80mm |
| D-D | 50mm | 50mm |
Note: Please note whether the interior space of the HVAC pipe can accommodate the product.
Installation Instructions
Selecting Mounting Location
- The unit can be mounted in any orientation, but cannot be installed where people can see the UV lights.
- Choose a location that will make changing/cleaning of the UV bulb easy.
- Install unit on a flat surface of the duct work ABOVE the air con cooling coil ("A Coil") if your HVAC system has air conditioning. If you HVAC system does not have air conditioning, the unit should be installed on the supply air duct if possible. The unit can be installed on a red duct if necessary
CAUTION: Do not install the unit in the “A coil” or under a hur as damage may occur.
If you are unsure if you have chosen a correct mounting location, re your HVAC system's owners manual or call a qualified professional fo assistance.
- Be sure to locate the unit away from any plastic or rubber compo that may be damaged by UV light. If mounting options are limited, p and rubber may be covered with aluminum foil duct tape in order to them from the UV light.
Installation steps
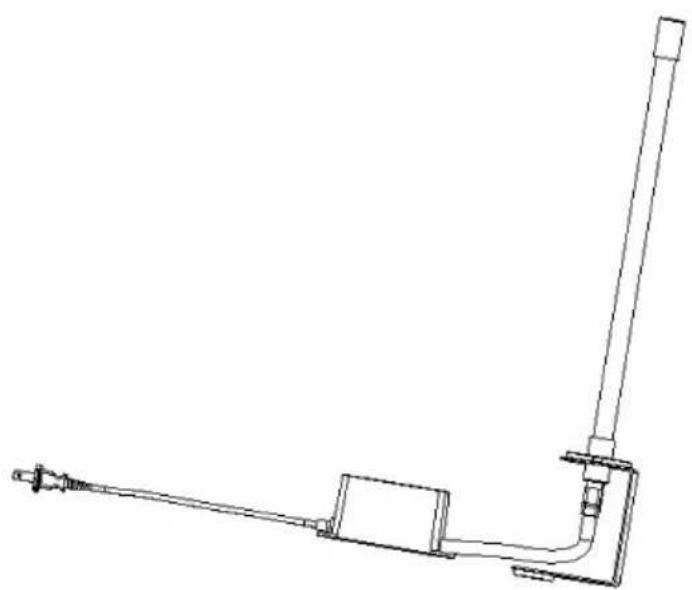
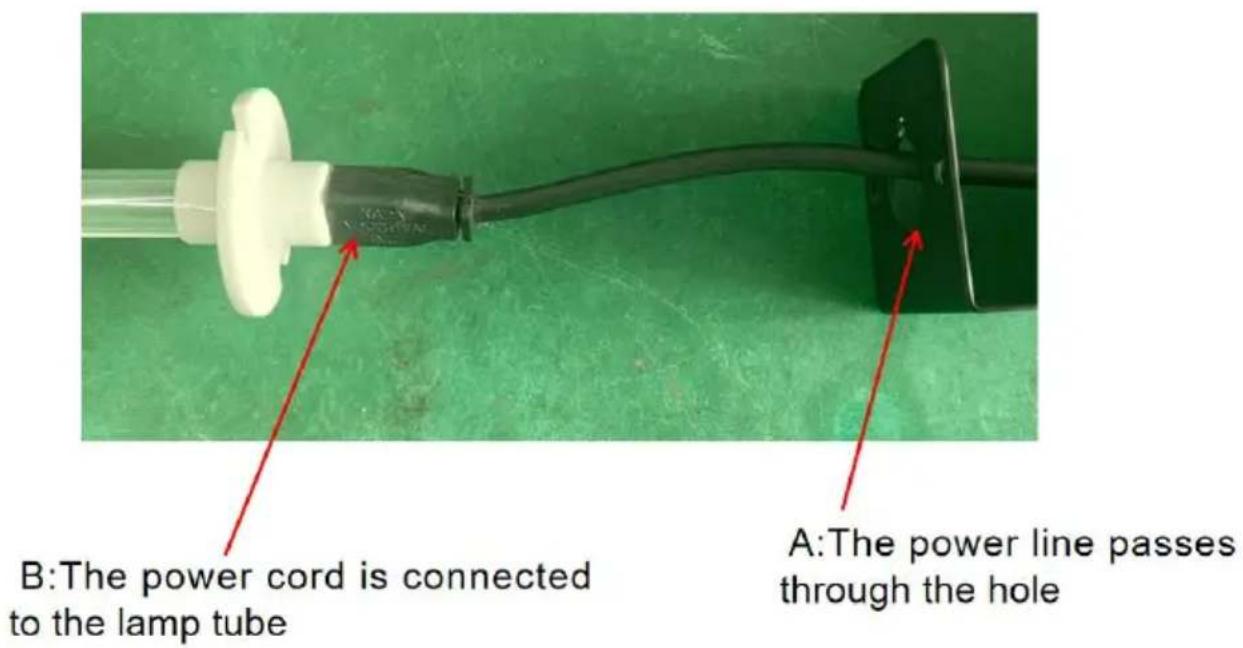
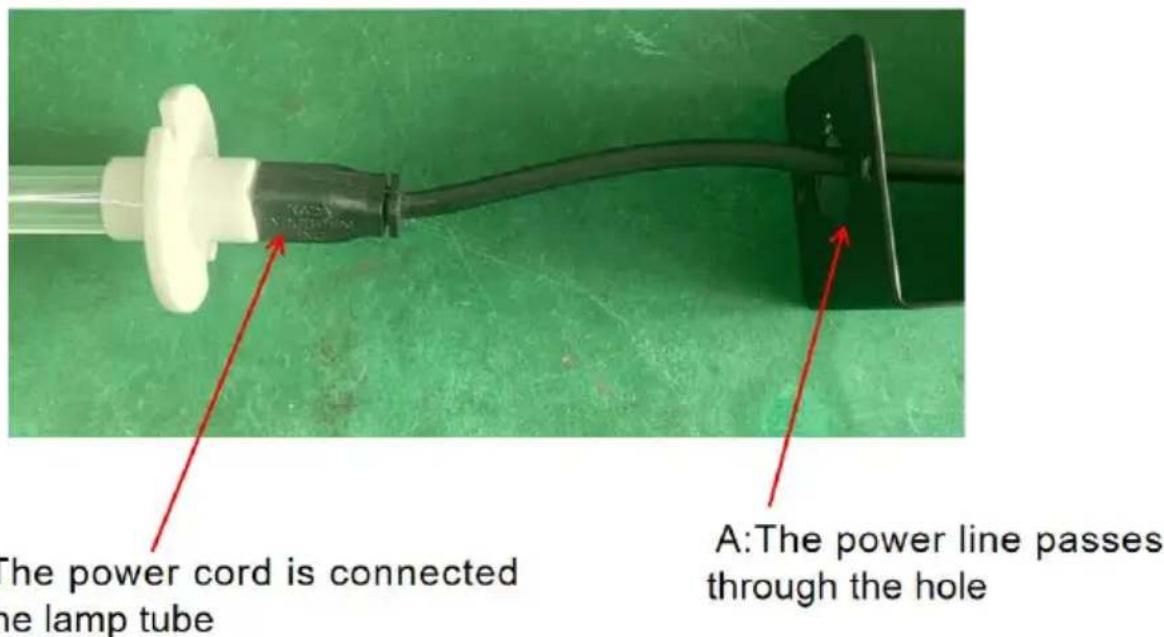
- Pass the power cord through the circular hole of the magnetic b and connect the coupler of the power cord to the lamp base.
2 . Attach the lamp tube to the magnetic holder with two M5 bolts
- Product fixed:
A. The machine holds the inner wall of the pipe to be installed through magnet

B. The product can install the bracket in the pipe through two screw
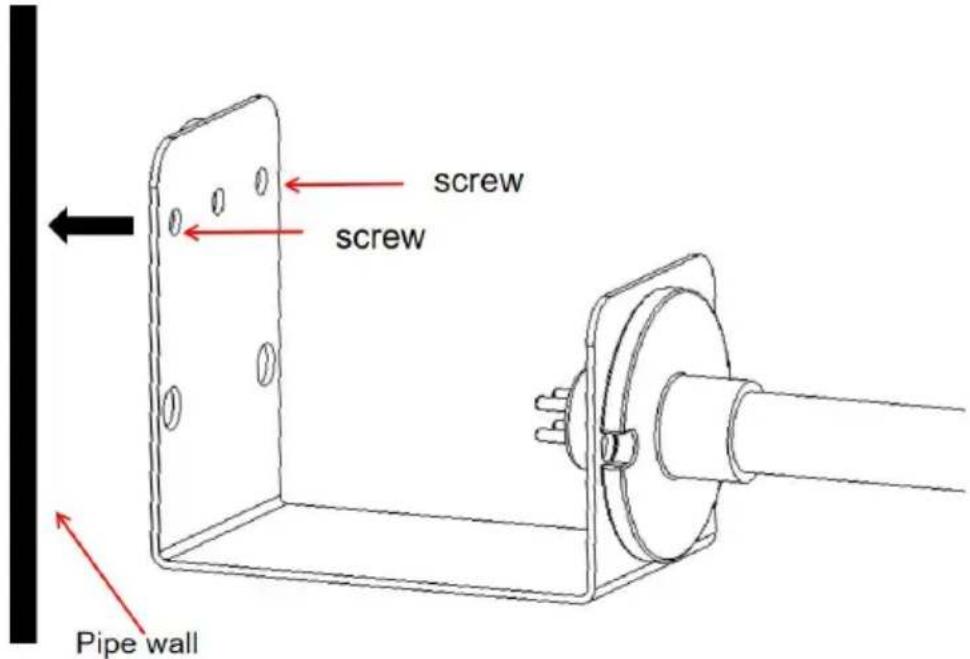
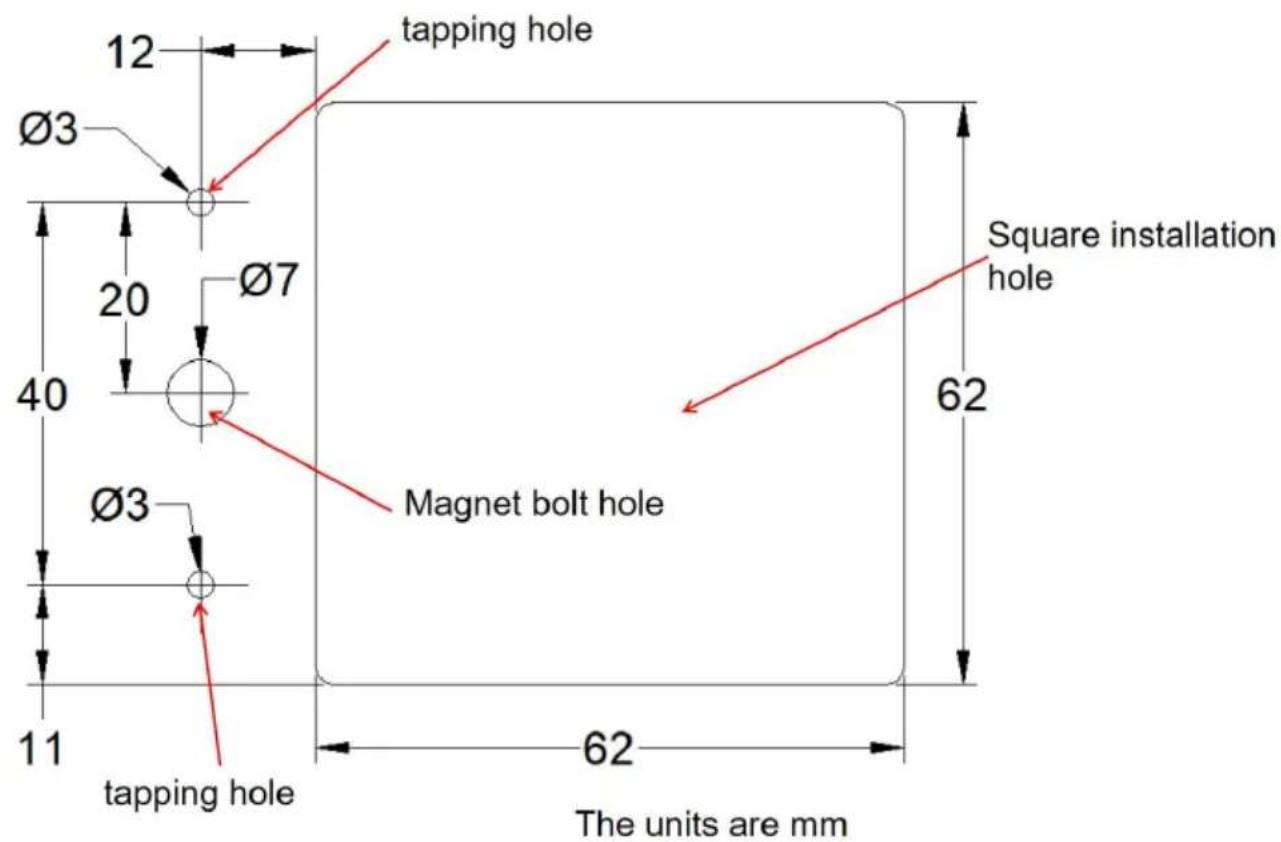
C. Products can also be installed from the outside to the pipeline; First cut an installation hole according to the picture, put the product the pipe. The two screw holes of the magnetic support shall be align the two 3mm drilled screw holes, need to reserve a position of a pow
and then fix the product on the pipe with screws.
After the installation, it is necessary to close the excess incision with aluminum foil tape or other insulation material to avoid UV light exposure and cause damage to people.
Open hole size diagram
Schematic diagram of installation
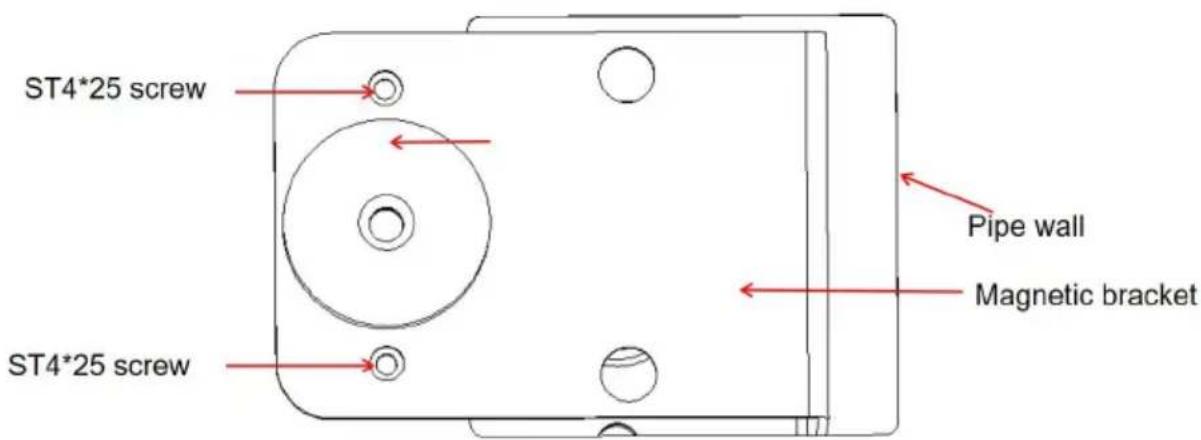
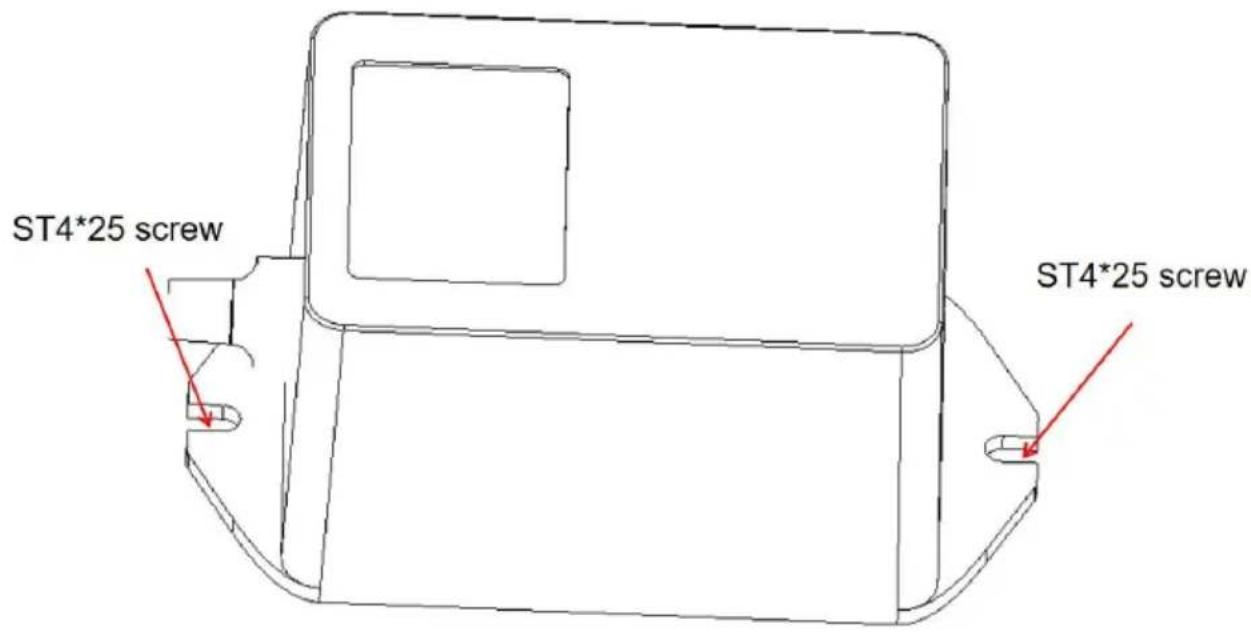
- The ballast can be secured to the pipe wall by two screws.
Bulb Cleaning and Replacement
- Disconnect the power to the HVAC system, unplug unit, and allow bulb(s) to cool for at least 15 minutes before attempting to remove t.
- Remove the 2 support screws and slide the unit from the pipe w system.
3a. To Clean: Hold the unit securely and wipe the UV bulb(s) with a cloth dampened with glass cleaner. If you touch the glass with your be sure to wipe away any fingerprints or dirt with cloth. Make sure it is clean and dry before installing unit back into duct.
3b. To Replace: Use of any bulb not approved for the unit will void warranty and could cause serious injury or damage. Hold the unit sec and push the bulb release button to remove the UV bulb. Install the bulb into the unit by sliding the bulb in from the outside until the bulb into place. If you touch the bulb with your hand, be sure to wipe a fingerprints or dirt with a soft damp cloth. Make sure the bulb(s) is/clean and dry before installing the unit back into the duct.
- Re-install the unit into the duct work and re-install the 2 screws. the screws evenly until unit is securely in place. DO NOT OVERTIGH SCREWS.
- Reconnect the power to the HVAC system and plug the unit back grounded power outlet.
Manufacturer: Shanghaimuxinmuyeyouxiangongsi
Address: Shuangchenglu 803nong11hao1602A-1609shi, baoshanqu, shanghai 200000 CN.
Imported to AUS: SIHAO PTY LTD. 1 ROKEVA STREETEASTWOOD NSW 2122 Australia
Imported to USA: Sanven Technology Ltd. Suite 250, 9166 Anaheim Place, Rancho Cucamonga, CA 91730
| UK | REP |
YH CONSULTING LIMITED. C/O YH Consultin Limited Office 147, Centurion House, London Road, Staines-upon-Thames, Surrey, TW18 4A>
| EC | REP |
Technical Support and E-Warranty Certificate
www.vevor.com/support
VEVOR®
TOUGH TOOLS, HALF PRICE
natural_image
Technical line drawing of a mechanical assembly with no visible text or symbolsBESOIN D'AIDE? CONTACTEZ-NOUS!
| Modèle | 2402-UV18 | 2402-UV25 |
| AA | 435 mm | 515 mm |
| BB | Environ 345 mm | Environ 425 mm |
| CC | 80 mm | 80 mm |
| DD | 50 mm | 50 mm |
natural_image
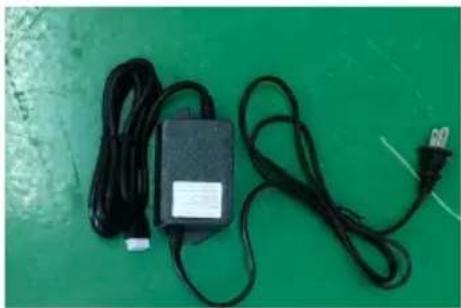
Close-up of a black cable with white connector and red arrows pointing to it, against a green background (no text or symbols)B: The power cord is connected to the lamp tube
A: The power line passes through the hole
Lieu, Rancho Cucamonga, CA 91730
| UK | REP |
YH CONSULTING LIMITED. C/O YH Consultin Limited Office 147, Centurion House, London Road, Staines-upon-Thames, Surrey, TW18 4A>
| EC | REP |
natural_image
Technical line drawing of a mechanical assembly with no visible text or symbolsnatural_image
Black and white photo of a connected power adapter with coiled cable and terminal plug, placed on green surface (no text or symbols visible)natural_image
Black metal bracket with two circular holes, set against a green background (no text or symbols)| Modell | 2402-UV18 | 2402-UV25 |
| AA | 435 mm | 515 mm |
| BB | Etwa 345 mm | Etwa 425 mm |
| CC | 80 mm | 80 mm |
| DD | 50 mm | 50 mm |
B: The power cord is connected to the lamp tube
A: The power line passes through the hole
YH CONSULTING LIMITED. C/O YH Consultin Limited Office 147, Centurion House, London Road, Staines-upon-Thames, Surrey, TW18 4A>
| EC | REP |
www.vevor.com/support
VEVOR®
TOUGH TOOLS, HALF PRICE
natural_image
Technical line drawing of a mechanical assembly with no visible text or symbols| Modello | 2402-UV18 | 2402-UV25 |
| AAA | 435mm | 515mm |
| BB | Circa 345mm | Circa 425mm |
| CC | 80mm | 80mm |
| GG | 50mm | 50mm |
YH CONSULTING LIMITED. C/O YH Consultin Limited Office 147, Centurion House, London Road, Staines-upon-Thames, Surrey, TW18 4A>
| EC | REP |
natural_image
Technical line drawing of a mechanical assembly with no visible text or symbols| Modelo | 2402-UV18 | 2402-UV25 |
| Automóvil club británico | 435 mm | 515 mm |
| CAMA Y DESAYUNO | Aproximadamente 345 mm | Aproximadamente 425 mm |
| C.C. | 80 mm | 80 mm |
| DD | 50 mm | 50 mm |
natural_image
Close-up of a black cable with white connector and red arrows pointing to its ends, against a green background (no text or symbols)B: The power cord is connected to the lamp tube
A: The power line passes through the hole
YH CONSULTING LIMITED. C/O YH Consultin Limited Office 147, Centurion House, London Road, Staines-upon-Thames, Surrey, TW18 4A>
| EC | REP |
natural_image
Technical line drawing of a mechanical assembly with no visible text or symbolsPOTRZEBUJESZ POMOCY? SKONTAKTUJ SIĘ Z NAMI!
YH CONSULTING LIMITED. C/O YH Consultin Limited Office 147, Centurion House, London Road, Staines-upon-Thames, Surrey, TW18 4A>
| EC | REP |
www.vevor.com/support
VEVOR®
TOUGH TOOLS, HALF PRICE
Technisch Ondersteuning en E-garantiecertificaat www.vevor.com/support
HVAC-LUCHTREINIGER
MODEL: 2402-UV18/2402-UV25
natural_image
Technical line drawing of a mechanical assembly with no visible text or symbolsHULP NODIG? NEEM CONTACT MET ONS OP!
| Model | 2402-UV18 | 2402-UV25 |
| AA | 435mm | 515mm |
| BB | Ongeveer345mm | Ongeveer425mm |
| CC | 80mm | 80mm |
| DD | 50mm | 50mm |
Lampen reinigen en vervangen
YH CONSULTING LIMITED. C/O YH Consultin Limited Office 147, Centurion House, London Road, Staines-upon-Thames, Surrey, TW18 4A>
| EC | REP |
natural_image
Technical line drawing of a mechanical assembly with no visible text or symbolsBEHÖVER HJÄLP? KONTAKTA OSS!
| Modell | 2402-UV18 | 2402-UV25 |
| AA | 435 mm | 515 mm |
| BB | Cirka 345 mm | Cirka 425 mm |
| CC | 80 mm | 80 mm |
| DD | 50 mm | 50 mm |
YH CONSULTING LIMITED. C/O YH Consultin Limited Office 147, Centurion House, London Road, Staines-upon-Thames, Surrey, TW18 4A>
| EC | REP |
www.vevor.com/support