
RE 17 AMS 10/10 - Pressure gauge ROTHENBERGER - Free user manual and instructions
Find the device manual for free RE 17 AMS 10/10 ROTHENBERGER in PDF.

| Product type | Three-gas welding, cutting, and brazing station |
| Model | RE 17 AMS 10/10 |
| Brand | Rothenberger |
| Cylinder capacity | 10 L acetylene / 10 L oxygen / 600 ml Maxigas 400 |
| Working temperature | 1250 °C |
| Flame temperature | 3100 °C |
| Welding range | 0.5 to 14 mm |
| Cutting range | 12 to 50 mm |
| Gases used | Acetylene (welding, cutting, brazing) with oxygen; Maxigas 400 (brazing with adapter) |
| Oxygen working pressure | Variable depending on insert: 2.5 to 3.5 bar |
| Acetylene working pressure | Variable depending on insert: 0.2 to 0.5 bar |
| Included accessories | Regulators, twin hoses, transport cart, safety lighter, blowpipe key, nozzle cleaners, flint stones |
| Power source | Gas cylinders (oxygen, acetylene) and Maxigas 400 cartridge |
| Weight | Not specified (estimation: approximately 15 kg with full cylinders) |
| Dimensions | Not specified (height with cylinders: approximately 1.2 m) |
| Ambient operating temperature | Not specified (outdoor or ventilated workshop use) |
| Protection rating | Not applicable (gas equipment) |
| Maintenance | Check seal of fittings, clean nozzles, replace porous hoses |
| Available spare parts | Regulators, hoses, nozzles, welding inserts, flashback arrestors, safety goggles |
| After-sales service | Rothenberger service centers, phone +49 (0) 61 95 / 800 - 8200 |
Frequently Asked Questions - RE 17 AMS 10/10 ROTHENBERGER
User questions about RE 17 AMS 10/10 ROTHENBERGER
0 question about this device. Answer the ones you know or ask your own.
Ask a new question about this device
Download the instructions for your Pressure gauge in PDF format for free! Find your manual RE 17 AMS 10/10 - ROTHENBERGER and take your electronic device back in hand. On this page are published all the documents necessary for the use of your device. RE 17 AMS 10/10 by ROTHENBERGER.
USER MANUAL RE 17 AMS 10/10 ROTHENBERGER
Instructions for use
35400
35401
35403
35798

OverviewA
B Description
Intro
| DEUTSCH - Originalbetriebsanleitung!Bedienungsanleitung bitte lesen und aufbewahren! Nicht wegwerfen! Bei Schäden durch Bedienungsfehler erlischt die Garantie! Technische Änderungen vorbehalten! | Seite 2 |
| ENGLISHPlease read and retain these directions for use. Do not throw them away! The warranty does not cover damage caused by incorrect use of the equipment! Subject to technical modifications! | page 11 |
| FRANÇAISLire attentivement le mode d'emploi et le ranger à un endroit sûr! Ne pas le jeter! La garantie est annulée lors de dommages dûs à une manipulation erronée! Sous réserve de modifications techniques! | page 20 |
| ESPAÑOL¡Por favor, lea y conserve el manual de instrucciones! ¡No lo tire! ¡En caso de daños por errores de manejo, la garantía queda sin validez! Modificaciones técnicas reservadas! | página 29 |
| ITALIANOPer favore leggere e conservare le istruzioni per l’uso! Non gettarle via! In caso di danni dovuti ad errori nell’uso, la garanzia si estingue! Ci si riservano modifiche tecniche! | Pagina 38 |
| TÜRKÇEKullanim açıklamalarini lütfen dikkatlice okuyunuz ve bir yerde muhafaza ediniz! Çöpe atmayiniz! Kullaniminda yapılan hatalar, garantinin silinmesine neden olur! Teknik deðipiklikler yapma hakkimiz saklidir! | sayfa 47 |
| ΕΛΛΗΝΙΚΑΟδηγίες χειρισμού παρακαλείσθε να τις διαβάσετε και να τις φυλάσσετε! Μην τις πετάξετε! Σε ζημιες από σφάλματα χειρισμού παυει να ισχύει η εγγύηση! Με επιφύλαξη για τεχνικές αλλαγές! | Σελίδα 56 |
| РУССКИЙПрочтите инструкцию по эксплуатации и сохраняйте её для дальнейшего использования! В случае поломки инструмента из-за несоблюдения инструкции клиент теряет право на обслуживание по гарантии! Возможны технические изменения! | Страница 65 |
Inhalt
Seite
natural_image
Diagram of a mechanical assembly with a tool and directional arrow (no text or symbols)richtig
natural_image
Diagram of a mechanical tool interacting with a block, showing motion direction (no text or symbols)zu hoch

natural_image
Diagram of a machining process showing a tool pressing into a workpiece with an arrow indicating direction (no text or symbols)zu niedrig
Email: service@rothenberger.com
www.rothenberger.com
10 Entsorgung
1 Safety instructions....12
1.1 Intended use....12
1.2 General safety instructions 12
1.3 Special safety instructions....13
2 Technical dara....14
3 Functions ....15
3.1 Overview (A)....15
3.2 Operational description and start up (B)....15
4 Setting and extinguishing the flame....16
4.1 Setting the flame....16
4.2 Extinguishing the flame....16
5 Exchanging the bottles and the gas cartridges....17
5.1 Exchanging the oxygen bottle....17
5.2 Exchanging the acetylene bottle 17
5.3 Exchanging the Maxigas 400 cartridge....17
6 Malfunctions and maintenance....17
7 Transport and storage....18
8 Accessories....18
9 Customer service....18
10 Disposal....19
Markings in this document:

Danger!
This sign warns against the danger of personal injuries.
Caution!

This sign warns against the danger of property damage and damage to the environment.

Call for action
1.1 Intended use
Through the use of refillable 5L or 10L steel acetylene and oxygen tanks, this universally applicable device allows a long welding time while being light and easy to handle. A device which is also excellent for hard soldering when used in combination with Maxigas 400.
1.2 General safety instructions

ATTENTION! All instructions must be read. Errors due to non-compliance with the instructions below can cause fire and/or severe injury. It is absolutely mandatory to comply with the legal safety regulations and technical guidelines. Damages due to operator error void the warranty.
KEEP THESE INSTRUCTIONS AVAILABLE.
1) Work area
a) Keep your work area neat and clean. Messy or poorly lit work areas can lead to accidents.
b) Do not work with the device in explosive environments containing flammable liquids, gases or dusts. Tools create sparks that can ignite the dust, fumes or gases. Make sure ventilation is adequate. If possible, do not work in closed spaces.
c) Keep children and other people away from the tool during use. If you are distracted, you can lose control of the device.
d) Do not misuse the hoses for carrying or hanging the device. Keep the hoses away from heat, oil, sharp edges and moving parts of the device. Damaged or tangled hoses increase the risk of explosion.
e) Keep the device free of oil and grease. In pure oxygen, oils and greases of any kind can explode on their own. Do not place the device near heat sources (heaters, ovens, open flames, etc.).
2) Personal safety
a) Stay alert, pay attention to what you do, and work sensibly with any tool. Do not use the device if you are tired or under the influence of drugs, alcohol or medication. A single moment of distraction when using the machine can lead to serious injury.
b) Wear personal safety equipment and always wear safety glasses. Depending on the tool type and application, wearing personal safety equipment, such as slip-resistant safety shoes, flame-resistant clothing and safety glasses decreases the risk of injury.
c) Do not be overconfident. Make sure to stand securely and always keep your balance. This allows you to control the device better in unexpected situations.
d) Wear proper clothing. Do not wear loose clothing or jewellery. Keep hair, clothing and gloves away from moving parts. Loose clothing, jewellery or long hair can get caught in moving parts.
3) Careful handling and use of tools
a) Keep unused tools out of the reach of children. Do not allow anyone to use the device who is not familiar with it or who has not read its instructions. Tools are dangerous when used by inexperienced persons.
b) Maintain the device with care. Check to see whether the device's parts are operating properly and do not jam. See whether parts are broken or damaged enough to affect the device's operation. Have the damaged parts repaired before using the device. Many accidents are caused by poorly maintained tools.
c) Never leave the brazing tool unsupervised during use. There is an acute risk of fire.
d) Make sure that the manometers are seated securely on the acetylene and oxygen pressure regulator. Replace damaged manometers only with original ROTHENBERGER replacement parts.
e) Safety check valve for oxygen and acetylene to be used in intellectual property applications.
4) Service
Have your device repaired only by qualified experts and only with original ROTHEN-BERGER replacement parts. This ensures the continued safety of the device.
1.3 Special safety instructions
Acetylene and Maxigas 400 are extremely flammable, colourless, heavier than air, and have a perceptible odour.
Cartridges, acetylene and oxygen tanks must not be handled by children.
Store the cartridges and gas tanks in a well-ventilated area.
Do not smoke when working near the tanks.
Keep the cartridges and gas tanks away from ignition sources.
Check the screw joints' tightness using foaming substances (e.g., soapy water, leak detection spray).
Close the tank valves during malfunctions and after work.
Do not use, transport and store the cartridges or bottles in a horizontal position. When cartridges lie flat, liquid Maxigas 400 enters the gas cartridge valve and the burner nozzle, and that leads to malfunctions.
Acetylene bottles must be stood upright when removing gas from them or with their valve 40 cm higher than the foot of the bottle in order to avoid liquid acetone also being dragged out of the bottle.
If medical advice is needed, have product container or label at hand.
Read label before use.
IF IN EYES: Rinse cautiously with water for several minutes. Remove contact lenses, if present and easy to do. Continue rinsing.
Avoid breathing in dust/smoke/gas/mist/vapour/aerosol.
IF THEY ARE BREATHED IN: Go out into the fresh air and stay quietly in one in position which eases breathing.
Eliminate all ignition sources if safe to do so.
Leaking gas fire: Do not extinguish, unless leak can be stopped safely.
In case of fire: Stop leak if safe to do so.
Keep the pressure reducer free of grease and oil.

DANGER WARNINGS! Contains gas under pressure; may explode if heated!
Causes serious eye irritation! May cause drowsiness or dizziness! May cause or intensify fire; oxidiser!
2 Technical dara
| RE 17 UNIVERSAL Triple Gas System AMS 5/5 | RE 17 UNIVERSAL Triple Gas System AMS 10/10 | RE 17 STANDARD Triple Gas System AMS 10/10 | |
| Product number: | 35400 | 35401 | 35798 |
| Cylinder contents | 5 l acetylene / 5 l oxygen / 600 ml Maxigas 400 | 10 l acetylene / 10 l oxygen / 600 ml Maxigas 400 | 10 l acetylene / 10 l oxygen / 600 ml Maxigas 400 |
| Welding range: | 0.5 to 14 mm | 0.5 to 9 mm | |
| Cutting range: | 12.0 to 50 mm | 12.0 to 25 mm | |
| Welding and cutting: | Acetylene with oxygen | ||
| Hard soldering: | Acetylene with oxygen or Maxigas 400 with adapter and torch (accessories) | ||
| Operating temperature: | 1250°C | ||
| Flame temperature: | 3100°C | ||
Welding inserts
| Welding insert | Welding size | Article-No. | Gas type | Oxygen pressure | Acetylene-pressure | Oxygen-consumption | Acetylene-consumption |
| Size | [mm] | [bar] | [bar] | [l/h] | [l/h] | ||
| 1 | 0,5 - 1,0 | 35325 | Acetylene | 2,5 | 0,2 | 80 | 80 |
| 2 | 1,0 - 2,0 | 35326 | 160 | 160 | |||
| 3 | 2,0 - 4,0 | 35327 | 315 | 315 | |||
| 4 | 4,0 - 6,0 | 35328 | 500 | 500 | |||
| 5 | 6,0 - 9,0 | 35329 | 800 | 800 | |||
| 6 | 9,0 - 14,0 | 35334 | 1250 | 1250 |
Flame cutting nozzles
| Nozzle | Cutting size | Article No. | Oxygen-pressure | Acetylene-pressure |
| Size | [mm] | [bar] | [bar] | |
| 1/32 | 12-25 | 35341 | 2,0 | ≤ 0,5 |
| 3/64 | 25-50 | 35344 | 2,5 | |
| 1/16 | 50-100 | 35345 | 3,5 |
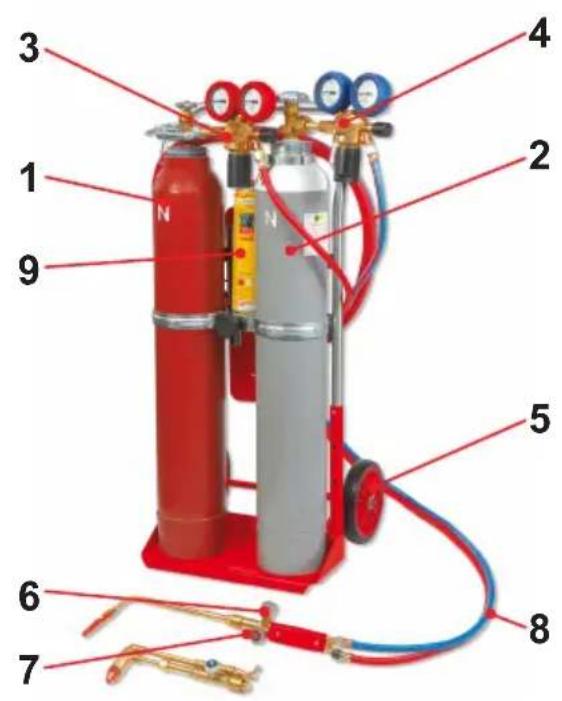
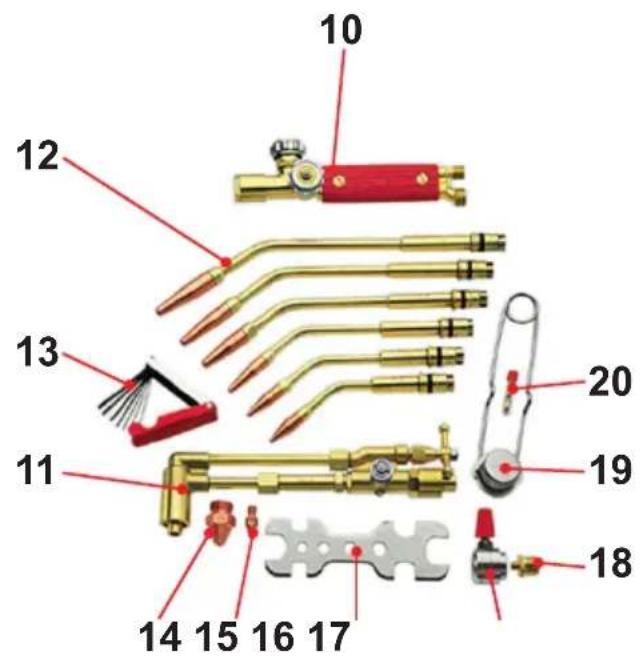
3.1 Overview (A)
| 1 | Acetylene cylinder | 8 | Twin tubing bundle | 15 | Cutting nozzle |
| 2 | Oxygen cylinder | 9 | Maxigas 400 | 16 | Torch key |
| 3 | Acetylene cylinder welding regulator | 10 | RE17 handle | 17 | Gas control valve Maxigas |
| 4 | Oxygen cylinder welding regulator | 11 | RE17 wing lever | 18 | Tube adapter Ma-xigas |
| 5 | Transport carriage | 12 | RE17 welding inserts | 19 | Safety lighter |
| 6 | Rubber caps red | 13 | Nozzle cleaner | 20 | Replacement flints |
| 7 | Rubber caps blue | 14 | Heating nozzle |
3.2 Operational description and start up (B)
Welding with high-performance welding nozzles:
Basically, the welding flame should burn neutrally (the gas mixture is balanced, see 4.1), and its size should be adjusted to the material thickness, the weld shape, the welding position and the heat conductivity of the material.
When welding steel at greater thicknesses, open both valves wide, and when welding thinner welding steel plates close the valves somewhat.
Preheat the material and welding rod. As soon as the metal begins to melt on both sides of the seam, introduce the welding rod. Make sure that the welding area heats evenly. Run the burner in half circles around the welding rod.
Brazing:
Clean the connecting surfaces polish them and round off the edges. Preheat the brazing area.
Place the tip of the soldering rod onto the soldering area, melt a drop of solder, and spread it under constant flame movement.
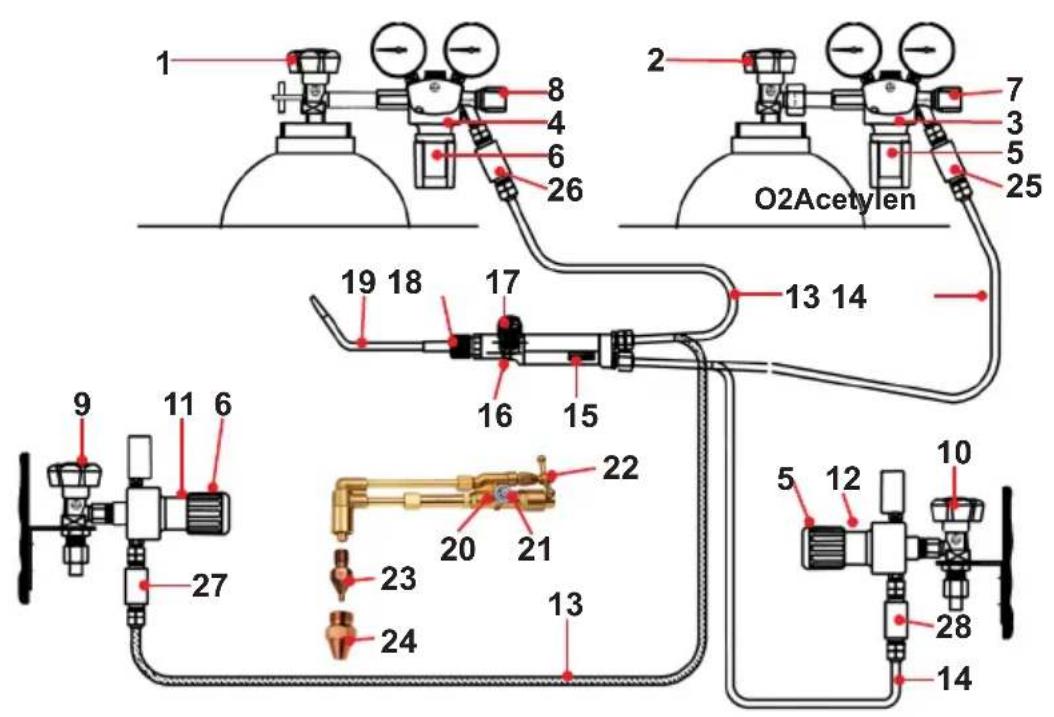
Torch cutting:
→ Select the cutting nozzles (23) according to the thickness of the workpiece (see Technical Data) and screw into the wing lever cutting insert (20). Now also screw the heating nozzle (24) into the wing lever cutting insert (20). Now connect up this unit with the hand grip (15).
To do this use a suitable installation wrench. Only use clean, undamaged original ROTHENBERGER cutting nozzles. Ensure that the sealing surfaces on the nozzles and the cutting head are perfect.
Adjusting the operating pressures
→ Initially keep the adjusting valves for oxygen and fuel gas (16 and 17) closed on the hand grip (15).
→ Slowly open the bottle valves (1 and 2) or the removal valves (9 and 10) on the distribution line by turning them to the left.
→ Open the shutoff valve (7) on the oxygen pressure regulator and the adjusting valve for oxygen (16) on the hand grip (15) by turning to the left and also open the cutting oxygen wing lever (22) through tipping to the left.
→ Adjust the operating pressure (see Technical Data) through turning the adjusting screw (5) on the bottle pressure reducer for oxygen (3).
→ Close the cutting oxygen wing lever (22) by tipping it to the right and close the adjusting valve for oxygen (16) by turning it to the right.
→ Open the shutoff valve (8) on the fuel gas pressure regulator and adjust the fuel gas pressure (see Technical Data) through turning the adjusting screw (6).
Ignition and adjustment of the flame
→ Before igniting, make sure that the connections between the containers and the regulator valves have no gas leaks (use a leak location spray or soapy water).
→ First open the adjusting valve for oxygen (16) on the hand grip (15) by turning to the left then open the preheating oxygen valve (21) and the adjusting valve for fuel gas (17) by turning to the left.
→ Ignite the flowing out gas mixture immediately using a suitable igniter. Adjust the flame into a neutral condition by making adjustments on the preheating oxygen valve (21) or the adjusting valve for oxygen (16) and the adjusting valve for fuel gas (17) (like the welding flame, see 4.1).
→ Open the cutting oxygen wing lever (22) completely by tipping it to the left, or reregulate the oxygen pressure (see Technical Data). Adjust the flame into a neutral condition again and then close the cutting oxygen wing lever (22) by tipping it to the right.
Beginning to cut
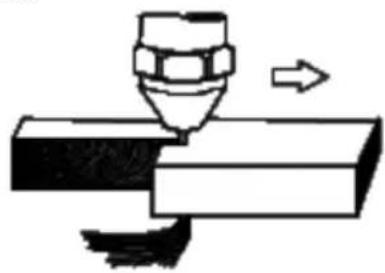
→ Put the torch in first cut position and use the heating flame to heat up the workpiece to ignition temperature, approximately bright red

Caution! Do not melt down the material! Then open the cutting oxygen wing lever (22) by tipping it to the left and slowly move the burner into the cutting position
Cutting speed
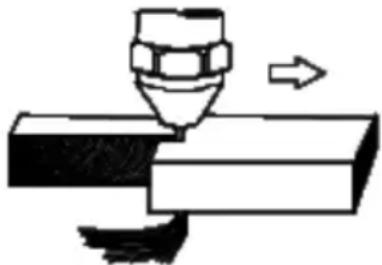
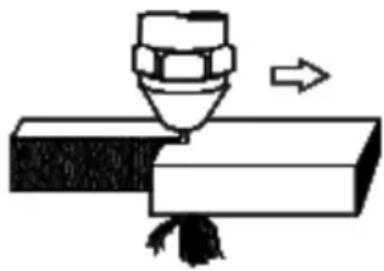
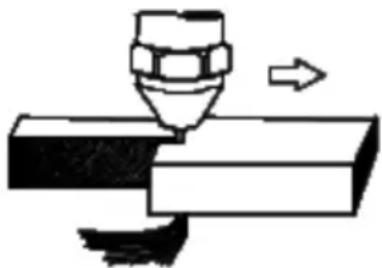
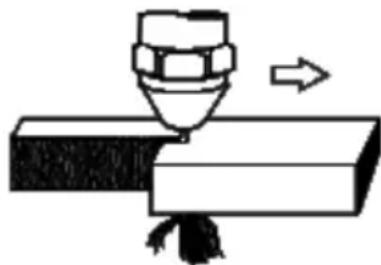
The correct cutting speed can be recognized by the slag discharge, vertical flying sparks and cutting noise.
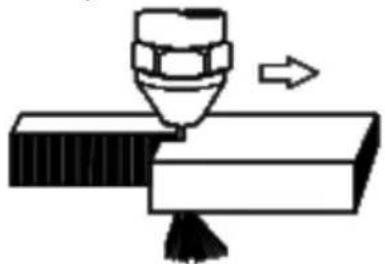
natural_image
Diagram of a mechanical assembly with a tool and directional arrow (no text or symbols)correct
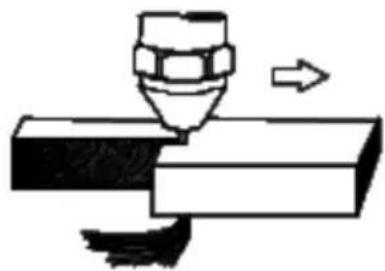
natural_image
Diagram of a mechanical component being cut with an arrow indicating direction (no text or symbols)to high

natural_image
Diagram of a machining process showing a tool pressing into a workpiece (no text or symbols present)to low
4 Setting and extinguishing the flame
4.1 Setting the flame
With the hand dial marked red on the handle, adjust the size and appearance of the flame. If the flame cannot be ignited or cuts off, the gas pressure is too high. In that case, choke off the gas at the torch handle (the dial marked red) by turning it rightward.
The oxygen valve (the dial marked blue) must be completely open at the torch handle. If the flame looks yellow, there is too much gas. Carefully choke the gas valve (the dial marked red) at the torch handle by turning it farther rightward.
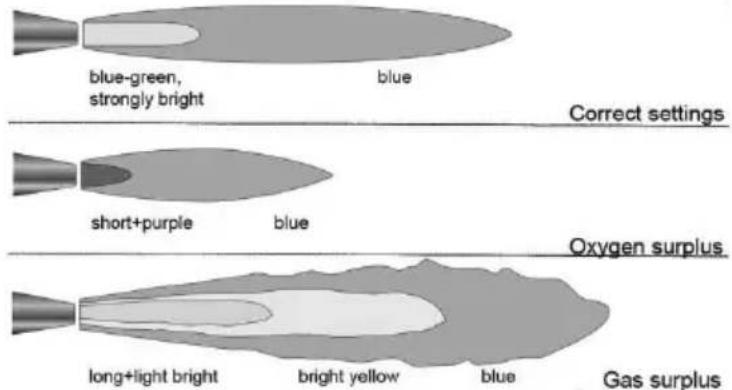
Then set to a neutral flame. This means that the strongly glowing blue-green core of the flame must be sharply delineated from the blue border of the flame (the secondary flame).
4.2 Extinguishing the flame
To extinguish the flame, first close the gas valve (the dial marked red) and then the oxygen valve (the dial marked blue) at the torch handle by turning rightward.
Close the acetylene and the oxygen tank valve by turning them rightward. Also close these valves during extended breaks.
5 Exchanging the bottles and the gas cartridges
5.1 Exchanging the oxygen bottle
→ Close the oxygen bottle (2) valve by turning it to the right.
→ Screw off the oxygen pressure regulator (3) by turning it counter-clockwise using a suitable spanner (spanner width 32).
→ Remove the oxygen bottle from its holder and unscrew the protective cap. Now replace the empty bottle by a full one and fasten it to the frame.
→ Ensure that the gasket in the oxygen pressure regulator is present and intact.
→ In so doing, make sure that the connections are free of oil and grease.
→ Remove the protective cap on the full bottle and screw the oxygen pressure regulator in a clockwise direction onto the oxygen bottle. Use a suitable spanner to tighten it down.
5.2 Exchanging the acetylene bottle
→ Close the acetylene bottle (1) valve by turning it to the right.
→ Screw off the acetylene pressure regulator (4) by turning it counter-clockwise.
→ Remove the acetylene bottle from its holder and unscrew the protective cap. Now replace the empty acetylene bottle by a full one and fasten it to the frame.
→ In so doing, make sure that the connections are free of oil and grease.
→ Remove the protective cap on the full bottle and screw the acetylene pressure regulator in a clockwise direction onto the acetylene bottle.
5.3 Exchanging the Maxigas 400 cartridge
→ Close the gas regulating valve by turning it to the right.
→ Pull the Maxigas 400 cartridge with its gas regulating valve and the hose line upward and out of the mounting.
→ Unscrew the Maxigas 400 cartridge to the left from the gas regulating valve.
→ Ensure that the gasket in the gas regulating valve is present and intact.
→ Only original ROTHENBERGER Maxigas 400 cartridges may be used. Install a full Maxigas 400 cartridge into the gas regulating valve by turning it to the right.
→ Lead the full Maxigas 400 cartridge with the mounted gas regulating valve and hose line into the holder.
6 Malfunctions and maintenance
| Problem | Cause / Solution |
| The flame turns yellow | Either the oxygen bottle valve is closed, or it is not open wide enough or the oxygen bottle is empty. Open the oxygen tank valve. Replace the empty oxygen tank with a full one. |
| The flame gets smaller or lifts off the burner. | Either the acetylene bottle valve is closed, or it is not open wide enough or the acetylene bottle is empty. Open the acetylene valve by turning it (farther) left, or replace the acetylene tank. |
! Regularly check the hoses for cuts and leaks (visual inspection). Replace the hose package with its single-tank fuse if the single-tank fuse has triggered after a flashback. Hoses become porous with time. Therefore, replace the hose package as soon as small cuts appear on the hoses.
7 Transport and storage
The bottle valves (1 + 2) on the bottles must be closed to transport them.
After finishing the welding work: With the oxygen and acetylene bottle valves (1 + 2) closed, slowly open the valves (16 + 17) on the handle piece and allow the residual quantity of gas to escape (note the manometer display). This discharges the hoses and the oxygen pressure regulator.
Remove the acetylene and oxygen pressure regulator. Screw off the gas cartridge valve of the Maxigas 400 cartridge. The hoses can be connected to the oxygen pressure regulator and the gas cartridge valve.
The protective cap must always be screwed on during transport!
Secure the device against tilting and slipping on the loading surface. Store and transport only with the containers upright.
Reusable containers must be filled only by authorized facilities.
Refilling in an unintended manner can cause severe accidents.
8 Accessories
| Accessory Name | ROTHENBERGER Part Number |
| Protective guard f. oxygen pressure red. | 35146 |
| Protective guard f.acetylen pressure red | 35140 |
| Nozzle Cleaner, 10 pcs. | 510105 |
| Torch Spanner | 510106 |
| Soapstone Marker, 100x10x10mm | 561550 |
| Wire scratch brush, 3rows | 561351 |
| Wire scratch brush, 4rows | 561352 |
| Flame protective mat, 33x50cm | 31050 |
| Oxygen refilling bend | 35199 |
| Dual hoses A/S, 2,5m | 35221 |
| Oxygen pressure reducer, ISO 5171 | 35634 |
| Acetylene pressure reducer, ISO 5171 | 35794 |
| Welding Goggles DIN EN 166 | 540620 (A4), 540621 (A5) |
| Blowback Prevention acetylen | 540365 |
| Blowback Prevention oxygen | 540360 |
| Hand-held-/ Magnet Welding Mirror | 540850 / 540855 |
| RE 17 Pipe Welding Attachments, flexible | www.rothenberger.com |
9 Customer service
The ROTHENBERGER service locations are available to help you (see listing in catalog or online) and replacement parts and service are also available through these same service locations.
Order your accessories and spare parts from your specialist retailer or using our service-after-sales hotline:
Phone: +49 (0) 61 95 / 800 - 8200
Fax: +49 (0) 61 95 / 800 - 7491
Email: service@rothenberger.com
www.rothenberger.com
10 Disposal
Components of the unit are recyclable material and should be put to recycling. For this purpose registered and certified recycling companies are available. For an environmental friendly disposal of the non-recyclable parts (e.g. electronic waste) please contact your local waste disposal authority.
For EU countries only:
Do not dispose electric tools with domestic waste. In accordance with the European Directive 2012/19/EC the disposal of electrical and electronic equipment and its implementation as national law, electric tools that are no longer serviceable must be collected separately and utilised for environmentally compatible recycling.
natural_image
Diagram of a mechanical assembly with a tool and directional arrow (no text or symbols)correct
natural_image
Diagram of a mechanical press or cutting tool with a conical component and an arrow indicating direction (no text or symbols present)trop haut

natural_image
Diagram of a machining process showing a tool pressing into a workpiece (no text or symbols present)trop bas
Email: service@rothenberger.com
www.rothenberger.com
natural_image
Diagram of a robotic arm cutting a rectangular object with a tassel, showing motion direction (no text or symbols)correcto

natural_image
Diagram of a mechanical press or cutting tool with a conical component and an arrow indicating direction (no text or symbols)demasiado alta
natural_image
Diagram of a machining process showing a tool pressing into a workpiece (no text or symbols present)demasiado bajo
Email: service@rothenberger.com
www.rothenberger.com
10 Eliminación
natural_image
Diagram of a mechanical assembly with a tool and directional arrow (no text or symbols)correcto
natural_image
Diagram of a mechanical component being cut with an arrow indicating motion (no text or symbols)troppo alto

natural_image
Diagram of a mechanical tool interacting with a block, showing motion direction (no text or symbols)troppo basso
Email: service@rothenberger.com
www.rothenberger.com
10 Smaltimento
Email: service@rothenberger.com
www.rothenberger.com
10 Atıklar İçin
natural_image
Diagram of a mechanical assembly with a tool and directional arrow (no text or symbols)Σωστή

natural_image
Diagram of a mechanical press or cutting tool with a tool and arrow indicating motion (no text or symbols)Πολύ υψηλή

natural_image
Diagram of a machining process showing a tool pressing into a workpiece with an arrow indicating direction (no text or symbols)Πολύ χαμηλ ή
Email: service@rothenberger.com
www.rothenberger.com
natural_image
Diagram of a mechanical assembly with a tool and directional arrow (no text or symbols)Правильна

natural_image
Diagram of a mechanical component being cut with an arrow indicating motion (no text or symbols)Слишком высокая
natural_image
Diagram of a mechanical press or cutting tool with a conical component and directional arrow (no text or symbols)Слишком низкая
ROTHENBERGER Worldwide
| Australia | ROTHENBERGER Australia Pty. Ltd.Unit 6 · 13 Hoyle Avenue · Castle Hill · N.S.W. 2154Tel + 61 2 / 98 99 75 77 · Fax + 61 2 / 98 99 76 77rothenberger@rothenberger.com.auwww.rothenberger.com.au | Italy | ROTHENBERGER Italiana s.r.l.Via G. Reiss Romol 17-19 · I-20019 Settimo MilaneseTel + 39 02 / 32 50 601 · Fax + 39 02 / 38 50 0151Info@rothenberger.it · www.rothenberger.it |
| Austria | ROTHENBERGER Werkzeuge- und Maschinen Handelsgesellschaft m.b.H.Gewerbeparkstraße 9 · A-5081 AntifTel + 43 62 46 / 7 20 91-45 · Fax + 43 62 46 / 7 20 91-15office@rothenberger.at · www.rothenberger.at | Netherlands | ROTHENBERGER Nederland by Postbus 45 · NL-5120 AA IRjenTel + 31 1 61 / 29 55 79 · Fax + 31 1 61 / 29 39 08Info@rothenberger.nl · www.rothenberger.nl |
| Belgium | ROTHENBERGER Benelux bvbaAntwerpsesteenweg 59 · B-2630 AartselaarTel + 32 3 / 8 77 22 77 · Fax + 32 3 / 8 77 03 94Info@rothenberger.be · www.rothenberger.be | Poland | ROTHENBERGER Polska Sp.z.o.o.Ul. Anopoli 4A · Budymek C · FL-03-256 WanszawaTel + 48 22 / 2 13 59 00 · Fax + 48 22 / 2 13 59 01bluro@rothenberger.pl · www.rothenberger.pl |
| Brazil | ROTHENBERGER do Brasil LTDAAv. Fagundes de Oliveira, 538 - Galpão A409950-300 · Dladema / SP - BrazilTel + 55 111 / 40 44-4748 · Fax + 55 111 / 40 444-50851spacente@rothenberger.com.br · www.rothenberger.com.br | Russia | ROTHENBERGER RussiaAvtosavodskaya str. 2511S260 Moscow, RussiaTel + 7 485 / 782 59 44 · Fax + 7 485 / 782 58 46Info@rothenberger.ru · www.rothenberger.ru |
| Bulgaria | ROTHENBERGER Bulgaria GmbHBoul. Sltnjakovo 79 · BG-11111 SofiaTel + 35 9 / 2 9 46 14 59 · Fax + 35 9 / 2 9 46 12 05Info@rothenberger.bg · www.rothenberger.bg | South Africa | ROTHENBERGER-TOOLS SA (PTY) Ltd.P.O. Box 4360 · Edenvalle 1610165 Vanderbilt Street, Meadowdale Gemiston Gauteng (Johannesburg), South AfricaTel + 27 111 / 3 72 986 31 · Fax + 27 111 / 37 72 986 32Info@rothenberger.co.za · www.rothenberger.co.za |
| China | ROTHENBERGER Pipe Tool (Shanghai) Co.,Ltd.D-4, No.195 Olanpu Road.East New Area of SongjiangIndustrial Zone, Shanghai 201611, ChinaTel + 86 21 / 67 60 20 61 · + 86 21 / 67 60 20 67Fax + 86 21 / 67 60 20 63 · office@rothenberger.cn | Spain | ROTHENBERGER S.A.Ctra. Durango-Borino, Km 2 · E-48220 Absdano (Vizcaya)(P.O. Box) 1117 - E-48200 Durango (Vizcaya)Tel + 34 94 / 6 21 01 00 · Fax + 34 94 / 6 21 01 31export@rothenberger.es · www.rothenberger.es |
| Czech Republic | ROTHENBERGER CZPrumyslova 1306/7 · 102 00 Praha 10Tel +420 271 730 183 · Fax +420 267 310 187prodej@rothenberger.cz · www.rothenberger.cz | Sweden | ROTHENBERGER Sweden ABHemvärnsgatan 22 · S- 171 54 Solna, SverfjeTel + 46 8 / 54 60 23 00 · Fax + 46 8 / 54 60 23 01roswe@rothenberger.se · www.rothenberger.se |
| Denmark | ROTHENBERGER Scandinavia AVSSmedevænget 8 · DK-9560 HadsundTel + 45 98 / 15 75 66 · Fax + 45 98 / 15 68 23roscan@rothenberger.dk | Switzerland | ROTHENBERGER (Schweltz) AGHerostr. 9 · CH-8048 ZürichTel + 41 (0)44 435 30 30 · Fax + 41 (0)44 401 06 08Info@rothenberger-werkzeuge.ch |
| France | ROTHENBERGER France S.A.24, rue des Draplers, BP 45033 · F-57071 Metz Cedex 3Tel + 33 3 / 87 74 92 92 · Fax + 33 3 / 87 74 94 03Info-fr@rothenberger.com · www.rothenberger.cfr | Turkey | ROTHENBERGER Tes. Aktive Mok. San. Tic Ltd. 38iPoyraz Sok. No 20/3 - Detay Is MerkeziTR-34722 Kacidkoy-IstanbulTel + 90//216 449 24 85 · Fax + 90//216 449 24 87rothenberger@rothenberger.com.trwww.rothenberger.tr |
| Germany | ROTHENBERGER Deutschland GmbHIndustriestraße 7 · D-65779 Kelkhelm/GermanyTel + 49 61 95 / 800 61 00 · Fax + 49 61 95 / 800 37 30verkauf-deutschland@rothenberger.comwww.rothenberger.com | UAE | ROTHENBERGER Middle East FZCOPO Box 261190 · Jebel All Free ZoneDubai, United Arab EmiratesTel + 971 // 48 83 97 77 · Fax + 971 // 48 83 97 57office@rothenberger.se |
| Greece | ROTHENBERGER Werkzeuge Produktion GmbHLilenthalstraße 71- 87 · D-37235 Hesselsch-LichtenauTel + 49 56 02 / 93 94-0 · Fax + 49 56 02 / 93 94 36 | UK | ROTHENBERGER EQUIPMENT TRADING & SERVICES LLCPO Box 91208 · Mussafah Industrial AreaAbu Dhabi, United Arab EmiratesTel + 971 // 25 50 01 54 · + 971 // 25 50 01 53ueesales@rothenberger.se |
| ROTHENBERGER Hungary Kit.Gubacst út 26 · H-1097 BudapestTel + 36 1 / 3 47- 50 40 · Fax + 36 1 / 3 47 - 50 59Info@rothenberger.hu · www.rothenberger.hu | USA | ROTHENBERGER USA LLC7130 Clinton Road · Loves Park, IL 611111.USATel. +1 // 60 05 45 76 96 · Fax + 1 // 61 56 33 08 79plpetools@rothenberger-usa.comwww.rothenberger-usa.com | |
| India | ROTHENBERGER India Pvt. Ltd.Plot No 17, Sector - 37, Pace city-IGurgaon, Haryana - 122 001, IndiaTel. 91124- 4618800 - Fax 91124-4019471contactus@rothenberger.indla.comwww.rothenberger.com | ROTHENBERGER Werkzeuge GmbHIndustriestraße 7D- 65779 Kelkheim / GermanyTelefon + 49 (0) 61 95 / 800 - 0Fax + 49 (0) 6195 / 800 - 3500 |
info@rothenberger.com

- OverviewA
- B Description
- Inhalt
- Seite
- Entsorgung
- Safety instructions....12
- Technical dara....14
- Functions ....15
- Setting and extinguishing the flame....16
- Exchanging the bottles and the gas cartridges....17
- Malfunctions and maintenance....17
- Transport and storage....18
- Accessories....18
- Customer service....18
- Disposal....19
- Markings in this document:
- Intended use
- General safety instructions
- KEEP THESE INSTRUCTIONS AVAILABLE.
- 1) Work area
- 2) Personal safety
- 3) Careful handling and use of tools
- 4) Service
- Special safety instructions
- Overview (A)
- Operational description and start up (B)
- Welding with high-performance welding nozzles:
- Brazing:
- Torch cutting:
- Adjusting the operating pressures
- Ignition and adjustment of the flame
- Beginning to cut
- Cutting speed
- Setting and extinguishing the flame
- Setting the flame
- Extinguishing the flame
- Exchanging the bottles and the gas cartridges
- Exchanging the oxygen bottle
- Exchanging the acetylene bottle
- Exchanging the Maxigas 400 cartridge
- Transport and storage
- Customer service
- Disposal
- For EU countries only:
- Eliminación
- Smaltimento
- Atıklar İçin
- ROTHENBERGER Worldwide
Brand : ROTHENBERGER
Model : RE 17 AMS 10/10
Category : Pressure gauge