
LS-700 - Turntable LENCO - Free user manual and instructions
Find the device manual for free LS-700 LENCO in PDF.

| Product Type | Hi-Fi high-power vinyl turntable |
| Brand | Lenco |
| Model | LS-700 |
| Dimensions (W x D x H) | 430 x 350 x 156 mm (lid closed) |
| Weight (turntable) | 9.5 kg |
| Weight per speaker | 5.1 kg |
| Power consumption | 300 W |
| Standby consumption | 0.3 W |
| Bluetooth version | 5.2 |
| Output power (PHONO) | 2 x 45 W RMS |
| Output power (Bluetooth) | 2 x 100 W RMS |
| Cartridge | Ortofon 2M Red (MM) |
| Playback speeds | 33 1/3, 45, custom adjustment |
| Motor | DC servo motor |
| Bluetooth antenna | Removable, screw-on at the back |
| Audio outputs | PHONO (RCA), Line (RCA) |
| Audio input | Line (RCA for external source) |
| Maintenance and cleaning | Clean the exterior with a soft, damp cloth; clean the stylus with an antistatic brush (from back to front); replace the stylus every 300-500 hours |
| Safety | Do not expose to water, do not open, unplug during storms, operating temperature 0°C to 35°C |
| Spare parts and repairability | Interchangeable cartridge (Ortofon 2M Blue or Silver); counterweight, belt, 45 RPM adapter, speaker cables included; repair by local dealer |
| General information | Fully manual turntable; indoor use only; warranty according to European legislation; declaration of conformity available at www.lenco.com |
Frequently Asked Questions - LS-700 LENCO
User questions about LS-700 LENCO
0 question about this device. Answer the ones you know or ask your own.
Ask a new question about this device
Download the instructions for your Turntable in PDF format for free! Find your manual LS-700 - LENCO and take your electronic device back in hand. On this page are published all the documents necessary for the use of your device. LS-700 by LENCO.
USER MANUAL LS-700 LENCO
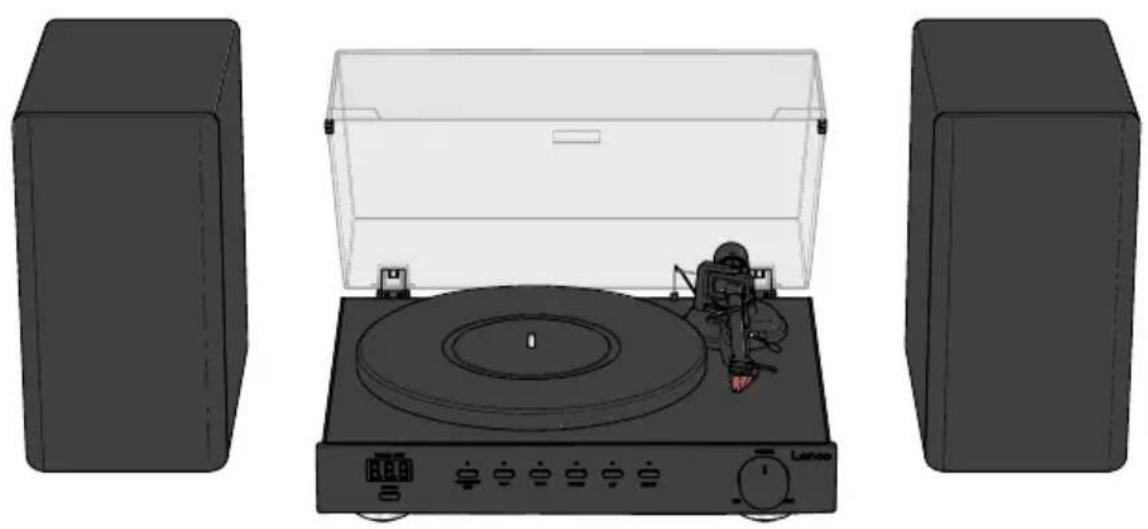
High power HiFi turntable
With stereo speakers and Ortofon 2M Red cartridge
USER MANUAL
EN User manual 3
DE Betriebsanleitung 14
FR Manuel d'utilisation 27
NL Gebruikershandleiding 39
IT Manuale d'uso 51
ES Manual del usuario 63
PT Manual do utilizador 75
SV Användarmanual 87
FI Käyttäjän käsikirja 98
NO Brukerhåndbok 111
DA Brugervejledning 122
HU Felhasználói kézikönyv 134
PL Podręcznik użytkownika 146
EL Εγχειρίδιο χρήσης
SK Používatel'ská príručka 171
cs Uživatelská příručka 183
RO Manual de utilizare 194
159
High power Hi-Fi turntable
LS-700
Aboutthisdocument
This document is the user manual and contains all the information for correct, efficient, and safe use of the product.
Ensure you have fully read and understood the instructions in this document before you install or use the product. Keep the packaging and this document for future reference.
Symbols used
| WARNING! | Signal word used to indicate a potentially hazardous situation which, if not avoided, could result in death or serious injury. |
| CAUTION! | Signal word used to indicate a potentially hazardous situation which, if not avoided, could result in minor or moderate injury. |
| NOTICE | Signal word used to address practices not related to physical injury. |
| i | Indicates important information that is not directly related to safety. |
Productdescription
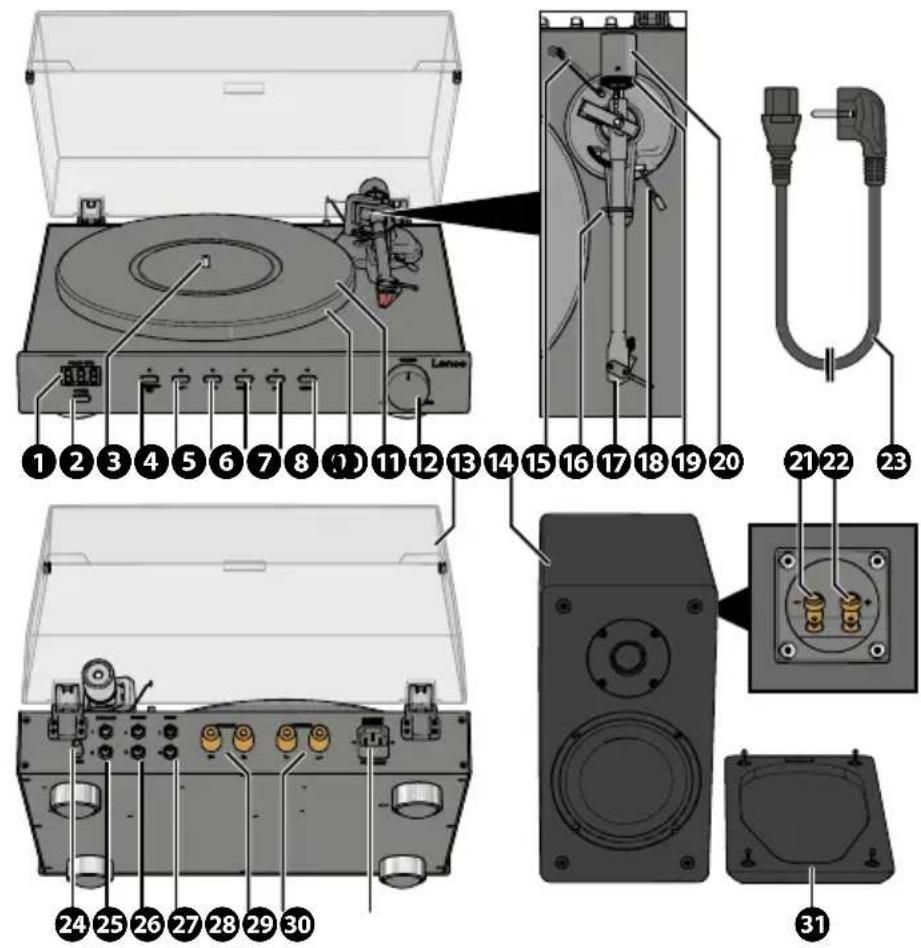
① LED display
②Powerbutton
3Turntablespindle
④Play/Stop/Setbutton
5331/3RPMbutton
645RPMbutton
⑦PHONOmodebutton
8Bluetooth®modebutton
9 Linemodebutton
10 Turntableplatter
11 Turntablemat(2×)
⑫ Volumedial
13 Dustcover
14Speakers(2×)
15 Anti-skatingweight
16 Tonearmrest(andlock)
17 Tonearm(withcartridge)
18 Cuelever
19 Trackingforcedial
20 Counterweight
21 Negativespeakerconnector
22 Positivespeakerconnector
23 Powercable(EU)
24 Bluetooth®antenna
25PHONOoutput
26Lineinput
27Lineoutput
28 Rightspeakerconnectors
29 Leftspeakerconnectors
30 Powerinput
31 Meshspeakercover(2×)
Additional included parts
- Turntable drive belt
- Turntablesub-platter
- Power cable (UK)
- 45 RPM adapter
- Speaker cables (2×)
- Cartridge alignment protractor
Specifications
| Specifications Value / Description | |
| LS-700 | |
| Product High power Hi-Fi turntable | |
| Drivemotor DC servo motor | |
| Speedsettings 33 1/3. 45, and custom | |
| Standby power consumption 0.3W | |
| Bluetooth®version5.2 | |
| Bluetooth® frequency range 2402 - 2480 MHz | |
| Bluetooth® operating distance 10m | |
| Max. transmission power < 6 dBm | |
| Power cable compliance IEC 60320 C14, Appliance Inlet, Male (for Power cable with IEC 60320 C13 connector to Schuko (CEE 7/7) plug) | |
| Power cable rated voltage 250 V AC | |
| Power cable rated current | 5 A / 250 V |
| Powerconsumption | 300W |
| Dimensions (I × w × h) | 430 × 350 × 156 mm (lid closed) |
| Weight | 9.5kg |
| Ortofon 2M Red | |
| Channelbalance | 1.5 dB at 1 kHz |
| Outputvoltage | 5.5 mV at 1 kHz, 5 cm/sec |
| Channelseparation | 22 dB at 1 kHz |
| Frequencyresponse | 20 Hz - 25,000 Hz (+3/-1 dB) |
| Trackingability | 70 μm (at 315 Hz) |
| Dynamic compliance (Lateral) | 20μm/mN |
| Cantilevermaterial | Aluminium |
| Stylustype | Elliptical |
| Stylus tip Radius | r/R 8/18 μm |
| Tracking force range | 1.6 - 2.0 g (16 - 20 mN) |
| Recommended tracking force | 1.8 g (18 mN) |
| Trackingangle | 20° |
| Internal impedance (DC resistance) | 1.3 kΩ |
| CartridgecolourBlack/red | |
| Cartridgeweight7.2g | |
| Premounted cartridge weight 16.7g | |
| Recommended load resistance 47kΩ | |
| Internalinductance700mH | |
| Recommended load capacitance 150 – 300 pF | |
| Styluscompatibility Interchangeable with 2M Blue and 2M Silver | |
| Speakers | |
| Audio power output (RMS) PHONO: 2× 45 W | |
| Bluetooth®: 2× 100 W | |
| Speakerdrivers Woofer: 6", 4 Ω, 100 W | |
| Tweeter: 3", 8 Ω, 15 W | |
| Frequencyresponse PHONO: 100 Hz (+10 dB) - 10 kHz (-13 dB) | |
| Bluetooth®: 100 Hz (-0 dB) - 10 kHz (-1 dB) | |
| Dimensions (per speaker) 192 × 275 × 319 mm | |
| Weight (per speaker) | 5.1kg |
The technical specifications for the Ortofon 2M Red cartridge have been sourced from the official Ortofon product page:
https://ortofon.com/products/2m-red?utm source#specifications
Intended use
This product is intended as a fully manual turntable with an Ortofon 2M Red cartridge, Bluetooth® functionality, and stereo speakers.
This product is intended for indoor use only.
Only use the product as described in this user manual.
This product is not intended for commercial use.
This device is not intended for use by persons (including children) with reduced physical, sensory or mental capabilities, or lack of experience and knowledge, unless they have been given supervision or instruction concerning use of the device by a person responsible for their safety, regarding the use of the device.
Safety instructions
Ensure you have fully read and understood the instructions in this document before you install or use the product. Keep the packaging and this document for future reference.
WARNING!
Chokinghazard:
- Do not let children play with packaging material. Packaging materials can lead to choking and suffocation. Always keep the packaging material out of reach of children.
Electricalhazard:
- Do not expose the product to water, rain, moisture, or high humidity.
- Do not use the product in damp environments, such as a bathroom or kitchen.
- Never insert any object into the ventilation opening of the product. The product contains electrical components.
• Only use the provided power adapter. - Keep the product away from pets and other animals. Animals can bite through the power cable and suffer electrical shock.
- Do not open the product, there are no user serviceable parts inside.
- This product may only be serviced by a qualified technician for maintenance.
Firehazard:
- Do not use the product if a part is damaged or defective. Always replace a damaged or defective product immediately.
• Unplug the product from the power source and other equipment if problems occur.
• Do not cover the ventilation openings. Always leave at least 5 cm of space around the product. - Do not place the product on top of other electrical equipment.
- Never use the product with a damaged power cable or adapter.
CAUTION!
Risk of hearing loss:
- Extended exposure to high volumes can cause hearing loss.
NOTICE
Risk of damaging the product:
- Keep the product away from heat sources, such as radiators, heaters, stoves, and naked flames.
- Keep the product away from strong magnetic objects.
• Always keep the power cable and the product away from usual walkways. - Do not disconnect the product by pulling on the cable. Always grasp the connector and pull.
- Avoid electrostatic discharge when handling the product. Electrostatic discharge can disturb the normal functioning of the product.
- Use the product only in moderate climates. Avoid extremely cold or hot environments. The recommended operating temperature is between 0°C and 35°C.
• Only use accessories provided by the manufacturer.
- Disconnect the product from the power outlet during lightning storms or before prolonged periods of disuse.
• Only use the product as described in this document.
- Do not drop the product and avoid bumping.
- Clean the outside of the product every month with a soft, damp cloth. Avoid abrasives that can damage the surface.
Installation
Check the contents of the package
Check that all parts are present and that no damage is visible on the parts. If parts are missing or damaged, contact the Lenco B.V. service desk via the website: www.lenco.com.
Installing the turntable platter and mat
- Remove the protective packaging.
- Place the product on a flat, stable, and low resonance surface close to a power outlet.
- Place the sub-platter onto the turntable spindle.
- Loop the turntable drive belt around the turntable sub-platter and motor pulley.
- Place the platter onto the spindle in the centre of the turntable.
- Place the turntable mat on top of the platter.

natural_image
Illustration of a vintage portable stove with a disc and rotary dial (no text or symbols)When removing the platter, lift the mat first, then gently lift the platter straight up. This prevents damage during shipping or moving.
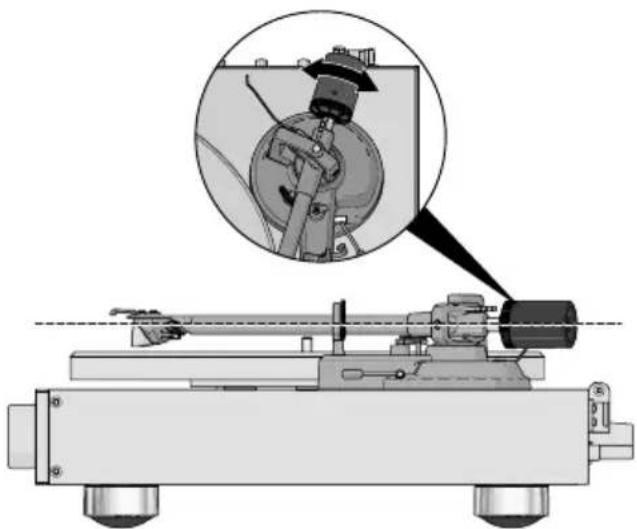
Attaching and adjusting the counterweight
-
Hold the counterweight with the number ring facing you and slide it onto the tonearm end.
-
Set the tracking force dial to 0.
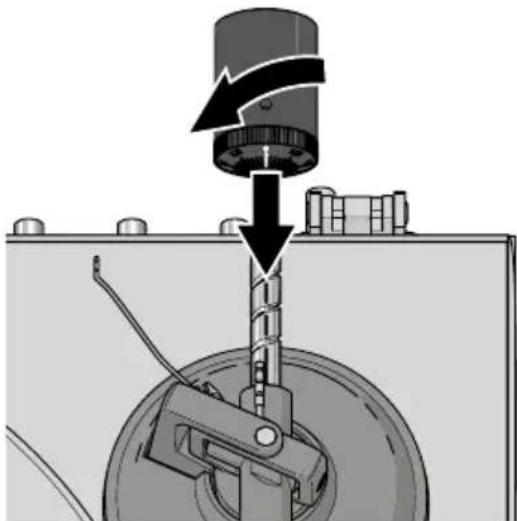
natural_image
Mechanical assembly diagram showing a rotating component with directional arrows indicating motion (no text or symbols)-
Push the cue lever backwards to lift the tonearm.
-
Carefully move the platter between the tonearm rest and the turntable platter.
-
Push the cue lever forwards to lower the tonearm.
The tonearm will be out of balance.
- Adjust the counterweight until the tonearm is horizontal.
Carefully push the tonearm up/down to test the alignment. The tonearm should automatically return to a steady horizontal position after pushing up/down.
natural_image
Mechanical device with a magnified inset showing a mechanical component (no text or symbols visible)-
Move the tonearm over to the rest position.
-
Hold the counterweight steady and rotate the tracking force dial until the "0" lines up with the mark on the tonearm.
-
Hold both the counterweight and the tracking force dial together and rotate them counter-clockwise until the recommended tracking force (1.8 grams) is set.
Adjusting the anti-skating force NOTICE
Risk of damaging the product:
- Do not adjust the tonearm or counterweight while changing anti-skating. This prevents damage to the stylus needle.
When a record plays, a small force pulls the tone arm toward the centre of the record. This is called skating. You can reduce this force by adjusting the anti-skating control.
The anti-skating weight is decided by the location of the anti-skating weight thread:
TrackingforceGroove
| 1.00 - 1.25 g 1 | 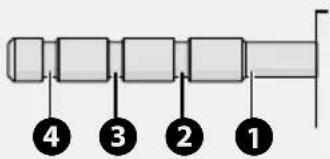 | |
| 1.25 - 1.50 g 2 | ||
| 1.50 - 1.75 g 3 | ||
| 1.75 - 2.00 g 4 |
- Feed the anti-skating weight thread through the wire hanger.
- Slip the loop of the anti-skating weight thread over the anti-skating adjustment stick and slip the thread into the 3rd groove.

natural_image
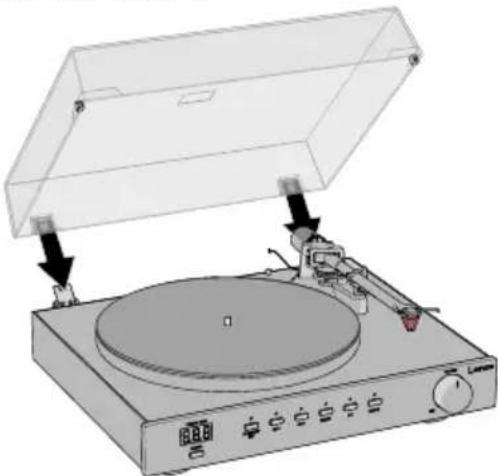
Mechanical device diagram showing a lever mechanism with no visible text or symbolsInstalling the dust cover
- Insert the dust cover hinges into the hinge slots on the back panel of the turntable.
- Hold the dust cover and insert it into the hinges.
natural_image
Diagram of a vintage typewriter with a disc and control panel, showing mechanical components and a lid (no text or symbols present)Connecting the included speakers
- Connect the included speaker wires to the speakers:
a. Press and hold the left and/or right speaker connector of a speaker in and insert the exposed metal wire into the speaker connector.
b. Release the left and/or right speaker connector to secure the speaker wire.
Make sure to connect positive (red) to positive (red) and negative (black) to negative (black)
- Connect the other end of the speaker wires to the turntable:
a. Unscrew the speaker connectors.
b. Wind the exposed metal wire on the speaker connectors.
Make sure you connect one set of wires to the left speaker connectors and one set of wires to the right speaker connectors.
c. Screw the speaker connectors back tight.
- Position the speakers to the left and right side corresponding to the connected wires.
Connecting to an external (pre-)amplifier
This turntable uses a moving magnetic cartridge (47 kΩ /MM-input), the (pre-)amplifier used must have a dedicated PHONO input supporting this type of phono cartridge or the turntable output will not work.
If you want to connect the product to your own speakers and amplifier:
- Plug one end of a RCA cable (not included) into the PHONO output of the turntable.
- Plug the other end of the RCA cable into the PHONO input on your (pre-)amplifier. Insert the R plug into the red RCA output jack. Insert the L plug into the white RCA output jack.
- Press the PHONO mode button.
Connecting to external speakers
To connect the turntable to active/powered speakers:
- Plug on end of a RCA cable (not included) into the Line output of the turntable.
- Plug the other end of the RCA cable into your active/powered speakers.
Insert the R plug into the red RCA output jack. Insert the L plug into the white RCA output jack. - Press the Line mode button.
Connecting the turntable via a RCA cable to passive/unpowered speakers does not work.
Powering the product
- Plug the power connector into the power input on the product.
- Plug the other end of the power adapter into a power outlet.
Use
Playing a vinyl record
- Press the power button to switch on the turntable.
- Open the dust cover.
- Press the PHONO mode button.
- Optionally: Place the 45 RPM adapter on the turntable shaft. Only needed for singles (45 RPM) and other vinyl records with a larger centre hole.
- Press on the speed button (33 1/3 or 45 RPM) corresponding to the applicable speed of the vinyl record.
-
Carefully remove the stylus guard.
-
Carefully place a vinyl record on the turntable platter.
-
Push the cue lever backwards to lift the tonearm.
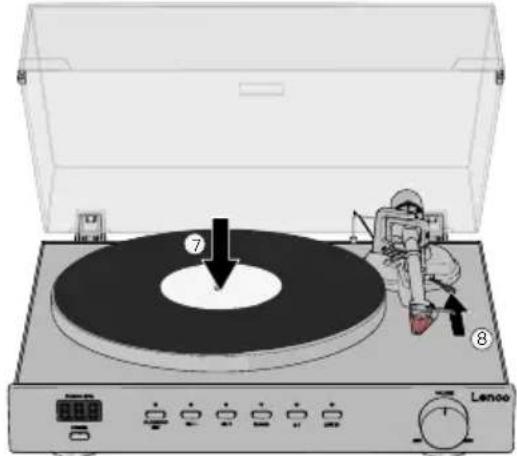
-
Carefully move the tonearm over the part you want play to on the vinyl record.
-
Push the cue lever forward to lower the tonearm and start playing the vinyl record.
natural_image
Illustration of a vintage typewriter with a person in space suit inspecting the disc, no text or symbols present.- Adjust the volume with the volume dial.
Press the start/stop/set button to start playing the vinyl record.
The product automatically switches off if there is no audio or operation for 3 minutes. Press the power button and select the speed again.
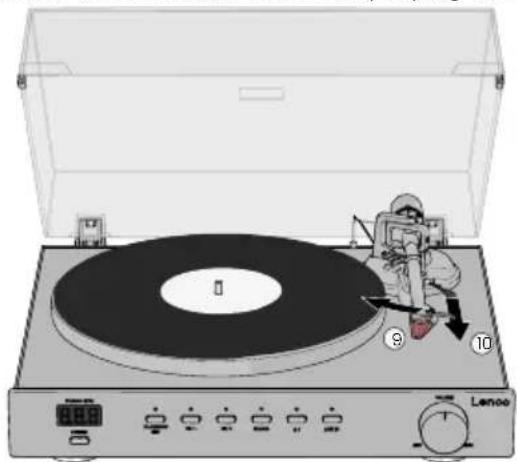
Stop playing a vinyl record
-
Press the start/stop/set button to stop playing the vinyl record.
-
Push the cue lever backwards to lift the tonearm.
-
Move the tonearm over to the rest position.
-
Push the cue lever forward to rest the tonearm.
-
Press the power button to switch off the turntable.
Playing a vinyl record via external Bluetooth® speaker/headphones
The product can wirelessly connect to external Bluetooth ^® speakers or headphones (not included).
-
Screw the Bluetooth® antenna into the back of the turntable.
-
Press the power button to switch on the turntable.
-
Activate Bluetooth® pairing mode on your speaker or headphones.
Make sure your Bluetooth ^® speaker or headphones are within one metre from the turntable. Make sure no other devices are in pairing mode.
- Press the Bluetooth® mode button.
The Bluetooth® mode LED blinks.
- Search for and select to "LS-700" to connect to the turntable.
The Bluetooth® LED indicator lights up when the connection is successful.
- Follow steps 4. - 11. of Playing a vinyl record.
Playing external audio to the speakers
The required RCA to 3.5 mm audio cable is not included.
The connected speakers can be used to play audio from an external audio source:
- Plug the RCA end of the cable into the Line input of the turntable. Insert the R plug into the red RCA output jack. Insert the L plug into the white RCA output jack.
- Plug the 3.5 mm audio end of the cable into your external audio source.
- Press the Line mode button.
- Use the volume dial to adjust the volume, use your external audio source for all other controls.
Adjusting turntable speed
To manually set a turntable speed:
- Press and hold the start/stop/set button for 3 seconds to enter speeds adjustment mode.
The speed on the LED display start blinking.
- Use the 33 1/3 and 45 RPM buttons to decrease or increase the turntable speed by 0.1 RPM increments.
The turntable needs 3 - 5 rotations to store the set speed.
- Press the start/stop/set button to confirm the set turntable speed.
The speed on the LED display stops blinking and displays the set value.
The product automatically recalls the set speed after powering off and on (within 3 - 5 rotations).
LED display
The LED display only lights up in PHONO mode.
The LED display automatically switches off after 30 seconds without pressing buttons.
-
Press the play/stop/set, 33 1/3 RPM, or 45 RPM button to activate the LED display.
-
Press the desired button again to enter the setting mode.
Switching off the product
Always make sure the tonearm is positioned on the tonearm rest.
- Press the power button to switch off the turntable.
The turntable remembers the last set mode and settings.
If the power cable is unplugged from the outlet or turntable the settings will be reset.
The product automatically switches to standby mode after 20 minutes without playing music.
Maintenance
Replacing the stylus
For the best listening experience the needle should be replaced every 300 - 500 listening hours.
Replace the stylus with a compatible Ortofon 2M stylus.
To replace the stylus:
- Switch off the product and disconnect the power adapter from the power outlet.
- Make sure the tonearm is in the resting position.
- Pull the stylus away from the tonearm.
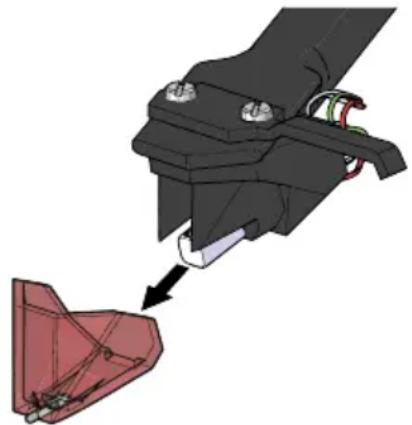
natural_image
Mechanical assembly diagram showing a hand holding a red component with a tool, no visible text or symbols- Place the new stylus on the tonearm.
Replacing the cartridge
Familiarise yourself with the process of replacing and finetuning a cartridge before removing the old cartridge. Consult with a professional when in doubt.
- Switch off the product and disconnect the power adapter from the power outlet.
- Make sure the tonearm is in the resting position.
- Install the stylus cover.
- Carefully unplug the lead wires from the cartridge.
- Loosen the two screws and remove the old cartridge.
- Place the new cartridge and screw the screws back in. Do not tighten the screws yet.
-
Connect the lead wires to the new cartridge:
-
White left channel positive (L+)
- Black left channel negative (L-)
• Red right channel positive (R+) -
Black right channel negative (R-)
-
Use the cartridge alignment protractor to align and adjust the cartridge:
a. Place the cartridge alignment protractor on the turntable mat.
b. Carefully position the tonearm on the 130 mm and 250 mm marks.
c. Finetune the cartridge position until the cartridge sits perfectly parallel to the reference lines on both markings on the protractor.
- Tighten the screws.
Cleaning
Beforecleaning:
- Unplug the power cable from the power outlet.
• Install the stylus cover.
Clean the outside of the product every month with a soft, damp cloth. Avoid abrasives that can damage the surface.
Clean your vinyl records with anti-static cloth for the best listening experience. We recommend using the Lenco TTA-3-in-1, TTA-5-in-1 or TTA-6-in-1 cleaning kit (not included).
Clean dust off the needle with an appropriate anti-static brush. Always brush from the back of the stylus to the front of the stylus, and avoid any left to right brushes.
Troubleshooting
If you experience problems with the product, refer to the table below for possible causes and solutions. Always ensure the product is installed and used as described in this manual.
| ProblemPossiblecausePossiblesolution | ||
| The product does not switch on when the power button is pressed. | The product is not connected to a power outlet. | Check the connection, power outlet, and mains power breaker. |
| The product is switched on, but the platter does not rotate. | The drive belt is not installed or slipped off the turntable sub-platter. | Remove your vinyl record, the turntable mat, and platter, and check the drive belt. |
| The product is not set to PHONO mode. | Press the PHONO mode button. | |
| The turntable platter rotates, but there is no sound/not enough sound. | The cue lever is in the up position. | Push the cue lever forwards to lower the tonearm. |
| The cables are not connected correctly. | Check the PHONO and/or Line output connections.Always connect the RCA cable to the Line output connectors when utilising the internal pre-amplifier. | |
| The speakers are not connected to the turntable. | SeechapterConnecting the included speakers. | |
| The stylus cover is still installed. | Remove the stylus cover from the stylus. | |
| No signal to one or more channels. | PHONO mode is not selected on your external (pre-)amplifier. | Make sure your (pre-)amplifier is in PHONO mode. |
| Your external (pre-)amplifier is switched off. | Switch on your external (pre-) amplifier. | |
| Your external (pre-)amplifier and/ or speakers are muted. | Unmute your (pre-)amplifier and/ or speakers. | |
| No correct connection to your external (pre-)amplifier or from your external (pre-)amplifier to your speakers. | Check all connections from the turntable to your (pre-)amplifier to your speakers. | |
| No correct connection to the cartridge. | Check the lead wire connections of the cartridge. See chapterReplacing the cartridgeforan overview of the lead wires. | |
| No sound emitted from the Bluetooth®speakers. | The Bluetooth® volume dial is set to minimum. | Increase volume using the Bluetooth® volume dial. |
| The selected input does not match the source. | Select the correct source input. | |
| Distinguishable humming sound on PHONO mode. | The speakers are positioned too close to the turntable. | Place the speaker further away from the turntable. |
| Distorted and/or inconsistent sound from one more channels. | The turntable is connected to the wrong (pre-)amplifier input. | Make sure the turntable is connected to the PHONO input on your external (pre-)amplifier. |
| The needle or cantilever of the stylus is damaged. | Check the stylus for any defects and replace is required. | |
| The platter bearing is dirty, damager or without oil. | Have the product inspected by a qualified service technician. | |
| There is dust on the stylus. Carefully remove the dust from the stylus, brushing with an appropriate anti-static brush from the back of the needle to the front.Do not brush the needle from left to right, this can cause damage to the needle. | ||
| The MM/MC switch on your external (pre-)amplifier is set incorrectly. | Set the MM/MC switch on your (pre-)amplifier to MM. | |
Guarantee
Commaxx B.V. offers service and warranty in accordance with the European law, which means that in case of repairs (both during and after the warranty period) you should contact your local dealer.
- It is not possible to send products that need repairs to Commaxx B.V. directly.
• If this unit is opened or accessed by a non-official service centre in any way, the warranty expires. - This device is not suitable for professional use. In case of professional use, all warranty obligations of the manufacturer will be voided.
Disclaimer
Updates to firmware and/or hardware components are made regularly. Therefore some of the instruction, specifications, and pictures in this documentation may differ slightly from your particular situation. All items described in this guide are for illustration purposes only and may not apply to your particular situation. No legal right or entitlements may be obtained from the description made in this manual.

This symbol indicates that the relevant electrical product or battery should not be disposed of as general household waste in Europe. To ensure the correct waste treatment of the product and battery, please dispose them in accordance to any applicable local laws of requirement for disposal of electrical equipment or batteries. In doing so, you will help to conserve natural resources and improve standards of environmental protection in treatment and disposal of electrical waste (Waste Electrical and Electronic Equipment Directive).
DeclarationofConformity
We, Commaxx B.V. declare as manufacturer that the product LS-700 from our brand Lenco®, produced in China, has been tested according to all relevant CE standards and regulations and that all tests have been passed successfully. This includes, but is not limited to the RED 2014/53/EU regulation.
The complete Declaration of Conformity (and the safety datasheet if applicable) can be found and downloaded via: https://commaxx-certificates.com/doc/ls-700 doc.pdf
Service
For more information and helpdesk support, please visit www.lenco.com Commaxx B.V. Wiebachstraat 37, 6466 NG, Kerkrade, The Netherlands.

Betriebsanleitung
LS-700
https://ortofon.com/products/2m-red?utm source#specifications
Anwendung
natural_image
Illustration of a vintage rotary press with a disc and fan on a gas stove (no text or symbols)natural_image
Mechanical assembly diagram showing a rotating component with a directional arrow indicating motion (no text or symbols present)natural_image
Mechanical device with a magnified inset showing a mechanical component (no visible text or symbols)natural_image
Mechanical device diagram showing a lever mechanism with no visible text or symbolsnatural_image
Diagram of a CD or DVD disc with a speaker base and control panel, showing mechanical components (no text or symbols)natural_image
Illustration of a vintage typewriter with a person in space suit standing beside it, no text or symbols present.natural_image
Mechanical assembly diagram showing a hand holding a red component with a tool, no visible text or symbolshttps://commaxx-certificates.com/doc/ls-700 doc.pdf
Dienst
1 Affichage LED
②Boutond'alimentation
3Axe
④BoutonPlay/Stop/Set
5 Bouton331/3RPM
⑥ Bouton45RPM
⑦ BoutonmodePHONO
8 BoutondumodeBluetooth
9 Boutonmodeligne
10 Plateaudelaplatinevinyle
⑪ Tapisdeplatinevinyle(2×)
⑫ Molettedevolume
https://ortofon.com/products/2m-red?utm source#specifications
Utilisation prévue
natural_image
Illustration of a vintage rotary press machine with a disc and fan, no text or symbols presentnatural_image
Mechanical assembly diagram showing a rotating component with directional arrows indicating motion (no text or symbols)natural_image
Mechanical device with a magnified inset showing a mechanical component (no visible text or symbols)natural_image
Mechanical device diagram showing a lever mechanism with no visible text or symbolsnatural_image
Diagram of a vintage CD or DVD player with a disc and control panel, showing mechanical components and a lid (no text or symbols present)natural_image
Illustration of a vintage typewriter with a person in spacesuit and a numbered dial, no text or symbols present.natural_image
Mechanical assembly diagram showing a hand holding a red component with a tool, no visible text or symbolshttps://commaxx-certificates.com/doc/ls-700 doc.pdf
Service
https://ortofon.com/products/2m-red?utm source#specifications
Bedoeld gebruik
natural_image
Illustration of a vintage rotary presser with a disc and rotary dial, no text or symbols presentnatural_image
Mechanical assembly diagram showing a rotating component with a spring and connecting rod (no text or symbols)natural_image
Technical illustration of a mechanical device with an inset close-up showing a mechanical component (no text or symbols visible)natural_image
Mechanical device diagram showing a lever mechanism with no visible text or symbolsDe stofkap installeren
natural_image
Diagram of a vintage CD or DVD disc with a top panel and base, showing mechanical components and a lid (no text or symbols present)natural_image
Illustration of a vintage typewriter with a person interacting with the top-right disc, showing control knobs and a rotary dial (no text or symbols on the device itself)natural_image
Mechanical assembly diagram showing a hand holding a red component with a tool, no visible text or symbolshttps://commaxx-certificates.com/doc/ls-700 doc.pdf
Service
① Display LED
②Pulsantediaccensione
③Pernodelgiradischi
④PulsantePlay/Stop/
Impostazione
⑤Pulsante+331/3giri/min.
https://ortofon.com/products/2m-red?utm source#specifications
Uso previsto
natural_image
Illustration of a vintage rotary induction cooktop with a disc and fan, no text or symbols presentnatural_image
Mechanical assembly diagram showing a rotating component with a spring and connecting rod (no text or symbols)natural_image
Mechanical device with a magnified inset showing a mechanical component (no visible text or symbols)natural_image
Mechanical device diagram showing a lever mechanism with no visible text or symbolsnatural_image
Diagram of a CD or DVD disc with a top panel and mechanical components, showing no text or symbols.natural_image
Illustration of a vintage typewriter with a person using a device, no text or symbols presentnatural_image
Mechanical assembly diagram showing a hand holding a red component with a tool, no visible text or symbolshttps://commaxx-certificates.com/doc/ls-700 doc.pdf
Servizio
① Pantalla LED
②BotónPower
③ Ejegiratorio
④BotónReproducir/Parar/Ajustar
5Botón331/3RPM
natural_image
Illustration of a vintage rotary induction cooktop with a disc and fan, no text or symbols presentnatural_image
Mechanical assembly diagram showing a rotating component with a spring and connecting rod (no text or symbols)natural_image
Mechanical device with a magnified inset showing a mechanical component (no text or symbols visible)natural_image
Mechanical device diagram showing a lever mechanism with no visible text or symbolsnatural_image
Diagram of a CD or DVD disc with a top panel and mechanical components, showing no text or symbols.natural_image
Illustration of a vintage typewriter with a person in a spacesuit adjusting its disc, no text or symbols present.natural_image
Mechanical assembly diagram showing a hand holding a red component with a tool, no visible text or symbolshttps://commaxx-certificates.com/doc/ls-700 doc.pdf
Servicio
https://ortofon.com/products/2m-red?utm source#specifications
Utilização prevista
natural_image
Illustration of a vintage rotary induction cooktop with a disc and fan, no text or symbols presentnatural_image
Mechanical assembly diagram showing a rotating component with directional arrows indicating motion (no text or symbols)natural_image
Mechanical device with a magnified inset showing a mechanical component (no text or symbols visible)natural_image
Mechanical device diagram showing a lever mechanism with no visible text or symbolsnatural_image
Diagram of a CD or DVD disc with a top panel and mechanical components, showing no text or symbols.natural_image
Illustration of a vintage typewriter with a person using a device, no text or symbols presentnatural_image
Mechanical assembly diagram showing a hand holding a red component with a tool, no visible text or symbolshttps://commaxx-certificates.com/doc/ls-700 doc.pdf
Serviço
1 LED-display
②Kraftknapp
③Skivtallriksaxel
④Play/Stop/Set-knapp
5331/3RPM-knapp
645RPM(-)-knapp
⑦LägesknappPHONO
8LägesknappförBluetooth®
natural_image
Illustration of a vintage portable TV or DVD machine with a rotary disc and control panel (no text or symbols visible)natural_image
Mechanical assembly diagram showing a rotating component with directional arrows indicating motion (no text or symbols)natural_image
Mechanical device with a magnified inset showing a mechanical component (no text or symbols visible)natural_image
Mechanical device diagram showing a lever mechanism with no visible text or symbolsnatural_image
Diagram of a vintage typewriter with a disc and control panel, showing mechanical components (no text or symbols)natural_image
Illustration of a vintage typewriter with a person in spacesuit inspecting the disc, no text or symbols presentnatural_image
Mechanical assembly diagram showing a red component being inserted into a black bracket (no text or symbols visible)https://commaxx-certificates.com/doc/ls-700 doc.pdf
Service
① LED-näyttö
②Virtapainike
③Levylautasenkara
④Play/Stop/Set-painike
5331/3RPM-painike
645RPM-painike
⑦Tilapainike
8Bluetooth®-tilapainike
9Tilapainike
10Levylautanen
11Levylautanen(2×)
natural_image
Illustration of a vintage rotary press machine with a disc and rotary knob (no text or symbols)natural_image
Mechanical assembly diagram showing a rotating component with directional arrows indicating motion (no text or symbols)natural_image
Mechanical device with a magnified inset showing a mechanical component (no text or symbols visible)natural_image
Mechanical device diagram showing a lever mechanism with no visible text or symbolsnatural_image
Diagram of a vintage typewriter with a disc and control panel, showing mechanical components (no text or symbols)natural_image
Illustration of a vintage typewriter with a person in space suit standing beside it, no text or symbols present.natural_image
Mechanical assembly diagram showing a hand holding a tool interacting with a red component (no text or symbols visible)https://commaxx-certificates.com/doc/ls-700 doc.pdf
Palvelu
① LED-display
②Av/på-knapp
3 Platespillerensspindel
④Play/Stop/Set-knapp
5331/3RPM-knapp
645RPM-knapp
⑦Modus-knappforPHONO
⑧ Modus-knappforBluetooth® -modus
⑨ Modus-knappforlinje
10 Platespillertallerken
⑪ Mattetiltallerken(2×)
⑫ Volum-knapp
13 Støvdeksel
14 Høyttalere(2×)
https://ortofon.com/products/2m-red?utm source#specifications
Tiltenkt bruk
natural_image
Illustration of a vintage rotary induction cooktop with a disc and fan, no text or symbols presentnatural_image
Mechanical assembly diagram showing a rotating component with directional arrows indicating motion (no text or symbols)natural_image
Mechanical device with a magnified inset showing a mechanical component (no text or symbols visible)natural_image
Mechanical device diagram showing a lever mechanism with no visible text or symbolsnatural_image
Diagram of a vintage CD or DVD player with a disc and control panel, showing mechanical components (no text or symbols present)natural_image
Illustration of a vintage typewriter with a person in space suit inspecting the disc, no text or symbols present- Juster volumet med volumhjulet.
natural_image
Mechanical assembly diagram showing a hand holding a red component with a tool, no text or symbols present- Plasser den nye pickupstiften på tonearmen.
Bytte ut patronen
https://commaxx-certificates.com/doc/ls-700 doc.pdf
Service
① LED-display
②Tænd-/sluk-knap
③Pladespillerensspindel
④Play/Stop/Set-knap
5331/3RPM-knap
645RPM-knap
⑦PHONOFunktions-knap
8Bluetooth®Funktions-knap
⑨Linje-funktions-knap
10 Pladespiller-tallerken
11 Pladetailerken-mätte(2×)
natural_image
Illustration of a vintage portable radio with a rotary dial and control panel (no text or symbols)natural_image
Mechanical assembly diagram showing a rotating component with directional arrows indicating motion (no text or symbols)natural_image
Mechanical device with a magnified inset showing a mechanical component (no text or symbols visible)natural_image
Mechanical assembly diagram showing a lever mechanism with no visible text or symbolsMontering af støvdaekslet
natural_image
Diagram of a vintage CD or DVD machine with a lid and base, showing mechanical components and control buttons (no text labels)natural_image
Illustration of a vintage typewriter with a person in space suit standing beside it, no text or symbols present.- Juster lydstyrken med volumenknappen.
natural_image
Mechanical assembly diagram showing a hand holding a red component with a black handle, no visible text or symbolsnatural_image
Illustration of a vintage rotary press machine with a disc and rotary knob (no text or symbols)natural_image
Mechanical assembly diagram showing a rotating component with directional arrows indicating motion (no text or symbols)natural_image
Mechanical device with a magnified inset showing a mechanical component (no text or symbols visible)natural_image
Mechanical device diagram showing a lever mechanism with no visible text or symbolsnatural_image
Diagram of a vintage CD or DVD disc with a top panel and control knobs, showing mechanical components (no text or symbols present)natural_image
Illustration of a vintage typewriter with a person interacting with the top-right disc, labeled with numbers 9 and 10 (no text or symbols on the device itself)natural_image
Mechanical assembly diagram showing a red component being inserted into a black bracket (no text or symbols visible)natural_image
Illustration of a vintage rotary press machine with a disc and rotary knob (no text or symbols)natural_image
Mechanical assembly diagram showing a rotating component with a directional arrow indicating motion (no text or symbols present)natural_image
Technical illustration of a mechanical device with an inset close-up showing a mechanical component (no text or symbols present)natural_image
Mechanical assembly diagram showing a lever mechanism with no visible text or symbolsnatural_image
Diagram of a vintage CD or DVD player with a disc and stand, showing mechanical components and control panel (no text or symbols)natural_image
Mechanical assembly diagram showing a hand operating a red component with a tool, no text or symbols presentnatural_image
Illustration of a vintage portable stove with a disc lid and rotary dial (no text or symbols)natural_image
Mechanical assembly diagram showing a rotating component with a directional arrow indicating motion (no text or symbols present)natural_image
Mechanical device with a magnified inset showing a mechanical component (no visible text or symbols)natural_image
Mechanical device diagram showing a lever mechanism with no visible text or symbolsnatural_image
Technical line drawing of a mechanical device with lever and base mount (no text or symbols)natural_image
Diagram of a vintage typewriter with a lid and base, showing mechanical components and control buttons (no text or symbols present)natural_image
Illustration of a vintage typewriter with a person using a telescope to press the disc, no text or symbols present.natural_image
Mechanical assembly diagram showing a hand holding a tool interacting with a red component (no text or symbols visible)https://commaxx-certificates.com/doc/ls-700 doc.pdf
Υποστήριξη
① LED displej
2 Tlačidlo napájania
③Vretenogramofónu
4 Tlačidlo Play/Stop/Set
5 Tlačidlo 33 1/3 RPM
6 Tlačidlo 45 otáčok za minútu12
natural_image
Illustration of a vintage rotary press machine with a disc and fan, no text or symbols presentPri vyberaní taniera najprv zdvihnite podložku a potom opatrne zdvihnite tanier rovno nahor. Zabránite tak poškodeniu počas prepravy alebo prenášania.
natural_image
Mechanical assembly diagram showing a rotating component with directional arrows indicating motion (no text or symbols)natural_image
Mechanical device with a magnified inset showing a mechanical component (no text or symbols visible)natural_image
Mechanical device diagram showing a lever mechanism with no visible text or symbolsnatural_image
Diagram of a vintage CD or DVD disc with a top panel and base, showing mechanical components and a lid (no text or symbols present)natural_image
Illustration of a vintage gramophone with a person in spacesuit and a numbered dial, no text or symbols present.- Nastavte hlasitost pomocou voliča hlasitosti.
natural_image
Mechanical assembly diagram showing a hand holding a bracket with a red component being inserted (no text or symbols visible)- Umiestnite novú ihlu na ramenko.
Výmena kazety
natural_image
Illustration of a vintage portable TV or DVD machine with a rotary disc and control panel (no text or symbols)natural_image
Mechanical assembly diagram showing a rotating component with directional arrow indicating motion (no text or symbols)natural_image
Technical illustration of a mechanical device with an inset close-up showing a mechanical component (no text or symbols visible)natural_image
Mechanical device diagram showing a lever mechanism with no visible text or symbolsnatural_image
Diagram of a vintage typewriter with a disc and control panel, showing mechanical components and a lid (no text or symbols present)natural_image
Illustration of a vintage typewriter with a person using a device to press the disc, no text or symbols present.natural_image
Mechanical assembly diagram showing a hand holding a bracket with a red component inserted, no text or symbols present1 Afişaj cu LED
②Butondepornire
③Acrotativ
④ButonulPlay/Stop/Set
⑤Buton331/3RPM
6Buton45RPM
⑦ButonpentrumodPHONO
⑧ButonpentrumodulBluetooth®
9Butonpentrumodlinie
10 Platoulpick-up-ului
11 Covoraş pentru platou (2×)
⑫Cadranvolum
https://ortofon.com/products/2m-red?utm source#specifications