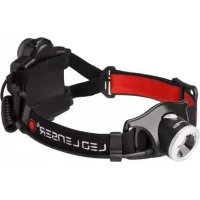
H7R.2 - Lamp Ledlenser - Free user manual and instructions
Find the device manual for free H7R.2 Ledlenser in PDF.


User questions about H7R.2 Ledlenser
0 question about this device. Answer the ones you know or ask your own.
Ask a new question about this device
Download the instructions for your Lamp in PDF format for free! Find your manual H7R.2 - Ledlenser and take your electronic device back in hand. On this page are published all the documents necessary for the use of your device. H7R.2 by Ledlenser.
USER MANUAL H7R.2 Ledlenser
natural_image
Close-up of a black LEO lenser headlamp with attached strap and cable (no text or symbols visible on the device itself)
natural_image
Close-up of a black handheld device with a heart-shaped highlight on its side (no visible text or symbols)Operating instructions
Bedienungsanleitung
natural_image
Close-up of a black handheld device with attached clamps and a circular lens (no visible text or symbols)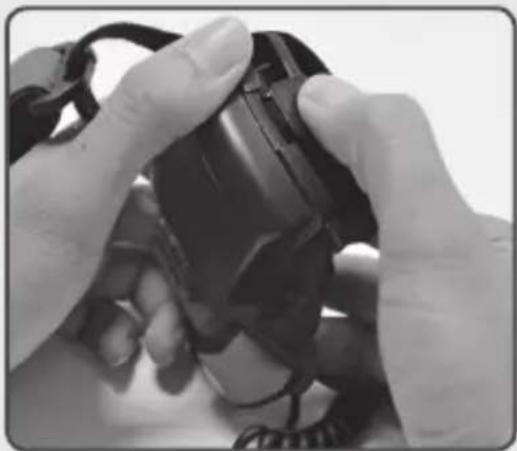
natural_image
Close-up of hands holding a black electronic device with coiled cable (no visible text or symbols)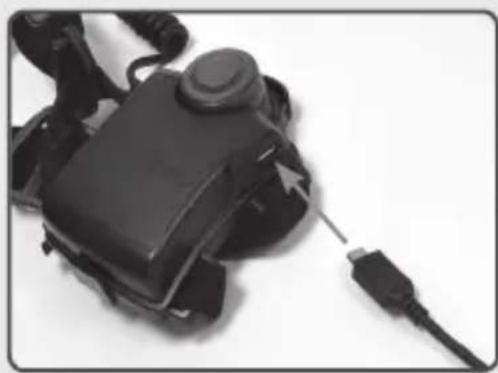
natural_image
Close-up of a black mechanical device with a cable inserted, showing no visible text or symbols.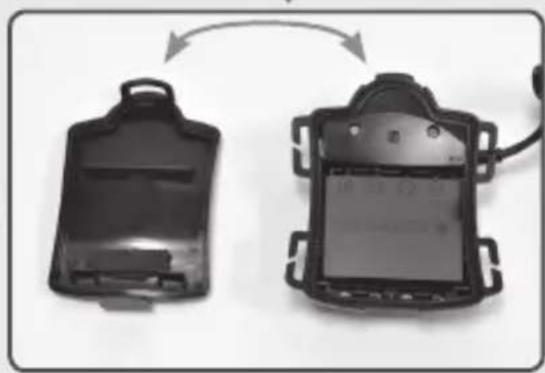
natural_image
Two black electronic devices with internal components, one open and one closed, shown side by side (no visible text or symbols)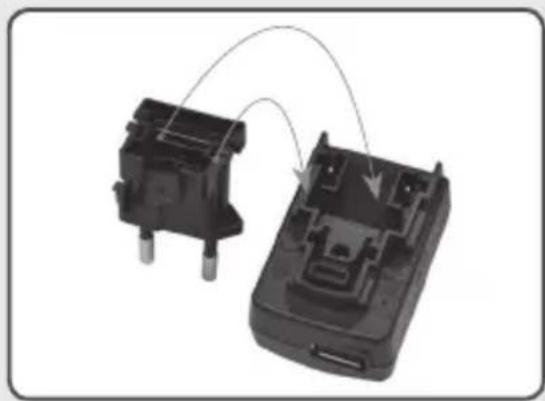
natural_image
Two black electronic components with pins, connected by a curved arrow indicating rotation or connection (no text or symbols visible)
natural_image
Close-up of a black plastic electrical connector with two leads and a port, shown against a plain background (no text or symbols visible)CE
We are delighted that you have purchased one of our products.
These are usage instructions to help you familiarize yourself with your new purchase. All the documents accompanying the product must be read attentively before using the product, preserved carefully and if the product is transferred to a third party, the documents must be handed over as well. This ensures that maximum benefit is drawn from the product and questions from users are anticipated before they arise.
Above all, comply with the warnings and safety instructions and dispose of the packaging material properly.
Additional Information for H7R.2 with "TEST IT" Function
Your LED LENSER H7R.2 headlamp is packaged with a "TEST IT" function (item no. 7398). This allows users to test the brightness while the product is still in the package. For testing, simply push the yellow "TEST IT" button on the front of the package. When testing, please do not look directly into the light.
The "TEST IT" button is connected to the battery housing of the H7R.2 via two wires and should be removed prior to use.
To remove the "TEST-IT" button and wires, open the battery box rear cover and remove 4xAAA alkaline battery (see also "Changing of the battery" further below). Separate the two "TEST IT" button wires from the battery housing by pulling on each wire until it releases from the battery housing. Insert the batteries in and noting the correct polarity. Close the battery box. Please dispose and recycle the packaging and "TEST IT" button with the wires according to the local regulations.
Product
7298, LED LENSER® H7R.2
7398, LED LENSER® H7R.2 (Blister)
Version of the operating manual: 1.5
1. Battery set:
1 x Li-ion battery pack 3.7 V (1400 mAh) 4XAAA alkaline battery (Blister)
2. ON and OFF
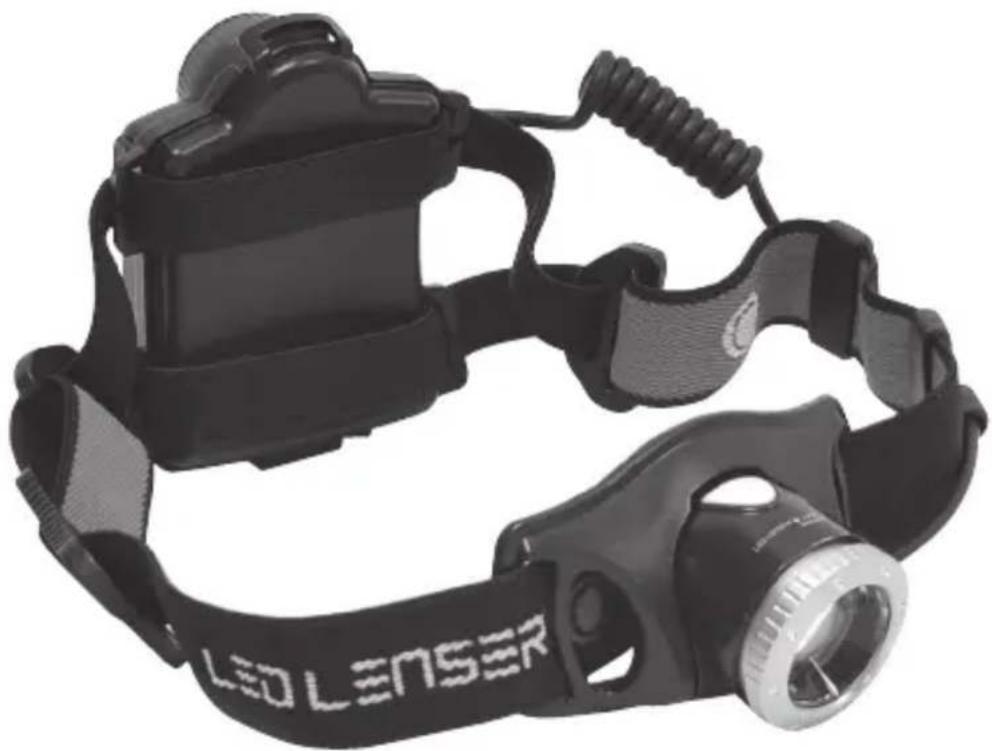
The H7R.2 has two switches. The front switch is located on the right side of the headlamp housing. This switch button is used to turn the H7R.2 ON/OFF. It is also used to activate the various Light Programs and Lighting Functions (see section 5.1) and the "Transport Lock" function (see Point 7).
The “Multi-function Wheel” switch is located on the backside at the upper part of the battery box. This allows you to adjust the brightness and flash rate infinitely and to change into different modes. In this switch is also a battery indicator and the red rear light located (see Section 5.2).
3. Focus
In the front, narrower region of the headlamp housing is the reflector lens located. This lens focused the light of the white LED through our patented "Advanced Focus System".
The reflector lens is held by a plastic ring. You can rotate that plastic ring using two fingers, and thus adjust the focus quickly and easily. This is our Turning Focus, which allows the adjustment of the light beam's focus.
You also can adjust the hinge of the headlamp, depending on whether you want to illuminate an area in the distance or in front of you. For this, you simply tilt the part of the lamp head, which containing the reflector lens and the white LED. The gradual detent allows also intermediate positions.
4. Smart Light Technology (SLT)
Smart Light Technology (SLT) is a program that consists of computer optimized microcontrollers which allows our products to have various lighting functions. The H7R.2 is equipped with this technology and is therefore able to use various Light Programs and Functions. The front switch at the top of the lamp head can turn the lamp On and Off, change the brightness, and turn on functions like the boost mode and others. Pressing the "Multi-function Wheel" switch on the upper part of the battery box can turn on the red light. This "Multi-function Wheel" switch can also be rotated to further adjust the brightness of your headlamp light.
5. Light Programs and Light Functions
The H7R.2 is equipped with three LEDs (LED = Light Emitting Diode), one white LED in the front housing, and two other red LED's in the battery box.
The white LED is very strong and ideal for normal use. This very bright white light may not suitable when your eyes have become accustomed through the dark or low ambient light.
The red LED is not meant to illuminate a space, but as a way to be seen or identified (see Section 5.2).
5.1 Light Program White (Front light)
In H7R.2, there are three different modes (Easy Low, Easy Power, Signal). The default mode is Easy Low.
When the product is off, press the "Multi-function Wheel" switch for 5 second. It will achieve mode transition. Then white LED will blink once (3Hz) to indicate that it is mode one; then blink twice for mode two; and finally blink thrice for mode three.
a) Light Mode one - Easy Low: when the product is off, firmly press the front switch button until it blinks once. The white LED will glow at its lowest brightness (light function: Low Power dim light). A second touch to the button on top of the lamp will turn ion the lamp to its full brightness (light function: Power strong light), and third touch will turn the lamp off.
b) Light Mode two - Easy Power: when the product is off, firmly press the front switch until it blinks twice. The white LED will glow at its fullest brightness (light function: Power). A second touch to the button on top of the lamp will turn on the lamp to its lowest brightness (light function: Low Power), and third touch will turn the lamp off.
c) Light Mode three - Signal: when the product is off, firmly press the front switch until it blinks thrice. The white LED will glows with full brightness (light function: Power). A second touch to the button on top of the lamp will start the strobe (12 Hz) (light function: Pulse), and a third touch will turn the lamp off.
Note: In the low power- and power- function, you can adjust the brightness stepless by turning the multi-function "Wheel" switch (Dim function). A short flash indicates the darkest (5 lumens) or brightest setting. In the Pulse- function, you can speed up or slow down the flashing frequency by turning the multi-function "Wheel" switch (Pulse function).
d) Boost Mode: in each setting, press the front switch for 2 seconds, you will enter to boost mode, after a short time the flashlight will return to previous choosing. The Light Functions above are in a loop. Note: when switching between modes, press the "Multi-function Wheel" switch button no longer than 2 seconds, otherwise the product will turn off.
5.2 Light Program Red (rear light)
ON-OFF / transition mode (change modes within 2 seconds, but more than 2 seconds the lamp will turn off) / charge indicator/ battery capacity indicator function is available for the red LED:
1) ON-OFF function: in any status, two red LED will light up by pressing the "Multi-function Wheel" switch once: the LEDs will start to blink, by pressing the switch twice; at the third push the LEDs will turn OFF.
2) Charge indicator function: the red LED will glow when charging. After full charge, the LED will glow green. Note that the white LED will not work when charging.
3) Battery capacity indicator: when you start to use white LED, the red LED on the battery box will glow for 5 seconds and then turn off. Green means that the battery capacity is at 50%-100%; yellow means the battery capacity is at 20-49%; when the red LED is glowing the battery capacity is lower than 19% & not suit for long time use, therefore must be charged.
6. Energy Modes
By selecting one of the two Energy Modes (Energy Saving or Constant Current), you decide how the energy contained in the accumulator or batteries are used.
6.1 Energy Saving: The light output is controlled by the integrated Smart Light Technology (SLT). The brightness is adjusted to the realistic conditions that occur during normal use of the lamp, thus providing a longer burn time.
6.2 Constant Current: This Energy Mode allows the continuous use of all the Light Functions with a constant light output. This Energy Mode
is preferable when a high brightness level is more important than a long burn time
6.3 Changing the Energy Modes
Changing the Energy Modes can only be done when the flashlight is in Light Program White and the lamp is turned Off. To change the energy mode, with the white LED off, press the "Multi-function Wheel" on the back 8 times, then on the 8th click keep the knob pressed for approx. 2-4 seconds. This should allow you change between the "energy mode" and "constant current mode." You know which mode you are in when:
a) Constant current mode: the brightness reduces immediately in 2 seconds.
b) Energy saving mode: the brightness reduce gradually to zero.
With this procedure, you can switch between the two Energy Modes. It is not possible to determine in which Energy Mode the H7R.2 is. To find this out, you must carry out the procedure. If the H7R.2 is thereafter not in the desired Energy Mode any more, you must repeat the procedure again. The flashlight will reset to energy saving mode if you change the battery or cut the power.
7. "Transport Lock"
When the H7R.2 switched Off, press the front switch for approx. 5 seconds till the light turns off in order to enable the "Transport Lock." The H7R.2 cannot be turned on any more, either intentionally or unintentionally. Accidental power consumption is not possible. To deactivate the "Transport Lock", just press the front switch again for 5 seconds. The headlamp will now return to the Light Program.
8. Reset function
If the Accumulator-Pack & the alkaline batteries are taken out the battery box you have "reset" the H7R.2. You have thus reset a few functions:
The Light Program White (see Section 5.1) is activated
The Light Function Dim (see Section 5.1) is set to low brightness
As Energy Mode Energy Saving is activated (see Section 6).
The "Transport Lock" (see Section 7) is deactivated
9. Charging
The flashlight will signal a low battery status when it is ON by blinking 3 times (3 Hz) every 15 seconds until the battery is empty.
The H7R.2 indicates by the flashing white LED that it is running out of energy in near future. Please charge the Accumulator-pack in time. Charge the Accumulator-pack of your H7R.2 in a dry place and only by using the charger that is included in the delivery or by a USB port (see below).
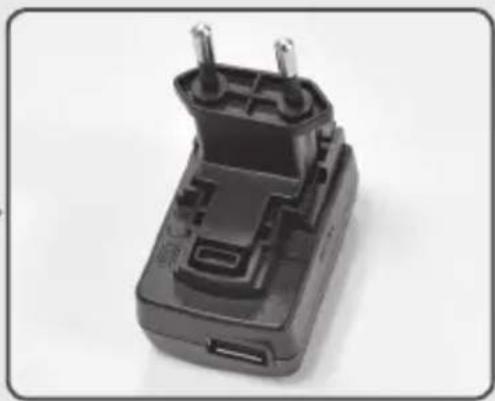
The following information applies only to the included accessories. You cannot charge any other accumulators or batteries in the H7R.2. In the scope of delivery of the H7R.2 there
is a plug and a charger. In case both are not connected already, please connect them so that the connection clicks.
H7R.2 charger has a USB port which must be connected with the corresponding port at the supplied charging cable in order to charge the Accumulator-pack. The other side of the charging cable (micro USB) must be connected to the micro USB port on the battery box. Only the supplied Accumulator battery pack can be charged with the charger.
The last step is to connect the plug into a socket (Input: 100 V to 240 V / 50 Hz to 60 Hz). When charging is completed (after maximum 4 to 5 hours), unplug the charger from the socket and the charging cable (micro-USB) from the Accumulator-pack. It is, however, no problem to continue charging the Accumulator-pack even it is already full.
When you are charging the Accumulator-Pack of the H7R.2 with the corresponding charger and charging cable by a USB port (see Section 9) the charging status will be shown by a glowing LED light. When the battery is still charging, it will shine red. The light will change to green when the charging is completed. You will be unable to use the white LED of H7R.2 while charging.
Instead of connecting the charging cable to the USB port of the charger, you can also connect it to a different USB port (5 V / 500 mA) such as a computer.
While using our optionally available car USB charger connection (Led Lenser Car Charger: Item no. 0380), the H7R.2 also can be charged at the cigarette lighter and sockets in vehicles. These accessory units match themselves automatically to the respective input voltage (12 V ó 24 V). These alternatives are suitable to charge the Accumulator-pack in case a power outlet is not available.
Note – Please ensure that there is no short-circuit at the charging contacts. The charging contacts may not be touched with moist or metallic objects.
10. Changing of the Accumulator-Pack / NiMH-rechargeable batteries / Alkaline batteries
Prior to the changing batteries, please turn off the H7R.2.
On the back of the battery box, where the headband is attached, there is the gate to the inside of the battery box. Once you open the battery box, there will be a silk tab that runs underneth the battery pack. In order to remove the battery, pull the silk tab and then insert a new one.
Alkaline batteries can also be inserted, but then the charger cannot be used!
During insertion, it is always necessary that it is in the correct direction. Therefore, pay attention to the polarities (+ and -). Both in the battery box and also on the Accumulator-Pack / alkaline batteries. Otherwise, there is risk for damaged Accumulators / batteries and a possible explosion.
The supplied Accumulator-Pack can only be recharged with the original charger or by a USB port (see Section 9)!
After replacing the batteries, the cover of the battery box has to be closed again.
To close the battery box, hold the battery box cover over the battery box in the right direction, hook the battery cover above the multi-function switch and then push the battery cover against battery box, until you hear a small "click" sound. Then push the middle of the cover again, until you hear another "click". Now the battery cover is securely closed.
11. Headband
The headband can be washed by water. The headband can be washed in a washing machine at 30 °C .
12. Cleaning
To clean, use a dry, lint-free, clean cloth. If salt water is spilled on the head lamp, it must be immediately entirely removed with such a cloth and water.
13. Scope of delivery
The H7R.2 headlamp is supplied with the following accessories:
1 H7R.2 headband
1 charger and plug
1 USB cable, connect the rechargeable battery and charger for charge
1 battery pack
1 user manual
14. General information batteries / accumulators
Non rechargeable batteries or other accumulators that are not of the same type of accumulator as the one included in with this product and therefore not allowed to be charged by the same charger. Never use non rechargeable batteries and accumulators together. Always change all nonrechargeable batteries and accumulators at the same time. Only use the Accumulator-Pack (scope of delivery), alkaline batteries AAA / LR03 / Micro (1.5 V DC) or NiMH-Accumulator AAA / LR03 / Micro (1.2 V DC) for the H7R.2.
If you intend not to use the item for an extended period, please full charge the Accumulator-Pack and take it out from the headlamp in order to avoid damage.
Used batteries and accumulators have to be taken out the item and disposed of in accordance with the national laws. The possibility of short-circuits of accumulators and batteries must be eliminated and so they may not be opened, thrown into a fire, or enter into the human body in any way.
Do not swallow any small parts or batteries/accumulators that are present. The products or parts thereof (including batteries / accumulators) must be stored out of the reach of children.
For safety and approval reasons (CE), the product must not be modified and/or changed. The product is to be used exclusively as an accumulator or battery powered lamp. If the H7R.2 is used for any other purpose, or incorrectly, it can get damaged and a hazard-free use is no longer guaranteed (danger from fire, short-circuit, electric shock etc.) and therefore there will be no liability for harm
anyone or damage to property. The warranty of the manufacturer is also rendered null and void.
The H7R.2 can be operated between -20 C° and +50 C° (Or between -4 F° and 122 F°). Ensure that the H7R.2 is not subjected to more extreme temperatures, intense vibrations, explosive atmosphere, solvents and/or vapors. Also continuous exposure to direct sunlight, high humidity and/or moisture must be avoided.
Changes, repairs and maintenance over and above those described in the documents accompanying the product may only be carried out by authorized technical personnel.
If it is found that the product is filled with full batteries / accumulators in the correct orientation (polarity!) and properly closed, and still unable to be function safely and normally, or the product shows damage, it must be rendered inoperable and not used any further. In this case, for warranty matters, contact your dealer.
15. Safety instructions
This product is not a children's toy. Since it has small parts that can be swallowed, it is especially not suitable for those under the age of 5.
The article may not be used for examinations of the eyes (e.g. for a pupil test).
When in use, heat accumulation, e.g. by covering, must be avoided.
If the product does not work correctly, the first thing that must be checked is whether this is due to discharged or incorrectly placed battery/accumulators.
If using in traffic, please follow the respective legal regulations.
The most hazardous threat posed by this product is the optical radiation known as Blue Light Hazard (400 nm to 780 nm). The thermal hazard threshold values are not clearly determined yet.
The risk for the viewer depends on the use or on how the product is installed. However, there is no optical hazard as long as the aversion responses limit the time of exposure and as long as the information contained in this instruction manual is observed.
The aversion reactions are triggered by the exposure and they are a natural reaction that protects the eye from hazards through optical radiation. This includes in particular conscious aversion reactions such as eye or head movement (e.g. turning away).
When using the product it is of particular importance to bear in mind that the aversion reactions of person at whom the light is directed at may be weakened or completely suspended as a result of medication, drugs or illness.
Because of the blinding effect of the product, improper use may lead to reversible, i.e. temporary impairment of sight (physiological blinding) or afterimages, or it may trigger queasiness and fatigue (through physiological blinding). The intensity of the temporary discomfort or the time until the side effects
subside depends primarily on the brightness between the blinding-light source and the surrounding area. Photosensitive people in particular ought to consult a medical consultant prior to using this product.
As a matter of principle the rule is that high-intensity light sources carry a high secondary hazard potential due to their blinding effect.
Just like looking into other bright light sources (e.g. headlights of a car), the temporary limited impairment of vision and afterimages may lead to irritation, inconveniences, impairments and even accidents, depending on the situation.
This information applies to the use of a single product. If more light-emitting products of the same type or of a different type are used together, the intensity of the optical radiation may increase.
Every longer viewing/eye-contact with the source of radiation of this product by the user or other persons, with and without other light-bundling instruments, is to be avoided as a matter of principle! Instead, the eyes are to be closed deliberately in such cases and the head ought to be turned away from the light beam. In case of a commercial use or the product's use by public bodies, the user must be instructed to follow all applicable laws and regulations that correspond to the individual case of usage.
Important rules of conduct:
Do not aim the light beam directly into the eyes of a person.
The user or any other person should not look directly into the light beam.
In the event of optical radiation hitting the eye, one must shut their eyes and turn their head away from the beam.
The instruction manual and this information must be stored safely and must always be kept together with the product.
It is prohibited to look straight into the light that is being emitted by this product.
13. Scope of delivery
7398 Led Lenser H7R.2 (Blister)
작동 설명서의 버전:V1.4
1. 건전지 세트
-1xLi-ion 건전지 팩3.7V(1400mAh)
Version of the operating manual: 1.4
1. 使用電池
Hersteller - Manufactured by
ZWEIBRÜDER® OPTOELECTRONICS GMBH & CO. KG
Kronenstr. 5-7 • 42699 Solingen • Germany
Tel. +49 (0)212/5948-0 • Fax +49 (0)212/5948-200
info@zweibrueder.com • www.zweibrueder.com
natural_image
Close-up of a black LEO lenser headlamp with adjustable straps and cable (no text or symbols visible on the device itself)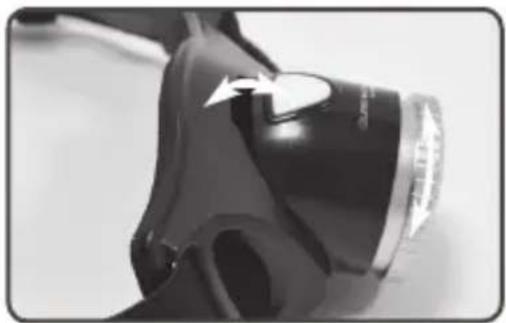
natural_image
Close-up of a black handheld device with a heart-shaped highlight on its side (no visible text or symbols)Operating instructions
Bedienungsanleitung