USX-ST5 - Steam cleaner Ulsonix - Free user manual and instructions
Find the device manual for free USX-ST5 Ulsonix in PDF.

User questions about USX-ST5 Ulsonix
0 question about this device. Answer the ones you know or ask your own.
Ask a new question about this device
Download the instructions for your Steam cleaner in PDF format for free! Find your manual USX-ST5 - Ulsonix and take your electronic device back in hand. On this page are published all the documents necessary for the use of your device. USX-ST5 by Ulsonix.
USER MANUAL USX-ST5 Ulsonix
natural_image
Black electric shock absorber with labeled parts (a, b, c), no text or symbols beyond labelsnatural_image
Two grayscale medical or laboratory device handles with a labeled arrow indicating click point (no text or symbols on the devices themselves)
natural_image
Two gray electric vehicle charging station designs with a labeled click point (no text or symbols on the devices themselves)

natural_image
Two identical electric vehicle charging station handles with a click button, shown from different angles (no text or symbols on the devices themselves)natural_image
Two identical medical or laboratory device handles with a click arrow indicator (no text or symbols on the devices themselves)natural_image
Two identical grayscale images showing a knife being cut, with no visible text or symbols.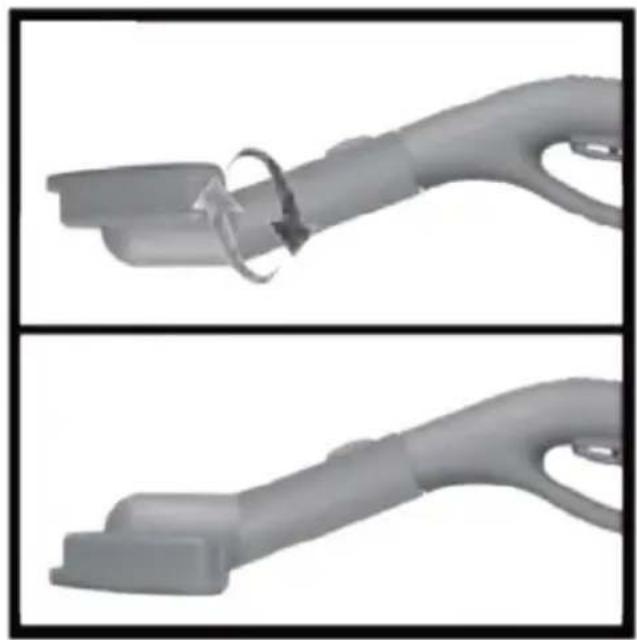
natural_image
Two grayscale images showing a handheld electric vehicle charging plug, one with a loop and arrow, the other with a handle (no text or symbols)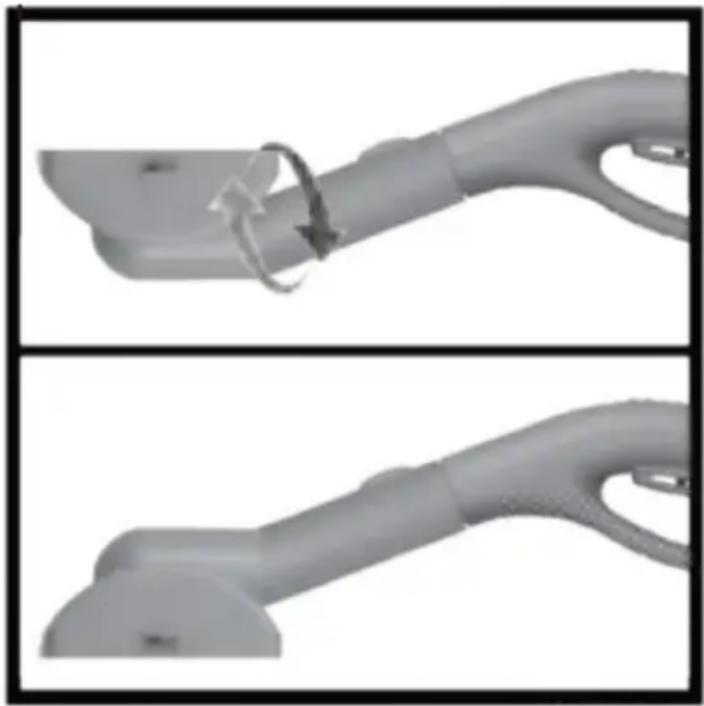
natural_image
Two grayscale images showing a hand holding an electric vehicle's cable, with no visible text or symbols.natural_image
Two identical medical or laboratory devices with a curved handle, one being adjusted by an arrow (no text or symbols visible)natural_image
Diagram of a door lock with control panel and indicator lights (no text or symbols)| Description of the parameter | Value of the parameter |
| Product name | Steam cleaner |
| Model | USX-ST5 |
| Supply voltage [V~] / Frequency [Hz] | 230/50 |
| Rated power [W] | 1800 |
| Number of steam generation levels | 2 |
| Maximum steam output [g/min] | 86 |
| Boiler capacity [L] | 2.8 |
| Water tank capacity [ml] | 1.2 |
| Steam pressure [bar] | >5 |
| Safety class | I |
| IP code | IPX4 |
| Dimensions [Width x Depth x Height; mm] | 410x270x290 |
| Weight [kg] | 11.2 |
1. General Description
The instruction manual is intended to assist in safe and reliable use. The product is designed and manufactured strictly according to technical specifications using the latest technology and components and maintaining the highest quality standards.
PLEASE CAREFULLY READ AND UNDERSTAND THIS INSTRUCTION MANUAL BEFORE OPERATION,
To ensure long and reliable operation of the unit, make sure to operate and maintain it properly in accordance with the guidelines in this instruction manual. The technical data and specifications contained in this instruction manual are up to date. The manufacturer reserves the right to make changes in order to improve the quality. Taking the technical progress and the possibility of reducing noise into account, the unit is designed and built in such
a way so that risks resulting from noise emissions are reduced to the lowest possible level.
Explanation of symbols
| CE | The product complies with applicable safety standards. |
 | Please read the instructions before use. |
 | Recyclable product. |
 | CAUTION! or WARNING! or REMINDER! describing a situation.(general warning sign). |
 | CAUTION! Warning of electric shock! |
 | Caution! Hot surface can cause burns! |
 | Caution! Hot surface |
 | For indoor use only. |
CAUTION!
The illustrations in this instruction manual are for reference only and may differ from the actual product in some details.
The original instruction manual is in the German language version. Other language versions are translations from German.
2. Safety of use
CAUTION! Read all safety warnings and all instructions. Failure to follow the warnings and instructions may result in electric shock, fire and/or severe personal injury or death.
The term "unit" or "product" in the warnings and in the description of the instructions refers to the STEAM CLEANER.
2.1. Electrical safety
a) The plug of this unit must fit into the outlet. Do not modify the plug in any way. Original plugs and matching outlets reduce the risk of electric shock.
b) Avoid touching grounded parts, such as pipes, heaters, ovens, and refrigerators. There is an increased risk of electric shock if your body is grounded and touches the unit exposed to direct rain, wet pavement, and operation in a humid environment. If water enters the unit, there is an increased risk of damage to the unit and electric shock.
c) Do not touch the unit with wet or damp hands.
d) Do not use the cord in an unintended manner. Never use it to carry the unit or to pull the plug out of the socket. Keep the cord away from heat sources, oil, sharp edges or moving parts. Damaged or tangled cords increase the risk of electric shock.
e) If you cannot avoid using the unit in a wet environment, use a residual current unit (RCD). Using an RCD reduces the risk of electric shock.
f) Do not use the unit if the power cord is damaged or shows signs of wear. A damaged power cord should be replaced by a qualified electrician or the manufacturer's service department.
g) To avoid electric shock, do not immerse the cable, plug, or device itself in water or other liquid. Do not use the device on wet surfaces.
h) CAUTION - THREAT TO LIFE! When cleaning or using the unit, never immerse it in water or other liquids.
i) Do not allow the machine to get wet. Risk of electric shock!
2.2. Safety in the workplace
a) Keep the work area tidy and well lit. Disorder or poor lighting can lead to accidents. Be foresighted, watch what you are doing and use common sense when using the unit.
b) Do not use the unit in an explosive area, for example in the presence of flammable liquids, gases or dust.
c) If you find any damage or irregularities in the operation of the unit, immediately turn it off and report it to an authorized person.
d) If you have any doubts as to whether the unit is working properly or if it is damaged, contact the manufacturer's service department.
e) Only the manufacturer's service department can repair the unit. Do not carry out repairs yourself!
f) In case of open flames or fire, use only dry powder or snow (CO2) fire extinguishers to extinguish the live equipment.
g) No children or unauthorized persons are allowed in the work area. (Inattention may result in loss of control of the unit.)
h) Use the unit in a well-ventilated area.
i) Check the condition of the safety stickers regularly. Replace them if they are illegible.
j) Keep these instructions for use for future reference. If the unit is to be passed on to a third party, the operating instructions must also be handed over together with the unit.
k) Keep the packaging and small assembly parts out of the reach of children.
I) Keep the unit away from children and animals.
Please note! Keep children and other bystanders safe while operating the unit.
2.3. Personal safety
a) Do not operate this product if you are tired, ill or under the influence of alcohol, drugs or medication that could impair your ability to operate the product.
b) The device is not intended to be used by persons (including children) with reduced mental, sensory or intellectual functions or persons who lack experience and/or knowledge unless they are supervised or have
been instructed by a person responsible for their safety on how to operate the device.
c) The device may be operated by persons who are physically fit, capable of operating it and appropriately trained, and who have read this instruction manual and have been trained in occupational safety and health.
d) Use caution and common sense when operating this unit. A moment's inattention during operation may result in serious personal injury.
e) To prevent accidental start-up, make sure the switch is in the off position before connecting to a power source.
f) Do not overestimate your capabilities. Maintain body balance and equilibrium at all times during operation. This allows for better control of the machine in unexpected situations.
g) The unit is not a toy. Children should be watched to ensure that they do not play with the unit.
2.4. Safe use of the unit
a) Do not use the unit if the ON/OFF switch does not function properly (does not turn on and off). Devices that cannot be controlled by the switch are unsafe, cannot operate, and must be repaired.
b) Disconnect the unit from the power supply before adjusting, cleaning, or servicing. This precaution reduces the risk of accidental start-up.
c) Keep unused equipment out of the reach of children and out of the reach of anyone unfamiliar with the unit or this instruction manual. These units is dangerous in the hands of inexperienced users.
d) Keep the unit in good working condition. Check before each use for general damage or damage to moving parts (cracks in parts and components or any other condition that may affect the safe operation of the unit). If damaged, have the unit repaired before use.
e) Keep the unit out of the reach of children.
f) Repairs and maintenance should be carried out by qualified personnel using only original spare parts. This will ensure the safety of use.
g) To ensure the designed operational integrity of the unit, do not remove factory-installed covers or loosen screws.
h) Do not leave the unit switched on unattended.
i) Clean the unit regularly to prevent permanent dirt build-up.
j) Before each use, make sure that the nozzle is properly mounted in the machine and that the hose is properly attached and undamaged.
k) The unit is not a toy. Cleaning and maintenance must not be performed by children without adult supervision.
I) Do not tamper with the unit to alter its performance or design.
m) Keep the unit away from sources of fire and heat.
n) Never aim the steam jet at your body, other people or animals. The hot steam causes skin burns!
o) Never operate the device with an empty water tank.
p) Never refill the water tank with hot water.
q) Do not direct the steam jet towards electrical equipment.
r) Do not use the steam cleaner to clean surfaces that are not resistant to heat or humidity.
s) Do not open the safety valve of the boiler when the device is in operation or when the pressure gauge shows a value >0.
t) Do not use dirty water, water mixed with chemicals, etc. in the unit. Only fill the tank with clean water.

CAUTION! Although the product has been designed to be safe, with dequate safeguards, and despite the additional safety features provided to the user, there is still a slight risk of accident or injury when andling the unit. You are advised to use caution and common sense when using this product.
3. Rules of use
The device is designed to clean surfaces using steam under pressure. The user is responsible for any damage resulting from misuse.
3.1. Description
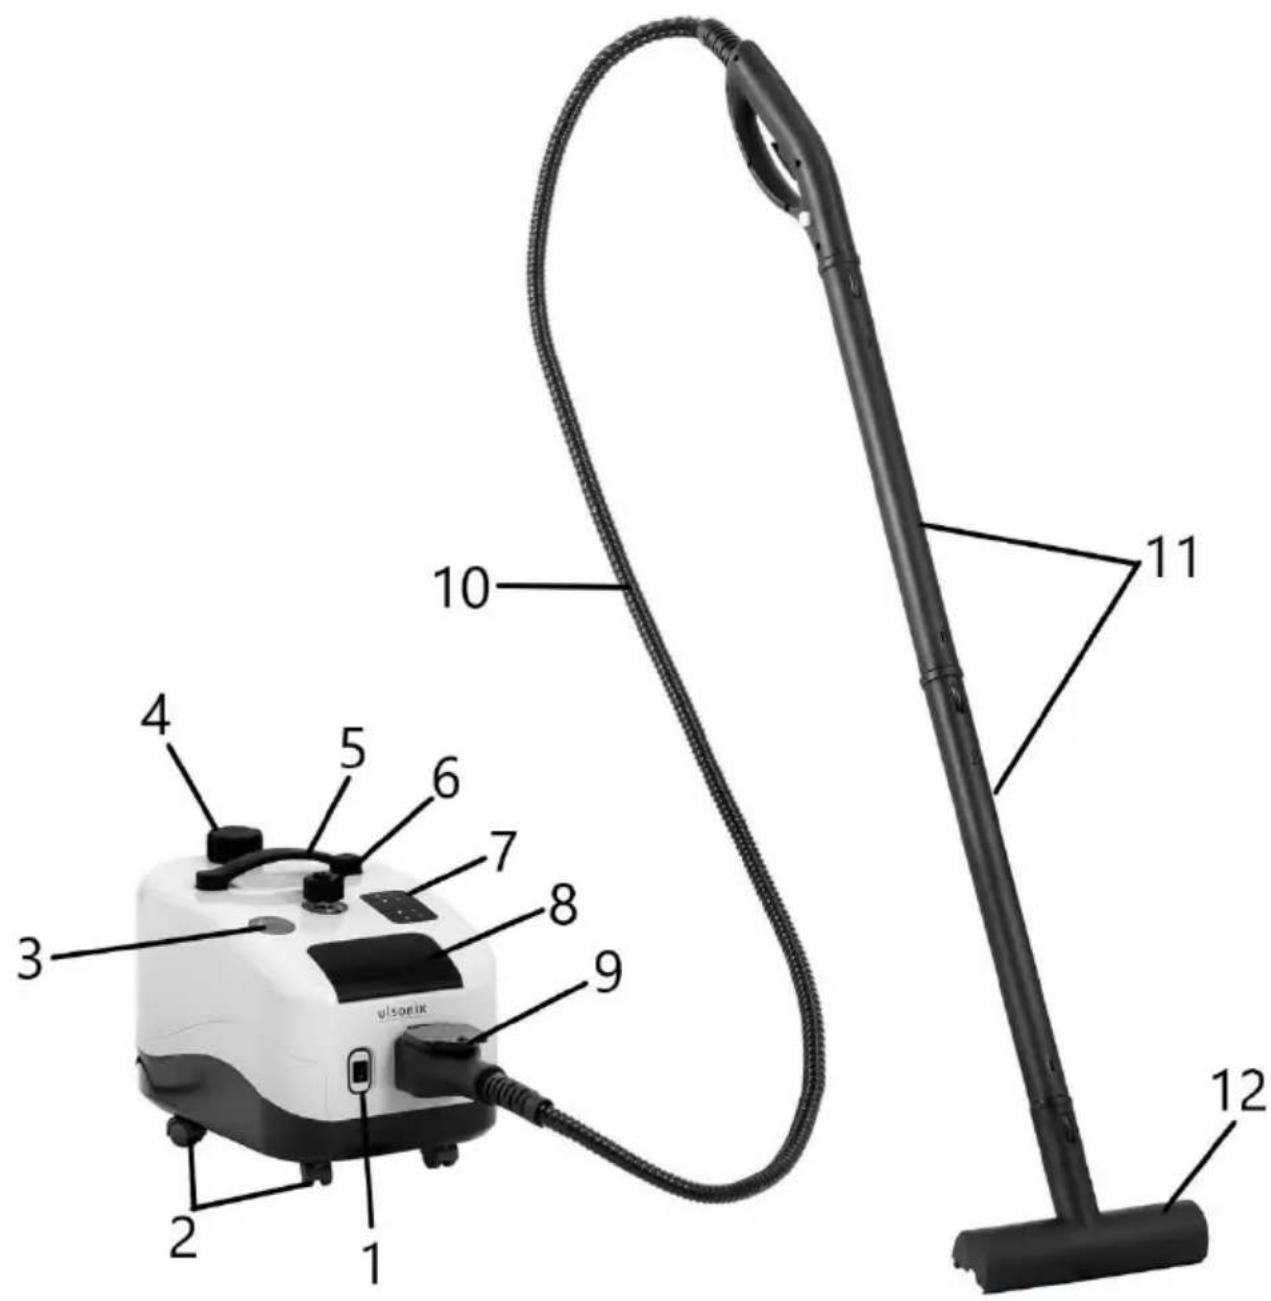
- On/Off button
- Wheels
- Pressure indicator
- Tank filler cap
- Handle
- Safety valve
- Display
- Water heating start button
- Connection socket
- Steam hose (with plug and handle)
- Extension tubes
- Brush
-
Hand piece
-
Adapter
- Nozzle
- Funnel
- Measuring cup
- Fabric mop pads
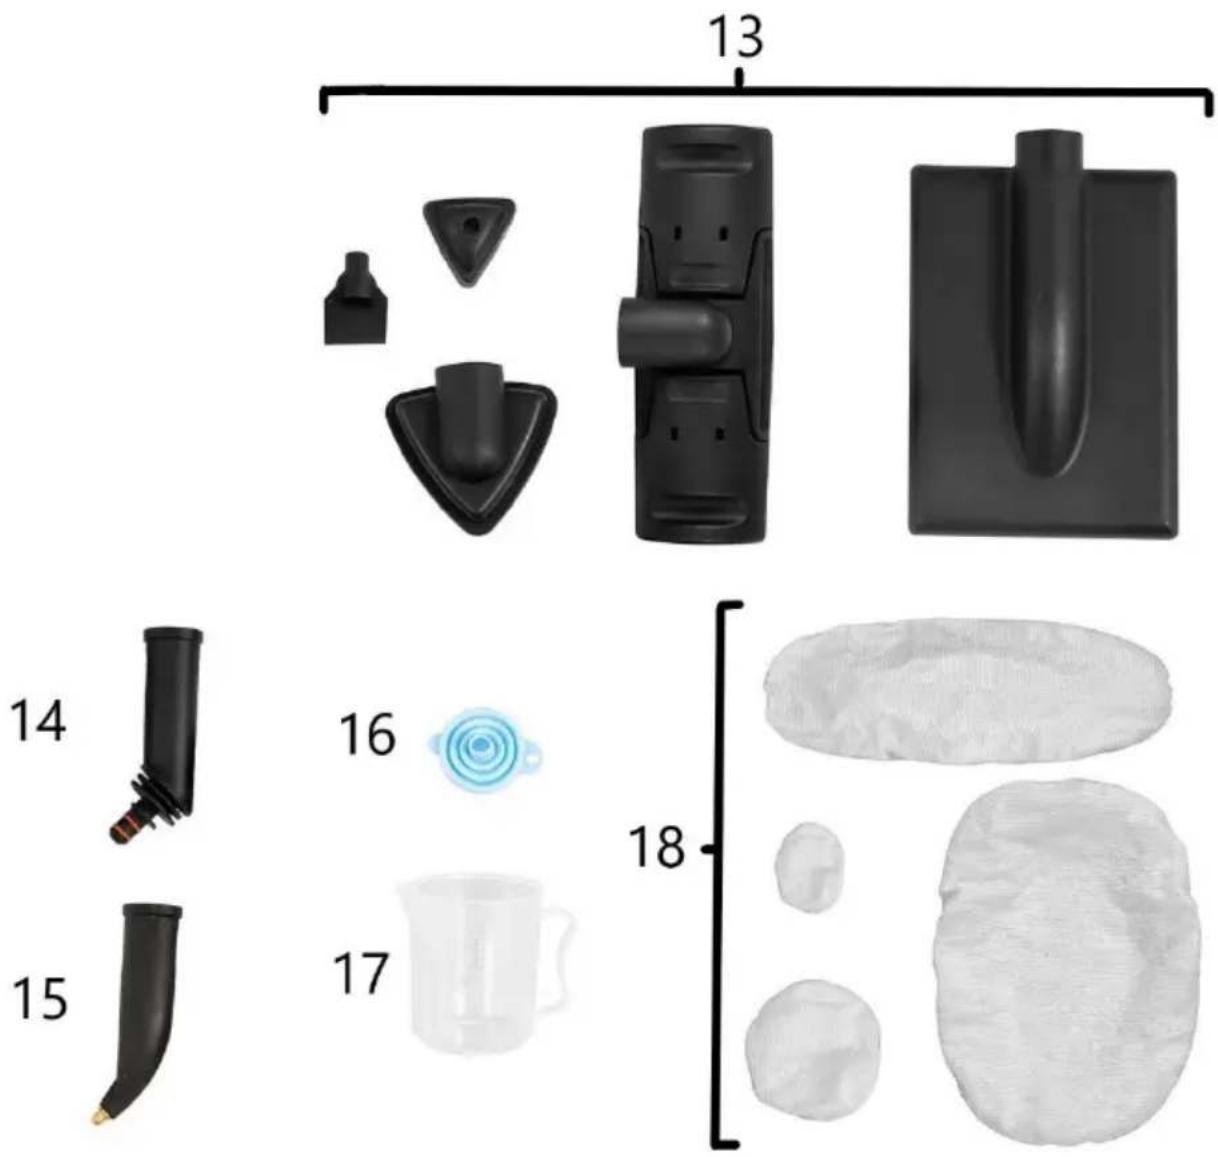
Description of the elements on the steam hose end handle (gun)

natural_image
Black electric shock absorber with labeled parts (a, b, c), no text or symbols beyond labelsa- Child lock
b- Trigger
c- Steam level switch
Display description
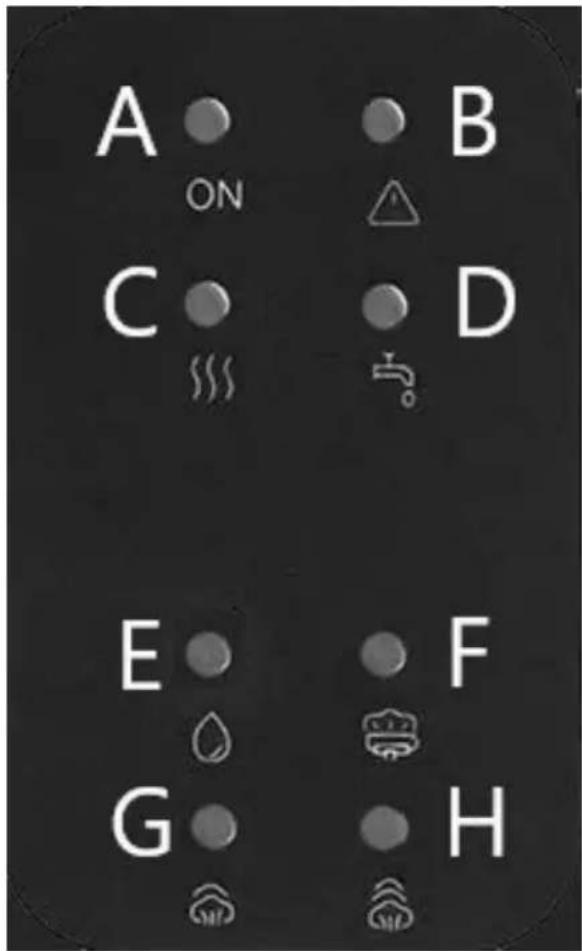
A - Power indicator light
B - Overheating alarm light
C - Heating indicator light
D - Water shortage alarm light
E - Light - Steam ejection active light
F - Light- Unit is heated and ready for operation
G - Light - first steam level set (minimum steam output)
H - Light - Second steam level set (maximum steam output)
3.2. Preparation for operation
POSITIONING OF THE UNIT
The ambient temperature must not exceed 40^ C and ambient humidity should not exceed 85%. Place the unit in a way that ensures good air circulation. Maintain a minimum clearance of 10 cm from any wall of the unit. Keep the unit away from any hot surfaces. Always operate the unit on a level, stable, clean, fireproof and dry surface and out of the reach of children and persons of impaired mental, sensory and intellectual
functions. Place the unit in such a way that the mains plug can be reached at any time. Ensure that the power supply to the unit corresponds to that specified on the identification plate!
ASSEMBLY OF THE UNIT
Caution: Do not install the unit while it is plugged in or still hot after previous use.
- Lift the flap covering the socket. Plug the steam hose plug into the socket. Make sure that the plug is securely installed.
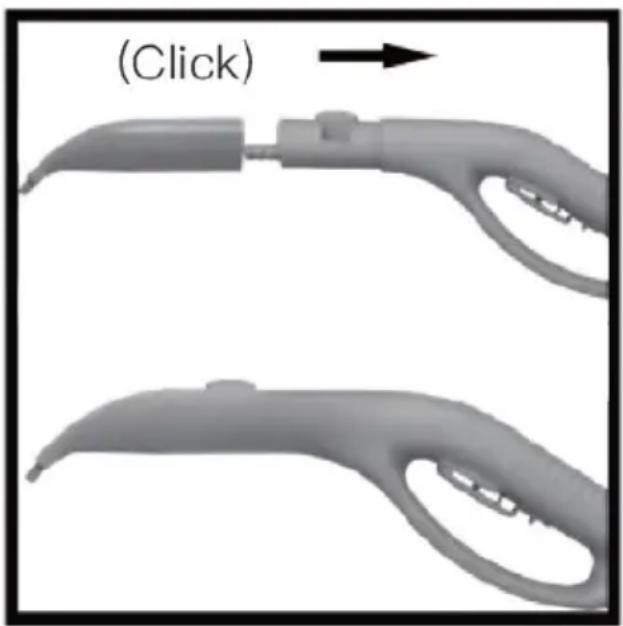
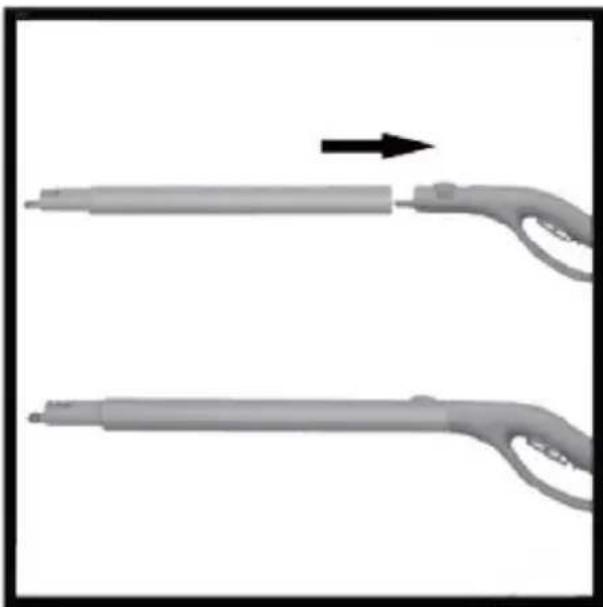
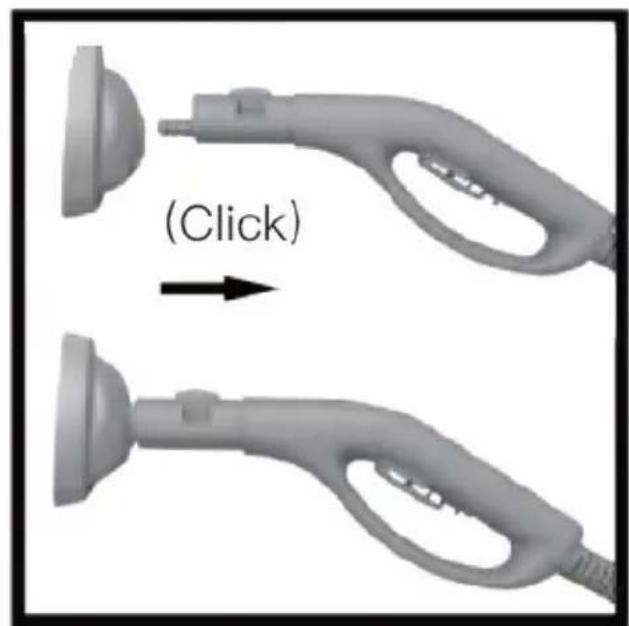
- Install the selected attachment following the picture instructions below.
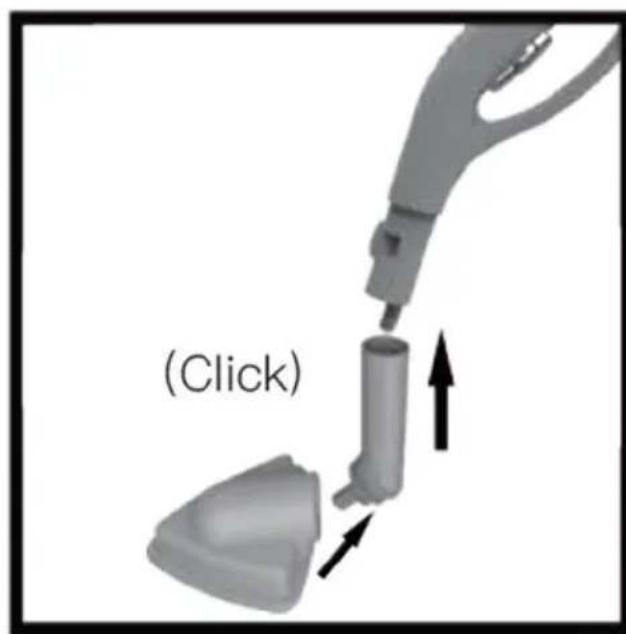
a) Working tips mount directly to the connector on the end of the steam hose handle.
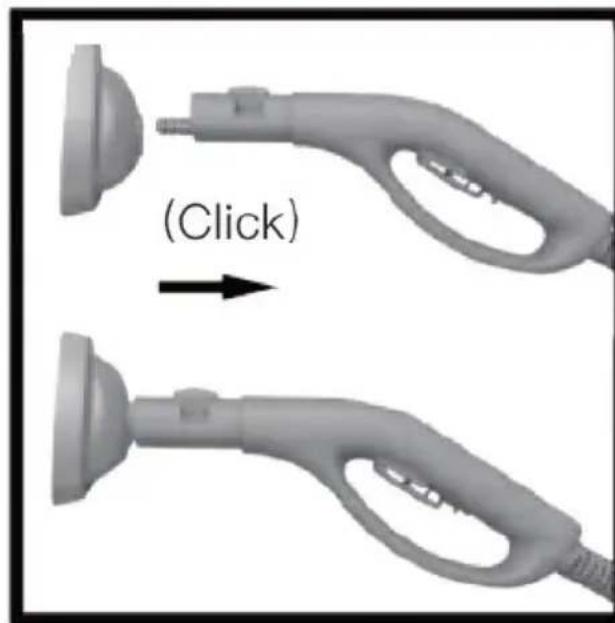
Place the working tip onto the nozzle until a "click" sound is heard.
natural_image
Two grayscale medical or laboratory device handles with a labeled arrow indicating (Click) direction (no text or symbols on the devices themselves)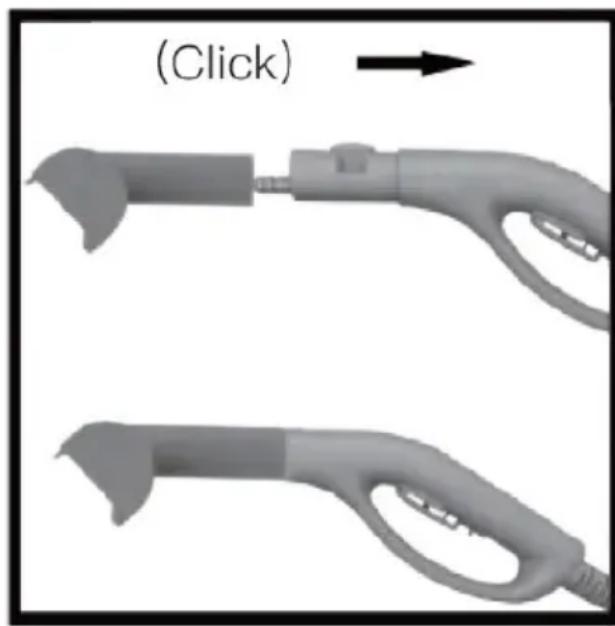
natural_image
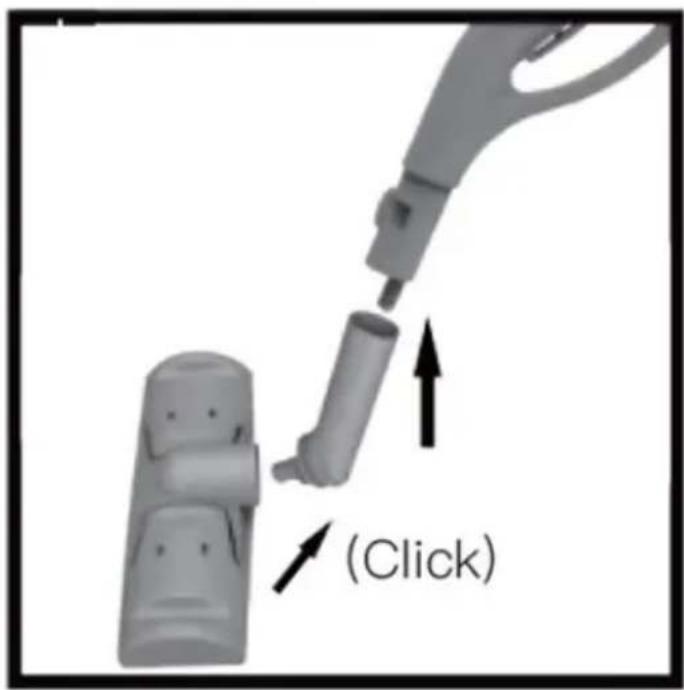
Two identical electric vehicle fuel torches with a click button labeled (Click) and an arrow indicating direction (no text or symbols on the devices themselves)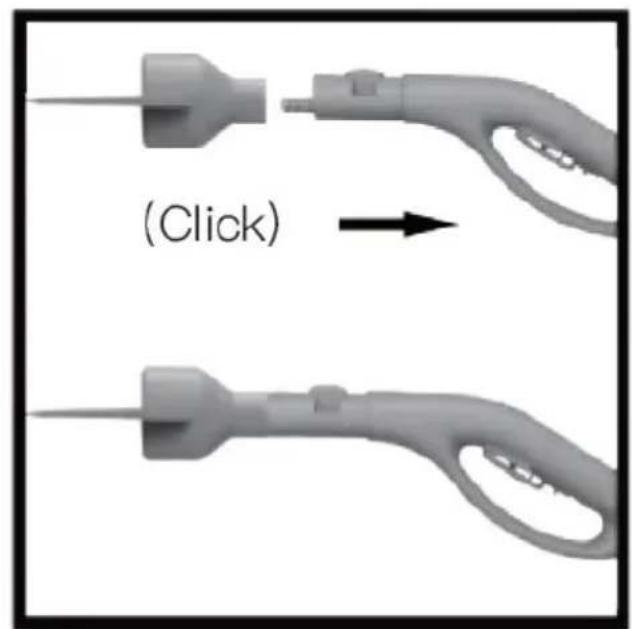
natural_image
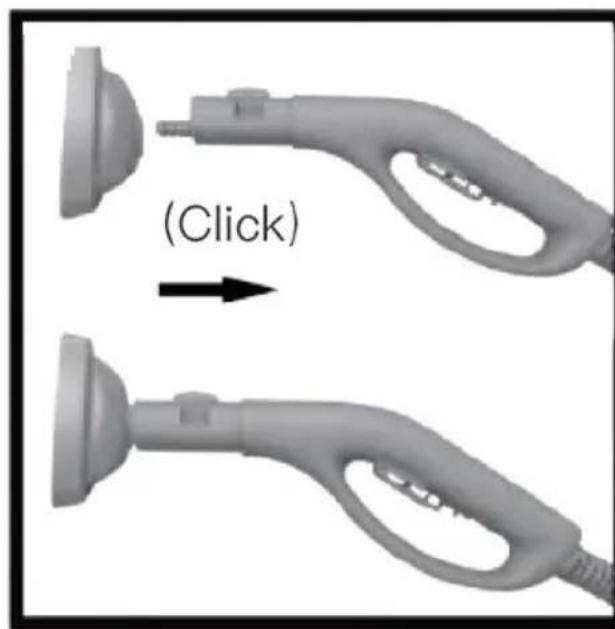
Two identical electric vehicle charging station handles with a click button, shown from different angles (no text or symbols on the devices themselves)"Click" - snap-on assembly
b) Attach the working tips using the adapter. Attach the adapter to the connector on the end of the steam hose handle, then attach the working tip to the adapter. The assembly is done in a snap-on fashion.
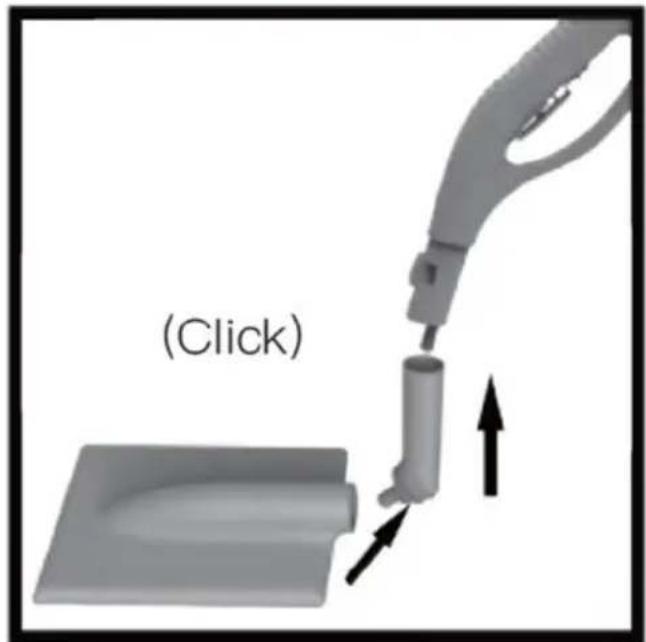
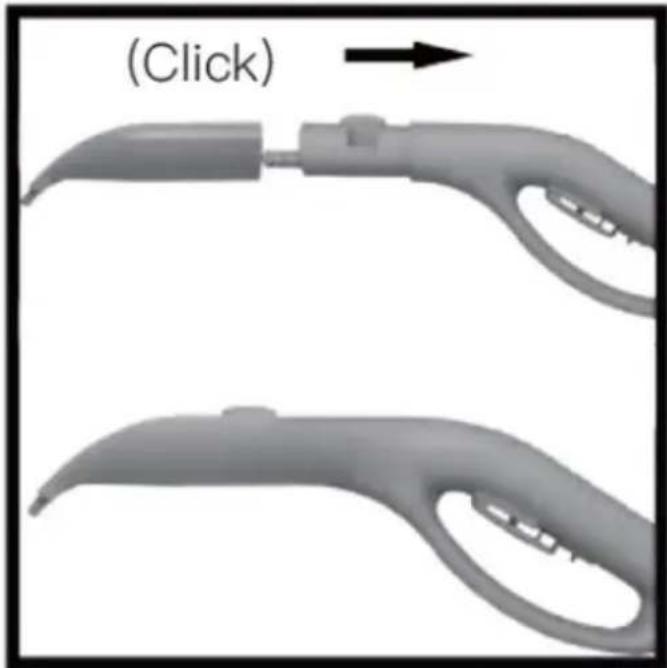
c) The working tips are mounted on the nozzle previously attached to the handle.
In the first step, attach the nozzle to the tip of the handle.
natural_image
Two identical medical or laboratory device handles with a labeled arrow indicating click point (no text or symbols on the devices themselves)Then attach the working tip by screwing it on by turning it 180 degrees.

natural_image
Two identical grayscale images of a knife with a handle, shown from top and side views (no text or symbols visible)
natural_image
Two grayscale images showing a handheld electric vehicle plug being attached, with no visible text or symbols.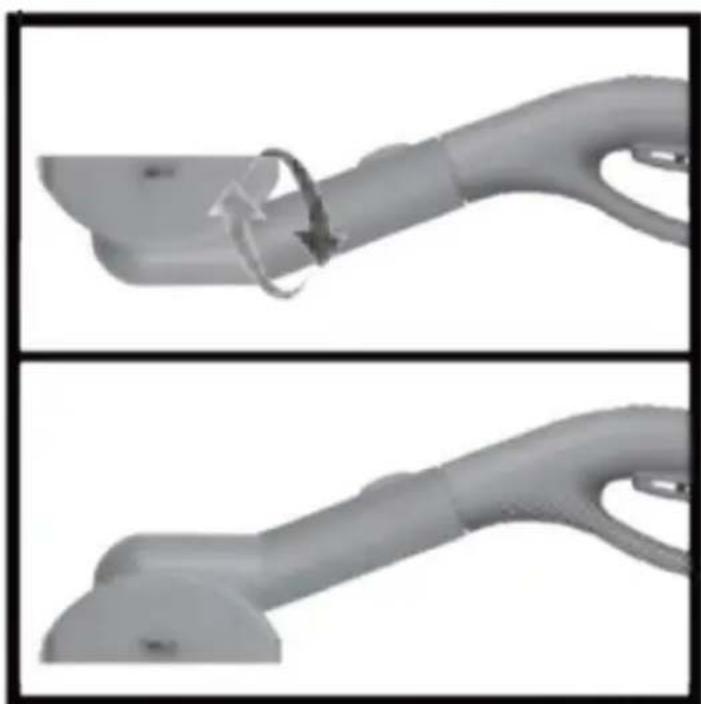
natural_image
Two grayscale images showing a hand holding an electric vehicle's cable, with a curved arrow indicating rotation (no text or symbols present)-
The included cloth mop pads can be attached to the selected working tips.
-
If necessary, you can extend the length of the work handle by connecting the extension tubes.
The tubes are snapped into place.
natural_image
Two identical medical or laboratory devices with a curved handle, one being pointed at the end of its length (no text or symbols visible)3.3. Working with the unit
-
Fill the tank with water. To do this, unscrew the cap (4), place a funnel (16) in the opening and, using the measure (17), measure the desired amount of water. Pour in the water, remove the funnel from the opening and screw the cap on.
-
Connect the steam hose and preferred operating nozzle according to the instructions in the Assembly of the unit section.
-
Connect unit to power source, then turn on by setting the On/Off button to the "I" position. The indicator light (A) on the display will light up.
-
Press the button (8) on the casing to start the steam generation process.
The indicator (C) will light up. When the device is above 4 bar and ready for operation, indicator (F) will light up.
- Control the steam output with the steam gun at the end of the steam hose.
I.e. using the switch (c) select the steam output level (1-min/2-max), for the selected level the corresponding indicator (G/H) will light up.
When both lights are on, the maximum steam output level is reached.
The machine will eject steam while the trigger is depressed.
-
Safety lock - when the trigger is not depressed, sliding the lock provides protection against starting the device. When the trigger is depressed, sliding the lock will lock the position, steam will be released continuously.
-
When the indicator light (B) appears in the display, the steamer has either overheated (in this case, stop using the steamer and allow it to cool down) or it is upside down (correct the position).
If there is no water in the tank, the indicator light (D) will light up on the display. If necessary, refill the tank with water as described in point NOTICE: use only running water. Distilled or pure water can also release this indicator light!
- Before disconnecting the unit from the power supply, lower the pressure inside the unit.
To do this, press the button (8) and then press the trigger (b) on the handle to expel the steam.
- Set the On/Off button to the "0" position. Disconnect the unit from the power supply.
INSTRUCTIONS FOR USE
- When cleaning a surface for the first time, testing in the least visible place to check whether the surface is steam resistant is recommended.
- Before cleaning after starting the machine, remove the condensed water from the steam hose by pressing the trigger on the handle.
- Adding detergents, fragrances, etc. to the water in the tank is prohibited. This can damage the machine.
- Avoid kinks in the steam hose.
- Refilling the tank with hot water is prohibited! Pouring hot water may deform the tank.
- Always turn off the device when not in use, before moving it to another location and when emptying the water tank.
Cleaning tilled floors:
- Push the spot nozzle on the steam gun and then push the floor brush on the spot nozzle, tum it around 180 degrees, fixing the cleaning cloth on all two clamps you need.
- Heat and moisture can lead to damage. Please check the heat resistance and steam effect on an insignificant area using a minimal volume of steam prior to use.
- We recommend sweeping the floor or vacuum cleaning it before using this device. In this way the floor will be cleared of dirt and loose particles before the wet cleaning commences. Work slowly on surfaces that are heavily soiled so that the steam has longer to take effect.
Carpet cleaning (delicate floors)
-
Push the spot nozzle on the steam gun and then push the floor brush on the spot nozzle, tum it around 180 degrees. Fix the cleaning cloth on all two clamps if you need.
-
Note: Please test on the invisible spot with a minimal volume or steam before using this appliance to check the heat resistance and impact of steam on the carpet. It is highly recommended vacuum cleaning the carpet before using this appliance In order to prevent too much moister and to avoid the risk of damage due to temperature effects. Do not direct the steam continuously onto one spot more than 5s.
Cleaning with big / small diamond shaped brush:
-
Push the spot nozzle on the steam gun and then push the big angle brush on the spot nozzle, turn it around 180 degree.
-
Push the Small triangle brush onto the steam gun firmly.
-
With the diamond shaped brush you can clean at smaller surfaces (e.g. wall tiles, cupboards, working surfaces, shower cabins, window frames, etc.)
Steam nozzle:
-
Push the short nozzle onto the steam gun so that the unlocking button on the steam gun engages.
-
To remove stains from carpets (not wool carpets) hold the nozzle low and even above the floor. Never treat a stain by aiming directly from above.
Window wiper:
-
Push the window wiper onto the steam gun so that the unlocking button on the steam gun engages.
-
Wipe the window dry from the top to the bottom. Wipe away the dirty water with a cloth.
High pressure steam plate:
- Push the spot nozzle on the steam gun and then push the high-pressure plate on the spot nozzle, tum it around 180 degrees. This plate is used to clean bed sheet and sofa.
Detail scraper:
- Push the detail scraper onto the steam gun firmly. The detailed scraper is used for cleaning stubborn
dirt. It is not suitable for cleaning sensitive surfaces.
3.4. Cleaning and maintenance
a) Cleaning and maintenance. Pull the mains plug and let the unit cool down completely before cleaning, adjusting or replacing accessories and when the unit is not in use.
b) Use only non-corrosive cleaning agents for cleaning the surfaces.
c) After each cleaning, all the parts should be dried well before the unit is used again.
d) Store the unit in a dry and cool place protected from moisture and direct sunlight.
e) Do not spray the unit with a stream of water or immerse it in water.
f) Make sure that no water enters through the ventilation openings in the housing.
g) Clean the ventilation openings with a brush and compressed air.
h) Perform regular inspections of the unit checking technical fitness and any damages.
i) Always drain the pressure from the unit before storing.
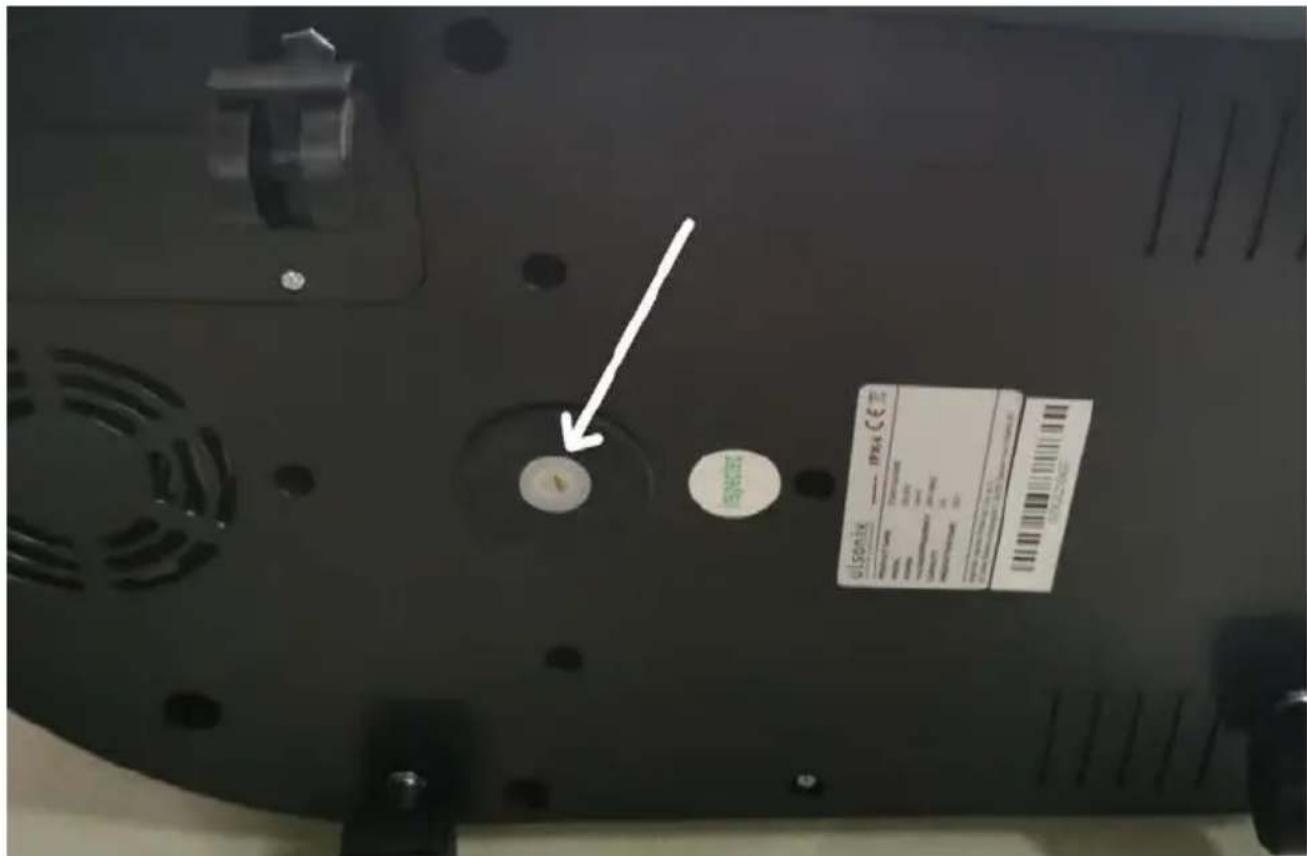
j) Always empty the water tank after using the unit to prevent limescale build-up.
Use a flat screwdriver (not included) to unscrew the cap located at the bottom of the unit (indicated by the arrow).
Only do this when the machine has cooled down and the pressure gauge reads 0.
k) To remove sediments and limescale from the boiler while heating water, unscrew the safety valve (6) and the plug in the lower part of the unit (only if the pressure gauge indicates 0 and the unit is cooled down).
To unscrew the safety valve, press it down and turn it. Pour clean water into the opening where the safety valve is fitted until no trace of sediment is visible in the water flowing out the bottom.
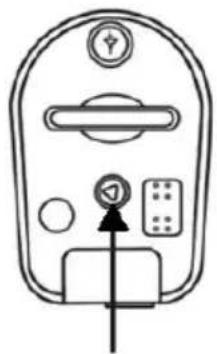
I) If you notice the steam is smaller You need to clean the sediment inside of heater.
Open the pressure release valve (see picture below) and drainage nut, and then add water into the pressure release valve. Sediment will be washed out from drainage outlet. Clean filter net regularly. Use tweezers to pick up filter net from water tank outlet, wash with water, and then put it back in.
natural_image
Simple line drawing of a door with buttons and a pointer (no text or symbols)Caution: when the pressure inside the steamer is more than 6 bar do not open the valve cap! Previous to opening release the rest of the steam inside before You switch off the device.
natural_image
Black electric shock absorber with labeled parts (a, b, c), no text or symbols beyond labelsnatural_image
Two grayscale medical or laboratory device handles with a labeled arrow indicating click point (no text or symbols on the devices themselves)
natural_image
Two gray electric vehicle charging station designs with a labeled click point (no text or symbols on the devices themselves)

natural_image
Two identical electric vehicle charging station handles with a click button, shown from different angles (no text or symbols on the devices themselves)natural_image
Two grayscale medical or laboratory device handles with a labeled arrow indicating (Click) direction (no text or symbols on the devices themselves)natural_image
Two identical grayscale images showing a tool with a curved handle and a circular ring, no text or symbols present.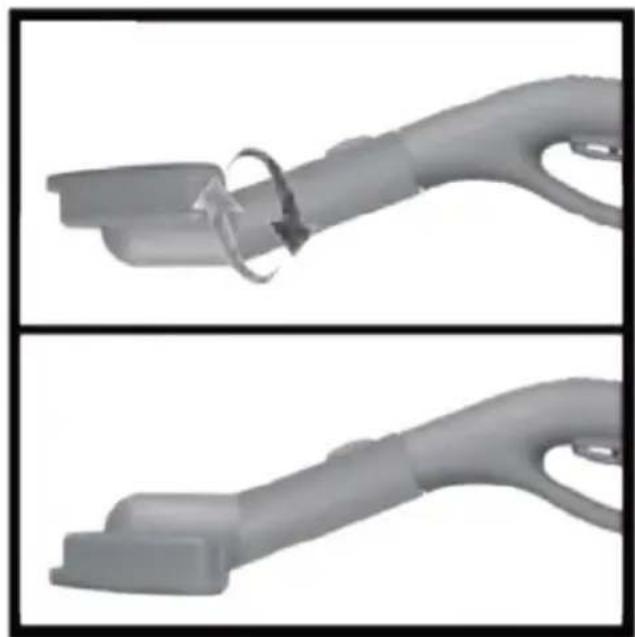
natural_image
Two grayscale images showing a handheld electric vehicle plug with a loop handle, no text or symbols visible.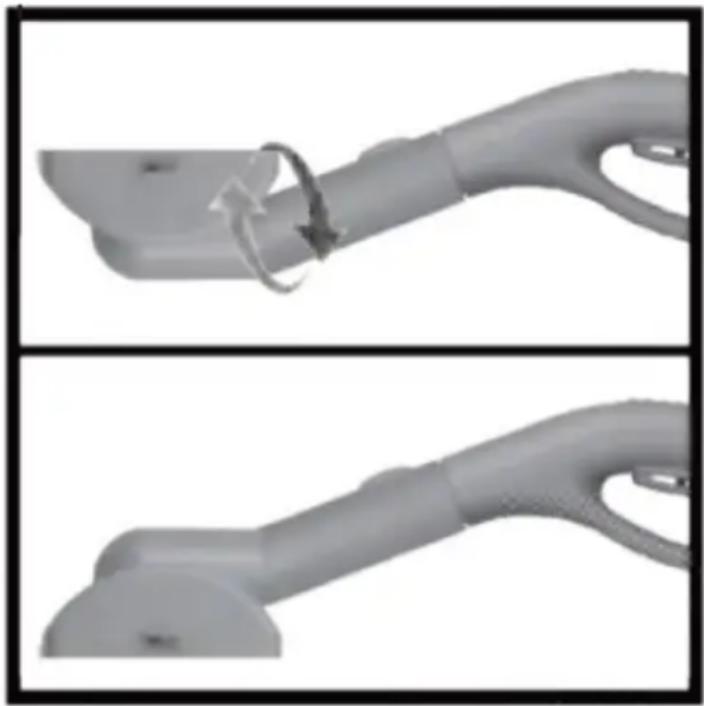
natural_image
Two grayscale images showing a hand holding an electric vehicle's cable, with a curved arrow indicating rotation (no text or symbols present)natural_image
Two identical gray medical or laboratory devices with a black arrow indicating direction (no text or symbols)3.3.
Praca z urządzeniem
natural_image
Pure diagram of a door handle with control buttons and a triangular indicator (no text or symbols)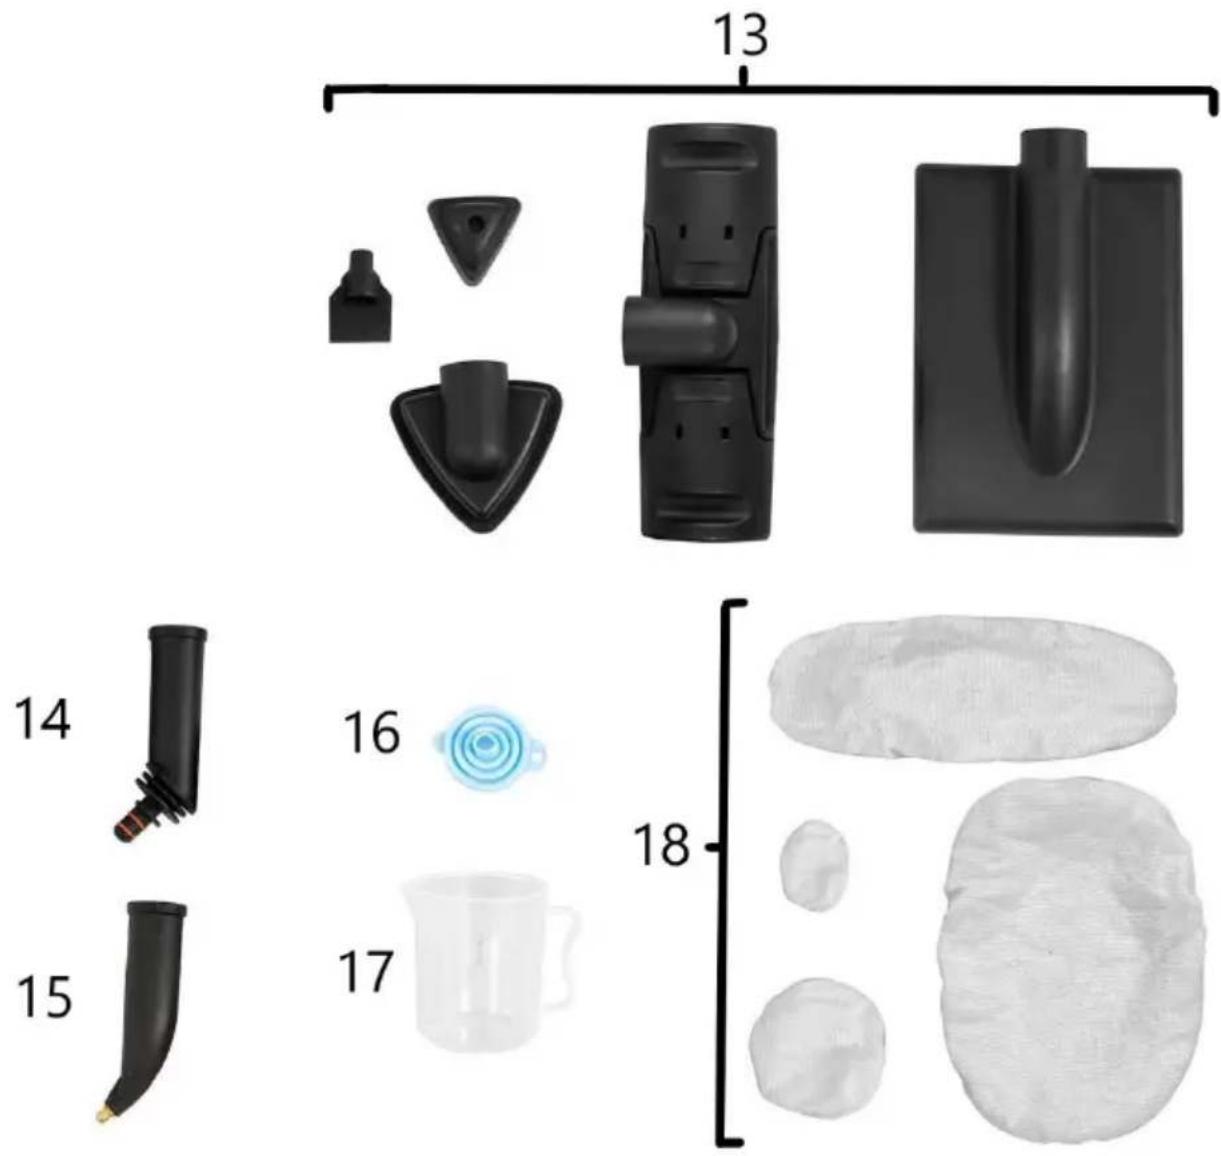
natural_image
Black electric vehicle hand with labeled parts (a, b, c), no visible text or symbols beyond labelsnatural_image
Two grayscale medical or laboratory devices with curved handles and a labeled arrow indicating (Click) direction (no text or symbols on the devices themselves)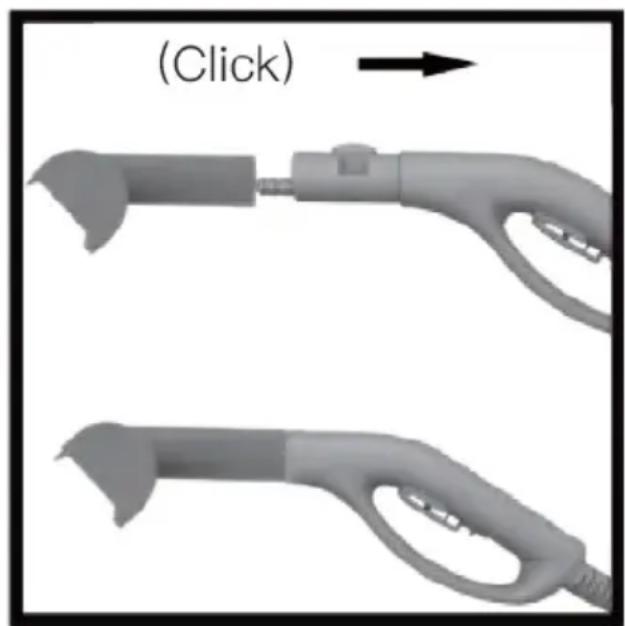
natural_image
Two 3D-printed electric vehicle handsets with a click arrow indicator (no text or symbols on the devices themselves)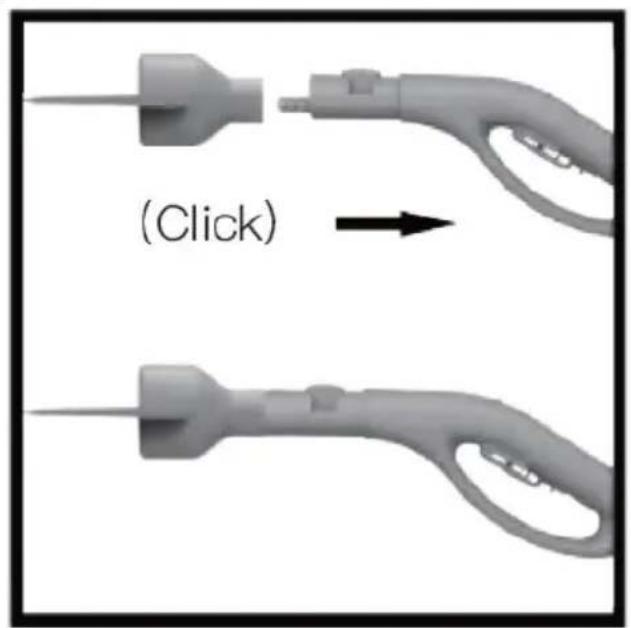

natural_image
Two identical electric vehicle charging station handles with a labeled click action (no text or symbols on the devices themselves)natural_image
Two identical gray medical or robotic devices with curved handles, one with a click arrow indicator (no text or symbols on the devices themselves)natural_image
Two identical grayscale images showing a knife with a handle and blade, no text or symbols visible.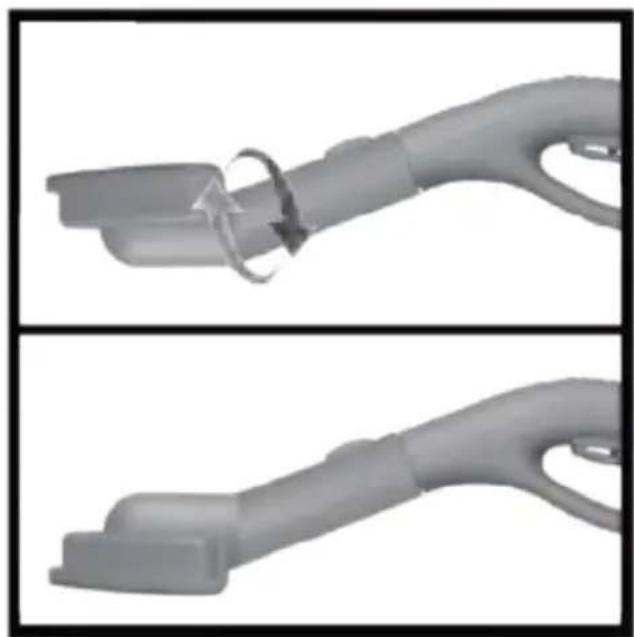
natural_image
Two grayscale images showing a hand holding a plastic clip with a loop, no text or symbols present.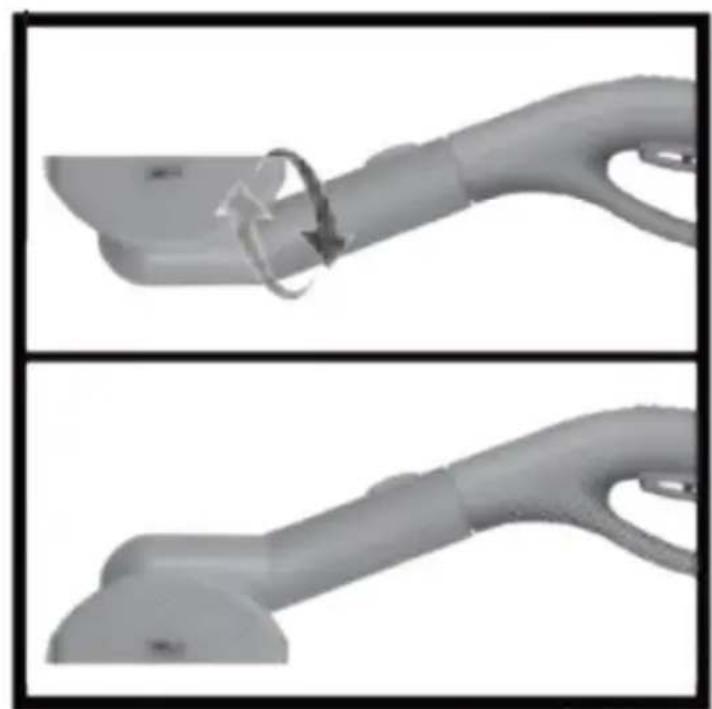
natural_image
Two grayscale images showing a hand holding an electric vehicle's cable, with a curved arrow indicating the cable attachment (no text or symbols present)natural_image
Two identical medical or laboratory devices with a black arrow indicating direction, no text or symbols present.natural_image
Pure diagram of a door handle with control buttons and indicator lights (no text or symbols)natural_image
Black electric shock absorber with labeled parts (a, b, c), no text or symbols beyond labelsnatural_image
Two grayscale medical or laboratory device handles with a labeled arrow indicating click point (no text or symbols on the devices themselves)
natural_image
Two gray electric vehicle charging station designs with a labeled click point (no text or symbols on the devices themselves)

natural_image
Two identical electric vehicle charging station handles with a click button, shown from different angles (no text or symbols on the devices themselves)natural_image
Two grayscale medical or robotic devices with curved handles, one with a click arrow indicator (no text or symbols on the devices themselves)natural_image
Two identical grayscale images showing a knife with a handle and blade, no text or symbols visible.
natural_image
Two grayscale images showing a hand holding an electric vehicle plug, with no visible text or symbols.
natural_image
Two grayscale images showing a hand holding an electric vehicle's cable, with no visible text or symbols.natural_image
Two identical medical or laboratory devices with a black arrow pointing to one, shown from different angles (no text or symbols visible)natural_image
Pure diagram of a door handle with control buttons and indicator lights (no text or symbols)natural_image
Black electric shock absorber with labeled parts (a, b, c), no text or symbols beyond labelsnatural_image
Two grayscale medical or laboratory device handles with a labeled arrow indicating click point (no text or symbols on the devices themselves)
natural_image
Two gray electric vehicle charging station designs with a labeled click point (no text or symbols on the devices themselves)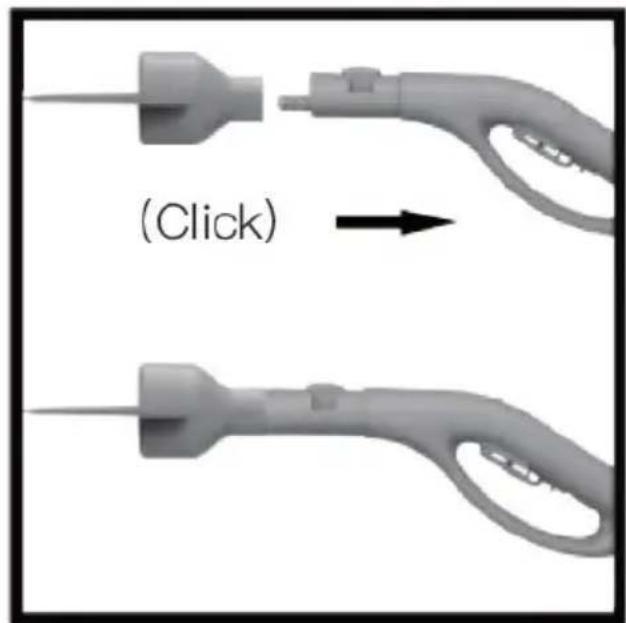

natural_image
Two identical electric vehicle charging station handles with a click button, shown from different angles (no text or symbols on the devices themselves)natural_image
Two grayscale medical or robotic devices with curved handles, one with a labeled arrow indicating (Click) direction (no text or symbols on the devices themselves)natural_image
Two identical images showing a knife being cut with a ring, no text or symbols visible.
natural_image
Two grayscale images showing a hand holding an electric vehicle plug, with no visible text or symbols.
natural_image
Two grayscale images showing a hand holding an electric vehicle's cable, with no visible text or symbols.natural_image
Two identical medical or laboratory devices with a black arrow indicating direction (no text or symbols)natural_image
Diagram of a door handle with control buttons and a triangular indicator (no text or symbols)natural_image
Black automotive fuel injector with labeled parts (a, b, c), no visible text or symbols beyond labelsnatural_image
Two grayscale medical or laboratory device handles with a labeled arrow indicating click point (no text or symbols on the devices themselves)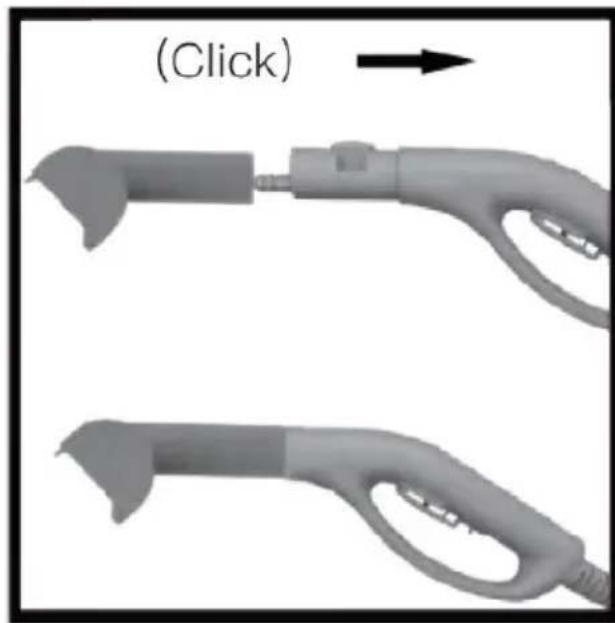
natural_image
Two gray electric vehicle charging station designs with a labeled click point (no text or symbols on the devices themselves)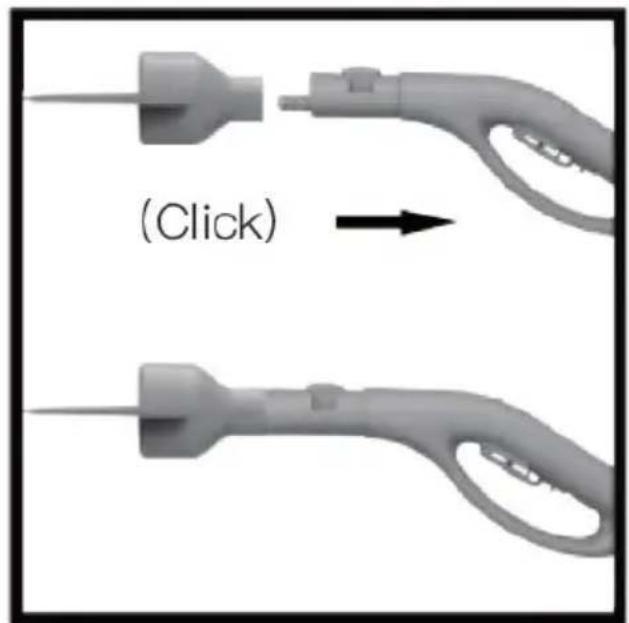
natural_image
Two identical electric vehicle charging station handles with a click button, shown from different angles (no text or symbols on the devices themselves)natural_image
Two grayscale medical or robotic devices with curved handles and a labeled arrow indicating (Click) direction (no text or symbols on devices)natural_image
Two identical images showing a knife being cut with a ring, no text or symbols visible.
natural_image
Two grayscale images showing a hand holding an electric vehicle plug, with no visible text or symbols.
natural_image
Two grayscale images showing a hand holding an electric vehicle's cable, with a curved arrow indicating rotation (no text or symbols present)natural_image
Two identical medical or laboratory devices with a black arrow indicating direction (no text or symbols)3.3.
natural_image
Diagram of a door handle with control panel and buttons (no text or symbols)natural_image
Black electric shock absorber with labeled parts (a, b, c), no text or symbols beyond labelsnatural_image
Two grayscale medical or laboratory device handles with a labeled arrow indicating click point (no text or symbols on the devices themselves)
natural_image
Two gray electric vehicle charging station designs with a labeled click point (no text or symbols on the devices themselves)

natural_image
Two identical electric vehicle charging station handles with a click button, shown from different angles (no text or symbols on the devices themselves)natural_image
Two grayscale medical or robotic devices with curved handles and a labeled arrow indicating (Click) direction (no text or symbols on the devices themselves)natural_image
Two identical grayscale images showing a knife with a handle and blade, no text or symbols visible.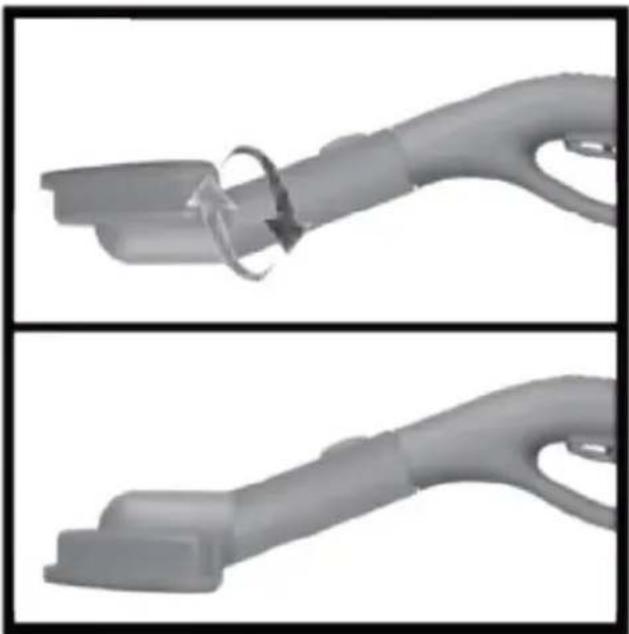
natural_image
Two grayscale images showing a hand holding an electric vehicle plug, with no visible text or symbols.
natural_image
Two grayscale images showing a hand holding an electric vehicle's cable, with no visible text or symbols.natural_image
Two identical medical or laboratory devices with a black arrow indicating direction (no text or symbols)natural_image
Diagram of a door lock with control buttons and indicator lights (no text or symbols)natural_image
Black electric shock absorber with labeled parts (a, b, c), no text or symbols beyond labelsA - Strømforsyningskontrollampe
B - Alarmkontrollampe for overophedning af apparatet
C- Varmekontrollampe
D – Vandmangel kontrollampe
E - Kontrollampe - aktiv dampudladning
APPARATETS PLACERING
natural_image
Two grayscale medical or robotic devices with a labeled arrow indicating click action (no text or symbols on the devices themselves)
natural_image
Two electric vehicle charging station designs shown in 3D renderings, with a click arrow indicating action (no text or symbols on the devices themselves)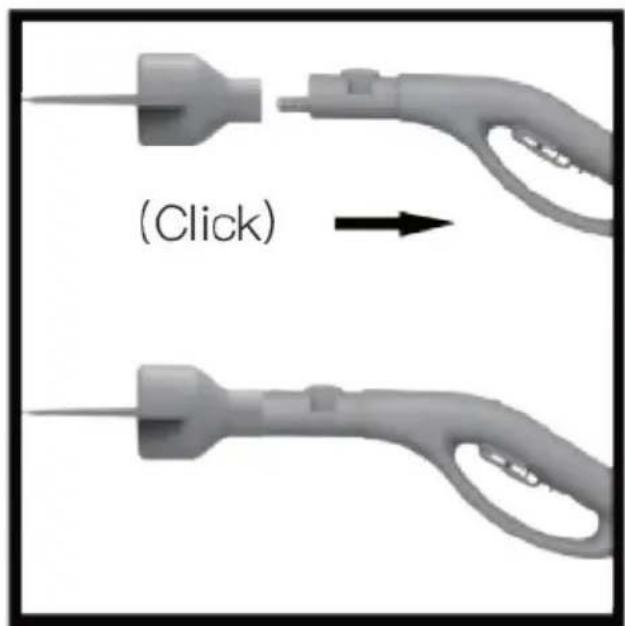
natural_image
Two identical electric vehicle charging station handles with a click button, shown from different angles (no text or symbols on the devices themselves)natural_image
Two grayscale medical or robotic devices with curved handles and a labeled arrow indicating (Click) direction (no text or symbols on the devices themselves)natural_image
Two identical grayscale images showing a knife with a circular ring and handle, no text or symbols present.
natural_image
Two grayscale images showing a handheld electric vehicle plug with a loop and ring, no text or symbols visible.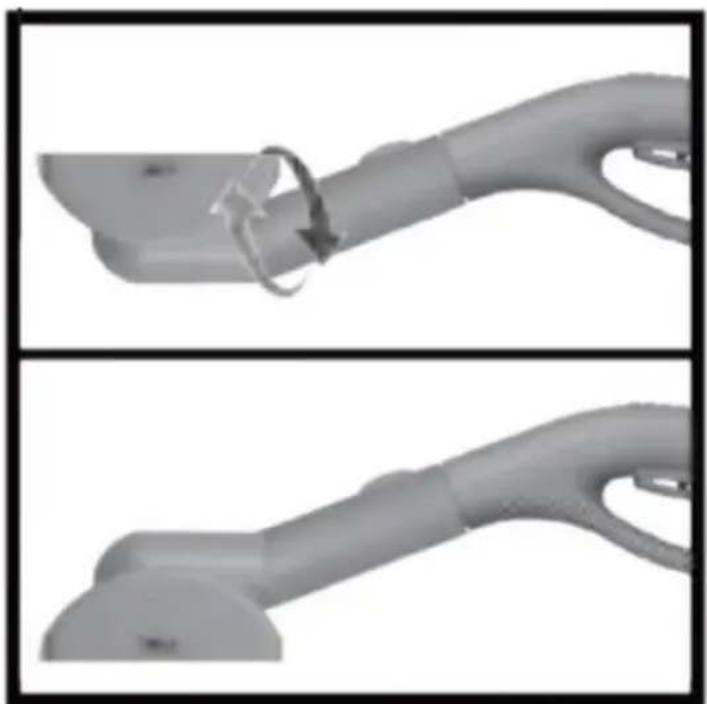
natural_image
Two grayscale images showing a hand holding an electric vehicle's cable, with no visible text or symbols.natural_image
Two identical medical or laboratory devices with a black arrow pointing to one, shown from different angles (no text or symbols visible)natural_image
Pure diagram of a door handle with control panel and indicator lights (no text or symbols)For the disposal of the device please consider and act according to the national and local rules and regulations.
CONTACT
expondo Polska sp. z o.o. sp. k.