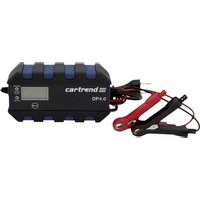
DP4.0 - Battery charger Cartrend - Free user manual and instructions
Find the device manual for free DP4.0 Cartrend in PDF.


User questions about DP4.0 Cartrend
0 question about this device. Answer the ones you know or ask your own.
Ask a new question about this device
Download the instructions for your Battery charger in PDF format for free! Find your manual DP4.0 - Cartrend and take your electronic device back in hand. On this page are published all the documents necessary for the use of your device. DP4.0 by Cartrend.
USER MANUAL DP4.0 Cartrend
text_image
Charging 12V Charging Direction Reverse 14.5V ModeGB Instructions for use 21
F Mode d'emploi 39
- Introduction 22
- Contents 23
- Normal use 23
- Technical data 24
- Safety 25
- Product Overview 29
- Operation 32
- Safety functions 36
- Cleaning, care and maintenance 37
- Disposal 37
INTRODUCTION
Explanation of symbols and signal words used in these operating instructions and/or the device:
Symbol Explanation

Follow instructions when using the machine.

Risk of bodily or fatal injury to children!

Follow warnings and safety instructions!

Only use device in locations protected from weather!

Double-insulated housing (protection class II)

Consider the environment when disposing of the packaging!
Symbol/signal word
Possible consequences of non-observance

Danger!
Immediate danger to life or severe injuries

Warning!
Serious injuries, potentially life-threatening

Caution!
Light to moderate injuries
Attention! Risk of property damage.
Note:
These instructions also refer to the battery charging device as device.
CONTENTS
Be sure to verify contents immediately upon opening the product. Check the product and all parts for image. Do not use a defective product or parts.
• Microprocessor Battery Charger
• operating instruction
Please include all relevant documentation to other users!
NORMAL USE
The charger is intended for charging open and a variety of closed, maintenance-free lead-acid rechargeable batteries (batteries) as found in cars, boats, lorries and other vehicles, e.g.:
- wet batteries (WET) Lead-acid batteries (liquid electrolyte)
• Gel batteries (gel-type electrolyte)
• EFB (enhanced flooded battery)
• AGM batteries (electrolyte inside absorbed glass matt)
• Maintenance-free lead-acid batteries (MF)
The unit can be used by children over eight years of age, by people with reduced physical, sensory or mental capabilities and by people who lack experience/knowledge in using it provided that they are supervised while doing soand/or have been shown how to use the unit safely and understand the potential risks involved. Do not allow children to play in the unit. Children should not clean the unit or carry out basic maintenance on it without supervision.
This device is not intended for commercial use.
Any other use or modification of the device is considered improper and involves significant risks. The manufacturer assumes no liability for damages due to improper use.
The manufacture is not responsible for damages caused by:
- Improper connection and/or operation.
- External forces, damage to the device and/or damage to parts of the device due to mechanical impacts or overload.
• Any type of modifications to the device. - Using the device for purposes not described in this operating manual.
- Subsequent damages from improper and/or incorrect use and/or defective batteries.
- Moisture and/or inadequate ventilation.
- Unauthorised opening of the device. This will void the warranty.
TECHNICAL DATA
| DP4.0 DP6.0 DP10.0 | |||
| Input | 220 - 240 V AC,50/60 Hz64 W | 220 - 240 V AC,50/60 Hz100 W | 220 - 240 V AC,50/60 Hz180 W |
| Output | 6 V DC /12 V DC | 6 V DC /12 V DC | 12 V DC /24 V DC |
| Charging voltage | 6 V battery:7,2 V / 7,4 V+/- 0,25 V | 6 V battery:7,2 V / 7,4 V+/- 0,25 V | 12 V battery:14,5 V / 14,8 V+/- 0,25 V |
| 12 V battery:14,5 V / 14,8 V+/- 0,25 V | 12 V battery:14,5 V / 14,8 V+/- 0,25 V | 24 V battery:28,4 V / 29,0 V+/- 0,25 V | |
| Charging current | 6 V battery:2 A+/-10 % | 6 V battery:2 A+/-10 % | 12 V battery:2 A / 10 A+/-10 % |
| 12 V battery:2 A ;4 A (90 s) / 2 A(300 s)+/-10 % | 12 V battery:2 A / 6 A+/-10 % | 24 V battery:5 A+/-10 % | |
DP4.0 DP6.0 DP10.0
| Reverse current | 4 mA 4 mA 4 mA | ||
| Ambient temperature | -20 to +40°C -20 to +40°C -20 to +40°C | ||
| Type of batteries | 6 V battery:6 V lead-acid batteries (WET, MF, AGM and GEL) with a battery capacity of1,2 - 14 Ah | 6 V battery:6 V lead-acid batteries (WET, MF, AGM and GEL) with a battery capacity of1,2 - 14 Ah | 12 V battery:12 V lead-acid batteries (WET, MF, AGM and GEL) with a battery capacity of1,2 - 200 Ah |
| 12 V battery:12 V lead-acid batteries (WET, MF, AGM and GEL) with a battery capacity of1,2 - 120 Ah | 12 V battery:12 V lead-acid batteries (WET, MF, AGM and GEL) with a battery capacity of1,2 - 120 Ah | 24 V battery:24 V lead-acid batteries (WET, MF, AGM and GEL) with a battery capacity of14 - 120 Ah | |
Fuse T2A T2A T3.15A
SAFETY
Read all safety guidelines and instructions. Non-compliance with safety guidelines and instructions can cause electric shock, fire and/or serious injury. Keep all safety guidelines and instructions for future reference.

Risk of bodily or fatal injury to children!
- Keep the device out of the reach of children. Children are unable to assess the risks associated with use of this product!
- Strangulation hazard! Do not allow children to play with the components or fasteners, as they could be swallowed and result in suffocation.

Risk of chemical burns!
Batteries contain acid, which could damage the eyes and skin. Charging batteries further generates gasses and vapours hazardous to the health.
- Avoid any contact with caustic battery acid. Immediately thoroughly flush skin and any objects which have come into contact with acid. If eyes have come into contact with battery acid, flush eyes with running water at least 5 minutes. Contact your physician.
- Use safety goggles and acid-proof safety gloves. Protect clothing, e.g. with an apron.
• Never tip the battery, as acid may leak.
• Always ensure adequate ventilation.
• Do not inhale emerging gasses and vapours.


Explosion and fire hazard!
Gaseous hydrogen (detonating gas) may form when charging the battery. Contact with open fire (flame, embers, sparks) may result in explosions.
- Never charge the battery close to an open fire or in places where sparks may occur.
• Always ensure sufficient ventilation. - Be sure the supply voltage matches the input voltage specified on the device (220 - 240 V AC) to prevent damage to the device.
- Only connect and disconnect the battery connecting cables when the charger is disconnected from the mains.
- Do not cover the device whilst charging, as it may be damaged from extreme heating.
- Immediately stop using the device if you notice smoke or an unusual odour.
- Do not use the device in rooms where explosive or flammable substances are stored (e.g. petrol or solvents).

Risk of electrical shock!
- Chargers may interfere with the operation of active electronic implants, e.g. pacemakers, thus pose a personal hazard.
- The unit is protected against splash- and hose water. However, be sure to always keep the unit in a safe location. Avoid pouring or dripping water or other liquids over it. If water penetrates electrical devices, the risk of electric shock increases.
- Ensure that all plugs and cables are free of moisture. Never connect the device to the mains with wet or moist hands.
- Never touch both connections at once when the device is in uses.
- Unplug from mains before connecting or disconnecting the charging cable with the battery, or when the device is no longer being used.
• Always connect the positive clamp (red) to the positive battery pole (not connected to the chassis of the car, marked with P or +). - Then connect the negative clamp (black) to the car chassis, away from the battery casing of the car, away from the battery and the fuel line. The charger can then be connected to a suitable power socket.
- After charging, first disconnect the charger from the power supply. Then, in this sequence, disconnect the cable to the car chassis (-), and then the battery connection (+).
- Remove all device cables from the battery before attempting to drive your vehicle.
• Always unplug device by the plug. The cable may be damaged. - Do not use device if damaged. Damage to the power cable, the device or the charging cable increase the risk of electrical shock.
- Do not attempt to disassemble or repair the device. Immediately have a defective device or damaged power cable repaired or replaced by a speciality shop.
- Risk of short circuits!! Do not allow the two connectors from the charging cable to touch if the power plug is plugged into the power outlet. Be sure not to connect the connectors or the battery poles through conductive objects (e.g. tools).
• Never use the cable to carry or pull the device.

Risk of injury!
- Never attempt to charge non-rechargeable, damaged or frozen batteries.
- Do not use this device to charge dry cell batteries. These could burst, resulting in personal injury and property damage.
- Please read and follow the operating manual and all safety instructions for the batteries to be charged and the vehicle before using this device.
Risk of damage!
- Never place the device over or near the battery to be charged. Gasses from the battery could damage the unit.
- Place the device as far from the battery as the connecting cable will allow.
- Never operate the device if it has been dropped or damaged in any other way. For inspection and repair, take it to a qualified electrician.
PRODUCT OVERVIEW

text_image
1 2 3 4 14.5V 5 7 689- LED „Reverse“
- LED „Charging“/“Charged Green“
- Display
- Battery charger
-
MODE button
-
Power cord
- Power plug
- Terminal connection cable (+) with clamp (red)
- Terminal connection cable (-) with clamp (black)
Functions
The charger has different charging modes to choose from based on the battery type, battery condition and the environmental conditions. The charging modes are activated based on the detected battery voltage.
The charger features a micro-computer unit (MCU). After selecting the desired charging mode the charger will recognise the battery connected (voltage, capacity, condition) and compute the necessary charging parameters (charging voltage, charging current). This allows for efficient and safe charging. When selecting a charging mode not suitable for the battery or if the battery is defective, the charging cycle still not start. The charger switches to error indicator.
The "trickle charge" function allows the charger to be permanently connected. A full charge will be maintained.
| Charging mode options | DP4.0 | DP6.0 | DP10.0 | ||
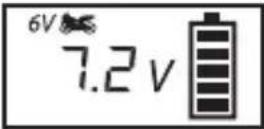 | Charging mode 7.2VSuitable for charging 6V batteries up to a capacity of 14Ah in normal condition.Suitable for WET- and most GEL batteries. | • | • - | ||
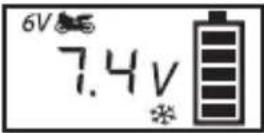 | Charging mode 7.4VSuitable for charging 6V batteries up to a capacity of 14Ah at temperatures below zero degrees.Suitable for WET- and most GEL batteries. | • | • - | ||
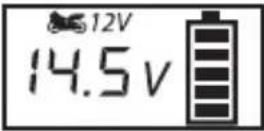 | Charging mode 14.6VSuitable for charging 12V batteries up to a capacity of 14Ah in normal condition.Suitable for WET- and most GEL batteries. | • | • • | ||
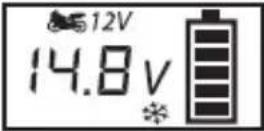 | Charging mode 14,8VSuitable for charging 12V batteries up to a capacity of 14Ah at temperatures below zero degrees.Suitable for WET- and most GEL batteries. | • | • • | ||
 | 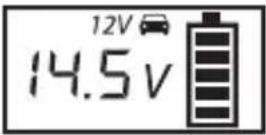 | Charging mode 14.5VSuitable for charging 12V batteries with a capacity above 14Ah in normal condition.Suitable for WET- and most GEL batteries. | • | • | • |
 | 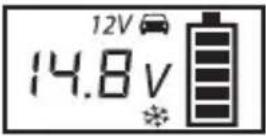 | Charging mode 14.8VSuitable for charging 12V batteries with a capacity above 14Ah in temperatures under zero degrees.Also suitable for many AMG batteries (with electrolyte absorbing mats). | • | • | • |
 | 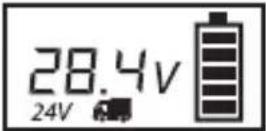 | Charging mode 28.4VSuitable for charging 24V batteries with a capacity above 14Ah in normal condition.Suitable for WET- and most GEL batteries. | -- | • | |
 | 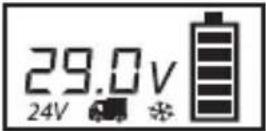 | Charging mode 29.0VSuitable for charging 24V batteries with a capacity above 14Ah in temperatures under zero degrees.Also suitable for many AMG batteries (with electrolyte absorbing mats). | -- | • | |
OPERATION
| Status indicators | |
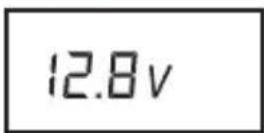 | Start indicator (Standby) after correctly connecting a battery. Displays the current battery voltage. |
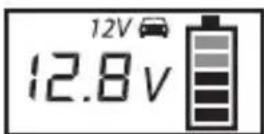 | Displays the charging process in the respective mode (the blocks inside the battery symbol will flash according to the charging status). Displays the current battery voltage and the charging mode selected. |
 | Battery fully charged. (all blocks inside the battery symbol are full). Displays the current battery voltage and the charging mode selected. |
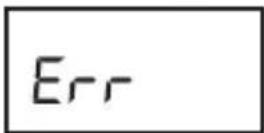 | Error indicator when selecting an incorrect charging mode, incorrect connection, short circuit (defective battery) or overheating. |
Before use

Warning!
Before using this device be sure to read the operating manual for the battery and the vehicle and understand all safety notices.
• Use safety goggles and acid-proof safety gloves.
- Ensure adequate ventilation.
- Ensure the battery poles are clean. If the battery has removable vent caps, fill each battery cell with distilled water to the level recommended by the battery manufacturer. Do not overfill the cells.
Connect the charger
Warning!
Always ensure correct polarity and firmly seated battery clamps when connecting the device to a battery, and prevent short-circuits from the battery clamps touching.
- Attach the red (+) clamp to the (+) battery terminal.
- Attach the black (-) clamp to the (-) battery terminal.
Note:
The black (-) clamp can also be connected to the vehicle chassis (Please refer to the auto maker's instructions!). Be sure both clamps have good contact and are securely seated.
Caution!
Verify the battery clamps are properly connected before connecting the device to the 230 V mains outlet.
- Plug the charger plug into a 230V power socket.
With the charger correctly connected, the charger will start, showing the start-up display (standby mode). In this mode the charger will automatically reset to the default settings.
If the battery is detected as defective or connected with the poles reversed, the error indicator (Err) will light up. In this case, unplug the charger and disconnect from the battery. Then check the polarity.
When connected with the incorrect polarity, the "Reverse" LED (1) will light up red. Charging will not start.
Note:
A battery is recognised to be defective if the battery voltage is below 3.0 V (6 V battery or 12 V battery). Have the battery checked by a speciality repair shop.
Start charging
- Repeatedly press the MODE (5) button after plugging into the mains to select the desired charging mode (see “Charging mode options”).
- After a short time charging will start automatically using the settings for the selected charging mode.
Note:
If an incorrect charging mode was selected, the error code (Err) will appear. In this case unplug the charger, wait briefly, and plug in again.
- During the charging process the blocks inside the battery symbol will flash based on the charging status. The “Charging” LED (2) will light up red.
- With the battery fully charged, all four blocks inside the battery symbol will light up. The “Charged Green” LED (2) will light up green.
• In addition, the display will show the current battery voltage. - Once the battery is fully charged, the charger will switch to trickle charge to maintain the charging status and protect the battery from overcharging.
Display light
Press the Mode (5) button.
The display light will automatically switch off after approx. 30 seconds whilst charging. Press the Mode button at any time to light the display for approx. 30 seconds.
Complete charging and disconnect charger
- Always first unplug the power plug from the 230V alternating current socket.
- Disconnect the black (-) clamp from the (-) battery terminal or the vehicle chassis.
- Disconnect the red (+) clamp from the (+) battery terminal.
Charging mode and time
| Battery size (Ah) | Mode | For about 80% charge (hours) | |||
| DP4.0 | DP6.0 | DP10.0 | |||
| 2 |  | 6V mode normal conditions | 2 2 - | ||
| 8 |  | 6V mode temperatures below 0°C | 8 8 - | ||
| 2 |  | 12V mode normal conditions | 2 2 2 | ||
| 8 8 5 8 | |||||
| 20 |  | 12V mode normal conditions | 4,5 4 2,5 | ||
| 60 14 12 8 | |||||
| 100 | 12V mode temperatures below 0°C | 23 20 12 | |||
| 120 28 24 14 | |||||
| 20 |  | 24V mode normal conditions | -- 5 | ||
| 60 |  | 24V mode temperatures below 0°C | -- 14 | ||
SAFETY FUNCTIONS
- The charge is protected from user error and prevents damage to the connected battery.
• No risk of overcharging!
• The charger will not damage the electronics in your vehicle.
| Protection Description | |
| Abnormal Operation | To avoid damage to charger and battery, the charger will turn off its own electronic system and will immediately reset the system to basic settings in the case ofshort circuitwrong connectionopen circuitreversed polarity connectionBattery voltage below 3.0 V ±0.5 VThe charger will remain in standby mode and the display shows the error indicator. |
| Overheat | During the charging process, if the charger becomes too hot or due to high ambient temperature, the power output is automatically reduced.The charger continues to trickle charge and automatically starts increasing power when the temperature drops. |
| MCU Control | Fully controlled by internal Micro-Computer-Unit (MCU), which assures a faster, powerful, reliable and smarter charging process. |
CLEANING, CARE AND MAINTENANCE
- Clean clamps after every charging. To prevent corrosion, wipe off any battery fluid which may have come into contact with the clamps.
- Carefully wind the cable when storing the device. This will help prevent accidental damage to the cable and the device.
- Clean the product with a soft, dry cloth.
• Store the machine in a clean, dry place.
Service
Should you have any questions regarding commissioning or operating in spite of studying these operating instructions, or if a problem should occur against all expectations, please get in contact with your specialist supplier.
DISPOSAL
The packaging consists of non-contaminating materials that you can dispose of at your local recycling point.

Do not throw electrical appliances in with domestic waste!
In accordance with European Directive 2012/19/EC for waste electrical and electronic equipment (WEEE) and conversion to national law, used electrical appliances must be collected separately and taken to a recycling point. For ways to dispose of old electrical appliances please contact your community or city administration.
Illustrations may vary slightly from the product itself. We reserve the right to modify the product in accordance with technical advances. Decoration not included.
TABLE DES MATIÈRES
Fusible T2A T2A T3.15A
Protection Description
76761 Rülzheim - Germany
www.mts-gruppe.com
Intertec Polska Sp. z o.o.
05-830 Nadarzyn - Poland
www.intertec-polska.pl
Tegro AG
Ringstr. 3
8603 Schwerzenbach - Switzerland
www.tegro.ch
EAN: 4038373063878, 4038373063908,
4038373063939
Stand: 08/2019