80320 - Pressure washer Cartrend - Free user manual and instructions
Find the device manual for free 80320 Cartrend in PDF.

| Product type | Mobile high-pressure cleaner |
| Brand | Cartrend |
| Model | 80320 |
| Dimensions (L x W x H) | 41.5 x 23.5 x 37.5 cm |
| Weight | 5.8 kg |
| Supply voltage | 12 V DC / 6 A (via cigarette lighter socket) |
| Power | 60 W |
| Pressure | 3 - 9 bar |
| Water tank capacity | 15 liters |
| Hose length | 6 m |
| Power cable length | 3 m |
| Fuse | 8 A |
| Noise level | 45 dB |
| Storage temperature | 0 °C to +40 °C |
| Recommended water temperature | 10 °C to 50 °C |
| Included accessories | Spray gun, 3 nozzles (shower head, jet nozzle, brush), hose, cable with cigarette lighter plug |
| Main features | Mobile high-pressure cleaning without water connection, adjustable flow (continuous or impulse), jet regulation |
| Intended use | Cleaning of outdoor surfaces (motorcycles, boats, camping) |
| Maintenance and cleaning | Rinse the nozzle, clean with a dry cloth, empty the tank after use, replace the fuse (8 A) if necessary |
| Safety | Do not point the jet at people or animals, use on 12 V battery, turn off after 5 minutes of inactivity |
| Warranty and repairability | Do not open or repair yourself; contact a specialized workshop |
Frequently Asked Questions - 80320 Cartrend
User questions about 80320 Cartrend
0 question about this device. Answer the ones you know or ask your own.
Ask a new question about this device
Download the instructions for your Pressure washer in PDF format for free! Find your manual 80320 - Cartrend and take your electronic device back in hand. On this page are published all the documents necessary for the use of your device. 80320 by Cartrend.
USER MANUAL 80320 Cartrend
natural_image
Exterior view of a gray industrial water purifier with coiled black hoses and mesh cover (no text or symbols visible)GB Instructions for use 15
F Mode d'emploi 27


natural_image
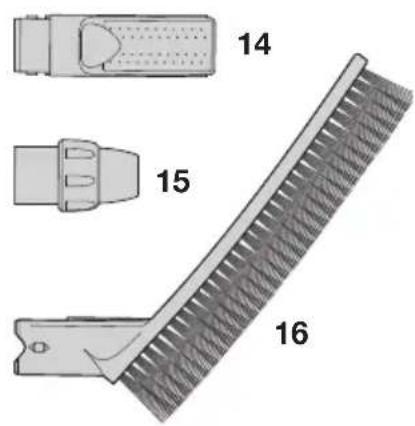
Diagram of a handheld electric shaver with an arrow indicating insertion or disassembly (no text or symbols present)Aufsatz Brause (14)
natural_image
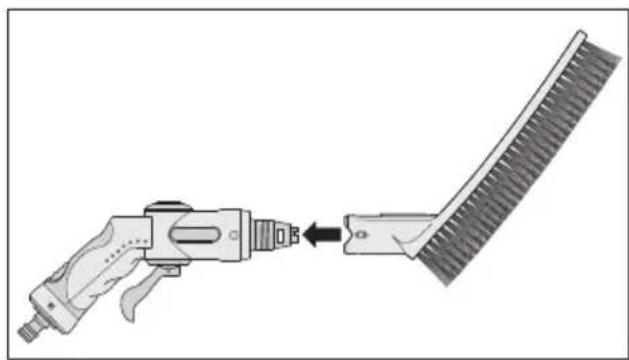
Diagram showing a tool being inserted into a rack, with no text or symbols present.Aufsatz Bürste (16)
natural_image
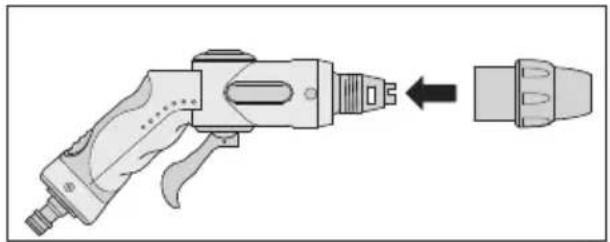
Diagram of a handheld electric shock absorber with a separate plug, showing internal components and an arrow indicating direction (no text or symbols present)Aufsatz Düse (15)
natural_image
Diagram of a handheld electric tool with a cable inserted, showing the connector and directional arrow (no text or symbols)Einschalten
⚠ Vorsicht!
natural_image
Illustration of a welding torch with handle and blade (no text or symbols)
natural_image
Illustration of a robotic arm with handle and grip (no text or symbols)natural_image
Illustration of a handheld welding torch with handle and blade (no text or symbols)
natural_image
Illustration of a handheld electric torch (no text or symbols)natural_image
Illustration of a welding torch with a curved arrow indicating rotation (no text or symbols)Ausschalten
natural_image
Diagram of a cable connector with three pins and an arrow indicating direction (no text or symbols)TECHNISCHE DATEN
Service
Explanation of symbols and signal words used in these operating instructions and/or the device:
Symbol Explanation
 | Follow instructions when using the machine. |
 | Risk of bodily or fatal injury to children! |
 | Follow warnings and safety instructions! |
 | Consider the environment when disposing of the packaging! |
| Symbol/ signal word | Possible consequences of non-observance |
| ⚠ Danger! | Immediate danger to life or serious injuries. |
| ⚠ Warning! | Serious injuries, potentially life-threatening. |
| ⚠ Caution! | Light to moderate injuries. |
| Attention! Risk of property damage. | |
Note:
These instructions for use also refer to the mobile cleaning station as cleaning station or unit.
CONTENTS
Be sure to verify contents immediately upon opening the product. Check the product and all parts for damage. Do not use a defective product or parts.
• Mobile Cleaning Station
- Spray gun
• Shower attachment (shower head)
- Jet attachment
- Brush attachment
- Hose
• Connection cable with 12 V car plug
• operating instruction
Please include all relevant documentation to other users!
NORMAL USE
The mobile cleaning stations is intended to easily and quickly clean outdoor surfaces. The 15L water reservoir allows for pressurised dirt removal without connecting to water. The cleaning station is perfect for mobile, quick and easy care of e.g. motorcycles, boats or camping equipment.
This device is not intended for use by children or persons with limited mental capacity or lacking experience and/or lacking expertise. Children should be supervised to ensure they do not play with the device.
This device is not intended for commercial use.
Any other use or modification of the device is considered improper and involves significant risks. The manufacturer assumes no liability for damages due to improper use.
The manufacturer is not responsible for damages caused by:
- Improper connection and/or operation.
- External forces, damage to the device and/or damage to parts of the device due to mechanical impacts or overload.
• Any type of modifications to the device.
• Using the device for purposes not described in this operating manual. - Subsequent damages from improper and/or incorrect use and/or defective batteries.
- Moisture and/or inadequate ventilation.
• Unauthorised opening of the device.
SAFETY
Read all safety guidelines and instructions. Non-compliance with safety guidelines and instructions can cause electric shock, fire and / or serious injury. Keep all safety guidelines and instructions for future reference.

Risk of bodily or fatal injury to children
- Risk of bodily or fatal injury to children! Risk of suffocation or strangulation! Keep the machine out of the reach of children. Children are unable to assess the risks associated with use of this product!

Fire hazard!
- Verify the on-board voltage matches the input voltage specified on the device to prevent damage to the device.
- Immediately stop using the device if you notice smoke or an unusual odour.
• Never expose the device to direct sunlight.

Risk of electrical shock!
- Ensure that all plugs and cables are free of moisture. Never connect the device to the mains with wet or moist hands.
- Do not use device if damaged. Damage to the power cable, the device or the charging cable increase the risk of electrical shock.
- Do not attempt to disassemble or repair the device. Immediately have a defective device or damaged power cable repaired or replaced by a speciality shop.
• Always unplug device by the plug. The cable may be damaged. - Never use the cable to carry or pull the device.
- Never operate the device if it has been dropped or damaged in any other way. For inspection and repair, take it to a qualified electrician.

Risk of injury!
- Do not modify or manipulate the product as this will increase the risk of injury.
- Do not aim the water jet at persons, animals or electronics.
- When transporting the device in a vehicle, keep it in the boot or on a suitable shelf so that it cannot move in the event of sudden vehicle movements.
• Never leave the unit unattended during operation.

Risk of damage!
- Do not fill the reservoir with flammable liquids.
PRODUCT OVERVIEW
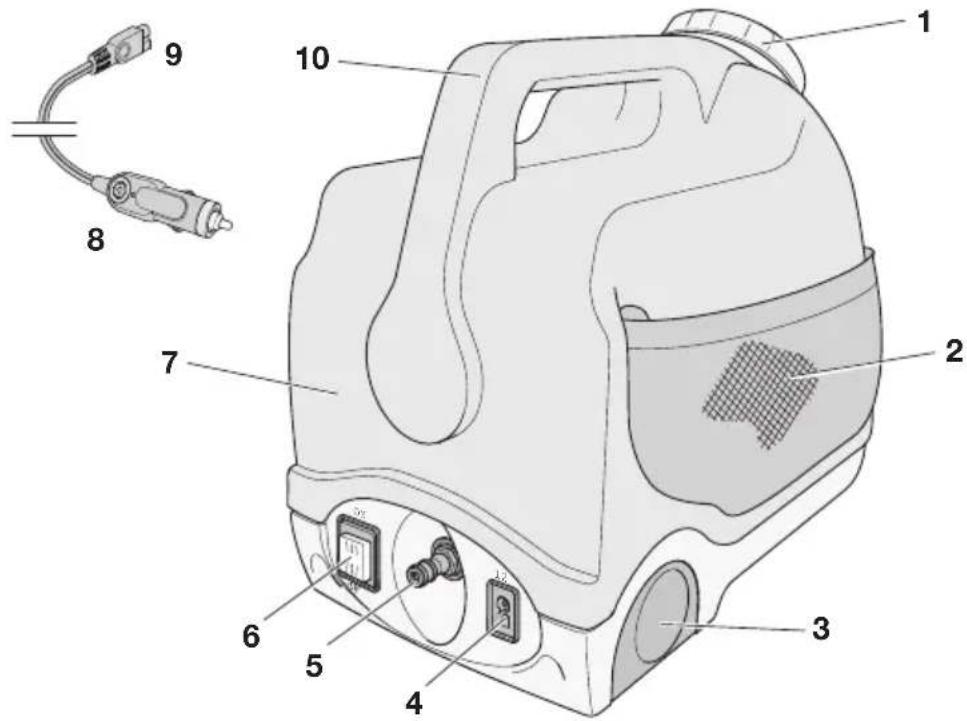

- Cover/opening
- Mesh storage bag
- Transport wheels
- 12 V connecting socket
- Hose connector
- ON/OFF switch
- Water reservoir
- 12 V car power plug
-
12 V plug
-
Carrying handle
- Spray gun
- Hose coupling
- Hose
- Shower attachment (shower head)
- Jet attachment
- Brush attachment
Information about use
Warning!
- Do not aim the water jet at the eyes or other persons. The water jet is pressurised and can cause serious injuries.
- Ensure that there are no people or animals in the work area.
Caution!
- If the unit is not being used for more than 5 minutes, switch the unit off (set switch to OFF position).
- Verify the hose is connected correctly and the spray gun and its attachment are securely seated.
- Some car outlets will only become active once the ignition is turned on. Please refer to your vehicle's operating manual or contact your specialized garage if you are unsure.
- Do not cover the device during use and ensure proper ventilation.
- Keep your workplace clean and tidy. Untidiness and poorly-lit working areas can lead to accidents.
Preparation
1. Open the cover (1):
Unscrew the cover counter-clockwise.
Attention!
- Only fill the water reservoir with pure, clean water as the water line may otherwise clog and the unit be damaged.
-
Do not add detergents.
-
Fill the water reservoir (7) with fresh water (max. 15L).
Water temperature: approx. 10°C to 50°C
- Close the cover (1):
Tighten the cover clockwise.
Connecting the hose
Connect the hose (13) to the hose connector (5).
- Slightly pull back on the connector to do so
- Place the hose coupling (12) over the hose connector (5) on the unit.
- Release the hose coupling. Be sure the hose coupling locks into place.
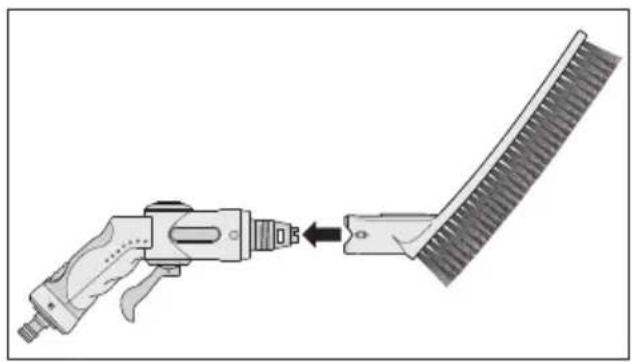
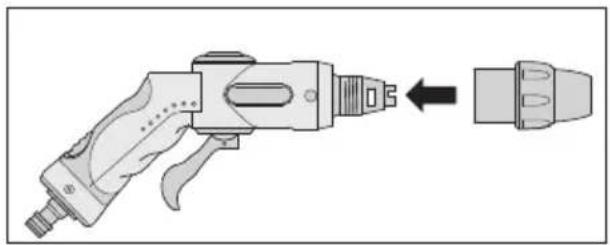
Attaching/changing the attachment
Caution!
Verify the unit is switched off before changing the attachment (switch set to OFF position).
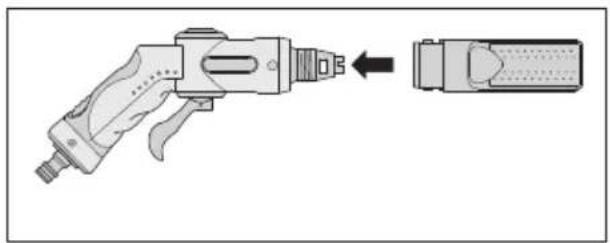
Select an attachment (14, 15 or 16) and attach it to the spray gun (11).
To remove or change, pull the attachment off the spray gun.
natural_image
Diagram of a handheld electric gun with an arrow pointing to its internal component (no text or symbols present)Shower attachment (14)

natural_image
Illustration of a handheld electric tool with an arrow pointing to its connector (no text or symbols present)Nozzle attachment (15)

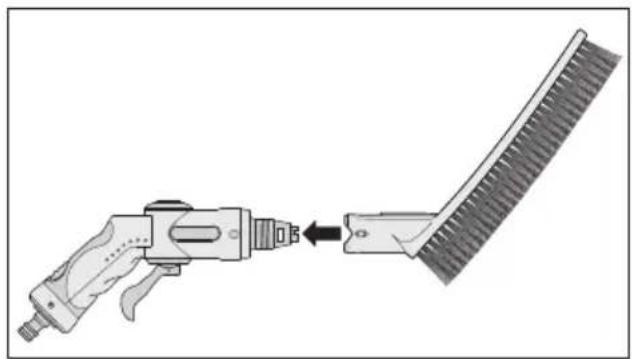
natural_image
Diagram showing a tool interacting with a rack-mounted device (no text or symbols present)Brush attachment (16)
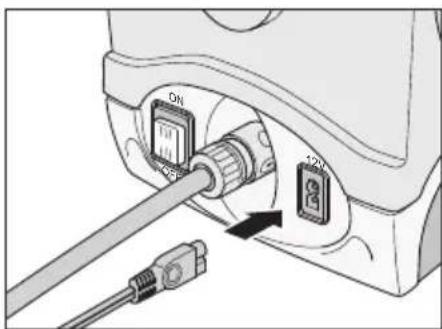
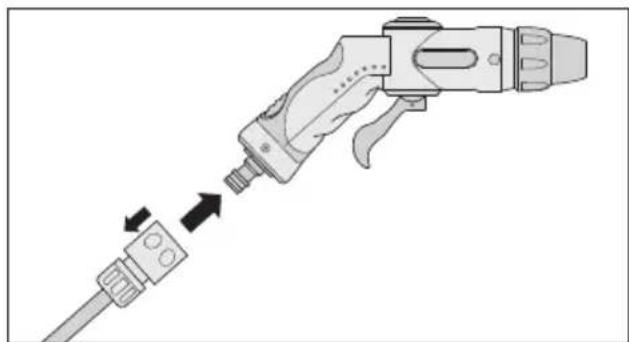
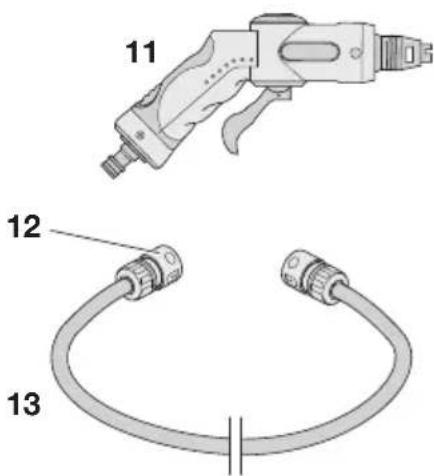
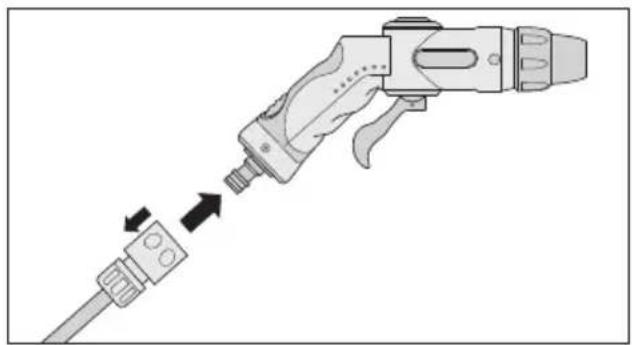
Connecting the spray gun
Connect the spray gun (11) to the hose (13).
-
Slightly pull back on the connector to do so
-
Attach the hose coupling (12) to the hose connector on the spray gun.
-
Release the hose coupling. Be sure the coupling locks in.

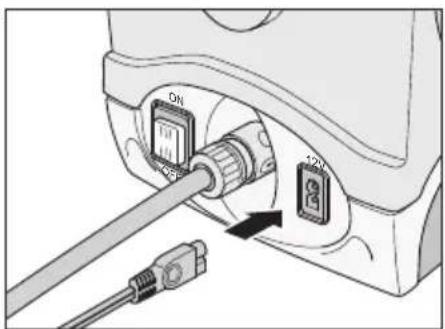
natural_image
Diagram of a handheld electric welding torch with a cable inserted, showing the tool's connector and movement direction (no text or symbols)Switching on
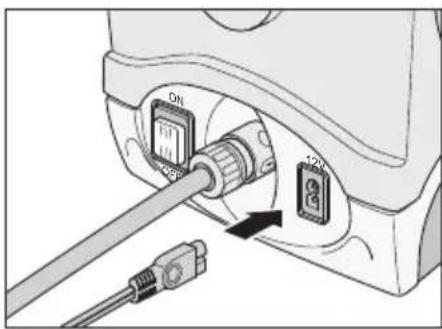
Caution!
-
Hold the spray gun firmly in your hand to counteract reactive forces. The water is pressurised.
• Do not press the lever on the spray gun! -
Plug the 12 V plug (9) into the 12 V connection socket (4).
- Plug the 12 V car power plug (8) into a 12 V car socket.
- Set the switch (6) to the ON position.
Cleaning

Caution!
If the unit is not being used for more than 5 minutes, switch the unit off (set switch to OFF position).
Attention!
- Do not hold the water jet close than 30 cm to the objects to be cleaned when using the spray gun with the jet nozzle. Please refer to the operating manual of the object to be cleaned.
- Remember the vehicle's battery will be discharged when the vehicle is not running.
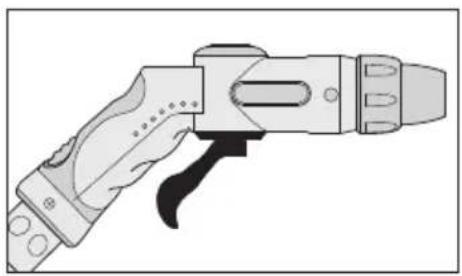
Start cleaning. The various lever settings of the spray gun (11) allow you to change the type of water flow.
Pulsed water flow
Keep the lever pressed to pressure wash an object. Releasing the lever will stop the water flow.
natural_image
Illustration of a welding torch with handle and blade (no text or symbols)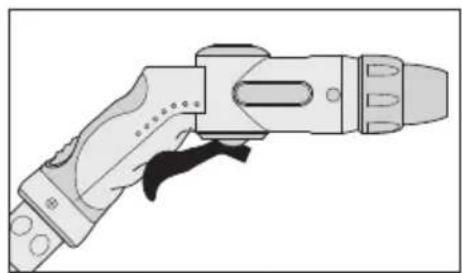
natural_image
Illustration of a robotic arm with handle and blade (no text or symbols)Position 2: Water flows. Position 1: Water stops.
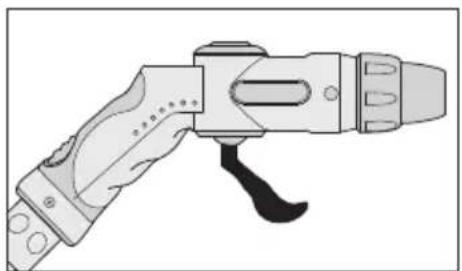
Continuous water flow
Flip the lever (position 3 or 4) to pressure wash an object. To stop the water flow, set the lever back to position 1.
natural_image
Illustration of a handheld welding torch with handle and blade (no text or symbols)
natural_image
Illustration of a handheld welding torch (no text or symbols)Position 3: Water flows. Position 4: Water flows.
Adjusting the water stream
Attention!
Turn the nozzle max. 2 turns clockwise, otherwise the nozzle will come off.
The water flow can be regulated variably by the nozzle. To do so, turn the nozzle clockwise and back.

natural_image
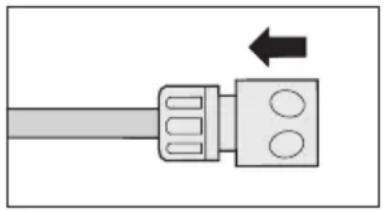
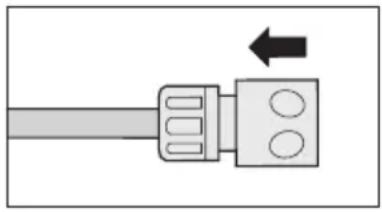
Illustration of a handheld welding torch with a curved arrow indicating rotation (no text or symbols)Switching off
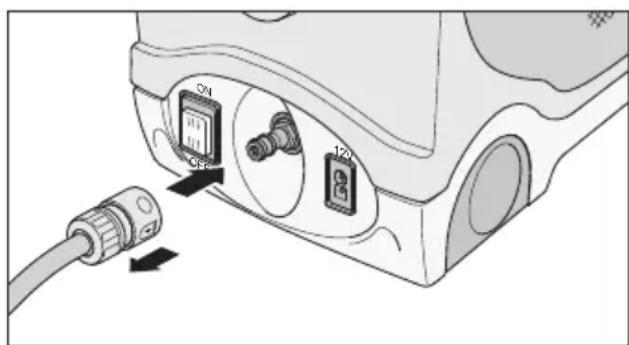
- Set the switch (6) to the OFF position.
- Hold the lever on position 2 (see "Cleaning") for a few seconds until the water stops.
- Disconnect the 12 V car power plug (8) from the 12 V car power socket.
- Disconnect the 12 V plug (9) from the 12 V connection socket (4).
- Disconnect the hose (13) from the device. Slightly pull back the hose coupling to do so.
natural_image
Diagram of a cable connector with three circular holes and an arrow indicating direction (no text or symbols)TECHNICAL DATA
| Dimensions 41,5 x 23,5 x 37,5 cm | |
| Weight 5,8 kg | |
| Voltage 12 V DC / 6 A | |
| Power 60 W | |
| Pressure 3 - 9 Bar | |
| Water reservoir 15 L | |
| Volume 45 dB | |
| Hose length 6 m | |
| Car connection cable length 3 m | |
| Storage temperature 0 °C to +40 °C | |
| Fuse 8 A |
TROUBLESHOOTING
| Problem Possible cause | Correction | |
| Water stream has inadequate pressure. | Air in the system. | Hold the lever for 30 sec. until you have a steady pressurised water jet.Note: To conserve water you can return the water to the reservoir.Open the cover (1) to do so. |
| Hose connected incorrectly. | Check the hose connection. | |
| No water stream. Clogged nozzle. Remove the nozzle | (see “Attaching/changing the attachment”) and clean under running water, if necessary remove dirt from the opening with a suitable tool (e.g. wooden pin) | |
| Unit isn’t working. | Unit is connected incorrectly. | Check the connections. |
| Check the fuse in the 12 V car power plug. | ||
CLEANING, CARE AND MAINTENANCE
- Carefully wind the cable when storing the device. This will help prevent accidental damage to the cable and the device.
- Clean the product with a soft, dry cloth.
• Store the machine in a clean, dry place. - Be sure there is no water in the unit or the hose. Allow the reservoir to dry and hang up the hose to allow the residual water to drain.
Cleaning/replacing the suction valve
Only have the suction valve inside the water reservoir cleaned or replaced by qualified professionals. Please consult your speciality retailer.
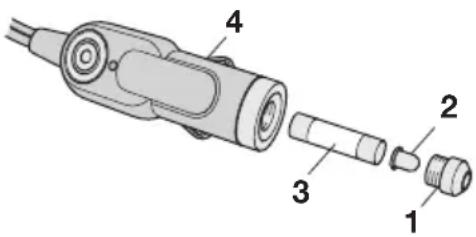
Changing the fuse inside the 12 V car power plug
- Unscrew the retaining pin (1) with the fuse cover (2) from the car plug (4).
- Insert a new micro-fuse (3) of the same rating (see Technical Data).
-
- Replace the retaining pin (1) with the fuse cover (2) in the car plug (4).
Service
Should you have any questions regarding commissioning or operating in spite of studying these operating instructions, or if a problem should occur against all expectations, please get in contact with your specialist supplier.
DISPOSAL
The packaging consists of non-contaminating materials that you can dispose of at your local recycling point.

Do not throw electrical appliances in with domestic waste!
In accordance with European Directive 2002 / 96 / EC for waste electrical and electronic equipment (WEEE) and conversion to national law, used electrical appliances must be collected separately and taken to a recycling point. For ways to dispose of old electrical appliances please contact your community or city administration.
Illustrations may vary slightly from the product itself. We reserve the right to modify the product in accordance with technical advances. Decoration not included.
TABLE DES MATIÈRES


natural_image
Diagram of a handheld electric shaver with an arrow indicating insertion or disassembly (no text or symbols present)Embout pomme (14)

natural_image
Diagram showing a tool being inserted into a rack, with no visible text or symbolsEmbout brosse (16)

natural_image
Diagram of a handheld electric shock absorber with a separate plug, showing internal components and an arrow indicating direction (no text or symbols present)Embout buse (15)
natural_image
Diagram of a handheld electric tool with a cable inserted, showing the connector and directional arrow (no text or symbols)Mettre en marche
Attention!
Nettoyer

Attention!
natural_image
Illustration of a welding torch with handle and blade (no text or symbols)
natural_image
Illustration of a mechanical tool or device with no visible text or symbolsnatural_image
Illustration of a handheld welding torch with handle and blade (no text or symbols)
natural_image
Illustration of a handheld welding torch (no text or symbols)natural_image
Illustration of a welding torch with a curved arrow indicating rotation (no text or symbols)Mettre à l'arrêt
natural_image
Diagram of a cable connector with two circular ports and an arrow indicating direction (no text or symbols)CARACTÉRISTIQUES TECHNIQUES
Service


natural_image
Diagram of a handheld electric shaver with an arrow indicating insertion or disassembly (no text or symbols present)Inserto doccia (14)
natural_image
Diagram showing a tool interacting with a brush, illustrating the process (no text or symbols present)natural_image
Diagram of a handheld electric shock absorber with a separate plug, showing internal components and an arrow indicating direction (no text or symbols present)Inserto ugello (15)
Collegare la pistola a spruzzo
Collegare la pistola a spruzzo (11) al tubo flessibile (13).
natural_image
Diagram of a handheld electric tool with a cable inserted, showing the connector and directional arrow (no text or symbols)Accendere
Attenzione!
natural_image
Illustration of a handheld welding torch with handle and grip (no text or symbols)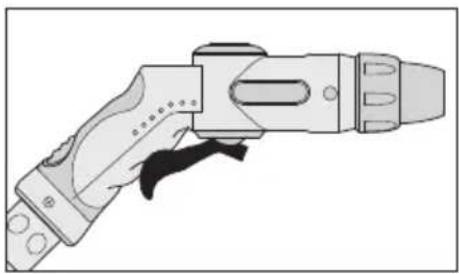
natural_image
Illustration of a robotic arm with a black handle, shown in profile view (no text or symbols)natural_image
Illustration of a welding torch with handle and blade (no text or symbols)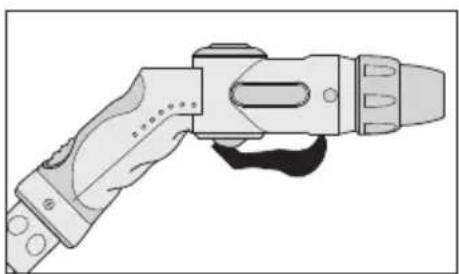
natural_image
Illustration of a handheld welding torch (no text or symbols)natural_image
Illustration of a welding torch with a curved arrow indicating rotation (no text or symbols)Spegnere
natural_image
Diagram of a cable connector with two circular ports and an arrow indicating direction (no text or symbols)DATI TECNICI
Assistenza


natural_image
Diagram of a handheld tool with an arrow pointing to a rectangular component (no text or symbols present)natural_image
Illustration of a hand holding a tool next to a brush, showing the process (no text or symbols present)natural_image
Diagram of a handheld electric tool with a separate connector, showing internal components and an arrow indicating direction (no text or symbols present)Nástavec s tryskou (15)
natural_image
Diagram of a handheld electric drill bit with a cable inserted, showing the insertion process (no text or symbols present)Zapnutí
⚠️ Pozor!
natural_image
Close-up of a cable connector with two labeled ports (0.0 and 120) and an attached connector, showing no visible text or symbols.Čištění
⚠️ Pozor!
natural_image
Illustration of a handheld welding torch (no text or symbols)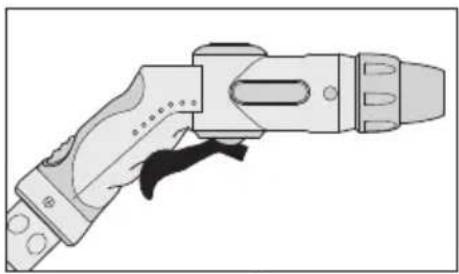
natural_image
Illustration of a robotic arm with a black handle and blue outline (no text or symbols)natural_image
Illustration of a handheld welding torch with handle and blade (no text or symbols)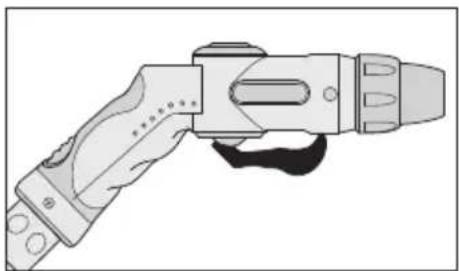
natural_image
Illustration of a handheld welding torch (no text or symbols)Poloha 3: Voda teče. Poloha 4: Voda teče.
natural_image
Illustration of a welding torch with a curved arrow indicating rotation (no text or symbols)Vypínání
natural_image
Diagram of a cable connector with a directional arrow indicating left motion (no text or symbols)TECHNICKÁ DATA
Servis


natural_image
Diagram of a handheld electric gun with an arrow pointing to its internal component (no text or symbols present)Nástavec sprcha (14)
natural_image
Illustration of a hand holding a tool next to a rack with a brush, showing mechanical assembly (no text or symbols)natural_image
Illustration of a handheld electric tool with an arrow pointing to its connector (no text or symbols present)Nástavec tryska (15)
Pripojenie striekacej pištole
Pripojte striekaciu pištol' (11) na hadicu (13).
-
Spojku preto mierne zatiahnite naspät.
-
Nasadte hadicovú spojku (12) na hadicovú prípojku striekacej pištole.
-
Opät pustite spojku hadice. Dbajte na to, aby spojka zapadla.
natural_image
Diagram of a handheld electric tool with a plug inserted, showing the insertion process (no text or symbols present)Zapnutie
⚠️ Pozor!
- Držte striekaciu pištol'pevne v ruke, aby ste predišli reakčnej sile. Voda je pod tlakom.
-
Nestláčajte páku striekacej pištole!
-
Zasuňte 12 V zástrčku (9) do 12 V pripojovacej zásuvky (4).
- Zasuňte 12 V automobilovú zástrčku (8) do 12 V automobilovej pripojovacej zásuvky.
- Stlačte spínač (6) do polohy ON.
Čistenie
⚠️ Pozor!
natural_image
Illustration of a welding torch with handle and blade (no text or symbols)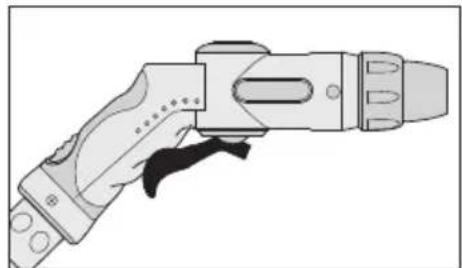
natural_image
Illustration of a robotic arm with a black handle, no text or symbols presentPoloha 2: Voda tečie. Poloha 1: Voda sa zastaví.
Trvalý prietok vody
natural_image
Illustration of a handheld welding torch with handle and blade (no text or symbols)
natural_image
Illustration of a handheld electric torch (no text or symbols)Poloha 3: Voda tečie. Poloha 4: Voda tečie.
natural_image
Illustration of a welding torch with a curved arrow indicating rotation (no text or symbols)Vypnutie
natural_image
Diagram of a cable connector with three pins and an arrow indicating direction (no text or symbols)TECHNICKÉ ÚDAJE
Servis

natural_image
Diagram of a handheld tool with an arrow pointing to a rectangular component (no text or symbols present)natural_image
Diagram showing a hand holding a tool interacting with a rack-mounted blade, no text or symbols presentNastavek s krtačo (16)
natural_image
Diagram of a handheld electric drill bit with an arrow indicating insertion or disassembly (no text or symbols present)Šobni nastavek (15)
Priklop brizgalne pištole
Priklopite brizgalno pištolo (11) na cev (13).
-
Pri tem spojni element nekoliko povlecite nazaj.
-
Namestite cevno spojko (12) na priključek za cev na brizgalni pištoli.
-
Ponovno izpustite cevno spojko. Bodite pozorni, da spojni element zaskoči.
natural_image
Diagram of a handheld electric shaver with a connector, showing mechanical assembly and directional arrows (no text or symbols)Vklop
Previdno!
- Trdno držite brizgalno pištolo v roki, da preprečite reakcijsko silo. Voda je pod pritiskom.
-
Ne pritisnite ročice na brizgalni pištoli!
-
Priklopite 12 V vtič (9) v 12 V priključno dozo (4).
- Priklopite 12 V avtomobilski vtič (8) v 12 V avtomobilsko priključno dozo.
- Preklopite stikalo (6) v položaj ON.
Čiščenje

Previdno!
natural_image
Illustration of a welding torch with handle and blade (no text or symbols)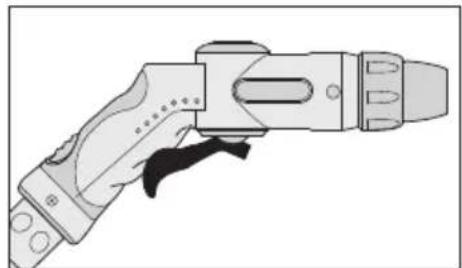
natural_image
Illustration of a robotic arm with a black handle, no text or symbols presentnatural_image
Illustration of a handheld welding torch with handle and blade (no text or symbols)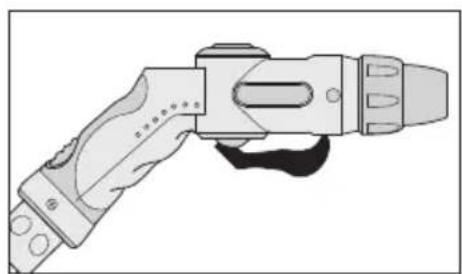
natural_image
Illustration of a handheld welding torch (no text or symbols)natural_image
Illustration of a handheld welding torch with a curved arrow indicating rotation (no text or symbols)Izklop
- Prestavite stikalo (6) v položaj OFF.
- Držite ročico nekaj sekund v položaju 2 (glejte „Čiščenje“), da voda preneha teči.
- Odklopite 12 V avtomobilski vtič (8) iz 12 V avtomobilske priključne doze.
- Odklopite 12 V vtič (9) iz 12 V priključne doze (4).
- Odklopite cev (13) od naprave. Pri tem cevno spojko nekoliko povlecite nazaj.
natural_image
Diagram of a cable connector with a directional arrow indicating left motion (no text or symbols)TEHNIČNI PODATKI
Servis
www.spa-automotive.com
EAN: 4038373803207
Stand: 12/2014