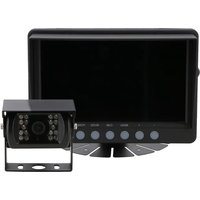
MC-200 - Surveillance Camera Mestic - Free user manual and instructions
Find the device manual for free MC-200 Mestic in PDF.


| Product type | Surveillance camera with 7-inch monitor |
| Brand | Mestic |
| Model | MC-200 |
| Screen size | 7-inch TFT LCD color |
| Screen resolution | 1024 (RGB) × 600 |
| Screen brightness | 550 cd/m² |
| Camera resolution | 1920 × 1080 pixels |
| Lens angle | H:106°, V:55°, D:120° |
| Focal length | 2.8 mm |
| Number of supported cameras | Up to 2 cameras |
| Trigger function | Yes, with automatic switching |
| Image mirroring | Yes |
| Power supply | 12/24 V DC, < 3.5 W |
| Operating temperature | -20°C to +70°C |
| Storage temperature | -30°C to +80°C |
| Allowable humidity | Up to 95% RH |
| Waterproof rating | Not waterproof |
| Cleaning | Mild detergent and damp cloth |
| Safety | Dangerous internal voltage, do not open |
| Warranty | See conditions |
Frequently Asked Questions - MC-200 Mestic
User questions about MC-200 Mestic
0 question about this device. Answer the ones you know or ask your own.
Ask a new question about this device
Download the instructions for your Surveillance Camera in PDF format for free! Find your manual MC-200 - Mestic and take your electronic device back in hand. On this page are published all the documents necessary for the use of your device. MC-200 by Mestic.
USER MANUAL MC-200 Mestic
natural_image
Black rectangular monitor displaying a menu, camera, mode, and power interface next to a black-and-white photo of a video camera with 12 sensors (no visible text or symbols on the device itself)Gebruiksaanwijzing NL User instructions EN Bedienungsanleitung DE Mode d'emploi FR
Instrucciones de uso ES Istruzioni per l'uso IT Betjeningsvejledning DK
Bruksanvisning SE Bruksanvisning NO
CAMERA
MC-200
SINGLE
NEDERLANDS
natural_image
Technical line drawing of a mechanical component with arrows indicating direction (no text or symbols)Pull out
Push

Let op!
flowchart
graph LR
    A["Monitor"] --> B["USB Port"]
    B --> C["Camera"]
    B --> D["Camera"]
    C --> E["USB Port"]
    D --> F["USB Port"]
    E --> G["USB Cable"]
    F --> H["USB Cable"]
    G --> I["Green Cable"]
    G --> J["White Cable"]
    G --> K["Black Cable"]
    G --> L["Red Cable"]
    H --> M["Red Cable"]
    I --> N["Red Cable"]
    J --> O["Red Cable"]
    K --> P["Red Cable"]
    L --> Q["Red Cable"]
Zwart: Aarde
Precautions, Storage and keeping
- Do not expose the monitor to excessive heat or cold. The storage temperature of this product is -30 \~ +75°C and the operating temperature is -20 \~ +60°C. The humidity is Rh90%.
- Do not puncture, scratch or use abrasive cleaning materials on this unit.
- Do not place cables where they can be pinched or stepped on.
- Allow at least 2" clearance between the monitor and walls, cabinets or other objects to allow adequate air circulation around the unit.
- The monitor is not waterproof.
Precautions, Operating Precautions
- The unit can be powered by a 12 or 24 volt automotive battery or vehicle electrical system.
- Ensure that all cables are connected correctly, observing the correct polarity. Incorrect connections may damage the monitor. Disconnect power cables when not in use.

Warning!
High voltage is present within the monitor. The opening of the case should be by professionals. Do not watch the video while driving unless you are monitoring the rear view camera display.

pecial notice!
Occasionally, the LCD screen may show some bright or dark spots. This is a very common phenomenon in active matrix display technology and doesn't necessarily indicate a defect or malfunction. Never attempt to repair this unit yourself. In the event of a problem, immediately turn off the monitor and contact our company or an authorized dealer. The monitor is a complex piece of equipment. Any disassembly or modification may cause damage and void the warranty.
Maintenance
- Disconnect all cables from the monitor before cleaning.
- Use a mild household detergent and wipe the unit with a damp, soft cloth. Never use strong solvents such as thinner or benzene as they may damage the finish of the unit.
This symbol is intended to alert the user to the presence of uninsulated "dangerous voltage" within the product's enclosure that may be of sufficient magnitude to constitute a risk of electric shock to persons.

This symbol is intended to alert the user to the presence of important operating and maintenance (servicing) instructions in the literature accompanying the appliance.

This symbol is intended to alert the user to the need to dispose of electrical and electronic equipment.
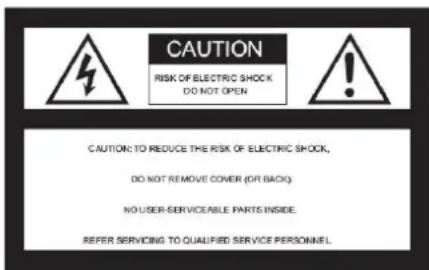
CAUTION
Please note that any changes or modifications not expressly approved in this manual may invalidate your warranty and require costly repairs.
Declaration of conformity
This device complies with Part 15 of the FCC Rules. Operation is subject to the following two conditions:
- This device may not cause harmful interference.
- This device must accept any interference received, including interference that may cause under sired operation.
Product Features
- Language selection: English / Deutsch / Francais / Italiano / Espanol / Nederlands.
- Equipped with remote control.
- Supports automatic video signal detection.
- Supports simultaneous video input from two cameras.
- Supports image mirroring function.
- Support trigger function, the camera is controlled by a trigger line, and automatically switches when triggered.
- Supports automatic start and switch to corresponding camera image when triggered in standby mode.
- Working power supply range 12-24V, power short circuit protection function.
Technical Specifications
Monitor
7" TFT LCD colour monitor.
Resolution: 1024(RGB)X600
System: N / P
Brightness: 550cd/m².
Active area: 154.21(H)X85.92(V) mm
Video: CVBS / AHD
Video Channel : 2 Channel
Reverse Function : 1 Channel
Guide function : 2 channel Auto switching
Power supply: 12/24V DC/<3.5W
Operating temperature: -20°C to +70°C.
Storage temperature: -25°C to +70°C.
CAMERA
TV system: NTSC/PAL
Effective pixels: 1920(H)*1080(V)
Sync. System: Internal
IR LED Qty: 18PCS
Scanning system: Interlace
Lens: 2.8mm
Lens angle: H:106° V:55° D:120°
Operating temperature: -20°C- 70°C, RH 95% MAX
Storage temperature: -30°C-80°C, RH 95% MAX
Special Notice!
All specifications may change without notification.
Key/Control descriptions
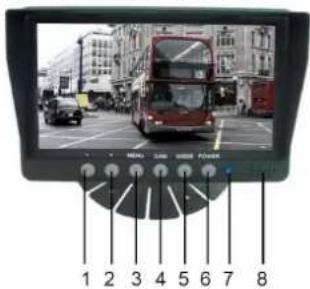
- Decrease button - Adjusts volume, brightness, contrast, language, rotation, etc.
- Increase button - Adjusts volume, brightness, contrast, language, rotation, etc.
- MENU - Access brightness, contrast, language, rotation, etc.
- CAM - Switches between all cameras connected to the monitor.
- MODE - Select brightness mode.
- POWER - Turns the monitor on and off.
- Power indicator.
- Speaker.
Menu options Image settings
-
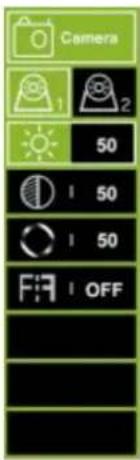
Press the MENU button to enter the menu, you will see the icon selected in green by default.
-
Press MENU button again to confirm to enter picture setting as shown on the left.
-
Press + to select Camera 1 or Camera 2, then press MENU button to confirm.
-
Press + again to enter the submenu below, it will turn green.
-
Press MENU button to confirm, then press - or + to adjust the value. After the value is well adjusted, press MENU button again to confirm the adjustment.
-
Then press + button to enter Brightness or other submenus to adjust the value. Repeat from step 4 to step 5. When all the settings are done, press MODE to exit to return to the main menu.
-
6 ^th option s for setting the mirror/non-mirror image.
Parking line settings
-
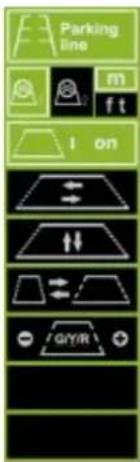
Press MENU button to enter menu, then press + button to move to Parking Line menu, press MENU button to confirm and enter Parking Line setting menu as shown on the left.
-
Press + or - key to select Camera 1 or Camera 2, press MENU key to confirm. Press + to move to M(meters) or ft(feet), press MENU to confirm.
-
Press + or - to select ON, then press MENU button to set as ON/OFF. Press + or - to select, then press MENU to confirm. Then press + or - to move the parking line horizontally. Press the MENU button to confirm the setting.
-
Press + to move to, then press MENU button to confirm to select. Then press + or - to move the parking line vertically. Press the MENU button to confirm the setting.
-
Press + to move to, then press MENU key to confirm to select. Then press + or - to move the parking line horizontally. Press the MENU button to confirm the setting.
-
Press + to move to, then press MENU key to confirm to select. Then press + or - to move the number you want to adjust. Press MENU to confirm the selection, then press + or - to increase or decrease.
-
When your setting is complete, press MODE to exit and return to the main menu. If the parking line is set to ON, please also connect the trigger wire to the positive + of the rear light power. When you put the car in reverse, the monitor will show the parking line. At this moment all buttons will not work. After reversing the buttons will work.
Language settings
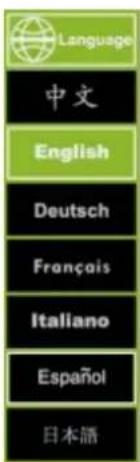
Press the MENU button to enter the menu Language, then press the + button to move to the menu, then press the MENU button to confirm and enter the submenu. Press + or - to select the language you prefer, then press MENU to confirm. Press MODE to exit.
Backlight settings
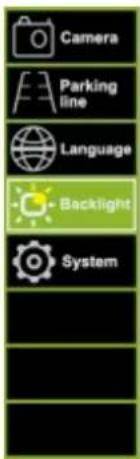
Press the MENU button to enter the menu Backlight, then press the + button to move to the menu, then press the MENU button to confirm and enter the submenu. Press + or - to select the language you prefer, then press MENU to confirm. Press MODE to exit.
System settings
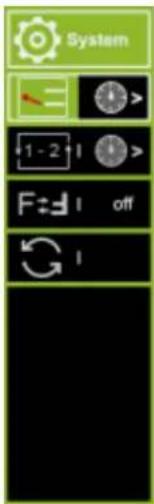
- Press the MENU button to enter the menu, then press the + button to move to the menu, then press the MENU button again to confirm.
- Press + to move to, then press MENU to confirm to set the trigger delay time. Then press + or - to select or to set the time for camera 1 or camera 2. then press MENU to confirm, press + or - to increase or to increase or decrease the number. When the setting is complete, press MODE to exit.
- Press + to move to and press MENU to confirm. button to confirm to set the automatic scanning/cycling between camera 1 and camera 2. Then press + or - to select the or to set the time for camera 1 or camera 2, then press MENU to confirm, press + or - to increase or decrease the number. When the setting is complete, press MODE to exit. If you want to start the automatic scanning/cycling, please leave all the menus and press the MENU button for about 5 seconds, it will start automatically scanning between 2 cameras. between 2 cameras. Press MODE to cancel.
- Press + to move to . Then press MENU to rotate the image. When the setting is complete, press MODE to exit.
- Press + to move to reset all.
Remote Control Operation
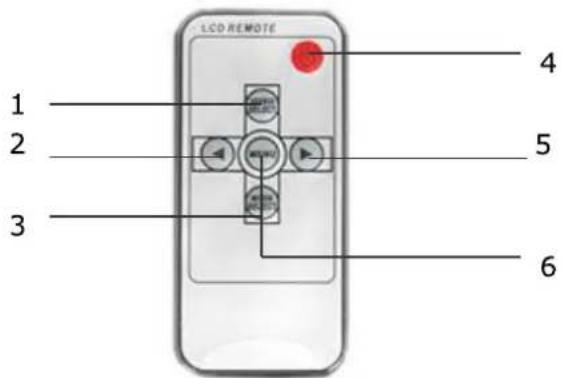
- Video Select - Switches between all cameras connected to the monitor.
- Down key - Adjusts volume, brightness, contrast, language, rotation, etc.
- Mode select - Select brightness mode
- Power On/Off
- Increase button - Adjusts volume, brightness, contrast, language, rotation, etc.
- Menu - Access brightness, contrast, language, rotation, etc.
Replacing the remote control batteries
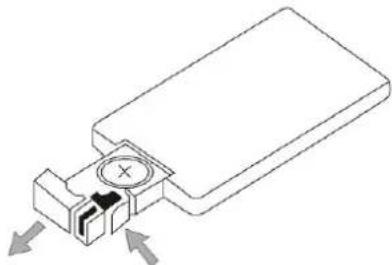
natural_image
Technical line drawing of a mechanical component with arrows indicating direction (no text or symbols)Pull out
Push

Notice!
-
To operate, point the remote control towards the infrared window on the monitor.
-
Never disassemble the remote control, drop it or get it wet.
-
Press the control buttons firmly. Allow 2 seconds for the picture to change.
Basic operation
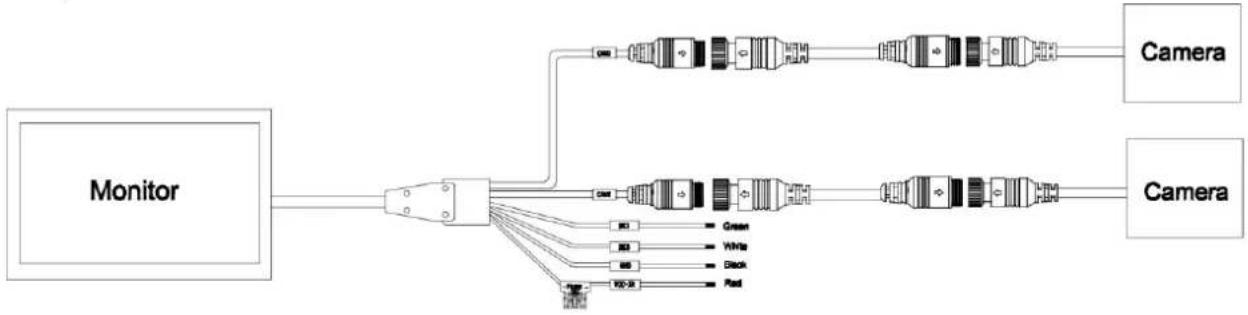
flowchart
graph LR
    A["Monitor"] --> B["USB Port"]
    B --> C["Camera"]
    B --> D["Camera"]
    C --> E["USB Port"]
    D --> F["USB Port"]
    E --> G["USB Cable"]
    F --> H["USB Cable"]
    G --> I["Green Cable"]
    G --> J["White Cable"]
    G --> K["Black Cable"]
    G --> L["Red Cable"]
    H --> M["Red Cable"]
    I --> N["Red Cable"]
    J --> O["Red Cable"]
    K --> P["Red Cable"]
    L --> Q["Red Cable"]
Black: Ground
Red: ACC (car key power) DC 12\~24V
Green: Trigger Cam 1 - Reverse light power positive DC12\~24V.
White: Trigger Cam 2 - Reversing light power positive DC12\~24V.
Troubleshooting
The symptoms described below do not necessarily indicate a fault within the display. Please check the following points before requesting service.
| Symptom | Possible causes/solution |
| No picture. No sound | Incorrect connection of the car adapter. Use of an unauthorized power supply. The power switch is in the OFF position. |
| No picture | Check that the locking cable is correctly connected. |
| No sound | Check that the lock cable is connected correctly or that the volume is set too low. |
| Dark picture | Check that the brightness and contrast are set correctly; check that the ambient temperature is not too low. |
| No color | Adjust the color settings. |
| Upside down or sideways Inverted image | Use the remote control/MENU-ROTATION button to set the correct orientation. |
| No reverse function (i.e. image) | Check for loose wires (black/red/green). |
DEUTSCH
natural_image
Technical line drawing of a mechanical component with arrows indicating direction (no text or symbols)Pull out
Push

Achtung!

Avis!
natural_image
Technical line drawing of a mechanical component with arrows indicating direction (no text or symbols)Pull out
Push

Avviso!
¡Atención!
IR LED Antal: 18 STK.
Scanningssystem: Interlace
Linse: 2,8 mm
Linsevinkel: H:106° V:55° D:120°
Driftstemperatur: -20°C - 70°C, RH 95% MAX
Opbevaringstemperatur: -30°C - 80°C , RH 95% MAX

Særlig meddelelse!
natural_image
Technical line drawing of a mechanical component with arrows indicating direction (no text or symbols)Pull out
Push

Bemærk!
flowchart
graph LR
    A["Monitor"] --> B["USB Port"]
    B --> C["Camera"]
    B --> D["Camera"]
    C --> E["USB Port"]
    D --> F["USB Port"]
    E --> G["USB Cable"]
    F --> H["USB Cable"]
    G --> I["Green Cable"]
    G --> J["White Cable"]
    G --> K["Black Cable"]
    G --> L["Red Cable"]
    H --> M["Red Cable"]
    I --> N["Red Cable"]
    J --> O["Red Cable"]
    K --> P["Red Cable"]
    L --> Q["Red Cable"]
Sort: Jord
Rød: ACC (strøm fra bilnøgle) DC 12\~24V
Grøn: Trigger Cam 1 - Baklysstrøm positiv DC12\~24V.
Hvid: Trigger Cam 2 - Baklysstrøm positiv DC12\~24V.
Fejlfinding
natural_image
Technical line drawing of a mechanical component with arrows indicating direction (no text or symbols)Pull out
Push

Meddelande!
natural_image
Technical line drawing of a mechanical component with arrows indicating direction (no text or symbols)Pull out
Push

Legg merke til det!
-
For å betjene den, peker du fjernkontrollen mot det infrarøde vinduet på skjermen.
-
Fjernkontrollen må aldri demonteres, slippes i bakken eller bli vät.
- Trykk kontrollknappene godt inn. Det tar 2 sekunder før bildet endres.
Grunnleggende drift
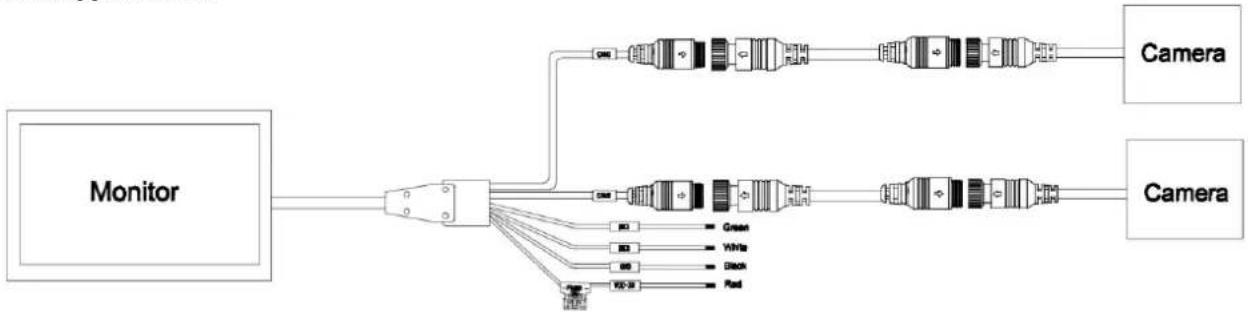
flowchart
graph LR
    A["Monitor"] --> B["USB Port"]
    B --> C["Camera"]
    B --> D["Camera"]
    C --> E["USB Port"]
    D --> F["USB Port"]
    E --> G["Green"]
    E --> H["White"]
    E --> I["Black"]
    E --> J["Red"]
Svart: Jord
- NEDERLANDS
- Precautions, Storage and keeping
- Precautions, Operating Precautions
- Warning!
- pecial notice!
- Maintenance
- CAUTION
- Declaration of conformity
- Product Features
- Technical Specifications
- Monitor
- CAMERA
- Special Notice!
- Key/Control descriptions
- Menu options Image settings
- Parking line settings
- Language settings
- Backlight settings
- System settings
- Remote Control Operation
- Notice!
- Troubleshooting
- DEUTSCH
- Achtung!
- Avviso!
- ¡Atención!
- Særlig meddelelse!
- Bemærk!
- Fejlfinding
- Meddelande!
- Legg merke til det!
Brand : Mestic
Model : MC-200
Category : Surveillance Camera