
Fuse - DJ Equipment TC HELICON - Free user manual and instructions
Find the device manual for free Fuse TC HELICON in PDF.

| Product Type | Voice processor and audio interface for gaming and streaming |
| Brand | TC Helicon |
| Model | Fuse |
| Power | Rechargeable battery via USB (5V) |
| USB Connectivity | Digital audio interface for computer or PlayStation |
| Analog Output | TRRS mini jack connector (CONSOLE) for controller or phone |
| Headphone Input | TRRS mini jack connector (mic + audio) |
| Auxiliary Mic Input | Mini jack connector for external microphone |
| Voice Effects | Megaphone, Pitch (correction and auto-tune), Echo, Beep |
| Microphone Adjustment | Adjustable gain, 9 tone presets (bright to deep) |
| Mic/Game Mix | Tactile slider to balance volumes |
| Headphone Level | Tactile slider with LED display |
| Displays | LEDs for level, battery, current settings |
| Customizable Lighting | Colored LEDs selectable via POWER button |
| Console Compatibility | Xbox, PlayStation, PC, phone (cables included) |
| Included Cables | USB cable, TRRS mini jack cable for console |
| Safety | Do not expose to heat, do not open, repair by qualified technician |
| Maintenance | Clean with a dry cloth |
| Warranty | Limited, see community.musictribe.com |
Frequently Asked Questions - Fuse TC HELICON
User questions about Fuse TC HELICON
0 question about this device. Answer the ones you know or ask your own.
Ask a new question about this device
Download the instructions for your DJ Equipment in PDF format for free! Find your manual Fuse - TC HELICON and take your electronic device back in hand. On this page are published all the documents necessary for the use of your device. Fuse by TC HELICON.
USER MANUAL Fuse TC HELICON
FUSE
Headset Mic Enhancer and Vocal FX for Gaming Consoles, Android, iOS, PC and Mac
2 3 Quick Start GuideFUSE
EN

Important Safety Instructions

Warning
- Don't replace a battery that
can defeat a safeguard;
- Disposal of a battery into fire or a hot oven, or mechanically crushing or cutting of a battery, that can result in an explosion;
- • Leaving a battery in an extremely high temperature surrounding environment that can result in an explosion or the leakage of flammable liquid or gas; and
- A battery subjected to extremely low air pressure that may result in an explosion or the leakage of flammable liquid or gas.
- Attention should be drawn to the environmental aspects of battery disposal.
- Batteries (battery pack or batteries installed) shall not be exposed to excessive heat such as sunshine, fire or the like.

Caution
These service instructions are
for use by qualified service personnel only. To reduce the risk of electric shock
do not perform any servicing other than that contained in the operation instructions. Repairs have to be performed by qualified service personnel.
- Read these instructions.
- Keep these instructions.
- Heed all warnings.
- Follow all instructions.
- Do not use this apparatus near water.
- Clean only with dry cloth.
- Do not block any ventilation openings. Install in accordance with the manufacturer's instructions.
- Do not install near any heat sources such as radiators, heat registers, stoves, or other apparatus (including amplifiers) that produce heat.
- Use only attachments/accessories specified by the manufacturer.

- Use only with the cart, stand, tripod, bracket, or table specified by the manufacturer, or sold with
the apparatus. When a cart is used, use caution when moving the cart/apparatus combination to avoid injury from tip-over.
- Correct disposal of this product: This symbol indicates that this product must not be disposed of with
household waste, according to the WEEE Directive (2012/19/EU) and your national law. This product should be taken to a collection center licensed for the recycling of waste electrical and electronic equipment (EEE). The mishandling of this type of waste could have a possible negative impact on the environment and human health due to potentially hazardous substances that are generally associated with EEE. At the same time, your cooperation in the correct disposal of this product will contribute to the efficient use of natural resources. For more information about where you can take your waste equipment for recycling, please contact your local city office, or your household waste collection service.
12. Do not install in a confined space, such as a book case or similar unit.
13. Do not place naked flame sources, such as lighted candles, on the apparatus.

Warning
Please refer to the information on the exterior of bottom enclosure for electrical and safety information before installing or operating the device.
LEGAL DISCLAIMER
Music Tribe accepts no liability for any loss which may be suffered by any person who relies either wholly or in part upon any description, photograph, or statement contained herein. Technical specifications, appearances and other information are subject to change without notice. All trademarks are the property of their respective owners. Midas, Klark Teknik, Lab Gruppen, Lake, Tannoy, Turbosound, TC Electronic, TC Helicon, Behringer, Bugera, Aston Microphones and Coolaudio are trademarks or registered trademarks of Music Tribe Global Brands Ltd. © Music Tribe Global Brands Ltd. 2024 All rights reserved.
LIMITED WARRANTY
For the applicable warranty terms and conditions and additional information regarding Music Tribe's Limited Warranty, please see complete details online at community.musictribe.com/pages/support#warranty.
EN
4 5 Quick Start GuideFUSE
ES
BESCHRÄNKTE GARANTIE
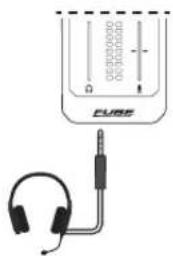
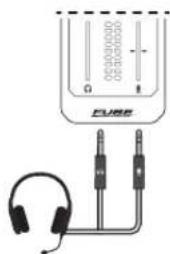
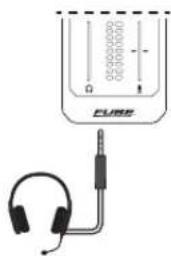
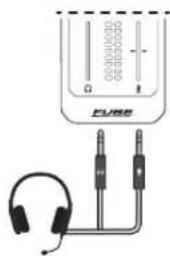
Headset with separate headphone and microphone connectors Headset with single connector

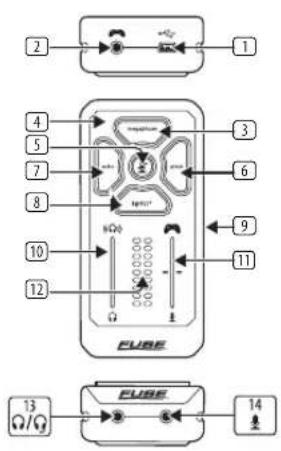
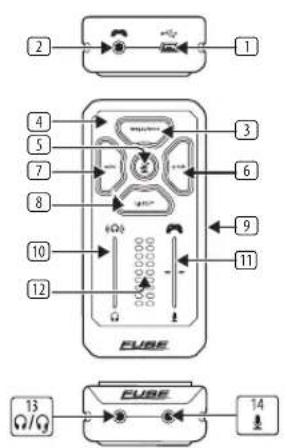
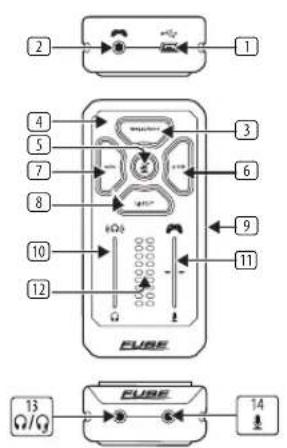
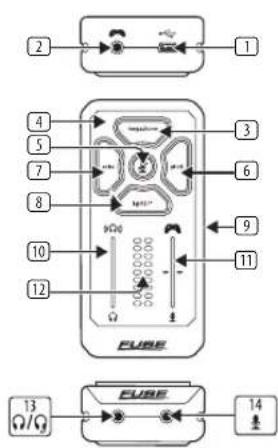
FUSE Controls
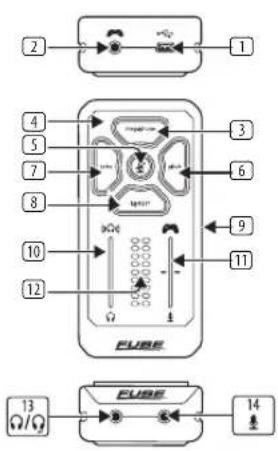
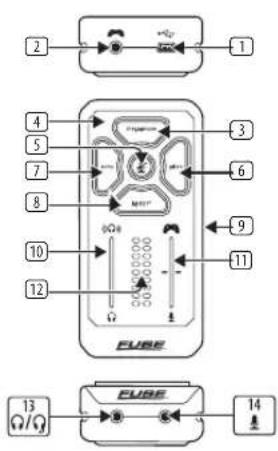
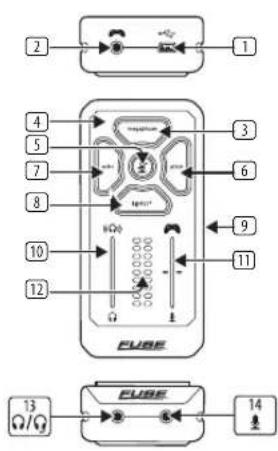
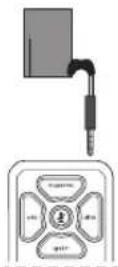
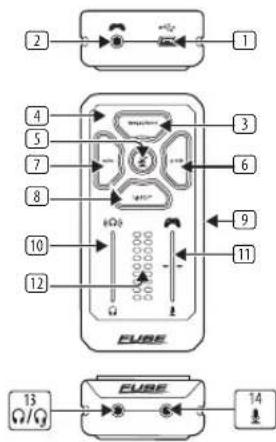
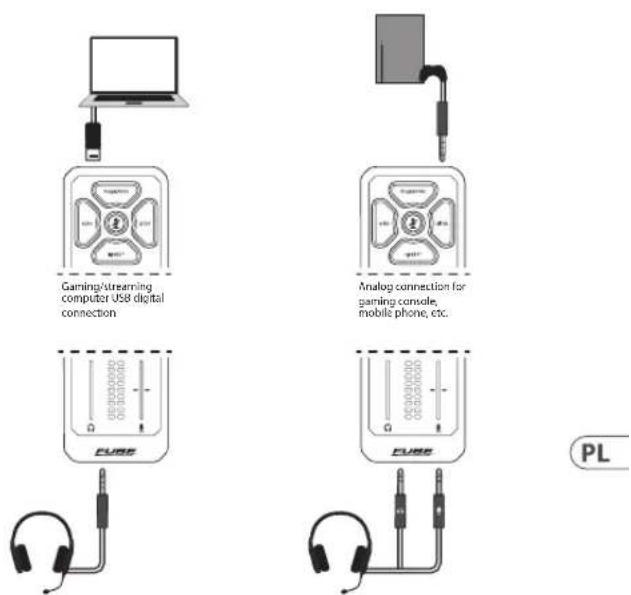
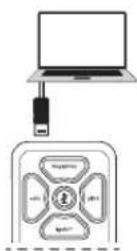
- USB – Use FUSE as a digital audio interface by connecting the supplied USB cable to a computer or Playstation* console.
To charge the battery connect to a powered USB port, USB charger or computer.
NOTE: Connecting the USB port and the analog CONSOLE JACK at the same time may cause ground loop noise.
-
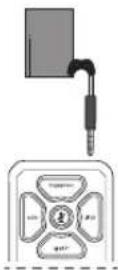
CONSOLE – Use FUSE with a console controller (Xbox*, PlayStation*, etc.) or mobile phone by connecting the supplied 18 "TRRS cable to the device's 18 " headset jack.
-
MEGAPHONE – Press to add megaphone distortion to your mic. Press and hold to adjust the amount of distortion using the HEADPHONE LEVEL slider and to select from different Megaphone presets using the MIC/ GAME BALANCE slider.
*Xbox is a registered trademark or trademark of Microsoft Corporation in the United States and/or other countries.
PlayStation is either a registered trademark or trademark of Sony Interactive Entertainment Inc.
28 29 Quick Start GuideFUSE
-
CHARGING LED – LED is on when battery is charging.
-
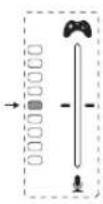
MUTE – Press to mute your mic. Press and hold to adjust your mic gain via HEADPHONE LEVEL slider and to choose from different Tone presets via the MIC/GAME BALANCE slider.
NOTE: Tone presets are a combination of different EQ and gate settings.
-
PITCH – Press to pitch shift and auto-tune your voice. Press and hold to adjust auto-tune mode via HEADPHONE LEVEL slider and adjust pitch up and down via MIC/GAME BALANCE slider.
-
ECHO – Press to add echo to your voice. Press and hold to adjust how loud the echo is via HEADPHONE LEVEL slider and to choose from different Echo presets via the MIC/GAME BALANCE slider.
-
BLEEP – Press this button to censor your !@#\$?* mic.
-
POWER – Press this to turn FUSE on. Press and hold for 4 seconds to turn off FUSE.
When powered, press multiple times to cycle through LED color options. Press and hold for 1 second to display battery levels on SLIDER DISPLAYS.
NOTE: Battery level will indicate charging while CHARGING LED is on.
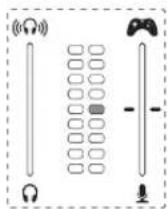
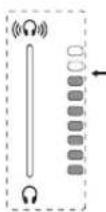
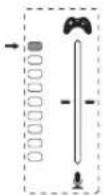
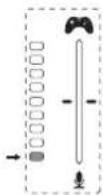
- HEADPHONE LEVEL – Adjust your headphone volume by sliding finger up or down. Level is indicated on the left SLIDER DISPLAY.
NOTE: Requires multiple swipes to go from min to max as to avoid accidental, extreme volume changes.
- MIC/GAME BALANCE – Adjust the balance between your mic and game audio.
Slide finger towards the controller to increase game audio and decrease mic monitor audio. Slide finger towards mic to decrease game audio and increase voice monitor audio.
NOTE: This does not affect your mic volume out USB or CONSOLE JACK.
NOTE: Requires multiple swipes to go from extremes as to avoid accidental balance changes.
- SLIDER DISPLAYS – Displays HEADPHONE LEVEL (left) and MIC/ GAME BALANCE (right) when idle, or battery level on 1-second long-press of POWER, or effects settings when either MEGAPHONE, MUTE, PITCH or ECHO are pressed and held (see 3 5 6 7 for left/right display descriptions).
EN
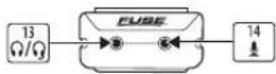
-
HEADPHONE/HEADSET - Connect 18 " TRRS from single connector headsets or 18 " TRS connector from headphones or split-connector headsets.
-
AUXILIARY MIC – Connect 12 " TRS microphone from split-connector headsets or lavalier mic.
30 31 Quick Start GuideFUSE
FUSE Getting Started

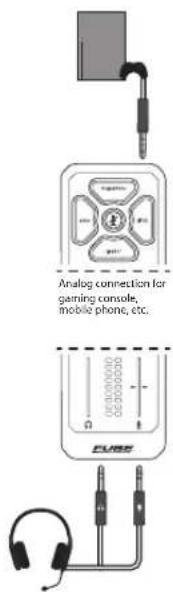
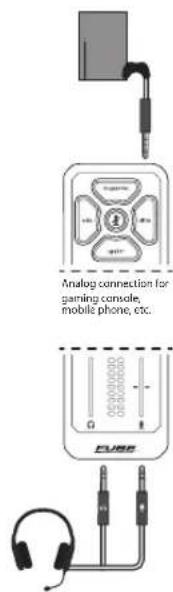
FUSE can be used with either analog or digital audio:
- Digital – Connect FUSE to your computer or Playstation® console by using included USB cable to stream digital audio.
*Some game consoles do not support USB audio devices
- Analog – Connect the CONSOLE 2 jack on FUSE to the headset jack on your console controller or mobile phone using the provided 18 " TRRS AUX cable.

If your headset has a single 18 " TRRS connector, connect it to the HEADPHONE/HEADSET 13 jack.
If your headset has separate 18 " TRS mic and headphones connectors, connect the headphones connector to the HEADPHONE/HEADSET [13] jack, and connect the mic connector to the AUXILIARY MIC [14] input.
No need for headset adapters!

Press the POWER button to turn on the unit.

Make sure HEADPHONE LEVEL is set to minimum and MIC/GAME BALANCE is set to neutral state
(no segments lit on LEFT SLIDER DISPLAY and center segment lit on RIGHT SLIDER DISPLAY).

Set computer/console/phone volume to 100% and play audio (video, audio file, etc.), slide your
finger up or down on the PHONES LEVEL slider to increase or decrease the volume until you find the desired headphone output.
NOTE: Multiple swipes are required to move from min to max volume.

Press and hold the MUTE button to enter mic edit mode where the SLIDER DISPLAYS will show your
mic level meter (left) and your selected tone preset (right).
- MIC GAIN
While speaking into your mic, slide your finger up/down the PHONES LEVEL slider to increase/decrease the mic gain until the level meter is occasionally peaking in the amber warning segment (2nd LED from the top). It should never be in the red clipping segment (top LED).
- TONE
While speaking into your mic, slide your finger up/down the MIC/GAME BALANCE slider to change the Tone Presets between 9 customized voicing settings. Listen to each preset and pick the one that makes your headset sound the best.
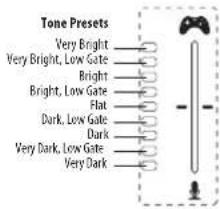
To exit mic edit mode press the MUTE button or wait until the MUTE buttons stops flashing.
PRO TIP: To pick the best preset for your voice, record your mic audio for each preset while repeating the same phrase. Once complete, listen back to your recordings and pick the best one!
32 33 Quick Start GuideFUSE

Adjust the listening balance between your affected mic and game audio by using the MIC/
GAME BALANCE slider. While playing audio from your console/computer/phone and speaking into the mic, slide finger towards the controller to increase game audio and decrease mic monitor audio, or slide finger towards mic to decrease game audio and increase mic monitor audio.
Game audio 100% Mic monitor 100%
Game audio 100% Mic monitor 0%
Game audio 0% Mic monitor 100%

Press the MEGAPHONE, PITCH, ECHO, or BLEEP buttons to hear how your voice sounds with each
effect. Press and hold the MEGAPHONE, PITCH, or ECHO buttons to edit the effects using sliders.

Press the MUTE button to toggle muting your mic on/off.

Press the POWER button multiple times to cycle through LED color options. Press and hold for
1 second to display battery levels on SLIDER DISPLAYS.
NOTE: If the battery gets below 3%, FUSE will flash a low battery warning on the SLIDER DISPLAYS to remind you to plug in the USB port for charging.
NOTE: If FUSE doesn't detect any audio or button presses for 10 minutes, it will automatically turn itself off.
34 35 Quick Start GuideFUSE
FUSE Conexión

Headset with separate headphone and microphone connectors Headset with single connector
FUSE Controles

Headset with separate headphone and microphone connectors Headset with single connector
FUSE Réglages
Headset with separate headphone and microphone connectors Headset with single connector
FUSE Bedienelemente

Headset with separate headphone and microphone connectors Headset with single connector
FUSE Controles


Headset with separate headphone and microphone connectors Headset with single connector
FUSE Controlli

Headset with separate headphone and microphone connectors Headset with sing
74 75 Quick Start GuideFUSE
FUSE Bediening
Game audio 100% Microfoonmonitor 100%
Game audio 100% Microfoonmonitor 0%
80 81Quick Start GuideFUSE

Game audio 0% Microfoonmonitor 100%

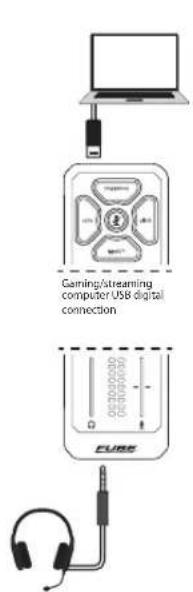
Gaming/streaming computer USB digital connection
Analog connection for gaming console, mobile phone, etc.
Headset with separate headphone and microphone connectors Headset with sing
82 83 Quick Start GuideFUSE
FUSE Kontroller
FUSE Podłączeni
Headset with separate headphone and microphone connectors Headset with sing
90 91 Quick Start GuideFUSE
FUSE Sterowanica
Gaming/streaming computer USB digital connection
Analog connection for gaming console, mobile phone, etc.
Headset with separate headphone and microphone connectors Headset with sing
98 99Quick Start GuideFUSE
FUSE コントロール
| Headset | |
| Connector 1 x 1⁄8" TRRS | |
| Mic input impedance 16 kΩ | |
| Mic bias voltage 2 V | |
| Frequency response (mic to game out) 20 Hz to 20 kHz (-3 dB) | |
| Headphone output impedance 10 Ω | |
| Headphone output power (per channel) 44 mW, 16 Ω @ 2.5 V | |
| Headphone THD+N < 0.04 %, 0 dB @ 1 kHz | |
| Channel separation < -57 dB, 20 Hz to 20 kHz (-7.5 dBu) | |
| Aux mic in | |
| Connector 1 x 1⁄8" TRS | |
| Mic input impedance 16 kΩ | |
| Mic bias voltage 2 V | |
| Frequency response (mic to game out) 20 Hz to 20 kHz (-3 dB) | |
112 113 Quick Start GuideFUSE
| Game audio | |
| Connector 1 x 1⁄8" TRRS | |
| Input impedance 2.3 kΩ | |
| Output impedance 400 Ω | |
| Frequency response (game in to headphone out) 20 Hz to 20 kHz (-2.5 dB) | |
| Digital Connections | |
| USB 1 x mini-USB 2.0, type B | |
| Bit depth 16-bit | |
| Sampling frequency 48 kHz | |
| USB channels 2 in / 2 out | |
| Controls | |
| Headphones, balance 2 x touch-sensitive sliders | |
| Buttons Echo, pitch, megaphone, | !@#$?* "BLEEP", mute |
| Lighting | RGB via power button |
| System | |
| Effects | Echo, reverb, pitch, megaphone, compressor, de-esser, gate, EQ |
| Power Supply / Voltage | |
| Connector Mini-USB type B | |
| Power supply 5 VDC 380 mA | |
| Battery, type | Rechargeable Li-Po |
| Battery, capacity 2000 mAh | |
| Battery, life (typ. usage) | >10 hrs |
| Physical | |
| Standard operating temperature range | 5^ to 45^ ( 41^ to 113^ ) |
| Dimensions (H x W x D) | 104 × 50 × 25.4 mm ( 4.09 × 1.97 × 1.0'' ) |
| Weight | 108 g (3.8 oz) |
114 115 Quick Start GuideFUSE
技术参数
Other important information

Important information
-
Register online. Please register your new Music Tribe equipment right after you purchase it by visiting musictribe.com. Registering your purchase using our simple online form helps us to process your repair claims more quickly and efficiently. Also, read the terms and conditions of our warranty, if applicable.
-
Malfunction. Should your Music Tribe Authorized Reseller not be located in your vicinity, you may contact the Music Tribe Authorized Fulfiller for your country listed under "Support" at musictribe.com. Should your country not be listed, please check if your problem can be dealt with by our "Online Support" which may also be found under "Support" at musictribe.com. Alternatively, please submit an online warranty claim at musictribe.com BEFORE returning the product.

Other important information

Other important information

Ważna Informacja
Responsible Music Tribe Commercial Party Name: NV Inc.
Address: 122 E. 42nd St.1, 8th Floor NY, NY 10168, United States
Email Address: legal@musictribe.com
FUSE
This equipment has been tested and found to comply with the limits for a Class B digital device, pursuant to part 15 of the FCC Rules. These limits are designed to provide reasonable protection against harmful interference in a residential installation. This equipment generates, uses and can radiate radio frequency energy and, if not installed and used in accordance with the instructions, may cause harmful interference to radio communications. However, there is no guarantee that interference will not occur in a particular installation. If this
equipment does cause harmful interference to radio or television reception, which can be determined by turning the equipment off and on, the user is encouraged to try to correct the interference by one or more of the following measures:
- Reorient or relocate the receiving antenna.
- Increase the separation between the equipment and receiver.
- Connect the equipment into an outlet on a circuit different from that to which the receiver is connected.
- Consult the dealer or an experienced radio/TV technician for help.
This device complies with Part 15 of the FCC rules. Operation is subject to the following two conditions:
(1) this device may not cause harmful interference, and
(2) this device must accept any interference received, including interference that may cause undesired operation.
Important information:
Changes or modifications to the equipment not expressly approved by Music Tribe can void the user's authority to use the equipment.
CE
Hereby, Music Tribe declares that this product is in compliance with Directive 2014/35/EU, Directive 2014/30/EU, Directive 2011/65/EU and Amendment 2015/863/EU, Directive 2012/19/EU, Regulation 519/2012 REACH SVHC and Directive 1907/2006/EC.
Full text of EU DoC is available at https://community.musictribe.com/
EU Representative: Music Tribe Brands DK A/S Address: Gammel Strand 44, DK-1202 København K, Denmark
UK Representative: Music Tribe Brands UK Ltd.
Address: 8th Floor, 20 Farringdon Street London EC4A 4AB, United Kingdom
TCHELICON