Realishot VLG-4K - Camera AGFAPHOTO - Free user manual and instructions
Find the device manual for free Realishot VLG-4K AGFAPHOTO in PDF.

| Product type | Digital camera with tripod and microphone |
| Brand | AgfaPhoto |
| Model | Realishot VLG-4K |
| Resolution | 4K |
| Power supply | Rechargeable lithium-ion battery (camera); Tripod battery 3.7 V 2500 mAh; CR2032 battery for remote control; AAA 1.5 V battery for microphone |
| Tripod dimensions | Height 200 mm, head 46 mm, width 40 mm |
| Tripod weight | Approximately 195 g |
| Maximum load capacity of tripod | Approximately 1 kg |
| Remote control distance | 10 meters maximum |
| Remote control battery | 3 V CR2032 |
| Microphone | Electrostatic condenser microphone, stereo, sensitivity -45 dB ±3 dB, response 50 Hz-16 kHz |
| Microphone power supply | AAA 1.5 V alkaline battery |
| Main functions | Photo, 4K video, slow motion, fast motion, loop recording, auto capture, digital zoom, built-in flash, self-timer |
| Storage media | microSD card (Class 10 or higher, not included) |
| Connectivity | USB (charging and transfer), external microphone jack, tripod output |
| Maintenance and cleaning | Wipe the lens and screen with a soft, clean cloth. Avoid dust and moisture. Store in a dry place below 30°C. |
| Safety | Do not expose to shocks, vibrations, extreme dust, humidity, direct sunlight, flames or high temperatures. Do not repair yourself. Household use only. |
| Battery life (microphone) | 20 to 30 hours |
| Tripod charging time | 3 to 4 hours |
| Adjustable angle of tripod | Vertical approximately 135°, horizontal 360° |
Frequently Asked Questions - Realishot VLG-4K AGFAPHOTO
User questions about Realishot VLG-4K AGFAPHOTO
0 question about this device. Answer the ones you know or ask your own.
Ask a new question about this device
Download the instructions for your Camera in PDF format for free! Find your manual Realishot VLG-4K - AGFAPHOTO and take your electronic device back in hand. On this page are published all the documents necessary for the use of your device. Realishot VLG-4K by AGFAPHOTO.
USER MANUAL Realishot VLG-4K AGFAPHOTO
natural_image
Black digital camera with tripod and screen displaying a woman's photo, set against a red background (no text or symbols visible)Vlogging Camera Bundle
Realishot VLG-4K
User manual
- Please do not insert other objects into the camera's card slot except the microSD card.
- When the camera is powered on for just few seconds, the image on display maybe not be stable. It is normal, not camera failure.
- Due to the optical performance of the lens, color dispersion may occur at the edge of the image. It is normal, not camera failure.
- The microSD card will get hot after using for a long time. It is normal, not camera failure.
- The camera's screen heats up after using the camera for a long time. It is normal, not camera failure.
- The camera does not have an auto focus function. To get the best picture, it is suggested to take a photo two meters away from the object.
- If the camera is not to be used for a long time, please take out the battery and put them in s dust-free and dry environment which temperature is less than 30°C.
- To make sure long battery life, please make sure the battery is fully discharged before storage.
- Please make sure the battery is charged and discharged at least one time every 3 months.
- If there is dust or dirt on the lens or display, please use a clean and soft lens cleaning cloth to wipe it softly.
- The camera is precise instrument, please prevent it from falling, knocking shaking, etc.
- Do not expose the unit to bumps, vibration, dust, or extreme humidity. This could lead to malfunctions, short circuits or damage to batteries and components.
-
Do not expose the unit to direct sunlight, flames or high temperatures.
-
Do not expose the unit to dripping water or splashes
- Do not use the unit if it does not operate normally.
- Do not repair the unit yourself. Only allow repairs to be carried out by a qualified person.
- This unit has been designed for domestic use only.
- The unit may only be used as described in this manual.
TRIPOD :
- Do not connect the output interface on the tripod with the input interface on the tripod
- Do not use this product in high temperature or humid environment.
- Do not dip the product into corrosive liquids. Please avoid impact, extrusion or fire.
- Do not disassemble this product.
- If the tripod haven't been used for a long time, it is recommended to discharge and fully charge the tripod every 3 months.
MICROPHONE :
- The microphone equipped with a professional condenser microphone core with high sensitivity, which needs to be protect from fall-off and strong strike.
- Keep the microphone in a dry and clean place if the microphone is not used for a long time.
- When the microphone stops working, please turn the power switch to "OFF" to save battery power. When it is not used for a long time, please remove the battery to prevent battery leakage and damage to the circuit.
- When the power is low, please replace the battery in time.
- To achieve good sound reception effect, please install the equipped windproof cover.
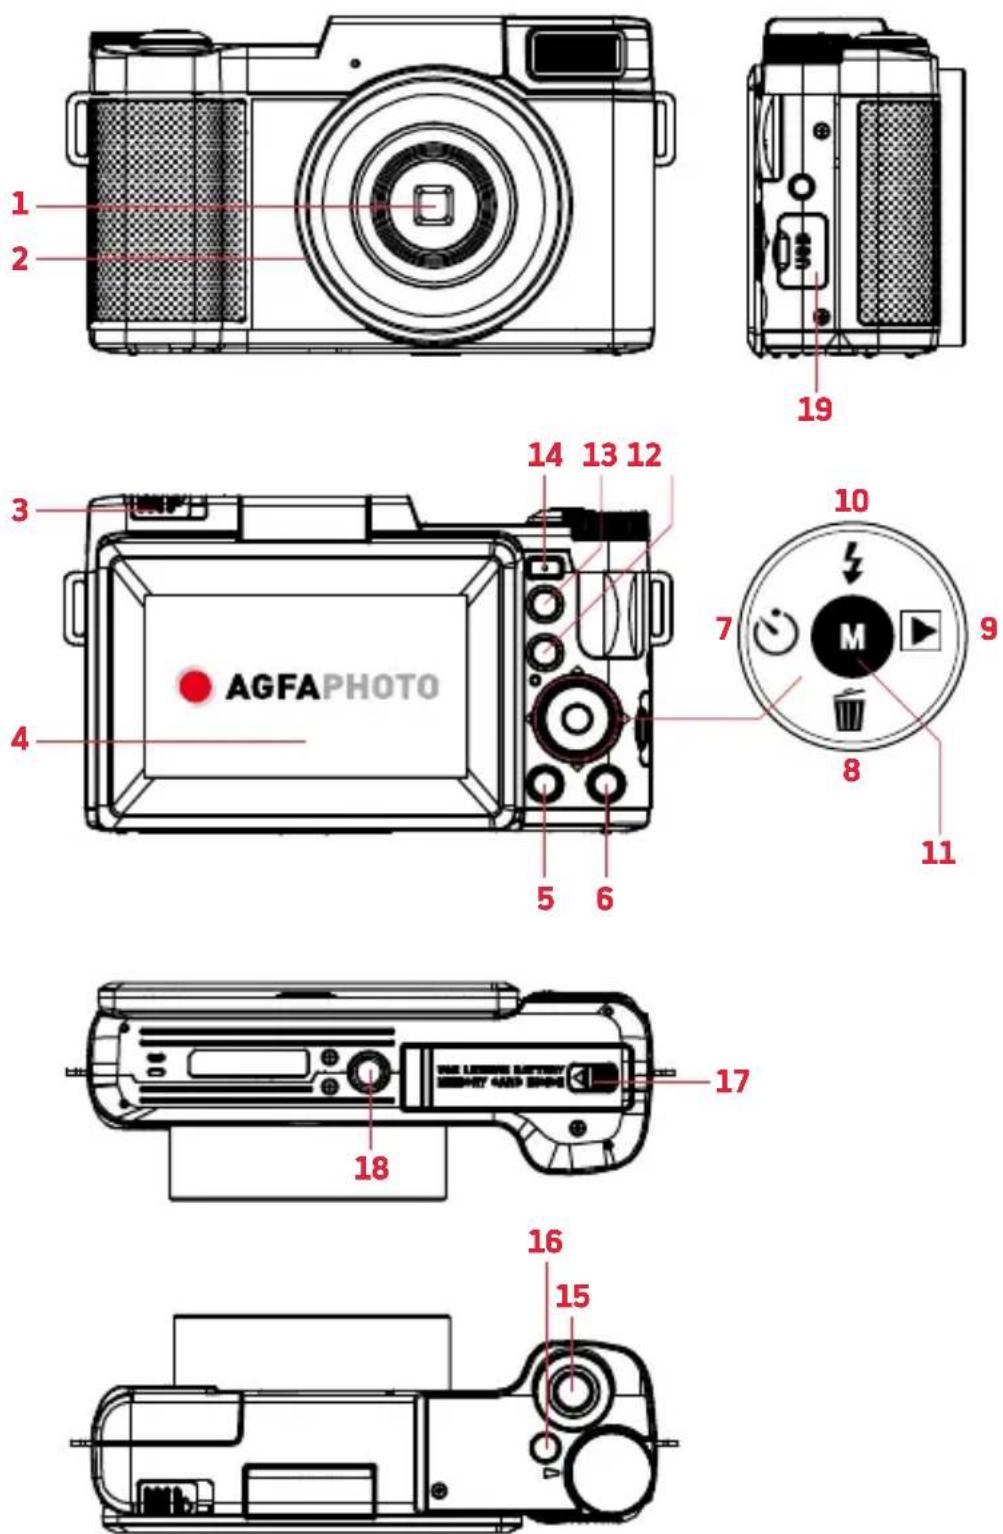
CAMERA
- Lens
- External lens interface
- Flash extend switch
- Display
- Display On/Off button
- Menu button
- Timer/Left button
- Delete/Down button
- Playback/Right button
- Flash/Up button
- Mode/OK button
- Zoom out button
- Zoom in button
- Macro button
- Shutter button
- Power button
- Battery door release
- Tripod mount socket
- USB port cover
HOW TO USE YOUR CAMERA
1. To open the Battery Door
Unlock the battery door by sliding the battery door notch away from the opening. Use a fingernail or other pointy object when sliding the latch to get a better grip.
2. Installing the Battery
Insert the lithium-ion battery into the battery compartment with the metal contacts facing the inside of the camera. The battery can only be inserted one way.
3. Installing the microSD card
Insert a microSD card to record and store your videos and photos. When the battery is low, media stored on the microSD card will not be erased. Please insert a microSD card by following the steps below:
1) Open the battery door.
2) Insert a microSD card. Ensure that the metal contacts are inserted first. Push the microSD card down until you hear an audible click.
The microSD card can only be inserted in one way. Do not force the card in if it will not go in smoothly.
3) Close the battery door by pushing it down and sliding the lock back into place. To remove the microSD card, simply push in and the card will pop up.
Note :
- Please format the microSD card before using the camera (Caution, this will erase all data on the card).
- Do not remove or insert the microSD card when recording. It may damage the card or cause data loss.
- MicroSD card rating must be Class 10 or above.
After closing the battery door, make sure that the door is closed securely and the lock is engaged.
4. Charging the Battery
Connect your camera with an AC adaptor and the USB cable. Insert the small end of the USB plug into the camera port under the battery door, and the larger end into the AC adaptor. While charging the LED indicator light will light up solid red, when finished charging the light will turn off.
5. Powering the Camera On/Off
Connect your camera with an AC adaptor and the USB cable. Insert the small end of the USB plug into the camera port under the battery door, and the larger end into the AC adaptor. While charging the LED indicator light will light up solid red, when finished charging the light will turn off.
1) Press and hold the Power button for 3 seconds to power the camera on. To power the camera off, press the Power button again.
2) If the camera's battery is low, a "Low Power" message will display on the screen and it will automatically shut down within a few seconds to prevent memory corruption or loss.
6. Formatting the Camera
1) Power on the camera, in Photo or Video mode, press the MENU Button to the main menu. Press the Up or down Button to switch to the System Settings menu. Press the Right Button, then press the Down Button to find format sub menu.
2) Press the Down Button to "Format", press Mode/OK Button to enter, and choose "OK". Press the Left or Right Button to choose "Yes [or No]", and press Mode/OK Button to confirm formatting.
Note: Formatting will delete all files stored on the microSD card. If you do not want to delete them, please either download them to your computer or use a fresh card.
BUTTONS AND FUNCTIONS

Photo Capture Button (Photo Mode)
Power on the camera, camera default is Photo Mode. In Photo Mode, Press T/W Button to move digital Zoom Slider to zoom in and out. Press Shutter Button to capture the image.

Video Capture Button [Video Mode]
In Photo Mode, press the Mode Button to choose Video Mode. Press Shutter Button to start video capturing and press it again to complete the video capture. Record video: during video recording, move the T/W digital Zoom Slider to zoom in and out.
![AGFAPHOTO Realishot VLG-4K - Video Capture Button [Video Mode] - 1](/content/2026/04/722815/images/bed16cfa981068ee935abf8764b55a0ef7f7d01009cacd50a4e19bb634168f94.jpg)
Playback Button (Playback Mode)
In Photo Mode or Video Mode, pressing the Playback Button, can direct you to Playback Mode. Press the button again to exit. When reviewing a video, press the Shutter Button to start playback. Press the Shutter Button to pause or continue video playback.

Delete Button
In Playback Mode, press Delete Button to quickly delete an image/video. Press Up or Down Button to select Yes/No. Press Mode/OK Button to confirm the selection.
SHOOTING MODE
In the photo or video mode, press the Mode/OK button to enter the shooting mode selection, press the Left or Right buttons to select the mode.
- Slow Photography: After entering the slow photography mode and starting to record, you can record the slow motion camera effect; the shooting size and rate can be set in the menu.
- Loop Recording: Entering loop recording, and start to record, you can record video after video, each video time can be set in the menu.
- Time-lapse video: Turn on the time-lapse video (interval video: take one frame every xx seconds and compose a video, the interval time can be set in the menu) and start recording. Can record time-lapse interval video.
- Automatically take pictures: Turn on automatic taking pictures (interval taking pictures) and press the camera button to start taking pictures. The camera will automatically take a picture at an interval and then press the camera button again to end the automatic picture. The interval time can be set in the menu).
MENU [Menu settings]
In photo or video mode, press the MENU Button to enter the menu interface, press the Up and Down Button to switch the shooting menu or set menu, press the Right Button to enter the sub-menu, press the Up or Down Button to select the required sub-menu and press Mode/OK Button to confirm. Press MENU to exit the menu.
Language Setting
This function allows you to set the camera's interface language.
1) In Photo Mode press the MENU button.
2) Press Up or Down Button to Select the Gear Icon.
3) Press the Right Button to enter the setup menu.
4) Select 'Language' using the Up or Down Button and press the Mode/OK button to enter the 'Language' menu.
EN
5) Press the Up or Down Button to switch between languages, and press the Mode/OK Button to confirm your selected language.
6) Press the MENU Button to exit the menu without making a selection.
Date Format
This function allows you to set the current Date and Time on your recorded video clips and captured photos.
1) In Photo Mode press the MENU button.
2) Press Up or Down Button to Select the Gear Icon.
3) Press the Right Button to enter the setup menu.
4) Select 'Date Format' using the Up or Down Button and press the Mode/OK button to enter the 'Date Format' menu.
5) Press the Up or Down Button to navigate the menu, and press the Mode/OK button to confirm your selected option.
6) Press the MENU Button to exit the menu without making a selection
Note: If there is no date and time for the photos or videos taken, please find the "time watermark" in the menu settings of taking photos and videos and press the Mode/OK button to select on or off.

Flashlight Button
In Photo Mode, press Up Button to switch back and forth between "Flash On" "Flash Off" and "Auto Flash".
Flash On ↓: When taking the photo, always flash.
Flash Off 📋: No flash when taking photos.
Auto Flash ↓: According to the environment around, flash automatically.
Note: The flash does not work in video mode.
CAMERA AND COMPUTER CONNECTION
After connecting the camera to a computer with a USB cable, the "Charging Mode" /"Mass Storage Mode" /"PC Camera" options appears on the screen. Press the up and Down Button to select, and press the Mode/OK Button to confirm the selection.
- MSDC(Storage): Select Mass storage mode, and find the related drive in the computer to review photos and videos.
- PCcamera: Choose PC Camera on display, press the Mode/OK Button to select. The camera could become a PC camera.
Note: If the PC camera can not be found on the computer, please open Skype or another similar application to test if the PC camera is available to use.
USE AN EXTERNAL MICROPHONE
The camera only supports the external microphone that comes with the factory. If the purchased camera is equipped with a microphone, insert the battery into the microphone according to the correct positive and negative poles and turn on the microphone switch, the indicator light will be on. Then plug the microphone into the headset port of the camera's external microphone, and start recording with the external microphone used for recording.
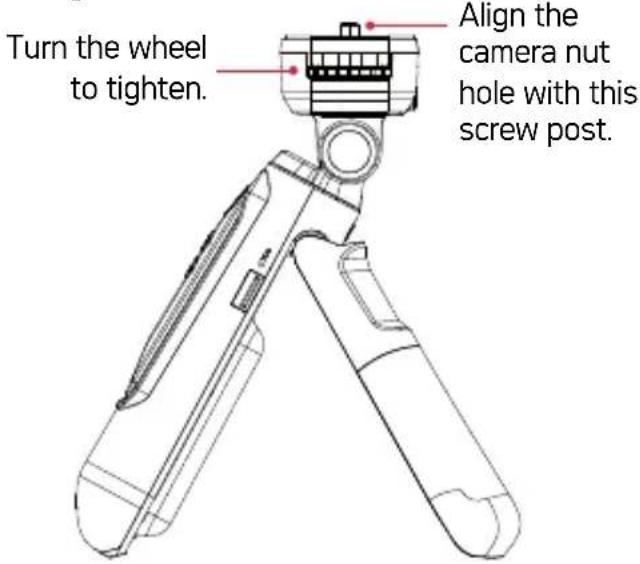
TRIPOD
CAMERA INSTALLATION
Align the nut hole of the camera with the screw post of the tripod and insert it, turn the wheel and tighten it.
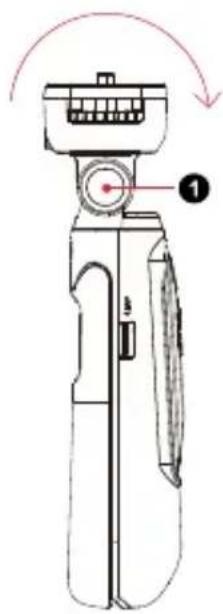
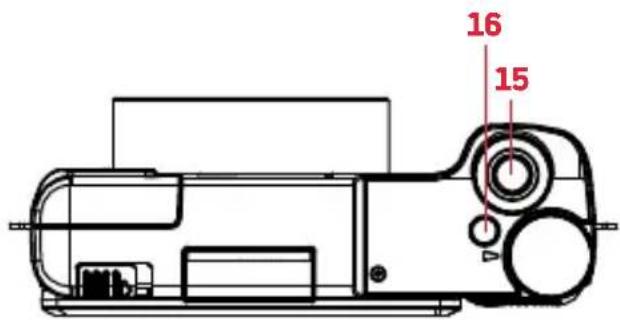
CAMERA ANGLE ADJUSTMENT
Press and hold the Vertical Adjustment Button ① and push the head of tripod. (The adjustable angle is about 135 degrees).
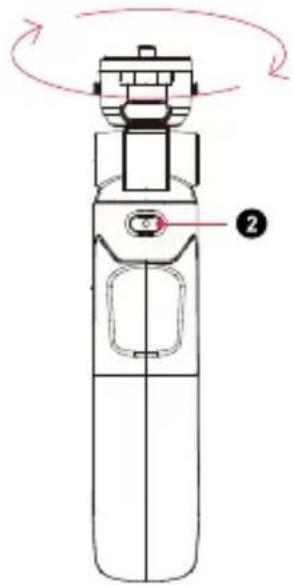
CAMERA DIRECTION ADJUSTMENT
Press and hold the Horizontal Adjustment Button 2 turn the head of tripod. (Adjustable angle 360 degrees).
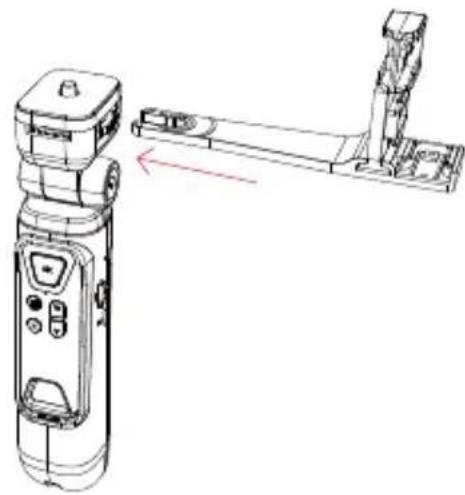
INSTALLATION OF EXTENSION BRACKET
As shown in the picture below, insert the extension bracket to install it. If it needs to be disassembled, just pull it out in the opposite direction (it can be installed in four directions).
natural_image
Technical line drawing of a handheld device with a vertical assembly and directional arrow (no text or symbols)CHARGING THE TRIPOD
Connect the USB cable to the tripod, then to a wall charger. During charging, the red indicator light is flashing. The red indicator light keeps on after the tripod is fully charged. (Charging time is 3-4 hours);
SUPPLY POWER TO THE CAMERA & OTHER EQUIPMENT
Insert the larger end of USB cable to the Output interface of the tripod, and connect the other end to the camera or the device to be charged. Turn on the power output switch of the tripod (turn it to the ON position), the blue indicator light will be on, which indicates the camera or device is being charged.
Note: The same USB cable cannot be connected to the output and input ports of the tripod at the same time.
REMOTE CONTROL
Functions: The remote control can be taken out from the tripod. Press the M Button to rotate the display. Hold and press the M Button, the camera turns to video or photo mode. Press the W/T Button to zoom, press Focus Button to focus. Press the OK button to take a photo or Video. The effective distance of the remote control is within 10 meters. (The camera needs to be installed with a memory card and powered on before being remotely controlled.)
Battery replacement : When the remote control battery is ran out (the button light is not bright enough or not bright), remove the screws on the back of the remote control, remove the battery cover, and take out the battery. Insert the new battery with the negative side facing down, and put the battery cover back.
SPECIFICATIONS
NAME PARAMETERS
| Tripod Vertical Adjustment Angle | About 135° |
| Tripod Horizontal Adjustment Angle | 360° |
| Tripod Battery 3.7V 2500mAh | |
| Input Voltage 5V(Micro) | |
| Input Current 1A | |
| Output Voltage 5V+/-0.3 | |
| Output Current 5V/1A | |
| Tripod Charging Time 3-4 Hours | |
| Tripod Size | H200*T46(Head)*W40mm |
| Tripod Load-bearing Within 1KG | |
| Tripod Weight About 195G | |
| Remote Control Distance | Within 10 meters |
| Remote Control Battery | 3V CR2032 |
MICROPHONE

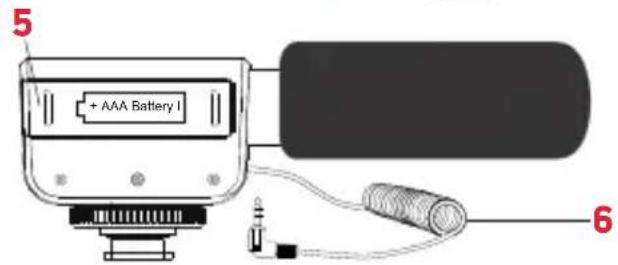
- Wind cap
- Tripod plug
- Indicator light
- Power Switch / dB Slider
- Battery cover
- 5 mm Audio cable
How to use your microphone
- Open the battery compartment, then install an AAA 1.5V battery correctly according to the positive and negative poles marked on the compartment.
- Mount the Tripod Plug to the base of Tripod and turn the connector clockwise to tighten it. Connect the microphone to the camera by inserting the Audio Cable to the camera.
- Plug the Audio Cable of the microphone into the MIC connector of the device and turn on the microphone Power Switch.
- Slide the Power Switch/dB Slider back and forth to turn on microphone and switch between 0dB and 20dB.
Note: If microphone is connected to camera and to be powered off, no sound will be recorded.
SPECIFICATIONS
| Channel | Stereo |
| Use Voltage | AAA 1.5V Alkaline battery |
| Output impedance | 200Ω±30% (at 1kHz) |
| Battery life | 20~30 hours. |
| Maximum sound pressure level | 130dB (THD ≤1.5% at 1kHz) |
| Microphone | Electrostatic capacitor microphone |
| Frequency response | 50HZ-16kHz |
| Sensitivity enhancement | +20dB±2dB |
| Sensitivity | -45dB±3dB(0dB=1V/Pa at 1kHz) |
| Equivalent noise level | 24dB A |
REMARQUES DE SÉCURITÉ
APPAREIL PHOTO :
- Bouton Lecture/Droit

- Bouton Flash/Haut

- Bouton Mode/OK

Bouton de capture photo (mode photo)
Bouton Lecture (mode Lecture)
RÉGLAGE DIRECTION DE L'APPAREIL PHOTO
INSTALLATION DU SUPPORT D'EXTENSION
natural_image
Technical line drawing of a handheld device with a vertical assembly and a left-side component (no text or symbols)CHARGER LE TRÉPIED
natural_image
Technical line drawing of a handheld device with a left-side assembly and a right-side component (no text or symbols)AUFLADEN DES STATIVS
natural_image
Technical line drawing of a handheld device with a vertical assembly and directional arrow (no text or symbols)CARGA DEL TRÍPODE

COME USARE LA FOTOCAMERA
INSTALLAZIONE DELLA STAFFA DI PROLUNGA
natural_image
Technical line drawing of a handheld device with a left-side assembly view (no text or symbols)CARICA DEL TREPPIEDE
natural_image
Technical line drawing of a handheld device with a left-side assembly and a right-angle view (no text or symbols)CARREGAR O TRIPÉ
natural_image
Technical line drawing of a handheld device with a left-side assembly view (no text or symbols)HET STATIEF OPLADEN
REGULACJA KIERUNKU USTAWIENIA APARATU
MONTAŻ WSPORNIKA PRZEDŁUŻAJĄCEGO
natural_image
Technical line drawing of a handheld device with a vertical assembly and left-side motion indicator (no text or symbols)ŁADOWANIE STATYWU
NASTAVENÍ SMĚRU KAMERY
INSTALACE PRODLUŽOVACÍHO DRŽÁKU
natural_image
Technical line drawing of a handheld device with a left-side assembly and a red arrow indicating direction (no text or symbols)NABÍJENÍ STATIVU
A HOSSZABBÍTÓ KONZOL FELSZERELÉSE
natural_image
Technical line drawing of a handheld device with a vertical assembly and left-side motion indicator (no text or symbols)AZ ÁLLVÁNY TÖLTÉSE
Notice of compliance for the European Union
Products bearing the CE mark comply with the applicable European directives and associated harmonised European standards.
Disposal of waste equipment by users in the European Union
This symbol means that according to local laws and regulations it is prohibited to dispose of this product with household waste. Instead it is your responsibility to protect the environment and human health by handing over your used device to a designated collection point for the recycling of waste electrical and electronic equipment. For more information about where you can drop off your waste equipment for recycling please contact your local city office, your household waste disposal service or the shop where you purchased the product.

Product manufactured for and distributed by :
GT COMPANY - 5 rue de la Galmy - 77700 Chessy -
France - +33 (0) 1.61.10.09.25 - www.gtcompany.fr
GT COMPANY UK LTD - 11 Old Jewry -
EC2R 8DU LONDON - UNITED KINGDOM
AgfaPhoto is used under license of Agfa-Gevaert NV. For this product a sub-license has been granted by AgfaPhoto Holding GmbH (www.agfaphoto.com). Neither Agfa-Gevaert NV nor AgfaPhoto Holding GmbH manufacture this product or provide any product warranty or support. For service, support and warranty information, contact the distributor or manufacturer.