
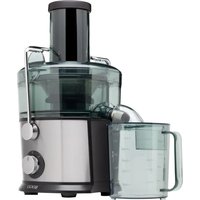
SS-5535 - Blender Sogo - Free user manual and instructions
Find the device manual for free SS-5535 Sogo in PDF.

| Product type | Blender |
| Brand | Sogo |
| Model | SS-5535 |
| Power | 1400 W |
| Voltage / Frequency | 220-240 V ~ 50/60 Hz |
| Bowl capacity | 1.7 L (glass) |
| Body material | Stainless steel |
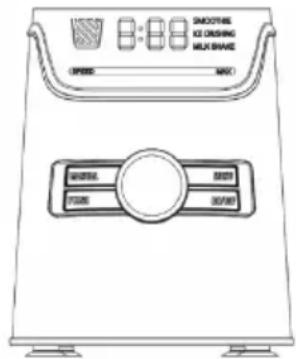
| Display | LED panel |
| Speeds | 6 variable speeds + pulse |
| Preset programs | Smoothie, Ice Crush, Milkshake |
| Pulse function | Yes, with progressive acceleration |
| Overheat protection | Yes, automatic shut-off |
| Assembly safety | Operation only if the bowl is correctly placed |
| Blades | Sharp stainless steel blades |
| Removable bowl | Yes, removable for cleaning |
| Cleaning | Removable parts washable with water; wipe the main body with a damp cloth |
| Standby consumption | < 0.5 W |
| Off consumption | < 0.3 W |
| Weight | Not specified (estimated: ~3 kg) |
| Dimensions | Not specified |
| Country of manufacture | China |
| Importer | Sanysan Appliances S.L., Valencia, Spain |
| After-sales service | www.sogosat.com / 0034 902 222 161 |
Frequently Asked Questions - SS-5535 Sogo
User questions about SS-5535 Sogo
0 question about this device. Answer the ones you know or ask your own.
Ask a new question about this device
Download the instructions for your Blender in PDF format for free! Find your manual SS-5535 - Sogo and take your electronic device back in hand. On this page are published all the documents necessary for the use of your device. SS-5535 by Sogo.
USER MANUAL SS-5535 Sogo
natural_image
SOGO blender with digital display and black handle, no visible text or symbols on the device itself.
Descarga tu manual
Download your manual
Téléchargez votre manuel
Baixe seu manual
Laden Sie Ihr Handbuch herunter
Scarica il tuo manuale
Stáhněte si manuál
Download din manual
Prenesite svoj priročnik
Preuzmite svoj priručnik
Pobierz swoją instrukcję
Descârcați manualul dvs
Завантажте посібник
Descàrrega el teu manual
BATIDORA DE VASO
GLASS JAR BLENDER
MIXEUR À BOCAL EN VERRE
MEŠALNIK V STEKLENEM KOZARCU
BLENDER U STAKLENOJ POSUDI
SZKLANY BLENDER SŁOIKOWY
BLENDER CU BORCAN DE STICLÄ
Declaration of conformity, Responsibility of Electronic products disposal, Importers Details and After-sales service on the last pages.
natural_image
Line drawing of a portable blender with label pointing to the number 8 (no text or symbols on the device itself)5. CÓMO UTILIZAR EL APARATO
natural_image
Line drawings of a two-step blender with a side panel showing the blade and handle (no text or symbols)MANTENIMIENTO Y LIMPIEZA:
• Always read the instruction book carefully before using.
- This manual can be downloaded from our web page www.sogo.es
- Keep these instructions for future reference.

fety instructions for the user
GENERAL PRECAUTIONS
General precautions during the use of electrical equipment
- Do not use the appliance for any other purpose than described in this manual.
- Do not use or store the appliance outdoors.
• Always place the appliance on to the flat and even surface. - The unit must be used only for the intended purposes. No liability is accepted for damages arising from improper use or wrong handling. Misuse or improper handling may cause problems in the appliance and cause injury to the user.
- This appliance is intended to be use used in household and similar applications.
- Ensure that the voltage indicated on the nameplate matches the mains voltage before plugging in the appliance.
- Always remove the plug from the power socket when the appliance is not in use. Do not leave the appliance unattended when switched on.
- Close supervision is necessary when any appliance is being used by or near children.
- Before cleaning or storing your appliance, always unplug the appliance from the power supply and let it cool down.
- The device is not completely disconnected from the power source, even after it has been turned off. To disconnect it completely, disconnect it from the mains plug.
- The appliances are not intended to be operated by means of an external timer or separate remote-control system.
- This appliance is intended to be used in household and similar applications such as:
- staff kitchen areas in shops, offices and other working environments;
- farm houses;
- by clients in hotels, motels and other residential type environments;
- bed and breakfast type environments

Restrictions on use to avoid personal injury
- Do not place or operate this appliance near water sources.
- Do not place or operate the appliance and its power cord on or near hot surfaces (e.g., stove plates) or open flames.
- Do not leave the power cord hanging from sharp edges and keep away from hot objects and flames. Do not wind the cord around the appliance and do not bend it.
- Never use accessories that are not recommended by the manufacturer.
- The use of accessories not recommended or sold by the appliance manufacturer may result in fire, electric shock or injury to persons.
- When you want to remove the plug from the wall contact, please do this at the plug itself and not by pulling on the cable or the appliance itself.
- To avoid electric shock, make sure your hands are dry before plugging or unplugging.
- Do not use the device with wet hands, on damp floors or when the atmosphere is humid, there is a risk of electric shock.
- Never immerse the appliance or the plugin water or any other liquid. In the event of the appliance falling in water, disconnect immediately from the mains supply and take it to an authorized service agent for repair before reusing.
- Do not use the appliance if it has fallen on the floor, if there are visible signs of damage or if it has a leak.
- Do not use the appliance if the cable or plug is damaged. In case of the cord be damaged, it must be replaced only by the manufacturer, its service agent or similarly qualified persons in order to avoid Hazard.
- In case of appliance malfunction, or if it has been damaged in any manner, return the appliance to the nearest authorized service facility for examination, repair or adjustment.

Restrictions on use when used with children and elders
- Children should be supervised to ensure that they do not play with the appliance.
- Keep the appliance and its cord out of the reach of the children.
• Children shall not play with the appliance.
- Cleaning and user maintenance shall not be made by children without supervision.
- Do not allow the children to use the appliance.
- Appliances can be used persons with reduced physical, sensory or mental capabilities or lack of experience and knowledge if they have been given supervision or instructions concerning use of the appliance in a safe way and understand the hazards involved.
- This appliance is not intended for use by persons (including children) with reduced physical, sensory or mental capabilities, or lack of experience and knowledge, unless instructed concerning use
of the appliance by a person responsible for their safety

Instructions to follow when using the appliance
- Before using the product, make sure that all the components are properly installed, and confirm that the voltage is consistent with the specifications of the product. Unplug the power plug from the socket when not in use.
- Operation without load and under overloaded conditions is strictly prohibited. Do not operate the machine beyond its capacity.
- Wait until all parts are stopped before removing the jug, or the small cup assembly.
- This appliance has overheating protection. If it overheats, it will automatically stop running and cannot be restarted until it cools down. Turn off and unplug the unit and allow it to cool down before using.
- The appliance cannot be used for blending hard and dry substance, otherwise the blades might get blunt.
• Always disconnect the blender from the mains when it is left unattended and before assembling, disassembling or cleaning. - Be careful if hot liquid is poured into the food processor or blender, as it can be ejected out of the appliance due to the sudden steaming.
- Never remove the lid until the knife has stopped completely.
- This appliance is designed to process small quantities. Do not exceed the quantities indicated in these instructions for use.
- Do not use this appliance to mix glutinous food or substance.
WARNING: The blades are very sharp!
- Avoid contacting moving parts of the appliance while in function.
- Turn off the appliance and disconnect from the mains supply before changing accessories or approaching movable parts in use.
- Care must be taken when handling the sharp blades, emptying the bowl and during cleaning.
- Do not connect the appliance to the mains until it is completely assembled and always disconnect the appliance before disassembling or handling the blade.
- Keep hands and utensils out of container while blending to reduce the risk of severe injury to persons or damage to the blender. A scraper may be used but must be used only when the blender is not running.
- To reduce the risk of injury, never place cutting blade on base without mounting with the jar properly.
- The unit is equipped with a security function. The unit can only be switched on if the jug is put on the motor base properly. If the unit cannot be switched on, pull the power cable and check the
connection between jug and engine base.
- CAUTION: Do not operate the unit when empty.
CAUTION: Do not put hot ingredients into the jar. Before food preparation, allow food to cool down for a few minutes.
- CAUTION: Before you eat or serve blended food, please
always check for ingredients that might have not been blended adequately.
- CAUTION: Maximum time of food processing should not
exceed 1 Minute of continuous use. The three Preset functions and the Pulse functions finish their working under 1 minute. In case your food which needs to be blended further to achieve the required smoothness, use the appliance with any present function or with intermediate speed with 10 second pauses to avoid permanent damage to the motor.
- To avoid a circuit overload when using this product, do not operate another high-wattage product on the same electrical circuit.
- A short power supply cord is provided with this product. An extension cord is not recommended for use with this product, but if one must be used:
- The marked electrical rating of the cord must be at least as great as that of the product.
- Arrange the extension cord so that it does not hang where it can be tripped over or pulled unintentionally.
- Installation of a spike protector will offer additional protection with a nominal trigger current of not more than 30 Ma in the house installation. Please consult your installing electrician.
CLEANING AND MAINTENANCE
Kindly refer to the cleaning and maintenance section for details on how to clean surfaces which comes in the contact of food.
- TECHNICAL SPECIFICATIONS
| Voltage Frequency Power | |
| AC 220-240V 50-60Hz 1400W |
Body: Stainless Steel Body blender.
Display: LED display Panel.
Speeds: Variable 6 speed control.
Pre-programs set: For Smoothie, Ice-crush and milk shake.
Glass jar capacity: 1.7 Ltr.
This product complies with EU regulation 2023/826 under directive 2009/125/EC on the Eco design requirements.
Power consumption in off mode: <0.3W
Power consumption in standby mode: <0.5W
Time after which the product enters into off mode: 2 mins.
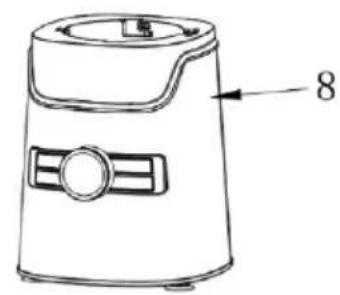
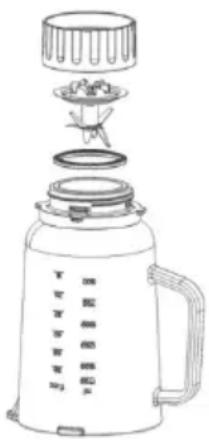
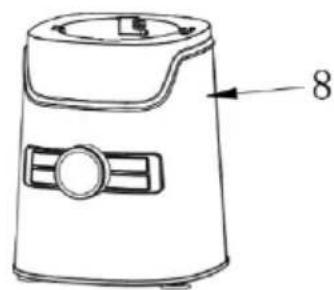
4. PARTS OVERVIEW
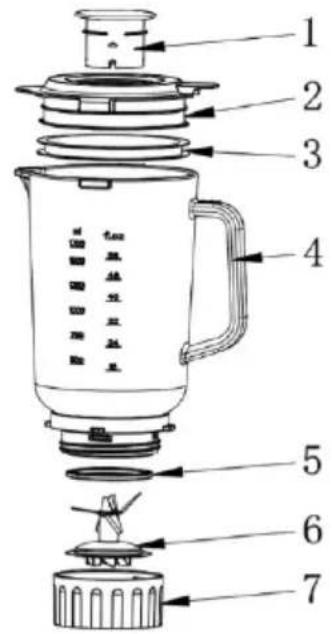
1- Measuring cup.
2- Blender Cover.
3- Seal Ring.
4- Blender Glass Jug.
5- Glass Base Seal ring.
6- Glass Jug Blade.
7- Glass Jug Base.
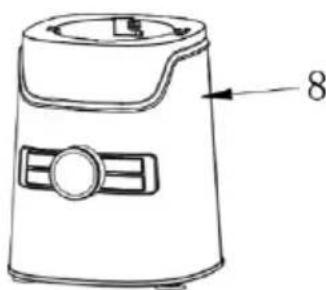
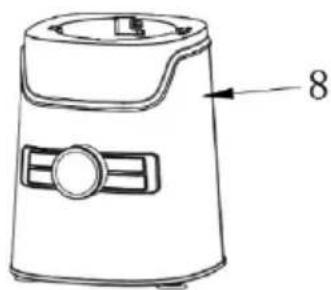
8- Main Body.
natural_image
Line drawing of a portable blender with label pointing to the number 8 (no text or symbols on the device itself)5. HOW TO USE THE APPLIANCE
natural_image
Line drawing of a blender with handle and side panel, showing internal structure and motion indicator (no text or symbols)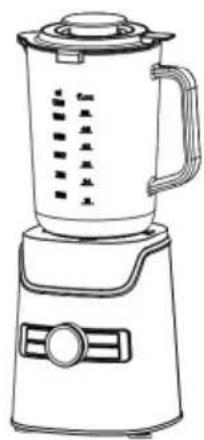
natural_image
Line drawing of a modern blender with control panel and side buttons (no text or symbols)- specified in the specifications.
- After plugging in, the icons on the upper screen will flash, indicating Place the appliance on a flat, dry and stable surface.
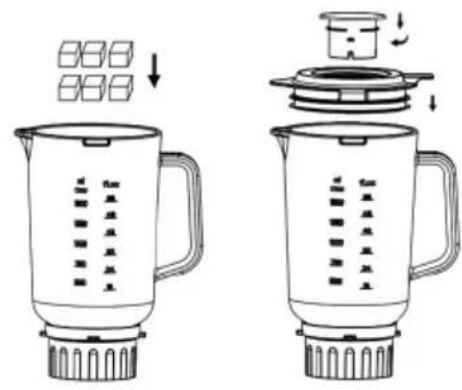
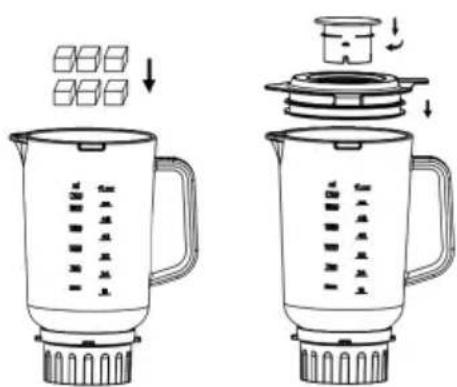
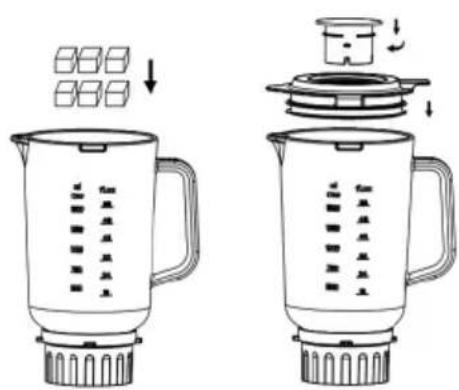
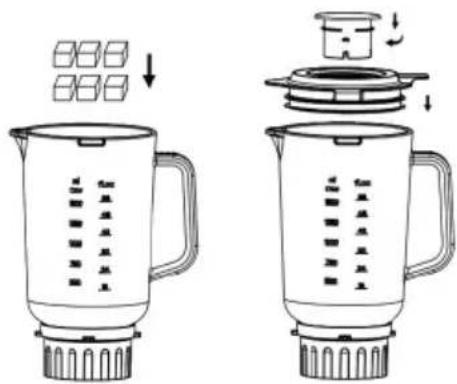
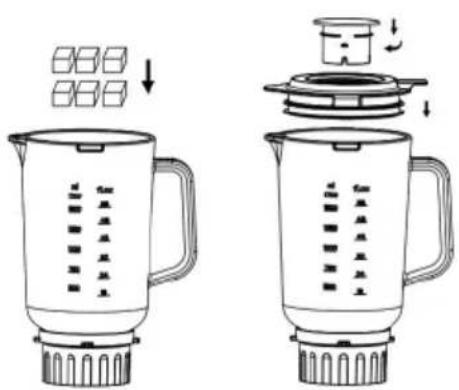
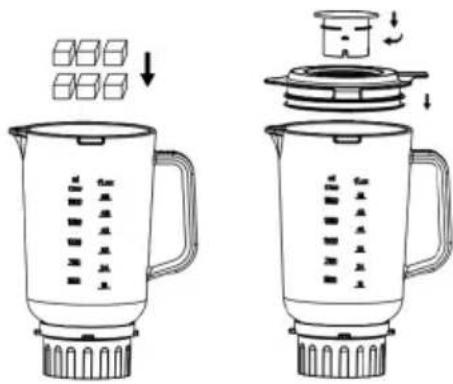
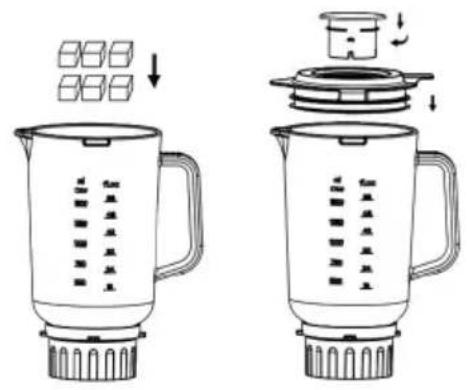
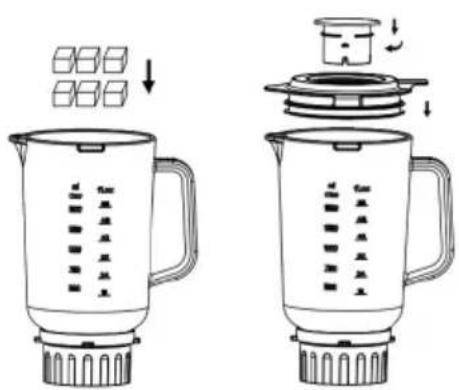
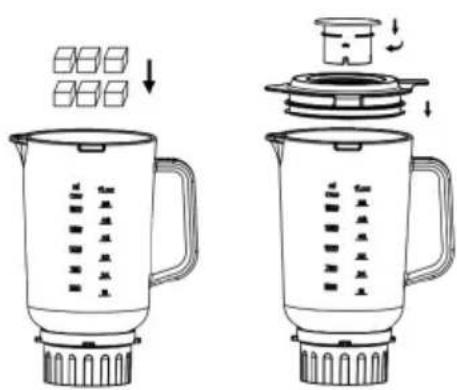
- Clean the blender jug, ensuring that there is no other debris. Cut the fruit into 15 x 15 x 15 mm (MAXIMUM SIZE) cubes, then put it into the blender and add the appropriate amount of water (NOTE: NO MORE THAN 1700 ml).
- Push the cap and cover onto the jug.
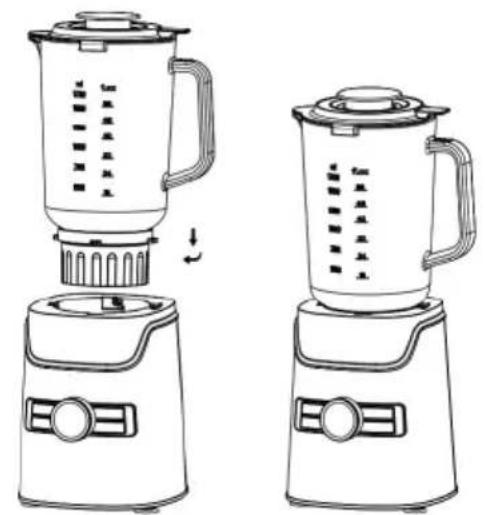
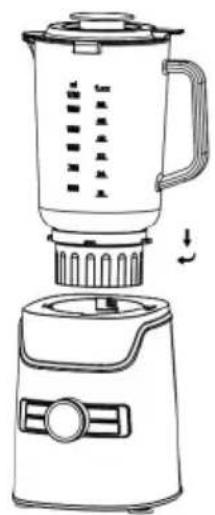
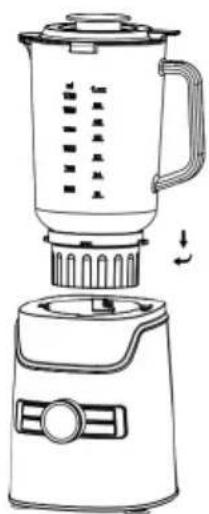
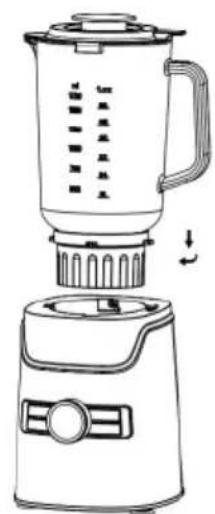
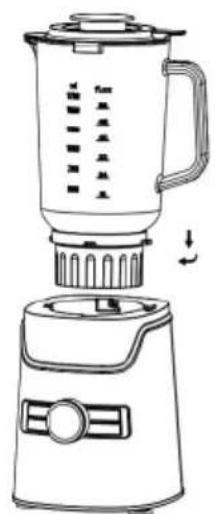
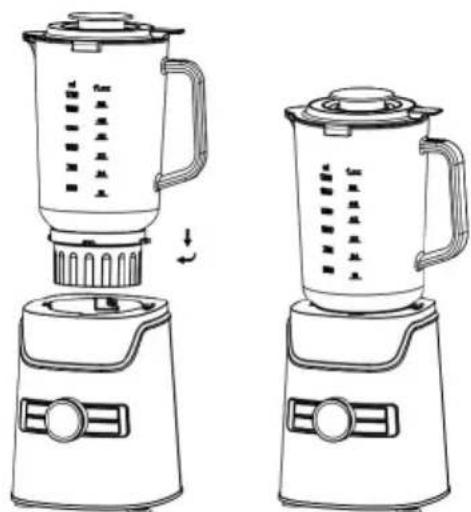
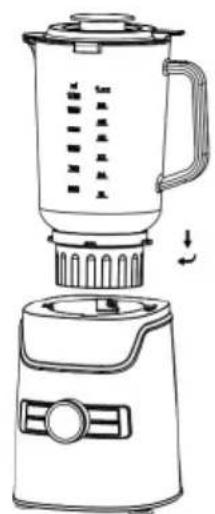
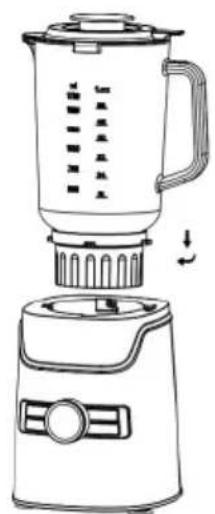
- Place the blender with the cover onto the main body and turn it clockwise until it stops.
- Plug the power cord into a power source that meets the requirements that the machine is in standby mode. You can select the quick programs Smoothie, Ice crush or Milk Shake according to the preparation by pressing the MENU key.
1- Smoothie function: This function runs for total 1 minute with 2 times auto pause and resume during that 1-minute run time.
2- Ice Crush function: This function has a run time of 50 seconds in which it will take few pauses for first 25 seconds and resume continuously for rest of time period.
3- Milk Shake: This function runs for total 1 minute with 2 times auto pause and resume during that 1-minute run time.
4- Pulse Function: Turn the knob towards Pulse function to start Pulse action and if you keep or hold the knob at the Pulse position, its speed will increase gradually.
5- Manual / Normal Function: Rotate the knob to start Normal function. Rotate the knob clockwise to increase the speed and rotate the knob Anti-clockwise to decrease the speed.
Note: in all the processes LED speed bar keep showing the speed process during function.
- Then press the ON/OFF key and the machine will start working until the program is completed. ON/OFF button is also used to pause the process and to stop the process and to switch off the appliance. You can also press the MANUAL key and rotate the knob clockwise to select the desired speed (the speed ranges from 1 to 6, with 1 being the lowest and 6 highest).
Note: The speed bar keeps showing the speed of the appliance.
- If you pause the process, the power icon blinks on the screen for few seconds and we can also restart the process by pressing the ON/OFF button.
Note: If the appliance is left idle for 2 minute, it's screen will turn off automatically.
- If you need to add food or water during the mixing process, pause the operation by pressing the ON/OFF button and remove the measuring cup on the top of blender by turning counter clockwise and add the ingredients through the middle feeding chute.
- Remove the blender jug, remove the processed food.
• After using, please unplug the power plug, wash the jug and dry it.
Note: This machine is not equipped with a safety protection function. Do not open the blender cover during operation.
DISASSEMBLY AND ASSEMBLY OF JAR:
1- Place the Glass Jug upside down on a flat work surface, and rotate the Jug counterclockwise to remove the Glass Jug Base, Glass Jug Blade, and Glass Base Seal ring, as shown in below.
2- To install the Glass Jug, reverse the process and insert the Glass Jug Blade and Glass Base Seal Ring into the Glass Jug Base, then rotate the Glass Jug Base clockwise and insert it into the Glass Jug.
Note: Be careful of the sharp blade. Do not forget to install the Glass Base seal ring and tighten the Glass Jug base clockwise.
MAINTENANCE & CLEANING:
1- Unplug the power plug to avoid electric shock before cleaning or wiping the machine (never immerse the motor unit in water for cleaning).
2- Except for the main body, all detachable parts can be cleaned with water; the water should be wiped off immediately after cleaning.
3- Clean the motor base with a soft, wet piece of cloth and some mild cleaning agent.
4- When cleaning the blender jug, you can add an appropriate amount of warm water and detergent to the cup, switch the knob to position 'P' to stir for a few seconds. Then take out the blender jug and rinse it under the tap. Dry all parts after washing.
5- Store in a dry and ventilated place.
6- Do not use abrasive cleaners on the unit.
7- Do not clean Motor main body, power cord and plug with water.
WARNING: Do not to touch the sharp blade. When clean, please wipe by dishcloth, to avoid any type of injury.
WARNING: Do not put hot ingredients into the jar. Before any food preparation, allow food to cool down for a few minutes
CAUTION: Before you eat or serve blended food, please always check for ingredients that might have not been blended adequately.
CAUTION: Maximum time of food processing should not exceed 1 Minute of continuous use. In case the food which needs to be blended further to achieve the required smoothness use the appliance dividing in various cycles with few second pauses in between each cycle to avoid permanent damage to the motor.
6. TROUBLE SHOOTING
| Problem Cause Solution | ||
| Machine does not work | Unit is not plugged | Ensure the power plug is plugged properly. |
| Blender jug is not assembled correctly. | Ensure correctly assembly: Please refer to the assembly instructions. |

PORTANT:
natural_image
Line drawing of a portable blender with label pointing to the number 8 (no text or symbols on the device itself)5. COMMENT UTILISER L'APPAREIL


natural_image
Line drawing of a blender with handle and side panel, no text or symbols present
natural_image
Line drawing of a blender with control panel and side buttons (no text or symbols)
natural_image
Line drawing of a portable blender with label pointing to the number 8 (no text or symbols on the device itself)5. COMO UTILIZAR O APARELHO

natural_image
Line drawing of a blender with a side panel and control knob (no text or symbols)
natural_image
Line drawing of a blender with control knob and handle (no text or symbols)
natural_image
Line drawing of a portable blender with label pointing to the number 8 (no text or symbols on the device itself)5. SO VERWENDEN SIE DAS GERÄT

natural_image
Line drawing of a blender with handle and side panel, showing internal structure and motion indicator (no text or symbols)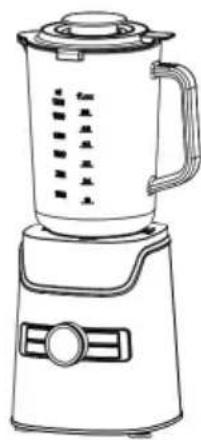
natural_image
Line drawing of a modern blender with handle and control knob (no text or symbols)
natural_image
Line drawing of a portable blender with label pointing to the number 8 (no text or symbols on the device itself)5. COME UTILIZZARE L'APPARECCHIO:

natural_image
Line drawing of a blender with handle and side panel, no text or symbols present
natural_image
Line drawing of a blender with control knob and handle (no text or symbols)
natural_image
Line drawing of a portable blender with label pointing to the number 8 (no text or symbols on the device itself)5. JAK POUŽÍVATSPOTŘEBIČ
natural_image
Line drawing of a blender with handle and side panel, showing internal structure and motion indicator (no text or symbols)
natural_image
Line drawing of a blender with control knob and side buttons (no text or symbols)DEMONTÁŽ A MONTÁŽ NÁDOBY
ÚDRŽBA A ČIŠTĚNÍ
natural_image
Line drawing of a portable blender with label pointing to the number 8 (no text or symbols on the device itself)5. SÄDAN BRUGER DU APPARATET

natural_image
Line drawing of a blender with handle and side panel, showing internal structure and motion indicator (no text or symbols)
natural_image
Line drawing of a blender with control buttons and a handle (no text or symbols)VEDLIGEHOLDELSE OG RENG∅RING

natural_image
Line drawing of a portable kitchen appliance with a labeled part (8), no text or symbols present.5. KAKO UPORABLJATI NAPRAVO
natural_image
Line drawing of a two-step kitchen blender with side and front views (no text or symbols)- Napravo postavite na ravno, suho in stabilno površino.
- Očistite vrč mešalnika in poskrbite, da v njem ni drugih odpadkov. Sadje narežite na kocke (MAKSIMALNA VELIKOST), nato ga dajte v mešalnik in dodajte ustrezno količino vode (velikosti 15 x 15 x 15 mm OPOMBA: NE VEČ KOT 1700 ml).
- Na vrč nataknite pokrovček in pokrovček.
- Mešalnik s pokrovom na glavno telo in ga zavrtite v smeri urinega kazalca, dokler se ne ustavi. postavite
VZDRŽEVANJE IN ČIŠČENJE
natural_image
Line drawing of a kitchen blender with label pointing to the number 8 (no text or symbols on the device itself)5. KAKO KORISTITI UREĐAJ

natural_image
Line drawing of a two-step kitchen blender with a side panel showing the blade and handle (no text or symbols)- Postavite uređaj na ravnu, suhu i stabilnu površinu.
- Očistite vrč blendera, pazeći da nema drugih nečistoća. Voće narežite na kockice 15 x 15 x 15 mm (MAKSIMALNE VELIČINE), zatim ga stavite u blender i dodajte odgovarajuću količinu vode (NAPOMENA: NE VIŠE OD 1700 ml).
• Gurnite čep i poklopac na vrč. - Postavite blender s poklopcem na glavno tijelo i okrenite ga u smjeru kazaljke na satu dok se ne zaustavi.
- Priključite kabel za napajanje u izvor napajanja koji zadovoljava zahtjeve navedene u specifikacijama.
- Nakon uključivanja, ikone na gornjem zaslonu će treperiti, pokazujući da je uređaj u stanju pripravnosti. Možete odabrati brze programe Smoothie, Ice crush ili Milk Shake prema načinu pripreme pritiskom na tipku IZBORNIK.
1- Smoothie funkcija: Ova funkcija radi ukupno 1 minutu s 2 puta automatskom pauzom i nastavkom tijekom tog 1-minutnog vremena rada.
2- Funkcija drobljenja leda: Ova funkcija ima vrijeme izvođenja od 50 sekundi u kojem će trebati nekoliko pauza za prvih 25 sekundi i nastaviti kontinuirano do kraja vremenskog razdoblja.
3- Milk Shake: Ova funkcija radi ukupno 1 minutu s 2 puta automatskom pauzom i nastavkom tijekom tog 1-minutnog vremena rada.
4- Funkcija Pulse: Okrenite gumb prema funkciji Pulse kako biste pokrenuli radnju Pulse i ako držite ili držite gumb u položaju Pulse, njegova brzina će se postupno povećavati.
5- Ručna/normalna funkcija: Okrešite gumb za pokretanje normalne funkcije. Okrenite gumb u smjeru kazaljke na satu za povećanje brzine i okrenite gumb suprotno od kazaljke na satu za smanjenje brzine.
ODRŽAVANJE I ČIŠĆENJE

natural_image
Line drawing of a portable blender with label pointing to the lid (no text or symbols on the device itself)5. JAK KORZYSTAĆ Z URZĄDZENIA
natural_image
Line drawing of a blender with handle and side panel, showing internal structure and motion indicator (no text or symbols)
natural_image
Line drawing of a blender with control knob and side buttons (no text or symbols)KONSERWACJA I CZYSZCZENIE
natural_image
Line drawing of a portable blender with label pointing to the lid (no text or symbols on the device itself)5. CUM SĂ UTILIZAȚI APARATUL


natural_image
Line drawing of a blender with handle and side panel, showing internal structure and motion indicator (no text or symbols)
natural_image
Line drawing of a modern blender with control panel and side buttons (no text or symbols)ÎNTRETINERE ŞI CURĂTARE
natural_image
Line drawing of a portable blender with label pointing to the number 8 (no text or symbols on the device itself)
natural_image
Line drawing of a blender with handle and side panel, showing internal structure and motion arrows (no text or symbols)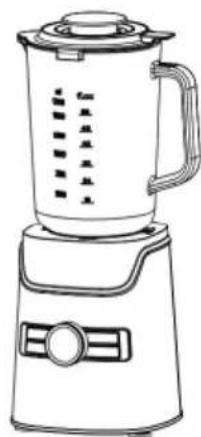
natural_image
Line drawing of a blender with control panel and side buttons (no text or symbols)
natural_image
Line drawing of a portable blender with label pointing to the lid (no text or symbols on the device itself)5. COM UTILITZAR L'APARELL
natural_image
Line drawing of a blender with handle and side panel, showing internal structure and motion indicator (no text or symbols)
natural_image
Line drawing of a blender with control knob and side buttons (no text or symbols)MANTENIMENT I NETEJA
DÉCLARATION DE CONFORMITÉ
DECLARATION OF CONFORMITY
This device complies with EU Low Voltage Directive 2014/35/EC.
Electromagnetic Compatibility Directive 2014/30/EU. Directive 2015/863/EU on the restriction of the use of certain hazardous substances in electrical.
Directive 2009/125/EC on the eco-design requirements applicable to energy-related products.

This symbol on the product or on the packaging indicates that this product can't be disposed as normal rubbish or household waste. All the electrical, electronic equipment's and battery-operated units must recycle in proper manner and according to the local municipal laws. You can recycle them by taking them to government authorized disposal centres or specialized bins which you can find in any nearby big super markets, electronics or electro domestics products stores or malls who have these types of facilities available.
Designed by: SOGO based on European quality standards Imported by: Sanysan Appliances S.L, NIF: B98753056, C/ Barcas 2, 2, 46002 Valencia, Spain Product manufactured in CHINA. After-sales service: www.sogosat.com sogosat@sogosat.com / 0034 902 222 161


- CÓMO UTILIZAR EL APARATO
- MANTENIMIENTO Y LIMPIEZA:
- fety instructions for the user
- GENERAL PRECAUTIONS
- General precautions during the use of electrical equipment
- Restrictions on use to avoid personal injury
- Restrictions on use when used with children and elders
- Instructions to follow when using the appliance
- WARNING: The blades are very sharp!
- CLEANING AND MAINTENANCE
- PARTS OVERVIEW
- HOW TO USE THE APPLIANCE
- DISASSEMBLY AND ASSEMBLY OF JAR:
- MAINTENANCE & CLEANING:
- TROUBLE SHOOTING
- PORTANT:
- COMMENT UTILISER L'APPAREIL
- COMO UTILIZAR O APARELHO
- SO VERWENDEN SIE DAS GERÄT
- COME UTILIZZARE L'APPARECCHIO:
- JAK POUŽÍVATSPOTŘEBIČ
- DEMONTÁŽ A MONTÁŽ NÁDOBY
- ÚDRŽBA A ČIŠTĚNÍ
- SÄDAN BRUGER DU APPARATET
- VEDLIGEHOLDELSE OG RENG∅RING
- KAKO UPORABLJATI NAPRAVO
- VZDRŽEVANJE IN ČIŠČENJE
- KAKO KORISTITI UREĐAJ
- ODRŽAVANJE I ČIŠĆENJE
- JAK KORZYSTAĆ Z URZĄDZENIA
- KONSERWACJA I CZYSZCZENIE
- CUM SĂ UTILIZAȚI APARATUL
- ÎNTRETINERE ŞI CURĂTARE
- COM UTILITZAR L'APARELL
- MANTENIMENT I NETEJA
- DÉCLARATION DE CONFORMITÉ
- DECLARATION OF CONFORMITY
Brand : Sogo
Model : SS-5535
Category : Blender