
SS-5141 - Blender Sogo - Free user manual and instructions
Find the device manual for free SS-5141 Sogo in PDF.

| Product type | Slow juice extractor (slow juicer) |
| Brand and model | Sogo SS-5141 |
| Power supply | 220-240V~, 50/60Hz |
| Rated power | 150 W |
| Juice container capacity | 600 ml |
| Pulp container capacity | 1000 ml |
| Continuous operation time | Up to 10 minutes |
| Minimum rest time | 20 minutes |
| Extraction technology | Slow auger pressing with fine strainer |
| Functions | Forward, reverse (to clear jams), stop |
| Materials of food-contact parts | BPA-free plastic and silicone (declared) |
| Safety | Overload protection, motor lock, automatic stop, safety lock |
| Cleaning and maintenance | Removable parts washable with clean water; do not use abrasive products; do not put in dishwasher |
| Spare parts and repairability | Auger, fine strainer, pusher, hopper, bowls; repair only by authorized center |
| Warranty | Manufacturer's warranty (see warranty card) |
| After-sales service | www.sogosat.com, sogosat@sogosat.com, 0034 902 222 161 |
| Country of manufacture | People's Republic of China |
| Standards and certifications | Low Voltage Directive 2014/35/EU, EMC 2014/30/EU, RoHS 2015/863/EU, ErP 2009/125/EC |
Frequently Asked Questions - SS-5141 Sogo
User questions about SS-5141 Sogo
0 question about this device. Answer the ones you know or ask your own.
Ask a new question about this device
Download the instructions for your Blender in PDF format for free! Find your manual SS-5141 - Sogo and take your electronic device back in hand. On this page are published all the documents necessary for the use of your device. SS-5141 by Sogo.
USER MANUAL SS-5141 Sogo
natural_image
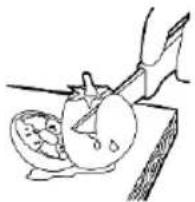
SOGO brand juice brush with orange juice being poured into a glass cup (no text or symbols visible)
Caution: please read and preserve these important instructions
IMPORTANTE:
natural_image
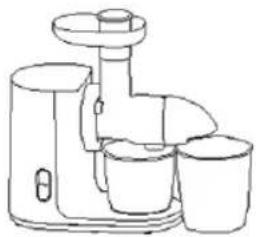
Line drawing of a modern juicer with three cups (no text or symbols)CÓMO INSTALAR Y UTILIZAR EL PRODUCTO
- Always read the instruction book carefully before use.
- This manual can be downloaded from our website, www.sogo.com
- Keep these instructions for future reference.
SAFETY INSTRUCTIONS FOR THE USER
- Please read the instructions carefully before using the appliance.
- This product is designed for indoor household, non-industrial and non-commercial use. Do not use the item outdoors or for any other purpose. Misuse or improper handling can cause problems with the appliance and can cause injury to the user.
- Make sure that the voltage indicated on the rating plate matches the main wall outlet voltage before plugging in the appliance.
- The appliance has been incorporated with a grounded plug. Please ensure the wall outlet in your house is well earthed.
• Always remove the plug from the outlet when the appliance is not in use. Do not leave the appliance unattended when it is switched on. - Always disconnect the appliance from the supply if it is left unattended and before assembling, disassembling or cleaning.
- Before cleaning or storing your appliance, always unplug the appliance from the power source and allow it to cool.
-
The appliances are not intended to be operated by means of an external timer or separate remote-control system.
-
Do not place or operate the appliance near sources of water.
- Never immerse the appliance or the plug-in water or any other liquid. In the event of the appliance being dropped into water, immediately disconnect it from the main supply and take it to an authorized service agent for repair before using it again.
- To protect against electric shock do not immerse cord, plugs, or appliance in water or any other liquid.
- Do not place or use the appliance and its power cord on or near hot surfaces (for example, cooktops) or open flames.
- Do not leave the power cord hanging by sharp edges and keep it away from hot objects and flames. Do not wrap the cord around the appliance and do not bend it.
- Do not use the appliance if the cord or plug is damaged. In the event that the cord is damaged, it should only be replaced by the manufacturer, its service agent, or similarly qualified persons, to avoid hazards.
- In the event of need repair do not try to dismount or repair to avoid any type of damage or personal injury.
- In the event of a malfunction of the appliance or if it has been damaged in any way, return the appliance to the nearest authorized service center for examination, repair or adjustment.
- When you want to remove the plug from the wall socket, do so by pulling the plug and not by the cord or the appliance itself.
• Make sure your hands are dry before plugging
or unplugging.
- This appliance is not to be used by the persons (including children) with reduced physical, sensory or mental capabilities or lack of experience and knowledge, unless they have been given supervision or instruction.
- This appliance can be used by children aged from 8 years and above, and persons with reduced physical, sensory or mental capabilities or lack of experience and knowledge if they have been given supervision or instruction concerning, use of the appliance in a safe way and understand the hazards involved.
• Children must be supervised to ensure that they do not play with the appliance. - Cleaning and user maintenance shall not be made by children without supervision.
- This appliance shall not be used by children. Keep the appliance and its cord out of reach of children.
- Close supervision is necessary when your appliance being used by or near children.
- Do not use the appliance for any other purpose than described in this manual.
- Do not let the appliance operate unattended.
- Never use accessories that are not recommended by the manufacturer.
- The use of accessories not recommended or sold by the appliance manufacturer may result in fire, electric shock or injury to persons.
- Always place the appliance on to the flat and even surface.
Safety instructions to be follow while using Slow juicer
- Do not use the appliance if the rotating sieve or the protecting cover is damaged or has visible cracks.
- Before plugging in to the wall outlet, please make sure that the removable parts are fully installed, such as the juicing body, auger, fine strainer, juicing body cover, etc.
- During operation, it is strictly prohibited to put fingers or sharp objects into the material inlet to avoid contacting the rotating parts such as the auger, etc. Also, it is strictly prohibited to use any object to replace pusher rods and keep eyes very close to the material inlet to avoid any harm or personal injury.
- The ingredients should be cut into small pieces, so that they can be put into the inlet of the slow juicer. If there are fruits and vegetables with kernel, hard seed, thick skin or hard shell it is recommended to remove them before processing.
- It is prohibited to use hard ingredients such as ice, sugarcane and coconut as these fruits can get stuck easily into the inlets and cause the damage of components affecting the service life of the product.
- It is normal for the fine strainer, juicing body cover, auger and other parts to be stained after making juice of certain fruits and vegetables. It will not affect the quality of the food in any manner and will not does any harm for consumer's health.
- The product is designed in such a way while processing hard ingredients, the motor will be locked-rotor and the current gets increased, then machine makes a tick sound and then motor stops working. This process makes assure the long service life of appliance.
- If the motor stops due to current limiting protection or locked-rotor and the motor cannot be automatically reversed during the operation process, press the “Reverse” key of the power switch. It is essential to take the ingredients out, and then press the “Forward” key of the power switch for normal use of the machine. In case of still locked-rotor, to protect the motor it is recommended to clean up the ingredients in the auger and continue to use it.
- After every single use, please wait until the motor and auger stop rotating and make sure that the power is disconnected before disassembling the detachable parts of appliance.
- All the detachable parts of this product should not be disinfected with hot water over 80°C and not used in microwave ovens to avoid thermal deformation damage.
- Do not use metallic wool or abrasive cleaners or corrosive liquids in order to clean the product.
- Switch off the appliance and disconnect from supply before changing accessories or approaching parts that move in use.
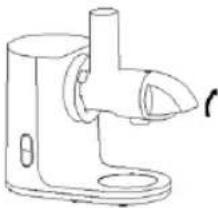
SLOW JUICER PARTS AND FUNCTIONS
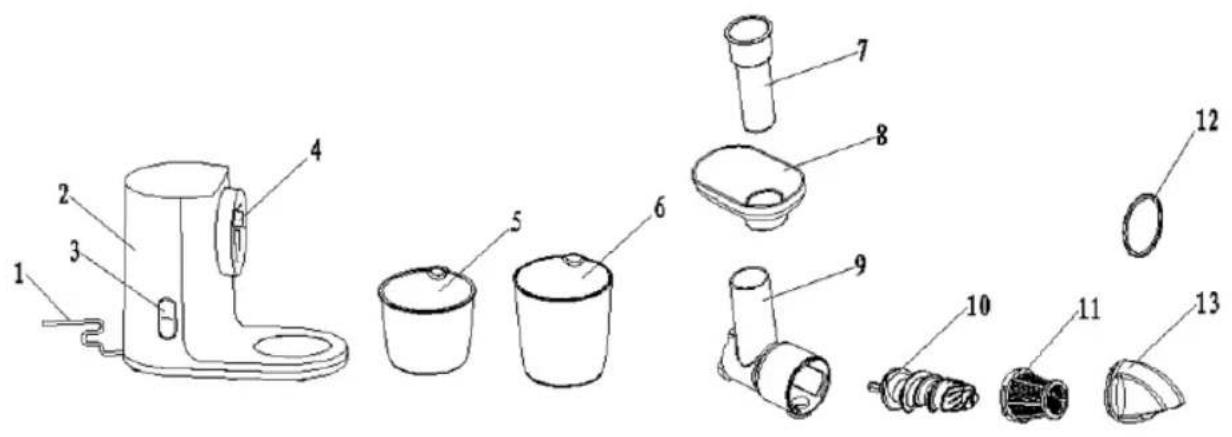
| Serial number | Name of parts Function introduction |
| 1 Main cord | To plug in the power outlet. |
| 2 Juicer Body | The main part of the appliance, including the motor and other parts. It is the source to make running the appliance. |
| 3 | On / Off and reverse switch |
| 4 Button | It is used to lock the juicing body and prevent the body from loosening from the machine body during operation. When you need to remove the juicing body from the machine body, you must press and hold the button. |
| 5 Juice Jar To collect fruit juice separated from the juicing body. (600ml) | |
| 6 Pomace Jar | To collect pomace separated from the juice. (1000ml) |
| 7 Pusher | When ingredients are placed, use to gently push the ingredients, so that the ingredients are in full contact with the auger to increase the juicing efficiency. |
| 8 Hopper | It is mainly used to store juiced ingredients. |
| 9 Juicing body | It is the main part of extracting juice. The ingredients are put in from the inlet on top of the juicing body, and release the juice and pomace through the juice outlet and pomace outlet. |
| 10 Auger | It is the main part of juicing, it is used to convey the ingredients and grind the ingredients by running in with the fine strainer. |
| 11 | Fine strainer (with screen inside) |
| 12 | Juicing body cover silicone loop |
| 13 Juicing body cover | The main components of juicing connects the juicing body to play a role in security protection. |
METHOD OF APPLICATION
Before using this product for the first time, please wash thoroughly all the parts which touch the food ingredients (see "Chapter Maintenance and Preservation")
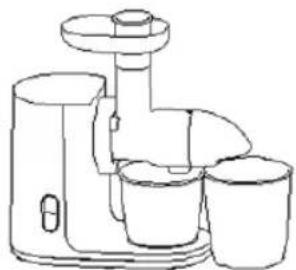
natural_image
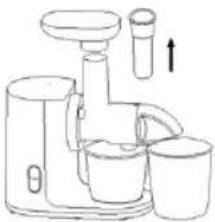
Line drawing of a modern juicer with three cups (no text or symbols)Keys operation instructions:
- ON / OFF key: normal operation key to make functioning the juicer and to stop.
- "Reverse" key: Used when the pomace discharging is not smooth or locked. (Hint: When the pomace discharging is not smooth or locked, press and hold the "Reverse" button gently for about 3 seconds, the auger will start to reverse, release the button, and stop the reversal; if you press "Forward" key at this time, the machine resumes working in the forward direction.
HOW TO, INSTALL AND USE THE PRODUCT
Follow these steps to install and use the product:
- Juicing
natural_image
Technical line drawing of a mechanical bracket with a curved arrow indicating rotation (no text or symbols)
natural_image
Technical line drawing of a mechanical device with a cylindrical component and an arrow indicating direction (no text or symbols)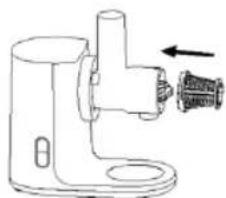
natural_image
Line drawing of a manual shaver with a cylindrical component and a black arrow indicating direction (no text or symbols)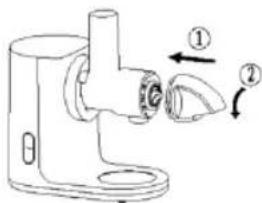

natural_image
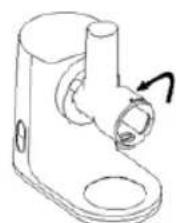
Line drawing of a kitchen electric shaver with handle and cup (no text or symbols)Connect the juicing body to the machine body:
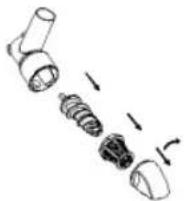
- Put the central position of the inlet of the juicing body to align the position of "unlocking sign" on the machine body (the three fasteners of the juicing body will be aligned).
- Then rotate anticlockwise, and when you hear a "tick" sound
Align the auger's hexagonal axis with the hole of the machine body and push it horizontally to the bottom. (If it is not aligned, align it by rotating the auger)
Put the broader end of the fine strainer in from the end of the auger, and align the three fasteners of the fine strainer to the three fastening slots in the juicing body. (The fine strainer is only used in conjunction with the juicing button on the back, and this function is used for juicing)
Displace the three fastening slots on the juicing body cover from the three fastening slots on the juicing body, push into horizontally, and then rotated counterclockwise to screw tightly the juicing body cover and the juicing body.
Place the juice cup next to the machine body so that its open aligns the juice outlet of the juicing body.
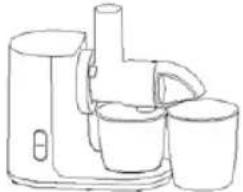 | 6 | Put the pomace cup under the pomace outlet of the juicing body, close to the juice cup (the high end of the pomace cup shall be close to the pomace outlet, which is more conducive for pomace discharging). |
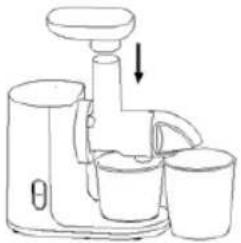 | 7 | Place the hopper on the upper end of the food barrel of the juicing body.The hopper helps to pass through food ingredients more conveniently, especially when processing small-grained ingredients such as grapes, strawberries, etc. |
 | 8 | Plug in the juicer plug into the wall outlet and turn the power on and get ready for work. (Make sure the on/off switch is in off position before turning on the power) |
 | 9 | Wash the fruits and vegetables, cut them into small pieces, so that can be put into the feed inlet, and place them on the hopper for use.Please remove kernels, hard seeds, thick or hard shell of fruits and vegetables first.Note: Fruits such as sugar cane, guava, and mango cannot be juiced with this machine. |
| [wwzd] | 10 | Press the “ON” key of the switch and the juicer starts to work. The working time shall be less than or equal to 10 minutes.Just make sure that your hands are dry and not wet to avoid any type of electric shock, electric leakage or fire. |
 | 11 | Put the ingredients into the feed inlet of the juicing body and push the ingredients with the pusher.When ingredients are into the food inlet donot push hard and it is advisable that the ingredients must be cut into the small pieces.(Don't put your fingers or other objects into the feed inlet of the juicing body! If the pomace cup or juice cup is full, disconnect the power and clean it before use.) |
 | 12 | When the juicing processing is completed and there is no juice out of the juice outlet, turn off the switch and disconnect the power and pullo ut the cord of wall outlet. Wait until the auger completely stops rotating, and then remove the juice cup from the juice mouth. (The fresh juice must use immediately. Do not let the juice exposed to the air, as being for a long period of time in air its taste and nutritional value get affected by oxidising of it.)Residues cannot be stored for long periods.Do not touch the power switch with wet hands to avoid electric shock, electric leakage or fire. |
TIPS FOR FRUIT SELECTION
- Select and use fresh fruits and vegetables, which contain more juice. Particularly suitable fruits include: pineapple, celery sticks, apples, cucumbers, spinach, melons, tomatoes, oranges, grapes, and the like.
- Instead of paring the thin skin of fruits and vegetables, you only need to pare the thick skin of fruits and vegetables like oranges, pineapples, raw beetroots, etc. Seeds of citrus fruits also need to be removed because they will bring bitterness to the juice.
- Freshly juiced apple juice may quickly turn brown, and you can add a few drops of lemon juice to slow this process.
- Leaves and leaf stems (such as lettuce) can be juiced with this machine.
- The nutrients of common fruits and vegetables are as follows:
| Fruits/vegetables | Vitamins/mineral substances KJ/Calorie | |
| Apple Vitamin C 200g=150KJ (72 Calorie) | ||
| Apricot | Abundant in dietary fiber, containing kalium | 30g=85KJ (20Calorie) |
| Beet Good sources of folic acid, dietary fiber, vitamin C and kalium | 160g=190KJ (45 Calorie) | |
| Blueberry Vitamin C | 125g=295KJ (70 Calorie) | |
| Brussels sprouts Vitamin C, B, B6, E, folic acid and dietary fiber | 100g=110KJ (26 Calorie) | |
| Cabbage Vitamin C, folic acid, kalium, B6 and dietary fiber | 100g=110KJ (26 Calorie) | |
| Carrot Vitamin A, C, B6 and dietary fiber 120g=125KJ (30Calorie) | ||
| Celery Vitamin C and kalium 80g=55KJ (13Calorie) | ||
| Cucumber Vitamin C | 280g=120KJ (29Calorie) | |
| Foeniculum vulgare | Vitamin C and dietary fiber | 300g=145KJ (35 Calorie) |
| Grape Vitamin C, B6 and kalium 125g=355KJ (85 Calorie) | ||
| Kiwi fruit | Vitamin C and kalium 100g=100KJ (40 Calorie) | |
| Melon | Vitamin C, folic acid, dietary fiber and vitamin A | 200g=210KJ (50 Calorie) |
| Nectarine | Vitamin C, B3, kalium and dietary fiber | 180g=355KJ (85 Calorie) |
| Peach | Vitamin C, B3, kalium and dietary fiber | 150g=205KJ (49Calorie) |
| Pear | Dietary fiber | 150g=250KJ (60Calorie) |
| Pineapple | Vitamin C 150g=245KJ (59 Calorie) | |
| Raspberry Vitamin C, ferrum, kalium and magnesium 125g=130KJ (31Calorie) | ||
| Tomato Vitamin C, dietary fiber, vitamin E, folic acid and vitamin A | 100g=90KJ (22 Calorie) | |
MAINTENANCE AND PRESERVATION
- Before Cleaning this product, be sure to turn off the switch and disconnect the power supply.
- Please clean this product after usage.
- Do not use any abrasive chemicals nor abrasive cleaner to clean these parts. Use soft sponge if necessary and dry cloth to wipe clean all detachable parts. It is not recommended to clean any detachable parts in the dishwasher to ensure long life.
- The juicer body must not be cleaned with water. The stains on the body must be wiped with a dry cloth.
- Please make sure the product and its accessories are clean and dry before storage.
- Please refer to the following steps to disassemble the juicer and then clean:
 | 1 Take the pusher and the hopper first. |
 | 2 Hold the button near the juicing body down, and at the same time rotate the juicing body clockwise to take the body down. If the button is not pressed, the body can't be taken down. |
 | 3 After the juicing body is disassembled, take the juicing body cover, the juice fine strainer and the auger down in proper order, and the removable parts can be cleaned with clear water. |
PRODUCT SAFETY INDEXES
| Model No. SS-5141 | |
| Rated voltage 220-240V~ | |
| Rated power 150W | |
| Rated frequency 50/60Hz | |
| Continuous Working Hours ≤10 minutes | |
| Interval ≥20 minutes | |
FAULT ANALYSIS AND TROUBLESHOOTING
| Fault phenomenon | Analysis of causes Fault resolution | |
| After connecting the power supply, turn on the switch, but this product cannot work. | 1. The power plug is not plugged in properly2. The outlet is in poor contact3. The internal cable of the main unit is off or the circuit board is damaged. | 1. Plug the power plug back in again2. Replace the power socket and try again3. Please send the product to the nearest maintenance shop for inspection |
| When this product is used initially, the motor smells terrible. | This is not an abnormal occurrence | If the product still emits this odor after repeated use, please send it to the nearest maintenance shop for inspection. |
| This machine stops during the application. | 1. The voltage is too low2. Excessive or hard ingredients3. The continuous working hour is too long | 1. Check if the voltage is too low2. Disconnect the power and remove the excess ingredients (Sugar cane cannot be juiced. Hard skin / hard core fruits and vegetables should be first removed the hard skin / hard core before juiced)3. It is a normal phenomenon, and the motor will resume operation after a break |
| Noise at work 1. The | auger and fine strainer are not fully installed, resulting in unsteady operation;2. The start motor in the machine body breaks down.3. Too noisy when some ingredients are juiced. | 1. Fully install the auger and fine strainer.2. Please send it to the nearest maintenance shop for inspection. |
| It is difficult to unscrew the juicing body cover after juicing | 1. There is oil stain on the surface of the juicing body cover2. The ingredients in the juice net are not juiced completely | 1. Clean the surface of the juicing body cover2. Continue to turn on and juice the ingredients completely or long press the reverse button for a few seconds to rotate the ingredients out of the juice net |
Note:
The above are analysis and resolution of common faults. As for other faults, please contact with the Customer Service Department of this company or come to appointed service center of this company to change. Be sure not to take apart or repair by yourself.
- For more details for appointed service centers of this company see the warranty card.
IMPORTANT:
MÉTHODE D'APPLICATION
natural_image
Line drawing of a modern juicer with three cups (no text or symbols)natural_image
Line drawing of a modern juicer with three cups (no text or symbols)natural_image
Line drawing of a modern coffee maker with three cups (no text or symbols)natural_image
Line drawing of a modern juicer with three cups (no text or symbols)DECLARATION OF CONFORMITY
This device complies with Low Voltage Directive 2014/35/EC, Electromagnetic Compatibility Directive 2014/30/EU, Directive 2015/863/EU on the restriction of the use of certain hazardous substances in electrical and electronic equipment and Directive 2009/125/EC on the eco-design requirements applicable to energy-related products.
DÉCLARATION DE CONFORMITÉ
This symbol means that in case you wish to dispose of the product once its working life has ended, take it to an authorised waste agent for the selective collection of waste electrical and electronic equipment (WEEE).

Imported by:
Sanysan Appliances S.L, NIF: B98753056, C/ Barcas 2, 2 46002 Valencia, Spain Product made in P.R.C. – Designed by SOGO based on the European Quality Standards Customer Service: www.sogosat.com / sogosat@sogosat.com / 0034 902 222 161


- IMPORTANTE:
- CÓMO INSTALAR Y UTILIZAR EL PRODUCTO
- SAFETY INSTRUCTIONS FOR THE USER
- Safety instructions to be follow while using Slow juicer
- METHOD OF APPLICATION
- HOW TO, INSTALL AND USE THE PRODUCT
- TIPS FOR FRUIT SELECTION
- MAINTENANCE AND PRESERVATION
- PRODUCT SAFETY INDEXES
- Note:
- IMPORTANT:
- MÉTHODE D'APPLICATION
- DECLARATION OF CONFORMITY
- DÉCLARATION DE CONFORMITÉ
- Imported by:
Brand : Sogo
Model : SS-5141
Category : Blender