Bali - Alarm clock radio HAMA - Free user manual and instructions
Find the device manual for free Bali HAMA in PDF.

| Product type | Clock radio |
| Brand | Hama |
| Model | Bali |
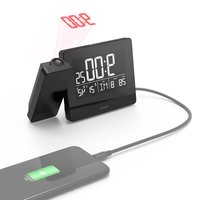
| Mains power | USB mains adapter 5V / 1A |
| Backup power | 3 AAA batteries 4.5 V |
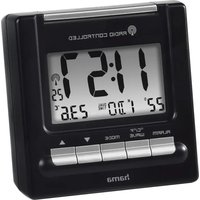
| Display type | LED digital |
| Date display | Yes (year, month, day) |
| Temperature display | Yes (Celsius or Fahrenheit units) |
| Time setting | Manual, 12/24 hour format |
| Alarm | Yes, with daily repeat or selected days |
| Snooze function | Adjustable repeat from 1 to 60 minutes |
| Alarm modes | Mon-Fri (1-5), Mon-Sat (1-6), Mon-Sun (1-7) |
| Brightness adjustment | 3 levels (high, medium, low) |
| Night mode | Automatic dimming over a definable period |
| Alarm signal volume | 3 levels (01-03) |
| Automatic display change | Yes (time 10 sec, date 3 sec, temperature 3 sec) |
| Care and cleaning | Slightly damp lint-free cloth, no harsh detergent |
| Safety instructions | Indoor use, avoid moisture and heat, do not open |
| Recommended batteries | 3 AAA batteries, observe polarity |
| Standby consumption | 0.10 W |
Frequently Asked Questions - Bali HAMA
User questions about Bali HAMA
0 question about this device. Answer the ones you know or ask your own.
Ask a new question about this device
Download the instructions for your Alarm clock radio in PDF format for free! Find your manual Bali - HAMA and take your electronic device back in hand. On this page are published all the documents necessary for the use of your device. Bali by HAMA.
USER MANUAL Bali HAMA
OperatingInstructions
Bedienungsanleitung
Moded'emploi
- Powersupplyunitconnectionsocket
- Volume(1-3)
- Batterycompartment
- Snooze/Light
A.SETbutton
B. Upbutton(increasesettingvalue, displaybrightness)
C. Downbutton(decrease settingvalue, C°/F°)
D. Alarmbutton
E.Snooze/Light(displayon/off)
1. Explanationofwarningsymbols and notes
Riskofelectricshock

This symbol indicates a risk of electric shock from touching uninsulated product part that may carry hazardous voltage.

Warning
This symbol is used to indicate safety instructions to draw your attention to specific hazards and risks.

Note
This symbol is used to indicate additional information or important notes.
2. Packagecontents
- Alarmclock
• USBpowersupplyunitwithcable
• Theseoperatinginstructions
3. Safetyinstructions
• The product is intended for private, non-commercial use only.
- Usetheproductforitsintendedpurpose only.
- Protect the product from dirt, moisture a nd overheating and use it indry environments only.
- Donotusetheproductintheimmediate vicinityofheaters,otherheatsourcesorindirectsunlight.
- As with all electrical products, this device should be kept out of there each of children!
- Donotoperatetheproductoutsidethe powerlimitsgiveninthe s pecifications.
- Donotusetheproductinareasinwhich electronicproductsare notpermitted.
- Donotusetheproductina d a m p environmentandavoidsplashing w ater.
- Donotpositiontheproductnear interferencefields, metalframes, computersandtelevisions, etc. Electronic devicesandwindowframeshavea negativeeffectonthefunctionofthe product.
- Donotdroptheproductanddonot exposeittoanymajorshocks.
- Donotmodifytheproductinanyway. Doingsovoidsthewarranty.
- Disposeofpackagingmaterialimmediately inaccordancewiththelocallyapplicable regulations.
- Onlyusethearticleundermoderate climaticconditions.
- Theproductisintendedonlyforuseinside buildings.
- Route all cables so there is no risk of tripping.
- Donotbendorcrushthe c able.
- Alwayspull directlyontheplugwhen disconnectingthecable,neveronthe cableitself.
- Onlyusethearticleundermoderate climatic conditions.
- Usetheproductonlyfortheintended purpose.
Riskofelectricshock

- Donotopenthedeviceorcontinueto operateitifitbecomesdamaged.
- DonotusetheproductiftheAC adapter, a daptercableorpowercable isdamaged.
- Donotattempttoserviceorrepairthe product yourself. Leave any and all serviceworktoqualifiedexperts.
Warning- Batteries

- When inserting batteries, not the correct polarity(+and- m markings) and insert the batteries accordingly. Failure todos could result in the batteries leakingorexploding.
- Onlyusebatteriesthatmatchthe specifiedtype.Keeptheinstructions forthecorrectchoiceofbatteries includedwiththeoperatinginstructions ofdevicessafeforfuturereference. Before youinsertthebatteries,clean thebatterycontactsandthepolarity contacts.
- Donotallowchildrentochangebatteries withoutsupervision.
- Replace all the batteries in a set at the sametime.
- Donotmixoldandnewbatteries, orbatteriesofdifferenttypesorfrom differentmanufacturers.
- Removethebatteriesfromproductsthat are n otbeingusedforanextendedperiod (unlesstheseare b eingkeptreadyforan emergency).
- Donotshort-circuitbatteries.
- Donotchargebatteries.
- Donotburnbatteriesorheatthemup.
Warning-Batteries

- Neveropen,damageorswallowbatteries orallowthemtoentertheenvironment. Theycancontaintoxic,environmentally harmfulheavymetals.
- Removespentbatteriesfromtheproduct and disposeofthemwithoutdelay.
- Avoidstoring, charging and using in extreme temperatures and at extremely low atmospheric pressures (such as at high altitudes).
- Ensure that batteries with damaged housingsdonotcome intocontactwithwater.
- Keepbatteriesoutofthe reachofchildren.

4. Setup
Warning

- Onlyoperatetheproductfroma socket thathasbeenapprovedforthedevice. Thesocketmustbeinstalledclose totheproductandmustbeeasily accessible.
- Disconnect the product from the power supply using the On/Off switch - if this is not available, unplug the power cord from the socket.
- Ifusinga m ulti-socketpowerstrip, makesure t hatthetotalpower consumptionofall c onnecteddevices doesnotexceedthesocketstrip's maximumthroughputrating.
- If you will not be using the product for a prolonged period, disconnect from mainspower.
4.1 Powersupply
- ConnecttheUSBcabletotheUSBpower supplyunit. Connectthepowersupplyunit totheconnectionsocket(1)ontheback ofthealarmclock.
- Connectthepowersupplyunittoa properlyinstalledsocket.
• Thealarmclockswitchesonautomatically. - Alternatively, you can also insert 3 AAA batteries, observing the correct polarity. However, the display switchestostandby mode after approx. 9 seconds.
5.Operation
5.1 Manualtimesetting, 12/24h
- The display shows "0:00". Press and hold theSETbutton(A)foraround2 second s togotoSettingsmode.Setthefollowing informationinsequence:12/24h, hour, minutes.
- Toselecttheindividualvalues, pressthe Upbutton(B)ortheDownbutton(C) and confirmyourselectionbypressingthe SETbutton(A).
Note
PressandholdtheUp(B)orDown(C) buttontoselectthevaluesmore q quickly.

5.2 Manual setting of the date
- Briefly press the SET button (A) and the displayshows"101".Pressandholdthe SETbutton(A)foraround2 s econdsto gotoSettingsmode.Setthefollowing informationinsequence:year, month, day
- To select the individual values, press the Upbutton(B) or the Downbutton(C) and confirm your selection by pressing the SETbutton(A).
Note

Briefly press the SET button allows you to togglebetweenthedisplayinformation (time, date, temperature).
5.3Alarmclock
Setting the alarm time, snooze time, alarmmode
- Briefly press the Alarm button (D) to switchtoAlarmmode.
- PressandholdtheAlarmbutton(D)for around 2 seconds and the alarm time startstoflash.
- Setthefollowinginsequence:Alarmtime hour- A larmtimeminutes-Snoozetime (01 - 60) - Alarm mode (1-7)
To select the individual values, press the Up or Down button and confirm your selection by pressing the Alarm button.

Note
Press and hold the Up (B) or Down (C) button to select the values more quickly.
- Oncethealarmclockisactivated, itis triggered at the corresponding time and for approx. 1 m inuteanalarmsignal is heard. The frequency of the alarmsignal increases asthedral duration of the alarm increases (speedalarm).
• Afterthis, the alarmclockis stopped automatically and triggered again at the setalarmtimethe followingday. - To end the alarm clock prematurely, briefly presstheAlarmbutton(D).
Activating/deactivatingthealarmclock
- Briefly press the Alarm button (D) to switchtoAlarmmode.
- Briefly press the Alarm button (D). If the alarmclockisactivated, the alarmclock symbol will a ppearinthedisplay.
- Todeactivatethealarmclock, pressthe Alarmbuttononceagainandthealarm clocksymbolgoesout.
Snoozefunction
Thesnoozefunctioncanbesetfrom1to 60minutes.If, forexample,thesnoozetime "01"issetfor1 m inute,thealarmclockwill ringafterapprox.2 m inutesafterthesnooze buttonispressed,asthepresetalarmtime is60seconds.
- Duringthealarmsignal, pressthe Snooze/Lightbutton(Eor4)toactivate thesnoozefunction.
Alarmmode
There are 3 different alarm modes to choose from. If activated, the alarm mode only triggers on these days.
• 1-5: Monday to Friday
• 1-6: MondaytoSaturday
• 1-7: MondaytoSunday
5.4Changedisplay
Manual
- You c answitchmanuallybetween time, date and temperature. Todo this, pressthe SETbutton(A) in quick succession.
Automatic
Inautomaticmode, the display changes automatically.
- To do this, briefly press the Down button (C), the temperature is displayed.
- NowpresstheSETbutton(A)forapprox. 2 seconds, the alarmclock will be e p once briefly to confirm. The display now changes automatically in the following rhythm: Time 10 sec. - Date 3 sec. - Temperature 3 s ec.
5.5Dimmingfunction
- Press the Up button (B) to dim the display. There are 3 dimming stages (bright, medium, low).
5.6Nightmode
Innightmode,youcanseta t imeperiodin whichthedisplayisautomaticallydimmed.
- PresstheSETbutton(A) in quick successionuntilOFFappearsonthe display.
- PresstheUporDownbutton to selectON.
- NowpresstheSETbuttonforapprox. 2 seconds 0:00 starts to flash. Set the followinginsequence:Starthour- Start minute - End hour - End minute (e.g: 21:30to6:30).
- Toselecttheindividualvalues, press the Upbutton(B)ortheDownbutton(C) and confirm your selection by pressing the SETbutton(A).
Note

Press and hold the Up (B) or Down (C) button to select the values more quickly.
5.7Volume
- PresstheDownbutton(B)toselectthe desiredvolume(Volume01-03).You can selectbetweenquiet(01),medium(02) andloud(03).
6. Careandmaintenance
Onlycleanthisproductusinga l int-free, slightlydampclothand d o n otuseanyharsh cleaners.Ensure t hatnowaterisableto entertheproduct.
7.Warrantydisclaimer
HamaGmbH& Co KG a ssumesnoliability andprovidesnowarrantyfordamage resultingfromimproperinstallation/mounting,improperuseoftheproduct orfromfailure t o o bservetheoperating instructions a nd/orsafetynotes.
8.Technicaldata
| Alarmclock | |
| Powersupply | Powersupplyunit or4.5V3 x A A A battery |

| Specificationsaccordingto Regulation(EU)2019/1782 | |
| Trademark, Commercialregister number, Address | Hama, HRA12159, DresdnerStr.9 86653 Monheim, Germany |
| Modelidentifier | HX06B-0501000-CG |
| Inputvoltage100-240V | |
| InputAC frequency | 50/60Hz |
| Outputvoltage Outputcurrent Outputpower | 5.0VDC 1.0A 5.0W |
| Average efficiency duringoperation | 73.6% |
| Efficiencyatlowload68.1% | |
| Powerconsumptionat zero load | 0.10W |
E.Snooze/Light(Displayon/off)
Wekkerinschakelen/ u its chakelen
IndicațiiconformDirectivei(UE)
2019/1782

E. Snooze/Light(visoron/off)
natural_image
Solid pink square with no text, symbols, or patternshama
HamaGmbH& Co K G 86652Monheim/ Germany
Service& Support


support.hama.com/00185896

+499091502-0
D
GB

CE


PAP
RaccoltaCarta
All listed brands are trademarks of the corresponding companies. Errors and omissions excepted, and subject to technical changes. Our general terms of delivery and payment are applied.