CAMYSAFEDUALM2 - External hard drive i-TEC - Free user manual and instructions
Find the device manual for free CAMYSAFEDUALM2 i-TEC in PDF.

| Product Type | External USB-C enclosure for M.2 SATA SSDs (dual bay) |
| Brand | i-TEC |
| Model | CAMYSAFEDUALM2 |
| Dimensions | 125 x 78 x 20 mm |
| Weight | 165 g |
| Power Supply | 5V, 900 mA (via USB-C, external 5V power supply possible - not included) |
| Transmission Interface | 1x USB-C Gen 2, backward compatible with USB 3.0 / 2.0 |
| Disk Compatibility | M.2 B-Key SATA SSDs 2230, 2242, 2260, 2280 |
| Main Functions | Plug & Play, LED activity indicator, RAID matrix selector (RAID 0, JBOD separate disks, JBOD total capacity, RAID 1), formatting required for new disks |
| Supported Operating Systems | Windows 7/8/8.1/10 32/64bit, macOS 10.x and higher |
| Package Contents | External enclosure, USB-C cable 45 cm, USB-C to USB 3.0 cable 45 cm, screwdriver, screws, rubber pads, user guide |
| Care and Cleaning | Do not cover the enclosure; the surface may get hot (normal heat dissipation) |
| Safety | Changing RAID settings causes data loss; format new disks before use |
| Spare Parts and Repairability | Screw assembly, M.2 disks replaceable by user |
| General Information | Warranty and support via www.i-tec.cz/fr/ or email support@itecproduct.com |
Frequently Asked Questions - CAMYSAFEDUALM2 i-TEC
User questions about CAMYSAFEDUALM2 i-TEC
0 question about this device. Answer the ones you know or ask your own.
Ask a new question about this device
Download the instructions for your External hard drive in PDF format for free! Find your manual CAMYSAFEDUALM2 - i-TEC and take your electronic device back in hand. On this page are published all the documents necessary for the use of your device. CAMYSAFEDUALM2 by i-TEC.
USER MANUAL CAMYSAFEDUALM2 i-TEC
natural_image
Exterior view of a gray USB drive with two ports and a logo on top (no text or symbols visible)User's guide • Gebrauchsanweisung • Mode d'emploi Manual de instrucciones • Manuale • Uživatelská príručka Instrukcje obsługi • Užívatel'ská príručka • Vartotojo vadovas
P/N: CAMYSAFEDUALM2
ENGLISH
Please read the entire instruction manual carefully. Detailed manual is available on our website www.i-tec.cz/en/ in the tab „Manuals, drivers“. In case of any issues, please contact our technical support at: support@itecproduct.com
DEUTCH
Declaration of Conformity.... 38
FCC....40

SPECIFICATION
- Extern USB-C case for 2x M.2 B-Key SATA Based SSD disks
• Transmission interface: 1x USB-C, Gen 2 - Compatible with M.2 B-Key SATA Based SSD disks with the sizes of 2230, 2242, 2260, 2280
- Backward compatible with the USB 3.0/2.0 interface thanks to the attached USB-C to USB 3.0 cable.
- Plug & Play function support
• Active LED diodes indicating the case state (illuminates - is connected, flashes - a writing/reading procedure in progress) - RAID field switch
• Power supply 5V, 900mA - Weight: 165 g
• Dimensions: 125 x 78 x 20 mm
SYSTEM REQUIREMENTS
Windows 7/8/8.1/10 32/64bit, macOS 10.x and higher – automatic installation of the drivers from the system.
Free USB-C or USB-A port.
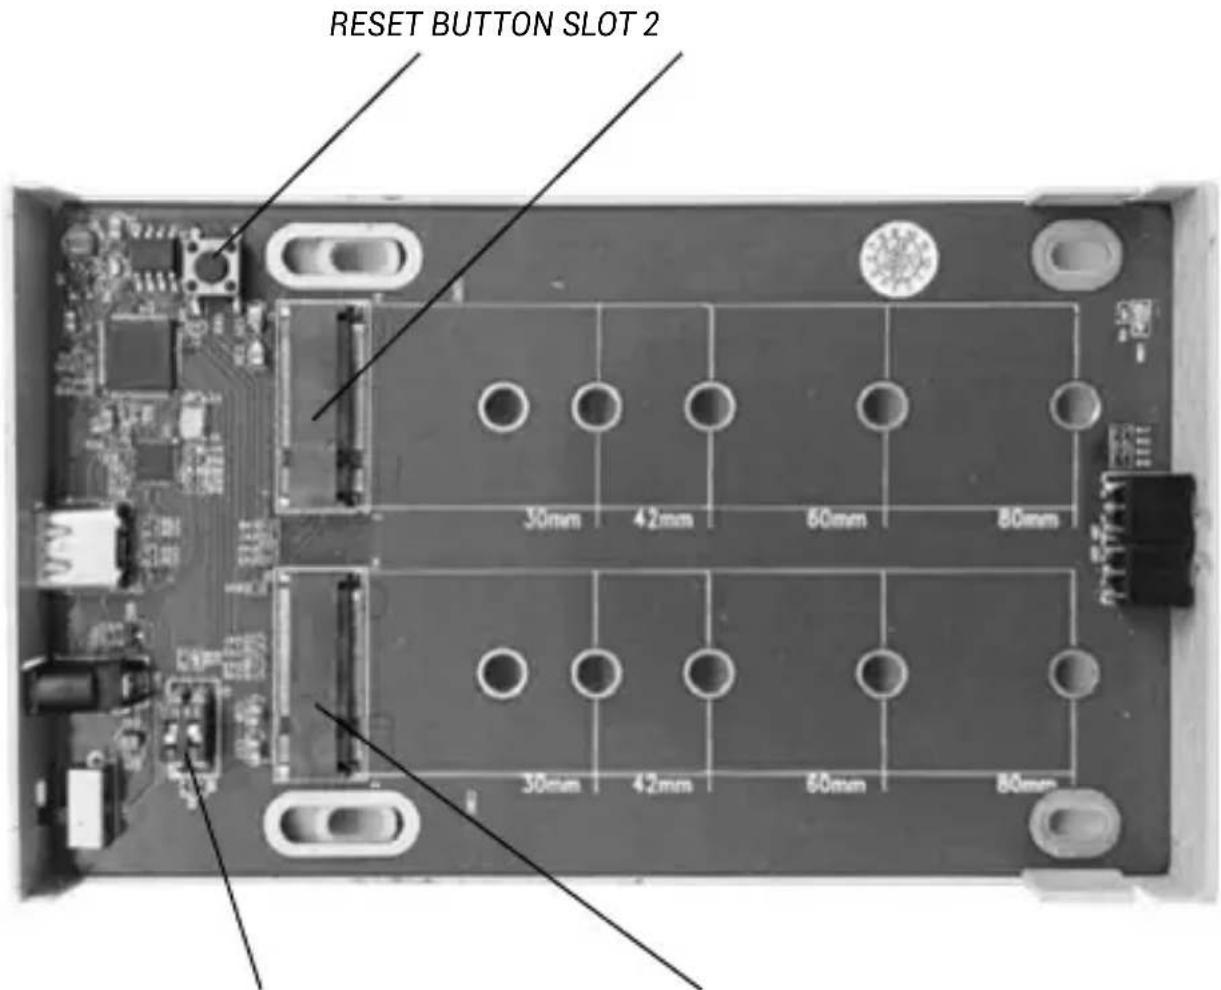
RAID CONTROLLER SWITCH SLOT 1
M.2 DISK HARDWARE INSTALLATION
Proceed according to the following instructions:
- Put out the inner part with the motherboard.
- Insert M.2 disks so that the slot in the disk complied with the slot on the M.2 connector. Afterwards screw the M.2 disks on the contrary side to the motherboard.
- Set the RAID field - see article "RAID field setting".
- Put this set back in the case and screw it from the bottom part.
- Glue legs on the bottom side of the case.
- Connect the USB-C or USB-C/A cable to the case and to the computer.
- Switch-over the ON/OFF switch to the ON position.
- Detection and automatic installation will be performed.
- Now the device is ready for use.
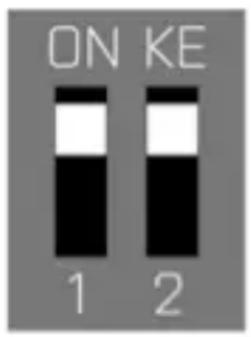
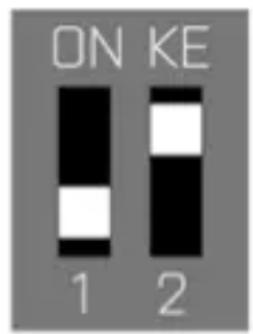
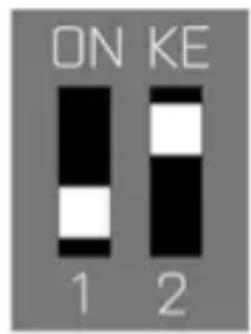
RAID FIELD SETTING
Attention: By changing the setting, you will always lose your already saved data.
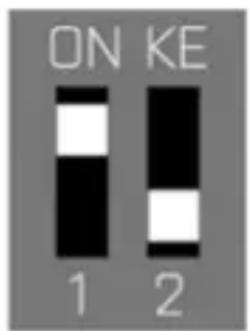
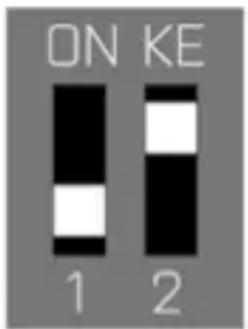
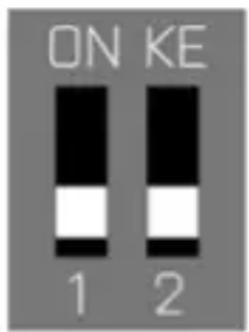
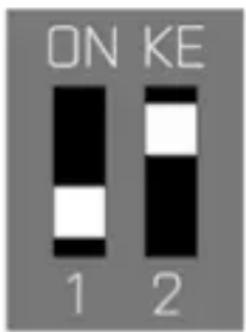
A

B

C
D
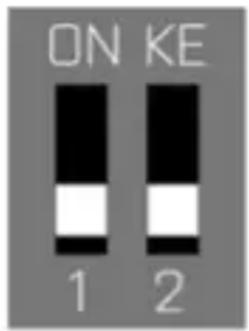
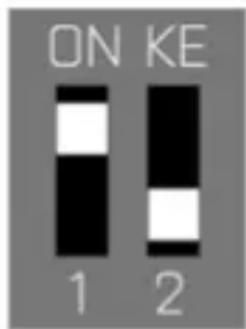
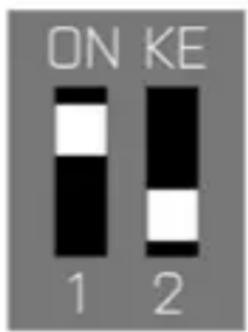
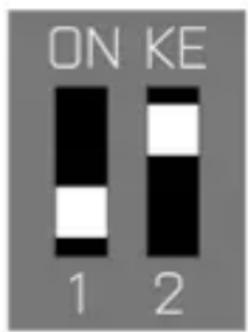
- At the switch, select one of four options of connection of the disks in dependence on the need of use.
A) Raid 0 – stripping/sum of disks, writing to the both simultaneously, interlaced (flash the both LED). A benefit is a high writing/reading speed. Attention: In case of a failure of one of the disks, all data will be lost
B) JBOD/separate disks – There is reported as two separate disks in the system (flashes LED depending on a disk to which the record is being performed)
C) JBOD/disks capacity sum – There is reported as one disk with a capacity of the sum of the inserted disks (consecutive writing to one and afterwards to the second disk, LED flashes depending on a disk to which the record is being performed)
D) Raid 1 - Mirroring (both LEDs flash at writing, in case of reading - just one). In case of a failure of one of the disks, data will not be lost.
2. While the case is connected and switched-on, push the Reset button for 5 seconds. The RAID field will be readjusted.
3. Format the disks.
POWER SUPPLY
In case that the case is not sufficiently powered by means of a USB-C port, we recommend that you connect an extern 5V power source (it is not a part of the package).
SOFTWARE INSTALLATION
Windows 7/8/8.1/10 32/64bit or macOS 10.x and higher
At connection of the device to a computer, detection and automatic installation of the drivers from the system will be performed.
Remarks: At operation, the case surface can be heated up. This is a usual operating feature and is not a defect. This way, the electronics are being cooled. We recommend that you not cover the case by things.
Remarks: For correct function of the device, firstly it is necessary to format the new disk Proceed according to the below mentioned instructions. As far as the disk was earlier used, then this might not be a necessity. By formatting, you will always lose your already saved data.
Remark: We recommend that you save essential or valuable data on more than one disks or other recording media.
NEW HDD FORMATTING
- Click the right mouse button on "My Computer".
- Select "Manage"
- Click on "Disks Management"
- Select HDD described as "Unallocated" or "Uninitialized" with a specified capacity of the inserted disk (usually, a number with a few digit values lower is being displayed).
- As far as the disk is not initialized, click the right mouse button on the left field and select "Initialize Disk".
- Click the right mouse button on the disk area and select "New Simple Bunch", click on "Next".
- Leave the bunch size on the maximum and click on "Next"
- Select "Allocate a Letter to the Unit" and click on "Next".
- Select "Format the Bunch with the Following Setting" (leave the initial setting). Click on "Next" and "Finish".
- HDD formatting will be performed. The formatting time depends on the HDD size. Afterwards the HDD is visible in the system.
PACKAGE CONTENT
- Extern case for a M.2 disk
• USB-C cable with a length of 45cm
• USB-C to USB 3.0 cable with a length of 45cm - Screw-driver
- Screws
- Rubber legs
- User manual
FREQUENTLY ASKED QUESTIONS
Available on our website www.i-tec.cz/en/ on the "FAQ" tab of this product.
i-tec MySafe USB-C / USB 3.0 2x M.2 SSD RAID External Case
SPEZIFIKATION
RAID CONTROLLER SWITCH SLOT 1
HARDWARE-INSTALLATION DER M.2 FESTPLATTE
A

B

C

D
RAID CONTROLLER SWITCH SLOT 1
INSTALLATION MATERIEL DU DISQUE M.2
A

B

C

D
RAID CONTROLLER SWITCH SLOT 1
A

B

C
D
RAID CONTROLLER SWITCH SLOT 1
INSTALLAZIONE HARDWARE DEL DISCO M.2
A
B

C

D
RAID CONTROLLER SWITCH SLOT 1
HARDWAROVÁ INSTALACE M.2 DISKU
A

B
C

D
RAID CONTROLLER SWITCH SLOT 1
INSTALACJA DYSKU M.2
A

B
C
D
RAID CONTROLLER SWITCH SLOT 1
HARDWAROVÁ INŠTALÁCIA M.2 DISKU
A

B
C
D
RAID CONTROLLER SWITCH SLOT 1
HARDWARE DISKO M.2 DIEGIMAS
A
B

C

D
RAID CONTROLLER SWITCH SLOT 1
HARDWARE-INSTALLATIE M.2 SCHIJF
Volg deze stappen:
A

B

C
D
This equipment is marked with the above recycling symbol. It means that at the end of the life of the equipment you must dispose of it separately at an appropriate collection point and not place it in the normal domestic unsorted waste stream. This wil benefit the environment for all. (European Union only).
DEUTSCH
This equipment has been tested and found to comply within the limits of a Class B digital device pursuant to Part 15 of the FCC Rules. These limits are designed to provide reasonable protection against harmful interference in a residential installation.
www.i-tec.pro