ROOT PAR BATTERY - Lamp Cameo - Free user manual and instructions
Find the device manual for free ROOT PAR BATTERY Cameo in PDF.


User questions about ROOT PAR BATTERY Cameo
0 question about this device. Answer the ones you know or ask your own.
Ask a new question about this device
Download the instructions for your Lamp in PDF format for free! Find your manual ROOT PAR BATTERY - Cameo and take your electronic device back in hand. On this page are published all the documents necessary for the use of your device. ROOT PAR BATTERY by Cameo.
USER MANUAL ROOT PAR BATTERY Cameo
natural_image
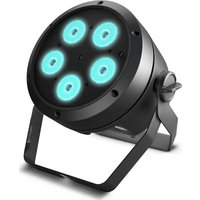
Black adjustable lighting fixture with four circular light sources on a stand (no text or symbols visible)FIRMWARE VERSION 1.1 AND LATER
ROOT® PAR BATTERY
5 × 4 W RGBW LED PAR SPOTLIGHT
CLROOTPARBAT
CONTENTS / INHALTSVERZEICHNIS / TABLE DES MATIÈRES / CONTENIDO / SPIS TREŚCI / CONTENUTO
ENGLISH
INTENDED USE 3
SAFETY INSTRUCTIONS 3
INFORMATION FOR PORTABLE INDOOR DEVICES 6
INTRODUCTION 8
CONNECTIONS, OPERATING, AND DISPLAY ELEMENTS 9
OPERATION 11
IR REMOTE CONTROL (OPTIONAL) 20
INSTALLATION AND MOUNTING 21
CARE, MAINTENANCE, AND REPAIR 23
DMX TECHNOLOGY 24
TECHNICAL SPECIFICATIONS 26
DISPOSAL 28
MANUFACTURER'S DECLARATIONS 28
DEUTSCH
This device was developed and manufactured under high quality requirements to ensure smooth operation for many years. Please read this user manual carefully to ensure you can quickly make the best use of your new Cameo Light product. Further information about Cameo Light is available on our website at WWW.CAMEOLIGHT.COM.
INTENDED USE
The product is a device for event technology!
The product has been specially developed for professional use in event technology and is not suitable for use in a household setting!
Furthermore, this product is only intended for qualified users with expertise in event technology!
Use of the product contrary to the specified technical specifications and operating conditions is considered improper!
Liability for damages or third-party damage to persons and property due to improper use is excluded!
The product is not suitable for:
- use by persons (including children) with reduced physical, sensory, or mental capabilities or with insufficient experience and knowledge.
- children (children must be instructed not to play with the device).
SAFETY INSTRUCTIONS
- To avoid possible damage, please carefully read and observe these instructions.
- Keep all information and instructions in a safe place.
- Observe all warnings. Do not remove any safety instructions or other information from the device.
TERMS AND SYMBOLS
- DANGER: The word DANGER, possibly used in combination with a symbol, Indicates a hazardous situation which, if not avoided, WILL result in death or serious injury.
- WARNING: The word WARNING, possibly used in combination with a symbol, Indicates a hazardous situation which, if not avoided, COULD result in death or serious injury.
- CAUTION: The word CAUTION, possibly used in combination with a symbol, refers to situations or conditions that can lead to injuries.
- NOTICE: The word NOTICE, possibly used in combination with a symbol, Indicates information considered important but not hazard related (EX: messages relating to equipment/property damage).

This symbol indicates an electrical hazard.

This symbol indicates a general hazard.

This symbol indicates danger from hot surfaces.

This symbol indicates danger from intense light sources.

This symbol indicates additional information on the operation of the product.

DANGER:
- Do not open the device or make any modifications to it.
- If your device stops working properly, if liquids or objects have penetrated the inside of the device, or if the device has been damaged in any other way, switch it off immediately and unplug it from the power outlet. Only authorized specialists may repair this device.
- The protective earth conductor for Class I appliances must be properly connected. Never disconnect the protective earth conductor. Class II appliances do not have a protective earth conductor.
- Make sure that voltage-conducting cables are not kinked or otherwise mechanically damaged.
- Never bypass the device fuse.

WARNING:
- The device must not be used if there are obvious signs of damage to the device.
- The device may only be installed in voltage-free state.
- Do not operate the device if its power cord is damaged.
- Only a qualified person may replace permanently connected power cords.

NOTICE:
- Do not operate the device right after it has been subjected to strong temperature fluctuations (e.g., after transport). Humidity and condensation may have damaged the device. Only switch the device on once it has reached room temperature.
-
Make sure that the voltage and frequency of the power supply correspond to the values specified on the device. If the device has a voltage selector, do not plug in the device until it has been properly set up. Only use suitable power cords.
-
Simply pressing the On/Off switch on the device is not enough to entirely disconnect the device from the power supply.
- Make sure that the fuse used corresponds to the type shown on the device.
- Make sure that suitable measures have been taken to prevent power surges (e.g., lightning strike).
- Observe the specified maximum output current on devices with a Power Out connection. Ensure that the total power consumption of all devices connected to the device does not exceed the specified value.
- Replace plug-in power cords only with cords that are comparable to the originally supplied cords. The cross-section must not fall below the cross-section of the original cord.

DANGER:
- Risk of suffocation! Plastic bags and small parts must be kept out of reach of persons (including children) with reduced physical, sensory, or mental capabilities.
- Fall hazard! Make sure that the device is securely installed and cannot fall down. Only use suitable stands or mountings (especially for fixed installations). Make sure that accessories are properly installed and secured. Ensure that applicable safety regulations are observed when doing this.

WARNING:
- Only use the device as properly intended.
- Only operate the device with accessories recommended and provided by the manufacturer.
- Please observe the safety regulations in place in your country when installing the device.
- After the device is connected, check all cable paths to prevent any damage or accidents (e.g., tripping hazards).
- Please observe the specified minimum distances to materials with normal flammability! Unless explicitly stated, the minimum distance is 0.98 ft.
- Always observe the minimum distance to the illuminated surface to be read on the device!

CAUTION:
- Moving components such as mounting brackets or other moving components may become trapped.
- In the case of devices with motor-driven components, there is a risk of being injured by the moving device. Sudden device movements can lead to startle responses.
- The device's housing surface can get very hot during regular operation. Make sure that unintentional contact with the housing cannot happen. Always allow the device to cool sufficiently before disassembly, maintenance work, and charging, etc..

NOTICE:
- Do not install or operate the device near heating elements, heat storage units, stoves, or other sources of heat. Make sure that the device is always installed so that it is adequately cooled and cannot overheat.
- Do not put any sources of ignition (e.g., burning candles) near the device.
- Ventilation slots must be kept uncovered, and fans must not be blocked.
- Use the original packaging or packaging provided by the manufacturer for transport.
- Avoid shaking or banging the device.
- Observe the IP rating as well as the ambient conditions such as the specified temperature and humidity.
- Devices can be subject to ongoing development. If information on operating conditions, output, or other device characteristics differs between the user manual and device label, the information provided on the device always takes priority.
- The device is not suitable for tropical climate zones and operation above 6561 ft above sea level.
- The device is not suitable for operation under marine conditions.

CAUTION! IMPORTANT INFORMATION ON LIGHT PRODUCTS!
- Never look directly (not even briefly) into the light source.
- Never look into the light source with optical devices (e.g., magnifying glasses).
- Strobe effects can trigger epileptic seizures in susceptible individuals!
- A permanently installed light source is built into this luminaire and cannot be replaced by the user. Please contact your distributor in case of a system failure.



INFORMATION FOR PORTABLE INDOOR DEVICES
- Temporary operation! Event equipment is designed in general for temporary operation only.
- Continuous operation or permanent structural attachment, especially in outdoor areas, can negatively impact functionality, as well as surfaces and seals, and can lead to accelerated material fatigue.

BATTERY SAFETY
- Keep the spotlight with the battery installed away from excessive heat and direct sunlight. Do not place it on or in heating devices, such as microwaves, ovens, or radiators. Batteries may explode if overheated.
- Do not attempt to open the spotlight and change or modify the battery, do not insert foreign objects into the battery, or do not immerse it in or let it come into contact with water or other liquids. Failure to do so may result in fire, explosion, or other hazardous situations.
- In the event of the spotlight becoming deformed or overheating due to a battery malfunction during the charging process or during storage, immediately refrain from using the device and contact an authorized service center. Further use of the device may result in fire or an explosion.
- Do not put the spotlight into a fire, as it could explode. Damaged batteries may also explode.
- Do not strike or puncture the spotlight, or place it under high pressure. Failure to do so may cause a short circuit or overheating.
- Do not drop the spotlight. If the device is dropped, particularly onto a hard surface, the internal battery may be damaged.
- If the battery life shortens significantly, please contact an authorized service center.
- Do not attempt to remove the battery, as this could cause damage to the device. Please contact an authorized service center to exchange the battery.
CHARGING THE BATTERY, OPERATING, AND STORING THE SPOTLIGHT
- Connect the spotlight to the power supply in order to charge the internal battery. The battery is charged both when it is switched on and when the spotlight is switched off.
- It takes approx. 2 hours to charge the battery from 0% to 100%.
- The electronic battery management system protects the battery from overcharge and deep-discharge.
- Do not charge the spotlight's battery at ambient temperatures below 0^ and above 40^ .
- Operation may only occur at an ambient temperature above 0°C and below 40°C.
- The storage temperature must be above 0°C and below 35°C.
- Fully recharge the battery immediately after discharge. Batteries that are not fully charged lose capacity and have a shortened service life.
- Store the spotlight only with a fully charged battery.
- If the spotlight is not used for a longer period of time, completely recharge the battery every 6 months.
- To extend the lifetime of the battery, it is recommended that the battery is recharged as soon as possible and that it is not used until completely empty/fully de-energized.
- In cold environments, battery life may be shorter than expected.
- Store the spotlight in cool and dry conditions to ensure optimal storage conditions for the battery.
INTRODUCTION
BATTERY-POWERED SPOTLIGHT WITH 5 × 4 W RGBW LEDS
CLROOTPARBAT
CONTROL FUNCTIONS
DMX modes without DMX delay channel: 2-channel, 4-channel 1, 4-channel 2, 5-channel, 6-channel, and 9-channel DMX control
DMX modes with DMX delay channel: 3-channel, 5-channel 1, 5-channel 2, 6-channel, 7-channel, and 10-channel DMX control
Master/slave mode
Stand-alone functions
Control via IR remote control (remote control optionally available)
W-DMX connection possible with optional iDMX stick
PROPERTIES
5 × 4 W RGBW LEDs. 3-pin DMX connectors. Power Twist power connector, IN and OUT. Power supply-independent operation thanks to internal Li-ion battery. OLED display. Configurable PWM frequency. Connection for iDMX stick. Convection cooling. Tilt screw. Removable stand and mounting bracket for inconspicuous uplighting. 100–240 V AC operating voltage. Power consumption in mains operation and with simultaneous charging of the battery 75 W.
BATTERY LIFE
| BATTERY LIFE WITH FULLY CHARGED BATTERY IN POWER MODE STANDARD (STD) | |
| RGBW 100% approx. 5 h | |
| R + G 100% approx. 8 h 30 min | |
| G 100% approx. 12 h | |
| BATTERY LIFE WITH FULLY CHARGED BATTERY IN ECO POWER MODE | |
| RGBW 100% approx. 6 h 30 min | |
| R + G 100% approx. 14 h | |
| G 100% approx. 20 h | |
The charging time is approx. 2 hours.
CONNECTIONS, OPERATING AND DISPLAY ELEMENTS
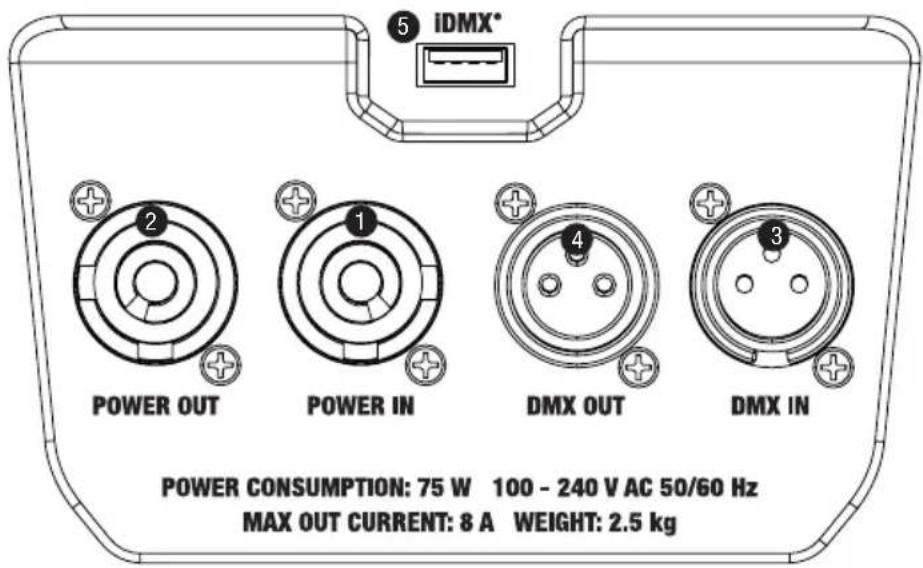
text_image
IDMX* POWER OUT POWER IN DMX OUT DMX IN POWER CONSUMPTION: 75 W 100 - 240 V AC 50/60 Hz MAX OUT CURRENT: 8 A WEIGHT: 2.5 kg1 POWER IN
Blue Power Twist power input socket. Operating voltage: 100–240 V AC / 50–60 Hz. A suitable power cable with Power Twist plug is included in the package contents.
2 POWER OUT
White Power Twist power output socket to supply power to additional Cameo spotlights (max. 8 A).
3 DMX IN
Male 3-pin XLR connector to connect a DMX control device (e.g., DMX console).
4 DMX OUT
Female 3-pin XLR connector to transmit the DMX control signal.
5 iDMX
Connection for the optionally available iDMX stick for W-DMX ^TM connection.
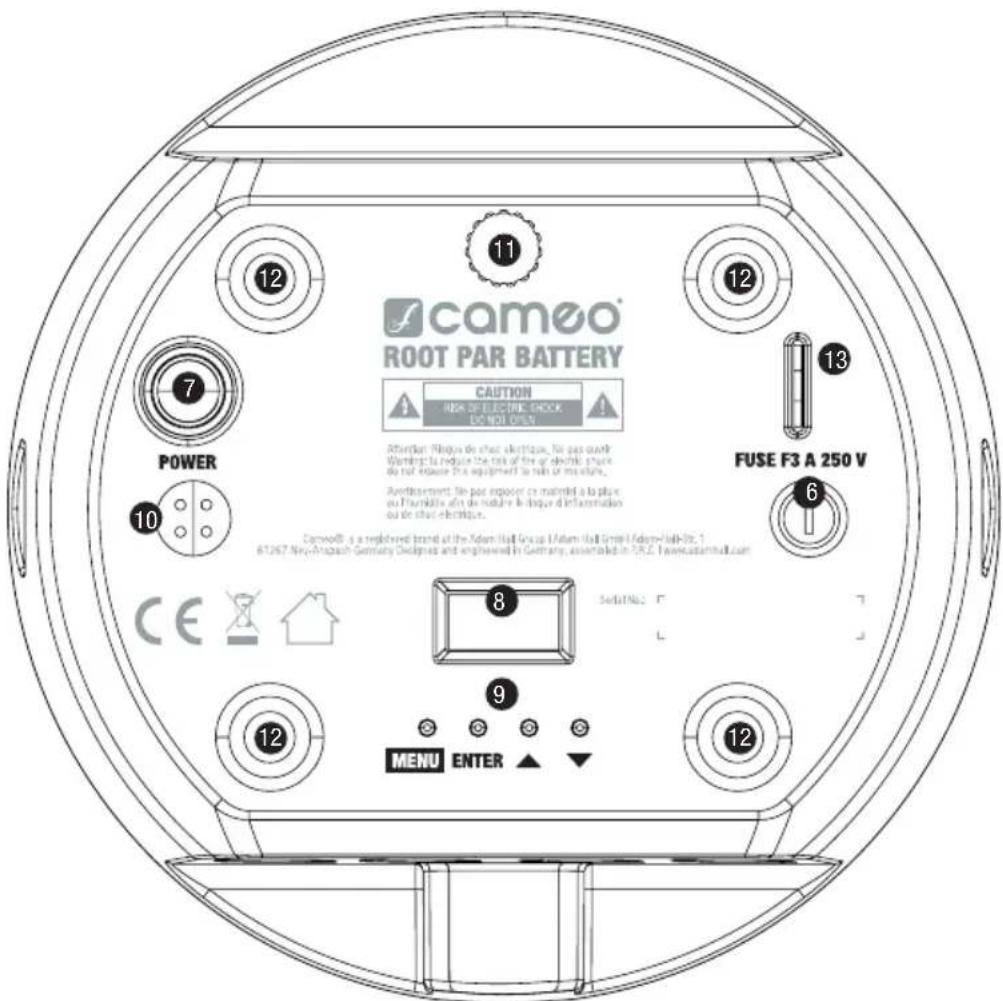
6 FUSE
Fuse holder for 5 × 20 mm micro fuses. IMPORTANT NOTE: Only replace the fuse with a fuse of the same type and values. If a fuse trips repeatedly, please contact an authorized service center.
7 POWER
Push switch for switching the spotlight on and off.
text_image
cameo® ROOT PAR BATTERY CAUTION NEW ELECTRIC CHECK IS NOT OPEN 12 11 12 13 7 POWER 10 FUSE F3 A 250 V 6 8 9 CE MENU ENTER ▲▼ Sed: No. 0 L CAMCOO® is a registered brand at the Atom Hall Group (Atom Hall General Assembly Hall-Str. 1) 61267 New-Amazon-Germany Designers and engineered in Germany, associated in P.E.C. Taiwan@camcoo.com8 OLED-DISPLAY
The OLED display shows the currently activated mode (main display), the menu options in the Options menu, and the numerical values or operating status for certain menu options. If there is no input within approx. two minutes, the information in the display automatically switches to the main display. Note on the main display in operating modes with external control: As soon as the control signal is interrupted, the symbols on the display will begin to flash. When the control signal is present again, the flashing will stop. Starting from the main display, briefly press the ▲ button to rotate the information in the display 180°.
9 CONTROL BUTTONS
MENU – you can access the options menu by pressing MENU. Pressing it again will return you to the main display. If you press MENU without having first pressed ENTER to confirm a value or status change, the previously confirmed value or status shall be restored.
ENTER – pressing ENTER takes you to the menu level, where value changes can be made, and you can reach the submenu using ENTER. Value or status adjustments can also by confirmed by pressing ENTER. ▲ and ▼ – these select the individual menu options in the selection menu (DMX address, mode, etc.) and in the submenus. They allow you to change the value of a menu option (e.g., DMX address) as desired.
10 MIC
Microphone for music control mode.
11 TILT
Knurled screw for tilting when used as uplight. The twin mounting bracket can be removed for a more subtle look.
12 RUBBER FEET
Four rubber feet for stability.
13 SAFETY EYEBOLT
Safety eyebolt for securing the spotlight on crossbeam installations.
OPERATION
NOTES
- After the spotlight is switched on, “Welcome to Cameo,” the model name, and the software version are shown one after the other on the display during the start-up process. Once the process is complete, the spotlight is ready for use and resumes whichever mode was most recently activated.
- Hold down the MENU button for approx. 2 seconds to directly access the main display from the lower menu levels. If there is no input within approx. two minutes, the main display is automatically activated. Briefly press MENU to go up one level in the submenus.
- Press MENU and ENTER at the same time to go directly to the last edited menu option.
- Starting from the main display, briefly press the ▲ button to rotate the information in the display 180°.
- To quickly change a value (e.g., DMX start address), hold down the ▲ or ▼ button.
- If the internal battery is charged while the spotlight is switched off, the battery symbol appears in the middle of the display and the charging status is shown by the corresponding segment flashing. The flashing stops once the battery is fully charged.
MAIN DISPLAY DMX MODE
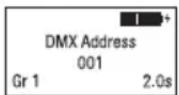
The DMX address and the currently configured DMX start address (e.g., 001) are shown on the display. If the DMX Delay function is activated, the delay group and the delay time are also displayed. The battery's charging status is shown in five segments in the upper-right corner of the display. When the spotlight is operated with a supply voltage, the internal battery is charged at the same time and a lightning symbol appears next to the battery symbol.
MAIN DISPLAY STAND-ALONE MODE
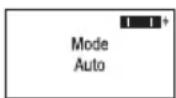
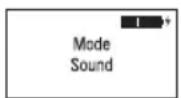
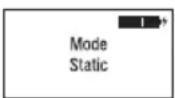
The display shows the currently activated stand-alone mode (Mode Auto, Mode Sound, Mode Static, Mode Color Preset, Mode User Color, Mode Loop). The battery's charging status is shown in five segments in the upper-right corner of the display. When the spotlight is operated with a supply voltage, the internal battery is charged at the same time and a lightning symbol appears next to the battery symbol.
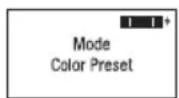
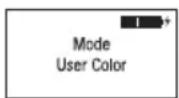
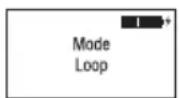
MAIN DISPLAY SLAVE MODE
Mode Slave is shown on the display. If the slave unit is assigned to a slave group, the slave group and delay time set on the master unit in the stand-alone modes Auto and Loop are also displayed. The battery's charging status is shown in five segments in the upper-right corner of the display. When the spotlight is operated with a supply voltage, the internal battery is charged at the same time and a lightning symbol appears next to the battery symbol.
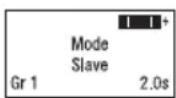
CONFIGURING THE DMX START ADDRESS
You can access the main menu by pressing MENU. Using the ▲ and ▼ buttons, now select the DMX Address menu option and press ENTER to confirm your selection. You can now set the DMX start address as desired using ▲ and ▼. Press enter to confirm your selection and then press MENU once to return to the main screen. If there is no input within approx. two minutes, the main display is automatically activated.

text_image
----Menu---- ►DMX Address DMX Mode DMX Delay Stand Alone Slave Settings System Info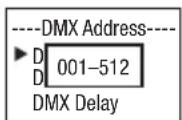
SETTING DMX MODE
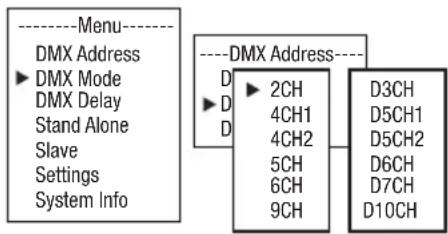
You can access the main menu by pressing MENU. Using the ▲ and ▼ buttons, now select the DMX Mode menu option and press ENTER to confirm your selection. Use ▲ and ▼ again to select the desired DMX mode and press ENTER to confirm your selection (DMX operating modes with DMX delay channel are labeled with "D"). Press MENU once to return to the main screen. If there is no input within approx. two minutes, the main display is automatically activated. You can
find tables on channel assignment in the different DMX modes in these instructions under DMX CONTROL.
flowchart
graph TD
    A["----Menu----"] --> B["DMX Address"]
    B --> C["DMX Mode"]
    C --> D["DMX Delay"]
    D --> E["Stand Alone"]
    E --> F["Slave"]
    F --> G["Settings"]
    G --> H["System Info"]
    I["----DMX Address----"] --> J["D 2CH"]
    J --> K["4CH1"]
    J --> L["4CH2"]
    J --> M["5CH"]
    J --> N["6CH"]
    J --> O["9CH"]
    P["D3CH"] --> Q["D5CH1"]
    P --> R["D5CH2"]
    P --> S["D6CH"]
    P --> T["D7CH"]
    P --> U["D10CH"]
DMX DELAY
The DMX Delay function allows a chaser light effect to be easily created with any number of spotlights of the same model and software version, which could otherwise only be achieved with a suitable DMX controller and complex programming. All spotlights integrated into the setup are set to the same DMX mode and controlled with the same DMX start address.
Manually set the DMX delay for DMX operating modes without DMX delay channel (2CH, 4CH1, 4CH2, 5CH, 6CH, 9CH):
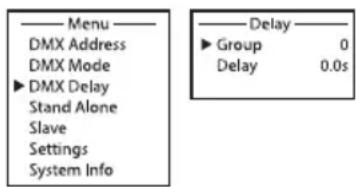
Starting from the main display, press MENU to go to the main menu. Using the ▲ and ▼ buttons, now select the DMX Delay menu option and press ENTER to confirm your selection. Use ▲ and ▼ again to select the desired submenu item, press ENTER to confirm, and set the corresponding value as desired. Press ENTER to confirm all entries.
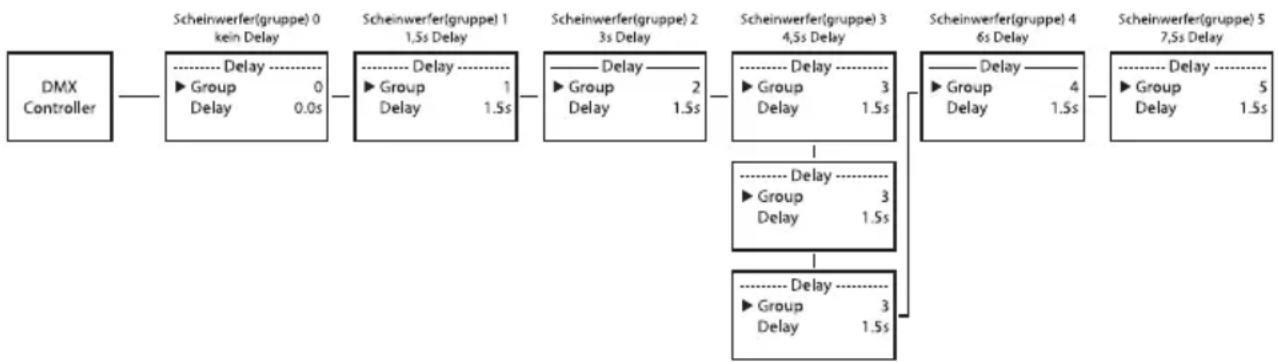
Assign the spotlight to one of 47 groups (maximum number of groups depends on the activated DMX mode). Several spotlights can also be assigned to one group. The group number is also the factor by which the set delay time is multiplied.
The delay time (delay time of the DMX signal) can be set manually on each spotlight separately with different values (0.0 s to 2.0 s in 0.1 s steps).
text_image
Menu DMX Address DMX Mode DMX Delay Stand Alone Slave Settings System Info Delay ► Group 0 Delay 0.0sSetup example:
flowchart
graph LR
    A["DMX Controller"] --> B["Scheinwerfer(gruppe) 0 kein Delay"]
    B --> C["Scheinwerfer(gruppe) 1 1,5s Delay"]
    C --> D["Scheinwerfer(gruppe) 2 3s Delay"]
    D --> E["Scheinwerfer(gruppe) 3 4,5s Delay"]
    E --> F["Scheinwerfer(gruppe) 4 6s Delay"]
    F --> G["Scheinwerfer(gruppe) 5 7,5s Delay"]

    subgraph Group1
        B --> B1["► Group 0 Delay 0.0s"]
        C --> C1["► Group 1 Delay 1.5s"]
        D --> D1["► Group 2 Delay 1.5s"]
        E --> E1["► Group 3 Delay 1.5s"]
        F --> F1["► Group 4 Delay 1.5s"]
        G --> G1["► Group 5 Delay 1.5s"]
    end
Set the DMX delay for DMX operating modes with DMX delay channel (D3CH, D5CH1, D5CH2, D6CH, D7CH, D10CH):
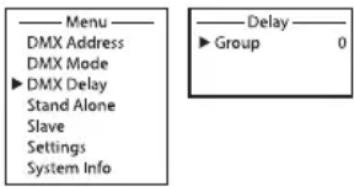
Starting from the main display, press MENU to go to the main menu. Using the ▲ and ▼ buttons, now select the DMX Delay menu option and press ENTER twice to confirm your selection.
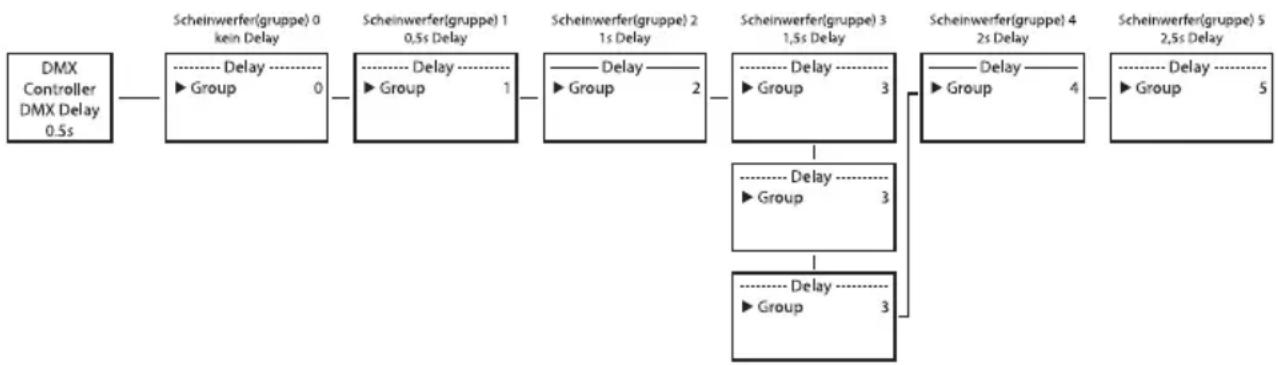
Assign the spotlight to one of 47 groups (maximum number of groups depends on the activated DMX mode). Several spotlights can also be assigned to one group. The group number is also the factor by which the set delay time is multiplied. Confirm each entry with ENTER.
text_image
Menu DMX Address DMX Mode DMX Delay Stand Alone Slave Settings System Info Delay ► Group 0The delay time (delay time of the DMX signal) is set using a DMX controller in the separate DMX delay channel of the corresponding DMX operating mode (0.0 s to 2.0 s in 0.1 s steps).
Setup example:
flowchart
graph LR
    A["DMX Controller DMX Delay 0.5s"] --> B["Scheinwerfer(gruppe) 0: kein Delay"]
    B --> C["Scheinwerfer(gruppe) 1: 0,5s Delay"]
    C --> D["Scheinwerfer(gruppe) 2: 1s Delay"]
    D --> E["Scheinwerfer(gruppe) 3: 1,5s Delay"]
    E --> F["Scheinwerfer(gruppe) 4: 2s Delay"]
    F --> G["Scheinwerfer(gruppe) 5: 2,5s Delay"]
    B --> H["Group 0"]
    C --> I["Group 1"]
    D --> J["Group 2"]
    E --> K["Group 3"]
    F --> L["Group 4"]
    G --> M["Group 5"]
    H --> N["Delay Group 0"]
    I --> O["Delay Group 1"]
    J --> P["Delay Group 2"]
    K --> Q["Delay Group 3"]
    L --> R["Delay Group 4"]
STANDALONE MODE AUTO / SOUND
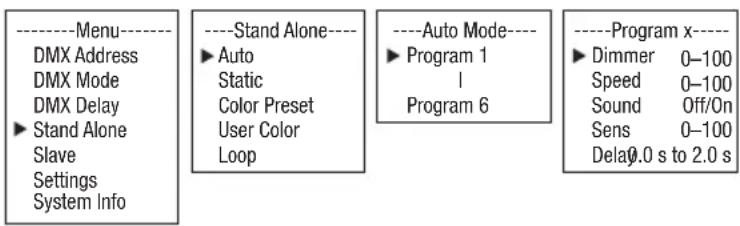
The 6 available Auto programs each consist of preprogrammed color change sequences; brightness, operating speed, music control with microphone sensitivity, and delay (signal delay) are configured separately for each program.
Starting from the main display, press MENU to go to the main menu. Using the ▲ and ▼ buttons, now select the Stand Alone menu option and press ENTER to confirm your selection. Use ▲ and ▼ again to select the stand-alone mode Auto and press ENTER to confirm your selection. Now use ▲ and ▼ to select the desired program (Program 1 to Program 6) and press ENTER to confirm your selection.
flowchart
graph TD
    A["----Menu---- DMX Address DMX Mode DMX Delay ▶ Stand Alone Slave Settings System Info"] --> B["----Stand Alone---- ▶ Auto Static Color Preset User Color Loop"]
    B --> C["----Auto Mode---- ▶ Program 1 I Program 6"]
    C --> D["----Program x---- ▶ Dimmer 0-100 Speed 0-100 Sound Off/On Sens 0-100 Delay 0.0 s to 2.0 s"]
This will take you to the submenu for setting the submenu options (see table, use ▲ and ▼ to select, press ENTER to confirm, use ▲ and ▼ to change the value or status, press ENTER to confirm). The settings are made separately for each program and remain unchanged even after the device is restarted.
| STANDALONE MODE AUTO / SOUND (PROGRAMME 1 to PROGRAMME 6) | |||
| Dimmer Sets brightness 0 - 100 | |||
| Speed Sets running speed 0 - 100 | |||
| Sound | Activates/deactivates music-control | Off | Deactivates music-control |
| On | Activates music-control | ||
| Sens Sets | microphone sensitivity 0 - 100 | ||
| Delay Delay time for slave groups 0.0s - 2.0s | |||
STANDALONE MODE STATIC
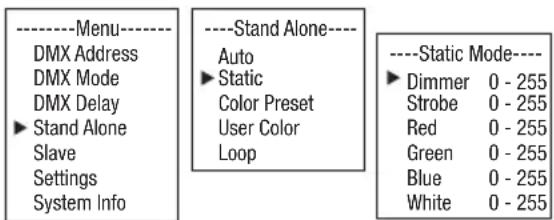
The standalone mode static allows the dimmer, strobe, R, G, B and W values to be set directly on the device, with values between 000 and 255, in a similar way to with a DMX controller. In this way, an individual scene can be created without an additional DMX controller.
Starting from the main display, press MENU to enter the main menu. Now use ▲ and ▼ to select the menu item Stand Alone and confirm with ENTER. Again use ▲ and ▼ to select standalone mode Static and confirm with ENTER. Using ▲ and ▼, now select the menu item that you wish to edit and confirm with ENTER. You can use ▲ and ▼ to configure the desired value between 000 and 255. Confirm all entries with ENTER.
text_image
----Menu---- DMX Address DMX Mode DMX Delay ► Stand Alone Slave Settings System Info ----Stand Alone---- Auto ► Static Color Preset User Color Loop ----Static Mode---- ► Dimmer 0 - 255 Strobe 0 - 255 Red 0 - 255 Green 0 - 255 Blue 0 - 255 White 0 - 255COLOR PRESET STAND-ALONE MODE
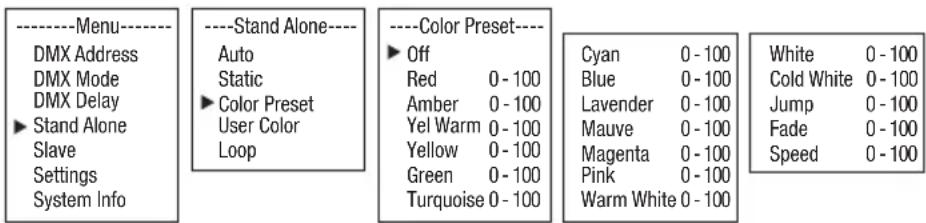
15 different color presets plus Jump and Fade are available as presets; the brightness can be configured separately for each preset, as well as the operating speed for Jump and Fade.
Starting from the main display, press MENU to go to the main menu. Using the ▲ and ▼ buttons, now select the Stand Alone menu option and press ENTER to confirm. Use ▲ and ▼ again to select the stand-alone mode Color Preset and press ENTER to confirm your selection. Now use ▲ and ▼ to select the color you want as a preset and press ENTER to confirm your selection (Off = Blackout; Speed refers to Jump and Fade). You can set the brightness as desired from 000 to 100 using ▲ and ▼. Confirm with ENTER.
text_image
----Menu---- DMX Address DMX Mode DMX Delay ► Stand Alone Slave Settings System Info ----Stand Alone---- Auto Static ► Color Preset User Color Loop ----Color Preset---- ► Off Red 0 - 100 Amber 0 - 100 Yel Warm 0 - 100 Yellow 0 - 100 Green 0 - 100 Turquoise 0 - 100 Cyan 0 - 100 Blue 0 - 100 Lavender 0 - 100 Mauve 0 - 100 Magenta 0 - 100 Pink 0 - 100 Warm White 0 - 100 White 0 - 100 Cold White 0 - 100 Jump 0 - 100 Fade 0 - 100 Speed 0 - 100USER COLOR STAND-ALONE MODE
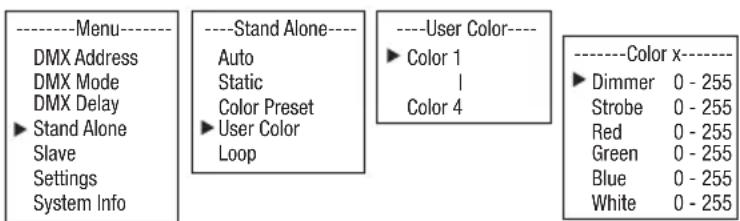
The stand-alone mode User Color makes it possible to save the overall brightness, strobe, and a color mix of R, G, B, and W to four individual color presets directly on the device.
Starting from the main display, press MENU to go to the main menu. Using the ▲ and ▼ buttons, now select the Stand Alone menu option and press ENTER to confirm your selection. Use ▲ and ▼ again to select the stand-alone mode User Color and press ENTER to confirm your selection. Now use ▲ and ▼ to select the desired preset (Color 1 to Color 4) and press ENTER to confirm. Now use ▲ and ▼ to select the menu option you would like to change and press ENTER to confirm your selection. You can set the value as desired from 000 to 255 using ▲ and ▼. The strobe effect values correspond to the values in channel 2 of the DMX table 4 CH mode 1. Press ENTER to confirm all entries.
text_image
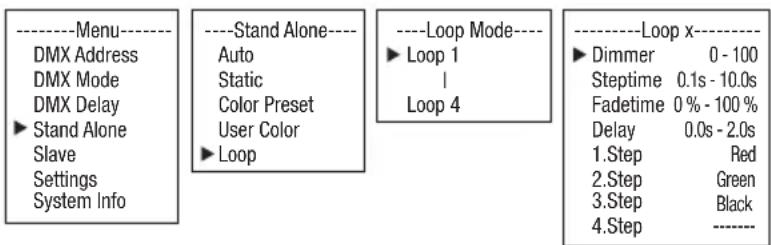
----Menu---- DMX Address DMX Mode DMX Delay ► Stand Alone Slave Settings System Info ----Stand Alone---- Auto Static Color Preset ► User Color Loop ----User Color---- ► Color 1 | Color 4 ----Color x---- ► Dimmer 0 - 255 Strobe 0 - 255 Red 0 - 255 Green 0 - 255 Blue 0 - 255 White 0 - 255The stand-alone Loop mode allows up to four different color change programs to be individually designed, saved, and reproduced. Brightness, step time, fade time, and delay (signal delay) can be set separately.
Starting from the main display, press MENU to go to the main menu. Using the ▲ and ▼ buttons, now select the Stand Alone menu option and press ENTER to confirm your selection. Use ▲ and ▼ again to select the stand-alone mode Loop and press ENTER to confirm your selection. Now use ▲ and ▼ to select the desired loop (Loop 1 to Loop 4) and press ENTER to confirm your selection.
text_image
----Menu---- DMX Address DMX Mode DMX Delay ► Stand Alone Slave Settings System Info ----Stand Alone---- Auto Static Color Preset User Color ► Loop ----Loop Mode---- ► Loop 1 | Loop 4 ----Loop x---- ► Dimmer 0 - 100 Steptime 0.1s - 10.0s Fadetime 0% - 100% Delay 0.0s - 2.0s 1.Step Red 2.Step Green 3.Step Black 4.Step ----This will take you to the submenu for setting the submenu options (see table, use ▲ and ▼ to select, press ENTER to confirm, use ▲ and ▼ to change the value or status, press ENTER to confirm). The settings are made separately for each loop and are retained even after restarting the device.
| STANDALONE MODE LOOP (Loop 1-4) | ||
| Dimmer Sets brightness 0-100 | ||
| Step time Sets step time 0.1 s to 10.0 s | ||
| Fade time Sets fade time in percent 0% to 100% | ||
| Delay Delay time for slave groups 0.0 s to 2.0 s | ||
| 1st step 15 | colors from Color Preset Red to CW (Cold White) | |
| 4 colors from User Color User 1 to User 4 | ||
| Blackout Blackout | ||
| 2nd step " | " | |
| 3rd step | 15 colors from Color Preset Red to CW (Cold White) | |
| 4 colors from User Color User 1 to User 4 | ||
| Blackout Blackout | ||
| ---- | Skip step | |
| 4th step | " | " |
SLAVE MODE
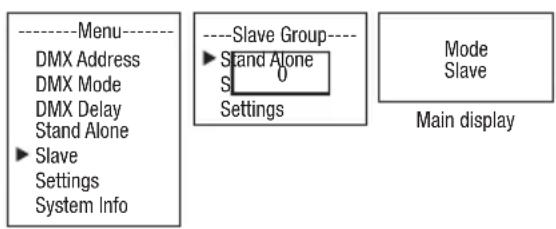
Standard Slave mode: Starting from the main display, press MENU to go to the main menu. Using the ▲ and ▼ buttons, now select the Slave menu option, press ENTER to confirm your selection, then select Slave Group 0, and press enter once again to confirm. Connect the slave and master unit (same model, same software version) using a DMX cable, and activate one of the stand-alone modes on the master unit (Auto, Static, Color Preset, User Color, Loop). The slave unit will now follow the master unit precisely.
text_image
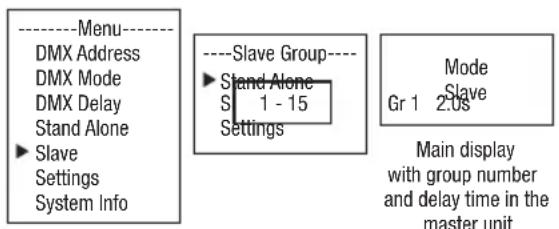
----Menu---- DMX Address DMX Mode DMX Delay Stand Alone ► Slave Settings System Info ----Slave Group---- ► Stand Alone S 0 Settings Mode Slave Main displayAdvanced slave mode: If you want to control the slave units in master/slave mode using one of the stand-alone modes Auto or Loop, the control signal can be reproduced with a time delay of up to 15 levels. The delay time can be set in the Delay submenu option in the respective stand-alone mode, and the delay factor for the corresponding slave unit can be set in the slave menu. This allows a chaser light effect to be easily created with any number of spotlights of the
same model and software version, which could otherwise only be achieved with a suitable DMX controller and complex programming.
text_image
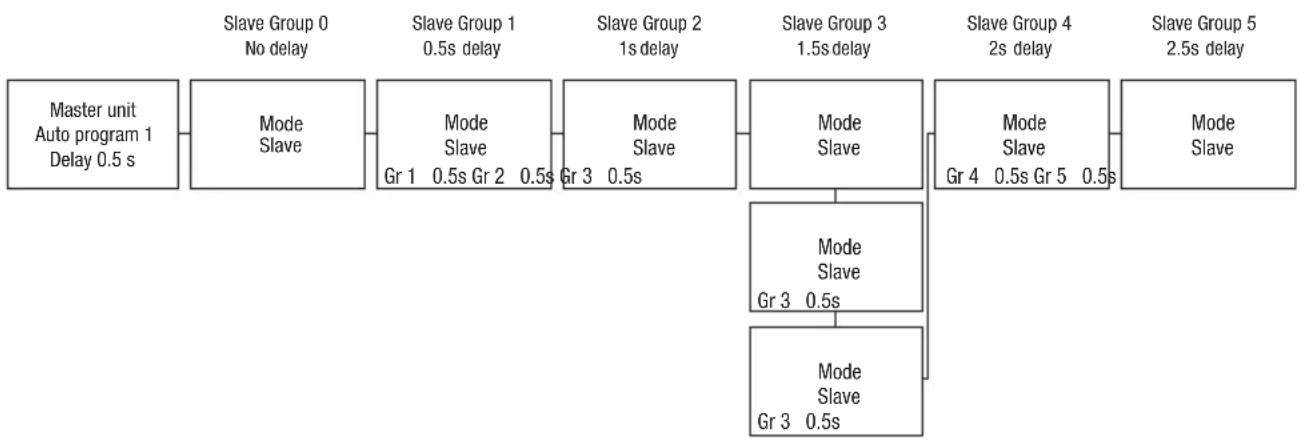
----Menu---- DMX Address DMX Mode DMX Delay Stand Alone ► Slave Settings System Info ----Slave Group---- ► Stand Alone S 1 - 15 Settings Mode Gr 1 2:0s Main display with group number and delay time in the master unitAssign the spotlight to one of 15 groups as you like. Several spotlights can also be assigned to one group. The group number is also the factor by which the set delay time on the master unit is multiplied (see setup example).
flowchart
graph LR
    A["Master unit Auto program 1 Delay 0.5 s"] --> B["Mode Slave"]
    B --> C["Slave Group 0 No delay"]
    C --> D["Slave Group 1 0.5s delay"]
    D --> E["Slave Group 1 0.5s delay"]
    E --> F["Slave Group 2 1s delay"]
    F --> G["Slave Group 2 1s delay"]
    G --> H["Slave Group 3 1.5s delay"]
    H --> I["Slave Group 3 1.5s delay"]
    I --> J["Slave Group 4 2s delay"]
    J --> K["Slave Group 4 2s delay"]
    K --> L["Slave Group 5 2.5s delay"]

    B --> M["Gr 1: Mode Slave, Gr 2: Mode Slave, Gr 3: Mode Slave, Gr 4: Mode Slave, Gr 5: Mode Slave, Gr 6: Mode Slave, Gr 7: Mode Slave, Gr 8: Mode Slave, Gr 9: Mode Slave, Gr 10: Mode Slave, Gr 11: Mode Slave, Gr 12: Mode Slave, Gr 13: Mode Slave, Gr 14: Mode Slave, Gr 15: Mode Slave, Gr 16: Mode Slave, Gr 17: Mode Slave, Gr 18: Mode Slave, Gr 19: Mode Slave, Gr 20: Mode Slave, Gr 21: Mode Slave, Gr 22: Mode Slave, Gr 23: Mode Slave, Gr 24: Mode Slave, Gr 25: Mode Slave, Gr 26: Mode Slave, Gr 27: Mode Slave, Gr 28: Mode Slave, Gr 29: Mode Slave, Gr 30: Mode Slave, Gr 31: Mode Slave, Gr 32: Mode Slave, Gr 33: Mode Slave, Gr 34: Mode Slave, Gr 35: Mode Slave, Gr 36: Mode Slave, Gr 37: Mode Slave, Gr 38: Mode Slave, Gr 39: Mode Slave, Gr 40: Mode Slave, Gr 41: Mode Slave, Gr 42: Mode Slave, Gr 43: Mode Slave, Gr 44: Mode Slave, Gr 45: Mode Slave, Gr 46: Mode Slave, Gr 47: Mode Slave, Gr 48: Mode Slave, Gr 49: Mode Slave, Gr 50: Mode Slave, Gr 51: Mode Slave, Gr 52: Mode Slave, Gr 53: Mode Slave, Gr 54: Mode Slave, Gr 55: Mode Slave, Gr 56: Mode Slave, Gr 57: Mode Slave, Gr 58: Mode Slave, Gr 59: Mode Slave, Gr 60: Mode Slave, Gr 61: Mode Slave, Gr 62: Mode Slave, Gr 63: Mode Slave, Gr 64: Mode Slave, Gr 65: Mode Slave, Gr 66: Mode Slave, Gr 67: Mode Slave, Gr 68: Mode Slave, Gr 69: Mode Slave, Gr 70: Mode Slave, Gr 71: Mode Slave, Gr 72: Mode Slave, Gr 73: Mode Slave, Gr 74: Mode Slave, Gr 75: Mode Slave, Gr 76: Mode Slave, Gr 77: Mode Slave, Gr 78: Mode Slave, Gr 79: Mode Slave, Gr 80: Mode Slave, Gr 81: Mode Slave, Gr 82: Mode Slave, Gr 83: Mode Slave, Gr 84: Mode Slave, Gr 85: Mode Slave, Gr 86: Mode Slave, Gr 87: Mode Slave, Gr 88: Mode Slave, Gr 89: Mode Slave, Gr 90: Mode Slave, Gr 91: Mode Slave, Gr 92: Mode Slave, Gr 93: Mode Slave, Gr 94: Mode Slave, Gr 95: Mode Slave, Gr 96: Mode Slave, Gr 97: Mode Slave, Gr 98: Mode Slave, Gr 99: Mode Slave, Gr 100: Mode Slave"]
SYSTEM SETTINGS (Settings)
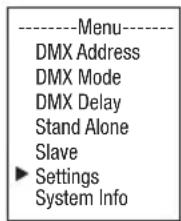
Starting from the main display, press MENU to go to the main menu. Using the ▲ and ▼ buttons, now select the Settings menu option and press ENTER to confirm your selection.
text_image
----Menu---- DMX Address DMX Mode DMX Delay Stand Alone Slave ► Settings System InfoThis will take you to the submenu for setting the submenu options (see table, use ▲ and ▼ to select, press ENTER to confirm, use ▲ and ▼ to change the value or status, press ENTER to confirm).
| Settings | ||||
| Disp Rev = Rotates display No Display does not rotate | ||||
| Yes Display rotates 180° (e.g., for overhead installation) | ||||
| Disp Back = Display backlight Off Deactivates after approx. 30 seconds of inactivity | ||||
| Sig Fail = Operating status if DMX signal is lost Master/Slave? | Hold Last command is held | |||
| Black Activates blackout | ||||
| User 1 User Color 1 is activated | ||||
| Power Mode = Battery life and LED brightness setting | STD Standard setting with maximum brightness | |||
| ECO Extended battery life at approx. 50% brightness | ||||
| IR Remote | = | Activates or deactivates control via IR remote control | On Activates control via the IR remote | |
| Off | Deactivates control via the IR remote | |||
| Sound | = | Adjusts the way the music control works | Last | Color is kept until next pulse |
| Off Color disappears after a short while until the next pulse | ||||
| PWM | = | LED PWM frequency | 650 Hz, 1530 Hz, 2150 Hz, 4000 Hz | Selects the LED PWM frequency |
| Calibration | = | Color calibration | Red, Green, Blue, White | Individual color calibration. Cross-mode brightness setting of the 4 LED groups RGBW with values from 0–255 |
| Reset | = | Resets settings | Factory | Resets to factory settings: Press ENTER to reset, MENU to cancel |
| Preset A | Resets to Preset A: Press ENTER to reset, MENU to cancel | |||
| Preset B | Resets to Preset B: Press ENTER to reset, MENU to cancel | |||
| Preset C | Resets to Preset C: Press ENTER to reset, MENU to cancel | |||
| Edit Preset | = | Saves all system settings in 3 individual presets | Preset A | Press ENTER to save |
| Preset B | Press ENTER to save | |||
| Preset C | Press ENTER to save | |||
| Service | = | Only for servicing purposes | ||
SYSTEM INFORMATIONEN (System Info)
Starting from the main display, press MENU to go to the main menu. Using ▲ and ▼, now select the System Info menu option and press EENTER to confirm your selection.
| ----Menu---- |
| DMX Address |
| DMX Mode |
| DMX Delay |
| Stand Alone |
| Slave |
| Settings |
| ►System Info |
This will take you to the submenu which will let you access system information (see table, use ▲ and ▼ to select, press ENTER to confirm, use ▲ and ▼ to change status, press ENTER to confirm).
| System Info | ||||
| Firmware = | Displays the device firmware | Firmware V1.xx | ||
| Tempera-ture | = | Displays tem-perature of the LED unit | LED xxx°C / xxx°F | |
| Unit °C (= displays in degrees Celsius) | ||||
| Op Hours = | Displays operatingtime | xx:xxh Displays the total operating time in hours and minutes | ||
IR REMOTE CONTROL (optional)
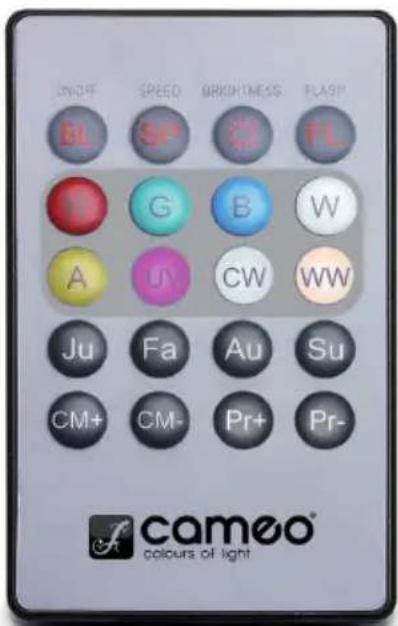
Aim the infrared remote control directly, within line-of-sight, at the infrared sensor installed on the front side of the spotlight. The maximum range is approx. 8 meters. The spotlight's sensor is deactivated in DMX and slave mode. The infrared remote control directly controls the internal stand-alone modes Auto / Sound, Static, and Color Preset.
BL / ON/OFF (Blackout)
The BL (Blackout) button switches off all LEDs, regardless of which mode is activated via the remote control. Press the BL button again to reactivate the previously selected mode.
SP (Speed)
6-speed setting for the color change programs: Color Jumping (Ju), Color Fading (Fa), and Auto Program (Au). Level 1 allows the color change sequence to progress slowly, pressing it again activates level 2 with a faster change sequence 4, 5, and 6, where level 6 is the fastest sequence of color change.
text_image
ON/OFF SPEED BRIGHTNESS FLASH BL SP FL G B W A JY CW WW Ju Fa Au Su CM+ CM- Pr+ Pr- camoo® colours of light
(Brightness)
Set the overall brightness in 6 steps. Press this button several times (Step 1 = blackout) to access the different brightness levels.
FL (Flash/Strobe)
Speed setting for the strobe effect in 6 steps. Step 1 deactivates the strobe effect, step 2 produces a slow frequency followed by steps 3 to 5. Step 6 produces the fastest flash frequency. The strobe effect can only be used in RGBW color mixing mode.
R / G / B / W
Individual color mixes can be created using these 4 buttons. The 6 brightness levels can be accessed by pressing the respective color button again, where level 1 means that the LEDs are switched off. Example: If you set red and green to their respective maximum levels and the other LEDs to their lowest (off), then you will have a color mix of light yellow.
Ju (Color change)
The color changes rapidly (color jumping). The color-changing speed can be set with the SP button (Speed).
Fa (Fade)
Colors fade into each other (color fading). The color-changing speed can be set with the SP button (Speed).
Au (Automatic mode)
Repeatedly press the Au button to select the desired color change program Auto 1–6.
Su (Music-controlled color change programs)
Repeatedly press the Su button to select one of the 6 music-controlled programs Sound 1–6. The control microphone is located on the back of the spotlight.
CM (Color macros)
Use the CM+ and CM- buttons to successively access fifteen color presets.
Pr+/Pr-
Select programs in automatic mode (Au) and in music control (Su).
INSTALLATION AND MOUNTING
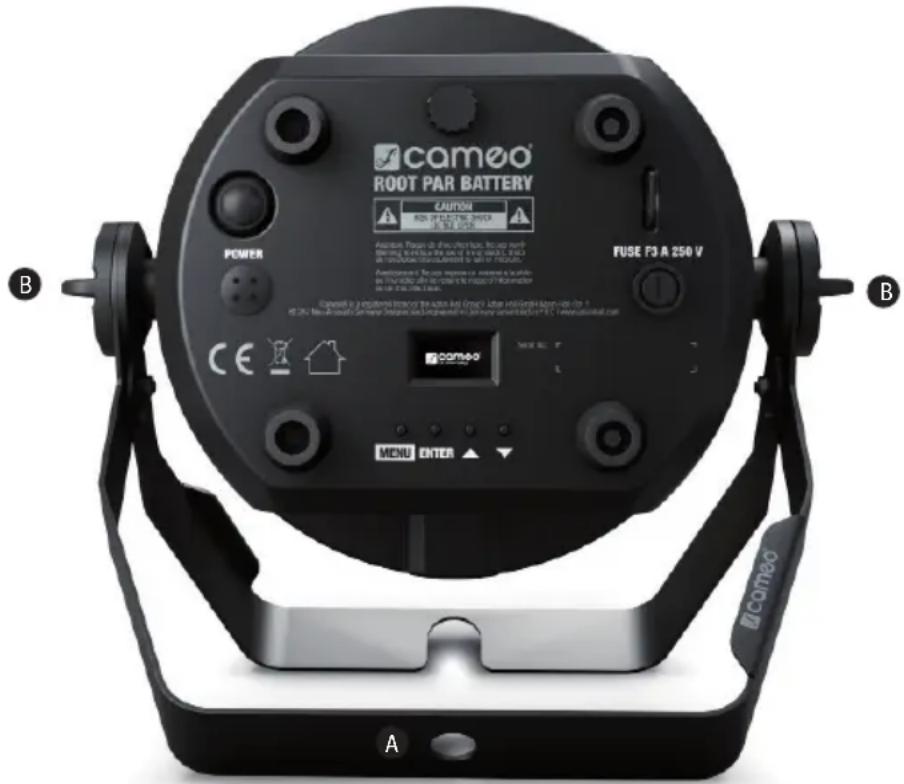
Thanks to its convenient double bracket, the lamp can be positioned in a suitable location on a level surface. Installation on a traverse is possible with a traverse clamp, which is attached to the mounting bracket (A). Suitable traverse clamps are optionally available. Ensure firm connections and secure the spotlight by attaching a suitable safety cable to the securing lug on the back of the spotlight.

DANGER: Overhead installation requires extensive experience, including the calculation of the load limit values of the installation material and regular safety inspection of all installation materials and spotlights. If you do not have these qualifications, do not attempt to carry out the installation yourself; contact a professional company. There is a risk that incorrectly mounted or secured devices may come loose and fall down. This may lead to serious injury and even fatalities.
text_image
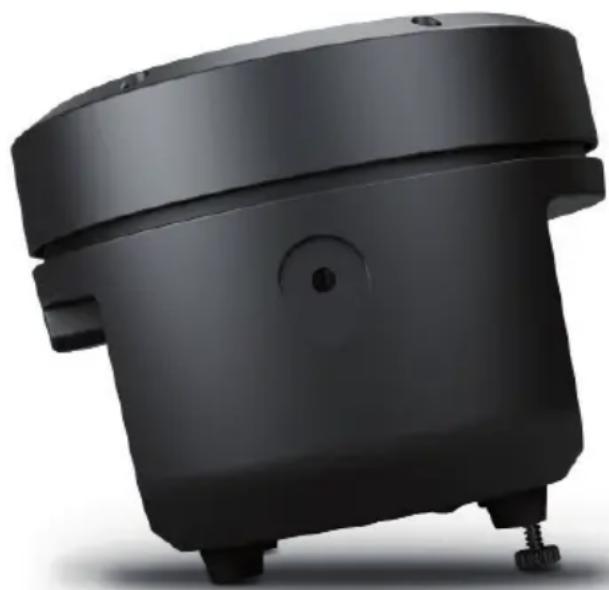
camoo ROOT PAR BATTERY CAUTION RUN OF ELECTRIC DETER IN 100 V/250V POWER FUSE F3 A 250 V CE MENU ENTER A B COMBOTo create a more discrete look when using as an uplight, the double mounting bracket can be removed by releasing both handle screws (B).
natural_image
Black industrial device with four legs and a circular vent, shown in profile view (no text or symbols visible)CARE, MAINTENANCE, AND REPAIR
The device must be maintained and serviced regularly, at least every 3,000 operating hours or at the latest after one year, in order to ensure that it continues to operate properly over the long term.
CARE (user executable)

WARNING! The power supply and, if possible, all device connections must be disconnected before carrying out any care/maintenance measures.

NOTE! Improper care can lead to damage to the device or even destruction.
- Housing surfaces must be cleaned with a clean, damp cloth. Make sure that no moisture can penetrate the device.
- Dust and dirt must be regularly removed from air inlets and outlets. If compressed air is used, care must be taken to prevent damage to the device (e.g., fans must be blocked in this case; otherwise they might overwind).
- Cables and plug-in contacts must be cleaned regularly and dust and dirt must be removed.
- In general, no cleaning agents or abrasive agents may be used to care for the device as this could have a negative impact on the surface finish.
- In general, devices must be stored in a dry place and protected from dust and dirt.
- All accessible or removable lenses and light emitting apertures must be cleaned on a regular basis to ensure proper and safe operation.
MAINTENANCE AND REPAIR (by specialists only)

DANGER! The device contains voltage-conducting components. There may still be residual voltage in the device even after it is disconnected from the power supply (e.g., due to charged capacitors).
NOTE! The device contains no user-serviceable components.
NOTE! Maintenance and repair work may only be carried out by sufficiently qualified specialists. In case of doubt, consult a specialist workshop.
NOTE! Improperly carried out maintenance work can affect the warranty claim.
NOTE! Please observe the enclosed installation guide when upgrading or retrofitting kits provided by the manufacturer.
DMX TECHNOLOGY
DMX-512
DMX (Digital Multiplex) is the designation for a universal transmission protocol for communications between corresponding devices and controllers. A DMX controller sends DMX data to the connected DMX device(s). The DMX data is always transmitted as a serial data stream that is forwarded from one connected device to the next via the “DMX IN” and “DMX OUT” connectors (XLR plug-type connectors) that are found on every DMX-capable device, provided the maximum number of devices does not exceed 32 units. The last device in the chain needs to be equipped with a terminator (terminating resistor).
DMX CONNECTION
DMX is the common “language” via which a very wide range of types and models of equipment from various manufacturers can be connected with one another and controlled via a central controller, provided that all of the devices and the controller are DMX compatible. For optimum data transmission, it is necessary to keep the connecting cables between the individual devices as short as possible. The order in which the devices are integrated in the DMX network has no influence on the addresses. Thus the device with the DMX address 1 can be located at any position in the (serial) DMX chain: at the beginning, at the end or somewhere in the middle. If the DMX address 1 is assigned to a device, the controller “knows” that it should send all data allocated to address 1 to this device regardless of its position in the DMX network.
SERIAL CONNECTION OF MULTIPLE LIGHTS
- Connect the male XLR connector (3-pin or 5-pin) of the DMX cable to the DMX output (female XLR socket) of the first DMX device (e.g. DMX-Controller).
- Connect the female 3-pin XLR connector of the DMX cable connected to the first projector to the DMX input (male 3-pin socket) of the next DMX device. In the same way, connect the DMX output of this device to the DMX input of the next device and repeat until all devices have been connected. Please note that as a rule, DMX devices are connected in series and connections cannot be shared without active splitters. The maximum number of DMX devices in a DMX chain should not exceed 32 units.
The Adam Hall 3 STAR, 4 STAR, and 5 STAR product ranges include an extensive selection of suitable cables.
DMX CABLES
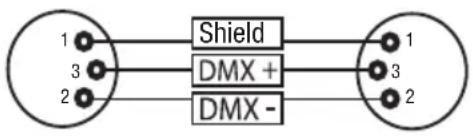
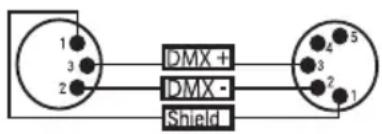
When fabricating your own cables, always observe the illustrations on this page. Never connect the shielding of the cable to the ground contact of the plug, and always make certain that the shielding does not come into contact with the housing of the XLR plug. If the shielding is connected to the ground, this can lead to short-circuiting and system malfunctions.
PIN ASSIGNMENT
DMX cable with 3-pin XLR connectors: DMX cable with 5-pin XLR connectors (pin 4 and 5 are not used):
flowchart
graph LR
    A["1"] --> B["Shield"]
    C["3"] --> B
    D["2"] --> B
    B --> E["1"]
    B --> F["3"]
    B --> G["2"]
    H["DMX +"] --> I
    J["DMX -"] --> K

text_image
DMX + DMX - ShieldDMX TERMINATORS (TERMINATING RESISTORS)
To prevent system errors, the last device in a DMX chain needs to be equipped with a terminating resistor (120 ohm, 1/4 Watt).
3-pin XLR connector with a terminating resistor: K3DMXT3
5-pin XLR connector with a terminating resistor: K3DMXT5
PIN ASSIGNMENT
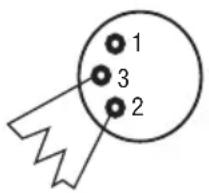
3-pin XLR connector: 5-pin XLR connector:
text_image
1 3 2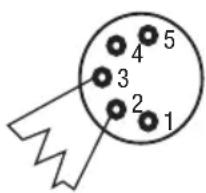
text_image
1 2 3 4 5DMX ADAPTER
The combination of DMX devices with 3-pin connectors and DMX devices with 5-pin connectors in a DMX chain is possible with suitable adapters.
PIN ASSIGNMENT
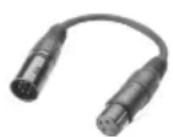
DMX Adapter 5-pin XLR male to 3-pin XLR female: K3DGF0020
Pins 4 and 5 are not used.
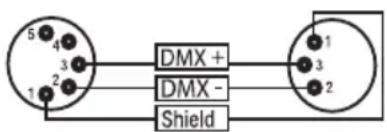
text_image
DMX + DMX - ShieldPIN ASSIGNMENT
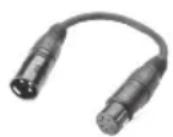
DMX Adapter 3-pin XLR male to 5-pin XLR female: K3DHM0020
Pins 4 and 5 are not used.
text_image
1 2 3 DMX + DMX - Shield 4 5 3 2 1TECHNICAL SPECIFICATIONS
| ARTICLE NUMBER: CLROOTPARBAT | |
| Product type: LED battery spotlight | |
| Type: PAR spotlight | |
| Color spectrum: RGBW | |
| Number of LEDs: 5 | |
| LED type: 4 W | |
| LED PWM frequency: 650 Hz, 1530 Hz, 2150 Hz, 4000 Hz (adjustable) | |
| Beam angle (half peak angle): | 33° (20°) |
| DMX input: 3-pin male | |
| DMX output: 3-pin female | |
| DMX modes: Without DMX delay channel: 2-channel, 4-channel 1, 4-channel 2, 5-channel, 6-channel, 9-channelWith DMX delay channel: 3-channel, 5-channel 1, 5-channel 2, 6-channel, 7-channel, 10-channel | |
| DMX functions: dimmer, fine dimmer, strobe, red, green, blue, white, color macros, running light selection, DMX delay, microphone sensitivity | |
| Controller: DMX512, IR remote control, W-DMX (via optional iDMX stick) | |
| Stand-alone functions: | auto programs, sound programs, static, color presets, user colors, loop function |
| Control elements: | Mode, Enter, Up, Down |
| Display elements: | OLED display |
| Operating voltage: | 100–240 V AC / 50–60 Hz |
| Power consumption (max.): | 75 W (when ALL LED @FULL ON and battery is charged)24 W when battery is full and ALL LED @FULL ON |
| Illumination intensity (@1 m/@3 m): | 8000 lx / 806 lx |
| Luminous flux: | 1000 lm |
| Power supply connection: | INPUT: Blue Power Twist power socketOUTPUT: White Power Twist power socket (max. 8 A) |
| Electrical protection class (IP): | 1 |
| Fuse: | F3A / 250 V (5 × 20 mm) |
| Battery: | Li-Ion / 4400 mAH / 22.2 V / 97.7 Wh |
| Ambient temperature (in operation): | 0°C to 40°C |
ARTICLE NUMBER: CLROOTPARBAT
Relative humidity: < 75%, non-condensing
IP rating: IP20
Housing color: Black
Housing material: ABS plastic
Housing cooling: Convection cooling
Dimensions 195 × 156 × 195 mm
(W × H × D, without
mounting bracket):
Weight (incl. mounting 2.5 kg
bracket):
Additional features: Power cable included in the package contents and IR remote control available as optional accessory (CLPFLAT1REMOTE). iDMX stick for W-DMX™ connection optionally available (CLIDMXSTICK)
DISPOSAL

Packaging
- Packaging can be recycled using the usual disposal methods.
- Please separate packaging in accordance with the disposal laws and recycling regulations in your country.
Device:
- This device is subject to the European Community Directive on waste electrical and electronic equipment (WEEE) in the currently applicable version. WEEE Directive Waste Electrical and Electronic Equipment. Waste equipment does not belong in household waste. Waste equipment must be disposed by a registered waste disposal company or at a municipal disposal facility. Please observe the applicable regulations in your country!
- Observe all waste disposal laws applicable in your country.
- Private customers can contact the distributor/retailer from whom the product was purchased or the relevant local authorities to obtain information on environmentally friendly waste management
MANUFACTURER'S DECLARATIONS
MANUFACTURER'S WARRANTY AND LIMITATION OF LIABILITY
Adam Hall GmbH, Adam-Hall-Str. 1, D-61267 Neu Anspach, Germany / Email Info@adamhall.com / +49 (0)6081 / 9419-0.
Our currently valid warranty conditions and limitation of liability are available at:
https://cdn-shop.adamhall.com/media/pdf/Manufacturers-Declarations-CAMEO_DE_EN_ES_FR.pdf.
Please contact your distributor when servicing is required.
CE CONFORMITY
Adam Hall GmbH hereby declares that this product complies with the following guidelines (where applicable):
R&TTE (1999/5/EG) or RED (2014/53/EU) as of June 2017
Low-Voltage Directive (2014/35/EU)
EMC Directive (2014/30/EU)
RoHS (2011/65/EU)
The full declaration of conformity can be found at www.adamhall.com.
It can also be requested from info@adamhall.com.
SUBJECT TO PRINTING ERRORS AND MISTAKES, AS WELL AS TECHNICAL OR OTHER CHANGES!
DEUTSCH
text_image
camoo® ROOT PAR BATTERY CAUTION HOLD OF ELECTRIC SWITCH DO NOT OPEN 12 11 12 13 7 POWER 10 FUSE F3 A 250 V 6 Aerolition: No power expener or material a le plus ou Humilate aft de reduce in disque d'information on die charge electrical. Camoo® is a registered brand of the Adam Hall Group (Adam Hall Group Adam-Hall-Str. 1) 61287 New-Asspass Germany Designed and employed in Germany, assembled on P.O.C. www.adamhall.com CE 8 9 MENU ENTER ▲▼ Serial No: C L7 POWER
natural_image
Black industrial robotic device with four legs and a circular vent, shown in profile view (no text or symbols visible)natural_image
Coiled black cable with two connectors and a 3-pin connector (no text or symbols visible)DMX-Adapter 5-Pol XLR male auf 3-Pol XLR female: K3DGF0020
text_image
fcamoo® ROOT PAR BATTERY CAUTION RISK OF ELECTRIC SHOCK DO NOT OPEN 12 11 12 13 7 POWER 10 FUSE F3 A 250 V 6 8 9 CE MENU ENTER ▲ Radio No. 0 L MENU ENTER 61267 Neu-Ampach Germany Designed and engineered in Germany, ascribed in PUEC www.adamhall.com7 POWER
text_image
ON/OFF SPED BRIGHTNESS FLASH BL SP G B W A UV CW WW Ju Fa Au Su CM+ CM- Pr+ Pr- cameo® colours of lightSP (Speed)
natural_image
Black industrial device with four legs and a circular top, no visible text or symbolsENTRETIEN, MAINTENANCE ET RÉPARATION
https://cdn-shop.adamhall.com/media/pdf/Manufacturers-Declarations-CAMEO_DE_EN_ES_FR.pdf.
Directive CEM (2014/30/UE)
RoHS (2011/65/UE)
text_image
cameo® ROOT PAR BATTERY CAUTION PAK OF COLDING SHOCK DEMOIT OPEN POWER 10 12 11 12 13 FUSE F3 A 250 V Afferler: Blaque de class electritus. He can auto. Working: to reduce the risk of fire or electric staws do not expose the equipment to rain or rainline. Averifarmant: No pas sequerir ou material a la plus ou tronally and do reduce le dosage d'information ou de class electritus. Camoele is a registered brand of the Adam Hall Group I Adam Hall GmbH Adams-Hall-Sta. 1 e1257 New-Atopaxi Germany Designed and ergovated in Germany, assertained in OUS Dewuxstammell.com CE 8 9 MENU ENTER 127 POWER
text_image
DRGFF SPED BRIGHTNESS FLASH BL SP Q FL K G B W A UV CW WW Ju Fa Au Su CM+ CM- Pr+ Pr- cameo® colours of lightSP (Speed)
natural_image
Black industrial robot component with mounting feet and a circular vent (no visible text or symbols)https://cdn-shop.adamhall.com/media/pdf/Manufacturers-Declarations-CAMEO_DE_EN_ES_FR.pdf.