F9 Pro - Robot vacuum DREAME - Free user manual and instructions
Find the device manual for free F9 Pro DREAME in PDF.

| Product type | Robot vacuum |
| Brand | Dreame |
| Model | F9 Pro (RLF22GA) |
| Power supply | Lithium-ion battery 14.4 V, charger 20.0 V 0.6 A |
| Charging time | Approximately 7 hours |
| Rated power | 40 W |
| Operating frequency | 2400-2483.5 MHz |
| Estimated battery life | Approximately 100 minutes (depending on mode) |
| Dustbin capacity | Approximately 300 ml |
| Water tank capacity | Approximately 200 ml |
| Navigation system | LDS laser (class 1) |
| Main functions | Quick mapping, scheduled cleaning, spot cleaning, silent/standard/strong/turbo mode, Do Not Disturb mode |
| Connectivity | 2.4 GHz Wi-Fi, Dreamehome app |
| Wet cleaning | Yes, with water tank and adjustable mopping pad |
| Sensors | Laser distance sensor, drop sensors, return-to-dock sensors |
| Maintenance and cleaning | Clean dustbin, filter, brushes, sensors, charging contacts; replace mopping pad every 3-6 months, main brush every 6-12 months |
| Safety | Automatic stop when lifted, fall detection, class 1 laser with no eye hazard |
| Estimated weight | Approximately 3.5 kg |
| Estimated dimensions (L×W×H) | 350 × 350 × 95 mm |
| Warranty | Contact customer service |
Frequently Asked Questions - F9 Pro DREAME
User questions about F9 Pro DREAME
0 question about this device. Answer the ones you know or ask your own.
Ask a new question about this device
Download the instructions for your Robot vacuum in PDF format for free! Find your manual F9 Pro - DREAME and take your electronic device back in hand. On this page are published all the documents necessary for the use of your device. F9 Pro by DREAME.
USER MANUAL F9 Pro DREAME
Robot Vacuum and Mop
User Manual
The illustrations in this manual are for reference only. Please refer to the actual product.
DREAME
Contents
EN User Manual
DE Benutzerhandbuch 22
FR Manuel d'utilisation 45
I Manuale utente 67
ES Manual de usuario 89
RU INHCTpyKcIyno 3KcIyatau
PL Instruktura obstugi 133
NL Gebruikershandleiding 155
TR Kullanici Kilavuzu 176
vi Huong dan surdung 197
218
HE 239
AR 260
Safety Information
To avoid electric shock, fire or injury caused by improper use of the appliance, please read the user manual carefully before using the appliance and keep it for future reference.
Usage Restrictions
This product should not be used by children younger than 8 years old nor persons with physical, sensory, intellectual deficiencies, or limited experience or knowledge without the supervision of a parent or guardian to ensure safe operation and to avoid any risks. Cleaning and maintenance shall not be performed by children without supervision.
Children shall not play with this product. Ensure children and pets are kept at a safe distance from the robot while it is operating.
This product is for floor cleaning in a home environment only. Do not use it outdoors, on non-floor surfaces, or in a commercial or industrial setting.
If the charger becomes damaged or broken, stop using it immediately and contact after-sales service.
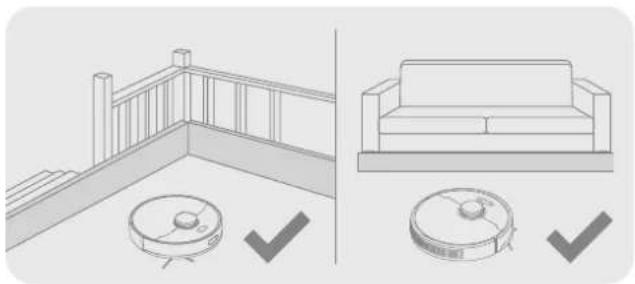
- Do not use the robot in an area suspended above ground level without a protective barrier.
- Do not place the robot upside down. Do not use the LDS cover, robot cover, or bumper as a handle for the robot.
- Do not use the robot at an ambient temperature above 40^ or below 0^ on a floor with liquids or sticky substances.
- Pick up any cables from the floor before using the robot to prevent it from dragging them while cleaning.
- Remove fragile or small items from the floor to prevent the robot from bumping into and damaging them.
Safety Information
Usage Restrictions
- To prevent damage or harm from dragging, clear any loose objects from the floor, and remove cables or power cords on the cleaning path before operating the appliance.
- Keep hair, fingers, and other body parts away from the suction opening of the robot.
Keep the brush cleaning tool out of reach of children.
Do not place children, pets, or any item on top of the robot regardless of whether it is stationary or moving. - Do not use the robot to clean any burning objects. Do not use the robot to pick up flammable or combustible liquids, corrosive gases, or undiluted acids or solvents.
- Do not vacuum hard or sharp objects. Do not use the appliance to pick up objects such as stones, large pieces of paper or any item that may clog the appliance.
Make sure the robot is turned off and the charging dock is unplugged before cleaning or performing maintenance. - Do not use a wet cloth to wipe or any liquid to rinse the robot and charging dock. Washable parts must be dried completely before installing and using them.
Make sure the robot is turned off when being transported and kept in its original packaging if possible.
Please use this product in accordance with the instructions in the User Manual. Users are responsible for any loss or damage that arise from improper use of this product.
Safety Information
EN
Batteries and Charging
- Do not use any third-party battery, charger, or charging dock. Use only with RCS1 supply unit.
- Do not attempt to disassemble, repair, or modify the battery or charging dock on your own.
- Do not place the charging dock near a heat source.
- Do not use a wet cloth or wet hands to wipe or clean the dock's charging contacts.
- Do not improperly dispose of old batteries. Unneeded batteries should be discarded at an appropriate recycling facility.
- If the robot will not be used for an extended period, fully charge it, then turn it off and store in a cool, dry place. Recharge the robot at least once every 3 months to avoid over-discharging the battery.
This product contains batteries that can only be replaced by qualified technicians or after-sales service.
Laser Safety Information
- The laser sensor in this product meets the IEC 60825-1:2014/EN 60825-1:2014/A11:2021 Standard for Class 1 laser products. Please avoid direct eye contact with it during use.
CLASS 1 LASER PRODUCT CONSUMER LASER PRODUCT EN 50689:2021
Hereby, Dreame Trading (Tianjin) Co., Ltd. declares that the radio equipment type RLF22GA is in compliance with Directive 2014/53/EU. The full text of the EU declaration of conformity is available at the following internet address: https://global.dreametech.com
For detailed e-manual, please go to https://global.dreametech.com/pages/user-manuals-and-faqs

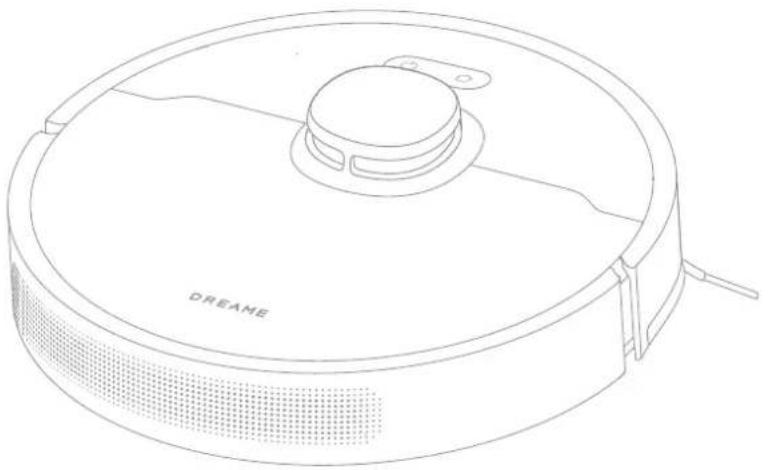
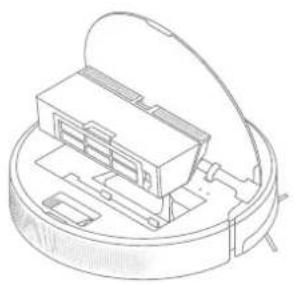
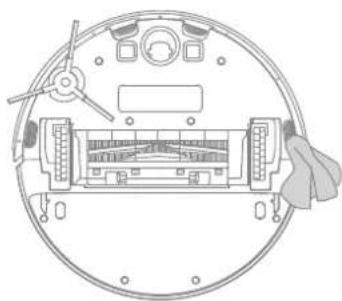
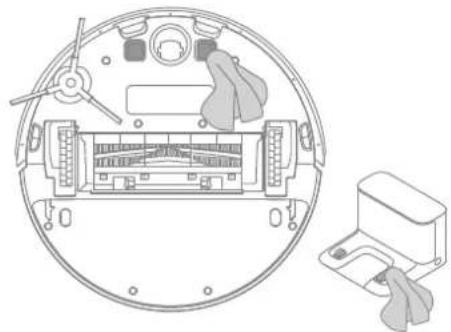
Product Overview
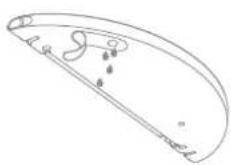
Accessories
Pre-Installed Accessories
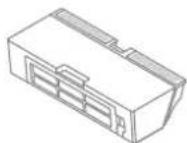
Main Brush Dust Box

Cleaning Tool
Other Accessories
Water Tank Side Brush

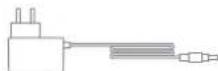
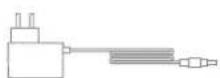
Charger Charging DockMop Pad
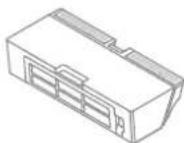
Product Overview
EN
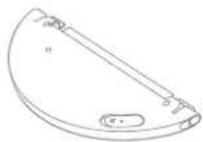
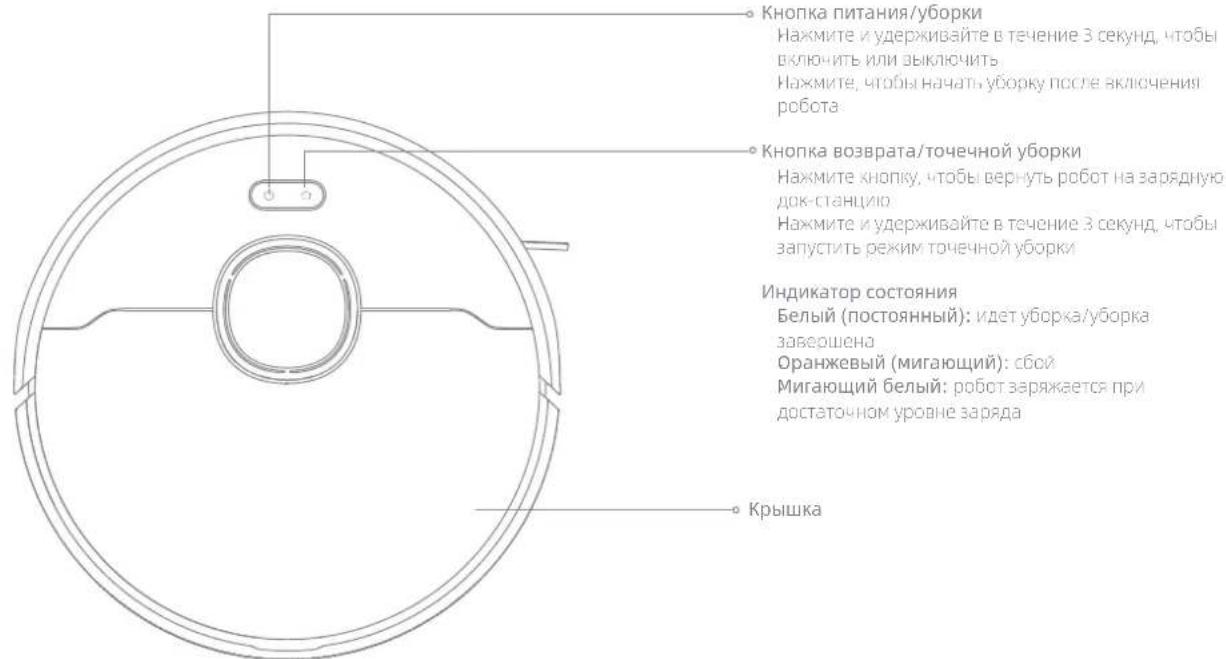
Robot

Product Overview
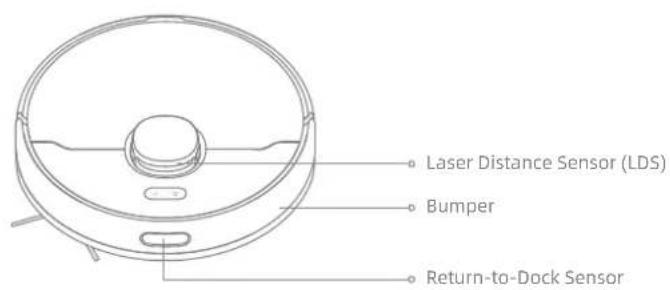
Robot
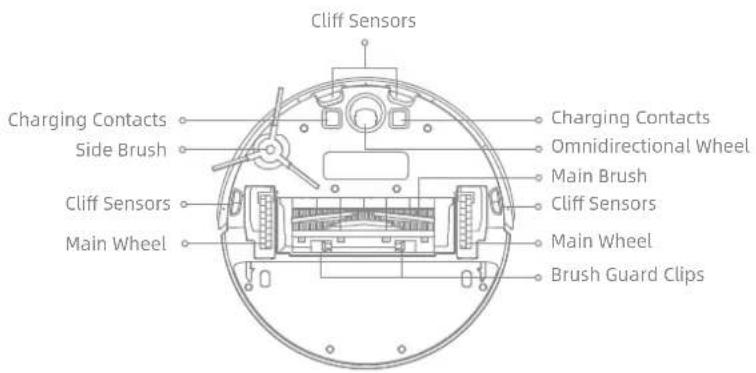
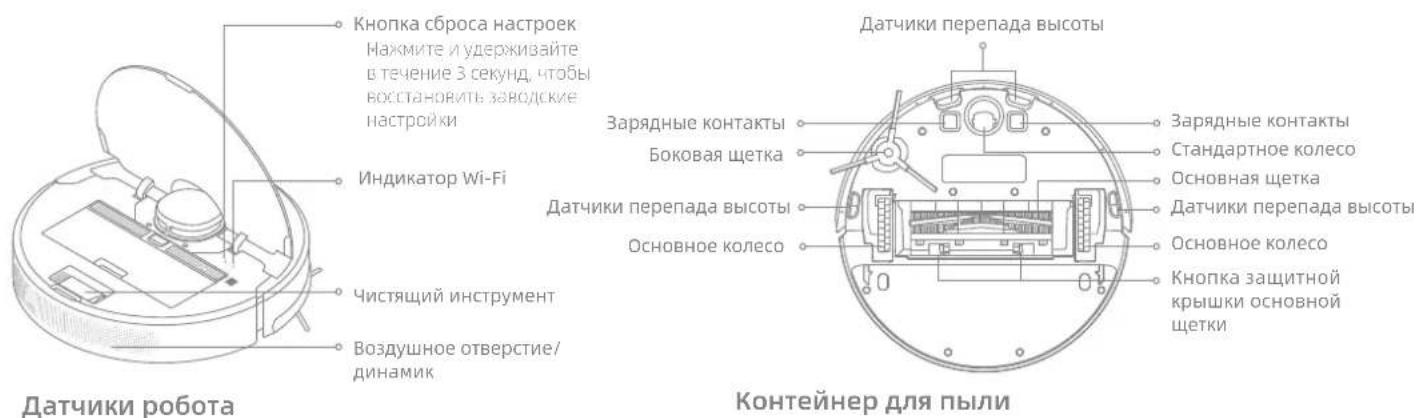
Robot Sensors
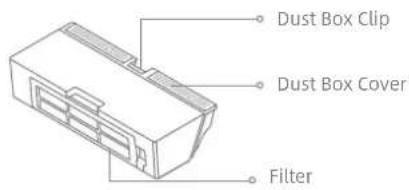
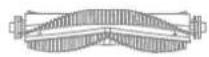
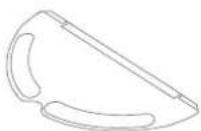
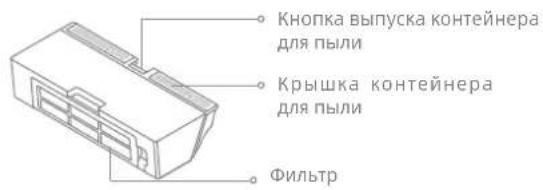
Dust Box
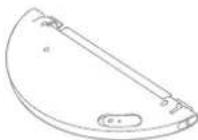
Product Overview
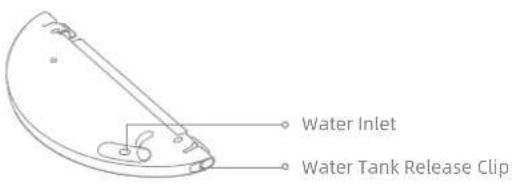
Water Tank
Mopping Module

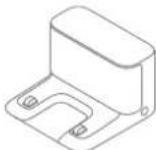
Charging Dock
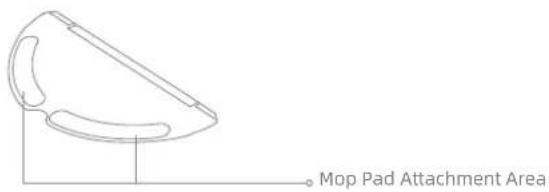
Mop Pad
EN Preparing Your Home
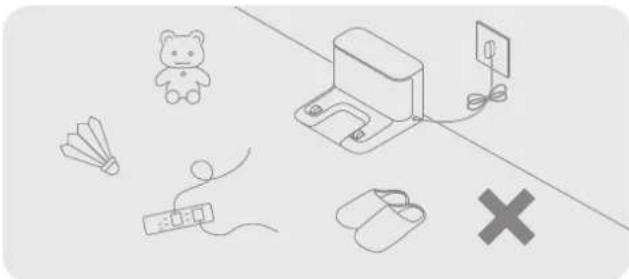
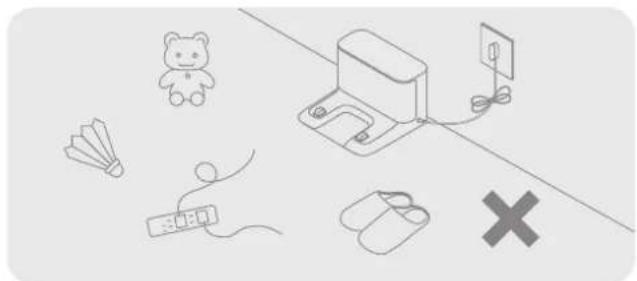
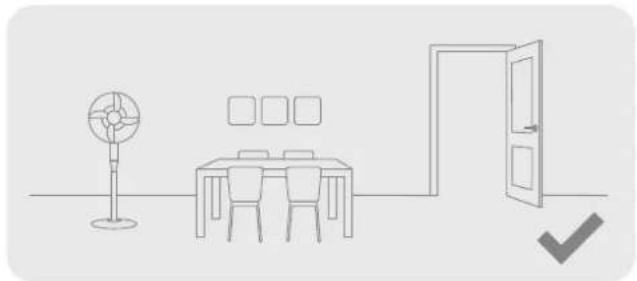
Tidy up items such as power cords, cloths, slippers, and toys to improve the efficiency of the robot.
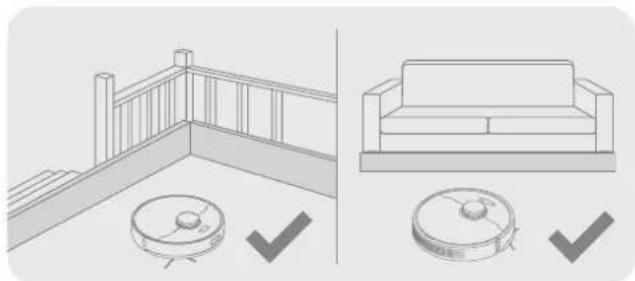
Before cleaning, place a physical barrier at the edge of the stairs and sofa to ensure safe and smooth operation of the robot.
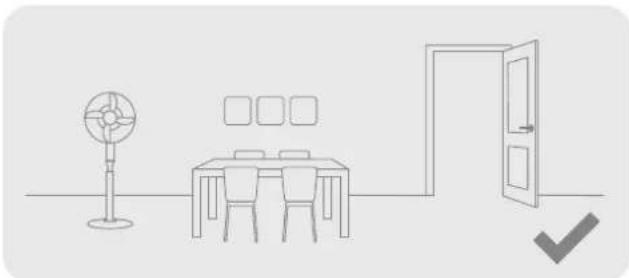
Open the door of the room to be cleaned, and put the furniture in its proper place to make more space.

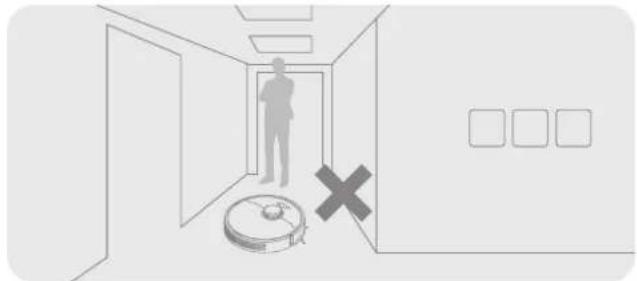
To prevent the robot from not recognizing the area that needs to be cleaned, do not stand in the front of the robot, threshold, hallway, or narrow places.
Note: When operating the robot for the first time, follow it around while cleaning to remove any potential obstacles in time.
Before Use
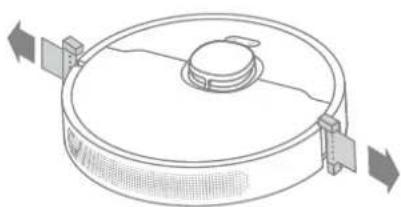
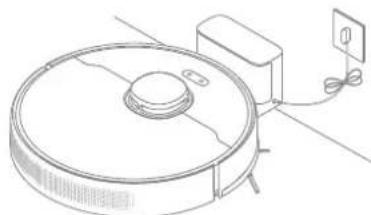
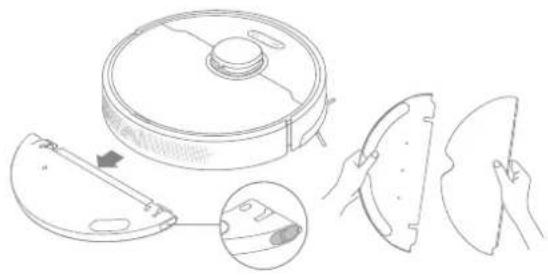
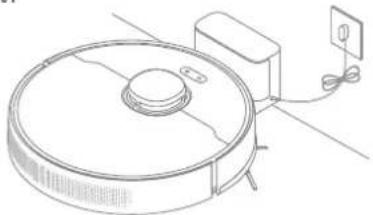
- Remove the protective strips 3. Place the charging dock on the level ground
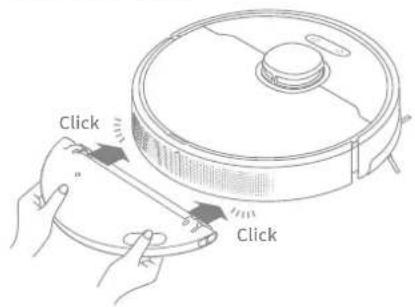
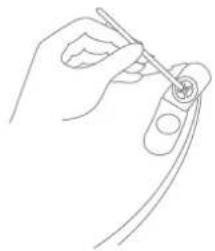
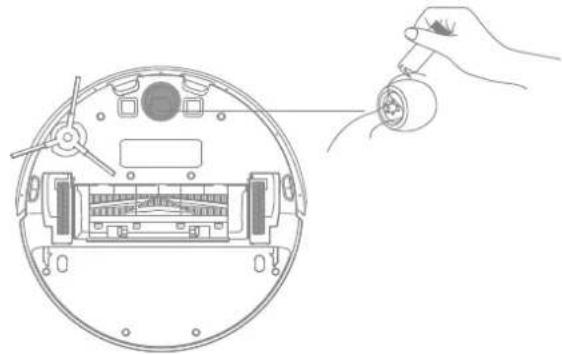
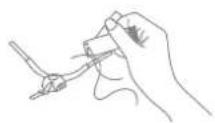
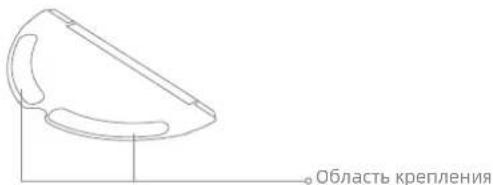
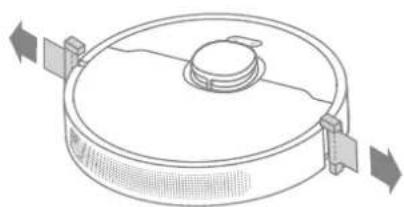
- Install the side brush
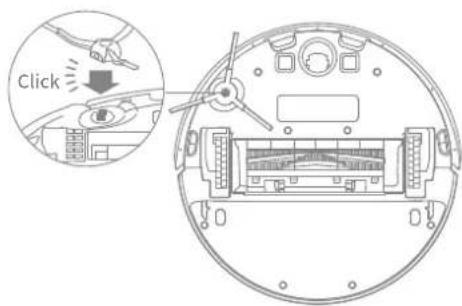
Note: Install the side brush until it clicks into place.
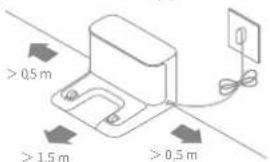
against the wall and connect it to a power outlet

Note:
- Keep the immediate area 1.5 m in front of the charging dock and 0.5 m to its both sides clear of objects.
To ensure you can connect to the robot with your phone well, make sure the robot and charging dock are within WiFi range. -
Do not place the charging dock in an area with direct sunlight or where other objects might block the signal, as this may hinder the robot from returning to the charging dock.
-
Place the robot onto the charging dock to charge
Note:
Fully charging is recommended before first-time use. This ensures that the robot returns to the charging dock successfully.
- Do not move the the charging dock while the robot is cleaning.

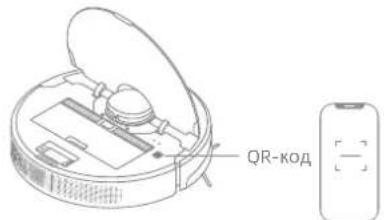
Connecting with Dreamehome App
This product works with the Dreamhome app, which can be used to control your device.
1. Download the Dreamehome App
Scan the QR code on the robot, or search "Dreamhome" in the app store to download and install the app.
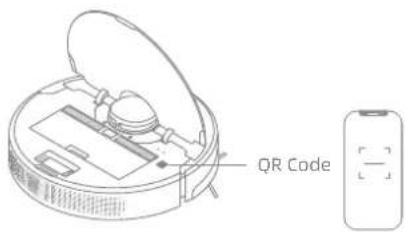
2.Add Device
Open the Dremehome app, tap "On the upper right, and scan the QR code above again to add "DremeBot F9 Pro". Please follow the prompts to finish the Wi-Fi connection.

Note:
Only 2.4GHz Wi-Fi is supported.
- Due to upgrades in the app software, the actual operations may be different from the statements in this manual. Please follow the instructions based on the current app version.
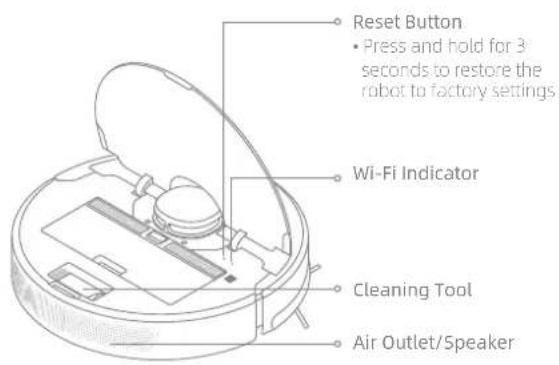
3. Reset Wi-Fi
Simultaneously press and hold the buttons end until you hear a voice prompt saying, "Waiting for the network configuration." Once the Wi-Fi indicator is blinking slowly, the Wi-Fi has been successfully reset.
Note: If your robot cannot connect to the app successfully, reset the Wi-Fi and add the device again.
How to Use
1. Fast Mapping
After configuring the network for the first time, follow the instructions on the app to quickly create a map, and the robot will start mapping without cleaning. The mapping process will be completed when the robot returns to the dock, and the map will be saved automatically.
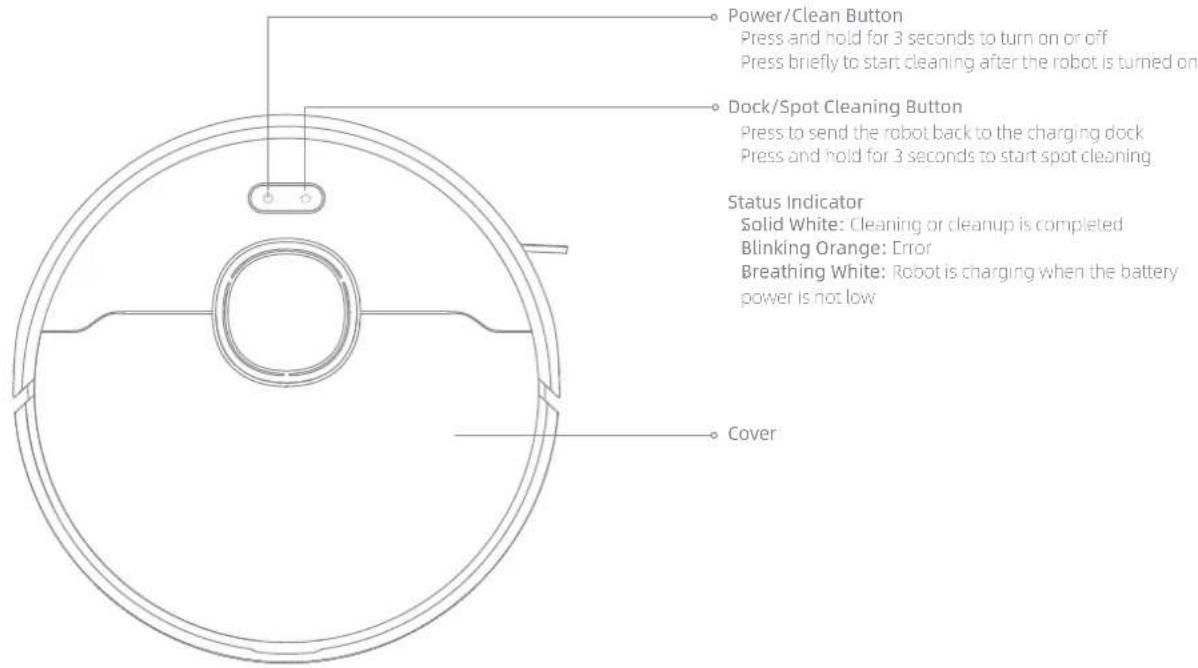
2. Turn On/Off
Press and hold the button for 3 seconds to turn on the robot. The power indicator should be illuminated. Place the robot onto the charging dock, the robot should turn on automatically and begin charging. To turn off the robot, move the robot away from the dock and press and hold the button for 3 seconds.
3. Start Cleaning
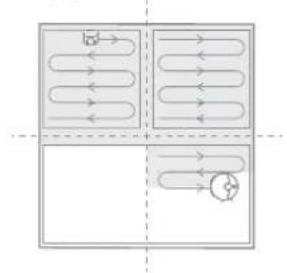
Press the button briefly to start cleaning after the robot is turned on. Then, the robot will accurately map out a route, methodically clean along the edges and walls, then finish by cleaning each room in an S-shaped pattern to ensure a thorough job.
4. Cleaning Mode
DremeBot F9 Pro has four cleaning modes: Quiet, Standard, Strong, and Turbo. The default mode is Standard. You can specify the cleaning mode in the app.
5. Pause/Sleep Mode
When the robot is running, press any button to pause it. If the robot is paused for more than 10 minutes, it automatically enters sleep mode. All indicators on the robot will turn off. Press any button on the robot, or use the app to wake up the robot.
Note:
The robot will turn off automatically if left in Sleep Mode for more than 12 hours.
- If the robot is paused and placed onto the charging dock, the current cleaning task will end.
6. Spot Cleaning
When the robot is paused or in Standby Mode, press and hold the button for 3 seconds to start Spot Cleaning Mode. In this mode, it will clean a square-shaped area of 1.5 × 1.5 meters directly around the robot. When the spot cleaning is done, the robot will automatically return to its original location and stop working.
Note: Activating Spot Clean Mode will end the current cleaning task of the robot.
7. Do Not Disturb (DND) Mode
When the robot is set to the Do Not Disturb (DND) mode, the robot will be prevented from resuming cleaning and the power indicator goes out. The DND mode is disabled by default at the factory. You can use the app to enable the DND mode or modify the DND period. The DND period is 22:00-8:00 by default.
Note:
The scheduled cleaning tasks will be performed on time during the DND period.
The robot will resume cleanup where it left off after the DND period expires.
8. Scheduled Cleaning
You can schedule cleaning time in the Dreamehome app. The robot will automatically start cleaning at the designated time and then return to the charging dock to recharge when the cleaning is done.

How to Use
9. Additional App Functions
Follow the instructions on the app interface to use more functions. The version of the app might have been updated; please follow the instructions based on the current app version.
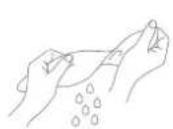
10. Use the Mopping Function
It is recommended that all floors are vacuumed at least three times before the first mopping session to achieve a better cleaning effect.
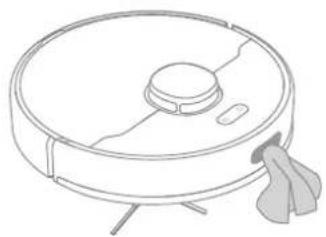
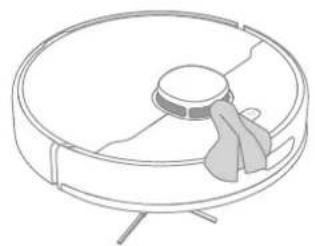
1) Dampen the mop pad and wring out excess water. Install the mop pad as shown in the diagram.
①

2
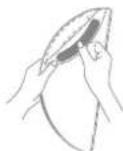
(3)
2) Fill the tank with water.
Note: Do not use detergent or disinfectant.
3) Align the mapping module as indicated by the arrow, then slide it into the back of the robot until it clicks into place. Press the button or use the Dramehome app to start cleaning.
Note:
- It is not recommended to use the mapping function on carpets.
- Use the app to adjust the water flow as required.
Routine Maintenance
To keep the robot in good condition, it is recommended to refer to the following table for routine maintenance.
| Part | Maintenance Frequency | Replacement Period |
| Mop pad After each use Every 3 to 6 months | ||
| Main brush | Once every 2 weeks | Every 6 to 12 months |
| Dust box filter | Every 3 to 6 months | |
| Side brush | ||
| Charging dock's signaling area | Once every month / | |
| Charging contacts | ||
| Omnidirectional wheel | ||
| Laser Distance Sensor (LDS) | ||
| Cliff sensors | ||
| Water tank | Clean it as needed / | |
| Dust box | ||
Note: The replacement frequency will depend on your usage of the robot. If an exception occurs due to special circumstances, the parts should be replaced.
EN Routine Maintenance
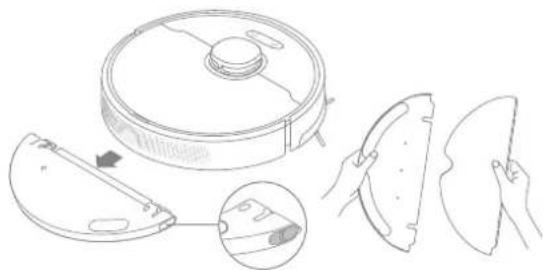
Clean the Dust Box and Filter
- Open the robot cover, then press the dust box clip to remove the dust box.
- Open the dust box cover and empty the dust box as shown in the diagram.
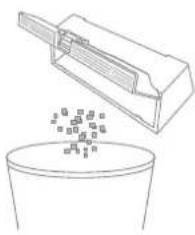
- Remove the filter and tap its basket gently.
Note:
Do not attempt to clean the filter with a brush, a finger or sharp objects to prevent damage.
- Rinse the dust box and filter with water and dry them completely before reinstalling.
Note:
Rinse the dust box and filter with clean water only. Do not use any detergent.
- Use the dust box and filter only when they are completely dry.
Routine Maintenance
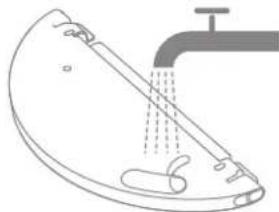
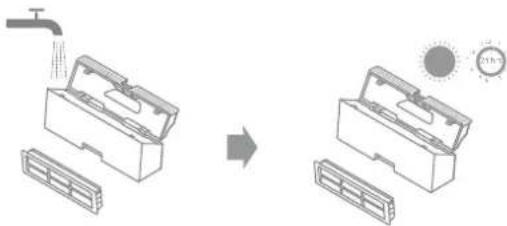
Clean the Mopping Module
- Slide the two release clips on the side of the water tank, remove the mopping module, and pull the mop pad off the mopping module.
- Pour out the water in the tank. Clean with only water and leave it to air-dry before re-installing.
Note: Do not expose the tank to the sun directly.
- Clean the mop pad with water only and leave to air dry before re-installing.

Note:
-
Remove the pad from the mopping module before cleaning it, and make sure dirty water does not flow back into the water outlet to avoid clogging.
-
If slow water flow occurs, or the outflow is not well-distributed, clean the air hole in the cover of the water tank.
EN Routine Maintenance
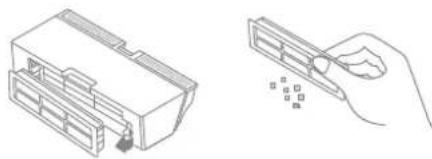
Clean the Main Brush
- Press the brush guard clips inwards to remove the brush guard and lift the brush out of the robot.
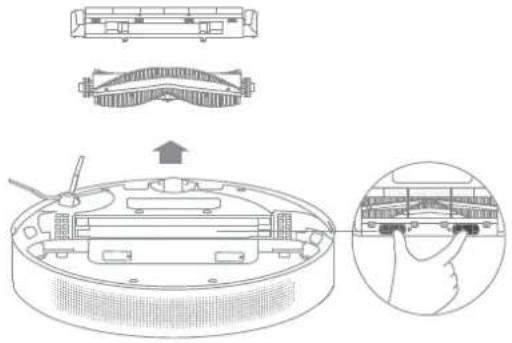
2.Pull out the brush cover as shown in the diagram. Use the included cleaning tool to remove any hairs tangled in the brush.

Note: Do not pull out the hair tangled in the main brush excessively. Otherwise, the brush may be damaged
Clean the Main Wheel / Omnidirectional Wheel
Note: Use a tool such as a small screwdriver to separate the axle and tire of the omnidirectional wheel.
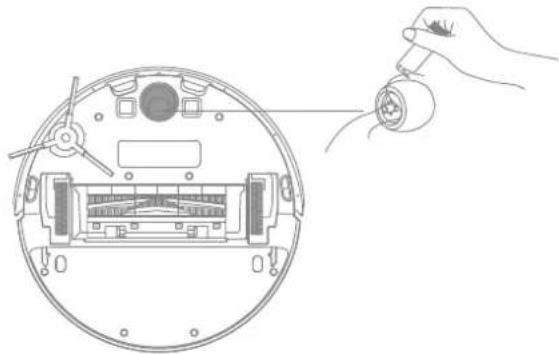
Clean the Side Brush
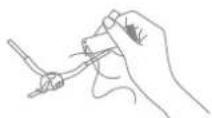
Pull out the side brush and use the included cleaning tool to remove any hair tangled in the brush.
Routine Maintenance
EN
Note: Wet cloths can damage sensitive elements within the robot and charging dock. Please use dry rags for cleaning.
Clean the Return-to-Dock Sensor
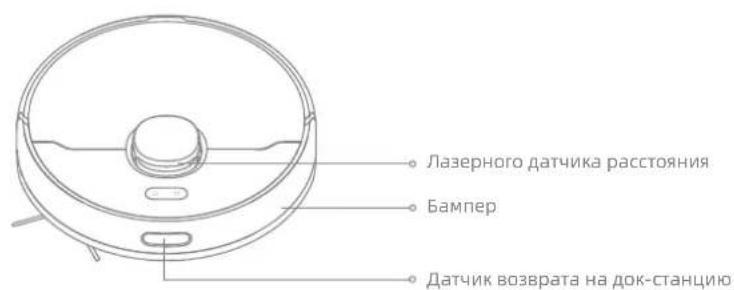
Clean the Laser Distance Sensor
Clean the Cliff Sensor
Clean the Charging Contacts
Robot Restarting
If the robot stops responding or cannot be turned off, press and hold down the button for 10 seconds to forcefully turn it off. Then press and hold the button for 3 seconds to turn the robot on.
Battery
The robot contains a high-performance lithium-ion battery pack. Please ensure that it remains well-charged for daily use to maintain optimal battery performance. If the robot is not used for an extended period of time, turn it off and put it away. To prevent damage from over-discharging, the robot should be recharged at least once every three months.
Troubleshooting
| Problem Solution | |
| Robot does not turn on | The battery level is low. Recharge the robot on the charging dock, then try again.The temperature of the battery is too low or too high. It is recommended to operate the appliance at a temperature between 32 °F (0°C) and 104 °F (40°C). |
| Robot does not recharge | The charging dock is not receiving power. Please confirm that both ends of the charger are plugged in correctly.Poor contact. Clean charging contacts of the charging dock and robot. |
| Robot does not return to charging dock | There are too many obstructions around the charging dock. Place the charging dock in a more open area.Please clean the dock's signaling area. |
| Robot is malfunctioning Turn off the robot and then reactivate it. | |
| Robot is making a strange noise | A foreign object may be caught in the main brush, side brush, or one of the main wheels. Stop the robot and remove any debris. |
| Robot no longer cleans efficiently or leaves dust behind | The dust box is full. Please clean it.The filter is blocked. Please clean it.A foreign object is caught in the main brush. Please clean it. |
Troubleshooting
| Problem Solution | |
| Robot cannot connect to Wi-Fi | There is something wrong with the Wi-Fi connection. Reset the Wi-Fi and download the latest version of the Dreamehome app, then try reconnecting. Location permission is not open. Please ensure the location permission on the Dreamehome app is enabled. Wi-Fi signal is weak. Make sure the robot is in an area with good Wi-Fi coverage. 5GHz Wi-Fi is not supported. Please ensure your robot connects to 2.4GHz Wi-Fi. The username or password of Wi-Fi is incorrect. Please enter the correct username and password. |
| Robot does not perform scheduled cleaning | The robot has low battery. Scheduled cleaning will not start unless the robot has at least 15% battery left. |
| Does leaving the robot on the charging dock consume power if it is already fully charged? | Leaving the robot on the charging dock after it's fully charged consumes very little electricity and helps maintain optimal battery performance. |
| No water comes out of the water tank, or only a little bit comes out | Check whether there is water inside the water tank. Clean the mop if it becomes dirty. Make sure the mop pad is installed correctly according to the User Manual. Clean the air hole on the top of the water tank. |
| Robot doesn't resume cleaning after charging | Make sure the robot is not set to Do Not Disturb mode (DND), which will prevent it from resuming cleaning. The robot does not resume cleaning when it is manually recharged or placed onto the charging dock. |
| Robot doesn't return to charging dock after being moved | Moving the robot may cause it to re-position itself or re-map its surroundings. If the robot is too far from the charging dock, it might not be able to automatically return on its own, in which case you need to manually place the robot onto the charging dock. |
For more support, contact us via https://global.dreametech.com

Specifications
Robot Charging Dock
| Model RLF22GA | |
| Charging Time Approx. 7 hours | |
| Rated Voltage 14.4 V | = = |
| Rated Power 40 W | |
| Operation Frequency 2400 | -2483.5 MHz |
| Maximum Output Power < | 20 dBm |
| Model RCS1 | |
| Rated Input 20.0 V 0.6 A | --- |
| Rated Output 20.0 V 0.6 A | --- |
Charger
| Model ZD012M200060EU | |
| Rated Input 100-240 V | 50/60 Hz 0.5'A |
| Rated Output 20.0 V 0.6 A | = |
Under normal use of condition, this equipment should be kept a separation distance of at least 20cm between the antenna and the body of the user.
Battery Disposal and Removal
EN
The built-in lithium-ion battery contains substances that are hazardous to the environment. Before disposing of the battery, make sure the battery is removed by qualified technicians and discarded at an appropriate recycling facility.
- the battery must be removed from the appliance before it is scrapped;
- the appliance must be disconnected from the supply mains when removing the battery;
the battery is to be disposed of safely.
CAUTION:
Before removing the battery, disconnect the power and run out the battery as much as possible.
Unneeded batteries should be discarded at an appropriate recycling facility.
Do not expose to high temperature environment to avoid risks of explosion.
Under abusive conditions, liquid may be ejected from the battery. If contact occurs, flush with water and seek medical help.
Removal Guide
- Turn over the robot, use a proper tool to remove the screws on the back of the robot, and then remove the cover.
- Unplug the terminals between the battery and PCB board to remove the battery.
WEEE Information

All products bearing this symbol are waste electrical and electronic equipment (WEEE as in directive 2012/19/EU) which should not be mixed with unsorted household waste. Instead, you should protect human health and the environment by handing over your waste equipment to a designated collection point for the recycling of waste electrical and electronic equipment, appointed by the government or local authorities. Correct disposal and recycling will help prevent potential negative consequences to the environment and human health. Please contact the installer or local authorities for more information about the location as well as terms and conditions of such collection points.

LASERPRODUKT DER KLASSE 1
LASERPRODUKT FÜR VERBRAUCHER
EN 50689:2021
po60T 3a KpbIshky Ia3epHoro DaTunKa pacCToHn, KpbIshKy po60Ta nn amOpTu3aTOP.
He ncpoIb3yIte po60T B cpeaX C TeMnepaTypoi OkpykaHoue CpeBbl BIIwe 40^ IIN Hxke 0^ , a TaKke Ha NOLy C XNIDKOCTAMN IIN IINKNIMN BeIecTBamN.
y6epnte c nola npooba npeed nCnoIb3ObaHnem po60ta, uTo6bl OH He TAHynx BO Bpemr y6opkn.
Y6epnte c nola xpyknne n MeIknne npedmetbl, yTo6bI po60T He Bpe3aIcB Hnx n He nobpeidn.
Bo n36eKanHe NOBpeKdEHNr Hn HapUSeHnra 6oTbI yCTpoNCTBa
n3-3a BOLOueHnnpedMeTOB nepeI erO BKIOueHnem cObePnte BCE
noCTOpOHnne ppeMToB C nola, a TaKKe y6epNTe npOBoJa N Ka6eJI
PiTuHnC nTyN dBnXeHnYcTPOJCTBa BO BpEmy6OpKn.
He donyckaIte nonaHaHnB ONoC, naIbueB n Ipynx YacteN TeNa BO BCacbIbAIOoee OTBepCTne po6ota.
XpaHnTe nHCTpyMeHT dIy uNCTKN 1eTKN B HeIOCTyHOM dIa DeTeMceTe. He pa3MeuaTe Ha po6ote deTeJ, KINBOTbIX N KaKne-Jn6O PpeMetbl, He3aBnCmO OT TORO OCTaHOBLeH OH IIN DBNXETcR.
He nCnoIb3yIte po6oT dIy6OpKn IIO6bIX rOpaux X BeueCTB.
3a npeaaetc nncnbl30BaTb po6oT dny y6opkn BocnnaMeHnoxcxra nnr oipuux xnkocTe, arpeccnBhbx ra3OB, Hepa36abIeHHbIX KNCLOT nnpactbopnteJe.
RU IHopmaunnoTexnke6e0nacnoctn
OrpaHnueHn no 3Kcnpnyatau
He nCnoJb3yIte po60T dIy y6OpKn TBepdbix N OCTpbix PpeDMeTOB. 3aIpeuaetcra nCnoJIb3OBAtB np60p dIy y6OpKn kAmHei, KpynHbIX KyCKOB 6ymarN iDpyrNx PpeDMeTOB, KOToPbIe MOryT 3aCTprT B np6ope. Ipeed OunchKoN I TexHnueckm OcbLyXnBaHnem yBeDuNTecb, YTO PO6OT BbIKIOUey H IOK-CTaHcIy dIy 3apAdk N OTCoeDInHeHa OT NCTOuHNka pNTAHn.
3anpeaetc npotnpabpo bot n 3apndhyo DOK-CTaHnIO BnaXhbIM noIOTeHcem nn npombBaTb XnkOctbIO. MoUuieceAJIemeHTbl Heo6xOIMO NOHOCbIO npocuyNTb nepey UcTAHOBKOHa MeCTO IN daIbHeiM NcNoIb3OBaHneM.
Ipeed TpaHcnpTnpoBko y6eHntecb, yTO po60T BbIKIOueH, n no BO3MOXHOCTN XpaHnte eRO BOpINHaJIbHOyNAKOBE.
IcnoIb3yIte 3TO yCTpOJCTBO cOrlaCHO pyKOBOdCTBy IOnb3OBaTeJI.
IoiB3OBaTeHn HecyT OTBeCTBHeHHOCTb 3a y6bItKn n yUepe6, BO3HnKUnne n3-3a Heco6JIIOJeHnN IHCTpyKcui.
AkkymyIaTOp I 3apJka
He nCnoJb3yIte 6aTaapeIO, 3apJdHoe yCTpOcTBO nn 3apJdHyIO DOKCTaHcIIO CTOpOHnIX npOn3BODnteNe.IncNoJIb3yIte TOnbKO C 6bLOkOM nITaHnR RCS1.
He pa36bpaIte, He peMOHTnpyIte n He MoDnΦNcnpyIte aKKymyIaTOp nII INOK-CTAHUIO DJIa 3apAdkn CaMOCTOReIbHO.
He pa3MeaTe DOK-CTaHcNIO DnI 3apdKn PpOOM CnCTOuHnKOM TePna.
He BbItnpaIte n He ouHsauTe 3apArdhble KOHTaKTbI BlaJxHOJ TKaHbIO nnBnaJXbIMn pyKaMn.
Hopmaia no texnke 6e3oNaChoctn
AkkymyIaTOp n 3apJaKa
He ytniIn3npyIe CTapbIe aKKymJIaTOpbI HeHaJIeXkaIIM 6pa3OM.
HehyxHbIe aKKymyIaTOpbl CneIyET cdaBaTb B COOTBeTCTByIOuIe NyHKTbI nepepa6oTKn.
Ecnp o6oT He 6ydtncnOb3OBaTbcB TeueHne dInTeIbHOro nepnoDa, nHOCTbIO 3apAINTE erO,OTKnIOHTe IN XpaHNTe B cyXOM npoxlaADHom MeTe. Bo n36exKaHHe Upe3MepHOn pa3prkN aKKymJrToPa 3apKJaTe p60t He peKe Ondoro pa3a B 3 Meca.
3TO yctpoiCTBO OCHaIeHO aKKyMylrTopHbIM 6JLOKOM, KOtOpbI DOJIxHbI 3aMeHbT ToIbKO KBaIINΦuIcnpoBaHHbIe TexHnueckne CpeZnaJIncTb IJIIN CpeZnaJIncTb OTdela NocLeIpOdaXHOrO 6CnyXnBaHnI.
Texnka 6e3oNaChOCTn npu nCNoIb3OBaHn nnape
Ja3epHbI DaTcHK B DaHHOM N3deHn COOTBeTCTBye T CTAHdapTy IEC 60825-1:2014/EN 60825-1:2014/A11:2021 dny Ja3epHbIX N3deHn Klacca 1. PoxaanyiSta, n36eraTe npamoro KOtakTa C Hm rna3 BO BpeMnCNoJIb3OBAHn.
JI3EPHOE 3DEJNE KIAACCA1
NOTPENEJIbCKOEJA3EPHOEIN3DEJINE
EN 50689:2021
Mepbl npedoctopoKHOCTn npxpaHeHn n TpaHCnpTupOBKe
IpoodyKTdoJxKeH TpaHCnOpTnpoBaTbCByyNaKOBke.He noDbepraTe npOdyKT daBleHIO nn yDapam BO Bpem TaPcHcNOpTnpoBKn.
Ioxaanyuicta, n36eraTe cInbHbIX CTOLKHOBeHn BO BpeM TpaHcnpTupOBKn.
RU IHopmaunnoTexnke6e3oNaChocTn
Mepbl npedoctopoXHocTN npxpaHeHn I TpahcnpTnpOBKe
He TpaHcnpTpyuTe po6oT-ntbIeCoc npn TempePaType BblSe 50 ^ C nnn Hnke -20°C.
B TeueHne KopoTkoTo nepnoDa, HapnMpEpe OndHoro Mecaua, PbIeCoc peKoMeHdyETcXpaHntb npn TemnepaType ot -20 do 50 ^ C n OTHCNTbHO BnaXHoCTN 60% ± 5% .B TeueHne dInTeBHorO BpeMeHxpaHnte PbIeCoc npn TemnepaType okpykaUoSei cpebl ot 0^ do 40^. YtIN3npyIte PbIeCoc NaIeKaUIM o6pa3OM. Korda erO cpoK cnJxbl NdoOndET K KOChy, YtIN3npyIte PbIeCoc B COOTBeTCTBnC MecTHbIMN 3aKOHAMn IN ppaBnAaMn CTpaHbl IN nn peNoHa, B KOTOpOM OH NCNOb3yETc.
IpaBnla n ycNoBnapeaun3aun: 6e3 orpaHnueHn.
I Mnpotep npojaet 3TOT npodykT; nHopmaunO6 mnpotpe cm. Ha ynak OBke.
CbeHn o6 nMnpTepe n KOHTaKTHa INOpMaun OToeNa nocJeepoJx Horo
06cnykBaHnYka3aHbHa ypaKOBKe.
ДаТа n3rTOBHeHЯ:СM.ΗΥηΚΟΒΕ
Cpok cnjxkbipnpoykun 3 roda.
HactoamKOMnAHHreame Trading (Tianjin) Co., Ltd. 3aBnT, TcT Pn Tn pAnooobopyoBAHN RLF22GA COOTBeCTBETTre6oBAHm DInpeKtBbl 2014/53/EU. NnHbTeKT
DekpO6hue OoCetBoHnE HOpMaTHBHM Tpe6oBAHm EC oIeTyHeNo cIeSyuMey aDpccy: https://global.dreametech.com
Piop6o6hue 3eKpOHNoe pykoBocTmo CM. no apdcy https://global.dreametech.com/pages/user-manuals-and-faqs
063op n3deleny
Akecccyapbl
PpeynOBnHbIe akceccyapbl
OchOBHna 电Tka
KoTheHepIyIbIIN

甲HCTPMEHT
ДргнeakceccyapbI
BODHON BAK BOKOBAR 电
3apnHoe yctpoIcTbO 3apnHaJdoK-CTaunHacJa dIy Wba6pbl

063op n3dennr
Po60T
063op n3dennr
Po60T

MouyIb WBa6pbl
063op n3dennr
BQHOH6aK

3apnHaDOK-CTaHcNIA
Hacakpna Wba6pbj
IodrotOBka doma
y6epTe KaBn NtAHH,TKaHeBbIe npEmdTb, TAnK nIrpyuKn dIra NOBbIeHn 3dpeKtnBHOCTn po6Ta.
OTkpoTe DBeBb NOMEeHnB, B KOTOpOM ByET npoBOuNTbc y6OpKa, n pacCTaBBte Me6eHb Ha npaBUNbHbIe MeCTa, UTo6bI OCBO6OHTb 60JIbWe npocTaHCTBa dIy y6OpKn.
Ipepey6bopkoynctahOBnTe p3nueckne 6apbpbyOCHOBaHn IeCTNtBu PdOM C DnBaHOM, YTO6bl OBeCneHTb 6eONacHOCTB n 6ecpeboHoCTb pa0bTb PbIeocca.
He cTaHOBntecb neped po60tOM, B dBePbHOM npOeM nBy3kOM npoxoJe, uTo6bIpo60T MoKoppeKTHo pacnO3HaTb 3OHy npEcdToauey6OpKN.
PpmeaHne. Pn nppeom nncno3oBaan no6oata npcyctayte Bo Bpema ybopka, yto6bl Bcpema ybnpaTb noteuuaanbIhe npenrTCTBa C eO ny

Ipeed nCnoJIb3OBAHnHeM
1. YdaInte 3aunTHbIe 3JeMeHtbi 3.YcTaHOBnTe 3apdHyIO DOK-CTaHcNIO HaPOBHyIO
NOBepxHOCTb y cTeHbI NODKIOUHTe NITaHHe
2.YcTaHOBuTe 6OKOByU 5eTky

PpmeaHne. XcTaHOBnTe BOKOByIO WETKy HA MecTo TAK, YTObIpa3dAnr C
PpmeaHne.
YbEHTECB,HTHa paCCTHHAN 0.5MetpaD16KOBXCTOPOH1.5Metpa CnpeepdOK-CTAHmOTcyTCTbyOTNoCTOpOHmNE PpEmetbl
YbEINTEC,HTPOO0T N3APHANBQKOPKCTAHXADITBC 30NEJECTBNI Wi-H,HTO6bApckTeKNBHOYPnABNtBE PO0TOM Hpe3 MOvNbHOe npnHexHe.
HpeaMeIaIe3pHHyDOK-CTAHUHO MECTA,NOBBePExHBHX B03cPOTHINIO pRMAIX COHNHEHLYJYEIN R 3OHAOTOPKEXHHX NOCTCPOHTNIM PIPDEMTAM TAK KKTMOKET NOMELATI POBOy BEPHyTcRa H3epdHyoDOK-CTAHUHO
4.YCTAHOBNTe pO60T Ha 3apAHyIO CTaHcNIO dIra NO3apAdkn
Примechани.
PepedepbbmMCNOb30BaHnEMNHOCTbO3apdnteakymyIATOp.
He nepemueaute 3apndhyoDOK-CTAHnIO, noka pOobOT bInOnHReT yOOpky.
IopKluoyeHne K yctpoiCTbY c nOmoaBIO npInloXeHn Dreamehome
I3dennnncnoh3yET npinloKeHne Dramehome nnynpabHeHH yCTPOINCTBOM.
1. 3arpy3ka npiloxeHn Dreamehome
OTCKAHpyTe QR-KoD,Ha pO6ote NnBVEeNBe B NOICKOBo CTPOKe Mara3Ha npInIOxHEn Dramehome UTObI 3aRpy3NTb N yCTaHOBHTb npInIOxHEn COrlaIOxo TpeOBaHnA.
OuHCTKaMoDyJMaBa6pbbl
- Nepemectne 06a 3axnma Ha 60koBc TcPOHe BOJHOrO 6aka, yTO6bl CHrMbMOyNb BnaXHOn y6OpKn, a 3aTe mCHmnte Wb6py.
2.Cnne octabwycb Body n3 BODaHoro 6ak. IpomOnTe 6ak BoDOn INpOTPte Hacyxo mN OCTabBe Tbe BicbXaTb eCTeCTBHeHbIM PyTEM.

PnmeaHne. He noDBepraTe 6ak BO3eNCTBnIO npMbx coNHeHbI Nyey.
PnmeHne, ECn H a octaIOc b MHOrO cnyTahbIX BONOC, He TAHIne Xx CnIOI, TObHe NoBpeNTb IeKy.
OuCTka OCHOBHoro KOleca /HaNPaBJIauoJxKoIEc
PnmeHne.OTeIeNTeObNooDcTAHApTHoroKoneCa c nomoucbu He6oBbou OTBeTKn 63ue3MePbIx yCnnn.
OuNTka 6OKOBbIX ueTOK
CHINMTE 60KOBYU 5ETKY UyAINTe CNYTAYBUNECBOLOCb CO UETKN C NOMOUBHUYCTRAUEI HNCTPYMENTBA KOMNIKETE.

I3BneueHn yTnIn3aunna aKKymyIaTopa
BCTpoeHHbI NHTN-NOHbI aKKMyJrTOp COepKjNT OaChbIe Ia OKpyKaJoueI cpeIbBEueCTBa.AkkyMJIrTOp DOJIKeH bIbIb N3JIeueH KBaINuPcIOBAHIM TExNHueCKMn CneuaJIaNCTAmN yTNIu3NPOBaH B npNCnOco6eHHOM J4 3TOrO MeCe.
- nepey utnnaauei akkymyaTOp Heo6xOIMo n3BLeu h3 np60pa;
-пенизвileechemakkymylantopa Heo6xOДmo OTKIOUHTb npu6op O TCTOUYNKA 3HEPIN; - aKKyMnyTOp Heo6xOaMo yTuNn3uPoBaT 6e3oNaChbIM cNooc6om.
MEPbI IPEIOCTOPOXHOCTN:
Ipepe, n3BneHnem akkyMylrTopo otKIOUHTe np6Op ot NCTOHNa IITAHNIA MAKCMMAIbHO 3pAcXOyUte 3apd akyyMylrTopa. HEnyJhHeA kkyMylrTopo Heo6xOdmo yTINn3nPoBaTB B npncnOC6beHnOMI JAA 3TOFOrMeCe.
3anpeaetc0ctabTb n3dennepn BbICOKoTmnpaTpe BO n36eKaHne B3pbIBOB.
B Cnyue NoPbEKeHn AKKyMylTOpa JxNkOcTb MoXeT BbTeUb. PInn cOnpNkoKCHOBHeH N C KxNkOcTbIO pOMoIte MeCTo KOHTaKTa BODoH IO6paNTec3 aMeDmUHcKO NOMaLbU.
Hnctpykzna no n3BneeyehnIO
- NpeBepHnTe po6oT, c nOmoIbIO INCTpyMeHTa IVBLeKIne BnHTbI B 3aHeN yactn po6oTa n 3aTeM CnHmTe KpbIky.
2.OTcoeHNHTe npoBaTe TepMNHaNoB MeKdy aKKyMylrTopOM n neaTHOI IaToH N3BnKeNte aKKyMylrTop.
HOpmaaOn 6yTnIn3aun n nepepa6OTke OTXoOB 3JeKtpueckoro n 3JeKtpoHHoro 6OpydoBaHn

Bce n3dennr c cnboom pa3dehboro cbopa otpa6oTahHoro 3eKtpnueckoro n 3eKtpnoHoro 0bopyoBaHH (NpeKTHBa WEE 2012/19/ EU) cneyet ytnnnnepobatb otdehbo HTncoptnpyembx b6tOBx OTXOB. C ceIbO oxpabHb 3doPobBn 3auNTbOkpykaouen cpebl Taoe 0bopyoBaHnhe 6oxDmIO CdaBb H nepepa6otky B cneuaNbBb nyHKtb npMeMa 3eKtpnueecko n 3eKtpnoHoro 0bopyoBaHH, onpepeHHe bnpAHTbcBOM INMecThbIMn OpraHAMn Bnactn. PpaNBnBnYnINa3aunn Npepe6oTK NOMOT npedOTbpATNTB 03MOHbE HeratNBbte NoCNECTBn DnOKpykaouen Cpebl N 3doPobBny ChOBKa. JnONJUYHn INHOPMaUN O MeTOHAXOJeHN N pOpJKe PnEma YcTPOCTB B NykHTax PnEma 6bpaNTceb B KOMNaHIO, 3aHMAIOUyOc YctAHOBKn 0bopyoBaHH, INB MecThbE opraHb BlactN.
Press and hold the button for 3 seconds to turn on the robot. The power indicator should be illuminated. Place the robot onto the charging dock, the robot should turn on automatically and begin charging. To turn off the robot, move the robot away from the dock and press and hold the button for 3 seconds.