RCGSG-60 - Grill plate Royal Catering - Free user manual and instructions
Find the device manual for free RCGSG-60 Royal Catering in PDF.

| Product Type | Gas barbecue for kebab (grill plate) |
| Model | RCGSG-60 |
| Brand | Royal Catering |
| Dimensions (L x D x H) | 567 x 615 x 1015 mm |
| Weight | 34.5 kg |
| Rated voltage | 230 V ~ / 50 Hz |
| Motor power (electric) | 30 W |
| Total heat output (gas) | 16.0 kW |
| Number of burners | 4 |
| Heat output per burner | 4.0 kW |
| Gas type | Butane, propane and their mixtures |
| Appliance categories | I3+(28-30/37), I3B/P(30), I3B/P(50), I3P/P(37) |
| Destination countries | BE, CH, CY, CZ, ES, FR, GB, GR, IE, IT, LT, LU, LV, PT, SI, SK, TR, etc. |
| Gas pressure | 28-30 mbar (butane), 37 mbar (propane), 29 mbar, 50 mbar depending on category |
| Injector size | 0.90 mm x 4 (depending on category) |
| Main functions | Motorized rotating grill, flame adjustment, oil collector, optional door |
| Main materials | Stainless steel, iron, aluminum, galvanized sheet |
| Safety | Gas shut-off valve, flame detection, ventilation required, keep away from combustible materials (≥50 cm) |
| Maintenance and cleaning | Clean after each use, removable oil collector, avoid abrasive products |
| Spare parts and repairability | Sealed parts by manufacturer, professional repair, replaceable motor and burners |
| General information | Outdoor use or well-ventilated area, not suitable for recreational vehicles or boats |
Frequently Asked Questions - RCGSG-60 Royal Catering
User questions about RCGSG-60 Royal Catering
0 question about this device. Answer the ones you know or ask your own.
Ask a new question about this device
Download the instructions for your Grill plate in PDF format for free! Find your manual RCGSG-60 - Royal Catering and take your electronic device back in hand. On this page are published all the documents necessary for the use of your device. RCGSG-60 by Royal Catering.
USER MANUAL RCGSG-60 Royal Catering
natural_image
Abstract white line drawing of a stylized creature or mythical creature on a dark blue background (no text or symbols)| DE | Produktname | Kebab-Gasgrill |
| EN | Product name | Kebab gas grill |
| PL | Nazwa produktu | Gazowy grill do kebaba |
| CZ | Název výrobku | Plynový gril na kebab |
| FR | Nom du produit | Grill à gaz pour kebab |
| IT | Nome del prodotto | Griglia a gas per kebab |
| ES | Nombre del producto | Parrilla de gas para kebab |
| HU | Termék neve | Kebab gázgrill |
| DA | Produktnavn | Kebab-gasgrill |
| FI | Tuotteen nimi | Kebab-kaasugrilli |
| NL | Productnaam | Kebab gasgrill |
| NO | Produktnavn | Kebab gassgrill |
| SE | Produktnamn | Kebab gasgrill |
| PT | Nome do produto | Grelhador a gás para kebab |
| SK | Názov produktu | Kebabový plynový gril |
| BG | Име на продукта | Газова скара за кебап |
| EL | Όνομα προϊόντος | Ψησταριά υγραερίου για κεμπάπ |
| HR | Naziv proizvoda | Plinski roštilj za kebab |
| LT | Produkto pavadinimas | Kebabų dujinė kepsninė |
| RO | Numele produsului | Grătar pe gaz pentru kebab |
| SL | Ime izdelka | Plinski žar za kebab |
| DE Modell | EN Product model | PL Model produktu | CZ Model výrobku | FR Modèle | IT Modello | ES Modelo | HU Modell | DA Model | FI Tuotteen malli | NL Productmodel | NO Produktmodell | SE Produktmodell | PT Modelo do produto | SK Model | BG Модел на продукт | EL Movtėlo προϊόντος | HR Model proizvoda | LT: Gaminio modelis | RO: Model de produs | SL: Model izdelka | RCGSG-40RCGSG-60RCGSG-80 | |
| DE Hersteller | EN Manufacturer | PL Producent | CZ Výrobce | FR Fabricant | IT Produttore | ES Fabricante | HU Termelő | DA Producent | FI Valmistaja | NL Producent | NO Produsent | SE Tillverkare | PT Fabricante | SK Výrobca | BG Производител | EL Κατασκευαστής | HR Proizvođač | LT Gamintojas | RO Producător | SL Proizvajalec | expondo Polska sp. z o.o. sp. k. | |
| DE Anschrift des Herstellers | EN Manufacturer Address | PL Adres producenta | CZ Adresa výrobce | FR Adresse du fabricant | IT Indirizzo del produttore | ES Dirección del fabricante | HU A gyártó címe | DA Producentens adresse | FI Valmistajan osoite | NL Adres producent | NO Produsentens adresse | SE Tillverkarens adress | PT Endereço do fabricante | SK Adresa výrobcu | BG Адрес на производителя | EL: Διεύθυνοη κατασκευαστή | HR Adresa proizvođača | LT Gamintojo adresas | RO Adresa producătorului | SL Naslov proizvajalca | ul. Nowy Kisielin – Innowacyjna 7, 66-002 Zielona Góra | Poland, EU | |

RCGSG-60
natural_image
Close-up of a hand operating a stainless steel industrial machine with a handle and valve (no visible text or symbols)This User Manual has been translated for your convenience using machine translation. Reasonable efforts have been made to provide an accurate translation; however, no automated translation is perfect nor is it intended to replace human translators. The official User Manual is the English version. Any discrepancies or differences created in the translation are not binding and have no legal effect for compliance or enforcement purposes. If any questions arise related to the accuracy of the information contained in the User Manual, please refer to the English version of those contents which is the official version.
Technical data
| Parameter description Parameter value | |||
| Product name | Kebab gas grill | ||
| Model | RCGSG-40 | RCGSG-60 | RCGSG-80 |
| Rated voltage [V~] / frequency [Hz] | 230/50 | ||
| Rated power [W] | 30 | 30 | 60 |
| Dimensions [width x depth x height; mm] | 567 x 615 x 850 | 567 x 615 x 1015 | 570 x 617 x 1190 |
| Weight [kg] | 30 | 34.5 | 39 |
| Manufacturer: expondo Polska sp. z o.o. sp. k.ul. Nowy Kisielin-Innowacyjna 7, 66-002 Zielona GóraPoland, EU | expondo.com | ||||
| Product Name | Kebab gas grill | CE2806 23 | |||
| Model | RCGSG-40 | ||||
| Production Year | |||||
| Appliance category | I3+(28-30/37) | I3B/P(30) | I3B/P(50) | I3B/P(37) | |
| Reference gas | Butane | Propane | Butane, propane and their mixtures | Butane | |
| Gas pressure | 28-30 mbar | 37mbar | 29 mbar | 50 mbar | 37 mbar |
| Injector size | 0.90 mm*3 | 0.90 mm*3 | 0.78 mm*3 | 0.88 mm*3 | |
| Nominal heat input of single burner | 4.0 kW | ||||
| Total nominal heat input | 12.0 kW | ||||
| Total nominal gas consumption | Butane: 946 g/h; Propane: 932 g/h | ||||
| Electricity type | Electric supply 230V~/50Hz 30W | ||||
| This appliance shall be installed in conformity with the current regulations and used only in a well-ventilated location. Consult the instructions before installing and using this appliance. | |||||
| Appliance category | Destination countries | ||||
| I3+(28-30/37) | BE, CH, CY, CZ, ES, FR, GB, GR, IE, IT, LT, LU, LV, PT, SI, SK, TR | ||||
| I3B/P(30) | AL, BA, BE, BG, CY, CZ, DK, EE, FI, FR, GB, GR, HR, HU, IT, LT, LU, LV, MD, MK, MT, NL, NO, RO, RS, RU, SE, SI, SK, TR, UA | ||||
| I3B/P(50) | AT, CH, CZ, DE, SK | ||||
| I3P/P(37) | PL | ||||
| Model | RCGSG-60 | ||||
| Production Year | |||||
| Appliance category | I3+(28-30/37) | I3B/P(30) | I3B/P(50) | I3B/P(37) | |
| Reference gas | Butane | Propane | Butane, propane and their mixtures | Butane | |
| Gas pressure | 28-30 mbar | 37mbar | 29 mbar | 50 mbar | 37 mbar |
| Injector size | 0.90 mm*4 | 0.90 mm*4 | 0.78 mm*4 | 0.88 mm*4 | |
| Nominal heat input of single burner | 4.0 kW | ||||
| Total nominal heat input | 16.0 kW | ||||
| Total nominal gas consumption | Butane: 1261 g/h; Propane: 1242 g/h | ||||
| Electricity type | Electric supply 230V~/50Hz 30W | ||||
| This appliance shall be installed in conformity with the current regulations and used only in a well-ventilated location. Consult the instructions before installing and using this appliance. | |||||
| Appliance category | Destination countries | ||||
| I3+(28-30/37) | BE, CH, CY, CZ, ES, FR, GB, GR, IE, IT, LT, LU, LV, PT, SI, SK, TR | ||||
| I3B/P(30) | AL, BA, BE, BG, CY, CZ, DK, EE, FI, FR, GB, GR, HR, HU, IT, LT, LU, LV, MD, MK, MT, NL, NO, RO, RS, RU, SE, SI, SK, TR, UA | ||||
| I3B/P(50) | AT, CH, CZ, DE, SK | ||||
| I3P/P(37) | PL | ||||
| Manufacturer: expondo Polska sp. z o.o. sp. k.ul. Nowy Kisielin-Innowacyjna 7, 66-002 Zielona GóraPoland, EU | expondo.com | ||||
| Product Name | Kebab gas grill | CE2806 23 | |||
| Model | RCGSG-80 | ||||
| Production Year | |||||
| Appliance category | I3+(28-30/37) | I3B/P(30) | I3B/P(50) | I3B/P(37) | |
| Reference gas | Butane | Propane | Butane, propane and their mixtures | Butane | |
| Gas pressure | 28-30 mbar | 37mbar | 29 mbar | 50 mbar | 37 mbar |
| Injector size | 0.90 mm*5 | 0.90 mm*5 | 0.78 mm*5 | 0.88 mm*5 | |
| Nominal heat input of single burner | 4.0 kW | ||||
| Total nominal heat input | 20.0 kW | ||||
| Total nominal gas consumption | Butane: 1576 g/h; Propane: 1553 g/h | ||||
| Electricity type | Electric supply 230V~/50Hz 60W | ||||
| This appliance shall be installed in conformity with the current regulations and used only in a well-ventilated location. Consult the instructions before installing and using this appliance. | |||||
| Appliance category | Destination countries | ||||
| I3+(28-30/37) | BE, CH, CY, CZ, ES, FR, GB, GR, IE, IT, LT, LU, LV, PT, SI, SK, TR | ||||
| I3B/P(30) | AL, BA, BE, BG, CY, CZ, DK, EE, FI, FR, GB, GR, HR, HU, IT, LT, LU, LV, MD, MK, MT, NL, NO, RO, RS, RU, SE, SI, SK, TR, UA | ||||
| I3B/P(50) | AT, CH, CZ, DE, SK | ||||
| I3P/P(37) | PL | ||||
Please read this instruction carefully before installation and using!
To Installer/Assembler:
Leave the instruction with end-user.
To End-User:
This manual is part of the appliance and is to be given to the owner or to the person responsible for training operations of this machine. Keep the manual for future reference.
1. SAFETY SYMBOLS
The symbols and boxes shown below explain what each heading means. Read and follow all the messages found throughout the manual.

DANGER
Danger: Indicates an imminently hazardous situation which, if not avoid, will result in death or serious injury.

WARNING
WARNING: Be alert to the possibility of serious bodily injury if the instructions are not followed. Be sure to read and carefully follow all the messages.

CAUTION
Caution: Indicates a potentially hazardous situation which, if not avoided, may result in minor or moderate injury.
2. FOR YOUR SAFETY
This instruction manual contains important information necessary for the proper assembly and safe use of the machine. Read all warnings and instructions before assembling and using the machine. Follow all warnings and instructions when assembling and using the machine. Failure to follow this instruction could result in fire or explosion which could cause property damage, personal injury, or even death. We are not responsible for any harm or injury caused due to any person's improper or negligent use of this machine. The product shall only be operated by someone over the age of 18, of sound mind, and not under the influence of any drugs or alcohol, who has been trained in the correct operation of this machine. Any modification to the machine voids any warranty and may cause harm to individuals using the machine or in the vicinity of the machine while in operation.

DANGER
If you smell gas:
- Shut off gas to the machine.
- Extinguish any open flame.
- DO NOT try to light any appliance.
- DO NOT touch any electrical switch.
-
DO NOT use any telephone in your building.
-
If odour continues, keep away from the machine and immediately call your department from a neighbouring location.
Failure to follow these instructions could result in fire or explosion which could cause property damage, personal injury, or even death.

WARNING
Do not store or use gasoline or other flammable liquids or vapours in the vicinity of this or any other machine.
WARNING:
It is the consumer's responsibility to see that the machine is properly assembled, installed, and maintained. Failure to follow the instructions in this manual could result in bodily injury and/or property damage.
PRECAUTIONS:
- To ensure the integrity of machine when remove the packing. If in doubt, please consult expert before using. To avoid danger, please don' put packing materials where children could touch. (Material is plastic bags, nails etc.)
- Do not operate the machine any closer than 50cm from any combustible floor or material.
- Do not use this machine under overhead combustible surfaces.
- Do not leave the machine unattended. Always keep children and pets away from the machine.
- Some parts may contain sharp edges, especially as noted in these instructions. Wear protective gloves if necessary.
- This machine is not intended for and should never be used as a heater.
- This machine will be hot during and after use. Use insulated oven mitts or gloves for protection from hot surfaces or splatter from cooking liquids.
- The use of alcohol, prescription or non-prescription drugs may impair the consumer's ability to properly assemble or safety operating the machine.
- In the event of an oil or grease fire do not attempt to extinguish with water. Immediately call the fire department.
- Perform a visual inspection of the gas path, from the tank connection to the element orifices for any breaks, leaks, cracks or intrusions. Begin at the tank and continue to the gas line connection. Visually inspect the knob mechanism for similar defects. Follow the gas path to the elements. Look for abnormalities or cracks on the element or orifices at the centre of the grill box. Please contact your supplier with any questions or concerns.

CAUTION
- This machine shall be used in ventilated places, and to install exhaust fan, ensure that the environment of installation and operation in the steam and of the burned gases emitted. It shall not be used in garage or any other enclosed area.
- This machine is not intended to be installed in or on recreational vehicles and /or boats.
3. USE AND CARE
Safety Tips:
- Please clean the machine and get rid of all industrial oil before using.
NOTICE: Make sure all the plastic protection and packaging is removed before using. -
Handle all components with care to avoid accidental injury.
-
When the machine is not in use, turn the machine off.
• Turn off the gas supply at the gas cylinder after use. - Never move the machine while in operation or still hot.
- Use long-handled barbecue utensils and oven mitts to avoid burns and splatters.
- Clean the machine often, preferably after each cookout.
- If you notice grease or other hot material dripping from the machine onto the valve or regulator, turn off gas supply at once. Determine the cause, correct it, then clean and inspect valve, hose and regulator before continuing. Perform a leak test.
- Keep ventilation openings in cylinder enclosure free and clear of debris.
- The regulator may make a humming or whistling noise during operation. This will not affect safety or use of the machine.
- If you have a problem with your machine refer to the Troubleshooting Section, if you can't resolve the problem, please contact your supplier.

WARNING
Accessible parts may be very hot. Keep young children away.
ASSEMBLING TIPS:

CAUTION
The machine must be kept in a horizontal position and stable enough after installation. Also, it can't shake when using.
Please read all instructions thoroughly before proceeding. Find a large, clean area in which to assemble your machine. Please refer to the assembly diagram as necessary.
- The machine should be installed alone or with other product according to prescribed scope.
- Check that all the parts are not loose, and that the unit is in working order before operating.
- When placing the machine, the back of the machine should be away from wall 50cm or above, and better place to the good airy place. The unit must be in a well-ventilated location to avoid a fire hazard.
- Do not place the flammability goods on the machine such as washcloth, otherwise it's possible to cause fire accident.
- To perform a leak test of your gas connections, mix a 50/50 solution of soap and water and brush around regulator and other gas connections. If growing bubbles appear, there is a leak. Retighten connections. If leaks cannot be stopped do not try to repair.
PLEASE DO NOT TEST BY FLAME!
- If found out leak gas, must be shut down the valve at once. And open windows, strengthen ventilation, do not turn on power switch and light fire. Only after repairing it can be put into use again.
- When finished, turn off the machine valve.

CAUTION
If ignition does NOT occur in 5 seconds, turn the burner controls OFF, wait a few seconds and repeat the lighting procedure. If the burner does not ignite with the valve open, gas will continue to flow out of the burner and could accidentally ignite with risk of injury.
Valve Check:
Important: To check valve, first push in knob and release, knob should spring back. If knob does not spring back, replace valve assembly before using the machine. Turn knob to low position then turn back to OFF position. Valve should turn smoothly.
Gas Connection:
- When connecting the unit to gas supply pipe or gas cylinder, a gas shut-off valve must be fixed upstream of the unit within the easy reach of the operator. If gas cylinder is used, please choose as per local standard. The max diameter is 40cm, the max length is 1.2 meter. Put it in dry cool position. The used type of regulating valve shall comply with the relevant EN standard.
- Verify the local available gas, and make sure the local gas is the same as that indicated on the nameplate.
- Connect the unit to a suitable gas source with an iron pipe, and make sure there is no sign of gas leakage. Use a pipe sealant around the joints.
- After connection, use water soap solution to check gas leakage, if there is a sign of leakage; apply the pipe sealant around the leaking point.
- Connect the position of the flexible pipe so that it is free from torsion.
- Consult the local gas supplier about the local gas pressure. If the gas pressure is higher or lower by 10% of the rated gas pressure, a gas release valve must be fixed upstream of the unit, ensuring the stability of the gas pressure.
- Please make sure the gas pressure conforms to data plate.
- When install the appliance, please make sure the gas flexible hose does not exceed 1.5 meter.
- The used gas supply tube or hose shall comply with the national requirement in form. The user should exam the gas tube periodically. If necessary, replace the tube or hose in time.
• This appliance must be kept away from flammable materials during use. - When replacing cylinders, keep them away from all sources of fire.
4. DIAGRAM
RCGSG-40
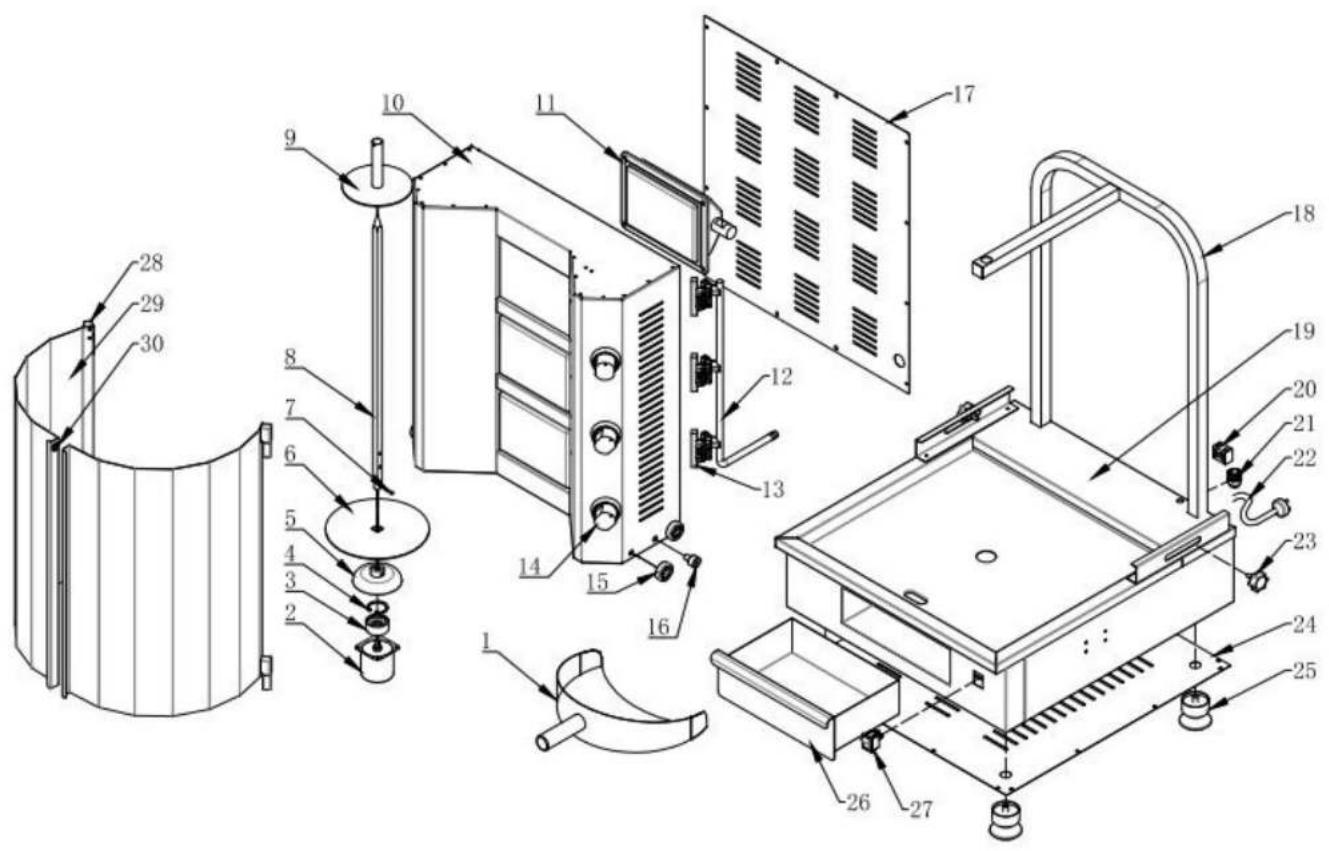
| No. | Name | Quantity |
| 1. | Meat pan | 1 |
| 2. | Motor | 1 |
| 3. | Bearing 1 | 1 |
| 4. | Circlip | 1 |
| 5. | Transmission Gear | 1 |
| 6. | Bottom fixed plate of meat pole | 1 |
| 7. | Pin of meat pole | 1 |
| 8. | Meat pole | 1 |
| 9. | Top fixed plate of meat pole | 1 |
| 10. | Top body | 1 |
| 11. | Burner | 3 |
| 12. | Gas pipe | 1 |
| 13. | Valve | 3 |
| 14. | Knob | 3 |
| 15. | Bearing 2 | 4 |
| 16. | Adjusting axle | 2 |
| 17. | Back cover plate of top body | 1 |
| 18. | Supporting frame | 1 |
| 19. | Bottom base | 1 |
| 20. | Porcelain terminal | 1 |
| 21. | Head of power cord | 1 |
| 22. | Power cord | 1 |
| 23. | Adjusting plastic screw | 2 |
| 24. | Bottom cover plate | 1 |
| 25. | Foot | 4 |
| 26. | Oil receiving box | 1 |
| 27. | ON/OFF switch | 1 |
| 28. | Hinge | 4 |
| 29. | Door | 2 |
| 30. | Magnet | 1 |
EN
RCGSG-60
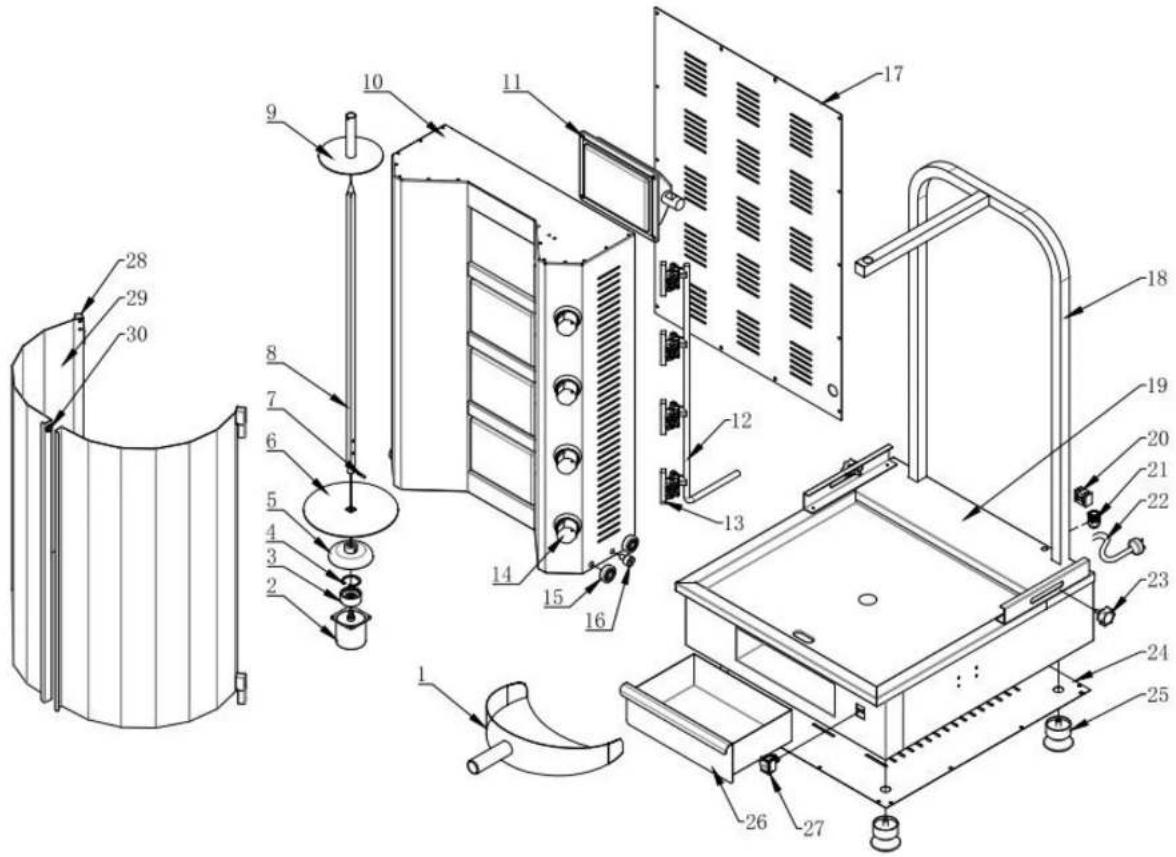
RCGSG-60
| No. | Name | Quantity |
| 1. | Meat pan | 1 |
| 2. | Motor | 1 |
| 3. | Bearing 1 | 1 |
| 4. | Circlip | 1 |
| 5. | Transmission Gear | 1 |
| 6. | Bottom fixed plate of meat pole | 1 |
| 7. | Pin of meat pole | 1 |
| 8. | Meat pole | 1 |
| 9. | Top fixed plate of meat pole | 1 |
| 10. | Top body | 1 |
| 11. | Burner | 4 |
| 12. | Gas pipe | 1 |
| 13. | Valve | 4 |
| 14. | Knob | 4 |
| 15. | Bearing 2 | 4 |
| 16. | Adjusting axle | 2 |
| 17. | Back cover plate of top body | 1 |
| 18. | Supporting frame | 1 |
| 19. | Bottom base | 1 |
| 20. | Porcelain terminal | 1 |
| 21. | Head of power cord | 1 |
| 22. | Power cord | 1 |
| 23. | Adjusting plastic screw | 2 |
| 24. | Bottom cover plate | 1 |
| 25. | Foot | 4 |
| 26. | Oil receiving box | 1 |
| 27. | ON/OFF switch | 1 |
| 28. | Hinge | 4 |
| 29. | Door | 2 |
| 30. | Magnet | 1 |
EN
RCGSG-80
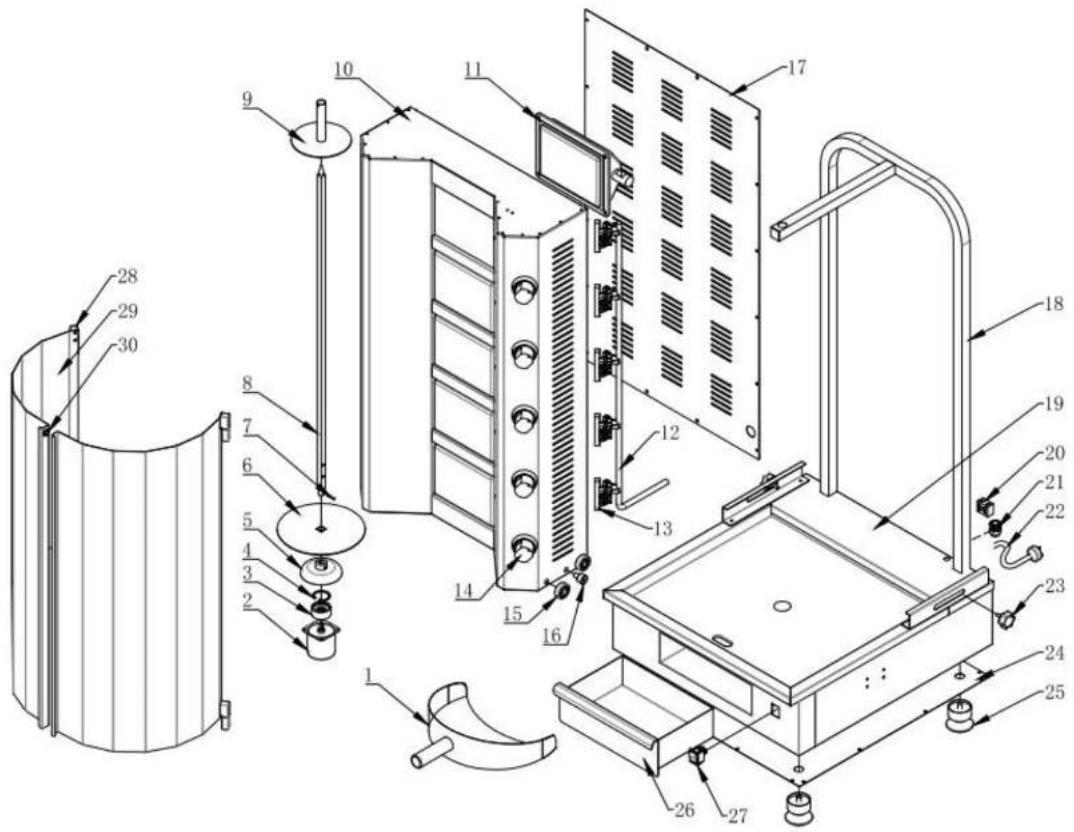
| No. | Name | Quantity |
| 1. | Meat pan | 1 |
| 2. | Motor | 1 |
| 3. | Bearing 1 | 1 |
| 4. | Circlip | 1 |
| 5. | Transmission Gear | 1 |
| 6. | Bottom fixed plate of meat pole | 1 |
| 7. | Pin of meat pole | 1 |
| 8. | Meat pole | 1 |
| 9. | Top fixed plate of meat pole | 1 |
| 10. | Top body | 1 |
| 11. | Burner | 5 |
| 12. | Gas pipe | 1 |
| 13. | Valve | 5 |
| 14. | Knob | 5 |
| 15. | Bearing 2 | 4 |
| 16. | Adjusting axle | 2 |
| 17. | Back cover plate of top body | 1 |
| 18. | Supporting frame | 1 |
| 19. | Bottom base | 1 |
| 20. | Porcelain terminal | 1 |
| 21. | Head of power cord | 1 |
| 22. | Power cord | 1 |
| 23. | Adjusting plastic screw | 2 |
| 24. | Bottom cover plate | 1 |
| 25. | Foot | 4 |
| 26. | Oil receiving box | 1 |
| 27. | ON/OFF switch | 1 |
| 28. | Hinge | 4 |
| 29. | Door | 2 |
| 30. | Magnet | 1 |
ATTENTION:
- Parts sealed by the manufacturer or its agent shall not be operated by the user.
- Do not modify the appliance.
5. OPERATION
Lighting the Machine:
Do not lean over the machine while lighting. Read all instructions before lighting.
(1) Press the knob and turn it counterclockwise from the 'OFF' position to approximately 10 degrees. Hold this position for approximately 10 seconds (do not release the knob's depressed state). Then turn the knob counterclockwise until you hear beeps, after which the burners will be lit (in the meantime hold the knob for about 3 seconds). If it does not work, repeat the above operations, but the duration of pressing the knob can be changed from 10 seconds to 3 seconds. If the appliance is not used for a long time or during first use, it will need more time to light up, which is normal.
(2) When a low flame is operating, turn the knob counterclockwise to the higher flame position. If a lower flame is required, turn the knob clockwise. Adjust the temperature to the desired level. Adjust the valve knob according to the gas quality until the burners are red with no flame.
(3) After use, rotate the knob from maximum or minimum to "OFF".
(4) If the appliance is not in use, shut off the gas supply valve.
Operating:
(1) Place the food on the rotating meat pole and insert the meat pole back into the lower fixed plate, then insert the top end of the meat pole into the upper fixed plate. Once correctly positioned, adjust the position and lock it in place. It is recommended not to exceed the maximum load described in the technical data to prevent damage to the appliance.
(2) Connect the power supply (the power supply voltage should be the same as that on the appliance nameplate and a power switch, fuse and circuit breaker for the appliance should be installed). Start the appliance according to the above steps. The burners will start to burn and the temperature of the appliance will start to rise. Turn on the motor switch. The pole will then start to rotate and the food will start to roast. While it is roasting, use a knife to cut off the roasted meat on the surface. When the meat is ready, it can be served to the customer.
(3) The user can choose whether or not to use the door. The door is easy to install and remove. Simply lift it up and remove it.

natural_image
Close-up of a hand operating a stainless steel door lock mechanism (no visible text or symbols)6. MAINTENANCE AND TROUBLESHOOTING
Transportation and Storage:
• Special care should be taken during transport to prevent strong vibrations.
- To extend and maintain the life and condition of the equipment, we strongly recommend that the packaged equipment is not placed in the open air for long periods of time. It should be stored in dry and non-aggressive air. If it is necessary to place it outdoors, it should have waterproof equipment.
- When a gas cylinder is connected to the appliance, store the appliance outside in a well-ventilated area out of the reach of children. Store the appliance indoors ONLY when the gas cylinder is capped and disconnected. The gas cylinder should always be stored outside, out of the reach of children and in a dry, well-ventilated place, away from sources of heat or ignition.
- Cover the burners with aluminium foil in order to prevent insects or other debris from collecting in the burner holes.
• It cannot be put upside-down.
Cleaning and Maintenance:
- To avoid an accident, unplug the power cord or power switch and disconnect the gas supply if the appliance has not been used for a long period of time. All servicing and maintenance should be carried out after disconnecting the power and gas supply. If there are any problems with the appliance, do not dismantle it and send it to the supplier for repair.
- It is recommended that the metal fasteners be checked and tightened annually.
• Regularly clean your machine between uses and especially after extended periods of storage. - Clean the appliance with a soft cloth and, if necessary, use a neutral cleaning agent, avoiding the use of sharp metal on the outer surface of the hotplate.
- Residual oil under the collection container should be cleaned frequently.
- Ensure that the unit and its components are sufficiently cool before cleaning. Never touch hot parts with unprotected hands.
- More than 90% of the appliance is made of metal (stainless steel, iron, aluminium, galvanised metal plate), so these metals can be reused after treatment at a specific treatment plant.
Troubleshooting:
| Problem | Possible Cause | Solution |
| The burner does not ignite using the piezo ignition system. | ·Faulty regulator.·Obstructions in the burner.·Obstructions in gas jets or gas hose.·Electrode is damaged/faulty igniter·Empty LP bottle·Have the regulator checked or replaced. | ·Clean burner.·Clean jets and gas hose.·Change electrode and wire or change igniter.·Use a new LP bottle. |
| Burner will not light with a match | ·Faulty regulator.·Obstructions in burner.·Obstructions in gas jets or gas hose.·Empty LP bottle | ·Have the regulator checked or replaced.·Clean burner.·Clean jets and gas hose.·Use a new LP bottle. |
| Fire in burner tube has a low flame or flashback (a hissing or roaring noise may be heard) | ·Obstructions in burner.·Obstructions in gas jets or gas hose.·Windy conditions. | ·Clean burner.·Clean jets and gas hose.·Use grill in a more sheltered position. |
Above trouble shooting is only for reference. Please stop use immediately for any fault, inform professionals to inspect and maintain.
Safety first! The maintenance should be carried out under the condition of cut off gas and electric.

Do instalatora/asemblera:
RCGSG-60
natural_image
Close-up of a hand operating a stainless steel industrial machine with a handle and control knob (no visible text or symbols)6. KONSERWACJA I ROZWIĄZYWANIE PROBLEMÓW
RCGSG-60
natural_image
Close-up of a hand operating a metallic door lock mechanism (no visible text or symbols)6. ÚDRŽBA A ODSTRAŇOVÁNÍ PROBLÉMŮ
RCGSG-60
natural_image
Close-up of a hand operating a stainless steel industrial machine with a handle and valve (no visible text or symbols)RCGSG-60
natural_image
Close-up of a hand operating a metallic industrial machine with a red arrow indicating a pivot point (no visible text or symbols)RCGSG-60
natural_image
Close-up of a hand operating a metallic door lock with a red arrow indicating rotation (no text or symbols visible)RCGSG-60
natural_image
Close-up of a hand operating a stainless steel door lock mechanism (no visible text or symbols)RCGSG-60
natural_image
Close-up of a hand operating a stainless steel kitchen sink with a handle, no visible text or symbols6. VEDLIGEHOLDELSE OG FEJLFINDING
RCGSG-60
natural_image
Close-up of a hand operating a stainless steel door lock mechanism (no visible text or symbols)6. HUOLTO JA VIANETSINTÄ
RCGSG-60