USER MANUAL RCEK-46 Royal Catering
This User Manual has been translated for your convenience using machine translation. Reasonable efforts have been made to provide an accurate translation; however, no automated translation is perfect nor is it intended to replace human translators. The official User Manual is the English version. Any discrepancies or differences created in the translation are not binding and have no legal effect for compliance or enforcement purposes. If any questions arise related to the accuracy of the information contained in the User Manual, please refer to the English version of those contents which is the official version.
Technical data
| Parameter description | Parameter value |
| Product name | Electric Kebab Shawarma Grill |
| Model | RCEK-46 |
| Rated voltage [V~] / frequency [Hz] | 230/50 |
| Rated power [W] | 2000 |
| Maximum load [kg] | 8 |
| Max Height of meat [mm] | 180 |
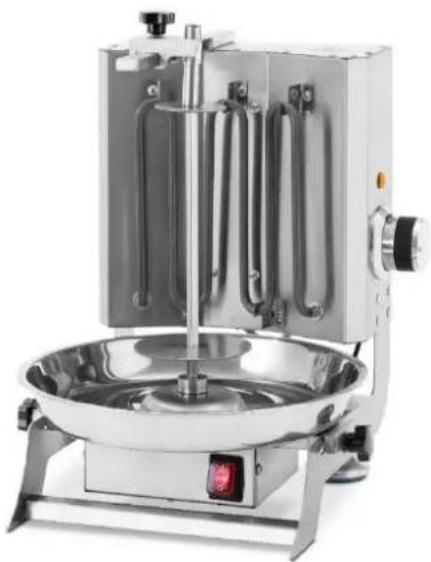
Product Overview

Operating Instructions
-
Place the machine in flat platform, power wire should be connected to the Leakage Circuit Switches.
-
Before use, please check whether the voltage of power supply is in conformity with that in the data plate, and whether user's power switch and fuse are in conformity with the request of the machine's power.
The body must be earthed properly.
- It is forbidden to put the tinder and explosive object near the machine.
- Keep it in the environment with the superior ventilation system. The temperature around should be less than 50^ .
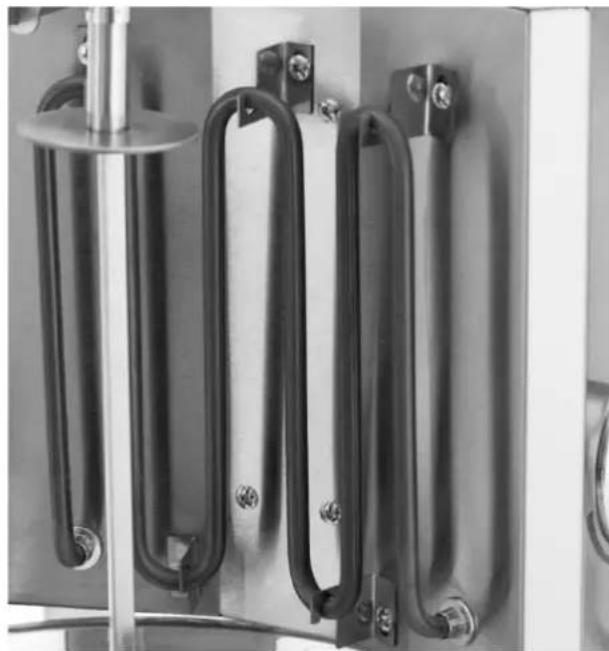
It is forbidden to make heating tube dry-burning in order to prolong machine's service lifetime.
Operating Steps
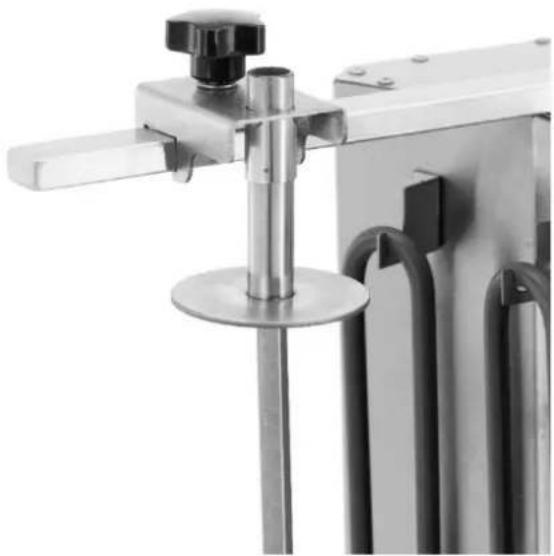
- Put the food onto the rotating meat pole and put the meat pole back into the bottom fixed plate, then insert the top tip of the meat pole into the top fixed plate. Adjust the position and lock it well after it is ready. It is recommended that the max load is 25kg to prevent any damage.
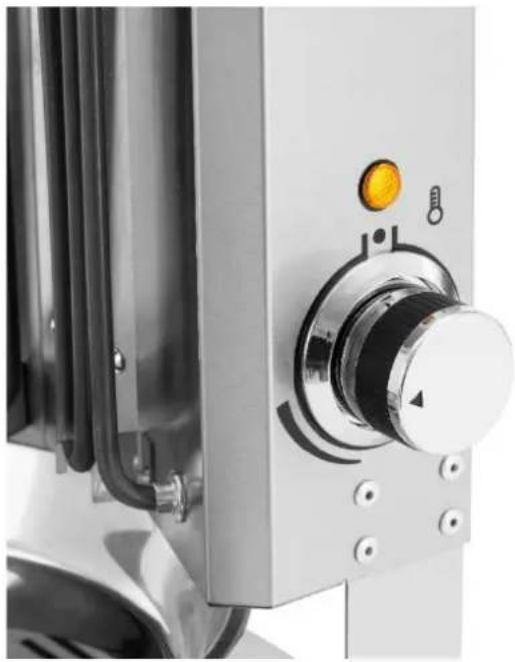
- Connect the power on (The voltage of power should be the same as nameplate of the machine and you should install power switch, fuse and breaker for the machine). Rotate the temperature knob clockwise, then the heat light is on, and the heating element starts to heat up. Turn on the motor on-off switch. Then the pole starts to rotate and the food start to roast. As the roasting proceeds, use the knife to cut down the roasted meat at the surface. You can serve the meat to your customer when the meat is ready.
- This machine uses stepless temperature regulation, if you rotate the temperature knob clockwise, the heating element working time will be lengthened and the temperature will be rising. Machine cycle operation (we call it intermittent heating process), to make the heating element in thermostat state within setting temperature range. While the intermittent heating process, as the rotating angle increases, the conduction time will be longer, and the temperature will be higher. If you want continuous heating, instead of the intermittent heating, please rotate the knob to the max position (you will have a distinct sense of pause when reaching this position), the heating element will be continuous heating status, and the barbecue temperature can reach maximum.
- The rotating meat pole is for the roasted food. It can be put up for clean or fixing the food. The food should put in the middle of the pole. During the pole rotating, the roasted food also rotates.
- The meat pan can be used to collect the remaining oil of heating plate expediently, and it should be cleaned out frequently to avoid coming out.
Attention: When you use this machine, do not touch the electrical heating area to avoid scalding.
Care and Maintenance
Transportation and Storage
- In transportation, it should be very careful, prevention from heavy vibration.
- In order to extend and maintain the life and condition of your machine, we strongly recommend that the equipment in package cannot be put in open-air for long time. It should be put in the good facility of air and non-corrosive air, dry storage. If it is necessary to put it in open-air, it should have waterproof facilities.
It cannot be put upside-down.
Cleaning and Maintenance
- In order to avoid the accident, you must unplug the power supply cord or cut off power switch if you have not used the machine for a long time. All the service and maintenance operation must be carried out after the power supply is cut off. If there is some trouble in machine, do not dismount the machine, and send it to your supplier for repair.
Annual checking and tightening of metal fittings is recommended.
Regularly clean your machine between uses and especially after extended periods of storage.
- Please clean the machine with soft fabric, and use neutral cleaning agent to clean if necessary, avoid using sharp metal to pull the surface of heating plate exterior.
- Ensure that the machine and its components are sufficiently cool before cleaning. Never handle hot parts with unprotected hands.
The oil leftovers in the meat pan should be cleaned out often.
- Above 90% of the machine is all made of metal (stainless steel, iron, aluminium, electroplating metal plate), so these metals can be reused after undergoing processing at a specialized treatment plant. (Please don't throw them away)
Parts Diagram
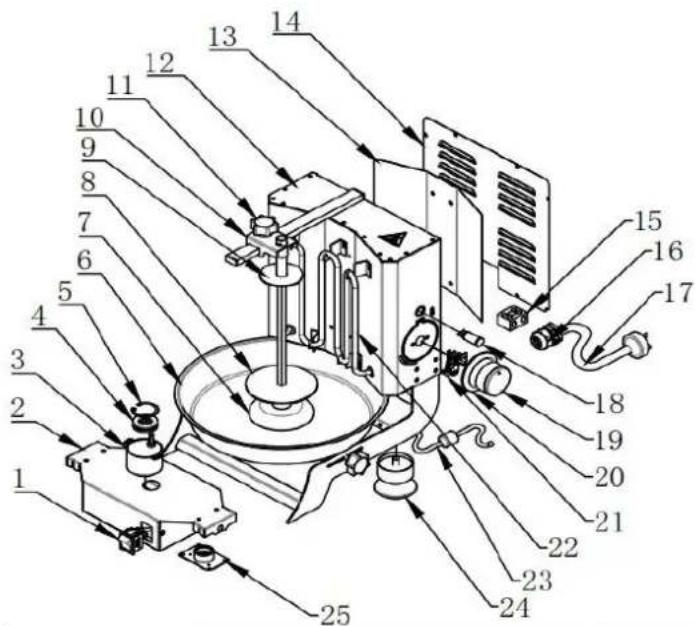
| Part number | Description | Quantity |
| 1 | On-Off Switch | 1 |
| 2 | Sliding Structure of Meat Pan | 1 |
| 3 | Motor | 1 |
| 4 | Bearing | 1 |
| 5 | circlips | 1 |
| 6 | Meat Pan | 1 |
| 7 | Transmission Structure | 1 |
| 8 | Meat Plate and Meat Pole | 1 |
| 9 | Top Positioning | 1 |
| 10 | Positioning Buckle of Meat Pole | 1 |
| 11 | Adjusted Knob | 1 |
| 12 | Body | 1 |
| 13 | Covering Plate | 1 |
| 14 | Back Plate | 1 |
| 15 | Porcelain Terminal | 1 |
| 16 | Cable Lock | 1 |
| 17 | Power Cord | 1 |
| 18 | Heat Light | 1 |
| 19 | Temp. Knob Component | 1 |
| 20 | 1 |
| 21 | Thermostat | 1 |
| 22 | Heating Element | 1 |
| 23 | Butt Cable | 1 |
| 24 | Leg | 2 |
| 25 | Motor Assembling Structure | 1 |
Attention:
- Parts sealed by the manufacturer or its agent shall not be operated by the user.
- Do not modify the appliance.
Electrical Schematics
Check the circuit.
The installer should be responsible for the installation of this appliance.
- Cut the power off and let the appliance cool down completely before dismantling this appliance.

1: 220-230V, 50/60Hz. User should test power supply with leakage protection. We suggest using 40A, 2.5m^2 power grid.
SA: ON-OFF SWITCH
M: MOTOR
ST:TEMPERATURE CONTROLLER
EH:HEATING ELEMENT
HL:HEATING LIGHT

ST: REGULACE TEPLOTY
EH: TOPNE TELESO
HL: SVETLO TOPENI