UNI_IHP_01 - Heating Uniprodo - Free user manual and instructions
Find the device manual for free UNI_IHP_01 Uniprodo in PDF.

| Brand | Uniprodo |
| Model | UNI_IHP_01 |
| Product type | Infrared heating panel with WiFi |
| Rated power | 300 W |
| Voltage / frequency | 230 V ~ 50 Hz |
| Protection rating | IP54 |
| Dimensions (W x D x H) | 500 x 600 x 30 mm |
| Weight | 2.95 kg |
| Heating surface | Infrared, heats objects and people |
| Control type | Remote control + Smart Life app (WiFi) |
| Adjustable temperature range | From 5 °C to 35 °C (estimated) |
| Remote control power | 2 AAA 1.5 V batteries (not included) |
| WiFi frequency | 2.4 GHz (IEEE 802.11 b/g/n) |
| Maximum remote control distance | 8 meters |
| Installation | Wall mounting (fixings supplied) |
| Safety distances | Front: 30 cm, sides: 10 cm, top: 50 cm, floor: 60 cm |
| Usage | Indoor only |
| Cleaning | Dry soft cloth, do not immerse, do not use corrosive products |
| Additional features | Weekly programming, timer, child safety, app control |
| Standby consumption | < 0.8 W |
| Panel material | Aluminum / glass (likely) |
| Warranty | Consult manufacturer (2 years standard) |
Frequently Asked Questions - UNI_IHP_01 Uniprodo
User questions about UNI_IHP_01 Uniprodo
0 question about this device. Answer the ones you know or ask your own.
Ask a new question about this device
Download the instructions for your Heating in PDF format for free! Find your manual UNI_IHP_01 - Uniprodo and take your electronic device back in hand. On this page are published all the documents necessary for the use of your device. UNI_IHP_01 by Uniprodo.
USER MANUAL UNI_IHP_01 Uniprodo
WITH BUILT-IN REMOTE
WIFI THERMOSTAT
| DE | Produktname | INFRAROT-HEIZSCHEIBE MIT INTEGRIERTEM FERN-WIFI-THERMOSTAT |
| EN | Product name | INFRARED HEATING PANEL WITH BUILT-IN REMOTE WIFI THERMOSTAT |
| PL | Nazwa produktu | PANEL GRZECZY NA PODCZERWIEN Z WBUDOWANYM ZDALNYM TERMOSTATEM WIFI |
| CZ | Název výrobku | NÁSTÉNNÍ INFRAPANEL S WIFI |
| FR | Nom du produit | PANNEAU CHAUFFANT INFRAROUGE AVEC WIFI |
| IT | Nome del prodotto | PANNELLO RADIANTE A INFRAROSSI CON WIFI |
| ES | Nombre del producto | CALEFACCIÓN DE PARED POR INFRARROJOS CON WIFI |
| HU | Termék neve | INFRAVÖRÖS FALI HÖSUGÁRZÓ WI-FI-VEL |
| DA | Produktnavn | INFRARÖDT VARMEPANEL MED WIFI |
| FI | Tuotteen nimi | LÄMPÖPANEELI WIFI - INFRAPUNA |
| NL | Productnaam | INFRAROOD WANDVERWARMING MET WIFI |
| NO | Produktnavn | INFRARÖD VARMEPANEL MED WIFI |
| SE | Produktnamn | INFRAVÄRMEPANEL FÖR VÄGG MED WIFI |
| PT | Nome do produto | AQUECEDOR DE INFRAVERMELHOS COM WI-FI |
| SK | Názov produktu | INFRAČERVENÍ NÁSTENNÍ OHRIEVAČ S WI-FI |
| DE | Modell | UNI_IHP_01UNI_IHP_04 |
| EN | Product model | |
| PL | Model produktu | |
| CZ | Model výrobku | |
| FR | Modèle | |
| IT | Modello | |
| ES | Modelo | |
| HU | Modell | |
| DA | Model | |
| FI | Tuotteen malli | |
| NL | Productmodel | |
| NO | Produktmodell | |
| SE | Produktmodell | |
| PT | Modelo do produto | |
| SK | Model | |
| DE | Hersteller | expondo Polska sp. z o.o. sp. k. |
| EN | Manufacturer | |
| PL | Producent | |
| CZ | Výrobce | |
| FR | Fabricant | |
| IT | Produttore | |
| ES | Fabricante | |
| HU | Termelő | |
| DA | Producent | |
| FI | Valmistaja | |
| NL | Producent | |
| NO | Produsent | |
| SE | Tillverkare | |
| PT | Fabricante | |
| SK | Výrobca | |
| DE | Anschrift des Herstellers | ul. Nowy Kisielin – Innowacyjna 7, 66-002 Zielona Góra | Poland, EU |
| EN | Manufacturer Address | |
| PL | Adres producenta | |
| CZ | Adresa výrobce | |
| FR | Adresse du fabricant | |
| IT | Indirizzo del produttore | |
| ES | Dirección del fabricante | |
| HU | A gyártó címe | |
| DA | Producentens adresse | |
| FI | Valmistajan osoite | |
| NL | Adres producent | |
| NO | Produsentens adresse | |
| SE | Tillverkarens adress | |
| PT | Endereço do fabricante | |
| SK | Adresa výrobcu |


natural_image
Exterior view of a rectangular electronic device with internal components and a cable (no visible text or symbols)natural_image
Close-up of a metallic triangular metal edge with a labeled point '1' (no text or symbols beyond the label)This User Manual has been translated for your convenience using machine translation. Reasonable efforts have been made to provide an accurate translation; however, no automated translation is perfect nor is it intended to replace human translators. The official User Manual is the English version. Any discrepancies or differences created in the translation are not binding and have no legal effect for compliance or enforcement purposes. If any questions arise related to the accuracy of the information contained in the User Manual, please refer to the English version of those contents which is the official version.
Technical data
| Parameter description | Parameter value | |
| Product name | Infrared heating panel with built-in remote wifi thermostat | |
| Model | UNI_IHP_01 | UNI_IHP_04 |
| Rated voltage [V~] / frequency [Hz] | 230/50 | |
| Rated power [W] | 300 | 450 |
| Protection rating IP | IP54 | |
| Dimensions [width x depth x height; mm] | 500 x 600 x 30 | 610 x 710 x 35 |
| Weight [kg] | 2.95 | 5.2 |
1. General description
The user manual is designed to assist in the safe and trouble-free use of the device. The product is designed and manufactured in accordance with strict technical guidelines, using state-of-the-art technologies and components. Additionally, it is produced in compliance with the most stringent quality standards.
DO NOT USE THE DEVICE UNLESS YOU HAVE THOROUGHLY READ AND UNDERSTOOD THIS USER MANUAL.
To increase the product life of the device and to ensure trouble-free operation, use it in accordance with this user manual and regularly perform maintenance tasks. The technical data and specifications in this user manual are up to date. The manufacturer reserves the right to make changes associated with quality improvement. The device is designed to reduce noise emission risks to a minimum, taking into account technological progress and noise reduction opportunities.
Legend

The product satisfies the relevant safety standards.
Read instructions before use.
The product must be recycled.
ATTENTION! Hot surface, risk of burns!
Only use indoors.
It is prohibited to place objects (such as towels, clothes etc.) above or directly in front of the device. In order to avoid overheating and fire hazards, the device must not be covered.
Do not spray with water.

PLEASE NOTE! Drawings in this manual are for illustration purposes only and in some details may differ from the actual product.
2. Usage safety

ATTENTION! Read all safety warnings and all instructions. Failure to follow the warnings and instructions may result in electric shock, fire and/or serious injury or even death.
The terms "device" or "product" are used in the warnings and instructions to refer to:
Infrared heating panel with built-in remote Wi-Fi thermostat
2.1. Electrical safety
a) The plug must fit the socket. Do not modify the plug in any way. Using original plugs and matching sockets reduces the risk of electric shock.
b) Avoid touching earthed elements such as pipes, heaters, boilers and refrigerators. There is an increased risk of electric shock if the earthed device is exposed to rain, comes into direct contact with a wet surface or is operating in a damp environment. Water getting into the device increases the risk of damage to the device and of electric shock.
c) Do not touch the device with wet or damp hands.
d) Use the cable only for its designated use. Never use it to carry the device or to pull the plug out of a socket. Keep the cable away from heat sources, oil, sharp edges or moving parts. Damaged or tangled cables increase the risk of electric shock.
e) If using the device in a damp environment cannot be avoided, a residual current device (RCD) should be applied. The use of an RCD reduces the risk of electric shock.
f) Do not use the device if the power cord is damaged or shows obvious signs of wear. A damaged power cord should be replaced by a qualified electrician or the manufacturer's service centre.
g) To avoid electric shock, do not immerse the cord, plug or device in water or other liquids. Do not use the device on wet surfaces.
h) ATTENTION! DANGER TO LIFE! While cleaning, never immerse the device in water or other liquids.
i) Do not use in very humid environments or in the direct vicinity of water tanks.
j) Before the first use, please check whether the main voltage type and current comply with the indicated data on the type plate.
k) The device will draw more current than small devices, so a separate 10A socket is required.
I) Do not use the device when the socket or cord is overloaded.
m) Turn off the device and disconnect the power cord from the power outlet when the device is not in use.
n) Do not use this device near bathtubs, paddling pools, swimming pools or other containers with water. Risk of electric shock!
o) The device should be placed in a place where switches and regulators cannot be touched by a person in the bath or shower.
2.2. Safety in the workplace
a) Make sure the workplace is clean and well lit. A messy or poorly lit workplace may lead to accidents. Try to think ahead, observe what is going on and use common sense when working with the device.
b) Do not use the device in a potentially explosive environment, for example in the presence of flammable liquids, gases or dust.
c) If you are unsure about whether the product is operating correctly or if you find damage, please contact the manufacturer's service centre.
d) Only the manufacturer's service centre may make repairs to the product. Do not attempt to make repairs yourself!
e) In case of fire, use a powder or carbon dioxide (CO2) fire extinguisher (one intended for use on live electrical devices) to put it out.
f) Please keep this manual available for future reference. If this device is passed on to a third party, the manual must be passed on with it.
g) Keep packaging elements and small assembly parts in a place not available to children.
Remember! When using the device, protect children and other bystanders.
2.3. Personal safety
a) Do not use the device when tired, ill or under the influence of alcohol, narcotics or medication which can significantly impair the ability to operate the device.
b) The device is not designed to be handled by persons (including children) with limited mental and sensory functions or persons lacking relevant experience and/or knowledge unless they are supervised by a person responsible for their safety or they have received instruction on how to operate the device.
c) The device is not a toy. Children must be supervised to ensure that they do not play with the device.
d) Do not put your hands or other items inside the device while it is in use!
2.4. Safe device use
a) Do not overload the device. Use the appropriate tools for the given task. A correctly-selected device will perform the task for which it was designed better and in a safer manner.
b) Do not use the device if the "ON/OFF" switch does not function properly (does not switch the device on and off). Devices which cannot be switched on and off using the ON/OFF switch are hazardous, should not be operated and must be repaired.
c) Make sure the plug is disconnected from the socket before attempting any adjustments, accessory replacements or before putting the device aside. Such precautions will reduce the risk of accidentally activating the device.
d) When not in use, store in a safe place, away from children and people not familiar with the device who have not read the user manual. The device may pose a hazard in the hands of inexperienced users.
e) Keep the device in perfect technical condition.
f) Keep the device out of the reach of children.
g) Device repair or maintenance should be carried out by qualified persons, only using original spare parts. This will ensure safe use.
h) To ensure the operational integrity of the device, do not remove factory-fitted guards and do not loosen any screws.
i) Do not move, adjust or rotate the device in the course of work.
j) Clean the device regularly to prevent stubborn grime from accumulating.
k) The device is not a toy. Cleaning and maintenance may not be carried out by children without supervision by an adult person.
I) Keep the device away from sources of fire and heat.
m) Panels intended for wall mounting only must not be mounted to the ceiling. Panels intended for mounting only to the ceiling should not be mounted on the wall. Otherwise, it may cause overheating or even fire.
n) Temperature sensors or a temperature controller should not be placed directly in the space towards which the heating panel will be facing, as this will affect the temperature measurement.
o) Do not use the device in small rooms where there are people who cannot leave the room on their own and who are not under constant supervision.
p) Some parts of this product can become very hot and cause burns. Do not touch the surface of the device during its operation and for some time after switching it off until it has cooled down.
q) Do not install the device near flammable materials. Danger of fire.
r) In order to avoid burns, special attention should be paid to places where people requiring special treatment are present: infants and children, people with sensitive skin, the elderly, the sick, people who are intoxicated, people taking sleeping pills.
s) Remove all protective films (front and back) before use.
t) Do not use the device in a humid environment.
u) Do not sit on the device.
v) The appliance should be installed at a sufficient distance from walls and other objects (especially curtains and similar flammable/heat-sensitive items).
w) Do not place the device on a flammable surface.
x) Never drill into the device.
y) Allow the device to cool down before transporting and/or carrying out maintenance work.
z) In order to avoid overheating and fire hazards, the device must not be covered.
aa) The wall panels must be installed at least 0.6 m above the floor.
bb) Ceiling panels must be installed at least 1.8 m above the floor.

ATTENTION! Despite the safe design of the device and its protective features, and despite the use of additional elements protecting the operator, there is still a slight risk of accident or injury when using the device. Stay alert and use common sense when using the device.
3. Use guidelines
The device is designed to provide an efficient, comfortable and healthy heating system for any domestic users. The user is liable for any damage resulting from unintended use of the device.
3.1. Device description
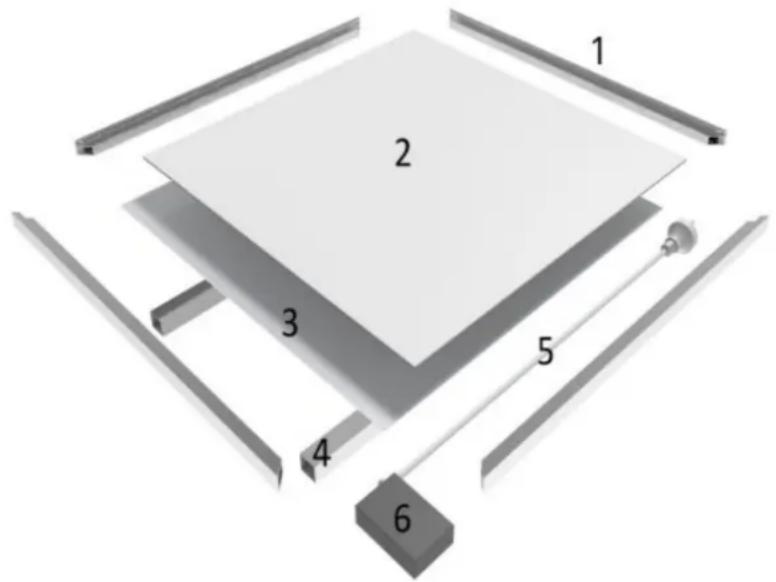
1 - Frame
2 - Heating element
3 - Rear metal plate
4 - Wall attachment
5 - Power cord
6 - Junction box
3.2. Assembling the device
Make sure remove all the protective films (both on the front and back)!
IMPORTANT: this way is for wall mounting only!

ATTENTION! Use wall plugs suitable for the type of wall material on which the unit will be hnted.
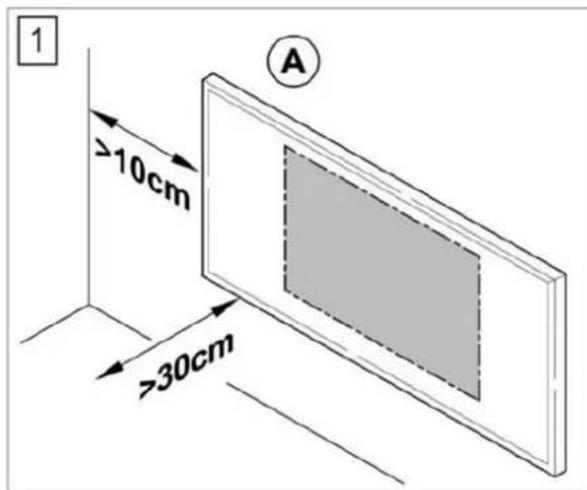
- Choose the mounting position, keep the required minimum distances.
| Distances required for device mounting | |
| front | Minimum 30cm |
| left | Minimum 10cm |
| right | Minimum 10cm |
| top | Minimum 50cm |

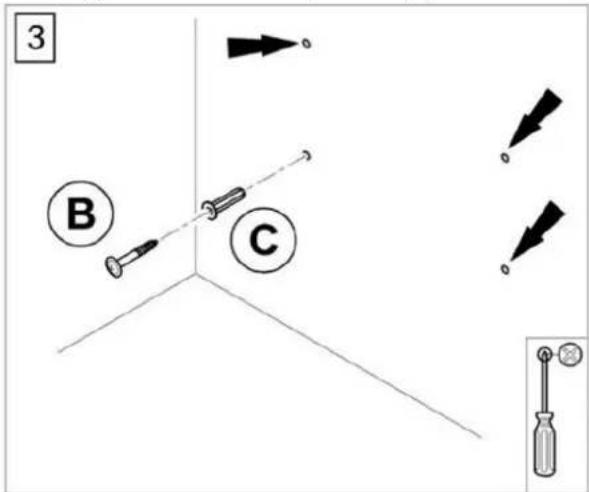
- Mark the positions for the bore holes onto the drilling template (D) if there are no existing marks. Stick the drilling template on the wall. Drill the holes with an appropriate bit.
- Insert the screws into the dowels and fasten the screws. The screws should protrude approx. 0.5 cm from the dowels.
- Hang the infrared heating device (A).
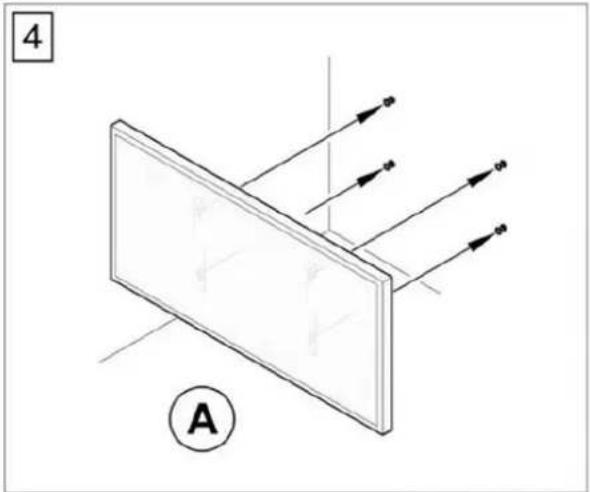
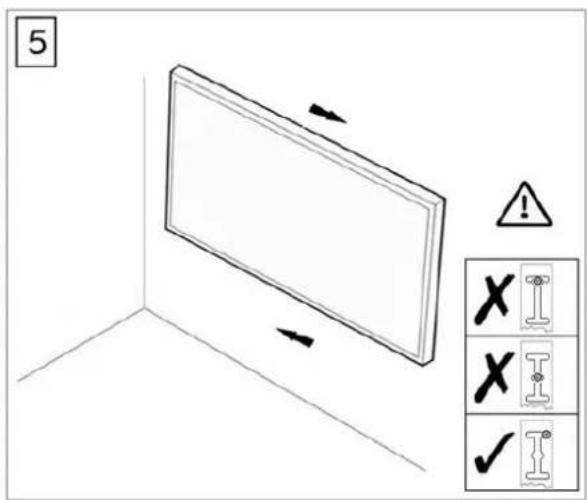
- Slid the device to make the screws into the correct positions as shown in below drawing.
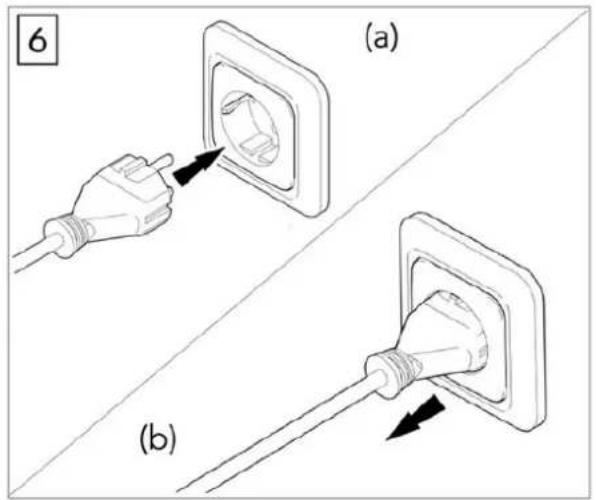
- Plug in to start using the heating device.
- Pull out the plug when not in use.
3.3. Device use
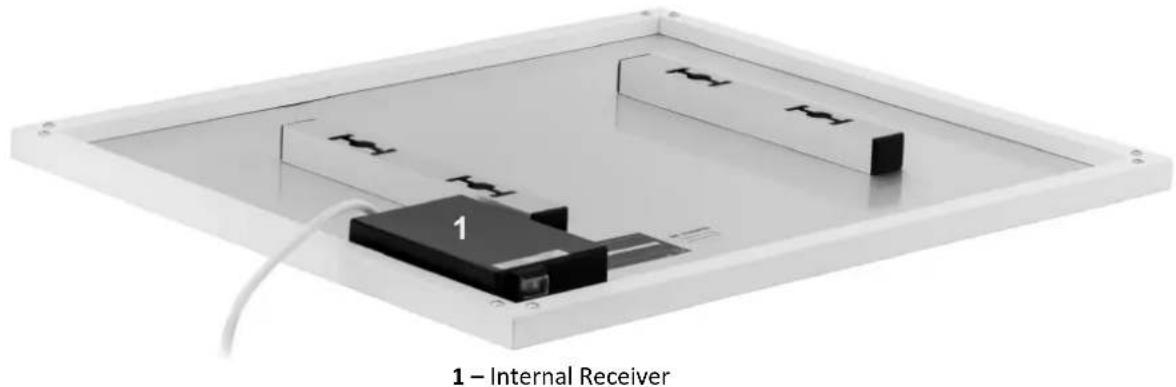
3.3.1. Internal Receiver
The receiver is located at the rear of the unit.
natural_image
Internal receiver device with labeled components and wiring (no text or symbols on the device itself)
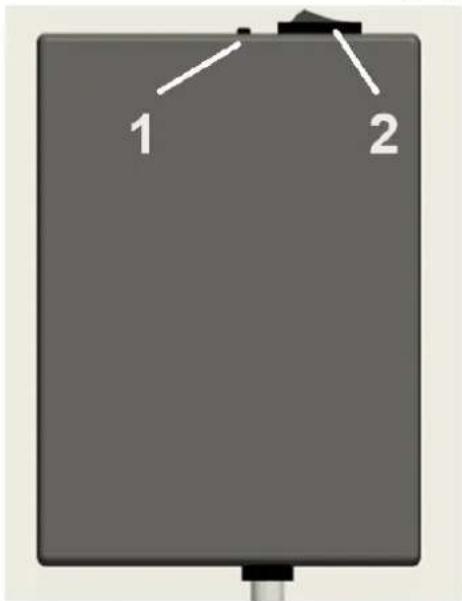
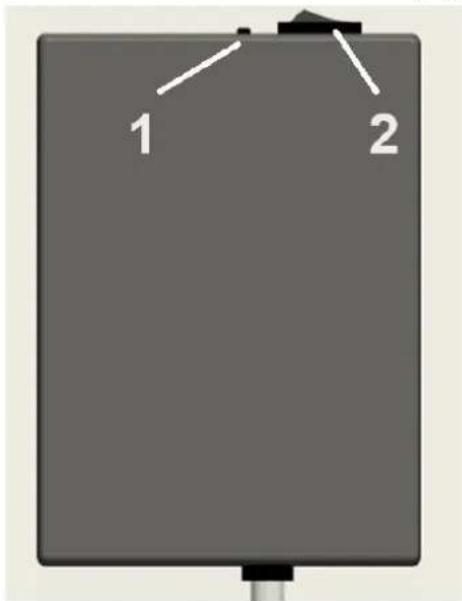
1 - Wi-Fi reset button (long press for 5-10 seconds for reset)
2 – Thermostat disable switch – ON means disabling thermostat
Internal receiver technical data:
• Power Supply: AC220-240V
• Wireless standard: IEEE802.11b/g/n
• Frequency range: 2.412\~2.484GHz
• Security mechanism: WEP/WPA-PSK/WPA2-PSK
• Encryption type: WEP/TKIP/AES
• Standby power consumption: <0.8W
• Working environment: temperature -5 \~ 50 °C; humidity 10% -95%.
3.3.2. Remote controller
- Built in receiver and remote controller constitute the temperature control system.
- The remote controller is powered by 2pcs of 1.5V AAA battery. Please change with new batteries if the battery symbol gets flashing, or else the remote will not be able to control the heaters.
- The remote controller acquires the room temperature through the senor on the top and send real-time temperature data to the receiver.
- The screen can display the room temperature, setting temperature, child lock, battery level etc.
- The remote controller has the functions of switching heater on/off, setting temperature, temperature conversion, child lock etc.
- When the screen of the remote-controller is off, it only means that the heater is off, and it does not mean that the remote-controller has stopped working. It is still detecting real-time temperature data and sending the real-time temperature data to the receiver every 60s for logical control (the remote controller will send the collected temperature data whether it is on or off).
- One remote controller can be paired with several heaters, users can pair them one by one or at same time together, both ways are workable.
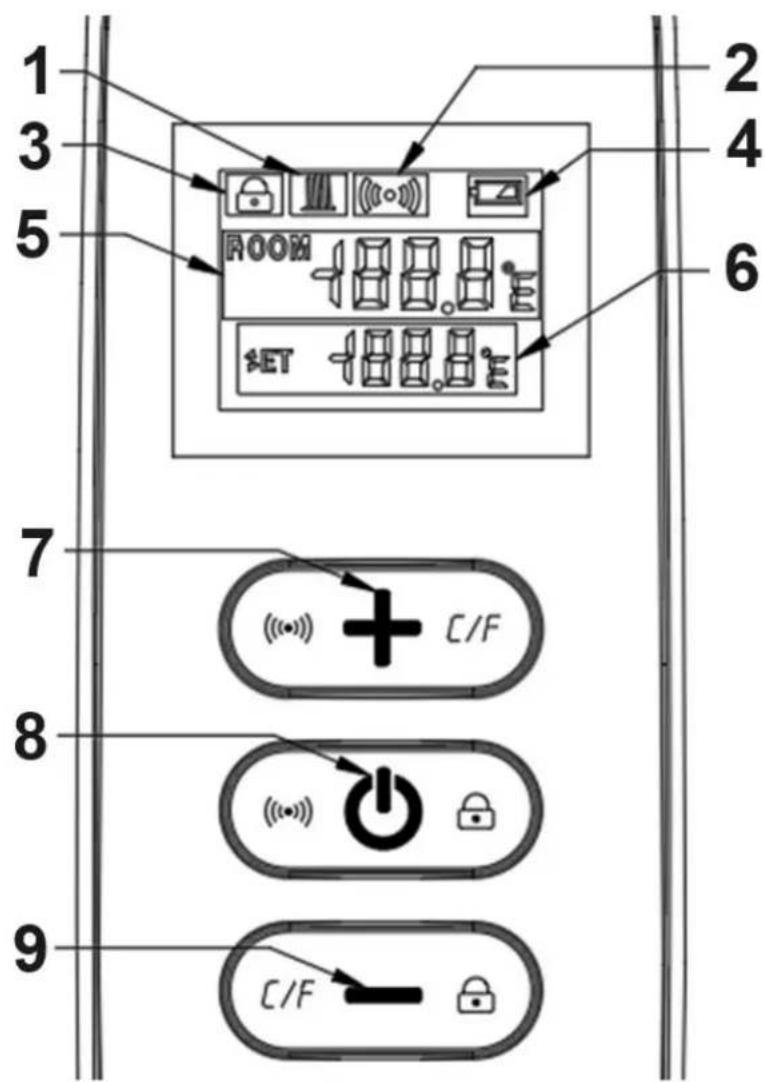
1 - Heating symbol
2-Wi-Fi
3 - Child lock
4-Battery level
5 - Room temperature
6 - Setting temperature
7 - Temperature "+"
8 - On/Off
9 - Temperature "-"
- Power on the heater, and then press " 🔊" and "+" at the same time within five minutes to start pairing, the WIFI symbol flashes three times and sends out the paring code to indicate that paring is taking place, there will be one beep sound from heater after success.
Note: 1. Please turn off the heaters that you do not want to be paired before pairing.
2. If the remote control needs to be replaced, please power on the heater again, and then complete the pairing within five minutes. If the pairing is not finished within five minutes, the pairing mode will be off and you will need to repeat the above steps to pair again.
- Press " 🔊" to turn on the heater and press again to turn off the heater.
-
Press the "+" key to increase the set temperature by 1°C, press the "-" key to decrease the set temperature by 1°C, and hold the "+" key or the "-" key for 3 seconds to increase or decrease the set temperature continuously.
-
Press the "+" and "-" key at the same time to switch the temperature unit between °C and °F.
-
Press the " 🔊 " key and the " — " key at the same time for 3 seconds to open the child lock mode, do so again to close.
-
SET means the target temperature. Heating symbol:
1) If the SET temperature is lower than the ROOM temperature, the heating symbol is not displayed.
2) If the SET temperature is higher than the ROOM temperature, the heating symbol is displayed.
3) When the room is heated to the SET temperature, then the remote control will stop displaying the heating symbol.
4) Every time you press the button, the screen background will light up, and it will be off if no operation within 5 seconds.
3.3.3. Wi-Fi connection
- Scan and install below Smart Life APP, and Register an account.
- Long press Wi-Fi reset button 5-10s or repeat powering on/off the heater 4 times by plug until the front corner red indicator light blinks.
NOTE: same operation is necessary when Wi-Fi hotspot changed, Wi-Fi password changed, or cell phone changed.
natural_image
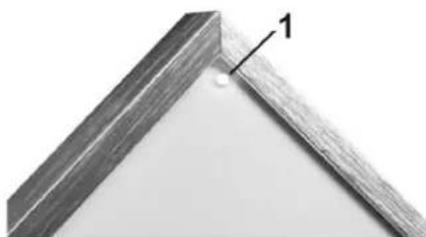
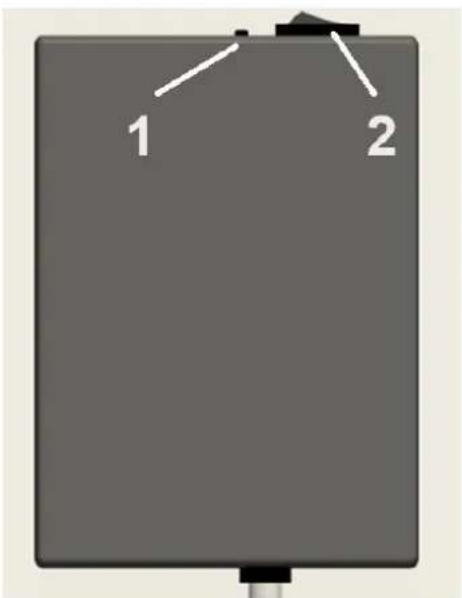
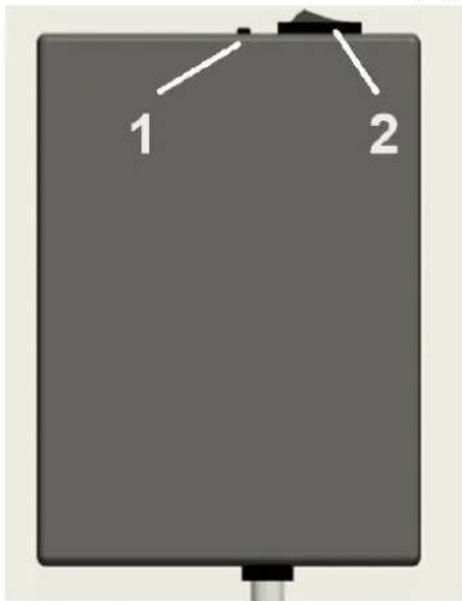
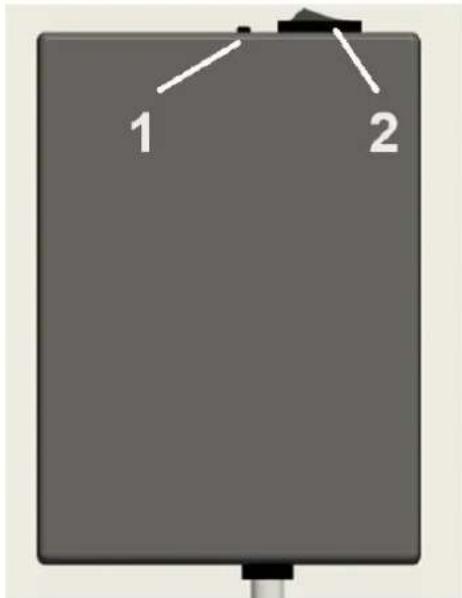
Close-up of a metallic T-shaped metal bracket with a small circular mark labeled '1' pointing to a small hole (no text or symbols beyond the label)1 – Corner indicator light – Red color means online; Blue color means heater powering on
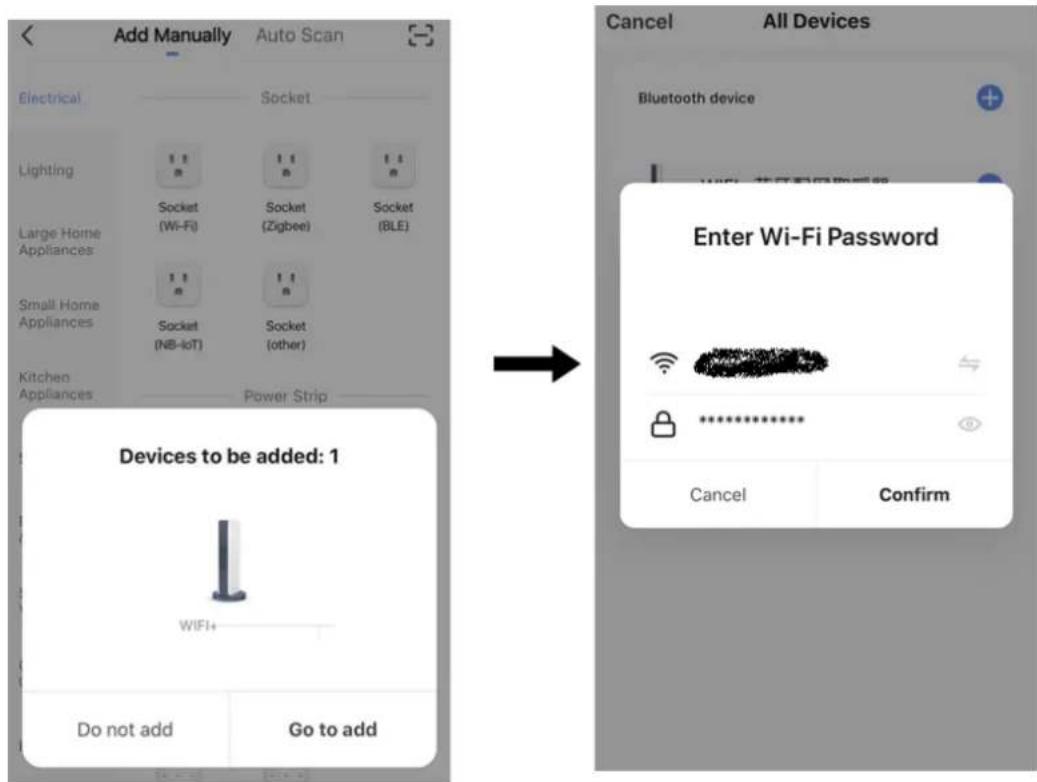
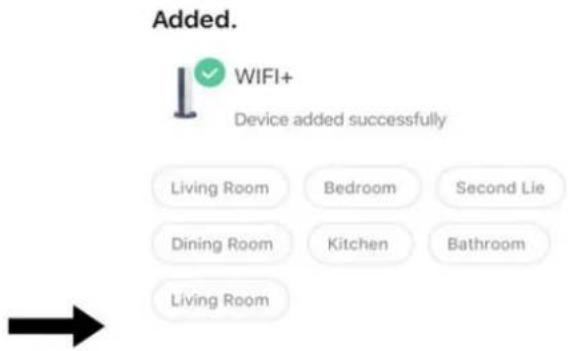
- Click Smart Life App to enter main interface, select room name and click "Add Device" or the upper right corner "+" icon. A pop-up window appears as below picture.
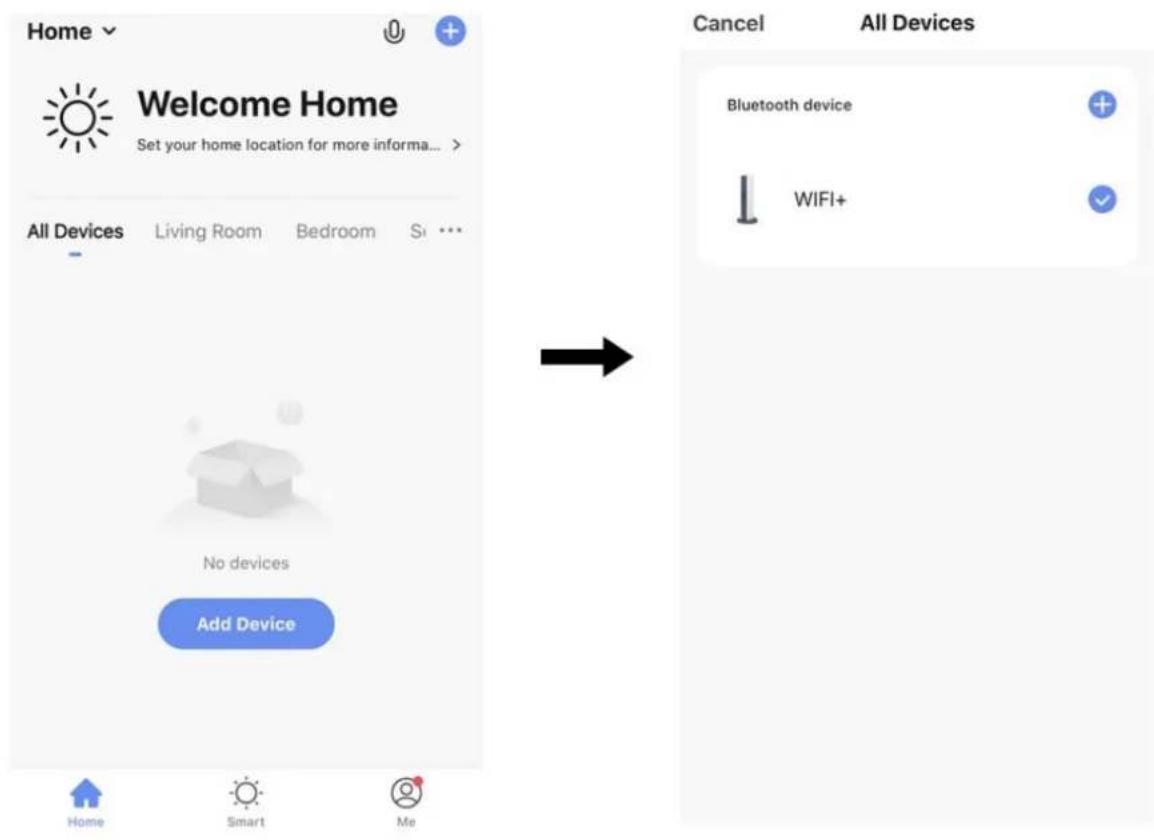
- Click "Go to add". In next page click "+" to add a bluetooth device, and a "Enter Wi-Fi Password" dialog will pop-up as following.

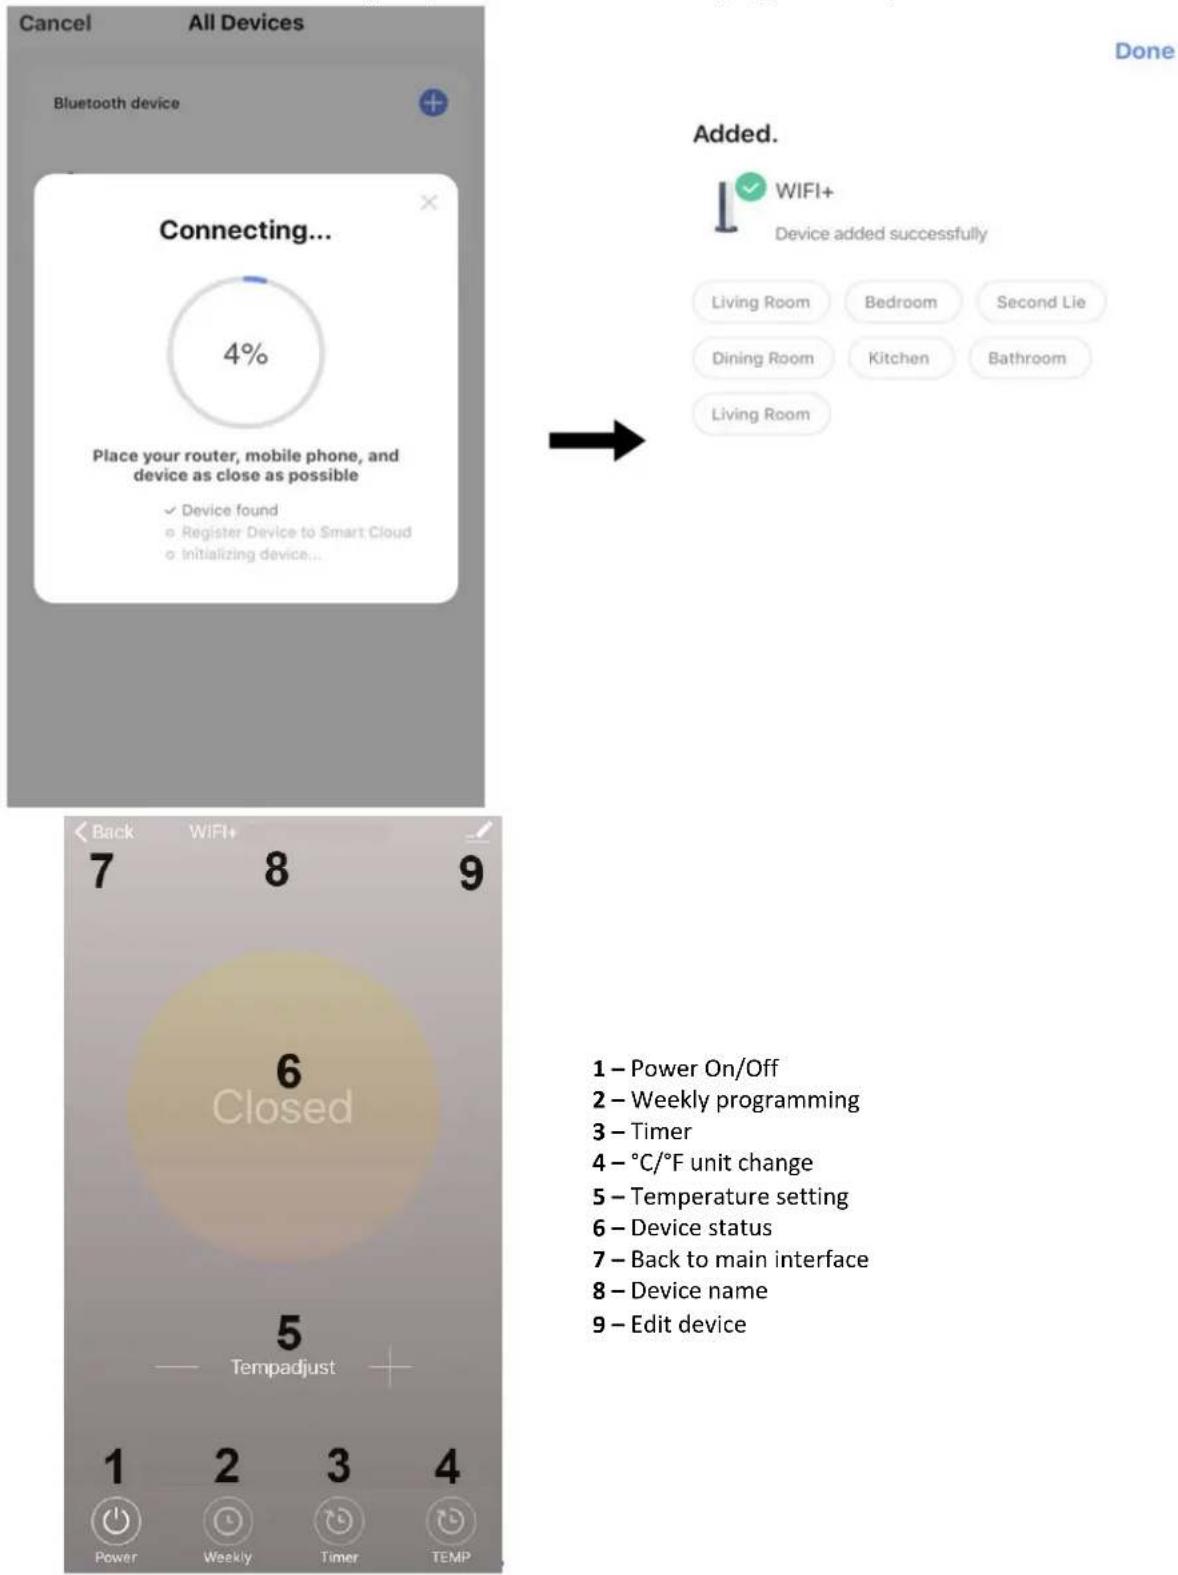
- Enter Wi-Fi password, click "Confirm". It will automatically enter the next step for Wi-Fi connection. The device will be added successfully after waiting for 20-30 seconds. And meantime the red indicator at the front corner of heater lights up. You can name this device, e.g., "Infrared panel heater".
3.3.3.1. Operating instructions
- Main view of the Smart Life APP after heater connected successfully as below.
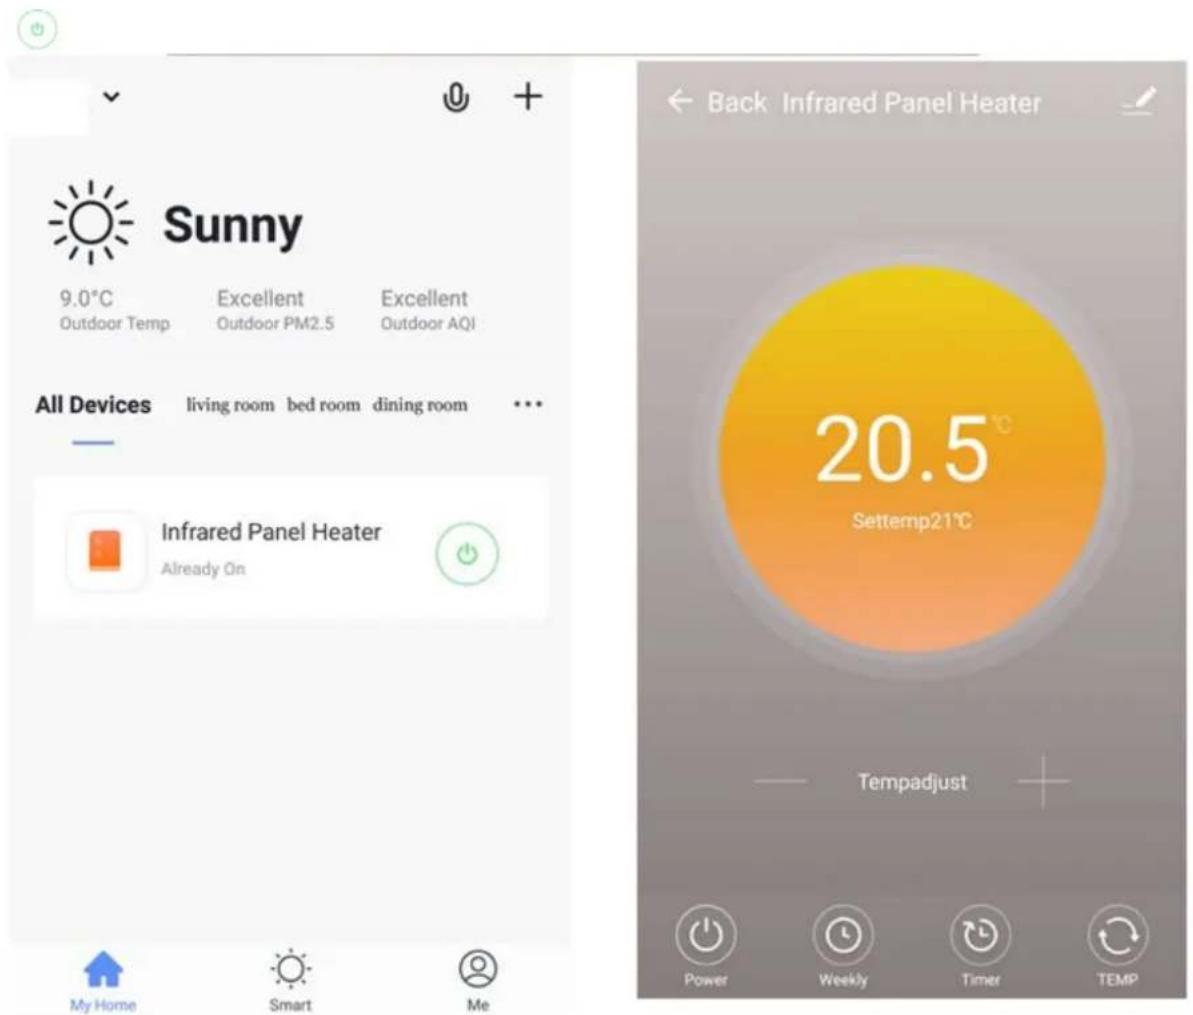
- Click the green ⚙ to turn on/off the power supply of the heater, blue indicator on heater panel lighting up means the heater has been powered on.
- Click device name "infrared panel heater" to enter the interface of the device.
- Power means turning on/off the power supply of the heater, setting temperature should be also at least 0.5 °C higher than room temperature if you want the heater to be powered on.
- Weekly means weekly programming mode. Under weekly mode, users can program the heater to change the operation and desired temperature throughout the week. ON and OFF timing is separate, you need to add individually. Don't forget to turn ON the weekly button to Green after programming. Note: weekly will still work as per setting even under APP powering off state.
- Time is countdown function for setting to power off the heater. Note: APP powering off will cause timer setting canceled.
- TEMP means convert temperature display between and ^ C/ ^ F.
Note: Weekly, Timer and TEMP: these three functions can be edited only under power on mode!
- means other editing of the heater, description as below.

1) Device name: edit the thermostat name.
2) Device information: to check the virtual ID etc. device information.
3) Share device: you can share the control of this thermostat to other mobile numbers/email addresses if they have been registered in "Smart Life" APP.
4) Create Group: you can group different thermostats to control together.
5) FAQ & Feedback: to report any problems to the APP supplier.
6) Add to the home interface: you can turn on the heater directly on the home interface.
7) Check Device network: check the Wi-Fi connection status of device.
8) Check Update: Get latest firmware version.
9) Remove Device: remove thermostat from your APP.
3.3.4. Remarks
- The heater only supports 2.4GHz network.
- Red light means the heater is online, blue light means the heater is powering on.
- If long press Wi-Fi reset button 5-10s or repeat powering on/off the heater 4 times by plug, internal Wi-Fi connecting information will be cleared, you need to pair Wi-Fi again.
- Thermostat disable switch ON means disabling thermostat.
- Wi-Fi or network disconnected will cause heater offline and heater powering off.
- The blue LED indicator may not light up at the first time when you finished the WIFI connecting, you need to wait for a couple of seconds due to network searching and connecting.
- Alkaline battery is recommended for the remote control. Please remove the battery if long time no use.
- If the remote cannot turn on the heater, please check if the setting temperature is not high above the room temperature.
- Put the remote controller at most 8 meters from the heater.
- Do not mount the remote controller close to any cold or heat source.
- Do not cover the remote controller.
- Locate it in an open normal room environment rather not inside a drawer/pocket etc., or under pillow/quilt etc.
- Do not use heaters in wet or running water environment.
- Please pull out the heater power supply from your socket if long time no use.
- Both the remote-controller and App can turn on/off the heater and set the temperature. The remote-controller setting can be linked to the App, but the App setting cannot be linked to the remote-controller.
- If the connection between remote and the built in receiver breaks and the temperature data can't be received for 5 minutes, the APP will display --.-, and the heater will stop heating, meanwhile, the mobile will get a warning message. If the connection is done again, the APP will display real room temperature.
- If the remote-controller is disconnected, please bring the remote-controller close to the heater (less than 3 meters) and repair.
- If the remote controller is always disconnected at one location, move it somewhere else.
3.4. Cleaning and maintenance
a) Unplug the mains plug and allow the device to cool completely before each cleaning, adjustment or replacement of accessories, or if the device is not being used.
b) Use only non-corrosive cleaners to clean the surface.
c) After cleaning the device, all parts should be dried completely before using it again.
d) Store the unit in a dry, cool place, free from moisture and direct exposure to sunlight.
e) Do not spray the device with a water jet or submerge it in water.
f) Do not allow water to get inside the device through vents in the housing of the device.
g) The device must be regularly inspected to check its technical efficiency and spot any damage.
h) Use a soft cloth for cleaning.
i) Do not leave the battery in the device if it will not be used for a longer period of time.
j) Do not use sharp and/or metal objects for cleaning (e.g. a wire brush or a metal spatula) because they may damage the surface material of the appliance.
k) Do not clean the device with an acidic substance, agents of medical purposes, thinners, fuel, oils or other chemical substances because it may damage the device.
SAFE REMOVAL OF BATTERIES AND RECHARGEABLE BATTERIES:
The batteries are installed in the devices.
Remove used batteries from the device using the same procedure by which you installed them.
Recycle batteries with the appropriate organisation or company.
DISPOSING OF USED DEVICES:
Do not dispose of this device in municipal waste systems. Hand it over to an electric and electrical device recycling and collection point. Check the symbol on the product, instruction manual and packaging. The plastics used to construct the device can be recycled in accordance with their markings. By choosing to recycle you are making a significant contribution to the protection of our environment.
Contact local authorities for information on your local recycling facility.

natural_image
Exterior view of a rectangular electronic device with internal components and a cable (no visible text or symbols)1 - Odbiornik
(http://e.tuya.com/smartlife)
natural_image
Close-up of a metallic triangular frame with a labeled point '1' on the edge (no text or symbols beyond the label)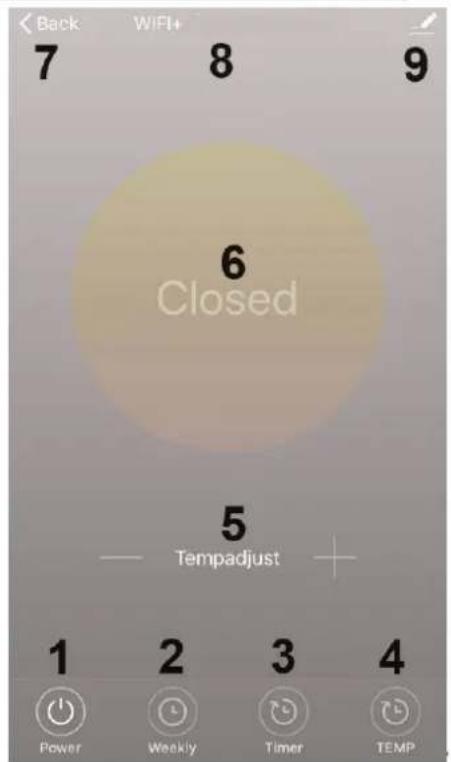
1 - Power On/Off
2 - Weekly programming
3 - Timer
4 - °C/°F unit change
5 - Temperature setting
6 - Device status
7 - Back to main interface
8 - Device name
9 - Edit device
3.3.3.1. Obstuga
natural_image
Exterior view of a rectangular electronic device with internal components and a labeled component '1' (no text or symbols beyond the label)natural_image
Close-up of a metallic triangular panel edge with a labeled point '1' (no text or symbols beyond the label)
natural_image
Exterior view of a rectangular electronic device with internal components and a labeled component '1' (no text or symbols beyond the label)natural_image
Close-up of a metallic triangular metal bracket with a labeled point '1' on the edge (no other text or symbols)
natural_image
Exterior view of a rectangular electronic device with internal components and a cable (no visible text or symbols)natural_image
Close-up of a metallic T-shaped metal joint with a labeled point '1' (no text or symbols beyond the label)
natural_image
Exterior view of a rectangular electronic device with black components and a white frame (no text or symbols visible)1 - Receptor Interno
natural_image
Close-up of a metallic angle joint with labeled point '1' (no text or symbols beyond label)natural_image
Close-up of a metallic triangular frame with a labeled point '1' on the edge (no other text or symbols)
3.3. Brug af enhed
3.3.1. Intern modtager
natural_image
Exterior view of a rectangular electronic device with internal components and a labeled component (no text or symbols beyond the label '1')1 - Intern modtager
natural_image
Close-up of a metallic triangular frame with a labeled point '1' on the edge (no text or symbols beyond the label)
natural_image
Exterior view of a rectangular electronic device with internal components and labeled part '1' (Sisäinen vastaanotin), no other text or symbols visible.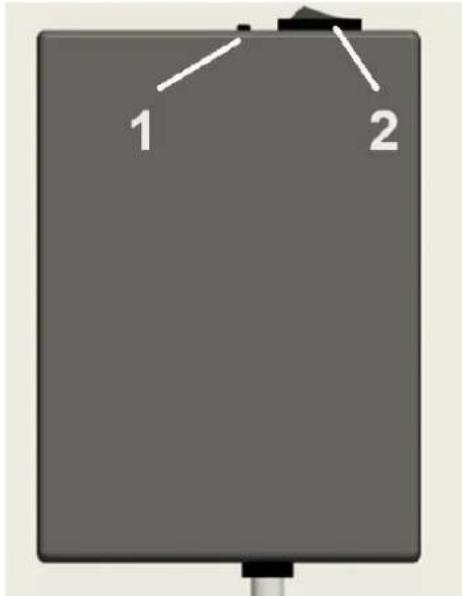
natural_image
Close-up of a metallic triangular frame with a labeled point '1' on the edge (no text or symbols beyond the label)Done


natural_image
Exterior view of a rectangular electronic device with black components and a white frame (no visible text or symbols)1 - Interne ontvanger
natural_image
Close-up of a metallic triangular metal bracket with a labeled point '1' on the edge (no other text or symbols)OBS! Varm overflate, fare for forbrenning!

natural_image
Exterior view of a rectangular electronic device with internal components and a labeled component '1 - Intern mottaker' (no other text or symbols visible)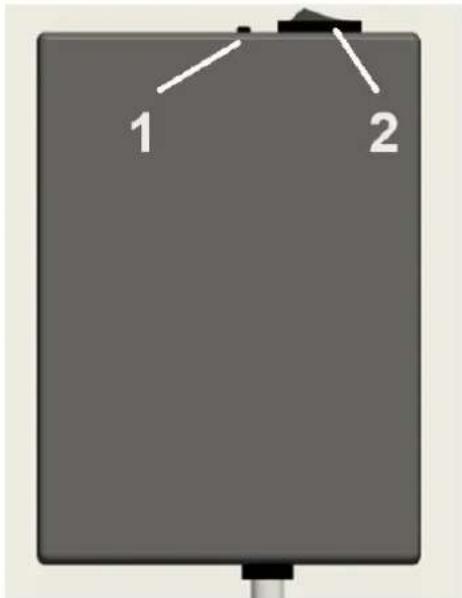
1 – Wi-Fi tilbakestillingsknapp (langt trykk i 5-10 sekunder for tilbakestilling)
2 – Termostat deaktiveringsbryter – PÅ betyr å deaktivere termostaten
Tekniske data for intern mottaker:
• Strømforsyning: AC220-240V
• Trådløs standard: IEEE802.11b/g/n
• Frekvensområde: 2,412\~2,484GHz
• Sikkerhetsmekanisme: WEP/WPA-PSK/WPA2-PSK
• Krypteringstype: WEP/TKIP/AES
• Strømforbruk i standby: <0,8W
- Arbeidsmiljø: temperatur -5 \~ 50 °C; fuktighet 10% -95%.
3.3.2. Fjernkontroll
natural_image
Close-up of a metallic triangular frame with a small circular indentation labeled '1' (no text or symbols beyond the label)NO

natural_image
Exterior view of a rectangular electronic device with internal components and a labeled part '1 – Intern mottagare' (no other text or symbols visible)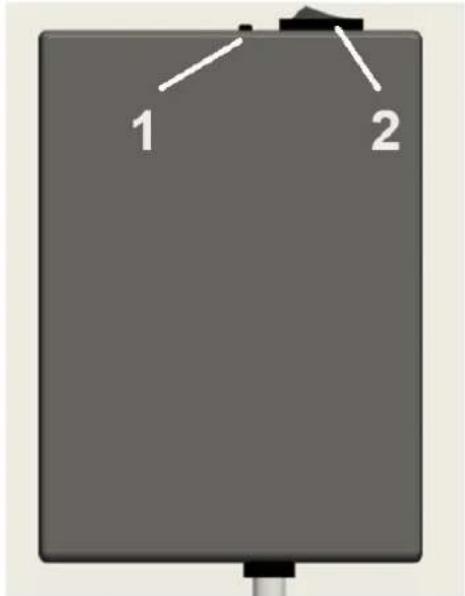
natural_image
Close-up of a metallic triangular metal bracket with a labeled point '1' on the edge (no text or symbols beyond the label)
natural_image
Exterior view of a rectangular electronic device with black components and a white frame (no visible text or symbols)1 - Receptor Interno
natural_image
Close-up of a metallic triangular metal edge with a labeled point '1' (no text or symbols beyond the label)1 - Rám
2 – Vyhrievacie teleso
3 – Zadná kovová platňa
4 – Uchytenie na stenu
5 - Napájací kábel
6 - Spojovacia skrinka
3.2. Montáž zariadenia

natural_image
Exterior view of a rectangular electronic device with internal components and a labeled component '1' (no text or symbols beyond the label)natural_image
Close-up of a metallic angle joint with a labeled point '1' (no text or symbols beyond the label)1 – Rohová kontrolka – Červená farba znamená online; Modrá farba znamená zapnutie ohrievača
- Kliknite „Prejst na pridanie“. Na d'alšej stránke kliknite na „+” pridanie zariadenia Bluetooth a a „Zadajte heslo Wi-Fi“ dialógové okno sa zobrazí nasledovne.