UNI_EH_02 - Heating Uniprodo - Free user manual and instructions
Find the device manual for free UNI_EH_02 Uniprodo in PDF.

| Product type | Infrared patio heater with remote control |
| Model | UNI_EH_02 |
| Rated voltage | 230 V / 50 Hz |
| Rated power | 2100 W |
| Protection rating | IP44 |
| Dimensions (L x D x H) | 470 x 470 x 400 mm |
| Weight | 3.5 kg |
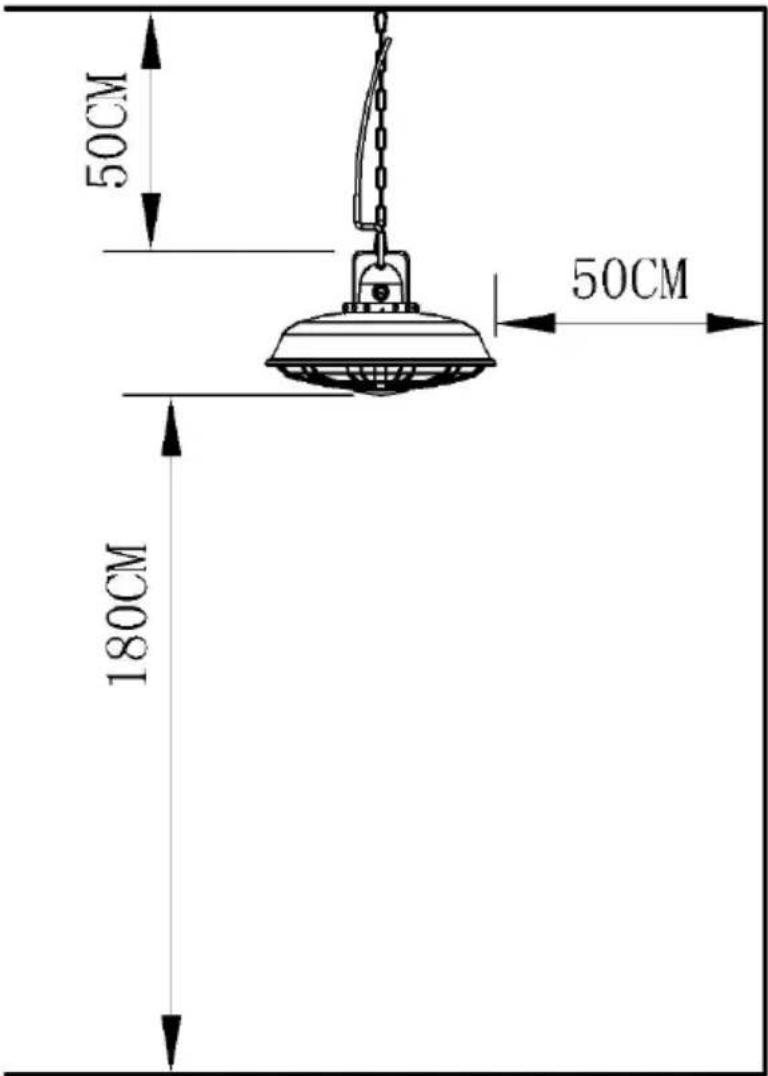
| Installation | Ceiling suspension, height ≥ 1.8 m from floor, lateral and ceiling distances ≥ 50 cm |
| Main functions | Infrared heating, 3 power settings (900/1500/2100 W) via button, 2 settings (900/1800 W) via remote control, ambient LED light |
| Remote control | Yes, with CR2025 button cell |
| Remote control battery type | CR2025 (lithium, non-rechargeable) |
| Heat levels | 3 levels (button): 900 W, 1500 W, 2100 W; remote: LOW (900 W) and HIGH (1800 W) |
| LED lighting | Yes, ambient light (5th button press without heat) |
| Usage area | Outdoor (patio) and indoor with sufficient ceiling height |
| Safety distance | Minimum 1 meter in front, sides, top and rear |
| Thermal protection | Not specified (no built-in room thermostat) |
| Maintenance and cleaning | Unplug then wipe with a damp cloth; do not use solvents or immerse |
| Spare parts and repairability | Halogen tube replaceable by a qualified electrician; no user-serviceable parts |
| Included accessories | Remote control, suspension chain (not specified, but likely) |
| Disposal | Do not dispose of with household waste; recycle via WEEE scheme |
Frequently Asked Questions - UNI_EH_02 Uniprodo
User questions about UNI_EH_02 Uniprodo
0 question about this device. Answer the ones you know or ask your own.
Ask a new question about this device
Download the instructions for your Heating in PDF format for free! Find your manual UNI_EH_02 - Uniprodo and take your electronic device back in hand. On this page are published all the documents necessary for the use of your device. UNI_EH_02 by Uniprodo.
USER MANUAL UNI_EH_02 Uniprodo
natural_image
Line drawing of a circular mechanical component with a central exclamation mark (no text or symbols)natural_image
Close-up of a gray remote control switch with two circular buttons and sun icons (no text or symbols)natural_image
Close-up of a black electronic device with a circular button and a small inset showing a leaf (no text or symbols visible)
natural_image
Close-up of a black electronic device with circular buttons and a blue-green scroll wheel (no text or symbols visible)
natural_image
Black electronic device with a circular button and cord (no visible text or symbols)natural_image
Hand-drawn sketch of a bowl with internal divisions and a red arrow pointing to the bottom (no text or symbols)natural_image
Diagram of a mechanical device with a circular button and a red directional arrow, no text or symbols present.This User Manual has been translated for your convenience using machine translation. Reasonable efforts have been made to provide an accurate translation; however, no automated translation is perfect nor is it intended to replace human translators. The official User Manual is the English version. Any discrepancies or differences created in the translation are not binding and have no legal effect for compliance or enforcement purposes. If any questions arise related to the accuracy of the information contained in the User Manual, please refer to the English version of those contents which is the official version.
Technical data
| Parameter description | Parameter value | |
| Product name | Infrared patio heater with remote control | |
| Model | UNI_EH_02 | UNI_EH_03 |
| Rated voltage [V~] / Frequency [Hz] | 230 / 50 | |
| Rated power [W] | 2100 | 1800 |
| Protection rating IP | IP44 | |
| Dimensions [Width x Depth x Height; mm] | 470 x 470 x 400 460 | x 460 x 290 |
| Weight [kg] | 3.5 | 3.7 |
This appliance can be used by children aged 8 years and above, as well as by persons with reduced physical, sensory, or mental abilities, or by those lacking experience and knowledge, provided they are supervised or instructed in its safe use and understand the associated hazards. Children must not play with the appliance. Cleaning and user maintenance should not be done by children without supervision.
WARNING: This heater does not have a device to control room temperature. Do not use this heater in small rooms occupied by persons unable to leave on their own, unless they are under constant supervision.
Children under 3 years of age should be kept away unless continuously supervised.
Children aged 3 to less than 8 years can only turn the appliance on or off if it is placed in its normal operating position and they have received supervision or instruction on its safe use and understand the hazards. However, they must not plug in, adjust, clean, or perform maintenance on the appliance.
CAUTION: Some parts of this product can become very hot and may cause burns. Extra care should be taken when children or vulnerable people are present.
Important instructions
When using this electric heater, follow basic safety precautions to reduce the risk of fire, electric shock, and injury. These include the following:
- Mount the heater in a large, open area, well away from any obstructions such as branches or objects affected by heat (e.g., furniture, curtains, or other flammable materials). Maintain a minimum distance of 1 meter.
- Do not position the heater directly above or below an electrical socket.
- Ensure the unit is installed at least 180 cm above the floor and 50 cm from the ceiling.
- If the power supply cord is damaged, it must be replaced by an authorized service agent or qualified professional to avoid danger.
- This appliance is not intended for use by persons (including children) with reduced physical, sensory, or mental capabilities, or those lacking experience and knowledge, unless supervised or instructed on its safe use by a responsible person.
-
Children must be supervised to prevent them from playing with the appliance.
-
Read all instructions before using this unit.
- CAUTION: Risk of electric shock. Do not open or attempt to repair the heater yourself.
- This heater may become hot during operation. To avoid burns, do not let bare skin touch hot surfaces. Use handles if provided when moving the heater.
- Keep combustible materials such as furniture, pillows, bedding, paper, clothes, and curtains at least 1 m from the front, sides, top, and rear of the heater. Do not place towels or other objects on the heater.
- Exercise extreme caution when using the heater around children, disabled persons, or when the heater is left operating and unattended.
- This appliance is not intended for use by children or persons with reduced physical, sensory, or mental capabilities without supervision or instruction. Children must not play with the appliance.
- Do not operate the heater if the power cord is damaged or if the heater malfunctions, has been dropped, or is damaged in any way. Return the heater to an authorized service facility for examination and repair.
- This heater is not intended for use in bathrooms, laundry areas, or other similar indoor locations. Never place the heater where it could fall into water. To protect against electrical hazards, do not immerse the heater in water or other liquids.
- Do not touch the control panel or plug with wet hands.
- Do not run the power cord under carpeting. Do not cover the cord with rugs, runners, or similar coverings. Arrange the cord away from high-traffic areas to prevent tripping.
- Do not insert foreign objects into any ventilation or exhaust opening. This could cause electric shock, fire, or damage to the heater.
-
To prevent a fire hazard, do not block air intakes or exhaust openings. Avoid placing the heater on soft surfaces, like beds, where airflow may be obstructed.
-
This heater contains hot, arcing, or sparking parts. Do not use it in areas where gasoline, paint, or flammable liquids are used or stored. Keep the unit away from heated surfaces and open flames.
- Avoid using an extension cord. If one must be used, it should be a minimum size of 2.5 mm^2 to prevent overheating and reduce the risk of fire.
- To avoid fire or electric shock, plug the unit directly into a 230V, 15A electrical outlet.
- To disconnect the heater, turn the controls to OFF, then unplug from the outlet. Pull on the plug, not the cord, to avoid damage.
- Always unplug the heater before moving, cleaning, or when not in use.
- Use this heater only for its intended household use, as described in this manual. Unauthorized use may result in fire, electric shock, or injury. Only use attachments recommended by the manufacturer or authorized dealers.
- Always place the heater on a dry, level surface. This unit is designed for ceiling installation only.
- WARNING: To reduce the risk of fire or electric shock, do not use this heater with any solid-state speed control device.
- Do not attempt to repair or adjust any electrical or mechanical components of this heater. Doing so will void the warranty. The heater contains no user-serviceable parts. Servicing should only be performed by qualified personnel.
- Connect the heater only to properly grounded outlets.
- The heater should not be placed immediately below a socket outlet.
- WARNING: This heater is not equipped with a room temperature control device. Do not use it in small rooms occupied by individuals who are unable to leave the room on their own, unless under constant supervision.
- Do not place the heater in front of a socket outlet.
- Save these instructions for future reference.
Installation instructions
A. The heater must be installed by a qualified electrician.
B. Install the heater on a firm, level ceiling surface. Ensure the ceiling can support the heater by mounting it on a strong, rigid structure such as wooden beams or metal rails.
C. The ceiling hook used to hang the patio heater must support 3 to 4 times the weight of the heater.
D. Attach Hook to the ceiling hook and use the chain to adjust the height of the patio heater by clipping into any ring of the chain. Ensure the heater is at the correct height above the floor.
E. The distance between the bottom of the patio heater and the floor must be at least 1.8 meters.
F. Plug the patio heater into a grounded 230V, 50Hz power outlet.
G. Only operate the heater when it is in an upright position.
Minimum Required Distances:
- 50 cm from the side wall
- 50cm from the ceiling
• Installation height above 180cm
Operating instructions
-
Plug the patio heater into a grounded 230V, 50Hz power outlet.
-
Ensure the heater is in the upright position before operating.
-
The electric patio heater is equipped with three heat settings.
-
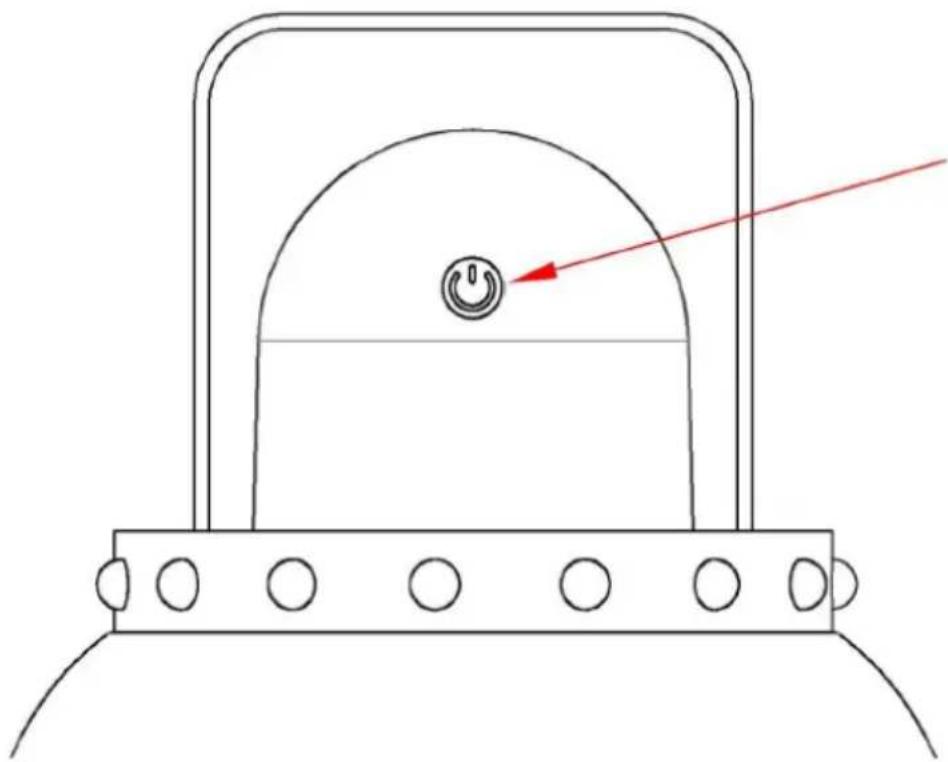
Use the ON/OFF switch to control the power of the heater.
-
Once the plug is connected, press the ON/OFF switch to turn the heater on or off.
natural_image
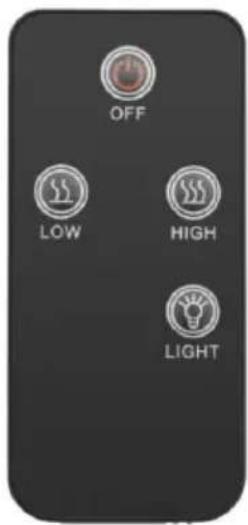
Line drawing of a circular mechanical component with a central mark and mounting base (no text or symbols)Remote control operations for UNI\_EH\_02
- To operate the LED light, press the "LIGHT" button on the remote control.
- Press the "LOW" button to set the heater to 900W.
- Press the "HIGH" button to set the heater to 1800W.
- Press the "OFF" button to turn off all functions.
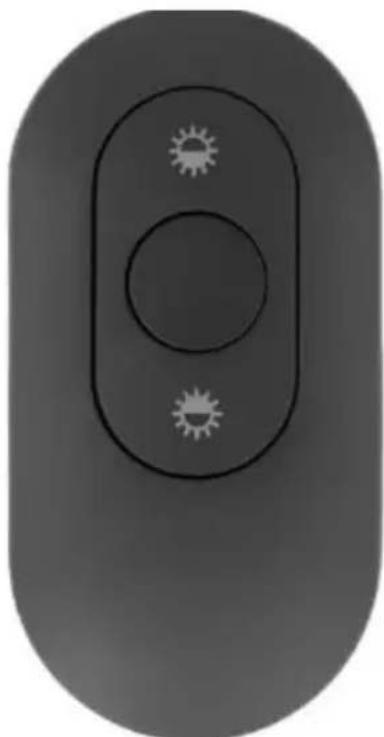
Remote control operations UNI\_EH\_03
- Press the top button to activate the 600W heat setting. Press it again to turn it off.
- Press the button below to activate the 1200W heat setting. Press it again to turn it off.
natural_image
Close-up of a gray remote control button with two circular buttons and a sun icon (no text or symbols)WANRING: The main power switch must be turned on to use the remote control.
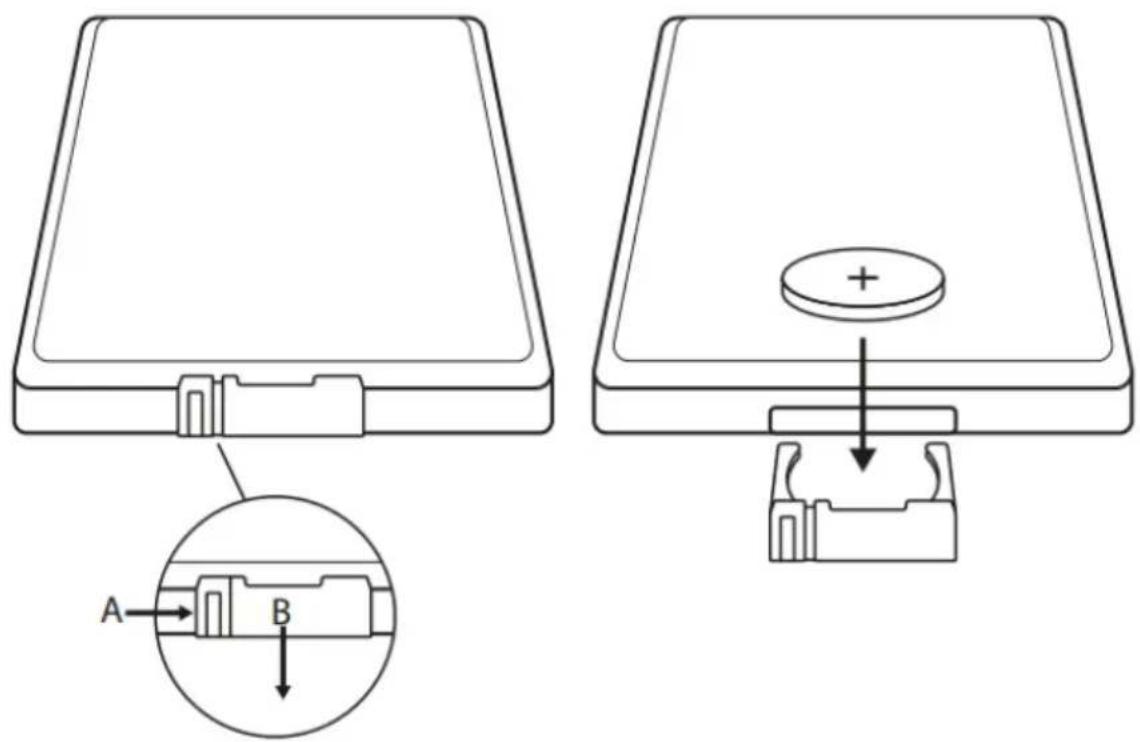
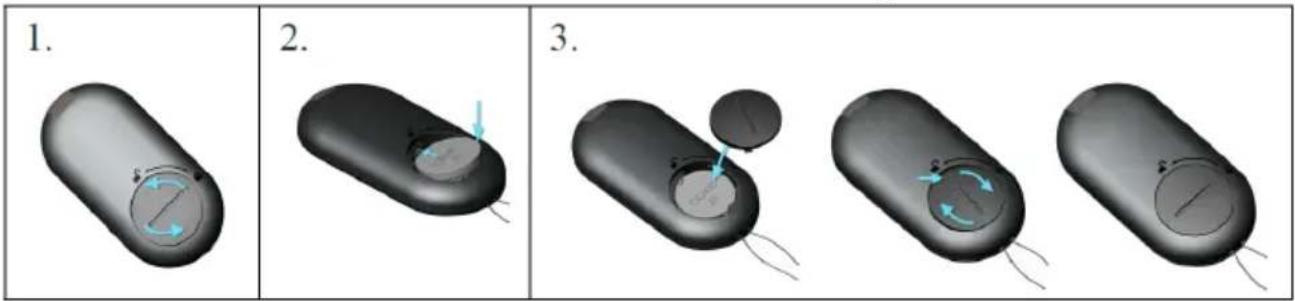
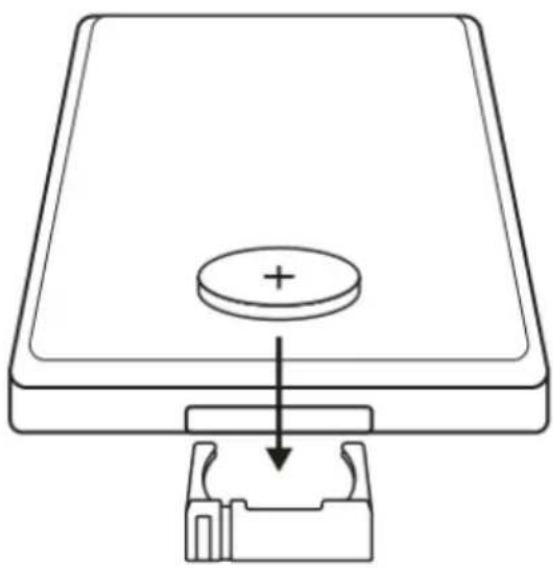
Battery information for UNI\_EH\_02
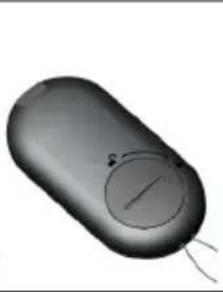
• Battery type: CR2025 coin cell (Lithium, non-rechargeable).
• To remove the battery, open the back cover of the remote control.
- Ensure the battery is inserted with the correct polarity.
- Remove and safely dispose of exhausted batteries.
- If the appliance will be unused for an extended period, remove the battery and store it out of reach of babies and children. Swallowing the battery can cause serious injury or even death.
• Do not short-circuit the supply terminals.
Remote control battery use for UNI\_EH\_03:
- Open the battery cover by using both thumbs to rotate it firmly in the direction indicated by the arrow.
- Insert a 3V CR2450 lithium battery with the positive (+) pole facing upwards. Align it with the positive spring on the side and push it down into the battery compartment.
- Close the battery cover by placing it into the slot and rotating it with both thumbs in the direction of the arrow until it is securely closed.
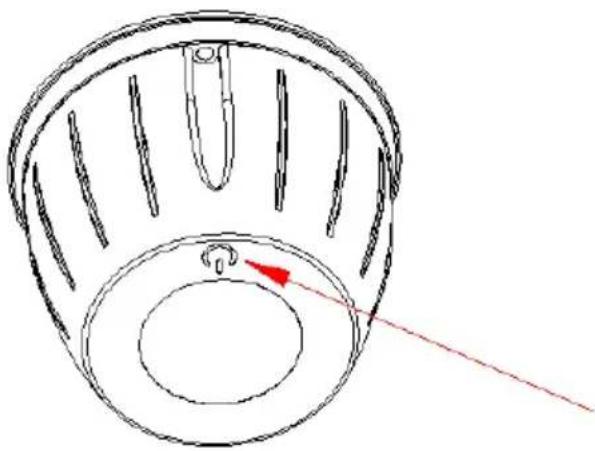
Activating press switch operations UNI\_EH\_02
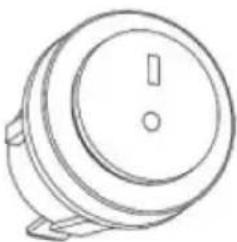
If you lose the remote control, you can operate the heater by touching the Activation Button located on the unit.
natural_image
Hand-drawn sketch of a bowl with internal divisions and a red arrow pointing to the bottom (no text or symbols)Press switch operations
- Press the ON/OFF switch to activate the heater.
- Touch the button once to operate the heater at 900W.
- Touch the button twice to operate the heater at 1500W.
- Touch the button three times to operate the heater at 2100W.
- Touch the button four times to activate the LED ambient light and operate the heater at 2100W.
- Touch the button five times to activate the LED ambient light without heat.
- Touch the button six times to turn off both the light and the heater.
Activating press switch operations for UNI\_EH\_03:
If you lose your remote control, use the activation button to operate the heater.
natural_image
Diagram of a mechanical device with a circular button and a red directional arrow, no text or symbols present.- Press the ON/OFF switch to turn the heater on.
- Touch the button once to operate the heater at 600W.
- Touch the button twice to operate the heater at 1200W.
- Touch the button three times to operate the heater at 1800W.
- Touch the button four times to turn the heater off.
Care and maintenance
- Before cleaning, disconnect the patio heater from the electrical supply. Wipe the exterior with a damp cloth. Do not use corrosive or solvent-based cleaners, and never immerse the heater in water.
- All maintenance or repairs, including the replacement of the halogen tube, should be performed by a qualified electrician or at an authorized service center.
Storage
- If the heater will not be used for an extended period, store it in a cool, dry location. To prevent dust and dirt accumulation, repack the unit in its original packaging.
Troubleshooting
If the heater will not operate, please check the following before seeking repair or service:
- Ensure the power cord is plugged into a functioning electrical outlet. If not, plug it in.
- Verify that electricity is available at the main fuse box.
- Make sure the power switches on the heater are turned on. If they are not, select an appropriate setting.
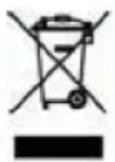
This symbol on the product or in the instructions indicates that your electrical and electronic equipment must be disposed of separately from household waste at the end of its life. In the EU, there are separate collection systems for recycling. For more information, please contact your local authority or the retailer where you purchased the product.
natural_image
Line drawing of a circular mechanical component with a central exclamation mark (no text or symbols)natural_image
Close-up of a gray remote control button with two circular buttons and sun icons (no text or symbols)natural_image
Close-up of a black electronic device with a circular button and a small inset showing a leaf (no text or symbols visible)
natural_image
Close-up of a black electronic device with circular buttons and a blue arrow indicating rotation (no text or symbols)
natural_image
Black electronic device with a circular button and cord (no visible text or symbols)natural_image
Hand-drawn sketch of a bowl with internal divisions and a red arrow pointing to the bottom (no text or symbols)natural_image
Diagram of a mechanical device with a circular button and a red directional arrow, no text or symbols present.natural_image
Line drawing of a circular mechanical component with a central hole and mounting base (no text or symbols)natural_image
Close-up of a gray remote control button with two circular buttons and a sun icon (no text or symbols)natural_image
Close-up of a black electronic device with a circular button and a small inset showing a leaf (no text or symbols visible)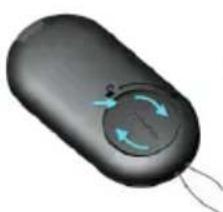
natural_image
Close-up of a black electronic device with circular buttons and a blue arrow indicating rotation (no text or symbols)
natural_image
Black electronic device with a circular button and cord (no visible text or symbols)natural_image
Hand-drawn sketch of a bowl with internal divisions and a red arrow pointing to the bottom (no text or symbols)natural_image
Simple line drawing of a mechanical device with a circular button and a red directional arrow (no text or symbols)natural_image
Line drawing of a circular mechanical component with a warning symbol (no text or labels)natural_image
Close-up of a gray remote control button with two circular buttons and sun icons (no text or symbols)natural_image
Close-up of a black electronic device with two circular buttons and a central button, no visible text or symbols.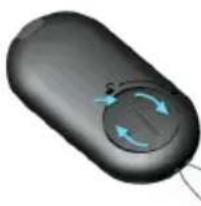
natural_image
Black remote control mouse with circular scroll buttons (no text or symbols visible)
natural_image
Black electronic device with a circular button and cable, no visible text or symbolsnatural_image
Hand-drawn sketch of a bowl with internal divisions and a red arrow pointing to the bottom (no text or symbols)natural_image
Diagram of a mechanical device with a circular button and a red directional arrow, no text or symbols present.natural_image
Line drawing of a circular mechanical component with a central exclamation mark (no text or symbols)natural_image
Close-up of a gray remote control button with two circular buttons and sun icons (no text or symbols)natural_image
Close-up of a black electronic device with two circular buttons and a central button, no visible text or symbols.
natural_image
Black remote control mouse with circular scroll buttons (no text or symbols visible)
natural_image
Black electronic device with a circular button and cable, no visible text or symbolsnatural_image
Hand-drawn sketch of a bowl with internal divisions and a red arrow pointing to the bottom (no text or symbols)natural_image
Diagram of a mechanical device with a circular button and a red directional arrow, no text or symbols present.natural_image
Line drawing of a circular mechanical component with a central exclamation mark (no text or symbols)natural_image
Close-up of a gray remote control switch with two circular buttons and sun icons (no text or symbols)natural_image
Close-up of a black electronic device with a circular button and a small inset showing a leaf (no text or symbols visible)
natural_image
Close-up of a black electronic device with circular buttons and a blue scroll wheel (no text or symbols visible)
natural_image
Black electronic device with a circular button and cord (no visible text or symbols)natural_image
Hand-drawn sketch of a bowl with internal divisions and a red arrow pointing to the bottom (no text or symbols)natural_image
Diagram of a mechanical device with a circular button and a red directional arrow, no text or symbols present.natural_image
Line drawing of a cylindrical mechanical component with a circular top and mounting base (no text or symbols)natural_image
Close-up of a gray remote control switch with two circular buttons and sun icons (no text or symbols)natural_image
Close-up of a black electronic device with two circular components and a blue pointer, no visible text or symbols.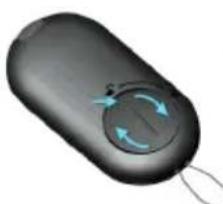
natural_image
Close-up of a black remote control device with circular buttons and a small cable (no text or symbols visible)
natural_image
Black electronic device with a circular button and wires, no visible text or symbolsnatural_image
Hand-drawn sketch of a bowl with internal divisions and a red arrow pointing to the bottom (no text or symbols)natural_image
Diagram of a mechanical device with a circular button and a red directional arrow, no text or symbols present.natural_image
Line drawing of a circular mechanical component with a central hole and mounting base (no text or symbols)natural_image
Close-up of a gray remote control button with two circular buttons and sun icons (no text or symbols)natural_image
Close-up of a black electronic device with two circular components and a blue pointer, no visible text or symbols.
natural_image
Close-up of a black remote control device with circular buttons and a small cable (no text or symbols visible)
natural_image
Black electronic device with a circular button and wires, no visible text or symbolsAktivering af trykkontaktoperationer UNI\_EH\_02
natural_image
Hand-drawn sketch of a bowl with internal divisions and a red arrow pointing to the bottom (no text or symbols)natural_image
Diagram of a mechanical device with a circular button and a red directional arrow, no text or symbols present.natural_image
Line drawing of a circular mechanical component with a central hole and mounting base (no text or symbols)natural_image
Close-up of a gray remote control button with two circular buttons and a sun icon (no text or symbols)natural_image
Close-up of a black electronic device with two circular components and a blue pointer, no visible text or symbols.
natural_image
Close-up of a black remote control device with circular buttons and a small cable (no text or symbols visible)
natural_image
Black electronic device with a circular button and wires, no visible text or symbolsnatural_image
Hand-drawn sketch of a bowl with internal divisions and a red arrow pointing to the bottom (no text or symbols)natural_image
Diagram of a mechanical device with a circular button and a red directional arrow, no text or symbols present.natural_image
Line drawing of a circular mechanical component with a central hole and mounting base (no text or symbols)natural_image
Close-up of a gray remote control button with two circular buttons and sun icons (no text or symbols)natural_image
3D rendered object with a circular arrow and blue arrows on its surface, labeled '1.' (no text or symbols on the object itself)
natural_image
3D rendered object resembling a computer mouse with a blue arrow pointing to its surface (no text or symbols)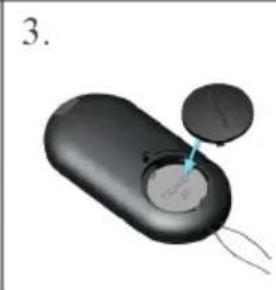
natural_image
Close-up of a black electronic device with a blue pointer and circular button, no visible text or symbols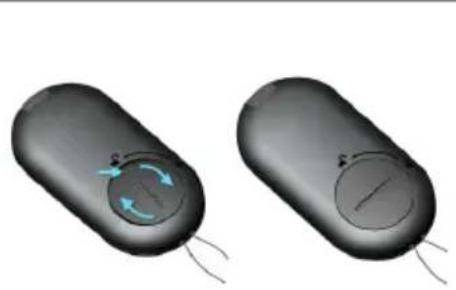
natural_image
Two black electronic devices with circular buttons and a blue-green rotation arrow, shown from different angles (no text or symbols visible)natural_image
Hand-drawn sketch of a bowl with internal divisions and a red arrow pointing to the bottom (no text or symbols)natural_image
Line drawing of a circular mechanical component with a central hole and mounting base (no text or symbols)natural_image
Close-up of a gray remote control button with two circular buttons and sun icons (no text or symbols)Fjernkontroll batteribruk for UNI\_EH\_03 :
natural_image
Close-up of a black electronic device with a circular button and a small inset showing a leaf (no text or symbols visible)
natural_image
Close-up of a black electronic device with circular buttons and a blue scroll wheel (no text or symbols visible)
natural_image
Black electronic device with a circular button and cord (no visible text or symbols)natural_image
Hand-drawn sketch of a bowl with internal divisions and a red arrow pointing to the bottom (no text or symbols)natural_image
Diagram of a mechanical device with a circular button and a red directional arrow, no text or symbols present.natural_image
Line drawing of a circular mechanical component with a central hole and mounting base (no text or symbols)natural_image
Close-up of a gray remote control button with two circular buttons and weather icons (no text or symbols)natural_image
Close-up of a black electronic device with two circular components and a blue pointer, no visible text or symbols.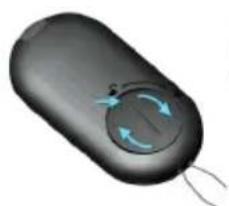
natural_image
Close-up of a black electronic device with a circular button and blue directional arrows (no text or symbols visible)
natural_image
Black electronic device with a circular button and wires, no visible text or symbolsnatural_image
Hand-drawn sketch of a bowl with internal divisions and a red arrow pointing to the bottom (no text or symbols)natural_image
Diagram of a mechanical device with a circular button and a red directional arrow, no text or symbols present.natural_image
Line drawing of a circular mechanical component with a warning symbol (no text or labels)natural_image
Close-up of a gray remote control button with two circular buttons and a sun icon (no text or symbols)natural_image
Close-up of a black electronic device with a circular button and a blue pointer, no visible text or symbols.
natural_image
Close-up of a black electronic device with circular buttons and a blue scroll wheel (no text or symbols visible)
natural_image
Black electronic device with a circular button and cord (no visible text or symbols)natural_image
Hand-drawn sketch of a bowl with internal divisions and a red arrow pointing to the bottom (no text or symbols)natural_image
Simple line drawing of a mechanical device with a circular button and a red directional arrow (no text or symbols)natural_image
Line drawing of a circular mechanical component with a central mark and mounting base (no text or symbols)Dial'kové ovládanie pre UNI\_EH\_02
natural_image
Close-up of a gray remote control with two circular buttons and a sun icon (no text or symbols)natural_image
Close-up of a black electronic device with two circular components and a blue pointer, no visible text or symbols.
natural_image
Close-up of a black remote control device with circular buttons and a small cable (no text or symbols visible)
natural_image
Black electronic device with a circular button and wires, no visible text or symbolsnatural_image
Hand-drawn sketch of a bowl with internal divisions and a red arrow pointing to the bottom (no text or symbols)natural_image
Diagram of a mechanical device with a circular button and a red directional arrow, no text or symbols present.• Stlačením vypínača ON/OFF zapnite ohrievač.
- Jedným dotykom tlačidla zapnete ohrievač na 600 W.
• Dvakrát sa dotknite tlačidla, aby ste zapli ohrievač na 1200 W.
Dotknite sa tlačidla trikrát, aby sa ohrievač uviedol do prevádzky na 1800 W.
• Dotknite sa tlačidla štyrikrát, aby ste ohrievač vypli.
natural_image
Line drawing of a circular mechanical component with a central hole and mounting base (no text or symbols)Операции за дистанционно управление за UNI\_EH\_02
natural_image
Close-up of a gray remote control button with two circular buttons and sun icons (no text or symbols)natural_image
Line drawing of a rectangular electronic device with a flat top and side connectors (no text or symbols)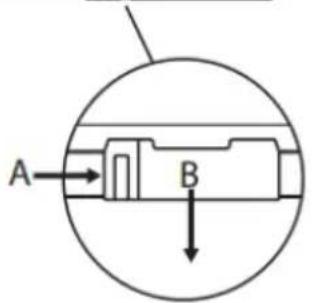
natural_image
Diagram of a computer monitor with a plus button and base mount (no text or symbols)natural_image
3D rendered object with a circular arrow and label 'g' (no text or symbols on the object itself)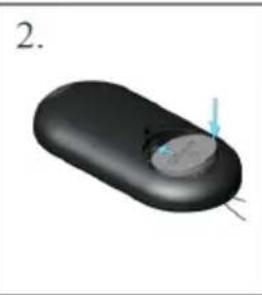
natural_image
3D rendered object with a small circular feature and a blue arrow pointing to it, labeled '2.' (no text or symbols on the object itself)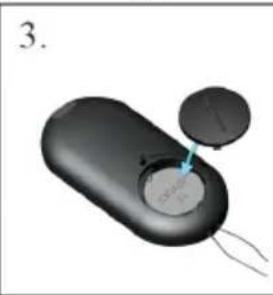
natural_image
3D rendered image of a black electronic device with two circular components and a blue pointer (no text or symbols)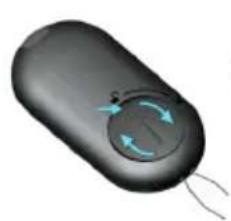
natural_image
3D rendered image of a black electronic device with a circular button and two curved wires, no visible text or symbols.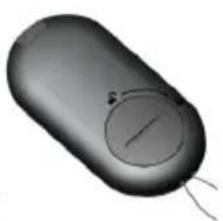
natural_image
3D rendered image of a black oval-shaped electronic device with a circular button and two wires attached (no text or symbols visible)natural_image
Hand-drawn sketch of a bowl with internal blades and a red arrow pointing to the bottom (no text or symbols)natural_image
Diagram of a mechanical device with a circular button and a red directional arrow, no text or symbols present.natural_image
Line drawing of a circular mechanical component with a central hole and mounting base (no text or symbols)natural_image
Close-up of a gray remote control button with two circular buttons and sun icons (no text or symbols)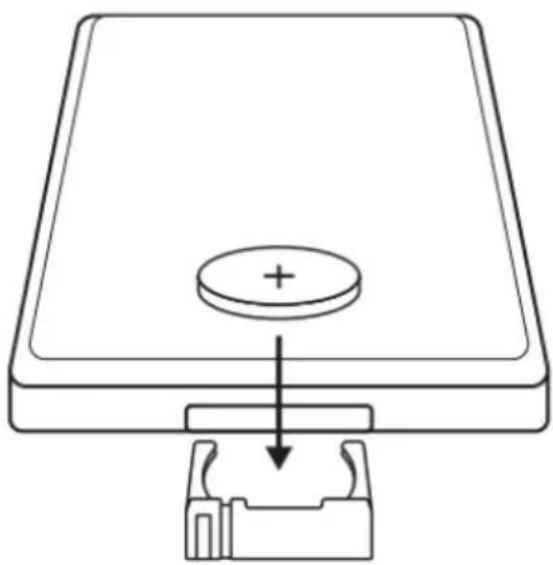
natural_image
Simple line drawing of a computer monitor with a plus button and base mount (no text or symbols)natural_image
3D rendered object with a circular arrow and curved arrow on its surface, labeled '1.' (no text or symbols on the object itself)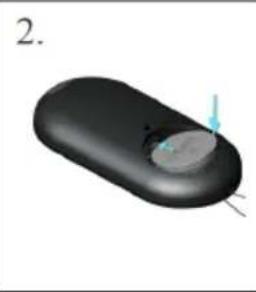
natural_image
3D rendered object resembling a computer mouse with a button and handle, labeled with number 2 (no text or symbols on the object itself)
natural_image
Close-up of a black electronic device with a blue indicator light and a circular button, labeled '3.' (no text or symbols on the device itself)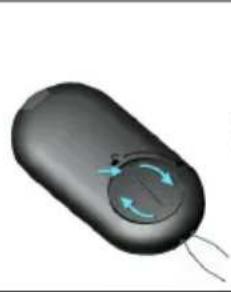
natural_image
3D rendered image of a black remote control mouse with blue circular buttons and a white cable (no text or symbols)