UATYQ450MCY1 - Air Conditioning DAIKIN - Free user manual and instructions
Find the device manual for free UATYQ450MCY1 DAIKIN in PDF.

User questions about UATYQ450MCY1 DAIKIN
0 question about this device. Answer the ones you know or ask your own.
Ask a new question about this device
Download the instructions for your Air Conditioning in PDF format for free! Find your manual UATYQ450MCY1 - DAIKIN and take your electronic device back in hand. On this page are published all the documents necessary for the use of your device. UATYQ450MCY1 by DAIKIN.
USER MANUAL UATYQ450MCY1 DAIKIN
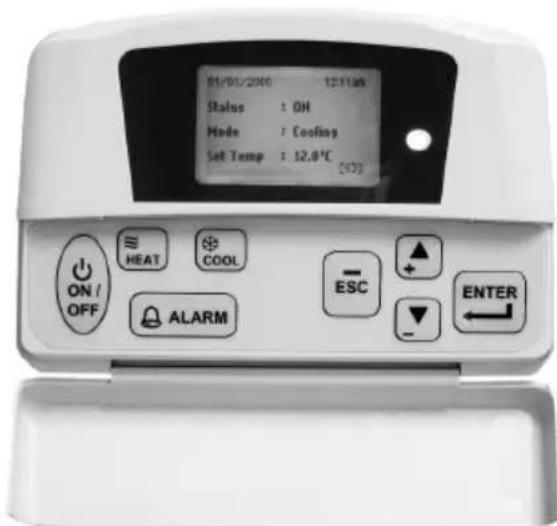
Operating Manual Wired Remote Controller
- Upon power up of the unit, the LCD displays the main display screen
| 2000/01/01 | [Sat] | 12:00am |
| Status : | OFF | |
| Mode : | Heating | |
| Set Temp : 24°C | ∞ | |
- Press the ON/OFF button for 1 second to switch on the unit if the status shows OFF. The status will change to ON. The ON/OFF LED will light up.
- Press the COOL button for 1 second if cooling is required or the HEAT button if heating is required.
- The 'Set Temp' refers to temperature setting.
- Press the button once to view the compressor(s) on, off or defrost status.
| 2000/01/01 | [Sat] | 12:00am |
| Compressor 1 : ON | ||
| Compressor 2 : DEFROST | ||
| 5 | ||
| ∞ | ||
- Press the button again to view the temperature for room and outdoor ambient.
| 2000/01/01 | [Sat] | 12:00am |
| Return Air : 24.0°C | ||
| Outdoor Air : 24.0°C | ||
| 5 | ||
| ∞ | ||
- Press the button again to view the selected type for unit, number of compressor used, indoor fan 'always on' option, model and EEPROM version.
| 2000/01/01 | [Sat] | 12:00am |
| Type | : H/Pump | |
| No. Comp | : 2 Comp | |
| IDF Opt | : -- | |
| Model | : 5RT90BR_E | |
| EP.Rev | : 0.0 | |
- Press the 5 button to return to previous screen(s) or ESC to return to main screen.
-
Press the ALARM button to view or clear the alarm history. If alarm occurs, contact your dealer or serviceman.
-
Note: Display diagram is for illustration purpose only. It may differ for different models. The display information shall be subjected to the setting in the main controller board.
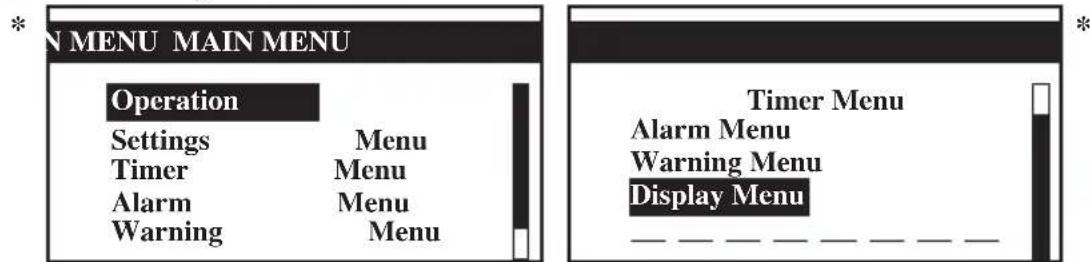
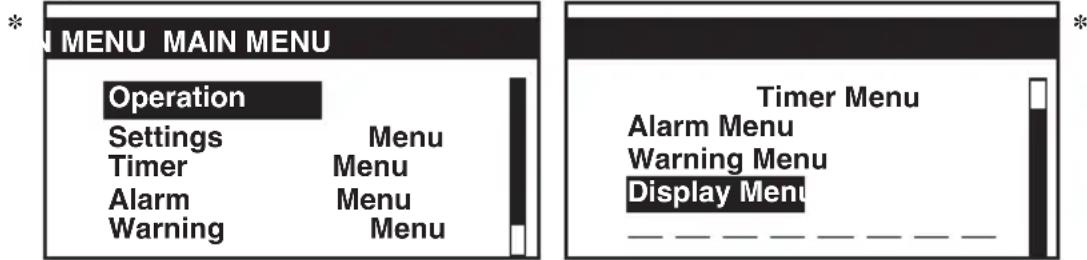
B. Main Menu
- Changes can be made to the factory setting parameter. This is done in the Main Menu. Press ENTER button to go into the Main Menu.
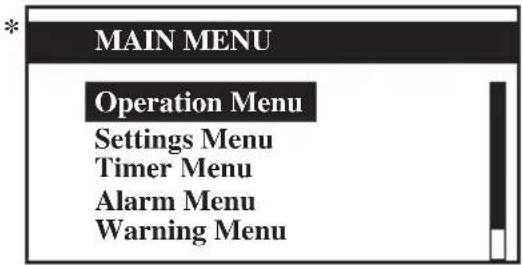
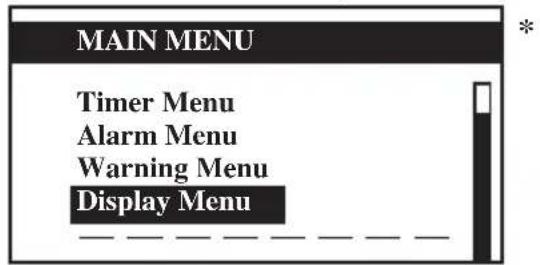
- The Main Menu consists of Operation Menu, Settings Menu, Timer Menu, Alarm Menu, Warning Menu and Display Menu.
How to use the Main Menu?
Step 1
Press ENTER to view the sub-Menu under Main Menu.
Step 2
Go to the sub-Menus you want by pressing the or button. Press ENTER to select the sub-Menus.
Step 3
Go to the parameter you want to change or view by pressing the or button. Press ENTER to select this parameter.
Step 4
Change the parameter by pressing the or button. Once completed press ENTER.
Press ESC to go back to previous screen until you see the initial display screen.
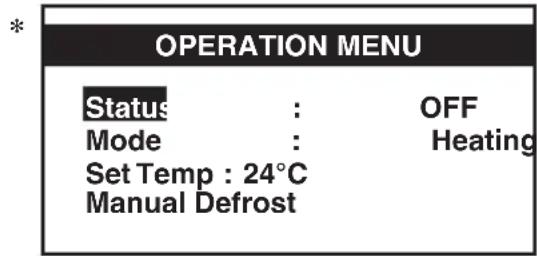
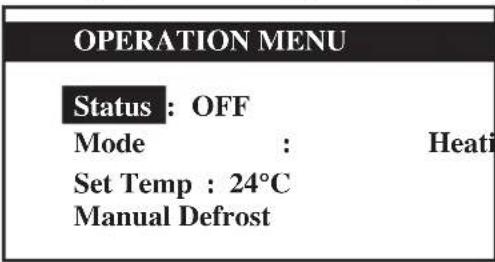
Operation Menu
This menu enables us to set the unit status (on or off), set the unit operation mode, change the temperature setting, and manually defrost the unit (applicable for heating mode only).
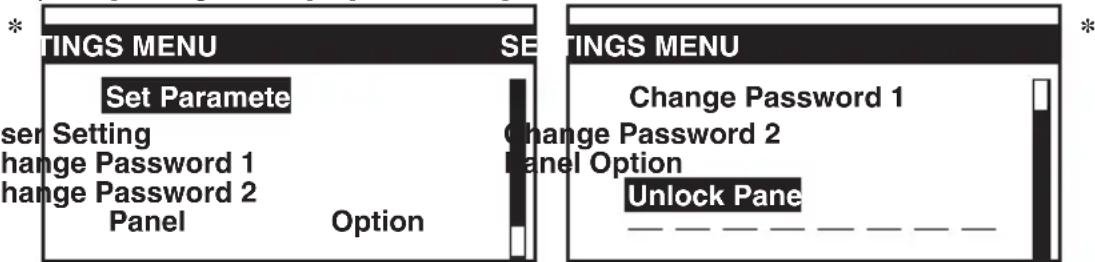
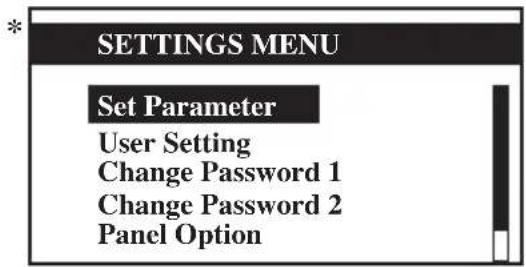
Settings Menu
This menu enables us to set the parameters for unit operation (requires password entering), user setting, change password, set panel option and unlock panel.
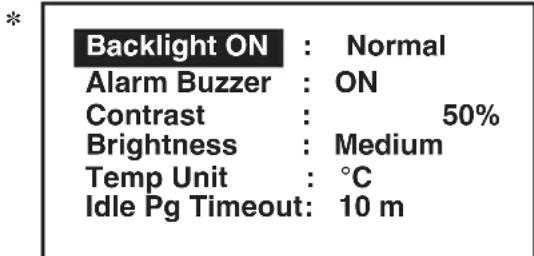
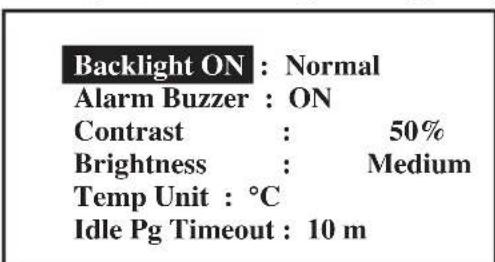
The panel option enables us to set the LCD backlight and contrast, set the alarm buzzer, enable and disable the screen saver and set a screen saver timeout and set the temperature display in ^ C or ^ F .
Note: The Set Parameter in the setting menu requires password for any changes to or to view its parameter.
CAUTION:
All the password entering must be done by local dealer/serviceman. User is not allowed to change the value of the set parameter as this may cause damage to unit or deter its operation.
Timer Menu
This menu enables us to set the clock, set the date, set a 7 days schedule to start and stop the unit and enable or disable the set schedule.
Alarm Menu
This menu enables us to view the alarm history and also clear the record. The panel can keep up to 20 fault / alarm records.
Warning Menu
This menu enables us to view the warning history and also to clear the record. The panel can keep up to 20 warning records.
Display Menu
This menu enables us to view the indoor heat exchanger sensor(s) temperature, outdoor heat exchanger sensor(s) temperature, discharge sensor(s) temperature, solenoid valve(s) operation status, compressor(s) run time record, EXV opening pulse, economizer operation status (applicable for unit with economizer only), filter checking time, control type and software version. Some of the submenu may require password for entering.
Main Menu
Press ENTER to go to this menu.
There are 6 sub menus in [Main Menu]. Press or to select sub menus, ENTER to enter into the sub menu or press ESC to exit to main display screen.
Operation Menu
Select [Operation Menu] in [Main Menu] and press ENTER to go to this menu.
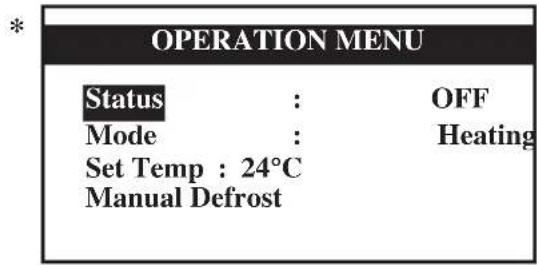
Some basic settings can be done here. Press or to select the required setting. Then, press ENTER to enter the setting mode. Press or to toggle the setting. Press ENTER again to confirm the setting. Press ESC to exit to [Main Menu].
Settings Menu
Select [Settings Menu] in [Main Menu] and press ENTER to go to this menu.
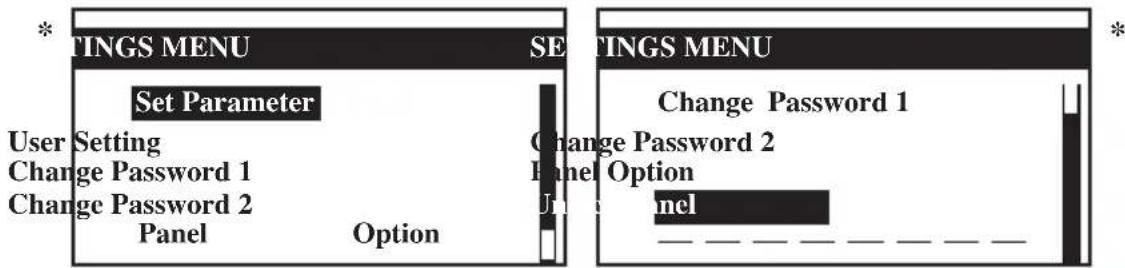
Some advance settings can be found here. Press or to select the required setting. Then, press ENTER to enter the setting mode. Press or to toggle the setting. Press ENTER again to confirm the setting. Press ESC to exit to [Main Menu].
Panel Option
Select [Panel Option] in [Settings Menu] and press ENTER to go to this menu.
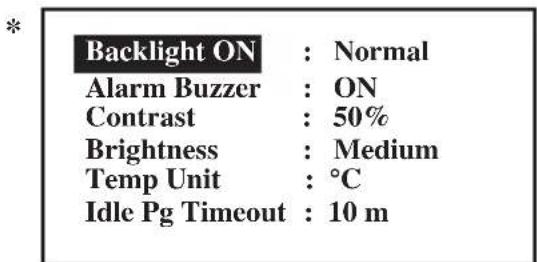
Press or to select the required setting, ENTER to enter into the setting. Press or to select the required option, ENTER to select the option. Press ESC to exit to [Settings Menu].
- Note: Display diagram is for illustration purpose only. It may differ for different models. The display information shall be subjected to the setting in the main controller board.
Timer Menu
Select [Timer Menu] in [Main Menu] and press ENTER to go to this menu.
*
TIMER
MENU
Clock Setting
Date
Setting
Timer
Schedule
Timer : Enable
All the timer/schedule settings are included in this menu. Press or to select the required setting. Then, press ENTER to enter the setting mode. Press or to toggle the setting. Press ENTER again to confirm the setting. Press ESC to exit to [Main Menu].
Clock Setting
Select [Clock Setting] in [Timer Menu] and press ENTER to go to this menu.
Set Time:
hh
mm

*
:00
Press or to select the required option. Then, press ENTER to enter the setting mode. Press or to toggle the setting. Press ENTER again to confirm the setting. Press ESC to exit to [Timer Menu].
Date Setting
Select [Date Setting] in [Timer Menu] and press ENTER to go to this menu.
Set Date:
yyyy
mm
dd

*
/01
/01
Day
: [Sat]
Press or to select the required option, ENTER to select the option.
Press ESC to exit to [Timer Menu].
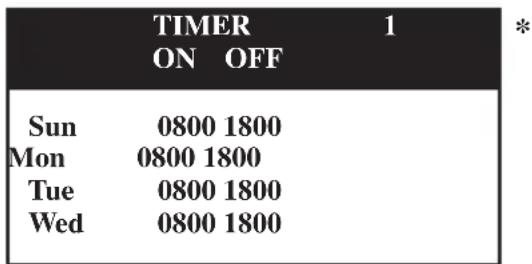
Timer Schedule
Select [Timer Schedule] in [Timer Menu] and press ENTER to go to this menu.
TIMER SETTINGS
Timer 1
Timer 2
Timer 3
*
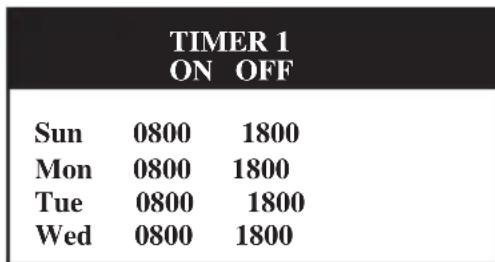
This is the 7 days programmable timer schedule menu. There are 3 ON/OFF events in one day. User can choose to set each day (Sunday - Saturday) ON/OFF timer.
Before this schedule can function, user needs to set the [Timer] in [Timer Menu] to enable. Press ESC to exit to [Timer Menu].
- Note: Display diagram is for illustration purpose only. It may differ for different models. The display information shall be subjected to the setting in the main controller board.
Alarm Menu/Warning Menu
Select [Alarm Menu]/[Warning Menu] in [Main Menu] and press ENTER to go to this menu.
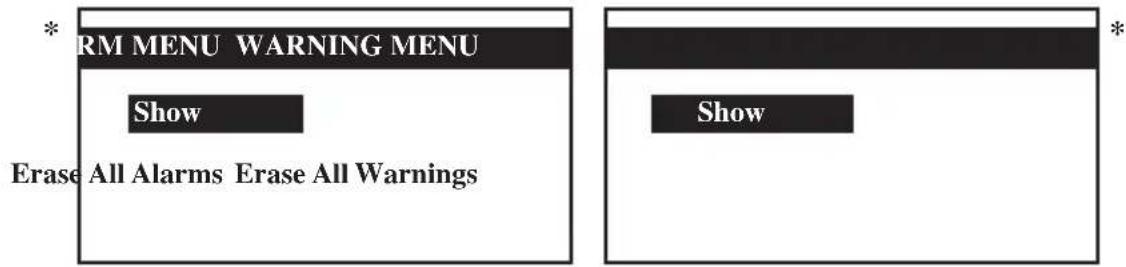
This place keeps records for all previous occurred faults/alarms/warnings.
User can view or clear these records. The panel can keep up to 20 faults/alarm warning records.
Press ESC to exit to [Main Menu].
Show Alarms/ShowWarnings
Select [Show Alarms]/[ShowWarnings] in [Main Menu] and press ENTER to go to this menu.
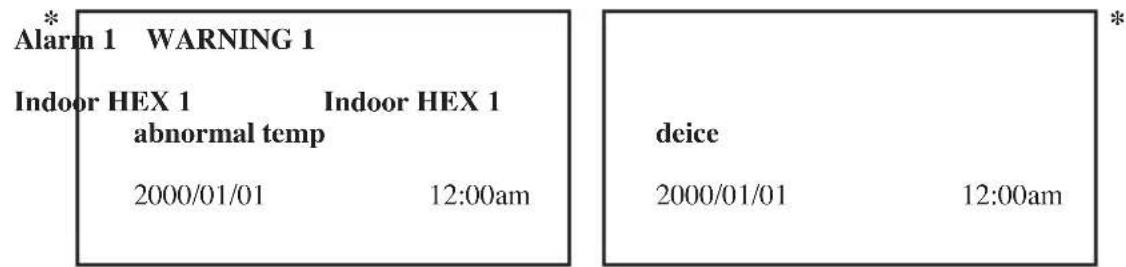
The record shows: - Alarm/Warning description
- Alarm/Warning occurance date
- Alarm/Warning occurance time
Besides that, user can erase the alarm/warning record(s) in this menu (password is required).
Press ESC to exit to [Alarm Menu]/[Warning Menu].
Display Menu
Select [Display Menu] in [Main Menu] and press ENTER to go to this menu.
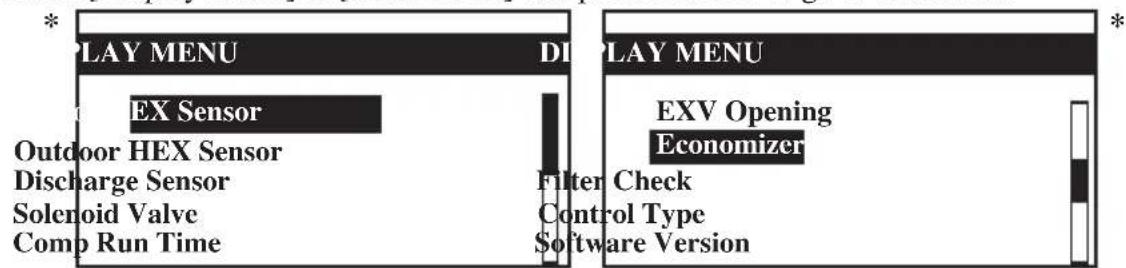
This menu displays indoor heat exchanger sensor(s) temperature, outdoor heat exchanger sensor(s) temperature, discharge sensor(s) temperature, solenoid valve(s) operation status, compressor(s) run time record, EXV opening pulse, economizer operation status (applicable for unit with economizer only), filter checking time, control type and software version. Some of the submenu may require password for entering. Besides that, user can clear the compressor run time record (password is required).
Press ESC to exit to [Main Menu].
- Note: Display diagram is for illustration purpose only. It may differ for different models.
The display information shall be subjected to the setting in the main controller board.
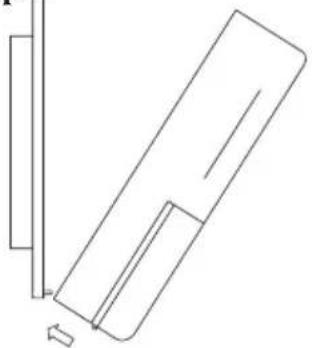
C. Installation
When installing the LCD panel to the bracket,
Step 1 Step 2
Hook the LCD panel
from the bottom first
Push to fasten the LCD panel to the bracket
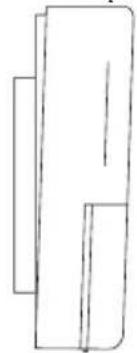
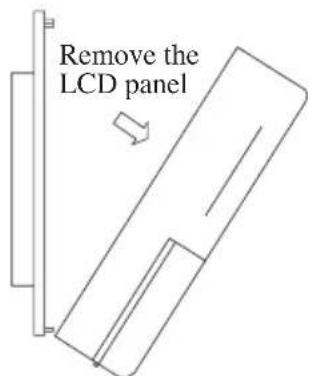
When removing the LCD panel from the bracket,
Step 1 Step2
Remove the LCD panel from the top part first

- A 3V DC battery is supplied with the LCD. It is used to ensure that the LCD displays real time once the timer is set.
- The LCD is wired to the main board via CN8 connection.
HaKMITE ENTER, yTo6bI OTKpbITb CnICOK NOmEHIO B IJIaBHOM MeHO.
War 2
Haximam KhoKn ▲ nnn▼, nepeiDnte K Tpe6yemomy noMeHIO. BbIbePte noMeHIO haxaTne M KhoKn ENTER.
War 3
Haxmam KhONKn ▲ nnn▼, nepeiDnte K npaMeTpY, KOtOpbI Bbl XOTnte npocMOTpeTb nn n3MeHnTb. Bbl6epnTe 3TOT npaMeTp HaxaTne KhONKn ENTER.
War 4
ДлгИЗМЕнEHпapametpa Haxmamte KhoNkn ▲иln▼.3aBepuB OepauH, Haxmnte ENTER.ДлгTORO,чTO6bl BepHytbcn Kпрдышу My ькpaHny,Haxmnte KhoNky ESC.HaxmmaTe 3Ty KhoNkY NOcNeIOBaTeIbHo Do BO3BpTaK INCXODHomy ькpaHny.
MeHIO Pa6Ota
DaHHoe MeHIO NO3BOJnEeYcTaHOBnTb CTAyC yCTPOINCTBa (BKN. INN BbIKN.), yCTaHOBnTB peXIM pa60tbl yCTPOINCTBa, IN3MeHnTb yCTaHOBky Tempeatypbl IN BpyHyIO pa3MOpO3nTB yCTPOINCTBO (npIMEHIMO TOnbKO dIg PEXIMA HarpeBa).
MeHIO NapaMeTpbi
Dahnoe MeHIO NO3BOJnEYCTaHOBnTb npaMeTpbl pa60Tb yCTpOYCTBa (dIy BxOda Tpe6yeTcNapOJIb), OcyueCTBnTB NlB3OBaTeJIbCKyU yCTaHOBky, NOMEHrTb napOl, yCTaHOBnTb ONuIO naHeJn n pa36nKnpoBaTb NaHeJIb.
Hactpoynnnahe nno3BOJIOYcTaHaBnBaTb NOcBETky N KOHTpactHOCTb KKN, HactpanBaTb 3ByKObyO cInHaJIIN3aUIO, aKTHBnPoBaTb N OTKIIIOy TaCTaBky, yCTaHaBnBaTb 3aIepkKy BKIOueHn 3aCTaBKn INpeKIIIOyA Tb OTo6paKeHne TempepaTypb Mejdy Cn F.
PpmeHne:I npocmToPa IINn I3MeHeHn yCTaHOBOuHOro npaMeTpBa MeHIO Paametpb Heo6xOIMo BBeCTn napoiB.
BHIMAHHE:
BBO napoJIoJXeH npO3BOIDtBCr TOnbKO KBAJIINΦNcIPOBaHHbIM NepCOHaJOM MeCTHO nnepa nn cepBnCHoi OpraHn3aun. IOnb3OBaTeJnM 3anpeuaeTc n3MeHrTb 3NaHeHne yctahOBouHOro napametpa, TaK KaK 3TO MOKeT npNBecTN K BbIXOdy annapaTa n3 CTpor nn C6oM B erO paBoTe.
Mehlo TaMep
3TO MeHIO NO3BOJnE T yCTaHaBnBaTb BpEm, DaTy, rpaΦNK BKJIoueHn/BBIKIoueHn 6IOKa Ha 7 dHei, a TaKxpeAKTNBnPoBaTb INHaKTNBnPoBaTb yCTaHOBJIeHHbI rpaΦNK.
MeHIO TpeBora
3TO MeHIO NO3BOJRAET NPOCMATPnBaTb NCTOPNIO Cpa6aTbIBaHHN CNrHaJIIN3aUNN IN PON3BOJNTB ee ONUCTKy. NaHeIb MoKet XpaHHTb Do 20 3aNNCeN O HeWtAThbIX CNTyaUNx/Cpa6aTbIBAHNAX CNrHaJIIN3aUNN.
Mehu npdeynpejxden
AnHoe MeHIO IO3BOJr IPOCMOTpeb NCTOpHIO ppeDynpexKdEHN I OuNCTNTb CnICOK. NaHeJIb MoKcT XpaHITb Do 20 3aIncEo IpeDynpexKdEHNx.
MehIO dncnpe
Данhoe MeHIO NO3BOJAEr YBnIeTb Tempeatpy DaTUNKa (DaTUNKOB) BHyTppeHHeRo TENLO6MeHHNka, TemepaTy pAaTUNKa (daTUNKO) HApyXHO rTeNLO6MeHHNka, TemepaTy pAaTUNKa (daTUNKO) BbIXOda, paOCh N CTAtyc 3JIeKTPomarHHTHO rKlanaHa (KlanaHO), 3aINCb O BpEmeH npoTo b KOMPecccopa (KOMPecccopOB), mNpybc OTKpbBaHn EXV, paOCh n CtaTyC 3KOHOMa3epa (TOIbKO dIra yCTpoIcTB C 3KOHOMa3epoM, BpEm npOBepKn PmNbTa, TIn UnpaBJeHn I BepCNIO nporpaMMHOrO obecneueHn. DnBxOda B HeKOTOpBie cy6MeHIO Tpe6yETcN napObl.
Главhoe MeHIO
ДляпэрхобаВЗTOMeHNoHaXmITEENTER.
[Main Menu] codepknt 6 noMeHIO.ДЯ BbIbopa noMeHIO haxMaTe ▲иN▼,ДЯ BXOda BNoDMeHIO haxMITE ENTER,ДЯ BO3BpaTa K rIaNbHomy ekpaHy - ESC.
Mehno Pa6ota
BbIbepe [Operation Menu] B [Main Menu] n Haxmte ENTER, TTo6bI BOITN B 3TO MeHIO.
3decb Moryt 6bItb BbINOHeHb HeKOTOpBie 6a3OBbIe yCTaHOBKn. HaxMnte ▲ nII ▼ДЯ BblOba Tpebyemoy yCTaHOBKn. 3aTeM HaxMnte ENTER dIyBXoDa B pexmU yCTaHOBKn. HaxMnte ▲ nII ▼ДЯ nepeKJIoueHn yCTaHOBKn. ChOba HaxMnte ENTER dIy NOdTBePxxDeHn yCTaHOBKn. HaxMnte ESC dIy BblxOda B [Main Menu].
NapaMeTpbl
Bbepnte [Settings Menu] B [Main Menu] n haxmte ENTER, yTo6bl BoTn B 3TO MeHIO.
3deb moKHO haHTn HeKOTOpBie npeBapnteIbHbIe yCTaHOBKn. HaxMnte ▲ nII▼ DJI BbIbopa Tpe6yemOyCTaHOBKn. 3aTeM haxMnte ENTER dJI BxOda B pexm yCTaHOBKn. HaxMnteA nII ▼DJI nepeKJIoueHnY yCTaHOBKn. ChOba haxMnte ENTER dJI NOITBePckDeHnY yCTaHOBKn.
HaxmTe ESC nBbixOa B [Main Menu].
Hactpoika naheJIi
Bb6epnte [Panel Option] B [Settings Menu] n Haxmnte ENTER, TTo6bl BoTn B 3TO MeHIO.
Bb6epnte Tpe6yembl npametp c nOMOsbIO KHOJOK AINN N OTKPOIte 3OT napameTp, haxab ENTER. Bb6epnte Tpe6yemyo ONUcIO C NOMOsbIO KHOJOK AINN N BBeINTe 3Ty ONUIO, haxab ENTER.
ДЯВОЗБРаТВ [SettingsMenu]нжмTe ESC.
*PpmeHHe: Ioka3aHHa dnaarpMa cnyKHT TOnbKO nllIOCTpauee. OHa moXeT pa3nUaTbcA DnPa3HbIX MoJeN. HOpmaun, BbIBOIma Ha dnCnJe, 3aBNCIT OT hAcToKN Ha rIaNBOH Pnate KOHTPOJIpepa.
Mehno TaHmep
BbIbepnte [Timer Menu] B [Main Menu] n haxmnte ENTER, yTO6bI BOITN B 3TO MeHIO.
TIMER MENU
Clock Settin
Date
Setting
Schedule
Timer
Timer : Enable
B 3TO MeHIO BKNIOUeHbI BCE yCTaHOBN TaMepa/pacncaHn. HaxMMTe A NIN V DnRA BblOpa Tpe6yEmoYCTaHOBN. 3aTeM HaxMMTe ENTER dNn BXODa B peXmU yCTaHOBN. HaxMMTeA NIN ▼DnRA nepeKJIIOUeHnY cTaNBOKn. ChOBa HaxMMTe ENTER dNn NOdTBePxxDeHnY cTaNBOKn. HaxMMTe ESC dNn BblOda B [Main Menu].
YCTAHOBKa YacOB
BbIbepnte [Clock Setting] B [Timer Menu] n haxmnte ENTER, yTo6bl BOITu B 3TO MeHIO.
*
Set Time:
hh
12 : 00
mm
HaxmTe ▲nI ▼dIy BbIbopa Tpe6yEmoOnu.3aTeM haxmTe ENTER dIyBXOaBpeXmUcTaHOBKn.HaxmTe ▲nI ▼dIy nepeKJIIOueHnY cTaNOBKn.CHOBa HaxmTe ENTER dIyNOdTBePckDeHnY cTaNOBKn.HaxmTe ESC dIy BbIXOaB [Timer Menu].
YctaHObKa DaTbI
BbIbepnte [Date Setting] B [Timer Menu] n haxmTe ENTER, yTo6bI BOITN B 3TO MeHIO.
*
Set Date:
yyyy
mm
dd
2000
/01
/01
Day
: [Sat]
BbIbePte Tpe6yEmyIO onuio C nOMoUIO KHOIOK AIIIN V IN BBeIte 3Ty OUIIO, HaxaB ENTER.
ДЯ BO3Bpata B [Timer Menu] haxmnte ESC.
Taimep PaCnncanHe
BbIbepnte [Timer Schedule] B [Timer Menu] n haxmnte ENTER, yTo6bI BOITN B 3TO MeHIO.
*
TIMER SETTINGS
Timer 1
Timer 2
Timer 3
TIMER
ON OFF
Sun
0800 1800
Mon
0800 1800
Tue
0800 1800
Wed
0800 1800
*
C NOMOUIIO 3TOTO MEHIO MOXHO 3aIporpaMMNPOBaTb TaIMep dIra pa60tI NO rpaqky B TeueHne 7 DHeB. B cyTKn DOyCKaETcTpru cIKLa BKIOUeHNr/BbIKIOUeHNr. IOnb3OBaTeIb Moxet yCTaHABINBaTb TaIMep BKIOUeHNr/BbIKIOUeHNr Ha KaKDbI DeHb (C BOCKepeHb r NO cy660Ty). UTO6bl 3aADHHbI rpaqNK BbINOHNrJcH, Heo6xODmO aKTUBnpoBaTb [Timer] B [Timer Menu]. IInr BO3Bpata B [Timer Menu] HaxMITE ESC.
HaxaTb InIe KKcaun KK-naHeN K KPOHHTeyHy.
Chayana, 3aKpeNtB
KK-naHeJIb CHn3y.
Pn CHaTIN KK-naHEn C KPOHHTeHa.
Cnayana ChTbIK-naHeNb 1 War2 C BepxHeyactn.


-
B KOMPNEKTe c XX-K-dncnneem nocTaBnreTc 6aTapeKeKa 3 B. OHa Heo6xOdIma Dnra TOrO, YTObI ObecneuHb npabNtBHOe OTobpaXeHne TeKyUeRo BpeMeHn NocJe UCTaHOBKn TaMepa.
-
XXK-dncnne nocknoaetc K OCHOBHn natae chepe3 coeHHne CN8.
Islem Menusulslem Menusu
Islem Menusui slem Menusu
Disposal Requirements

The batteries supplied with the controller are marked with this symbol. This means that the batteries shall not be mixed with unsorted household waste. If a chemical symbol is printed beneath the symbol, this chemical symbol means that the batteries contains a heavy metal above a certain concentration. Possible chemical symbols are:
Pb:lead(>0.004%)
Hg: mercury (>0.0005%)
Waste batteries must be treated at a specialized treatment facility for re-use. By ensuring correct disposal, you will help to prevent potential negative consequences for the environment and human health. Please contact your local authority for more information.
Batterie
P.O.Box 18674, Galleries 4, 11th Floor, Downtown Jebel Ali, Dubai, UAE.
Importer for Turkey
DAIKIN ISITMA ve SOGUTMA SISTEMLERI SAN TIC A.Ş.
Hurriyet Mahallesi Yakacik D-100 Kuzey Yanyol Caddesi No:49/1-2 Kartal - Istanbul
DAIKIN INDUSTRIES, LTD.
Head office:
Umeda Center Bldg., 2-4-12, Nakazaki-Nishi, Kita-ku, Osaka, 530-8323 Japan
Tokyo office:
JR Shinagawa East Bldg., 2-18-1, Konan,
Minato-ku, Tokyo, 108-0075 Japan
http://www.daikin.com/global/
aLl 1
Joo Joo 0o oog 0g 0000
DAIKIN INDUSTRIES, LTD.
Head office:
Umeda Center Bldg., 2-4-12, Nakazaki-Nishi, Kita-ku, Osaka, 530-8323 Japan
Tokyo office:
JR Shinagawa East Bldg., 2-18-1, Konan, Minato-ku, Tokyo, 108-0075 Japan http://www.daikin.com/global/
DAIKIN EUROPE N.V.
P.O.Box 18674, Galleries 4, 11th Floor, Downtown Jebel Ali, Dubai, UAE.
Importer for Turkey
DAIKIN ISITMA ve SOGUTMA SISTEMLERI SAN TIC A.S.
J (LwLw) LwLw J (LwLw) wLw J (LwLw) o 21
JcLWJg Jw. yLqy (Lolaw) pLw J (LwLw) Ww J (LwLw)
Jz
Jz
Jz
Jz
Jz
Jz
Jz
Jz
Jz
Jz
Jz
Jz
Jz
Jz
Jz
Jz
Jz
Jz
Jz
Jz
Jz
Jz
Jz
Jz
Jz
Jz
Jz
Jz
Jz
Jz
Jz
Jz
Jz
Jz
(1)
[Main Menu] ESC
aalil 10yogolx aylis jn kay. hao zgagai ygo yagai hbsio:abdo
y1 1 y1 jg> gX J 1 b2x1 1 1 1 1 1 1 1 1 1 1 1 1 1 1 1 1 1 1
TIMER MENU
Clock Setting
Date Setting
Timer Schedule
Timer:Enable
jj b j 1j. gblbll h j s2 g1 ▲ h j 1aill a 10g JgJl/ Cg all lBg j ESC j jll h j. bll jENTER jj h j 1. bll Jj Jg1 ▲ h j 1jLL ENTER
.[Main Menu]
ac( LW) H
.ENTER [Timer Menu] [Clock Setting]
Set Time:
hh
mm
12
JgI ▲ b.ENTER j J
.[Timer Menu] ESC jj ENTER.
acl_ 1b = 0
Enter [Timer Menu] [Date Setting]
Set Date:
yyy
mm
dd
2000
/01 /01
Day
:
[Sat]
jLxI jLxENTER jJl IaI .gJbJI J,1JxI J,1JxV ▲jjI J
[Timer Menu] ESC
aJ 1
.ENTER [Timer Menu] [Timer Schedule]

TIMER SETTINGS
Timer 1
Timer 2
Timer 3
3 ON/OFF 7 dol Jl Ld all
(1)ON/OFF 1/
JooJI Joo Joo [Timer Menu] [Timer] Joo Joo Joo Joo Joo Joo Joo Joo Joo
[Timer Menu] ESC
aalilsslllglall alisn jns 10000000000000000000000000000000000000
jJl jI jg> gJ Jla bai jy iL u Logle jgS
AELI JENTER jll 122Vgl ▲jll b.6J 111111111111111111111111111
Jie jiu li aolil
.ENTER [Main Menu] [Operation Menu]
JENTER jb bbl bbl bbl 2 g1 ▲beal. lla wlll albogwlll jn J [Main Menu] jll ESC jbl bbl bbl bbl BLENTER jb bbl bbl 2 g1 ▲beal. bbl
Lb+JzjL
Enter [Main Menu] [Settings Menu]

JSSLLENTER JJbIaI JIyBbIaI bIaI JIyS VglA bIaI. IIO aIgboal Ibgai IaI JIy S [Main Menu] jIgssLESC JJbIaI bIaI JIyS VglA bIaI JIy S
a>gU|L
ENTER [Settings Menu] [Panel Option]
JSSLLENTER JSSLLENTER JSSLLENTER [Settings Menu] ES
ailllll lgyall aliy jn kay hag cnggill gol yell hnfo :ablo
aaijB
ENTER jxI 1 JaoJaoJaoJaoJaoJaoJaoJaoJao
awwyy21 aaijla21 g21
aolg jx21 acllej xyl aollej xlaollej 10021 aollej y21 aolL21 aXl3
auiy1 aaiLay1 Joaiw
1g
auij21 aoiLai 21 cui aicai21-aoiLa21 joe ENTERjj21 J
20gh - 81
ENTER jX1 h 1. gJ jx1 b 1b w Jyj x1 -aia
3 ① g h 2 = 2
ENTER jj1 1. g| jj1 b w g
4 ① g h =
ENTER jj21 1sglg21 sic. g1 ▲ jj21 1aabwgojolr21
A 1
J 1
aJx21 aJx Jx Jx Jx Jx Jx Jx Jx Jx Jx Jx Jx Jx Jx Jx Jx Jx Jx Jx Jx Jx Jx Jx Jx Jx Jx Jx Jx Jx Jx Jx Jx Jx Jx Jx Jx Jx Jx Jx Jx Jx Jx Jx
()
[ \Rightarrow {b}{1} = {20},{b}{2} = {120}]
aLs jusj. pssua21 hui (jw aols Jlsu 1hbi) oogx1 Jie uolalz1 hao no aoia21 oio li:
g181 Jae cLeg a>gljus
Lai g J 1gLCD a Lg21 oLg21
aagaa21 aagaa21 aagaa21 aagaa21 aagaa21 aagaa21 aagaa21 aagaa21
.°F a 1g j g2g 1a 2g L g
1
:
gaaa aaiia 1000 1000 1000 1000 1000
1 1
a_0^2 = 1
g1 7 028 21 1 1 1 1 1 1 1 1 1 1 1 1 1 1 1 1 1 1 1 1
Lai
jix1 aie
20 18 18 18 18 18 18 18 18 18 18 18 18 18 18 18 18 18 18 18 18 18 18
jai 1
20 20 20 20 20 20 20 20 20 20 20 20 20 20 20 20 20 20 20 20 20 20 20 20 20 20 20 20 20 20 20 20 20 20 18 18 18 18 18 18 18 18 18 18 18 18 18 18 18 18 18 18
(LwL)wLw> 121j(LwLw)wLw> aJdoaLla0
Jxg21 LLoLolao Ploa Jwax xL. aX (LwLw) wLw 0j
(gogjg21Jg21JgL)gog21Jg21aXLEXVJg21Jg21
Jgds 18 Jw aols aeg 21 gai gai jy buiu u k ay coliray 21 aasig hag 21 egj. waa 21
| 2000/01/01 | [Sat] | 12:00am |
| Status : | OFF | |
| Mode : | Heating | |
| Set Temp : 24°C | ||
2
. ON/OFF LED 10000g .ON J#
HEAT 1 COOL
a < b < 1
. Set Temp' 4
JJI JJI JJIg (jclg) JCLlJI JJJooJooJooJooJooJooJooJoo
| 2000/01/01 | [Sat] | 12:00am |
| Compressor 1 : ON | ||
| Compressor 2 : DEFROST | ||
| ▲ | ||
| ▼ | ||
A 6
| 2000/01/01 | [Sat] | 12:00am |
| Return Air : 24.0°C | ||
| Outdoor Air : 24.0°C | ||
| ▲ | ||
| ▼ | ||
Ji jil jil jil Jai wll hcll qg gll li aal egill ool a jil o▼jjll .7 EEPROM g Jjogall .always on' aJlJIa
| 2000/01/01 | [Sat] | 12:00am |
| Type | : H/Pump | |
| No. Comp | : 2 Comp | |
| IDF Opt | : -- | |
| Modcl | : 5RT90BR_E | |
| EP.Rev | : 0.0 |
.8 1ALARM jll
aiilallos
g5i gss aalil lglall aliy jn 5ay hag cngill gol g yell hbso : bLo*

S_1 = 12 · 2^1 × 2^1 = 12