
KIM 20821 M - Electric kitchen appliance Koenic - Free user manual and instructions
Find the device manual for free KIM 20821 M Koenic in PDF.

| Product type | Ice cream maker (ice cream machine) |
| Brand | Koenic |
| Model | KIM 20821 M |
| Rated voltage | 220-240 V~ |
| Rated power | 12 W |
| Frequency | 50 Hz |
| Protection class | II |
| Maximum capacity | 800 ml |
| Maximum operating time | 45 minutes |
| Typical preparation time | 25 to 30 minutes |
| Pre-freezing of the bowl | 24 hours at -18 °C |
| Pre-cooling of the mixture | 4 hours in the refrigerator |
| Ice bowl material | Double wall (stainless steel or plastic?) |
| Included accessories | Ice bowl, mixing element, lid with opening, clamping ring, motor housing |
| Main functions | Preparation of ice cream, frozen yogurt, sorbet |
| Controls | On/Off switch, Forward and Reverse buttons, display |
| Safety | Automatic shut-off after 45 min, supervision recommended |
| Cleaning | Hand wash removable parts (except motor) with soapy water |
| Maintenance | Dry thoroughly after each use |
| Repairability | Do not repair yourself, contact an authorized service |
| Warranty | Included (duration not specified) |
| Country of origin | Not specified |
Frequently Asked Questions - KIM 20821 M Koenic
User questions about KIM 20821 M Koenic
0 question about this device. Answer the ones you know or ask your own.
Ask a new question about this device
Download the instructions for your Electric kitchen appliance in PDF format for free! Find your manual KIM 20821 M - Koenic and take your electronic device back in hand. On this page are published all the documents necessary for the use of your device. KIM 20821 M by Koenic.
USER MANUAL KIM 20821 M Koenic
natural_image
Exterior view of a modern kitchen appliance with a clear glass lid and black base (no visible text or symbols)| Ding: 1-8 | — |
| Engs:0 16 | — |
| spart:15-24 | — |
| Innance:7 -26 | — |
| Elong:27 32 | — |
| Vogus:11-11 | — |
| Tulou:39 44 | — |
| Estrange:42-50 | — |
| Heik:51 55 | — |
| Fangula:17 02 | — |
| Swedie:03 08 | — |
| Therap:4-24 | — |
Innov. 24t+
[SIGNATURE]
E-17 In-3b4
L. "TIME"
5.6% FIBAO
8.651%
表决意见:同意9票反对0票弃权0票。
V: 0420831 14 201704 936
CE
Sicherheitshinweise
- Do not operate the product by means of an external timer or separate remote control system.
- This product can be used by children aged from 8 years and above and persons with reduced physical, sensory or mental capabilities or lack of experience and knowledge if they are being supervised or have been given instructions concerning the use of the product in a safe way and understand the hazards involved.
• Children shall not play with the product. - Cleaning and user maintenance shall not be carried out by children unless they are older than 8 years and supervised.
- Keep this product and its power cord out of reach of children under the age of 8 years.
- The product is to be connected to a socket-outlet having an earthing contact.
- The supply cord should be regularly examined for signs of damage, and if the cord is damaged, the product must not be used.
- The product is designed for the preparation of normal household quantities in the home, or in household-like, non-commercial environments. Household-like environments include staff kitchens in shops, offices, agricultural and other small businesses or for use by guests at bed and breakfast establishments, small hotels and similar residential facilities.
English
Safety Instructions
- A damaged power cord may only be replaced by the authorised service agent in order to avoid hazards.
- Clean the product and all other accessories after each use.
-
Follow the instructions in the chapter Cleaning and care.
-
Read this manual thoroughly before first use. It contains important information for your safety as well as for the use and maintenance of the equipment.
- Keep this manual for future reference and pass it on with the product.
- Pay particular attention to the warnings on the product and in this manual.
- Use the product only for its intended purpose. Improper use may lead to hazards.
- In the event of improper use or wrong operation, we do not accept any liability for resulting damages.
- The use of accessories and components not expressly recommended by the manufacturer may result in injuries or damages and voids the warranty.
- Never leave the product unsupervised while it is switched on.
- Do not place any objects on top of the product.
- Never immerse electrical parts of the product in water or any other fluid during cleaning or operation. Never hold the product under running water.
- Do not under any circumstances attempt to repair the product yourself. For servicing and repairs, please consult an authorised service agent.
- The mains voltage must match the information on the rating label of the product.
- The power plug is used as the disconnect device. Please be sure that the power plug is in operable condition.
10
-
Only unplugging from the power socket can separate the product completely from the mains.
-
Avoid damages to the power cord that may be caused by kinks or contact with sharp corners.
-
Keep this product including its power cord and power plug away from all heat sources such as ovens, hot plates and other heat-producing devices/objects.
-
Only unplug from the power socket by the plug itself. Do not pull on the cord.
-
Unplug the product ...
- when the product is not being used,
- in case of malfunctions,
- before attaching / detaching,
- accessories and
-
before cleaning the product.
-
If the power cord or the casing of the product have been damaged or if the product has been dropped, the product may not be used before it has been examined by an authorised service agent.
-
Use this product in dry indoor areas only and never outdoors.
Congratulations!
Thank you for your purchase of a KOENIC product. Please read this manual carefully and keep it for future reference.
Intended use
This product is suitable for preparing ice cream only. Any other use can lead to damage to the device or injuries.
The Imtron GmbH assumes no liability for damage to the product, for property damage or for personal injury due to careless or improper usage of the product, or usage of the product which does not meet the manufacturer's specified purpose.
Before first use
Carefully take the product and its accessories out of the original packaging. Retain the original packaging in case you would like to store the product away or transport it at a later date. If you choose to dispose of the original packaging, then do so according to the applicable legal regulations.
Check the packaging contents for completeness and damages. Should the contents in the packaging not be complete or damaged, do not use the product. Return it to your retail outlet immediately.
After unpacking, please refer to chapter
Cleaning and care.
Disposal
Do not dispose of this appliance as unsorted municipal waste. Return it to a designated collection point for the recycling of WEEE. By doing so, you will help to conserve resources and protect the environment. Contact your retailer or local authorities for more information.
Content
1 x Ice cream maker
1 x Instruction manual
1 x warranty card
Technical data
Rated voltage : 220 - 240 V\~
Rated input power : 12 W
Rated frequency : 50 Hz
Protection class : II
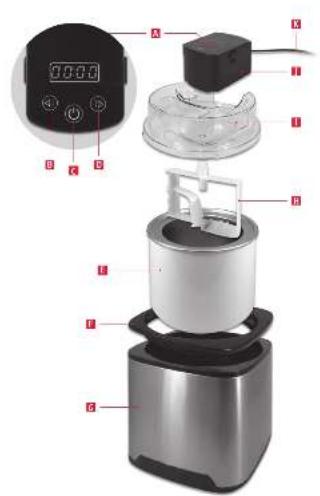
Controls and components
Control panel with display
Back button
On / off switch
Forward button
Double-walled ice container
Grip ring
Outer container
Mixer insert with adapter
Lid with filling opening
Motor housing
Power cord with plug
English
Operation
Note:
Place the device on a flat and non-slip surface, near a suitable socket. The device is equipped with non-slip feet.
Using the ice cream maker
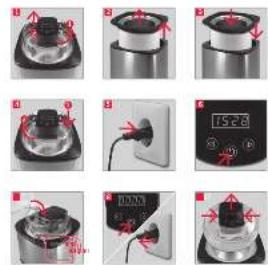
Fig. 1 Turn the cover with the motor housing slightly counter-clockwise so that it loosens and remove it.
Fig. 2 Take the grip ring together with the ice container from the outer container and lift it up.
Preparation
Place the ice container in a freezer at -18 °C for about 24 hours.
Note:
- Store the ice cream container upright in the freezer compartment.
• Make sure the ice cream container is absolutely dry before you put it in the freezer. - Before freezing, put the ice cream container in a plastic bag, e.g. a freezer bag.
• Prepare all ingredients according to the recipe. - Let the ice cream mixture cool in the refrigerator for approx. 4 hours so that it can cool down more quickly when you actually prepare the ice cream.
Making ice cream
Fig. 3 Place the frozen ice cream container together with the grip ring in the outer container.
Fig. 4 Place the lid on the outer container so that the power cord is led away to the rear and the lugs on the lid engage in the recesses on the grip ring. The filling opening is at the front. Twist the cover slightly clockwise until it clicks into place.
Fig. 5 Insert the power plug into the socket.

Warning
Always start the appliance first and then add the ingredients and never stop the appliance while the ice cream is being prepared! The ice cream immediately freezes on the walls of the ice container and the mixer is blocked when you switch it on (again), which can damage the motor and gearbox!
Fig. 6 Switch on the mixer with the on / off switch. Use the forward and backward buttons to set the operation time.
Fig. 7 Add the ice cream mixture, max. 800 ml, through the funnel into the ice container. Let the appliance run until you are satisfied with the consistency of the ice cream. The ice cream is ready after 25 minutes at the latest. 45 minutes is also the maximum operating time for the ice cream maker.
Fig. 8 Switch of the device with the on / o switch and pull out the mains plug. Twist the lid slightly until you can remove it. Pull the mixer out of the ice. Scrape of any stuck ice from the mixer insert with a plastic spoon or something similar. Take the grip ring together with the ice container from the outer container and remove the ice. Use only plastic or wooden cutlery for this.

Warning
Do not use metal cutlery to remove the ice from the ice cream container, as this could lead to scratches!
Tips and recommendations
- Always prepare the ice cream mixture in advance and refrigerate it, before further preparation in the ice cream maker. It will freeze faster this way.
- Blend or chop all ingredients evenly, to ensure even blending.
- Add bigger ingredients, e.g. pieces of chocolate or fruits, only after the ice cream mixture is slightly frozen, as otherwise they might not be blended in evenly.
- When adding alcohol, do so sparsely and towards the end of the freezing, as alcohol delays the freezing process.
- Use cream or whipped cream for creamier ice cream. The higher the fat content of the cream, the creamier the ice cream.
- Ice cream is usually of softer consistency. If you wish to further freeze the ice cream, place it in a separate, sealable, box.
- Do not store ice cream in open containers, as ice crystals might form.
Yoghurt - lemon ice cream
300 g pure yoghurt
400 g whipped cream
150 g powdered sugar
50 ml lemon juice
- Blend the yoghurt, sugar and lemon and fold in the whipped cream afterwards. Refrigerate the mixture before further preparation in the ice machine.
• Freezing time in the machine: 30 min.
Chocolate ice cream
150 g chocolate
570 ml milk
400 g whipped cream
100 g sugar
50 g chocolate bits
- Heat up the sugar, milk and chocolate in a pot until all ingredients have properly dissolved and mixed. Add the whipped cream and heat up for two minutes.
- Cool down the mixture before further preparation.
- Freezing time in the machine: 30 min. (add chocolate bits after 15 min.)
English
Cleaning and care

Caution
Never immerse electrical parts of the device in water or any other fluids during cleaning or operation. Never hold the device under running water. Never use solvents and abrasives, hard brushes, metallic or sharp objects for cleaning. Solvents are harmful to your health and attack the plastic parts. Abrasive cleaners and tools do scratch the surface.
- Assuming the lid, grip ring and ice cream container have already been removed, pull the mixer insert off the connection on the motor housing.
Fig. 9 Detach the motor housing from the cover by pressing the tabs on both sides so that both parts can be separated. If you have difficulties, press the tabs one after the other.
-
Wash all components except the motor housing with warm water and washing-up liquid, and then rinse them thoroughly with clean water.
-
Carefully dry all components after each cleaning.
-
Put all the previously cleaned and dried parts back together. Please note the relevant points in the Using the ice cream maker section.
-
Never use solvents, abrasives, hard brushes, metallic or sharp objects for cleaning. Solvents are harmful to health and attack plastic parts; Abrasive cleaners and auxiliaries scratch the surface.
Yoghurt - citronglass
300 g ren yoghurt 400 g vispad grädde 150 g pulver socker 50 ml citron juice
- Sicherheitshinweise
- English
- Safety Instructions
- Congratulations!
- Intended use
- Before first use
- Disposal
- Content
- Technical data
- Controls and components
- Operation
- Note:
- Using the ice cream maker
- Preparation
- Making ice cream
- Warning
- Tips and recommendations
- Yoghurt - lemon ice cream
- Chocolate ice cream
- Cleaning and care
- Caution
- Yoghurt - citronglass
Brand : Koenic
Model : KIM 20821 M
Category : Electric kitchen appliance