
MRK-24 - Food Processor MPM - Free user manual and instructions
Find the device manual for free MRK-24 MPM in PDF.

| Product Type | Food Processor |
| Brand | MPM |
| Model | MRK-24 |
| Bowl Capacity | 6.5 L |
| Bowl Material | Stainless Steel |
| Number of Speeds | 11 (1-11) |
| Main Functions | Mixing, Kneading, Whipping, Mincing, Shredding, Fermentation |
| Planetary Movement | Yes |
| Heating Function (Fermentation) | Yes (25°C to 45°C) |
| Included Accessories | Hook, Whisk, Beater, Mincer, Shredder, Screens (3/5/7 mm), Splash Guard, Spatula, Pusher |
| Control Type | Touchscreen + Rotary Knob |
| Automatic Programs | Yes (built-in challah recipe) |
| Timer | Yes, adjustable from 1 min to 99h59 |
| Cord Length | 1.05 m |
| Power Supply | Mains (230V, 50Hz) |
| Safety | Head lock, automatic shut-off in case of overload |
| Cleaning | Hand wash recommended (do not put in dishwasher) |
| Usage | Household use only |
| Included Grating Discs | 3 types: large holes, small holes, slicing |
| Built-in Recipe | Challah |
Frequently Asked Questions - MRK-24 MPM
User questions about MRK-24 MPM
0 question about this device. Answer the ones you know or ask your own.
Ask a new question about this device
Download the instructions for your Food Processor in PDF format for free! Find your manual MRK-24 - MPM and take your electronic device back in hand. On this page are published all the documents necessary for the use of your device. MRK-24 by MPM.
USER MANUAL MRK-24 MPM
EN We wish you satisfaction from using the product and invite you to check a wide range of other MPM/ appliances
natural_image
Black and white photo of a 1400 W industrial mixer with a stainless steel bowl (no visible text or symbols)C2 NAVOD K OBSLUZE 3
DEMONTÁŽ PŘÍSLUŠENSTVÍ
flowchart
graph LR
    A["PG1: Tractor with directional arrow"] --> B["PG2: Rotation arrow"]
    B --> C["PG3: Transporter with arrow"]
    C --> D["PG4: Reassembly with downward arrow"]
MÍCHADLO S POVRCHOVOU ÚPRAVOU SILICON
flowchart
graph LR
    PG1["PG1"] --> PG2["PG2"]
    PG2 --> PG3["PG3"]
    PG3 --> PG4["PG4"]
- Read the instructions carefully before use.
- Take special care when children are near the device.
- Do not use the device for purposes other than those for which it was intended.
- Use of accessories not recommended by the manufacturer may cause damage to the device or personal injury.
- Do not immerse the device, cable or charger in water or other liquids.
- Do not leave the device unattended during operation.
- Disconnect the device from the power supply each time when the device is left unattended and before any assembling, disassembling, or cleaning works.
- Never use a damaged device, including one with a damaged cord or plug, in which case have it repaired at an authorised service centre.
- Do not use the device outdoors.
- Do not hang the power cable on sharp edges or allow it to come into contact with hot surfaces.
- Do not let the power cord hang over the edge of the table/counter.
- Do not touch the device with wet hands.
- The device is intended for domestic use only.
- Remember to keep a safe distance from rotating parts of the appliance during operation. Contact with them may result in personal injury or (i) damage to property, e.g. by pulling out loosely hanging items of clothing / jewellery etc.
- Place foodstuffs only with the dedicated pusher - do not put your hand into the chamber of the running appliance, do not place foodstuffs in the appliance with accessories not intended for this purpose, e.g. forks, spoons, etc.
- NOTE! The cutting blades are very sharp, avoid touching them while emptying or cleaning the appliance – it may result in serious injury.
-Clean the device, in particular parts being in direct contact with food, before first use, immediately after finishing work and if the device has not been used for a long time. The procedure is described in details in the “CLEANING AND MAINTENANCE” section.
- Do not place the device near other electric cookers, burners, ovens, etc.
- Always ensure that all parts of the device are correctly fitted before starting work.
- Do not place the device on a hot surface.
- The device may be used by people with reduced physical, sensory or mental abilities, as well as those without prior knowledge or experience in using such types of device, provided that they either are supervised or have been instructed and fully understood the training content.
-Children are not allowed to perform cleaning and maintenance tasks.
- The device must be kept away from children. Keep the device and cable out of the reach of children.
-Children should be supervised to ensure that they do not play with the equipment/device.
- Disconnect the device from the power supply each time when the device is left unattended and before any assembling, disassembling, or cleaning works.
- Turn off the device before making any changes in equipment or before approaching any moving parts during use.
- Do not connect the plug to the power socket with wet hands.
- Do not pull the plug out of the power socket by pulling the cord.
- Use the device on a smooth and stable surface.
-For the safety of children, please do not leave freely accessible parts of the packaging (plastic bags, cardboard boxes, polystyrene, etc.).
- WARNING! Do not allow children to play with the film. Danger of suffocation!
DESCRIPTION OF THE DEVICE
- Attachment mounting socket with cap
- Tilt head
- Speed control knob / On / Off / Start / Pause / Stop
- Control panel with touch screen display
- Drive shaft with pin (attachment location for attachments)
- Splash guard
-
Bowl with stainless steel handle with a capacity of 6.5 l
-
Base with space to attach the bowl
-
Head lock lever
-
Mixer with silicone finish
-
Mixer for whipping lightweight masses
-
Mixer for multi-component masses (hook)
-
Vane
-
Grinding chamber
-
Tacka
-
Pusher with storage compartment
-
Snail
-
Stainless steel knife
- Sieve with a mesh diameter of 3 mm
- Stio with a mesh diameter of 5 mm
- A sieve with a mesh diameter of 7 mm
- Grinding chamber cap
- Shredder housing
- Shredder pusher
- Large bore grater
- Tarka with small holes
- Slicing grater
PREPARATION FOR WORK - GENERAL REMARKS
- Unpack the device from the carton, remove any plastic bags, labels, Styrofoam fillers and shipping blocks.
- Thoroughly wash all food-contact accessories of the robot before first use (see the „Cleaning and Maintenance" section).
- Be sure to install / remove accessories (bowl, stirrers, etc.) only when the device is not connected to a power source.
- Plug the power cord into an electrical outlet with a grounding pin.
INSTALLATION OF ACCESSORIES
STEP 1 - INSTALLING THE ANTI-GLARE SHIELD
Release the tilt head (2) by turning the head lock lever (9) clockwise, and then gently lift the tilt head until you hear a click (the sound of the lock snapping). When the lock is engaged, the arm of the head lock lever (9) will point downward. Slide the splash guard (6) over the edge of the housing that covers the drive shaft with the pin (5). Ensure that the hole used for adding foodstuffs faces outward, so that the tilting head (2) does not obstruct access to the hole.
STEP 2 - MONITORING THE BOWL
Place the bowl (7) in the base (8), then rotate the bowl (7) clockwise so that the tabs on the bowl lock against the latches in the base (8).
STEP 3 - MIXTURES ASSEMBLY
When installing mixers, the tilt head (2) should be raised for easier access. Attach (until you feel resistance) one of the three dedicated agitators (10, 11, 12) to the drive shaft pin (5). Make sure that the tab located on the pin goes into the mounting hole of the agitator. Then turn the agitator counterclockwise until the tab locks against the edge of the agitator mounting hole.

STEP 4 - ASSEMBLY OF THE DEVICE
After attaching the stirrers (10, 11, 12), the device is ready for operation. Turn the head lock lever (9) clockwise and gently lower the tilt head (2) until you hear a click (locking sound). Make sure that the tilt head (2) is properly locked - the arm of the head locking lever (9) will be pointing downwards.
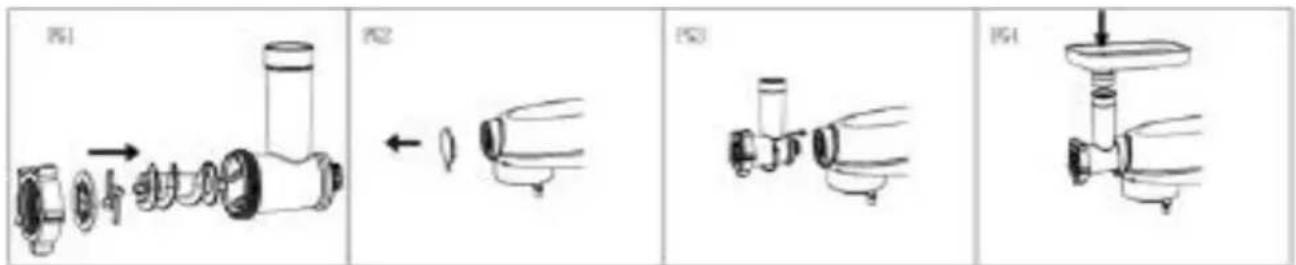
DISMANTLING OF ACCESSORIES
Removal of accessories can be done after lifting the tilt head (2).
Release the accessory from the latches by twisting them in the opposite direction to the direction of installation. Agitators (10, 11, 12) must first be released from the locking mechanism before turning, i.e. push the agitator deeper on the drive shaft pin until resistance is felt. The splash guard (6) should be removed after removing the agitators (10, 11, 12).
INSTALLATION AND USE OF ATTACHMENTS
GRINDING ATTACHMENT
- From the robot head (2), remove the cap of the grinding/shredding attachment mounting socket (1).
- Place the grinding chamber (14) in the attachment mounting slot (1) in such a way that the element through which the products to be ground are inserted is tilted from vertical to the right by about 30^ , then rotate the element to vertical so that the latch engages. The latch will only work if the chamber is properly seated in the socket.
- Mount the auger (17) inside the grinding chamber (14) so that the auger gear is inside the chamber.
- On the end of the auger (17), mount the knife (18) in such a way that the base of the knife faces the inside of the grinding chamber (14) and the knife blades face the outside of the chamber.
- Then place one of the sieves (19), (20) or (21) depending on the desired diameter of the hole and then screw the grinding chamber nut (22) onto the chamber.
- Place the tray (15) on the grinding chamber and fix it in position.
- Place the container under the outlet of the attachment.
- Cut the products to be processed, e.g. meat into pieces to make it easier to put it into grinding chamber (14).
- Connect the device to a power source and start it up. Select the automatic program or use the knob (3) to select the appropriate speed (recommended between 3 and 9), then place the products in the upper opening of the grinding chamber and push with the pusher(16).
- Disassembly of the grinding attachment is done in reverse order to the described assembly.
NOTE! The maximum operating time of the device for the grinding attachment is 5 minutes. After this time, the device should be left to cool, for a period of not less than 15 minutes.
NOTE! To avoid jamming, do not allow the device to operate under excessive load.
NOTE! Do not use the device to grind bones and nuts, or to grind products with hard fibers.
UWAGA! If jamming and stopping occurs due to hard material inside the attachment, the device should be turned off and cleaned immediately.
SHREDDER ATTACHMENT
- From the robot head (2), remove the cap of the grinding/shredding attachment mounting socket (1).
- Install a suitable grater (25), (26) or (27) with the bottom towards the center of the shredder housing (23).

flowchart
graph LR
    A["PGL"] --> B["→"]
    B --> C["PG2"]
    C --> D["←"]
    D --> E["PG3"]
    E --> F["→"]
    F --> G["PG4"]
    G --> H["↓"]
- Place the container under the outlet of the attachment.
- Cut the products into smaller pieces to fit comfortably in the chamber of the shredder.
- Connect the device to a power source and start it up. Select the automatic program or use the knob (3) to select the appropriate speed (recommended between 3 and 9), then place the products in the upper opening of the shredder chamber and push with the pusher(24).
- When you have finished working, turn off the device, unplug it from the power source and disas -semble the shredder in the same way as the grinding chamber. Wash all parts of the shredder.
NOTE! The blades of the grater are very sharp. Be careful!
ATTENTION! Do not crush fruits with seeds.
NOTE! The maximum operating time of the device for the shredder is 5 minutes. After this time, the device should be left to cool, for a period of not less than 15 minutes.
WORKING WITH THE DEVICE
Turn the head lock lever (9) clockwise and gently lower the tilt head (2) until you hear a click (locking sound). Make sure that the tilt head is properly locked - the arm of the head locking lever (9) will be pointing downwards. Then place the foodstuffs in the bowl (7) through the opening located in the splash guard (6), connect the appliance to the power supply and set the desired operating speed with the speed control knob (3).
Place foodstuffs in the bowl (7) through the opening located in the splash guard (6), connect the device to the power supply. The control panel will turn on. Select the preferred function (see section "Description of Control Panel Functions")
Press or turn the adjustment knob (3) to highlight the control panel. By turning the knob, you can select the function, speed or adjust the running time. Press and hold the adjustment knob to end the current mode. The device will go into standby mode. To restart, briefly press the adjustment knob.
NOTE! While the planetary robot is running, do not turn the head lock lever (9)!
Unplug the device from the power source when you are done.
USE OF THE DEVICE
APPLICATION OF INDIVIDUAL ACCESSORIES
| Mixer with silicone finish (10) | For mixing light and heavier masses, such as pastry, shortcrust pastry, ground meat and fish masses, butter and pudding creams, cheese masses, mashed potatoes and other vegetables, cake bottoms, loose dough ingredients. |
| Mixer for whipping lightweight masses (11) | For whipping products that need to be well aerated, such as eggs, egg whites, sponge cake, whipped cream, meringue, creams, mayonnaise. |
| Mixer for multi-component masses (hook) (12) | For kneading dough, especially yeast dough and kneading such as for: bread, rolls, muffins, pies, pizza, steamed dough, pasta, fava beans. |
| Grinding attachment (14) | For grinding meat, cooked poultry, pork, beef, cooked liver, cooked fish for soups; raw pork and beef for minced chops, raw liver, meat and fat for pate sausage, pork for tagine. |
| Shredding attachment (23) | For slicing and grinding vegetables and fruits. |
NOTE ! Do not leave knives, metal spoons or forks and other such items in thebowl while the machine is running.
NOTE! When using the custom settings, please note that the operating time of the machine, especially for heavy masses kneaded with the hook agitator (12), should not exceed 5 minutes of continuous operation. After this time, the device should be left to cool, for a period of not less than 15 minutes.
PLANETARY MOTION OF THE ATTACHMENTS
During the operation of the planetary robot, the agitator rotates in a compound motion: around its own axis and simultaneously around the perimeter of the bowl. As a result, during one full rotation, the mixer thoroughly works throughout the interior of the bowl resulting in shorter working time and greater mixing efficiency. For this reason, shorten the mixing time given in most recipes.
The shape of the bowl and attachments is designed so that when the robot is running, there is no need to constantly scrape and push the ingredients that are on the walls of the bowl. During one blending cycle, you only need to clean the bowl walls once or twice. Unplug the robot before doing this!
The robot may get hot during operation. With a heavy load and a long mixing cycle, the upper part of the robot head can be very warm. This is normal.
CLEANING AND MAINTENANCE
- Disconnect the device from the power source.
- During prolonged operation, the tilting head (2) may become hot. Allow the device to cool down before proceeding.
- Clean the housing of the device, using a damp cloth.
- Clean the agitators (10, 11, 12) and the paddle, as well as the grinding attachment and the shredding attachment under running water with detergent.
It is recommended to clean the accessories immediately after working with the device.
This will remove any lingering deposits, prevents residue from drying up, making washing more efficient and easier, and prevents the proliferation of bacteria.
NOTE! Do not wash in the dishwasher the stirrer for whipping light masses (11), the stirrer with silicone finish (10), the hook (12) and the grinding attachment and the shredding attachment-it risks damaging them.
DESCRIPTION OF CONTROL PANEL FUNCTIONS
The planetary robot has automatic adjustable functions.
| Function | Icon on the display | Speed Temperature Time | |
| Challah recipe 1 – 5 38°C |  | 72:00 min. | |
| Speed 1 – 11 - |  | - | |
| Time – - |  | 1:00 - 99:59 min. | |
| Custom settings 1 – 11 - |  | 1:00 - 99:59 min. | |
| Mixer for multi-component masses (hook) |  | 1 – 4 - | 1:00 - 20:00 min. |
| Mixer with silicone finish 4 – 9 - |  | 1:00 - 10:00 min. | |
| Mixer for whipping lightweight masses |  | 9 – 11 - | 1:00 - 20:00 min. |
| Heating "F" - 25°C – 45°C |  | 30:00 - 99:59 min. | |
| Grinding attachment Shredding attachment |  | 3 – 9 - | 1:00 - 20:00 min. |
BUILT-IN CHALLAH RECIPE
-
On the control panel, press the manual function button. The time / quantity column will be displayed by default: quantity 400 g (speed 5, quantity flashes for the current quantity). By turning the knob you can adjust the quantity to 400 g, 600 g, 800 g, 1000 g, 1200 g. At the same time, the speed also changes according to the selected quantity (400 g / 5, 600 g / 5, 800 g / 5, 1000 g / 4, 1200 g / 4). In standby, the control panel will be dimmed to 30% in 10 min, press any button to resume operation. If no function is selected within 30 minutes, the device will automatically turn off. Press the knob to wake the device to standby mode.
-
After selecting the quantity, press the dial button to specify the quantity to be entered to make the recipe. All display buttons are fully illuminated except for „Get Ready“ and „Add in sequence“
(at this time „Get Ready“ flashes and „Add in sequence“ does not display). Press the dial button to confirm the program. Then follow the instructions on the display (the ingredient buttons flash synchronously, add the ingredients one by one: flour, eggs, water, sugar, salt, yeast).
- After adding the indicated ingredients according to the quantity, press the dial button to confirm.
- After 3 minutes of operation, the device will stop and inform you that butter has been added. Add the butter and press the knob to continue mixing.
- After 12 minutes of operation, the heating (fermentation) process will be carried out automatically. The default heating time is 60 minutes (the maximum time can be set to 99 minutes and 59 seconds), the temperature is 38^ C . During the process, the heating time and temperature can be adjusted.
SPEED SETTINGS
The speed can be set or adjusted using the adjustment knob or the speed function button. Available speed range from 1 to 11.
To set or adjust the operating time, press the time function button and then use the dial to set the required time. Available range from 1 minute to 99:59 minutes.
CUSTOM SETTINGS
When the function button is pressed, the display will show the default speed 1 and the time 00:00. With the dial or speed function button, you can select the speed in the range of 1 to 11, while by pressing the time function button, you can select the time in the range of 1:00 minutes to 99:59 minutes.
MIXER FOR MULTI-COMPONENT MASSES (HOOK)
When the hook function button is pressed, the display will show the default speed 3 and the time 12:00 minutes. With the dial or the speed function button, you can select the speed from 1 to 4, while by pressing the time function button, you can select the time from 1:00 minutes to 20:00 minutes.
MIXER WITH SILIKON FINISH
After pressing the function button of the stirrer with silicone finish, the display will show the default speed 4 and the time 10:00 minutes. With the dial or the speed function button, you can select the speed from 4 to 9, while by pressing the time function button, you can select the time from 1:00 minutes to 20:00 minutes.
MIXER FOR WHIPPING LIGHTWEIGHT MASSES
When you press the function button of the lightweight whipping mixer, the display will show the default speed of 9 and the time of 6:00 minutes. With the dial or speed function button, you can select the speed in the range of 9 to 11, while by pressing the time function button, you can select the time in the range of 1:00 minutes to 10:00 minutes.
HEATING SETTING (FERMENTATIONA)
After pressing the heating (fermentation) function button, the display will show the default temperature of 38^ C and the time of 60:00 minutes. With the dial, you can select the temperature in the range of 25-45^ C, while by pressing the time function button, you can select the time in the range of 30:00 minutes to 99:59 minutes.
GRINDING ATTACHMENT AND SHREDDING ATTACHMENT
After pressing the function button of the grinding attachment, the display will show the default speed 3 and the time 10:00 minutes. With the dial or speed function button, you can select the speed from 3 to 9, while by pressing the time function button, you can select the time from 1:00 minutes to 20:00 minutes.
USING THE ROBOT FOR YOUR OWN RECIPES
This manual provides some general, practical advice on the specifics of working with the robot, which may come in handy when preparing your own recipes. However, your own observations and experiences will be necessary to achieve a perfect result and develop a suitable mixing procedure. Control the mixing process and finish it exactly when the consistency required by the recipe (e.g., "smooth and elastic dough") is reached.
COOKING TIPS
- Ingredients that are stored in the refrigerator, such as butter or eggs, must come to room temperature before being blended. Therefore, take such products out of the refrigerator early enough.
- To avoid dropping egg shells or spoiled eggs into the bowl, it is best to pound them into a separate container before adding the rest of the products.
- Whisking for too long can adversely affect the final product. Keep an eye on the blending time specified in the recipe.
- Changes in temperature, texture of food products (e.g., due to fluctuations in ambient temperature) can affect the shortening/extending of the mixing process of ingredients and the final result of mixing.
- Always start blending at low speed and gradually increase the speed to that required for the recipe.
| Accessories Speed | Time (min.) | Maximum quantity of products in the bowl | Description of operation | |
| Stirrer for multi-component masses (hook) (12) | 1 - 43 - 5 | 1000 g of flour + 538 g of water | speed level 1 for 30 seconds, speed level 2 for 30 seconds, then speed level 3 for 2 - 4 minutes. | |
| A stirrer with a silicone finish (10) | 5 - 93 - 10 | 660 g of flour + 840 g of water | speed level 2 for 20 seconds, speed level 4 for 2 minutes and 40 seconds | |
| Stirrer for beating light masses (11) | 9 - 11 | 3 - 10 | 3 egg yolks (minimum) | speed level 10 for 3 min. |
RECIPES
LINSEED ROLLS
√ 30 g of linseed
√ 40 g of water
√ 250 g of bread flour
√ 3 g of dried yeast
√ 30g of sugar
√ 5g of salt

√ 10 g of powdered milk
√ 150 g of water
√ 20 g of soft butter
√ 1 egg
PREPARATION:
[Non-Text]
1) Soak the linseed in water for 12 h.
2) Mount the stirrer for multi-component masses (hook).
3) Put bread flour, dried yeast, sugar, salt, powdered milk and water in a bowl.
4) Knead at a speed of 1 - 3 until the ingredients are combined, then add butter and continue kneading until the dough is smooth. Then add the linseed and continue kneading.
5) Stop the mixer, cover the bowl with a cloth and leave the dough to grow. Set the heating (fermentation) function to 38^ C for 30 minutes. After this time, knead the dough once again, take it out of the bowl and form 6 rolls. Cover the rolls with a cloth and put aside in a warm place to grow for 1 hour.
6) Brush the rolls with beaten egg. Put the rolls in the oven preheated to 180^ C top/bottom, bake for 20 minutes. After taking the rolls out of the oven, leave them until they cool down
FRENCH BREAD
√ 250g of wheat flour
√ 50 g of rye flour
√ 150 g of water
√ 10 g of sugar
√ 4 g of dried yeast
√ 3 g of salt

PREPARATION:
1) Mount the stirrer for multi-component masses (hook).
2) Put all the ingredients in a bowl and stir them at a speed level 1-3 until the ingredients are combined.
3) Stop the mixer, cover the bowl with a cloth and leave the dough to grow. Set the heating (fermentation) function to 30^ C for 30 minutes. After this time knead the dough once again accurately.
4) Remove the dough from the bowl and roll it into an oval shape, then roll it up. Put the bread into an oblong tin, cover it with a cloth and leave it in a warm place to rise for about 1 hour.
5) Brush the surface of the bread with sesame oil and place the bread in an oven preheated to 180^ C top to bottom and bake for 30 minutes. Finally, check whether the bread is baked using a stick.
HOME-MADE PIZZA
√ 500g of wheat flour
√ 300 g of warm water
√ 5g of salt
√ 10 g of sugar
√ 10g of fresh yeast
√ 1 tablespoon of olive oil

PREPARATION:
1) Mount the stirrer for multi-component masses (hook).
2) In a separate bowl, prepare the leavening. Pour in the warm water, sugar and crumbled yeast and mix.
3) Pour the wheat flour and salt into the bowl and pour in the prepared leavening. Mix at a speed of 1 - 3 until the ingredients are combined. Once the dough has been kneaded, add the olive oil and continue kneading until the dough has an elastic consistency.
4) Stop the mixer, cover the bowl with a cloth and leave the dough to grow. Set the heating (fermentation) function to 38^ C for 30 minutes. After this time, knead the dough thoroughly once more, remove it from the bowl and divide it into 2 parts. Roll out and leave for 5 minutes to rest.
5) Transfer the shaped dough to the pizza tin, press it down with your hands around the tin. Spread the pizza with tomato sauce and arrange your favourite toppings. Put the pizza in the oven preheated to 200°C, top/bottom, bake for 20 minutes.
SPONGE CAKE
√ 5 eggs
√ 120g of sugar
√ 100g of wheat flour
√ 30 g of potato flour
√ 5g of baking powder
√ pinch of salt

PREPARATION:
1) Mount the stirrer for beating light masses
2) In a bowl, whisk the eggs and pour in the sugar.
Beat at speed 11 until the mixture is fluffy.
3) Add wheat and potato flour, baking powder and a pinch of salt to the mixture Mix gently on
your own settings at speed 2 until the ingredients are combined.
4) Transfer the finished dough to a cake tin lined with baking paper and place the dough in the oven. Set the temperature at 180^ C top to bottom and bake for about 30 minutes. Finally, check with a stick that the sponge cake is baked through.
MASHED POTATOES
√ 1kg of potatoes
√ 125 g of hot milk
√ 25 g of butter
√ 5g of salt

PREPARATION:
1) Peel and cook the potatoes in salted water, be careful not to make them too soft.
2) When they become floury, start kneading in the appropriate bowl or transfer the dough to the mixer's bowl.
Then, knead the potatoes prepared in this way in a mixer at medium speed for about 1 minute.
3) When finished, scrape the potatoes off the sides of the bowl.
4) Mix hot milk, butter and salt together. Add these to potatoes and knead at a speed of 4 until smooth mass is obtained.
TECHNICAL DATA
Technical specifications are given on the product nameplate
Length of mains cable: 1.05m
WHISKING EGG WHITES
√ 2 eggs
√ pinch of salt

PREPARATION:
1) Place the egg yolks in a bowl and add a pinch of salt.
2) Beat at the highest speed possible, i.e. 11, controlling the beating level.

CAUTION! MPM agd S.A. reserves the right to technical changes!
This manual has been machine translated.
In case of any doubts, please read its English version.
Proper disposal of the product (waste electrical and electronic equipment)

Marking on the product indicates that after the service-life of the product expires, it should not be disposed with other type of municipal waste. Used equipment may have a negative impact on the environment and health of people due to potentially containing hazardous substances, mixtures and components.
Mixing electric waste with other types of waste or disassembling those in an unprofessional manner may cause a release of substances that are hazardous to the environment and health. Used equipment should
be handed-over to a point for collection of electric waste. In order to obtain detailed information regarding the electric waste collection points, the user should contact the municipal point of electric waste collection or used equipment processing department.
INSTRUCCIONES DE USO
natural_image
Simple line drawing of a tractor and a vehicle (no text or symbols)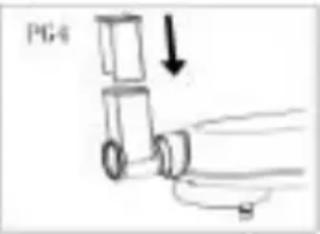
natural_image
Simple line drawing of a toy car with an arrow indicating motion (no text or symbols)MAISĪTĀJS AR SILIKON APDARI
MAISĪTĀJS AR SILIKON APDARI
APPARAAT BESCHRIJVING
WERKEN MET HET APPARAAT
natural_image
Technical line drawing of a mechanical component (no text or symbols)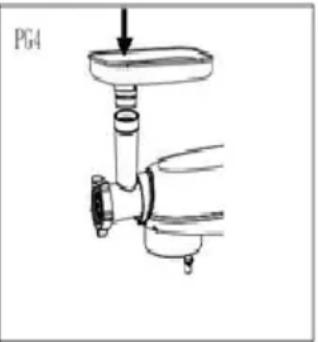
natural_image
Technical line drawing of a mechanical component with a downward arrow indicating force or direction (no text or symbols)PROSTY PLACEK DWUJAJECZNY
natural_image
Mechanical assembly diagram showing a motor and gear assembly (no text or labels)natural_image
Simple line drawing of a mechanical component with an arrow indicating direction (no text or symbols)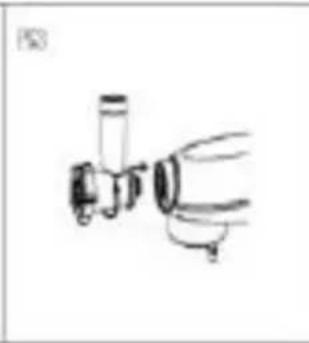
natural_image
Simple line drawing of a mechanical component or tool (no text or symbols)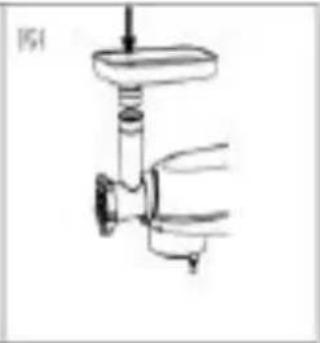
natural_image
Technical line drawing of a mechanical component (no text or symbols)flowchart
graph LR
    A["PG1: Machine component"] --> B["PG2: Internal part"]
    B --> C["PG3: Internal part"]
    C --> D["PG4: Transport unit with downward arrow"]


- DEMONTÁŽ PŘÍSLUŠENSTVÍ
- MÍCHADLO S POVRCHOVOU ÚPRAVOU SILICON
- DESCRIPTION OF THE DEVICE
- PREPARATION FOR WORK - GENERAL REMARKS
- INSTALLATION OF ACCESSORIES
- STEP 1 - INSTALLING THE ANTI-GLARE SHIELD
- STEP 2 - MONITORING THE BOWL
- STEP 3 - MIXTURES ASSEMBLY
- STEP 4 - ASSEMBLY OF THE DEVICE
- DISMANTLING OF ACCESSORIES
- INSTALLATION AND USE OF ATTACHMENTS
- GRINDING ATTACHMENT
- SHREDDER ATTACHMENT
- WORKING WITH THE DEVICE
- USE OF THE DEVICE
- PLANETARY MOTION OF THE ATTACHMENTS
- CLEANING AND MAINTENANCE
- DESCRIPTION OF CONTROL PANEL FUNCTIONS
- BUILT-IN CHALLAH RECIPE
- SPEED SETTINGS
- CUSTOM SETTINGS
- MIXER FOR MULTI-COMPONENT MASSES (HOOK)
- MIXER WITH SILIKON FINISH
- MIXER FOR WHIPPING LIGHTWEIGHT MASSES
- HEATING SETTING (FERMENTATIONA)
- GRINDING ATTACHMENT AND SHREDDING ATTACHMENT
- USING THE ROBOT FOR YOUR OWN RECIPES
- COOKING TIPS
- RECIPES
- LINSEED ROLLS
- FRENCH BREAD
- PREPARATION:
- HOME-MADE PIZZA
- SPONGE CAKE
- MASHED POTATOES
- TECHNICAL DATA
- WHISKING EGG WHITES
- CAUTION! MPM agd S.A. reserves the right to technical changes!
- Proper disposal of the product (waste electrical and electronic equipment)
- INSTRUCCIONES DE USO
- MAISĪTĀJS AR SILIKON APDARI
- APPARAAT BESCHRIJVING
- WERKEN MET HET APPARAAT
- PROSTY PLACEK DWUJAJECZNY
Brand : MPM
Model : MRK-24
Category : Food Processor