
CC2000P - Heating UFESA - Free user manual and instructions
Find the device manual for free CC2000P UFESA in PDF.

| Product type | Ceramic wall heater |
| Nominal thermal power | 2.0 kW |
| Power supply | 220-240 V ~ 50 Hz |
| Display | LED |
| Remote control | Yes |
| Heating modes | Fan, low heat, high heat |
| Adjustable temperature range | 10-49 °C |
| Timer | 1-12 hours |
| Weekly programming | Up to 6 periods per day |
| Open window detection | Yes |
| Installation | Wall-mounted, minimum height 1.8 m from floor |
| Minimum distance to walls/objects | ≥20 cm on each side |
| Safety | Overheat protection (do not cover), auto shut-off after 12h, use under supervision of children |
| Maintenance and cleaning | Unplug and allow to cool before cleaning; use a damp cloth; do not immerse |
| Spare parts and repairability | Contact official technical service; do not open yourself |
| Warranty | According to legislation in effect in the country of sale |
| Usage | Domestic use only |
| Maximum altitude | 2,000 m |
Frequently Asked Questions - CC2000P UFESA
User questions about CC2000P UFESA
0 question about this device. Answer the ones you know or ask your own.
Ask a new question about this device
Download the instructions for your Heating in PDF format for free! Find your manual CC2000P - UFESA and take your electronic device back in hand. On this page are published all the documents necessary for the use of your device. CC2000P by UFESA.
USER MANUAL CC2000P UFESA
natural_image
White UFESA air conditioner unit with digital display and control buttons (no text or symbols on body)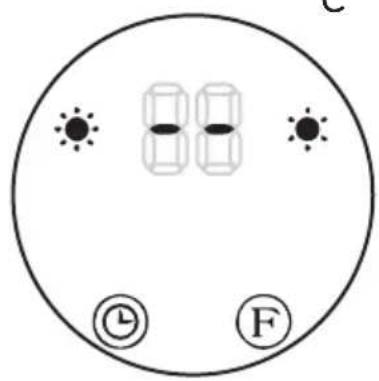
FIG.5

ESPAÑOL
AGRADECEMOS QUE HAYA DEPOSITADO SU CONFIANZA EN UFESA Y DESEAMOS QUE EL FUNCIONAMIENTO DEL PRODUCTO LE SATISFAGA PLENAMENTE.
ATENCIÓN
natural_image
Two identical diagrams of a trash bin with no text or symbols, each containing a cross symbol and a horizontal bar (no text or labels present)WE WOULD LIKE TO THANKS YOUR FOR CHOOSING UFESA, WE WISH THE PRODUCT PERFORMS TO YOUR SATISFACTION AND PLEASURE.
WARNING
PLEASE READ THE INSTRUCTIONS FOR USE CAREFULLY PRIOR TO USING THE PRODUCT. STORE THESE IN A SAFE PLACE FOR FUTURE REFERENCE.
DESCRIPTION
1- Wall ceramic heater
3- Control button
4- LED Display
5- Regular Function area
6- Adjust& confirm area
7- Program Area
2- Receiver window of remote control
SAFETY MEASURES
This appliance can be used by children aged from 8 years and above and persons with reduced physical, sensory or mental capabilities or lack of experience and knowledge if they have been given supervision or instruction concerning use of the appliance in a safe way and understand the hazards involved. Children shall not play with the appliance. Cleaning and user maintenance shall not be made by children without supervision. If the supply cord is damaged it must be replaced by the manufacturer, its service agent or similarly qualified persons in order to avoid a hazard. Heater must not be located immediately below a socketoutlet. Children of less than 3 years should be kept away unless continuously supervised. Children aged from 3 years and less
than 8 years shall only switch on/off the appliance provided that it has been placed or installed in its intended normal operating position and they have been given supervision of instruction concerning use of the appliance in a safe way and understand the hazards involved. Children aged from 3 years and less than 8 years shall not plug in, regulate and clean the appliance or perform user maintenance.
CAUTION-Some parts of this product can become very hot and cause burns. Particular attention has to be given where children and vulnerable people are present.
The heater must be installed at least 1,8m above the floor. The heater is to be installed so that switches and other controls cannot be touched by a person in the bath or shower. Proceed according to INSTALLATION section of this manual for installation instructions.
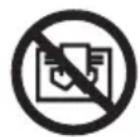
This symbol means that the product should not be covered.
WARNING: In order to avoid overheating, do not cover the heater. This appliance is intended for use at a maximum altitude of 2000m above sea level.
IMPORTANT WARNING
This appliance is designed for home use and should never be used for commercial or industrial use under any circumstances. Any incorrect use or improper handling of the product shall render the warranty null and void. Prior to plugging in the product, check that your mains voltage is the same as the one indicated on the product label. The mains connection cable must not be tangled or wrapped around the product during use. Do not use
the device, or connect and disconnect to the supply mains with the hands and / or feet wet. Do not pull on the connection cord in order to unplug it or use it as a handle Unplug the product immediately from the mains in the event of any breakdown or damage and contact an official technical support service. In order to prevent any risk of danger, do not open the device. Only qualified technical personnel from the brand's Official technical support service may carry out repairs or procedures on the device.
B&B TRENDS SL. disclaims all liability for damages that may occur to people, animals or objects, for the non-observance of these warnings.
INSTALLATION
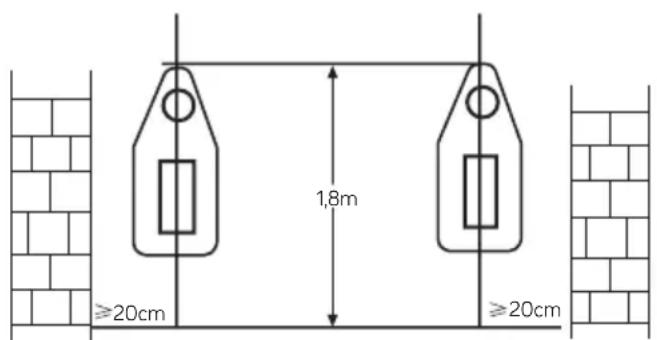
Drill two holes in wall and have a distance of 1.8m from the ground. The diameter of the hole just contained the inflated plastic pipe. After tucked the inflated plastic pipe, fixed pothook on the pipe with screw. Make sure pothook fastness and hang the heater. The clip under the pothook should be inserted rabbet of the heater bottom.
Function operation (both machine & remote control):
- Plug in and switch on by pressing the red switch 0/I, enter into standby mode and display shows (fig 1)
- Press"F" button for one time, enter into fan mode and the display show "--"(photo A). Press second time, the product works in low heating and display shows like photo B Press third time, changes to high heating and display shows like photo C, then Press fourth time, enter into in standby mode and display shows"--"like photo A. the cool fan will work for 30 seconds and enter into standby mode. (Figuer 2)
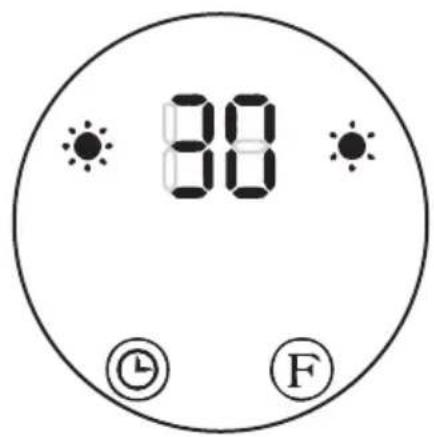
- Press "💡" button to set timer(00-12hours). Pressing the button one time increases one hour for timer. After setting time, the display will show current setting time for 5 seconds, then resume to previous display, meanwhile the light of "💡" will on. Below photo is an example of setting 8h: (Figure 3)
- Appointment "ON": In standby mode, press "☐" timer button, you can set the appointment turn-on time in 1-12 hours. After complete setting, the display shows the appointment turn-on time and also the light "☐" is on. The display automatically decreases 1 hour for each hour passed. When the appointment power-on time arrived, the product will automatically turns on. The default setting temperature is 23 °C during appointment turn-on. Below photos is an example to set appointment turn-on time to 8 hours:
Note: If not setting the temperature and weekly program, the product will automatically turn-off after 12 hours of continuous work, and enter into standby.
Function operation (ONLY by remote control)
-
Press "⊕", the product enter into working status. See below :A
-
Press "⑪" button for one time, the product works with low heating and display shows"--/●." See below: B. Press again, changes to high heating and display shows"--/●●".See below: C (figure 4)
-
The timer "☐" of remote control operate as same as the timer button on unit body.
-
Set current TIME/DAY (can set both under standby mode & working status):
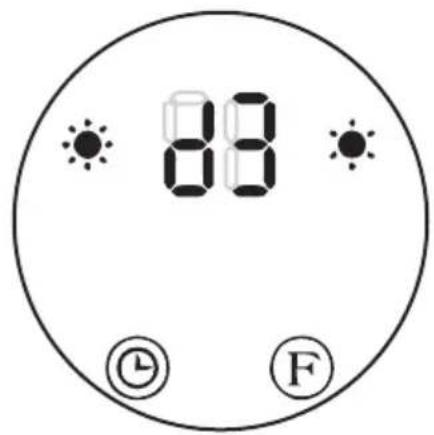
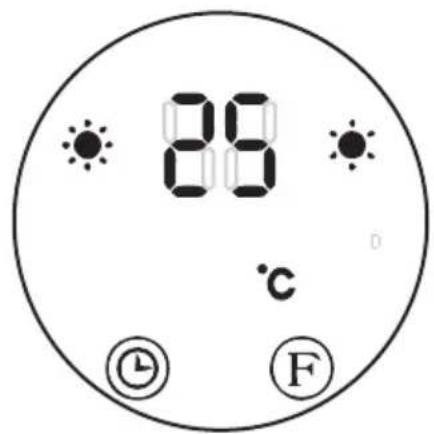
Press "SET" button for one time, the display shows "12" as default, press "+/-" to set current hour; press "SET" again, the display shows minute "30", press "+/-" to set current minute, then press "SET" for third time, the display shows the day "d1", press "+/-" to set current day (Monday-Sunday: d1-d7). Then press "OK" to confirm the setting, the display will show previous settings. For example: Setting to Wednesday, 9:30 AM under 25 °C under II heating, pls. refer to the following photos: Figure 5
Nota: - After the product is power off, it needs to be reset, then press "SET" to check the current time & day in turn;
- Set temperature. During working status, Press "+/the display shows " 23 " as default. Press "+/-" to set desired temperature (temperature range 10-49 °C), press "OK" to confirm the setting.
Set weekly program(ONLY by remote control):
After complete setting of current TIME/DAY, below is the steps to set weekly program:
1) Press "💡", the product enter into working status.
2) Press "P", the display shows "P", it enter into weekly program setting: See below :A
3) Press "DAY", the display shows d1\~d7, set to working day(Monday-Sunday: d1\~d7). Such as set Monday: See below: B
Note: In order to distinguish between setting current day & working day:
Current day - Monday-Sunday: d1\~d7
Working day - Monday-Sunday: d1\~d7
4) Press "EDIT", the display shows P1\~P6 (for each day, it can be set maximum 6 time periods). Such as setting P1: See below :C
5) Press "TIME" ,the display shows 00"as default. Press "TIME" continuously to set the turn-on time. Such as set the turn-on time 7:00am P1:See below :D (Memo: the setting time 0-24 for choice)
6) Press "TIME/om", the display shows the previous step turn-on time by default. Press "TIME/oh" continuously to set the turn-off time. Such as set the shutdown time at 13:00pm: (Note: turn-off time later than turn-on time, when turn-on time same as turn-off time, the unit in stand by mode) See below :E
7) Press "+/to setting the target temperature(Temperature range 10-49 °C);
8) Repeat steps 3-7 above, you can set the whole weekly program. Then press "to confirmed;
9) To cancel the weekly function, press the Ⓥ "agian, the light "P" will go off. The weekly program is off. The product will revert to the previous function working status.
-Press"⊕/",set working temperature under different time periods.
- The turn-on time periods 0\~24hours, cannot set to minutes;
-The"TIME/OFF" can not be less than "TIME/ON";
-When the"TIME/ON" is the same as"TIME/OFF", the time period enter into standby mode;
Set open-window detection(ONLY by remote control):
1). Press "©" the product enter into working status. Heating for a moment until stable.
2). Press "☐" by remote control, light "☐" will on; The temperature display "23" by default. Press "+/to set target temperature. During open-window detection mode, once the ambient temperature drops 5-10 °C within 10 minutes, then the product will stop working within 30 minutes and enter into stand by mode. Then press "☐" to turn on the product. Press "☐ again to turn off the open-window detection, the light " " will go off and the product will resume to previous working mode. Below is an example to set 23 °C during open-window detection.See below :F
3). When turn on at the same time for both open-window detection and weekly program, during the OFF period of weekly program, the product doesn't work. During the working status of weekly program, the temperature is subject to the setting temperature of open-window detection. See below: G
Information requirements for electric local space heaters
| MODEL IDENTIFIER(S): CC2000P | |||||
| Item Symbol Value Unit Item Unit | |||||
| Heat output | Type of heat input, for electric storage local space heaters only | ||||
| Nominal heat output | P nom 2,0 KW | Manual heat charge control, with integrated thermostat | No | ||
| Minimum heat output (indicative) | P min 0 KW | Manual heat charge control with room and/or outdoor temperature feedback | No | ||
| Maximum continuous heat output | P max,c 2,0 KW | Electronic heat charge control with room and/or outdoor temperature feedback | No | ||
| Auxiliary electricity consumption | Fan assisted heat output No | ||||
| At nominal heat output | el max 0 KW | Type of heat output/room temperature control (select one) | |||
| At minimum heat output | el min | 0 KW | Single stage heat output and no room temperature control | No | |
| In standby mode | el SB | 0.000 | KW | Two or more manual stages, no room temperature controlWith mechanic thermostat room temperature control | NoNo |
| With electronic room temperature control | No | ||||
| Electronic room temperature control plus day timer | No | ||||
| Electronic room temperature control plus week timer | Yes | ||||
| Other control options (multiple selections possible) | |||||
| Room temperature control, with presence detection | No | ||||
| Room temperature control, with open window detection | Yes | ||||
| With distance control option No | |||||
| With adaptive start control No | |||||
| With working time limitation Yes | |||||
| With black bulb sensor No | |||||
| Contact details | B&B TRENDS, S.L. - C. Cataluña, 24 P.I. Ca N'Oller 08130 Santa Perpètua de Mogoda (Barcelona) - España C.I.F. B-86880473 | ||||
PRODUCT DISPOSAL
This product complies with European Directive 2012/19/EU on electrical and electronic devices, known as WEEE (Waste Electrical and Electronic Equipment), provides the legal framework applicable in the European Union for the disposal and reuse of waste electronic and electrical devices. Do not dispose of this product in the bin, instead going to the electrical and electronic waste collection centre closest to your home.
The product may contain batteries. Remove them before disposing of the product and dispose in special containers approved for this purpose.
AVERTISSEMENT
VEUILLEZ LIRE ATTENTIVEMENT LE MODE D'EMPLOI AVANT D'UTILISER LE PRODUIT. VEUILLEZ CONSERVER CE DOCUMENT DANS UN ENDROIT SÛR POUR UN USAGE ULTÉRIEUR.
DESCRIPTION
natural_image
Two identical diagrams of a trash bin with cross-hatching, no text or symbols present.natural_image
Two identical diagrams showing a trash bin with crosshair and a blank horizontal bar, no text or symbols present.B&B TRENDS, SL. guarantees compliance of this product, for the use for which it is, during the period established by the legislation in force in the country of sale. In the case of breakdown during the term of this warranty, users are entitled to repair or else the replacement of the product at no charge if the former is unavailable, unless one of these options proves impossible to fulfil or is disproportionate. In this case, you can then opt for a reduction in price or cancellation of the sale, which must be dealt with directly with the sales vendor. This also covers replacement of spare parts provided that the product has been used according to the recommendations specified in this manual for both cases, and has not been tampered with by any third party that is not authorised by B & B TRENDS, SL. The warranty will not cover any parts subject to wear and tear. This warranty does not affect your rights as a consumer in accordance with the provisions in Directive 1999/44/EC for member states of the European Union.
USE OF WARRANTY
Customers must contact a B&B TRENDS, SL., authorised Technical Service for repair of the product. Since any tampering of the same by anyone not authorised by B&B TRENDS, SL., or the careless or improper use of the same shall render this warranty null and void.
You must keep the purchase invoice, receipt or delivery docket in order to exercise your warranty rights.
For technical service and after-sales care outside the Spanish territory, please submit your query to the point of sale where you purchased the item.
BON DE GARANTIE
Check out your nearest service station at https://sat.ufesa.com/
ufesa
B&B TRENDS, S.L. · C.I.F. B-86880473

- ESPAÑOL
- ATENCIÓN
- WARNING
- DESCRIPTION
- SAFETY MEASURES
- IMPORTANT WARNING
- INSTALLATION
- Function operation (both machine & remote control):
- Function operation (ONLY by remote control)
- Set weekly program(ONLY by remote control):
- Set open-window detection(ONLY by remote control):
- PRODUCT DISPOSAL
- AVERTISSEMENT
- USE OF WARRANTY
- BON DE GARANTIE
- ufesa
Brand : UFESA
Model : CC2000P
Category : Heating