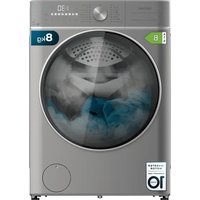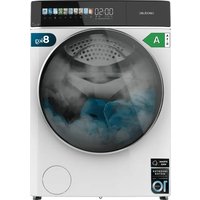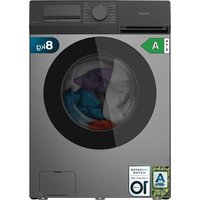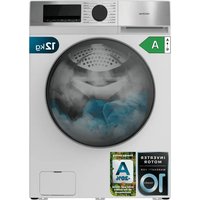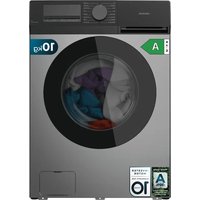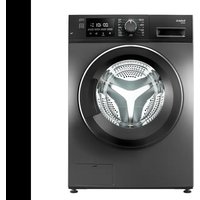
Bolero DressCode 7200 - Washing machine CECOTEC - Free user manual and instructions
Find the device manual for free Bolero DressCode 7200 CECOTEC in PDF.


User questions about Bolero DressCode 7200 CECOTEC
0 question about this device. Answer the ones you know or ask your own.
Ask a new question about this device
Download the instructions for your Washing machine in PDF format for free! Find your manual Bolero DressCode 7200 - CECOTEC and take your electronic device back in hand. On this page are published all the documents necessary for the use of your device. Bolero DressCode 7200 by CECOTEC.
USER MANUAL Bolero DressCode 7200 CECOTEC
Safety instructions 8
Cautions during the handling of the machine 11
- Parts and components 62
- Before use 52
- Product installation 53
- Operation 64
- Cleaning and maintenance 73
- Troubleshooting 75
- Technical specifications 76
- Disposal of old electrical appliances 77
- Technical support and warranty 77
- Technical sheets 78
SOMMAIRE
Read these instructions thoroughly before using the appliance. Keep this instruction manual for future reference or new users.
- Make sure that the mains voltage matches the voltage stated on the rating label of the appliance and that the wall outlet is grounded.
- If the supply cord is damaged, it must be replaced by the Technical Support Service of Cecotec or by a similarly qualified person in order to avoid a hazard.
- This appliance is for indoor use only.
- Make sure the device is installed in places where temperature is above 0 °C.
– The device is not designed for built-in installation. - The new hose-sets supplied with the appliance are to be used and that old hose-sets should not be reused.
- Before any maintenance the device, unplug the appliance from the mains.
- Always unplug the machine and turn off the water supply after use. The max. inlet water pressure, in pascals. The min. inlet water pressure, in pascals.
– Never pull out power plug with wet hand. - Please remember to disconnect water and power supply immediately after the clothes are washed.
- Pull out its plug from the power socket before cleaning or maintenance.
- To ensure your safety, power plug must be inserted into an earthed three-pole socket. Check carefully and make sure that your socket is properly and reliably earthed.
- Make sure that the water and electrical devices must be connected by a qualified technician in accordance with the manufacturer's instructions and local safety regulations.
- The glass door may be very hot during operation. Keep kids
and pets away from the machine during the operation.
- Do not operate the device in very wet rooms or in rooms with explosive or caustic gas.
- Adequate ventilation has to be provided to avoid the back flow of gases into the room from appliances burning other fuels, including open fires.
- Do not dry unwashed items in the appliance.
- Do not wash items that have been soiled with substances such as cooking oil, acetone, alcohol, petrol, kerosene, spot removers, turpentine, waxes and wax removers. These should be washed in hot with an extra amount of detergent before being dried in the appliance.
- Items such as foam rubber (latex foam), shower caps, waterproof textiles, rubber backed articles and clothes, or pillows fitted with foam rubber pads should not be dried in the machine.
- Fabric softeners or similar products should be used as specified by the fabric softener instructions.
- Do not wash or dry articles that have been cleaned in, washed in, soaked in, or dabbed with combustible or explosive substances (such as wax, oil, paint, gasoline, degreasers, dry-cleaning solvents, kerosene, etc.) This may result in fire or explosion.
- When washing fabrics that contain vegetable or cooking oil or have been contaminated by hair care products, they should first be washed in hot water with extra detergent. This will reduce, but not eliminate, the hazard.
- The exhaust air must not be discharged into a flue which is for exhausting fumes from appliances burning gas or other fuels.
– The openings must not be obstructed by a carpet. - The appliance with single inlet valve can only be connected to a cold-water supply. The appliance with double inlet
valve should be correctly connected to a hot water and cold-water supply.
– The plug must be accessible after installation.
- The appliance must not be installed behind a lockable door, a sliding door or a door with a hinge on the opposite side to that of the device.
– The appliance shall not be installed in a humid place.
- The product is only for home use and is only designed for the textiles suitable for machine washing and drying.
- Do not stand on sit on the machine.
- Do not lean against machine door.
- Flammable and explosive or toxic solvents are forbidden. Gasoline, alcohol, etc. shall not be used as detergents. Use only detergents suitable for machine washing, especially for the drum.
- Never stop the device before the end of the drying cycle unless all items are quickly removed and spread out so that the heat is dissipated.
- This appliance can be used by children aged 8 and above, and persons with reduced physical, sensory or mental capabilities or lack of experience and knowledge, as long as they have been given supervision or instruction concerning the use of the appliance in a safe way and understand the hazards involved. Do not allow children to play with the appliance. The cleaning and maintenance of the appliance should not be carried out by children without supervision.
- Children of less than 3 years should be supervised to ensure that they do not play with appliance.
- Kids should be supervised that they do not play with the appliance.
CAUTIONS DURING THE HANDLING OF THE MACHINE
- Transport bolts shall be reinstalled on the machine by a qualified technician.
- The accumulated water shall be drained out of the machine.
- Handle the machine carefully. Never hold each protruded part on the machine while lifting. Machine door cannot be used as the handle during the conveyance.
- This appliance is heavy. Transport it with care.
- Do not insert hands into the running water extracting tub.
- Do not close the door with excessive force. If it is found difficult to close the door, please check if the clothes are put in or distributed well.
- It is forbidden to wash carpets.
– Never refill the water by hand during washing.
INSTRUCTIONS DE SÉCURITÉ
- Top cover
- Control panel
- Power cord
- Drum
- Service filter
- Drain hose
- Door
- Detergent dispenser
- Water supply hose
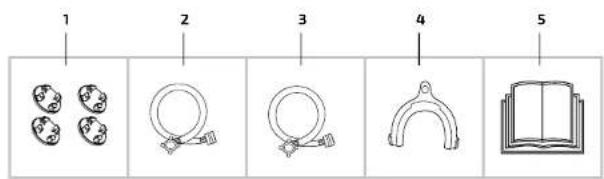
Attachments
Fig. 2.
- Transport hole plug
- Cold water supply hose
- Hot water supply hose (optional)
- Drain hose support (optional)
- Instruction manual
2. BEFORE USE
- Unpack the appliance and keep the original packaging and materials in a safe place. It will help prevent any damage if the product needs to be transported in the future, in case the original packaging is disposed of, make sure all packaging materials are recycled accordingly.
- Make sure all parts and accessories are present and in good conditions. If not, contact immediately the Technical Support Service of Cecotec.
- Keep all packaging materials away from children.
Note
- Before using the wash machine, the product shall be calibrated.
Before washing the clothes for the first time, the product shall be operated in one round of the whole procedures without the clothes inside. - Make sure that all pockets are emptied. Sharp and rigid items such as coins, brooches, nails, screws or stones may cause serious damage to the machine.
3. PRODUCT INSTALLATION
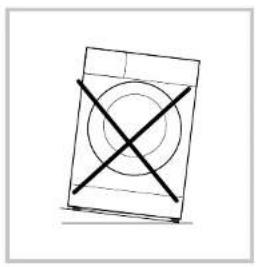
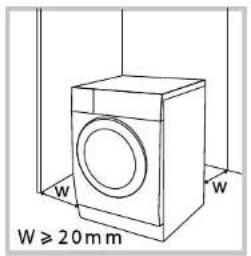
- Place the device on a flat, stable and dry surface. Make sure the product does not stand on the power cord.
Fig. 3
- Avoid direct sunlight and ensure sufficient ventilation.
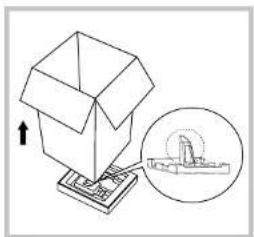
Fig. 4.
- Remove the cardboard box and Styrofoam packing.
- Lift the washing machine and remove the base packing. Make sure the small triangle foam is removed with the bottom one together. If not, lay the unit down with on the side surface, then remove the small foam from the unit bottom manually.
Fig. 5.
- Remove the tape securing the power supply cord and drain hose.
- Remove the inlet hose from the drum.
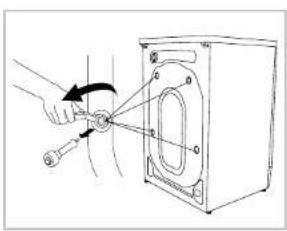
Removing the transport bolts
- The transport bolts must be removed from the backside of the device before using it.
- The transport bolts will be necessary again when moving the product, so make sure they are kept in a safe place.
In order to remove the bolts:
Fig. 6
- Loosen 4 bolts with a spanner and then remove them.
- Stop the holes with transport hole plugs.
- Keep the transport bolts properly for future use.
Levelling the washing machine
Warning
The lock nuts on all four feet must be screwed tightly against the housing.
- Check if the legs are closely attached to the cabinet. If not, please turn them to their original position and tighten the nuts.
- Loosen the lock nut to turn the feet until it closely contacts with the floor.
- Adjust the legs and lock them with a spanner. Make sure the machine is steady.
Fig. 7.
Water supply hose connection
Warning
Do not kink, crush, modify or sever the water inlet hose.
ENGLISHENGLISH
For the models equipped with hot valve, connect it to a hot water tap with the hot water supply hose. Energy consumption will decrease automatically for some programs.
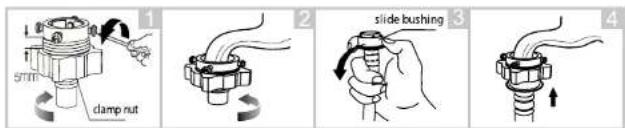
Connect the inlet hose following one of the below methods:
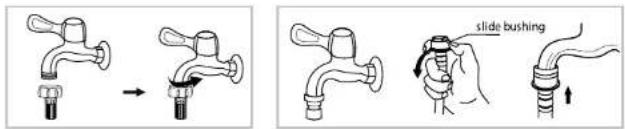
Connection between ordinary tap and inlet hose.
Fig. 8.
- Loosen the clamp nut and four bolts.
- Tighten the clamp nut.
- Press slide bushing and insert inlet hose into connecting base.
- Connection finished.
Connection between screw tap and inlet hose.
Fig. 9.
Tap with threads and inlet hose.
Special tap for washing machine.
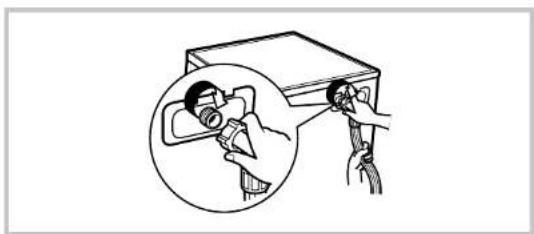
Connect the other end of inlet hose to the inlet valve at the backside of product and fasten the pipe tightly clockwise. Fig. 10.
Drain hose
Note
do not kink or protract the drain hose.
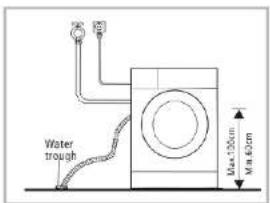
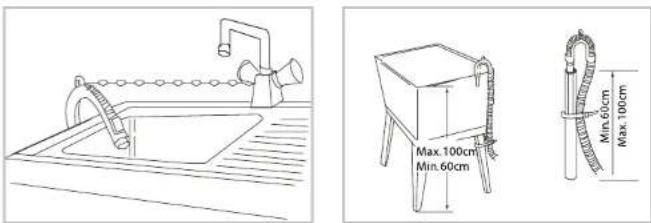
- Position the drain hose properly, at 60–90 cm from the floor.
There are two ways to place the end of the drain hose:
- In a drainpipe. It is recommended to use a vertical tube
- In a sink's drainpipe, over the trap.
Fig. 11.
If the machine has drain hose support, it can also be installed on a sink or a tank, like the following. Fig.12.
Warning
When installing drain hose, fix it properly with a rope. If drain hose is too long, do not force it into washing machine as it will cause abnormal noises.
4. OPERATION
Note
- Please make sure the appliance is properly installed before operating it.
- Before washing the clothes for the first time, the product shall be operated in one round of the whole procedures without the clothes inside.
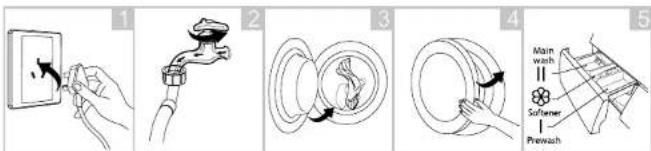
QuickStart
Before washing
- Plug the device into a power supply.
- Open the tap.
- Load.
- Close the door.
- Add detergent.
Fig. 13.
Note
Detergent must be added in "case I" only after selecting pre-washing for machines with this function.
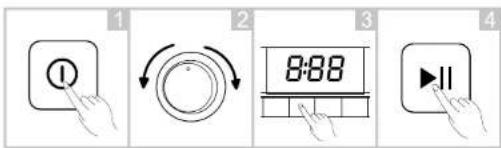
Washing
- Turn the device on.
- Turn the knob to select the desired programme.
- Select function or use the default one.
- Press Start
Fig. 14.
Note
If any of the default options is selected, step 3 can be skipped.
After washing
The appliance will beep, or the display will show "End".
Using the washing machine
Before each washing
- The washing machine should be operated within a temperature range of 0–40 °C. If used under 0°C, the inlet valve and draining system may be damaged. If the machine is placed or operated in rooms at 0 °C or below, it should be transferred to normal ambient temperature to ensure the water supply hose and drain hose are not frozen before use.
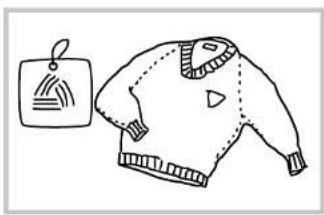
- Check the labels and the product instructions when using detergent before washing. Use non-foaming or less-foaming detergent suitable for machine washing.
– Check the label. Fig. 15.
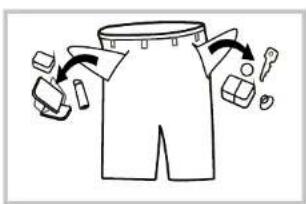
– Empty the pockets of the clothes to be washed. Fig. 16
ENGLISHENGLISH
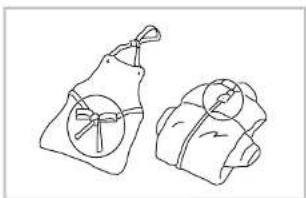
- Knot the long strips, close zips or tighten button. Fig. 17.
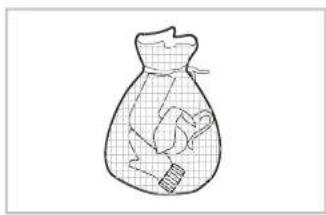
- Put small clothes inside a pillow slip. Fig. 1B.
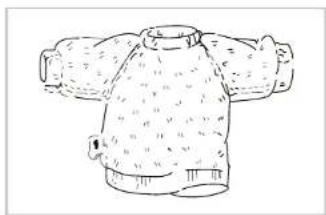
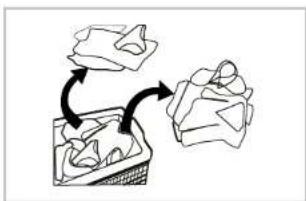
– Turn easy-pilling and long-pile fabrics inside out. Fig. 19. - Separate clothes with different textures. Fig. 20.
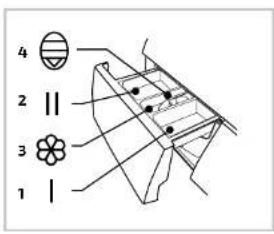
Detergent tank
Fig. 21.
1. Pres-wash detergent
2. Main wash detergent
3. Softener
4. Pull out the dispenser to open it.
| Programm Programm | I | II | O | I | II | O | |||
| Cotton | O | ● | O | Spin only | |||
| 60 °C Wash Wool | ● | O | ● | O | |||
| Intensive | ● | O | Delicate | ● | O | ||
| Express 15' | ● | O | Wet & Dry | O | ● | O | |
| Rapid 45' | ● | O | Synthetics | O | ● | O | |
| CCO 40-60' | ● | O | Sport | O | ● | O | |
| Rinse & Spin | O | 20 °C | ● | O | |||
| Sterilization | ● | O |
Means must
Means Optional


Note
- When using agglomerated, ropy detergent or additives, before they are poured into the detergent box, it is suggested to use some water for dilution to prevent the inlet of detergent box from being blocked and overflowing while filling water.
- Use a suitable type of detergent for the various washing temperatures to get the best washing performance with less water and energy consumption.
Detergent must only be added in compartment I after selecting pre-wash function.
| Recommended detergent | Wash cycles Washing temp. Type of laundry and textile | |
| Heavy-duty detergent with bleaching agents and optical brighteners | Cotton, ECO 40-60, Mix, Intensive | 40 / 60 / 90 White laundry made from boil-proof cotton or linen |
| Colour detergent without bleaching agent and optical brighteners | Cotton, ECO 40-60, Mix, Intensive, 20 °C | 20 / 30 / 40 Coloured laundry made from cotton or linen |
| Colour or mild detergent without optical brighteners | 20 °C, Synthetic 20 / 30 / 40 Coloured laundry made from easy care fibres or synthetic materials | |
| Mild washing detergent | Delicate 20 / 30 Delicate textiles, silk, viscose | |
| Special wool detergent | Wool 20 / 30 / 40 Wool | |
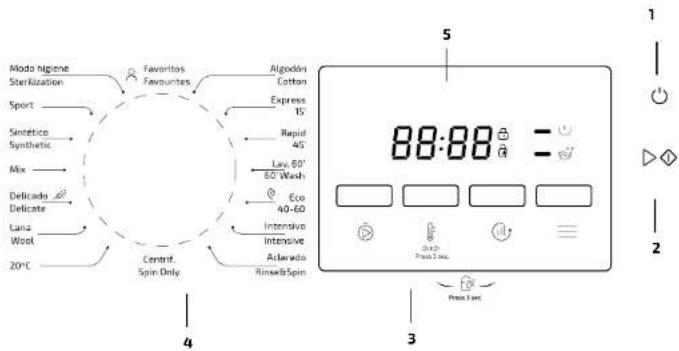
Control panel
Fig. 22.
On/off (1)
Press the On/off button to turn the device on and off.
Start/pause (2)
Press the button to start or pause the washing cycle.
Option (3)
Select an additional function, the light indicator will light when selected.
Programmes (4)
Different types of programmes for different types of laundry.
ENGLISHENGLISH
Display (5)
The display shows the settings, estimated time remaining, options, and status messages of the washing machine. The display will remain on through the cycle.
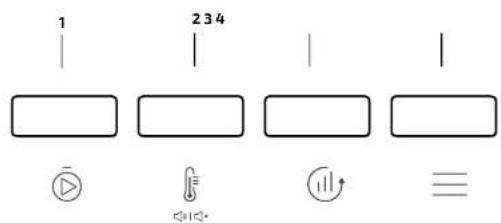
Fig. 23.
Fig. 23.1
Selectable options
Delay start (1)
To set the Delay start function:
- Select a programme.
- Press the Delay button to choose the time (the delaying time is 0-24 H.).
- Press Start/Pause to activate the delay operation.
To cancel the Delay start function:
- Press the Delay button until the display be shows OH. It should be pressed before starting the programme.
- If the programme has already started, switch off programme to reset a new one.
Temperature (2)
Press this button to select the desired temperature (Cold, 20 °C, 30 °C, 40 °C, 60 °C, 90 °C).
Speed (3)
Press this button to select the desired speed. 0-400-800-1200-1400.
Function (4)
Use this button to select the desired option: Pre-wash, Extra-rinse, Extra-wash, Night wash or Anti-crease.
Child lock
- Hold down buttons (2) and (3) for 3 seconds, the device will beep indicating the Child lock function is activated. This function is designed to prevent children from misusing the appliance.
- When the Child lock is activated and a programme starts, the Child lock indicator will switch on, and the CL and remaining time on the display are alternately displayed.
– Every time a button is pressed, the Child lock indicator will flash for 3 seconds. - When a programme finishes, END will be displayed for 10 seconds. Then, the Child lock light will flash for 3 seconds.
- To cancel the Child lock function, hold down both buttons for 3 seconds again.
- The "Child Lock" will lock all buttons except for the Power button and the Child Lock button.
- Deactivate the Child lock function before selecting a programme and starting washing.
Favourites
Hold down the speed button for 3 seconds when a washing programme is running in order to save it to your favourites. The default programme is cotton.
Last saved
For the convenience of the users, this programme remembers the washing programme and function used for the last time. When this programme is selected, the device will run the programme and options saved to the memory automatically.
Silence
Select this programme to mute the washing machine. Hold down button 1 for 3 seconds, this setting will remain active until it is restarted. To activate the sound again, hold down the same button for 3 seconds.
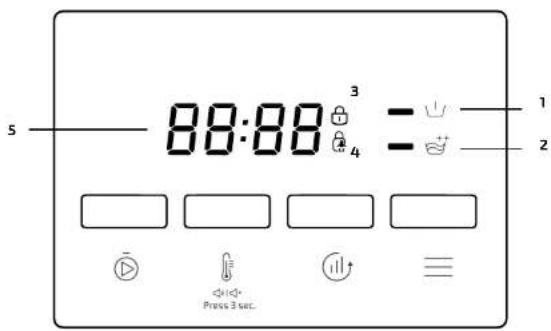
Display settings
Fig. 24
These options will light up when selected for a washing cycle.
Pre-wash (1)
The Pre-wash function is used to perform an extra-wash before the main wash cycle. It is suitable for washing the dust on the surface of the clothes.
Extra rinse (2)
The laundry will undergo extra rinse once after you select it.
Door lock (3)
Child lock system activated (4)
Time and speed (5)
| Cycle Default | temperature (°C) | Default spin speed in rpm | Additional functions |
| Wash cycles | |||
| Cotton 40 1000 | |||
| Express 15' Cold B | 00 | ||
| Rapid 45' 20 800 | |||
| 50' Wash 30 1000 | |||
| ECO 40-50 -- 1400 | |||
ENGLISHENGLISH
| Intensive 40 800 | |||
| Rinse & spin -- 1000 | |||
| Spin -- 1000 | |||
| 20 °C 20 1000 | |||
| Wool 40 600 | |||
| Delicate 30 800 | |||
| Wet & Dry 40 1000 | |||
| Synthetics 40 800 | |||
| Sport 20 800 | |||
| Sterilization mode | 70 800 |
Note
- The table shows the cycles' options and how they can be adjusted.
- It also shows if some settings are not compatible with some cycles.
Washing programmes
There are different programmes suitable for different types of laundry:
| Bolero DressCode 7200 / Steel | ||||||
| Cycle | Normel capacity in kg | Cycle duration in hours and minutes | Energy consumption in kWh per operating cycle | Water consumption in litres per operating cycle | Highest temperature °C | Residual moisture in % per spot speed |
| Cotton (60°C) | 7.0 | 2.45 | 1.585 | 63 | 60 | 95%/800 |
| Wet & Dry | 7.0 | 1.20 | 0.7 | 60 | 40 | 70%/1000 |
| 20°C | 3.5 | 1.01 | 0.2 | 35 | 20 | 85%/1000 |
| Intensive | 7.0 | 5.45 | 1.000 | 63 | 40 | 70%/800 |
| Express TS | 2.0 | 0.15 | 0.05 | 39 | 100 | 75%/800 |
| FLO 40-50 | 7.0 | 5.28 | 1.074 | 35.5 | 30 | 53%/1400 |
| 3.5 | 2.42 | 0.700 | 42 | 15 | 53%/1400 | |
| 2.0 | 2.42 | 0.450 | 34.6 | 24 | 35%/1400 | |
| Bolero DressCode 8200 / Steel | ||||||
| Cycle | Normal capacity in kg | Cycle duration in hours and minutes | Energy consumption in kWh per operating cycle | Water consumption in liters per operating cycle | Highest temperature °C | Residual moisture in % oil spin speed |
| Cotton (60°C) | 8.0 | 2/15 | 7/191 | 70 | 60 | 35%/800 |
| Wet & Dry | 8.0 | 1.20 | 0.8 | 65 | 40 | 70%/900 |
| 20°C | 4.0 | 1.01 | 0.22 | 57 | 20 | 65%/1000 |
| Intensive | 8.0 | 3/18 | 1.15 | 70 | 40 | 70%/900 |
| Express 15 | 2.0 | 0.15 | 0.05 | 40 | Cold | 75%/800 |
| ECO 40-60 | 8.0 | 3/15 | 1,209 | 50 | 38 | 35%/1400 |
| 4.0/2.45 | 0.735 | 48 | 33-53%/1400 | |||
| 2.0 | 2/15 | 0.785 | 35 | 21 | 53%/7100 | |
| Programme | Load (kg) | Display time | |
| 7.0 | 8.0 | 7.0/8.0 | |
| Cotton | 7.0 | 8.0 | 2:40 |
| Express 15' | 2.0 | 2.0 | 0:15 |
| Rapid 45' | 2.0 | 2.0 | 0:45 |
| 60' Wash | 3.5 | 4.0 | 1:00 |
| ECO 40-60 | 7.0 | 8.0 | 3.28/3.38 |
| Intensive | 7.0 | 8.0 | 3:48 |
| Rinse & spin | 7.0 | 8.0 | 0:20 |
| Sterilization mode | 3.5 | 4.0 | 2:27 |
| Sport | 3.5 | 4.0 | 0:45 |
| Synthetics | 3.5 | 4.0 | 2:20 |
| Wet & Dry | 7.0 | 8.0 | 1:20 |
| Delicate | 2.0 | 2.0 | 0:50 |
| Wool | 2.0 | 2.0 | 1:07 |
ENGLISHENGLISH
| 20°C 3.5 4.0 1:01 | |||
| Spin 7.0 8.0 0:12 |
Programmes are available according to the laundry type.
| Programmes | |
| Cotton Hard-wearing | textiles, heat-resistant textiles made of cotton or linen. |
| Synthetics Wash synthetic articles, for example shirts, coats, mix. While washing the knitting textiles, detergent quantity shall be reduced due to its loose string construction and easily-forming bubbles. | |
| Wet & Dry Mixed load | consisting of textiles made of cotton and synthetics. |
| 20 °C 20 °C default. | can choose cold water. |
| Express 15' Extra-short programme, suitable for lightly soiled washing or for small amounts of laundry. | |
| Rapid 45' This programme is suitable for washing not very dirty clothes, saves more energy and water. | |
| 60' Wash This programme is suitable for daily wash, for daily laundry, to achieve a good washing performance in about 60 min. | |
| ECO 40-60 | Default 40 °C, not selectable, suitable for laundry washing at about 40 °C-60 °C. |
| Wool | Hand or machine washable wool or rich-wool textiles. Gentle washing programme to prevent shrinkage, longer programme pauses (textiles rest in wash liquor). |
| Spin Extra spin with | selectable spin speed. |
| Intensive To increase the washing effects, washing time is increased. | |
| Sterilization mode | Keeps the washing temperature above 60 °C for more than 30 minutes to effectively remove harmful bacteria. |
| Delicate | For delicate, washable textiles, e.g. silk, satin, synthetic fibres or blended fabrics. |
| Sport | This programme is suitable for washing the sportswear. |
| Rinse & spin | Extra-rinse with spin. |
Warnings
- After a programme is completed, wait for two minutes before opening the door.
- Check whether the water inside the drum has been drained before opening its door. Do not
- Open the door if there is any water visible.
- Never stop the device before the end of the drying cycle unless all items are quickly
removed and spread out so that the heat is dissipated.
- Do not wash only one piece of clothes or garment, as these could cause great unbalance. Always introduce at least 3 or 4 clothes so that draining can be done smoothly.
5. CLEANING AND MAINTENANCE
Warning
- Before cleaning or maintaining, unplug the appliance and close the tap.
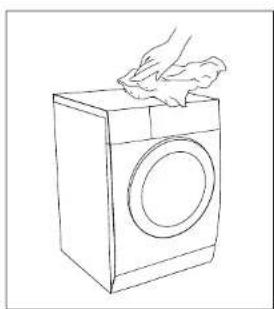
- Proper maintenance on the washing machine can extend its working life. The surface can be cleaned with diluted non-abrasive neutral detergents when necessary. If there is any water overflow, use a cloth to wipe it off immediately.
Fig. 25 - Do not use abrasive cleaners or scouring pads to clean the product.
Cleaning the drum
- The rusts left inside the drum by the metal articles shall be removed immediately with chlorine-free detergents.
- Do not use steel wool.
Note
Do not put laundry in the washing machine during the drum cleaning.
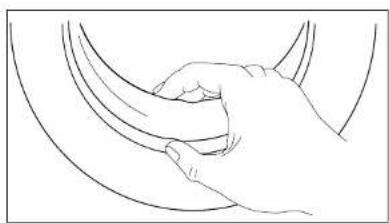
Cleaning the door seals and glass
- Wipe the glass and seal after each wash to remove lint and stains. If lint builds up it can cause leaks.
- Remove any coins, buttons and other objects from the seal after each wash.
Fig. 26.
Cleaning the inlet filter
Note
The inlet filter must be cleaned when there is little water.
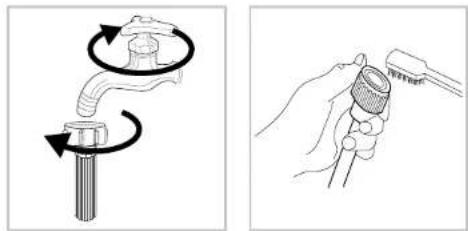
Washing the filter in the tap
Fig. 27
- Close the tap.
- Remove the water supply hose from the tap.
- Clean the filter edge.
- Reconnect the water supply hose.
ENGLISHENGLISH
Washing the filter in the washing machine
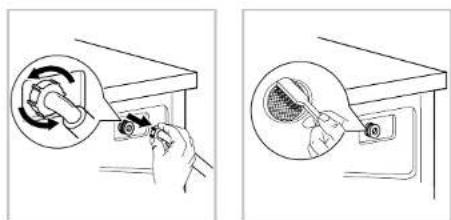
Fig. 2B.
- Screw off the inlet hose from the backside of the machine.
- Pull out the filter with long nose pliers and reinstall it back after being washed.
- Use the brush to clean the filter.
- Recconnect the inlet hose.
Note
If the brush is not clean, pull out the filter and wash it separately. Then, reconnect it and turn on the tap.
Cleaning the detergent dispenser
- Press down the arrow on the softener cover inside the dispenser drawer.
- Lift the clip up and take out the softener cover and wash all grooves with water.
- Replace the softener cover and push the drawer into position.
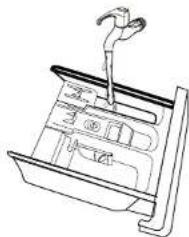
- Pull out the dispenser drawer by pressing the A. Fig. 29.
- Clean the dispenser drawer under running water. Fig. 30.
- Clean inside the recess with an old toothbrush. Fig 31.
- Insert the dispenser drawer. Fig. 32.
Warning
Do not use alcohol, solvents or chemical products to clean the washing machine.
Cleaning the drain pump filter
Warning
- Be careful with the hot water!
- Allow detergent solution to cool down.
– Unplug the machine to avoid electrical shock before washing. -
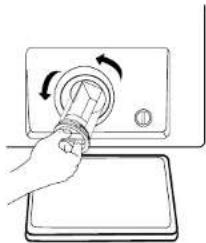
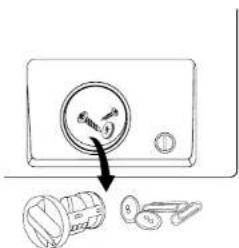
The drain pump filter can filter the yarns and small foreign matters from the washing.
– Clean the filter periodically to ensure proper operation of the washing machine. -
Open the lower cover cap. Fig. 33.
-
Rotate 90 °C and pull out the emergency drain hose and take off the hose cap. Fig. 34.
-
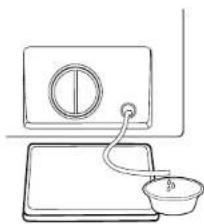
When it is fully emptied, reset the drain hose. Fig. 35.
-
Open the filter by turning it counterclockwise. Fig. 36.
-
Remove dust, dirt and other substances or objects. Fig. 37.
-
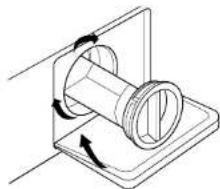
Close the lower cover cap. Fig. 38.
Warning
- Make sure that the valve cap and emergency drain hose are reinstalled properly, cap plates should be inserted aligned to the hole plates.
*Some machines don have emergency drain hose, so step 2 and step 3 can be skipped.
- Rotate the lower cover cap directly for water to run into the basin.
- When the appliance is in use and depending on the programme selected there can be hot water in the pump. Never remove the pump cover during a wash cycle, always wait until the appliance has finished the cycle and is empty.
-
When replacing the cover, ensure it is securely re-tightened.
-
TROUBLESHOOTING
| Problem Cause Solution | ||
| The washing machine does not start up | The door is not closed properly | Restart after the door is closed.Check if there are clothes stuck. |
| The door does not open The safety lock system is activated | Unplug it and restart the product. | |
| Water leakage Bad connection between pipes and water supply hose or drainpipe. | Check and fasten water pipes and hose.Clean up outlet hose. | |
| Detergent residues in the box | Detergent is dampened or agglomerated | Clean and wipe the detergent box |
| Indicator or display does not light | The power PC board is disconnected, or harness has connection problem | Check if the power is shut down and the power plug is connected correctly. |
| Abnormal noise Check if the fixing bolts have | been removed.Make sure the appliance is installed on a solid, level floor. | |
Errors
| Error Cause Solution | ||
| E30 Door is not closed properly | Restart after the door is | closed.Check if there are clothes stuck. |
ENGLISHENGLISH
| E10 Water injecting problem | while washing | Check if the water pressure is too low.Straighten the water pipe.Check if the inlet valve filter is blocked. |
| E21 Overtime water draining | check if the drainpipe is | blocked. |
| E12 Water overflow Restart the appliance. | ||
| EXX Others Contact the official Technical | Support Service of Cecotec. |
7. TECHNICAL SPECIFICATIONS
Product: Bolero DressCode 7200
Product reference: 02316
Washing capacity: 7 kg
Dimension (W*D*H) cm: 59.5*49.5*85
Net weight: 61 kg
Rated power: 2050 W
220-2/10 V\~50 Hz. 10 A
Standard water pressure: 0.05 MPa-1 MPa
IPX4
Made in China | Designed in Spain
Product: Bolero DressCode 7200 Steel
Product reference: 02318
Washing capacity: 7 kg
Dimension (W*D*H) cm: 59.5*49.5*85
Net weight: 61 kg
Rated power: 2050 W
220-240 V-, 50 Hz, 10 A
Standard water pressure: 0.05 MPa-1 MPa
IPX4
Made in China | Designed in Spain
Product: Bolero DressCode 8200
Product reference: 02321
Washing capacity: 8 kg
Dimension (W*D*H) cm: 59.5*56.5*85
Net weight:
Rated power: 2000 W
220-240V\~50Hz,10A
Standard water pressure: 0.05 MPa-1 MPa
IPX4
Made in China | Designed In Spain
Product: Bolero DressCode B200 Steel
Product reference: 02323
Washing capacity: B kg
Dimension (W*D*H) cm: 59.5*56.5*85
Net weight:
Rated power: 2000 W
220-240 V-, 50 Hz, 10 A
Standard water pressure: 0.05 MPa-1 MPa
IPX4
Made in China | Designed In Spain
8. DISPOSAL OF OLD ELECTRICAL APPLIANCES

The European directive 2012/19/EU on Waste Electrical and Electronic Equipment (WEEE), specifies that old household electrical appliances must not be disposed of with the normal unsorted municipal waste.
Old appliances must be collected separately, in order to optimise the recovery and recycling of the materials they contain and reduce the impact on human health and the environment.
The crossed out "wheeled bin" symbol on the product reminds you of your
obligation to dispose of the appliance correctly.
If the product has a built-in battery or uses batteries, they should be removed from the appliance and disposed of appropriately.
Consumers must contact their local authorities or retailer for information concerning the correct disposal of old appliances and/or their batteries.
9. TECHNICAL SUPPORT AND WARRANTY
This product is under warranty for 2 years from the date of purchase, as long as the proof of purchase is submitted, the product is in perfect physical condition, and it has been given proper use, as explained in this instruction manual.
The warranty will not cover the following situations:
ENGLISHENGLISH
- The product has been used for purposes other than those intended for it, misused, beaten, exposed to moisture, immersed in liquid or corrosive substances, as well as any other fault attributable to the customer.
- The product has been disassembled, modified, or repaired by persons, not authorised by the official. Technical Support Service of Cecotec.
-
Faults deriving from the normal wear and tear of its parts, due to use. The warranty service covers every manufacturing defects of your appliance for 2 years, based on current legislation, except consumable parts. In the event of misuse, the warranty will not apply. If at any moment you detect any problem with your product or have any doubt, do not hesitate to contact Cecotec Technical Support Service at +34 963 210 728.
-
TECHNICAL SHEETS
| Brand Cecotec | |
| Name of the model Bolero DressCode | 7200 (02316) / Bolero DressCode 7200 Steel (02318) |
| Capacity 7 | |
| Energy efficiency class on scale from A+++ (most efficient) to D (least efficient) | A+++ |
| Energy consumption 174 kWh per year, based on 220 standard washing cycles for normal cotton programmes at 60 °C and 40 °C at full and partial load, and the consumption of the "off" and "left-on" modes. Actual energy consumption will depend on how the appliance is used | |
| Energy consumption of the intensive 60 °C programme at full load Q | 91 kWh |
| Energy consumption of the intensive 60 °C programme at partial load | 0.69 kWh |
| Energy consumption of the intensive 40 °C programme at partial load | 0.61 kWh |
| Weighted power consumption of the off-mode 0.50 W | |
| Weighted power consumption of the left-on mode 1.00 W | |
| Water consumption 9900 Litres per year, based on 220 standard washing cycle for intensive programmes at 60 °C and 40 °C at full and partial load. Actual water consumption will depend on how the appliance is used. | |
| Spin-drying efficiency class B on a scale from G (least efficient) to A (most efficient) | |
| Maximum spin speed 1400 rpm | |
| Remaining moisture content 53% | |
| Intensive 60 °C programme and the intensive 40 °C programme are the standard washing programmes to which the information in the label and the fiche relates. These programmes are suitable to clean normally soiled cotton laundry and that they are the most efficient programmes in terms of combined energy and water consumption. | |
| Programme time of intensive 60 °C programme at full load 240 min | |
| Programme time of intensive 60 °C programme at half load 230 min | |
| Programme time of intensive 40 °C programme at half load | 230 min |
| Duration time of let-on mode | -1 min |
| Airbone acoustical noise emissions during washing phase | 62 dB |
| Airborne acoustical noise emissions during spinning phase | 79 dB |
| Built-in washing machine | No |
Energy test programme: Cotton; Speed: the highest speed; Other as the default.
| Parameter | Value | Parameter | Value | ||
| Rated capacity (kg) | 8.0 | Dimensions in cmWidthDepth | Height | 85 | |
| Width | 60 | ||||
| Depth | 50 | ||||
| EEIW | 91.0 | Energy Efficiency Class | E | ||
| Washing efficiency index | 1.04 | Rinsing effectiveness (g/kg) | 5.0 | ||
| Energy consumption in kWh per cycle, based on the Eco 40-60 programme. Actual energy consumption will depend on how the appliance is used | 0.784 | Water consumption in litre per cycle, based on the Eco 40-60 programme. Actual water consumption will depend on how the appliance is used and on the hardness of the water | 45 | ||
| Maximum temperature inside the treated textile (°C) | Capacity | 39 | Remaining moisture content (%) | Capacity | 53 |
| Half | 35 | Half | 53 | ||
| Quarter | 24 | Quarter | 53 | ||
ENGLISHENGLISH
| Spin speed (rpm) | Capacity 1400 | Spin-dying efficiency class | BHalf 1400 | |
| Quarter 1400 | ||||
| Programme duration (hmin) | Capacity 328 | Type Free-standingHalf 2:42 | ||
| Quarter 2:42 | ||||
| Airbone acoustical noise emissions during spinning phase (B) | 80 | Airbone acoustical noise emission class (spinning phase) | C | |
| Off-mode (W) 0.50 Standby mode (W) NA | ||||
| Delay start (W) 4.00 | Networked standby (W) | NA | ||
| Minimum duration of the guarantee offered by the supplier: 2 years | ||||
| Further information: | ||||
| Brand Cecotec | |
| Name of the model Bolero DressCode | B200 (02321) /Bolero DressCode 8200 Steel (02323) |
| Capacity B | |
| Energy efficiency class on scale from A+++ (most efficient) to D (least efficient) | A+++ |
| Energy consumption 196 kWh per year, based on 220 standard washing cycles for normal cotton programmes at 60 °C and 40 °C at full and partial load, and the consumption of the "off" and "left-on" modes. Actual energy consumption will depend on how the appliance is used. | |
| Energy consumption of the intensive 60 °C programme at full load | 0.90 kWh |
| Energy consumption of the intensive 60 °C programme at partial load | 0.88 kWh |
| Energy consumption of the intensive 40 °C programme at partial load | 0.79 kWh |
| Weighted power consumption of the off-mode | 0.50 W |
| Weighted power consumption of the left-on mode | 1.00 W |
| Water consumption 11000 litres per year, based on 220 standard washing cycle for intensive programmes at 60 °C and 40 °C at full and partial load. Actual water consumption will depend on how the appliance is used. | |
| Spin drying efficiency class B on a scale from G (least efficient) to A (most efficient) | |
| Maximum spin speed | 1400 rpm |
| Remaining moisture content | 53 % |
| Intensive 60 °C programme and the intensive 40 °C programme are the standard washing programmes to which the information in the label and the fiche relates. These programmes are suitable to clean normally soiled cotton laundry and that they are the most efficient programmes in terms of combined energy and water consumption. | |
| Programme time of intensive 60 °C programme at full load | 245 min |
| Programme time of intensive 60 °C programme at half load | 240 min |
| Programme time of intensive 40 °C programme at half load | 230 min |
| Duration time of let-on mode | -1 min |
| Airbone acoustical noise emissions during washing phase | 62 dB |
| Airbone acoustical noise emissions during spinning phase | 79 dB |
| Built-in washing machine | No |
Energy test programme: Cotton; Speed: the highest speed; Other as the default.
| Parameter | Value | Parameter | Value | |
| Rated capacity (kg) | 8.0 | Dimensions in cmWidthDepth | Height | 85 |
| Width | 60 | |||
| Depth | 57 | |||
| EEIW | 90.6 | Energy Efficiency Class | E | |
| Washing efficiency index | 1.04 | Rinsing effectiveness (g/kg) | 5.0 | |
| Energy consumption in kWh per cycle, based on the Eco 40-60 programme. Actual energy consumption will depend on how the appliance is used | 0.824 | Water consumption in litre per cycle, based on the Eco 40-60 programme. Actual water consumption will depend on how the appliance is used and on the hardness of the water | 48 | |
| Maximum temperature inside the treated textile (°C) | Capacity 3/8 | Remaining moisture content (%) 5/3 | Capacity 5/3 | ||
| Half 33 Half 5/3 | |||||
| Quarter 25 | Quarter | ||||
| Spin speed (rpm) | Capacity 1/100 | Spin-dying efficiency class | BHalf 1/100 | ||
| Quarter 14/10 | |||||
| Programme duration (h/min) | Capacity 3/68 | Type Free-standingHalf | 2/18 | ||
| Quarter 3/48 | |||||
| Airbone acoustical noise emissions during spinning phase (B) | 80 | Airbone acoustical noise emission class (spinning phase) | C | ||
| Off-mode (W) 0.50 Standby mode (W) | NA | ||||
| Delay start (W) /1.00 | Networked standby (W) | NA | |||
| Minimum duration of the guarantee offered by the supplier: 2 years | |||||
| Further information: | |||||
FRANÇAISENGLISH
1. PIÈCES ET COMPOSANTS
Img. 1.
3. INSTALLATION DU PRODUIT
Made in China | Designed in Spain
Produkt: Bolero DressCode 7200 Steel
Referencia: 02318
Made in China | Designed in Spain
Produkt: Bolero DressCode 8200
Referencia: 02321
Made in China | Designed in Spain
Produkt: Balero DressCode 8200 Steel
Referencia: 02323
Made in China | Designed in Spain
8. RECYKLING SPRZETU AGD

3. INSTALACE PRODUKTU
text_image
Technical diagram of a washing machine with numbered parts for identificationFig. / Img. / Rys. / Obr. 1
text_image
1 2 3 4 5I bolero
BOLERO DRESSCODE 720D / 720D STEEL / 820D / 820D STEEL
natural_image
Simple line drawing of a rectangular frame with a central circle and intersecting diagonal lines (no text or symbols)Fig. / Img. / Rys. / Obr. 3
text_image
W ≥ 20 mmFig. / Img. / Rys. / Obr. 4
natural_image
Illustration of a box with an arrow pointing upward, and a magnified inset showing a ship silhouette (no text or symbols)Fig. / Img. / Rys. / Obr. 5
natural_image
Diagram of a hand using a tool to adjust or install a device into a washing machine (no text or symbols present)text_image
1 2 Raise Lower 3 Lock nut footFig. / Img. / Rys. / Obr. 7
text_image
1 5mm clamp nut 2 slide bushing 3 4Fig. / Img. / Rys. / Obr.8
text_image
Diagram illustrating the step-by-step instructions for removing a faucet, showing how to slide bushing.Flg. / Img. / Rys. / Obr. 9
natural_image
Illustration of a person using a device to interact with another person, showing a magnified inset (no text or symbols)Fig. / Img. / Rys. / Obr. 10
text_image
Water trough Max 120cm Max 60cm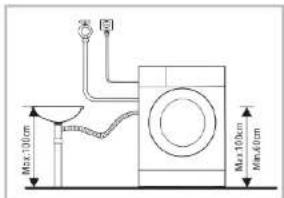
text_image
Max 100cm Min 60cm Max 100cm Min 60cmFig. / Img. / Rys. / Obr. 11
text_image
Max. 100cm Min. 60cm Max. 100cm Min. 60cmFig. / Img. / Rys. / Obr. 12
text_image
1 2 3 4 5 Main wash Softener PrewashFig. / Img. / Rys. / Obr. 13
text_image
1 2 3 4Fig. / Img. / Rys. / Obr. 14
natural_image
Simple line drawing of a sweater with a tag and tie, no text or symbols presentFig. / Img. / Rys. / Obr. 15
natural_image
Line drawing of a bag filled with a light bulb and a small object inside (no text or symbols)Fig. / Img. / Rys. / Obr. 18
text_image
Diagram illustrating a garment pattern with labeled parts and directional arrows indicating movement or processing steps.Fig. / Img. / Rys. / Obr. 16
natural_image
Line drawing of a textured, symmetrical object resembling a shirt or garment (no text or symbols)Fig. / Img. / Rys. / Obr. 19
natural_image
Line drawing of two bags with ropes and a circular design on the cover (no text or symbols)Fig. / Img. / Rys. / Obr. 17
natural_image
Simple line drawing of a bag with a bag being folded, showing the process from top to bottom (no text or symbols)Fig. / Img. / Rys. / Obr. 20
text_image
4 2 || 3 1 |Fig. / Img. / Rys. / Obr. 21
text_image
Moda nigene Sterilization Sport Sintetico Synthetic Mix Delicado Delicate Lana Wool 20°C Faveritas Favourites Algodón Cotton Express 15 Rapid 45' Law, 60' 60' Wash Eco 40-60 Intensive Intensive Aclarado Rinse&Spin 88:88 = - Press Fast 3 4 5 1 2Fig. / Img. / Rys. / Obr. 22
text_image
1 234 ■ ■ ■ ■ ■ ■ ■Fig. / Img. / Rys. / Obr. 23

text_image
LED LED Display Power Off Memory Delay Start My Cycle Express Wish Press 3 sec. to set Signal/My CycleFig. / Img. / Rys. / Obr. 23.1
text_image
5 88:88 3 - 1 2 4 Press 3 sec.Fig. / Img. / Rys. / Obr. 24
| bolero
BOLERO DRESSCODE 72DD / 72DD STEEL / 82DD / 82DD STEEL
natural_image
Line drawing of a washing machine with a cloth cleaning the top part (no text or symbols)Fig. / Img. / Rys. / Obr. 25
natural_image
Two-step diagram showing a valve being adjusted to a bolt, with no text or symbols present.Fig. / Img. / Rys. / Obr. 27
natural_image
Line drawing of a hand gripping a curved object (no text or symbols)Fig. / Img. / Rys. / Obr. 26
natural_image
Two-step diagram showing a hand inserting a component into a device, with no visible text or symbols.Fig. / Img. / Rys. / Obr. 28
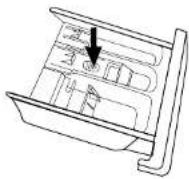
Fig. / Img. / Rys. / Obr. 29
natural_image
Technical line drawing of a mechanical assembly with no visible text or symbolsFig. / Img. / Rys. / Obr. 30
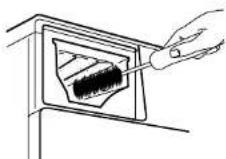
Fig. / Img. / Rys. / Obr. 31
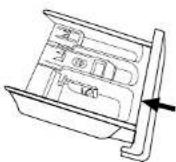
Fig. / Img. / Rys. / Obr. 32
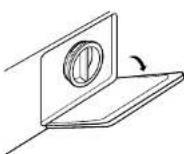
Fig. / Img. / Rys. / Obr. 33
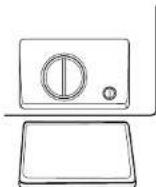
Fig. / Img. / Rys. / Obr. 34
natural_image
Line drawing of a kitchen appliance with a plate, sink, and side arm (no text or symbols)Fig. / Img. / Rys. / Obr. 35
natural_image
Hand holding a rotary knob on a device (no text or symbols visible)Fig. / Img. / Rys. / Obr. 36
text_image
Diagram showing a device control panel with a dial indicator and two separate parts labeled 8 and 9, likely illustrating a mechanical or electrical setup.Fig. / Img. / Rys. / Obr. 37
natural_image
Mechanical diagram showing a rotating component mounted on a base plate (no text or symbols)Fig. / Img. / Rys. / Obr. 38
www.cecotec.es
Quart de Poblet, Valencia (Spain)
YV_042104503