
S4_LM505DC - Lawn mower Vonroc - Free user manual and instructions
Find the device manual for free S4_LM505DC Vonroc in PDF.

User questions about S4_LM505DC Vonroc
0 question about this device. Answer the ones you know or ask your own.
Ask a new question about this device
Download the instructions for your Lawn mower in PDF format for free! Find your manual S4_LM505DC - Vonroc and take your electronic device back in hand. On this page are published all the documents necessary for the use of your device. S4_LM505DC by Vonroc.
USER MANUAL S4_LM505DC Vonroc
natural_image
White silhouette of a car with extended antenna on dark background (no text or symbols)EN Original Instructions
natural_image
Close-up of mechanical components with a vertical rod inserted, no visible text or symbols34b 34c 34a
natural_image
Close-up of mechanical components with a tool inserted, no visible text or symbols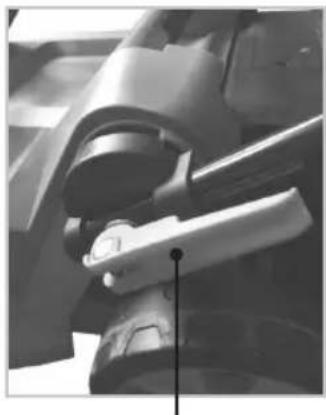
natural_image
Close-up of a mechanical component with no visible text or symbols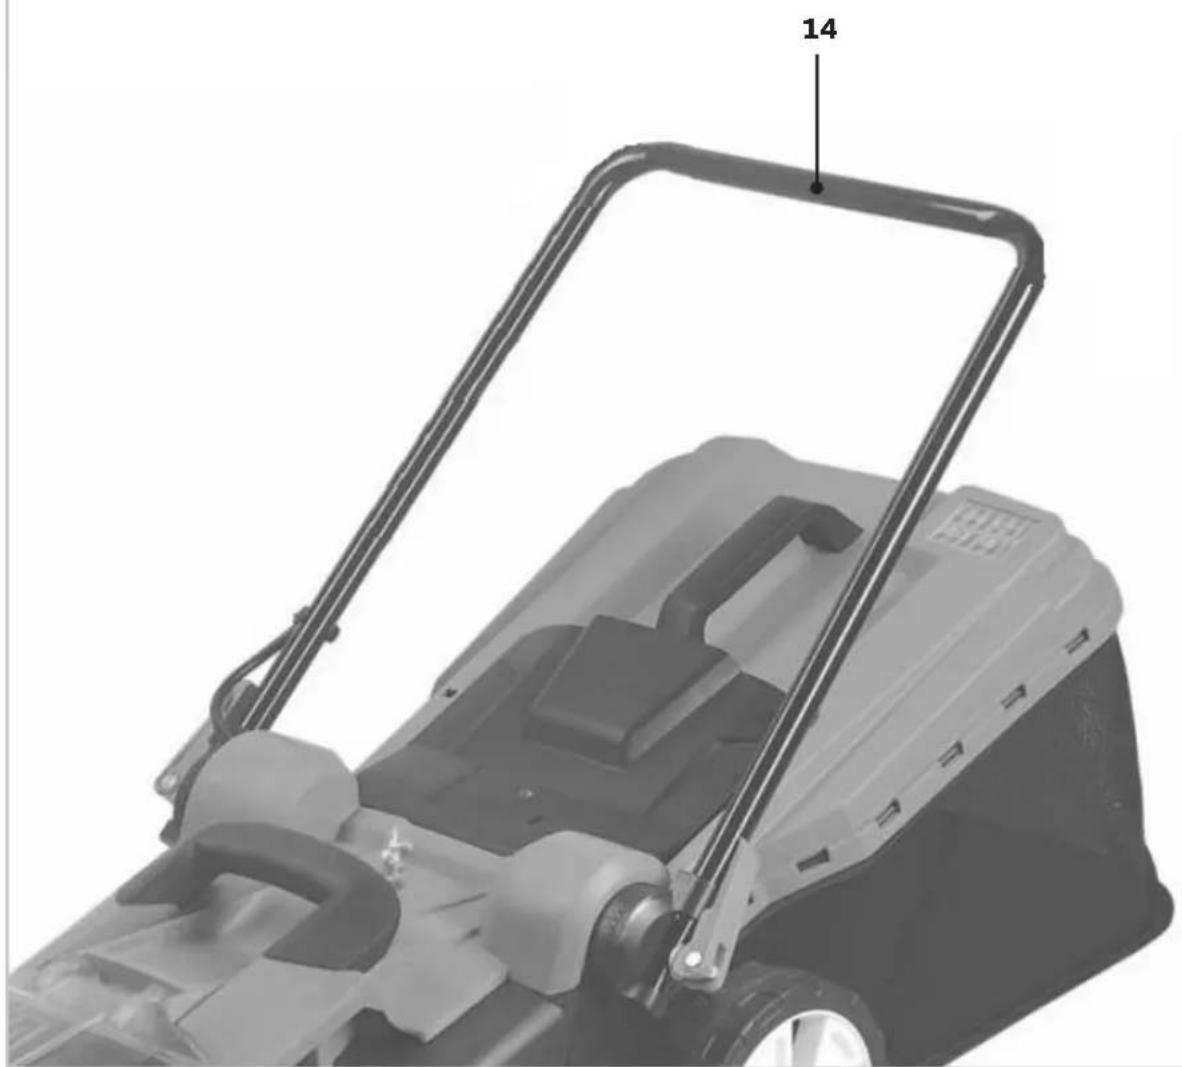
natural_image
Close-up of a lawn mower with handle and frame (no visible text or symbols)C
natural_image
Technical diagram of a mechanical assembly with an inset showing a component labeled '6' (no text or symbols present)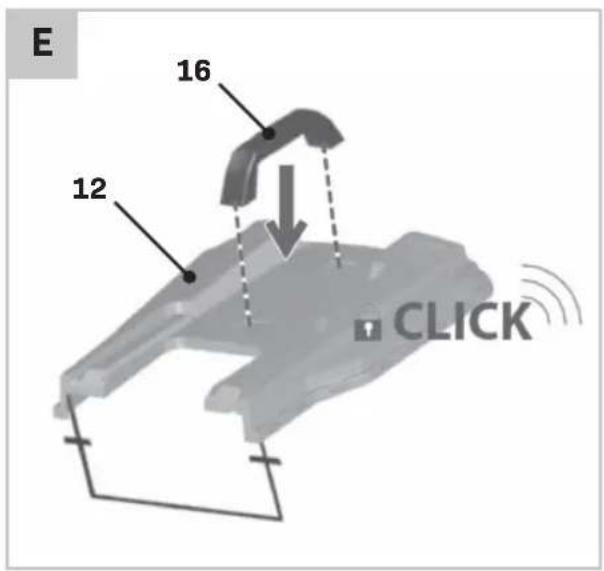
natural_image
Illustration of a lawn mower with a magnified inset showing a cutaway view (no text or symbols)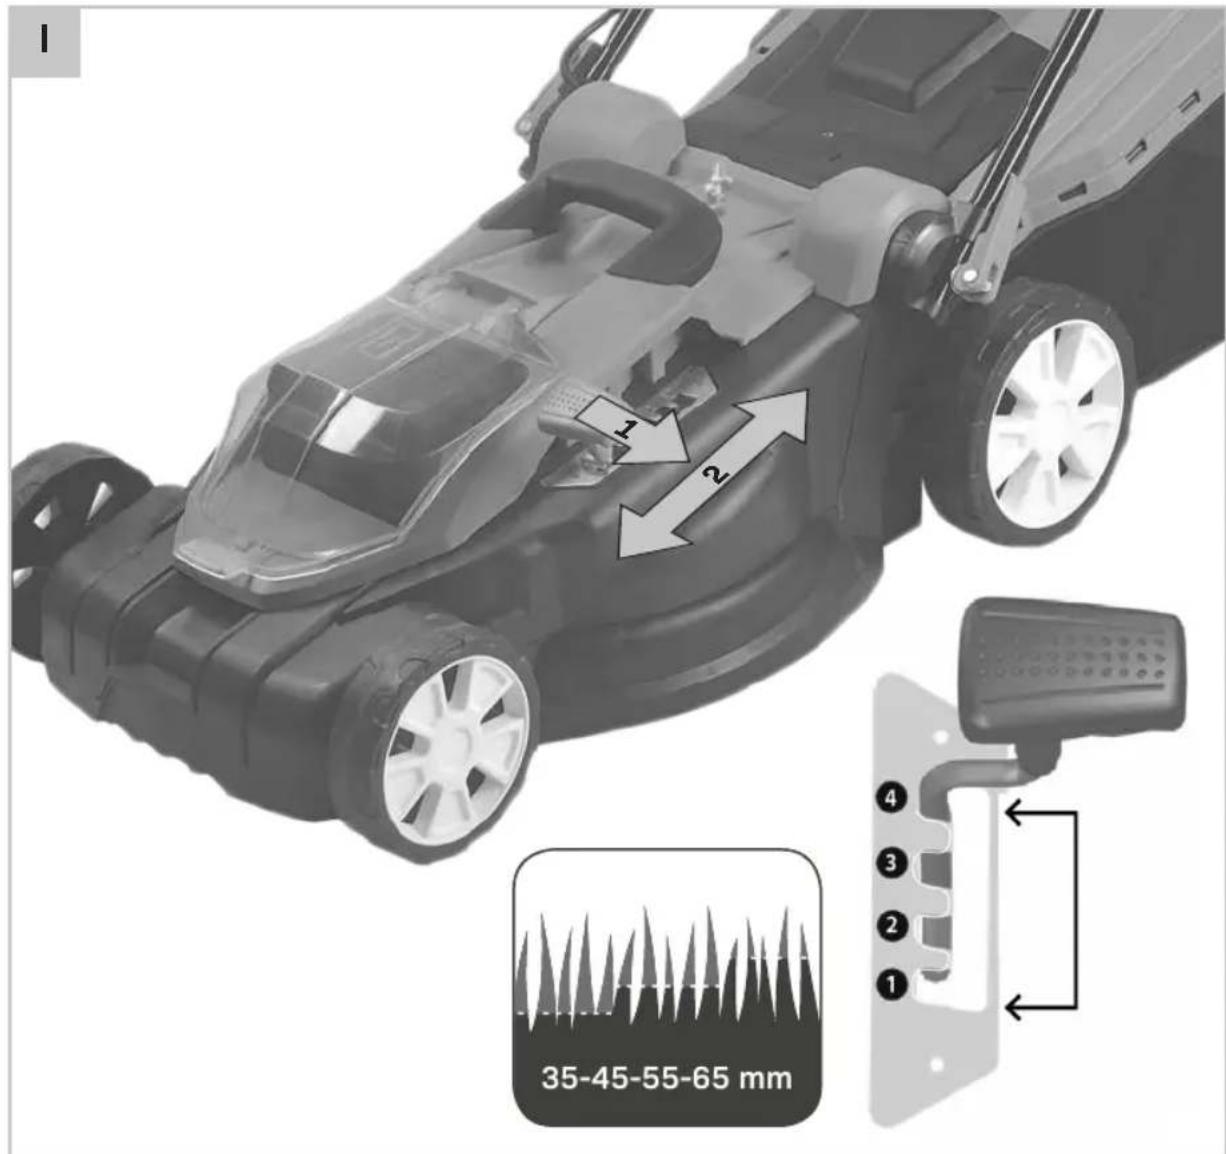
flowchart
graph TD
    A["Top Left Road"] --> B["Top Right Road"]
    B --> C["Bottom Left Road"]
    C --> D["Bottom Right Road"]
    D --> E["Bottom Left Road"]
    style A fill:#f9f,stroke:#333
    style B fill:#f9f,stroke:#333
    style C fill:#ccf,stroke:#333
    style D fill:#ccf,stroke:#333
    style E fill:#cfc,stroke:#333
1. SAFETY INSTRUCTIONS

Read the enclosed safety warnings, the additional safety warnings and the instructions. Failure to follow the safety warnings and the instructions may result in electric shock, fire and/or serious injury. Save the safety warnings and the instructions for future reference.
The following symbols are used in the user manual or on the product:

Read the instructions!

Risk of personal injury.

Risk of electric shock.

Wear hearing protection.

Wear eye protection.

Caution: Do not touch rotating blades. Sharp blade(s). Beware of severing toes or fingers. Keep bystanders, especially children and pets, at a distance greater than 10m.

The lawn mower shall not be operated without either the entire grass catcher or the guard in place.

Do not use in the rain or leave the mower outdoors while it is raining.

Switch off and remove safety key (isolator switch) before adjusting, cleaning and before leaving the product unattended for any period of time.

Use only batteries which are charged to the same level. Never combine full and half-full batteries. Always charge the two batteries simultaneously. The equipment's operating time depends on the battery with the lower charge level. The two batteries must always be fully charged before use. Close the battery cover before use.

This machine is designed and developed specifically to be used with CD803AA 4.0Ah only. It is not allowed to use this machine with CD801AA 2.0Ah battery or any other battery type, as it may permanently damage the battery and/or the machine. Warranty is voided for both battery as the machine, when the wrong battery type is used.

Wait until all machine components have completely stopped before touching them. The blades continue to rotate after the machine is switched off, a rotating blade can cause injury.

sure that bystanders are not injured by foreign objects being thrown away.

Warning: Keep a safe distance to the product when operating.

refully check the area where the tool is to be used for wildlife and pets. Wildlife and pets may be injured while the machine is in operation. Thoroughly check the working area and remove any stones, sticks, wires, bones and foreign objects. When sing the machine, ensure that no wildlife, pets or small tree stumps are hidden in the dense grass.

Only use the battery charger indoors.

Conforms to all relevant European Directives.

Do not dispose of the product in unsuitable containers.

The guaranteed sound power level LWA = 96 dB(A)
GENERAL POWER TOOL SAFETY WARNINGS

WARNING! Read all safety warnings and all instructions. Failure to follow the warnings and instructions may result in electric shock, fire and/or serious injury.
Save all warnings and instructions for future reference.
The term “power tool” in the warnings refers to your mains-operated (corded) power tool or battery-operated (cordless) power tool.
1) Work area safety
a) Keep the work area clean and well lit. Cluttered or dark areas invite accidents.
b) Do not operate power tools in explosive atmospheres, such as in the presence of flammable liquids, gases or dust. Power tools create sparks which may ignite the dust or fumes.
c) Keep children and bystanders away while operating a power tool. Distractions can cause you to lose control.
2) Electrical safety
a) Power tool plugs must match the outlet. Never modify the plug in any way. Do not use any adapter plugs with earthed (grounded) power tools. Unmodified plugs and matching outlets will reduce risk of electric shock.
b) Avoid body contact with earthed or grounded surfaces, such as pipes, radiators, ranges and refrigerators. There is an increased risk of electric shock if your body is earthed or grounded.
c) Do not expose power tools to rain or wet conditions. Water entering a power tool will increase the risk of electric shock.
d) Do not abuse the cord. Never use the cord for carrying, pulling or unplugging the power tool. Keep cord away from heat, oil, sharp edges or moving parts. Damaged or entangled cords increase the risk of electric shock.
e) When operating a power tool outdoors, use an extension cord suitable for outdoor use. Use of a cord suitable for outdoor use reduces the risk of electric shock.
f) If operating a power tool in a damp location is unavoidable, use a residual current device (RCD) protected supply. Use of an RCD reduces the risk of electric shock.
3) Personal safety
a) Stay alert, watch what you are doing and use common sense when operating a power tool. Do not use a power tool while you are tired or under the influence of drugs, alcohol or medication. A moment of inattention while operating power tools may result in serious personal injury.
b) Use personal protective equipment. Always wear eye protection. Protective equipment such as dust mask, non-skid safety shoes, hard hat, or hearing protection used for appropriate conditions will reduce personal injuries.
c) Prevent unintentional starting. Ensure the switch is in the off-position before connecting to power source and/or battery pack, picking up or carrying the tool. Carrying power tools with your finger on the switch or energising power tools that have the switch on invites accidents.
d) Remove any adjusting key or wrench before turning the power tool on. A wrench or a key left attached to a rotating part of the power tool may result in personal injury.
e) Do not overreach. Keep proper footing and balance at all times. This enables better control of the power tool in unexpected situations.
f) Dress properly. Do not wear loose clothing or jewellery. Keep your hair, clothing and gloves away from moving parts. Loose clothes, jewellery or long hair can be caught in moving parts.
g) If devices are provided for the connection of dust extraction and collection facilities, ensure these are connected and properly used. Use of dust collection can reduce dust related hazards.
h) Do not let familiarity gained from frequent use of tools allow you to become complacent and ignore tool safety principles. A careless action can cause severe injury within a fraction of a second.
4) Power tool use and care
a) Do not force the power tool. Use the correct power tool for your application. The correct power tool will do the job better and safer at the rate for which it was designed.
b) Do not use the power tool if the switch does not turn it on and off. Any power tool that cannot be controlled with the switch is dangerous and must be repaired.
c) Disconnect the plug from the power source and/or the battery pack from the power tool before making any adjustments, changing accessories, or storing power tools. Such preventive safety measures reduce the risk of starting the power tool accidentally.
d) Store idle power tools out of the reach of children and do not allow persons unfamiliar with the power tool or these instructions to operate the power tool. Power tools are dangerous in the hands of untrained users.
e) Maintain power tools. Check for misalignment or binding of moving parts, breakage of parts and any other condition that may affect the power tool's operation. If damaged, have the power tool repaired before use. Many accidents are caused by poorly maintained power tools.
f) Keep cutting tools sharp and clean. Properly maintained cutting tools with sharp cutting edges are less likely to bind and are easier to control.
g) Use the power tool, accessories and tool bits etc. in accordance with these instructions, taking into account the working conditions and the work to be performed. Use of the power tool for operations different from those intended could result in a hazardous situation.
h) Keep handles and grasping surfaces dry, clean and free from oil and grease. Slippery handles and grasping surfaces do not allow for safe handling and control of the tool in unexpected situations.
5) Battery tool use and care
a) Recharge only with the charger specified by the manufacturer. A charger that is suitable for one type of battery pack may create a risk of fire when used with another battery pack.
b) Use power tools only with specifically designated battery packs. Use of any other battery packs may create a risk of injury and fire.
c) When battery pack is not in use, keep it away from other metal objects, like paper clips, coins, keys, nails, screws or other small metal objects that can make a connection from one terminal to another. Shorting the battery terminals together may cause burns or a fire.
d) Under abusive conditions, liquid may be ejected from the battery; avoid contact. If contact accidentally occurs, flush with water. If liquid contacts eyes, additionally seek medical help. Liquid ejected from the battery may cause irritation or burns.
e) Do not use a battery pack or tool that is damaged or modified. Damaged or modified batteries may exhibit unpredictable behaviour resulting in fire, explosion or risk of injury.
f) Do not expose a battery pack or tool to fire or excessive temperature. Exposure to fire or temperature above 130 °C may cause explosion. NOTE The temperature „130 °C“ can be replaced by the temperature „265 °F“.
g) Follow all charging instructions and do not
charge the battery pack or tool outside the temperature range specified in the instructions. Charging improperly or at temperatures outside the specified range may damage the battery and increase the risk of fire.
6) Service
a) Have your power tool serviced by a qualified repair person using only identical replacement parts. This will ensure that the safety of the power tool is maintained.
b) Never service damaged battery packs. Service of battery packs should only be performed by the manufacturer or authorized service providers.
ADDITIONAL SAFETY INSTRUCTION FOR BATTERY LAWN MOWERS
- Never allow children or people unfamiliar with these instructions to use the product. Local regulations may restrict the age of the operator. When not in use store the product out of reach of children.
- Never allow children, persons with physical, sensory or mental limitations or a lack of experience and/or knowledge and/or people unfamiliar with these instructions to use the product. Local regulations may re-strict the age of the operator.
- Children should be supervised to ensure that they do not play with the product.
- Never work while people, especially children, or pets are nearby.
- The user is responsible for accidents or hazards occurring to other people or their property.
- Do not wear open rubber shoes or sandals when using the product. Al-ways wear sturdy shoes and long trousers. Do not use barefoot.
- Thoroughly inspect the area where the machine is to be used and re-move all stones, sticks, wires, bones and other foreign objects.
- Before using, always visually inspect to see that the blades, blade bolts and cutter assembly are not worn or damaged. Replace worn or damaged blades and bolts in sets to preserve balance.
- Mow only in daylight or in good artificial light.
- Avoid mowing in bad weather conditions especially when there is a risk of lightning.
- Avoid operating the machine in wet grass, where feasible.
- Walk, never run.
- Never operate the machine with defective guards or shields, or without safety devices, for example
deflectors and/or grass catchers in place.
- We would advise you to wear ear protection for your own convenience.
- Never operate the product when you are tired, ill or under the influence of alcohol, drugs or medicine.
-
Working on banks can be dangerous:
-
Do not mow on excessively steep slopes.
- Always be sure of your footing on slopes or wet grass.
- Mow across the face of slopes never up and down.
-
Exercise extreme caution when changing direction on slopes.
-
Use extreme caution when stepping back or pulling the machine towards you.
- Never mow by pulling the mower towards you.
- Wait until the blades stop if the machine has to be tilted for transportation when crossing surfaces other than grass and when transporting the machine to and from the area to be mowed.
- Do not tilt the machine when starting or switching on the motor.
- Switch on the motor according to the instructions with feet well away from rotating parts.
- Do not put hands or feet near or under rotating parts.
- Always stand clear of the discharge zone when operating the machine.
- Never pick up or carry the machine while the motor is running.
- When storing, make sure that all 4 wheels of the garden tool stand on the ground/floor.
- Only lift the garden tool with the carrying handle. Use the carrying handle with care.
- Do not modify the machine. Unauthorized modifications can impair the safety of your machine, lead to increased noise and vibrations, and poor performance.
-
Remove the safety key (isolator switch):
-
Whenever you leave the machine.
- Before clearing a blockage.
- Before checking, cleaning or working on the machine.
- After striking a foreign object. Inspect the machine for damage and change the blade as necessary.
- If the machine starts to vibrate abnormally (check immediately).
SAFETY WARNINGS FOR BATTERY
a) Do not open the battery. Danger of short-circuiting.
b) Protect the battery against heat, e. g., against continuous intense sunlight, fire, water, and moisture. Danger of explosion.
c) In case of damage and improper use of the battery, vapours may be emitted. Ventilate the area and seek medical help in case of complaints. The vapours can irritate the respiratory system.
d) Use the battery only in conjunction with your Vonroc product. This measure alone protects the battery against dangerous overload.
e) The battery can be damaged by pointed objects such as nails or screwdrivers or by force applied externally. An internal short circuit can occur and the battery can burn, smoke, explode or overheat.
SAFETY WARNINGS FOR CHARGER
Intended use
Charge only CD801AA and CD803AA type rechargeable Battery packs with the charger. Other types of batteries may burst causing personal injury and damage.
a) The appliance is not to be used by persons (including children) with reduced physical, sensory or mental capabilities, or lack of experience and knowledge, unless they have been given supervision or instruction.
b) Children being supervised not to play with the appliance.
c) Do not recharging non-rechargeable batteries!
d) During charging, batteries must be placed in the well ventilated area!
This appliance can be used by children aged from 8 years and above and persons with reduced physical, sensory or mental capabilities or lack of experience and knowledge if they have been given supervision or instruction concerning use of the appliance in a safe way and understand the hazards involved. Children shall not play with the appliance. Cleaning and user maintenance shall not be made by children without supervision.
Electrical safety
Always check that the voltage of the power supply corresponds to the voltage on the rating plate.
- Do not use the machine if the mains cable or the mains plug is damaged.
- Only use extension cables that are suitable for the power rating of the machine with a minimum thickness of 1.5 mm ^2 . If you use an extension cable reel, always fully unroll the cable.
2. MACHINE INFORMATION
Intended use
This product is designed for lawnmowing in domestic environments. The lawn mower is intended for private gardens at home. The lawn mower may not be used to trim bushes, hedges or shrubs, to cut scaling vegetation, planted roofs, or balcony-grown grass, to clean (vacuum) dirt and debris off walkways, or to chop up tree or hedge clippings. Moreover, the lawn mower may not be used as a power cultivator to level out high areas such as molehills. The equipment is to be used only for its prescribed purpose. Any other use is deemed to be a case of misuse.
TECHNICAL SPECIFICATIONS
| MACHINE | |
| Model No. S4_LM505DC | |
| Voltage 40V (2 x 20V) | --- |
| No load speed 3500/min | |
| Cutting width 380 mm | |
| Cutting height 35/45/55/65mm | |
| Grass box capacity 45 L | |
| Weight 16,5 kg | |
| Protection level IPX1 | |
| Sound pressure level (Lpa) 80.8dB(A), K=3dB(A) | |
| Sound power level (Lwa) | 91.4dB(A), K=2.29dB(A) |
| Vibration value | <2.5m/s ^2 , K=1.5m/s ^2 |
| BATTERY | |
| Model No. | CD803AA |
| Battery Type | Lithium-Ion |
| Voltage | 20V--- |
| Capacity | 4.0 Ah |
| Recommended charger | CD802AA, CD820AA |
| Weight | 0.65 kg |
| CHARGER | |
| Model No. | CD802AA |
| Charger input | 220-240V, 50Hz 0.4A |
| Charger output | 21V = 2.5A |
| Charging time 2Ah battery | 60 minutes |
| Charging time 4Ah battery | 120 minutes |
| Recommended batteries | CD801AA, CD803AA |
| Weight | 0.36 kg |
| Model No. | CD820AA |
| Charger input | 220-240V, 50-60Hz, 200W |
| Charger output | 21V = 2.3A, <3.8A |
| Charging time 2Ah battery | 45 minutes |
| Charging time 4Ah battery | 85 minutes |
| Recommended batteries | CD801AA, CD803AA |
| Weight | 0.81 kg |
Only use the following batteries of the VONROC VPOWER 20V battery platform. Using any other batteries could cause serious injury or damage the tool.
CD803AA 20V, 4Ah Lithium-Ion
The following chargers can be used to charge these batteries.
CD802AA Quick charger
CD820AA Dual quick charger
Vibration level
The vibration emission level stated in this instruction manual has been measured in accordance with a standardized test given in EN 60335-1 and EN 60335-2-77; it may be used to compare one tool with another and as a preliminary assessment of exposure to vibration when using the tool for the applications mentioned.
- Using the tool for different applications, or with different or poorly maintained accessories, may significantly increase the exposure level.
- The times when the tool is switched off or when it is running but not actually doing the job, may significantly reduce the exposure level.
Protect yourself against the effects of vibration by maintaining the tool and its accessories, keeping your hands warm, and organizing your work patterns.
DESCRIPTION
The numbers in the text refer to the diagrams on pages 2-8.
-
Upper handle
-
On/off switch
-
Safety button
-
Power cable
-
Machine
-
Cable holder
-
Carrying handle
-
Wheel
-
Wheel cover
-
Grass box bag
-
Grass box lid
-
Grass box cover
-
Grass level indicator
-
Lowerhandle
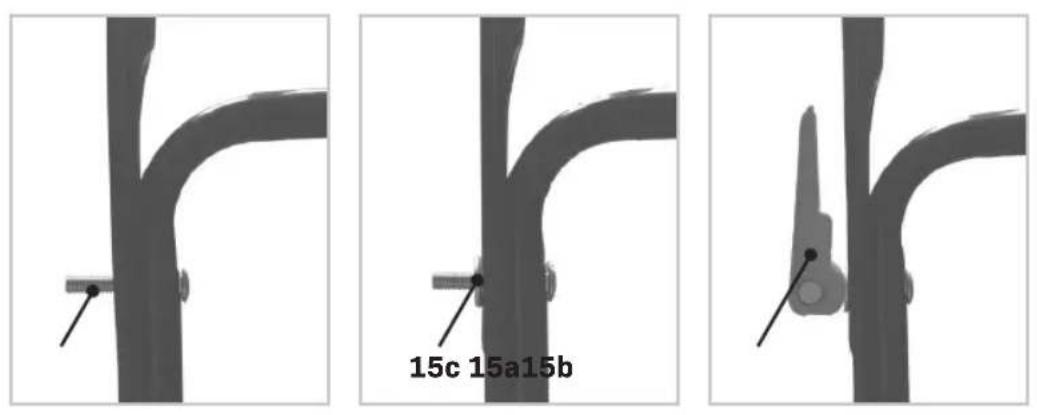
15A. Upper handle adjustment knob
15B. Bolt for upper handle
15C. Washer for upper handle
-
Grass box carrying handle
-
Height adjustment lever
18.Grassoutlet
- Battery compartment cover
20.Batterybay
-
Safety key (isolator switch)
-
Battery unlock button
23.Battery
-
Battery LED indicators button
-
Battery LED indicators
26.Charger
- Charger LED indicators
28.Blade
29.Bladebolt
30.Charger
-
Green LED indicators
-
Amber LED indicators
-
Red LED indicators
34A. Lower handle adjustment knob
34B. Bolt for lower handle
34C. Washer for lower handle
3. ASSEMBLY

Before any work on the power tool, remove the battery.

The battery must be charged before first use.

Warning: Use only batteries which are charged to the same level. Never combine full and half-full batteries. Always charge the two batteries simultaneously. The equipment's operating time depends on the battery with the lower charge level. The two batteries must always be fully charged before use.
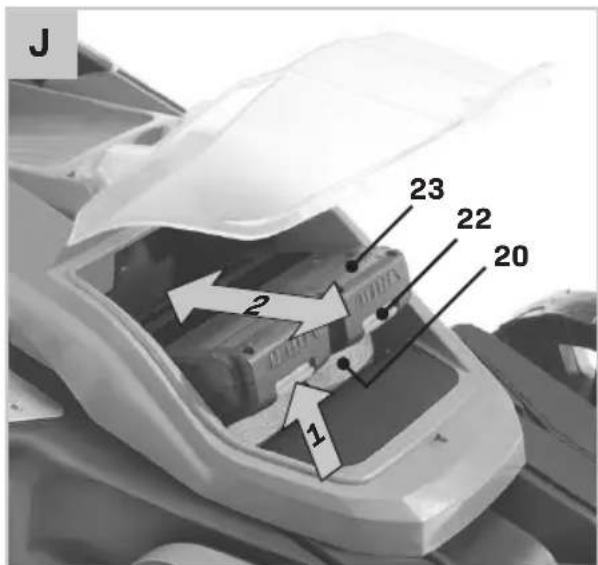
Inserting the battery into the machine (Fig. A, J)

Ensure that the exterior of the battery is clean and dry before connecting to the charger or machine. Close the battery cover before use.

This machine is designed and developed specifically to be used with CD803AA 4.0Ah only. It is not allowed to use this machine with CD801AA 2.0Ah battery or any other battery type, as it may permanently damage the battery and/or the machine. Warranty is voided for both battery as the machine, when the wrong battery type is used.
- Open the battery compartment cover (19).
- Insert the battery (23) into the battery bay (20) as shown in Fig. J.
- Push the battery further forward until it clicks into place.
- Repeat for the other battery (23).
- Close the battery compartment cover (19).
Removing the battery from the machine (Fig. A, J)
- Open the battery compartment cover (19).
- Pull the battery (23) out of the battery bay (20) as shown in Fig. J.
- Repeat for the other battery (23).
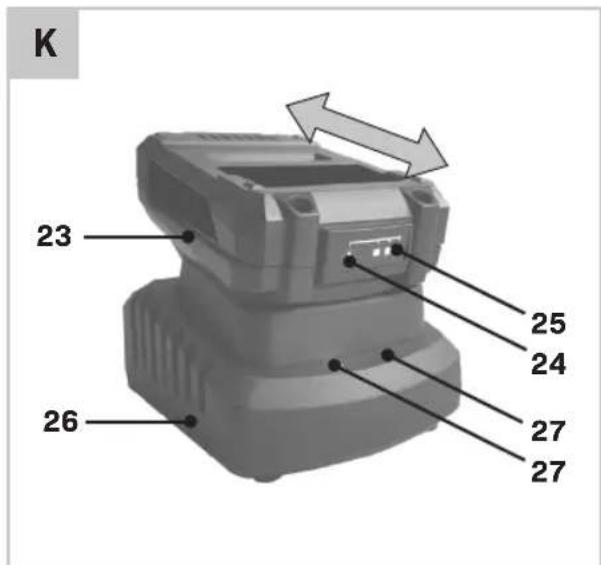
Checking the battery charging status (Fig. K)
- To check the battery charge status, push the button (24) on battery shortly.
- The battery has 3 lights indicating the charge level, the more lights that burn, the more charge the battery has left.
- When the lights are not burning it means the battery is empty and must be charged immediately.
Charging the battery with the CD802AA charger (Fig. K)
- Take the battery (23) from the machine.
- Turn the battery (23) to upside down position and slide it onto the charger (26) as shown in Fig. K.
- Push the battery until it is fully pushed into the slot.
- Plug the charger plug into an electrical outlet and wait for a while. The LED indicators on the charger (27) will lighten up and show the charger status.
The charger has 2 LED indicators (27) which indicate the status of the charging process:
| Red LED Status | Green LED status | Charger status |
| Off Off No power | ||
| Off On | Standby mode:- No battery is inserted or,- Battery inserted but charging has finished | |
| On Off Battery charging in progress | ||
- Fully charging the 4Ah battery may take up to 120 minutes.
After the battery is fully charged remove the charger plug from the outlet and remove the battery from the charger.

When the machine is not being used over a longer period of time it is best to store the battery in charged condition.
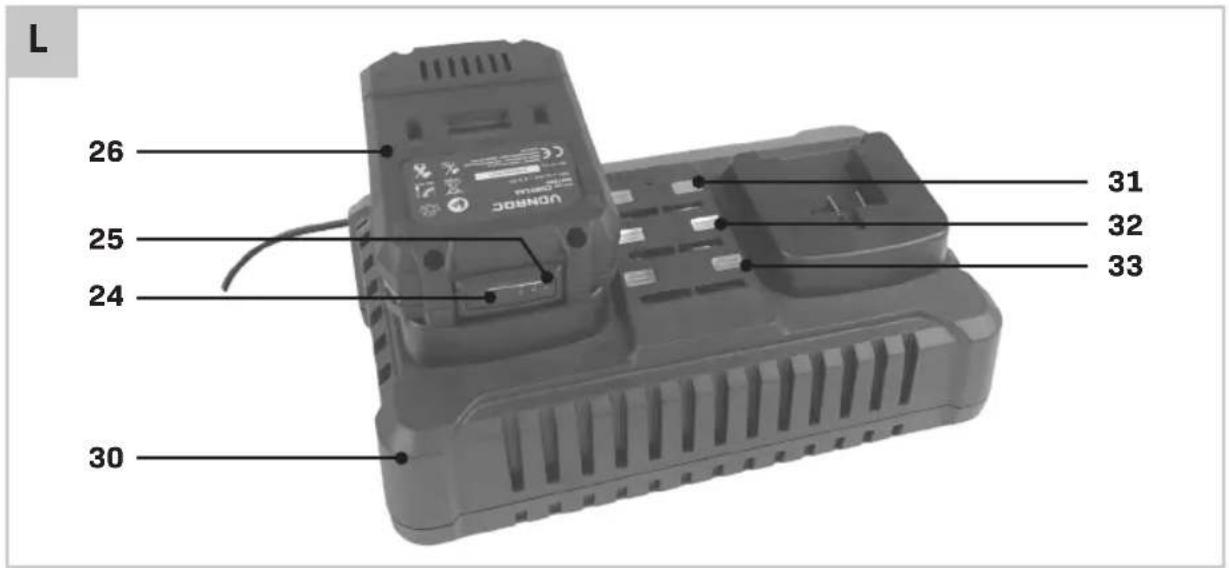
Charging the battery with the CD820AA dual charger (Fig. L)
- Take the battery (26) from the machine.
- Turn the battery (26) to upside down position and slide it onto the charger (30) as shown in Fig. L.
- Push the battery until it is fully pushed into the slot.
- Plug the charger plug into an electrical outlet and wait for a while. The LED indicators on the charger (31, 32, 33) will lighten up and show the charger status.
The charger has 6 LED indicators (31, 32, 33) which indicate the status of the charging process:
| Item Conditions LED colour | ||||
| Red Amber Green | ||||
| Stand by Power on On On On | ||||
| Charging Started charging (10-19V DC±0.5V DC) | Blink Off Off | |||
| Halfway charging (19-20V DC±0.5V DC) | On Blink Off | |||
| Finished charging (20-21V DC±0.5V DC) | On On Blink | |||
| Fully charged | Trickle charging ≤300±150mA | On On On | ||
| Stop charging | ||||
| High temperature | High-temperature protection of the battery works | On On On | ||
- Fully charging the 4Ah battery may take up to 85 minutes.
After the battery is fully charged remove the charger plug from the outlet and remove the battery from the charger.

When the machine is not being used over a longer period of time it is best to store the battery in charged condition.
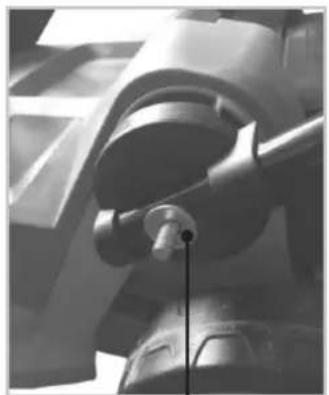
Assembling the lower handle (Fig. A, B)
- Mount the lower handle (14) onto the lawn mower body, as shown on figure B.
- Put the washer (34C) onto the bolt (34B).
- Screw the handle adjustment knob (34A) onto the bolt (34B) with assembled washer and secure the handle by closing it.
- Repeat these steps for the other side.
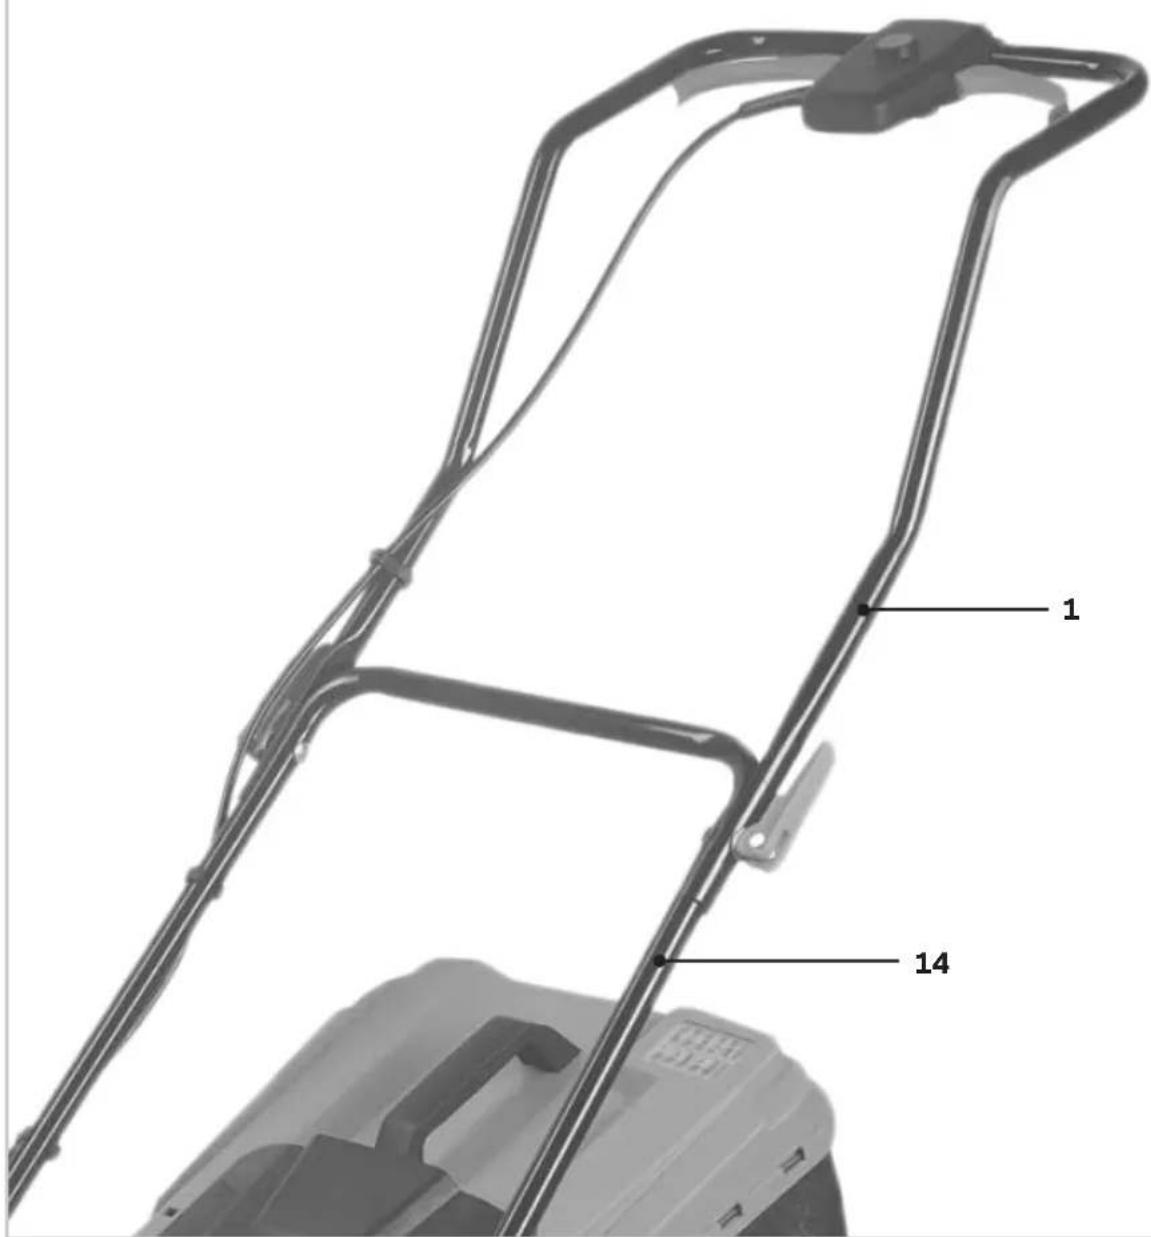
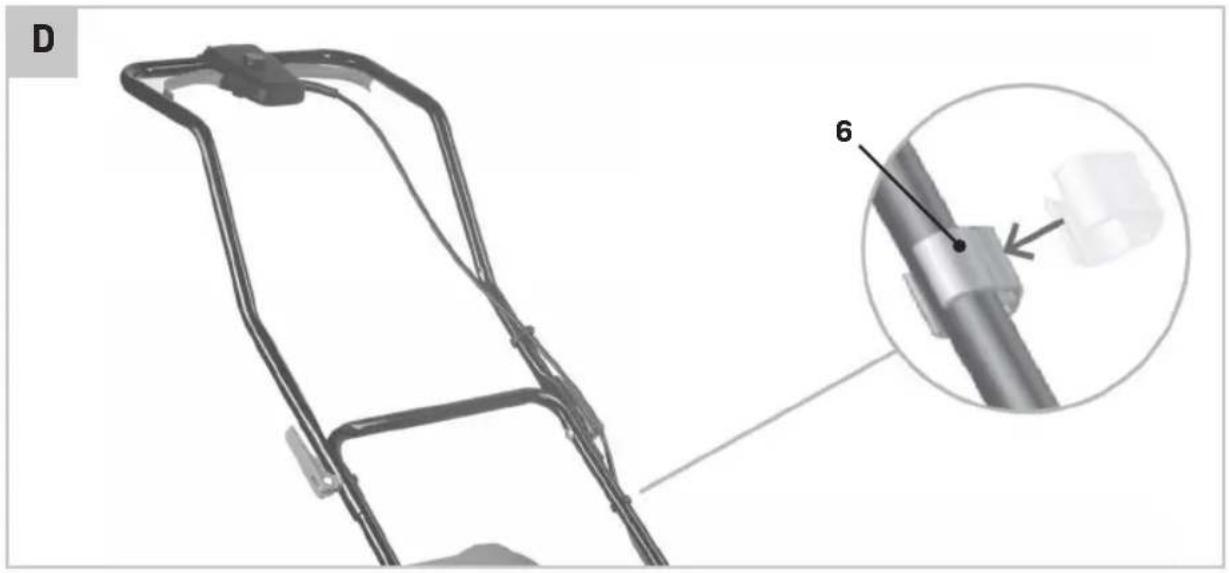
Assembling the upper handle (Fig. A, C, D)
- Attach the upper handle (1) to the lower handle (14).
- Secure the upper handle (1) by inserting the bolts (15B), washers (15C) and handle knobs (15A) as shown on figure C.
- Fixate the cable to the handle by using the cable holders (6), as shown on figure D.
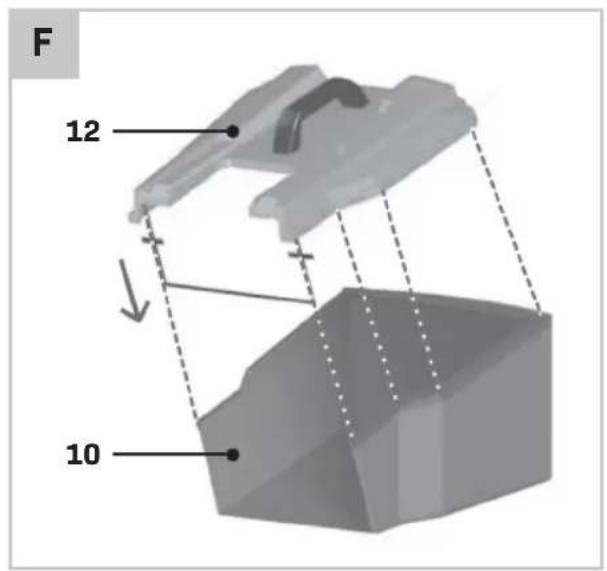
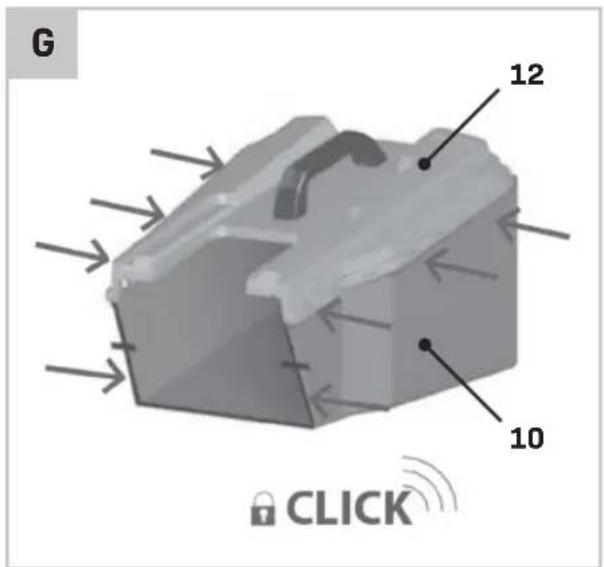
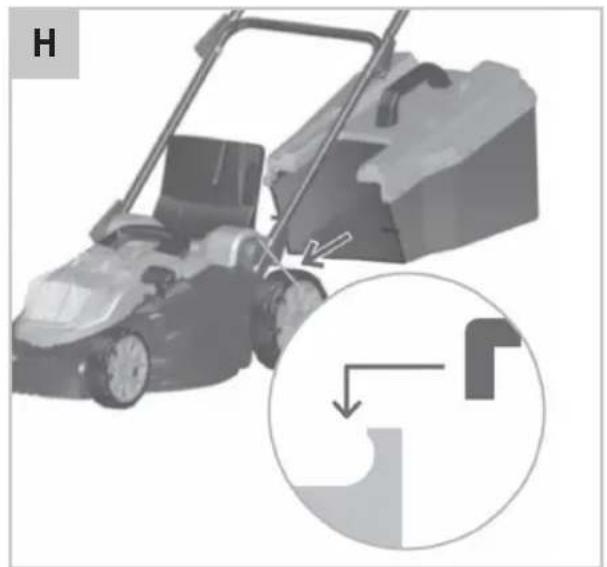
Assembling and mounting the grass box
(Fig. A, E, F, G, H)

The lawn mower shall not be operated without either the entire grass catcher or the guard in place.
It is possible to use the lawn mower with or without grass box. Remember though that when cutting without the grass box, the grass box lid (11) must be lowered. Do not operate the mower with outlet lid lifted.
- Mount the Grass box carrying handle (16) onto the grass box cover (12), as shown on figure E.
- Mount the grass box cover (12) onto the grass box bag (10), as shown on figure F.
- Ensure the notches are properly inserted until a clicking noise can be heard, as shown on figure G.
- Lift the grass box lid (11) and attach the assembled grass box onto the lawn mower, as shown on figure H. Ensure the indents in the grass box align properly with the holders of the lawn mower body.
Note: the grass box is fitted with a grass level indicator (13), which shows the amount of mowed grass. As long as the grass box is not full, the indicator will be opened. When the grass box is full, the indicator will close. In that case immediately stop mowing and empty the grass box. This indicator is only a rough guideline, of which the functionality depends on the condition inside the grass basket.
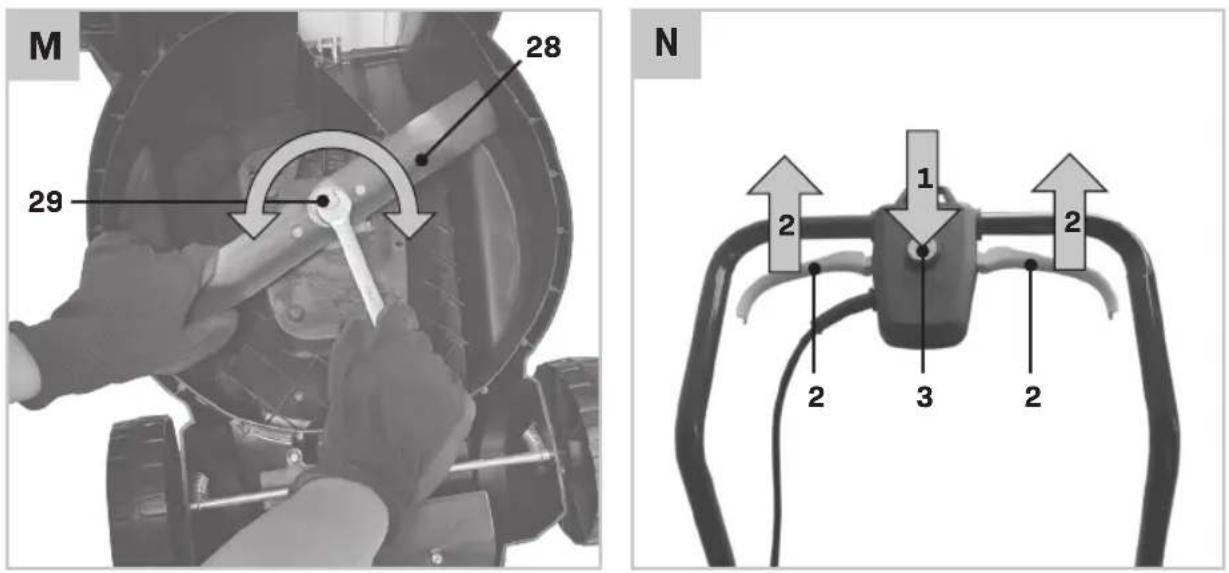
Replacing the cutting blade (Fig. A, M)

Before any work on the power tool, remove the battery.

When replacing the cutting blade, wear protective gloves. Danger of injury when touching the cutting blade.

Only use blades that are recommended by the manufacturer.
- Remove the grass box.
- Turn the mower onto its side.
- Firmly hold cutting blade using protective gloves.
- Turn the cutting blade fixing screw counterclockwise to loosen it, as shown on figure M.
- Replace or sharpen the cutting blade.
- Install the cutting blade, use the above pro-
cedure in reversed order (holes in the cutting blade must be seated on the spindle pins).
- It is best to entrust sharpening or replacement of cutting blade to a qualified person. Only original parts should be used. All defects should be repaired by service workshop authorized by the manufacturer.
4. OPERATION

Before using, always visually inspect to see that the blades, blade bolts and cutter assembly are not worn or damaged. Please remove the battery from the tool. Replace worn or damaged blades and bolts in sets to preserve balance.

If the machine starts to vibrate abnormally (check immediately):
- inspect for damage,
- replace or repair any damaged parts,
- check for and tighten any loose parts.

Immediately switch off the machine in the following cases:
- whenever you leave the machine,
- before clearing blockages or unclogging chute,
- before checking, cleaning or working on the machine,
- after striking a foreign object. Inspect the machine for damage and make repairs before restarting and operating the machine;

Be careful during adjustment of the machine to prevent entrapment of the fingers between moving blades and fixed parts of the machine.
Adjusting the cutting height (Fig. A, I)

Switch off the equipment, wait for the blade to stop and remove the battery. There is a risk of injury.
Depending on the preferred cutting height, you can adjust the heigh level in one of five positions.
Adjust the cutting height according to the needs of your lawn. The cutting height depends on the kind of lawn and its actual height. When mowing high grass, start with the maximum cutting height and
make a second cut with a lower cutting height.
A higher cut height should always be selected for the first cut of the season.
- Pull the height adjustment lever (17) outwards (away from the machine housing) as shown on figure I.
- Whilst holding the height adjustment lever (17) in outwards position, push it forward or backward to the desired cutting height.
- Release the lever (17) and ensure it engaged in the slot properly.
NOTE: There are 4 cutting height levels available: 35mm, 45mm, 55mm, 65mm
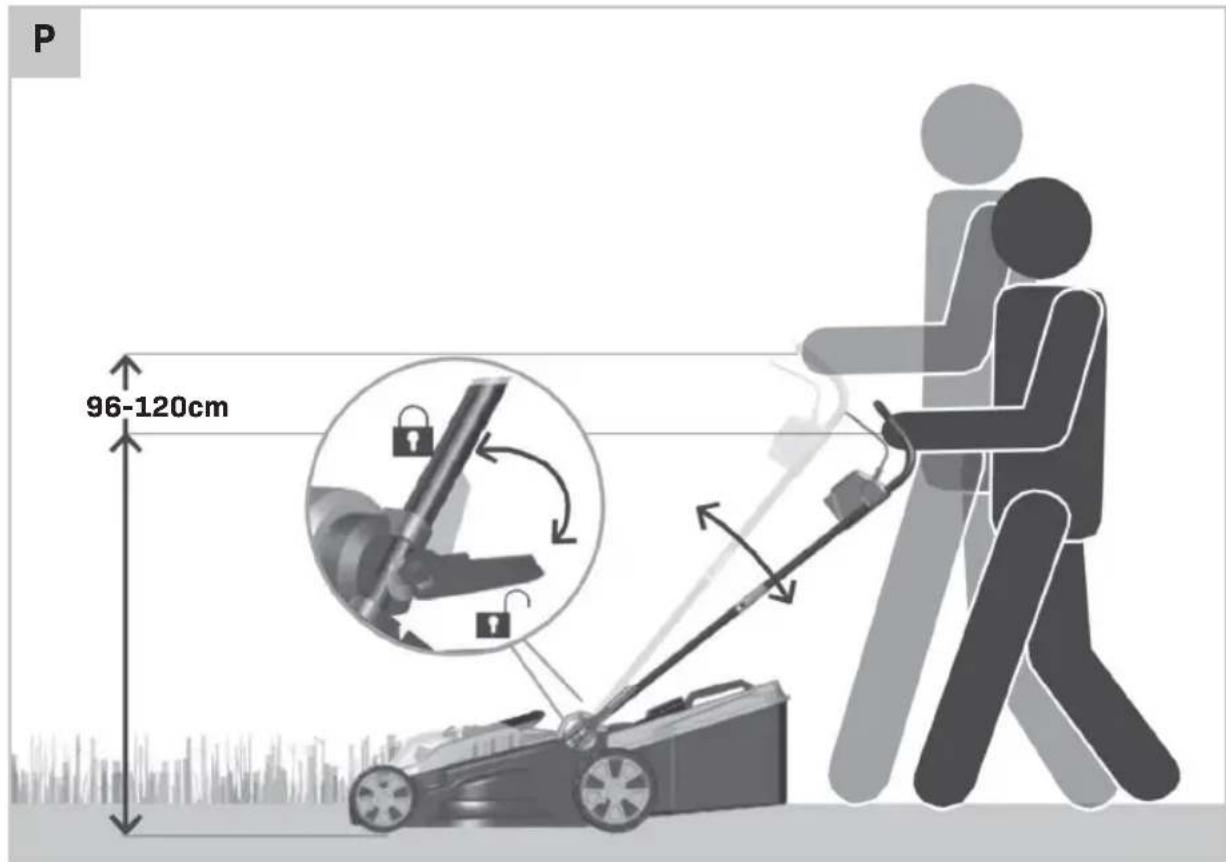
Adjusting the handle (Figure A, P)

When adjusting the upper handle (1) or lower handle (14), ensure that the power cable is not caught.
The upper handle (1) can be folded inwards, to store the lawn mower in a more compact formfactor.
The lower handle (14) can also be folded inwards for storage purposes, but it can also be adjusted in several positions as shown on figure P. This way, the lawn mower can be adjusted to the ideal height depending on the length of the user.
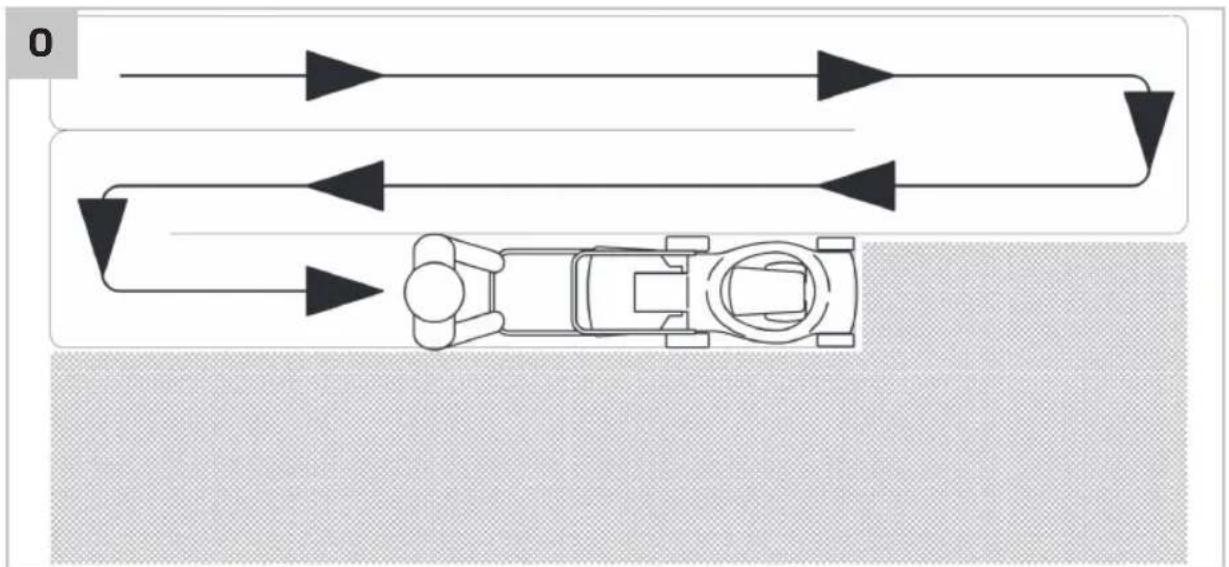
Switching the machine on/off (Fig. A, N)

Before starting, put the product on a flat surface free of high grass.

Clean the underside of the deck before turning on the machine.

Keep your feet well away from the cutting blade.

Do not tilt the product when starting the motor.
- Ensure the safety key (21) is inserted in the designated spot on top of the machine housing, behind the carrying handle (7).
- To start the machine, press and hold the safety button (3) and press the on/off switch (2). Whilst holding the on/off switch (2), you can release pressure on the safety button (3).
- To stop the machine, release the on/off switch (2) and wait until cutting blade stops rotating.
Operating the mower (fig. A, O)

Always ensure that a safe distance (provided by the length of the long handles) is maintained between the user and the mower housing.

Be especially careful when mowing and changing direction on slopes and inclines. Maintain a solid footing and wear sturdy, non-slip footwear and long trousers. Always mow along the incline (not up and down). For safety reasons, the lawn mower may not be used to mow inclines whose gradient exceeds 15 degrees.

Use special caution when backing up and pulling the lawn mower. Tripping hazard!
Before use
- Make sure that the lawn is clear of stones, sticks, wire or other objects that could damage the product or its product.
- Do not cut wet grass because it tends to stick to the underbody of the product, preventing the proper discharge of grass clippings, and it could also cause you to slip and fall.
- Never cut off more than one-third of the total length of the grass for a healthy lawn. In the autumn, lawns should only be cut as long as there is growth.
- Slowly push the product forward, do not force.
- Mow in slight overlapping rows. The most effective hat all the lawn is cut without missing any spots, as shown on figure 0.
- Circle around flower beds. When reaching a flower bed in the middle of the lawn, cut a row or two around the circumference of the bed.
- Pay special attention when changing direction.
- Always mow along inclines (not up and down). You can prevent the lawn mower from slipping down by holding a position at an angle upwards.
- Select the cutting height according to the length of the grass. Make several passes to prevent that too much grass is cut at one time.
- Empty the grass box regularly.
Note: The operating time of the rechargeable batteries and therefore the area in square meters that can be covered with a single battery charge is largely dependent on the state of the grass (e.g. density, moisture, height, cutting height, etc.) and the mowing
speed (walking speed). To adjust the area coverage to your individual requirements, it is recommended that you mow the lawn more often, with a higher cutting height and at an appropriate speed. Frequently turning the equipment on and off while mowing will also reduce the amount of area that you can cover. If the operating time of the rechargeable batteries (area coverage) is still unsatisfactory in spite of the above measures, you can remedy the problem by using rechargeable batteries with a larger capacity (Ah).
After use
- After use, switch the product off, disconnect the safety key (21).
- Remove the battery packs (23).
- Check, clean and store the product as described in chapter 'maintenance'.
5. MAINTENANCE

Switch off the equipment, wait for the blade to stop and remove the battery. There is a risk of injury.
Cleaning
Your mower has been designed to operate over a long period of time with minimum of maintenance. Continuous satisfactory operation depends upon proper mower care and regular cleaning.
- Keep the mower clean and dry.
- Regularly use a blunt scraper to remove grass and dirt from the mower
- To clean the mower, use only mild soap and a damp cloth. Never let any liquid get inside the tool and never immerse any part of the tool into liquid. Do not use any abrasive or solvent-based cleaner.
Stop the blade(s) if the machine has to be tilted for transportation when crossing surfaces other than grass, and when transporting the machine to and from the area to be used. Do not start the machine when standing in front of the discharge opening.
Storage
Always allow the machine to cool down before storing. Replace worn or damaged parts for safety. Use only genuine replacement parts and accessories.
-
Switch the product off, disconnect the safety key (21) and remove the battery pack (23) before storage.
-
Clean the product as described above.
- Store the product and its accessories in a dark, dry, frost-free, well-ventilated place. The ideal storage temperature is between 10 °C and 30 °C.
- Always store the product in a place that is inaccessible to children.
- We recommend using the original package for storage or covering the product with a suitable cloth or enclosure to protect it against dust.
Transportation
- Switch the product off, disconnect the safety key (21) and remove the battery pack (23) before transporting it anywhere.
- Always transport the product by its transport handle (7).
- Protect the product from any heavy impact or strong vibrations which may occur during transportation in vehicles.
- Secure the product to prevent it from slipping or falling over, damage and injury.
ENVIRONMENT

Faulty and/or discarded electrical or electronic apparatus have to be collected at the appropriate recycling locations.
Only for EC countries
Do not dispose of power tools into domestic waste. According to the European Guideline 2012/19/EC for Waste Electrical and Electronic Equipment and its implementation into national right, power tools that are no longer usable must be collected separately and disposed of in an environmentally friendly way.
WARRANTY
VONROC products are developed to the highest quality standards and are guaranteed free of defects in both materials and workmanship for the period lawfully stipulated starting from the date of original purchase. Should the product develop any failure during this period due to defective material and/or workmanship then contact VONROC directly.
The following circumstances are excluded from this guarantee:
- Repairs and or alterations have been made or attempted to the machine by unauthorized service centers;
- Normal wear and tear;
- The tool has been abused, misused or improperly maintained;
- Non-original spare parts have been used.
This constitutes the sole warranty made by company either expressed or implied. There are no other warranties expressed or implied which extend beyond the face hereof, herein, including the implied warranties of merchantability and fitness for a particular purpose. In no event shall VONROC be liable for any incidental or consequential damages. The dealers remedies shall be limited to repair or replacement of nonconforming units or parts. The product and the user manual are subject to change. Specifications can be changed without further notice.
The product and the user manual are subject to change. Specifications can be changed without further notice.
ADDITIONELE VELIGHEIDSINSTRUCTIES VOOR GAZONMAAIERS MET ACCU
VEILIGHEIDSWAARSCHUWINGEN VOOR DE ACCU
Warning: for use with CD002AA-4.0Ah only!
CE
DECLARATION OF CONFORMITY S4\_LM505DC - ELECTRIC LAWN MOWER
(EN) We declare under our sole responsibility that this product is in conformity with directive 2011/65/EU of the European parliament and of the council of 8 June on the restriction of the use of certain hazardous substances in electrical and electronic equipment is in conformity and accordance with the following standards and regulations:
(DE) Der Hersteller erklärt eigenverantwortlich, dass dieses Produkt der Direktive 2011/65/EU des Europäischen Parlaments und des Rats vom 8. Juni 2011 über die Einschränkung der Anwendung von bestimmten gefährlichen Stoffen in elektrischen und elektronischen Geräten entspricht. den folgenden Standards und Vorschriften entspricht:
(NL) Wij verklaren onder onze volledige verantwoordelijkheid dat dit product voldoet aan de conform Richtlijn 2011/65/EU van het Europees Parlement en de Raad van 8 juni 2011 betreffende beperking van het gebruik van bepaalde gevaarlijke stoffen in elektrische en elektronische apparatuur en in overeenstemming is met de volgende standaarden en reguleringen:
(FR) Nous déclarons sous notre seule responsabilité que ce produit est conforme aux standards et directives suivants: est conforme à la Directive 2011/65/EU du Parlement Européen et du Conseil du 8 juin 2011 concernant la limitation d'usage de certaines substances dangereuses dans l'équipement électrique et électronique.
(ES) Declaramos bajo nuestra exclusiva responsabilidad que este producto cumple con las siguientes normas y estándares de funcionamiento: se encuentra conforme con la Directiva 2011/65/UE del Parlamento Europeo y del Consejo de 8 de junio de 2011 sobre la restricción del uso de determinadas sustancias peligrosas en los equipos eléctricos y electrónicos.
(IT) Dichiariamo, sotto la nostra responsabilità, che questo prodotto è conforme alle normative e ai regolamenti seguenti: è conforme alla Direttiva 2011/65/UE del Parlamento Europeo e del Consiglio dell'8 giugno 2011 sulla limitazione dell'uso di determinate sostanze pericolose nelle apparecchiature elettriche ed elettroniche.
(SV) Vi garanterar på eget ansvar att denna produkt upp fyller och följer följande standarder och bestämmelser: uppfyller direktiv 2011/65/EU från Europeiska parlamentet och EG-rådet från den 8 juni 2011 om begränsningen av användning av farliga substanser i elektrisk och elektronisk utrustning.
(DA) Vi erklærer under eget ansvar, at dette produkt er i overensstemmelse med følgende standarder og bestemmelser: er i overensstemmelse med direktiv 2011/65/EU fra Europa-Parlamentet og Rådet af 8. juni 2011 om begrænsning af anvendelsen af visse farlige stoffer i elektrisk og elektronisk udstyr.
(PL) Deklarujemy na własną odpowiedzialność, że ten produkt spełnia wymogi zawarte w następujących normach i przepisach: jest zgodny z Dyrektywą 2011/65/UE Parlamentu Europejskiego i Rady z dnia 8 czerwca 2011 r. w sprawie ograniczenia stosowania niektórych niebezpiecznych substancji w sprzęcie elektrycznym i elektronicznym.
(RO) Declarăm prin aceasta cu răspunderea deplină că produsul acesta este în conformitate cu următoarele standarde sau directive: este în conformitate cu Directiva 2011/65/UE a Parlamentului European și a Consiliului din 8 iunie 2011 cu privire la interzicerea utilizării anumitor substanțe periculoase la echipamentele electrice și electronice.
(PT) Declaramos, sob nossa exclusiva responsabilidade, que este produto está em conformidade com a directiva 2011/65/UE do Parlamento Europeu e com a do conselho de 8 de Junho sobre a restrição da utilização de determinadas substâncias perigosas em equipamento eléctrico e electrónico está em conformidade e de acordo com as seguintes normas e regulamentações:
(HU) Kizárólagos felelősségünk tudatában kijelentjük, hogy ez a termék megfelel az Európai Parlamentnek és a Tanácsnak az egyes veszélyes anyagok elektromos és elektronikus berendezésekben való alkalmazásának korlátozásáról szóló 2011/65/EU irányelvének (2011. június 8.), valamint a következő szabványoknak és jogszabályoknak:
(CS) Prohlašujeme na svou výhradní odpovědnost, že tento výrobek splňuje požadavky směrnice 2011/65/EU Evropské rady a parlamentu ze dne 8. června, která se týká omezení používání určitých nebezpečných látek v elektrických a elektronických zařízeních, a splňuje také všechny požadavky následujících norem a předpisů:
Measured sound power level: 91.4 dB(A)
Guaranteed sound power level: 96 dB(A)
Conformity assessment method to Annex VI Directive 2000/14/EC amended by 2005/88/EC.
The notified body involved: TÜV SÜD Industrie Service GmbH, Certification Body of the Notified Body 0036
EN 60335-1, EN 60335-2-77, EN 62233, EN 55014-1, EN 55014-2, EN 61000-3-2, EN 61000-3-3, 2006/42/EC, 2014/30/EU, 2000/14/EC ANNEX VI & 2005/88/EC, 2012/19/EU, 2011/65/EU
Zwolle, 01-02-2022 H.G.FRosberg CEO

VONROC • Lingenstraat 6 • 8028 PM Zwolle • The Netherlands

VONROC®
BUILD YOUR FUTURE
©2022 VONROC
WWW.VONROC.COM
2202-21

- SAFETY INSTRUCTIONS
- GENERAL POWER TOOL SAFETY WARNINGS
- Save all warnings and instructions for future reference.
- 1) Work area safety
- 2) Electrical safety
- 3) Personal safety
- 4) Power tool use and care
- ADDITIONAL SAFETY INSTRUCTION FOR BATTERY LAWN MOWERS
- SAFETY WARNINGS FOR BATTERY
- SAFETY WARNINGS FOR CHARGER
- Intended use
- Electrical safety
- MACHINE INFORMATION
- Vibration level
- DESCRIPTION
- ASSEMBLY
- Inserting the battery into the machine (Fig. A, J)
- Removing the battery from the machine (Fig. A, J)
- Checking the battery charging status (Fig. K)
- Charging the battery with the CD802AA charger (Fig. K)
- Charging the battery with the CD820AA dual charger (Fig. L)
- Assembling the lower handle (Fig. A, B)
- Assembling the upper handle (Fig. A, C, D)
- Assembling and mounting the grass box
- (Fig. A, E, F, G, H)
- Replacing the cutting blade (Fig. A, M)
- OPERATION
- Adjusting the cutting height (Fig. A, I)
- Adjusting the handle (Figure A, P)
- Switching the machine on/off (Fig. A, N)
- Operating the mower (fig. A, O)
- Before use
- After use
- MAINTENANCE
- Cleaning
- Storage
- Transportation
- ENVIRONMENT
- Only for EC countries
- WARRANTY
- ADDITIONELE VELIGHEIDSINSTRUCTIES VOOR GAZONMAAIERS MET ACCU
- VEILIGHEIDSWAARSCHUWINGEN VOOR DE ACCU
- CE
- DECLARATION OF CONFORMITY S4\_LM505DC - ELECTRIC LAWN MOWER
Brand : Vonroc
Model : S4_LM505DC
Category : Lawn mower