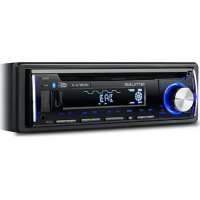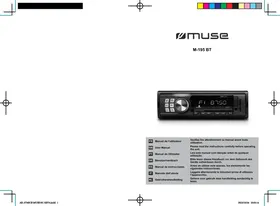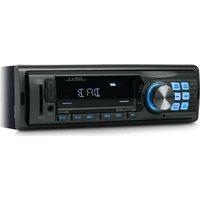
M-198 DAB - Car stereo MUSE - Free user manual and instructions
Find the device manual for free M-198 DAB MUSE in PDF.


User questions about M-198 DAB MUSE
0 question about this device. Answer the ones you know or ask your own.
Ask a new question about this device
Download the instructions for your Car stereo in PDF format for free! Find your manual M-198 DAB - MUSE and take your electronic device back in hand. On this page are published all the documents necessary for the use of your device. M-198 DAB by MUSE.
USER MANUAL M-198 DAB MUSE
natural_image
Color gradient bar transitioning from black to white, with no text or symbols
muse
M-198 DAB
text_image
D/F3.B DATA 4.0 DATA 4.0 DATA 4.0 DATA 4.0 DATA 4.0 DATA 4.0 DATA 4.0 DATA 4.0 DATA 4.0 DATA 4.0 DATA 4.0 DATA 4.0 DATA 4.0 DATA 4.0 DATA 4.0 DATA 4.0 DATA 4.0 DATA 5.0 DATA 5.0 DATA 5.0 DATA 5.0 DATA 5.0 DATA 5.0 DATA 5.0 DATA 5.0 DATA 5.0 DATA 5.0 DATA 5.0 DATA 5.0 DATA 5.0 DATA 5.0 DATA 5.0 DATA 5.0 DATA 5.0 D/F3.B| FR | Manuel de l'utilisateur | Veuillez lire attentivement ce manuel avant toute utilisation. |
| GB | User Manual | Please read the instructions carefully before operating the unit. |
| PT | Manual do Utilizador | Leia este manual com atenção antes de qualquer utilização. |
| DE | Benutzerhandbuch | Bitte lesen dieses Handbuch vor dem Gebrauch des Geräts aufmerksam durch. |
| ES | Manual de instrucciones | Antes de utilizar este aparato, lea atentamente las siguientes instrucciones. |
| IT | Manuale dell'utente | Leggere attentamente le istruzioni prima di utilizzare l'apparecchio. |
| NL | Gebruikershandleiding | Gelieve voor gebruik deze handleiding aandachtig te lezen. |


AUTORADIO DAB+/FM AVEC BLUETOOTH ET USB/SDFR
IMPORTANTES CONSIGNES DE SÉCURITÉ
FM USB CARD DAB BT AUX → →
- TA VOL (TA VOLUME)
EON (Enhanced Other Networks Information)
natural_image
Color gradient bar transitioning from black to white, no text or symbols present

DAB+/FM CAR RADIO WITH BLUETOOTH & USB/SDGB
PRECAUTIONS
- Do not attempt to modify the unit, modifying the unit may cause an accident.
- Installation or servicing of the unit by persons without training and experience in electronic equipment and automotive accessories may be dangerous and could expose you to the risk of electric shock or other hazards.
- Stop the vehicle before carrying out any operation that could interfere with your driving.
- Keep the volume at a level which you could hear sounds from outside the vehicle.
- Do not work in extremely high or low temperature. Be sure the temperature inside the vehicle is between +60°C and -10°C before turning on your unit.
- When replacing the fuse(s), the replacement must be of the same amperage as shown on the fuse holder.
- Do not block vents or radiator panels. Blocking them will cause heat to build up inside and may result in fire.
- Using this unit without running the engine can result in battery drainage.
- Use only in cars with a 12 volt negative ground.
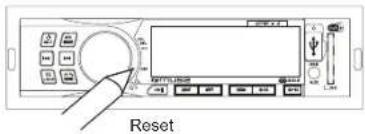
- After completing the installation or replacing the car battery, you need to reset the unit before using it. Press RES button on the front panel with pointed object (such as ball-point pen) to reset the unit to its initial settings.
text_image
ResetUNPACK YOUR UNIT
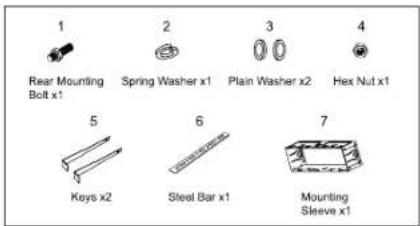
When you unpack your new car radio, make sure that you have removed all the accessories and information papers:
Main unit
User manual
Accessories
text_image
1 Rear Mounting Bolt x1 2 Spring Washer x1 3 Plain Washer x2 4 Hex Nut x1 5 Keys x2 6 Steel Bar x1 7 Mounting Sleeve x1GB-1 GB-2
CONNECTION
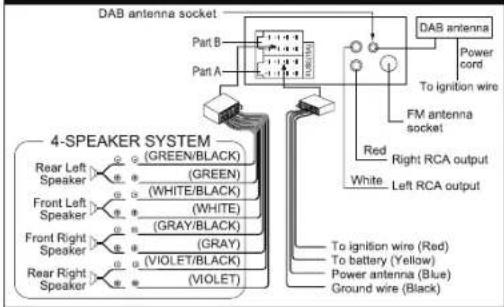
WIRING DIAGRAM
flowchart
graph TD
    A["4-SPEAKER SYSTEM"] --> B["DAB antenna socket"]
    A --> C["FM antenna socket"]
    A --> D["Right RCA output"]
    A --> E["Left RCA output"]
    B --> F["DAB antenna"]
    B --> G["FM antenna"]
    B --> H["Right RCA output"]
    C --> I["White"]
    C --> J["Red"]
    C --> K["White"]
    D --> L["To ignition wire (Red)"]
    D --> M["To ignition wire (Red)"]
    D --> N["To battery (Yellow)"]
    D --> O["Power antenna (Blue)"]
    D --> P["Ground wire (Black)"]
    A --> Q["Rear Left Speaker"]
    A --> R["Rear Right Speaker"]
    A --> S["Front Left Speaker"]
    A --> T["Front Right Speaker"]
    A --> U["Front Right Speaker"]
    A --> V["Front Left Speaker"]
    A --> W["Front Right Speaker"]
INSTALLATION
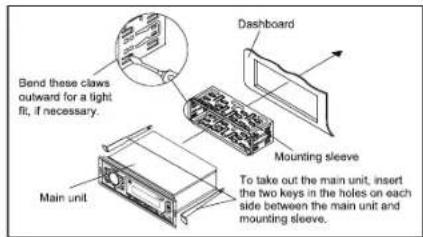
The unit is installed to be an anti-theft one. The chassis of the unit wears a sliding metal housing. Please do the connection of the power. Speakers and antenna are according to the requirement of the instruction book. Then install the sliding metal housing in the car as follows:
text_image
Bend these claws outward for a light fit, if necessary. Main unit Dashboard Mounting sleeve To take out the main unit, insert the two keys in the holes on each side between the main unit and mounting sleeve.

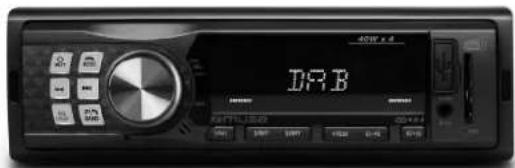
- Button: To turn unit on/off; To mute or restore sound
- To hang up the call; To select function mode
- VOL/SEL/PTY knob: volume, select, Program type selection knob
- RES (RESET) button
- LCD display
- USB port for MP3 playback
- SD/MMC card slot
- 1kip backward
- To select desired sound effects: FLAT/CLASSIC/ROCK/JAZZ/POP; Loudness On/Off
- Preset stations, Automatic storing, Search a track; To answer / redial the phone; To
select band: F1, F2, F3 and DAB1, DAB2, DAB3
11.▶hip forward - Built-in microphone
- 1/▶|| button: To select preset channel 1 in radio mode; To start or pause playback
- 2/INT button: To select preset channel 2 in radio mode; To start/cancel intro playback
- 3/RPT button: To select preset channel 3 in radio mode; To repeat playback
- 4/RDM button: To select preset channel 4 in radio mode; To start/ cancel random playback
- 5/-10 button: To select preset channel 5 in radio mode; To skip backward 10 tracks (mp3 only
- 6/+10 button: To select preset channel 6 in radio mode; To skip forward 10 tracks (mp3 only)
- AUX jack
Turn on/off the unit
Press ⏻ button to turn on the unit. Press and hold this button again to turn off the unit.
Selecting the mode
When the unit is on, press button repeatedly to select different source mode:
FM-USB CARD DAB BT AUX → →
Note: USB, CARD mode can not be selected if no such source was plugged in the unit.
Current time display
Press VOL/SEL/PTY button to display the current time when unit is ON.
Adjust time:
-
When the unit is ON. Press VOL/SEL/PTY button once to display the current time, then press and hold this button to enter into setting mode. The hour digits will flash.
-
Rotate volume knob anti-clockwise and clockwise to adjust the hour value. Press VOL/SEL/PTY button again to confirm the hour value.
-
The minute digits will flash, rotate volume knob anti-clockwise and clockwise to adjust the
minute value. Press VOL/SEL/PTY button to confirm.
Noted: It will confirm your setting if no key is pressed within 5 seconds.
Reset the unit
Operating the unit for the first time or after replacing the car battery, you must reset the unit. To set the unit to initial status, press RES button on the front panel with a pointed object. When some errors occur in display, you can also reset the unit, but it will erase the clock setting and some memorized functions.
SOUND FEATURES
Volume adjusting
To increase or decrease the sound level, rotate VOL/SEL/PTY knob clockwise or anti-clockwise.
Muting the sound
When the unit is ON, press ⬆ to mute the sound. Press again to restore.
Using VOL/SEL/PTY knob to select sound feature
Repeatedly press VOL/SEL/PTY knob
To select the desired mode for sound setting in the following order: "BAS"(BASS) →
*TRE"(Treble)—"DAL"(Balance) "FAD(Fader)
After selecting the desired mode, you can adjust the level by rotating the volume knob.
When you are listening to pop music, classic music or rock music, use the equalizer to adjust the sound quality. Press button repeatedly to select different equalizer mode in following
order: FLAT CLASSIC ROCK POP EQ off.
GB-3 GB-4
natural_image
Color gradient bar transitioning from black to white with no text or symbols

Loudness on /off
Press and hold EQ LOUD button until "LOUD ON" appears on display to activate LOUDNESS function. Press and hold this button again until "LOUD OFF" displayed to cancel LOUDNESS function. By this function, you can increase the low frequency, which can improve sound sensitivity.
Noted: Please refer to "LISTENING TO THE RADIO" for others items operation.
In DAB or FM radio mode, repeatedly press P1 BAND button to select bands in following order: DAB1 → DAB2 —DAB3 or F1 F2—F8. →
LISTENING TO DAB/DAB+ RADIO
- When the unit is ON, press "Button repeatedly to select DAB mode. The unit will start automatic scan for DAB/DAB+ stations if it's the first time to use. The display will change to "SCAN". A progress bar will show the progress of the scan and the number of stations found during the scan will also be displayed.
- When the scan is complete, the unit will select the first available station and start to play automatically. Stations will be listed in numerical and then alphabetical order by default. Note: When the DAB/DAB+ radio station list is stored, it will not search automatically again. Press and hold a button to search and list station.
- Use ◀◀ or ▶▶ to select through the list of stations. "TUNING" appears on display and will tune to the desired station after a few seconds.
Note:
- If no broadcasts are found by DAB/DAB+ scan, "NO SERVICE" appears in the display.
- For a better reception, extend the antenna or do the full scan again in another place.
- During the search operation, the sound level is automatically muted.
LISTENING TO FM RADIO
In FM radio mode, press ◀◀ or ▶▶I button to manual tuning, press and hold ◀◀◀ or ▶▶◀ I to automatic search. Note: For a better reception, extend the antenna
Scanning and memorizing stations
This unit can store 18 FM and 18 DAB/DAB+ stations.
- By P button
In DAB or FM radio mode, press and hold button for 3 seconds to start scanning for stations and store them automatically in memory. All preset stations are scrolled during few seconds under your selected band. To remain on a station, press again the button.
- By number button 1-6
- In DAB or FM radio mode, tune to a station by button.
- Press and hold one of the 1-6 number buttons for 2 seconds until LCD shows the corresponding number, which indicates that station is stored in the corresponding number button.
- Press 1-6 Number buttons to listen to stored stations.
- When you are listening to a station stored on a number button, press and hold another number button for more than 2 seconds to store the station on this number button. Note: The unit can be stored up to 6 stations for each band.
RDS (Radio Data System)
This unit has a built-in RDS decoder system that supports broadcast stations transmitting RDS data. This system can automatically switch to the broadcast station with the best reception as you move on long distances (AF switching). Also if a traffic announcement (TA) or programme type (PTY) is broadcast from a RDS station, no matter what mode you are in. this broadcast is received.
Press VOL/SEL/PTY button once to display the current time, press this button again will enter into setting menu. Shortly press VOL/SEL/PTY knob to choose your desired item. Rotate VOL/SEL/PTY knob to choose corresponding setting desired. AF(ON/OFF) REG(ON/OFF) TA(ON/OFF) TA VOL-SON(ON/OFF) → SEL PTY -SIFEREO/MONO DXLOCAL
- Alternative frequency (AF)
When the AF switching mode is selected, the radio scans the signal strength of alternative frequencies. A new AF is stronger than the current station, it switches over to that frequency for very short time, and the new frequency is displayed for 1-2 second. (When AF flashes on LCD, it will search for the stronger RDS station.)
Segment off: AF switching mode off.
Segment on: AF switching mode on, and receive RDS information.
Segment flashing: AF switching mode on, but RDS information is not received yet.
- Region ON/OFF (REG)
When the AF is on. Repeatedly press VOL/SEL/PTY button until "REG" appears in the display, rotate VOL/SEL/PTY knob to switch between "REG ON" and "REG OFF" mode. REG ON: should be selected to listen to the REGIONAL broadcast of the current station, even if there is a national broadcast of this station. REG OFF: should be selected to listen to the national broadcast of this station.
- Traffic alarm (TA)
In the TA standby mode, when a traffic announcement broadcast starts, the traffic announcement broadcast is received as top priority regardless of the function mode so you can listen to it. If you select TA mode off, while a traffic announcement broadcast is being received, the traffic announcement broadcast reception is cancelled and the unit goes into the TA standby mode.
GB-5 GB-6
natural_image
Color gradient bar transitioning from black to white with no text or symbols

TA SEEK:
When newly tuned station does not receive TP information for 5 seconds, the radio retunes to next station which doesn't have the same station (PI) as the last station, but has the TP information. When TP information gets lost at the current station for return time which is set by RETUNE S or RETUNE L, the radio starts to return to next same PI station. When PI station does not catch in one cyclic search, the radio retunes to next station with TP information. Note: In TA SEEK mode, the current station can be changed to the completely different station because the unit searches TP station when the field (signal) strength of the current station is very weak, or the current station has no "TP" signal. (The higher priority is TP rather than PI.)
TA ALARM:
When this mode is selected, any automatic return mode is not activated. Only double beep sound (ALARM) is output. So, in this mode, the unit keeps the current station anyhow. (The PI priority is higher than TP.) When newly tuned station doesn't have TP information for 5 seconds, beeps come out. When TP information gets lost at the current station for return time, the beep sound is output. When newly tuned station doesn't have RDS signal, "PI SEEK" is suppressed somewhat.
- TA VOL (VOLUME)
The default TA volume value is 20. You can set it to another value.
- EON (Enhances Other Network Information)
Repeatedly press VOL/SEL/PTY knob until "EON" appears in the display, rotate VOL/SEL/PTY knob to switch between "EON ON" and "EON OFF" mode. When receive the EON information, the EON indication is on. With EON facility, it offers the ability for local stations to "break into" a national station's broadcast for the duration of a Traffic Announcement.
- Program type selection (PTY)
When PTY is selected, the radio starts to search corresponding PTY information and stops when the corresponding PTY information is detected. If corresponding PTY information does not exist any more, PTY is automatically stopped to normal mode.
Shortly press VOL/SEL/PTY knob, when "SEL PTY" appears on display. Rotate VOL/SEL/PTY knob to select below programs: NEWS/ AFFAIRS/ INFO/ SPORT/ EDUCATE DRAMA/ CULTURE/ SCIENCE/ VARIED POP M/ ROCK M/ EASY M/ LIGHT M/ CLASS (CLASSICS)/ OTHER M/ WEATHER/ FINANCE CHILD(CHILDREN)/ SOCIAL/ RELIGION PHONE IN/ TRAVEL/ LEISURE/ JAZZ/ COUNTRY NATIONAL M/ OLDIES/ FOLK M/ DOC(DOCUMENT)/ TEST
After few seconds, the radio automatically searches a station with corresponding PTY information.
- STEREO/MONO
Repeatedly press VOL/SEL/PTY knob to select "STEREO/MONO" mode. FM listening is generally done in Stereo mode. However, if the signal is weak or reception is not as good as you would like, switching to Mono mode usually improves the overall sound quality.
Repeatedly press VOL/SEL/PTY knob to select "DX/LOCAL" mode. DX: The weak signal out-of-town stations may be received. LOCAL: The strong signal local stations can be received.
GB-7 GB-8
LISTENING TO USB/CARD
To insert an USB device (not included)
Connect your USB device to the USB port on front panel. It will switch to "USB" mode and start playback automatically.
To insert a SD/ MMC card (not included)
Insert a SD/MMC card to the card slot. It will switch to "CARD" mode and start playback automatically.
Basic player functions
Play/pause: Press the 1▶|| button to pause playback. Press again to resume playback.
Skip/fast search:
- Press ▶ skip forward to next song.
- Press ◄ button to play the previous song.
- Press and hold ▶ to search quickly within a track.
- Press 5/-10 or 6/+10 to skip to 10 songs backward or forward.
- Long press 5/-10 or 6/+10 to select previous folder or next folder in MP3 mode.
Intro scan:
Press 2/INT button to play first 10 seconds of each track and "INT ON" appears on display. Press again to cancel intro playback and "INT OFF" appears.
Repeat:
Press 3/RPT button repeatedly to select a play mode: RPT ONE, RPT DIR, RPT OFF
Random playback:
Press 4/RDM button to play all files in random order, and "RDM ON" appears on display. Press again to cancel this function and "RDM OFF" appears.
Note:
- The total number of MP3 files on the USB device and Micro SD card should not exceed 9999.
- The device may not contain more than 99 directories.
- The reading time takes about a few seconds or more depending on the amount of MP3 files and folders on USB device and Micro SD card.
- Do not put anything other than a USB device to the port of this unit. Other objects may damage the USB mechanism.
- Do not put anything other than a micro SD card to micro SD card slot of this unit. Other objects may damage the card mechanism.
- The USB socket must not be connected to the computer directly, for that may damage the unit.
- There are many USB devices and micro card in the market. We cannot guarantee to support all different models. Please try another USB device and micro SD card if your device is not supported.
- The unit might not support all the multimedia files stored in USB or micro SD card because it includes some special playback procedure which might not be compatible with the procedure of this unit.
natural_image
Color gradient bar transitioning from black to white with no text or symbols

LISTENING TO AUXILIARY SOURCE
- Connect your auxiliary source (e.g. mp3 player) to the AUX jack.
- Press button to turn the unit on.
- Press to select AUX mode.
- Start playback from your auxiliary source.
- Adjust the volume to desired level.
- Disconnect your auxiliary source from the Aux jack, press button to select other source.
BLUETOOTH FUNCTION
The Bluetooth ^® word mark and logos are registered trademarks owned by Bluetooth SIG, Inc. and any use of such marks by New One S.A.S is under license. Other trademarks and trade names are those of their respective owners.
- Before operate the Bluetooth function, make sure your mobile phone supports Bluetooth function.
- For different model of mobile phone, Bluetooth emissive power has some difference. To get the best conversation quality, it is recommended that the distance between the mobile phone and the unit is within 3 meters (Max.10 meters).
- Don't put any metal object or any obstacle between the path of the mobile phone and the unit.
PAIRING
- When the unit is ON, press button repeatedly to select BT.
- On the Bluetooth device, enable Bluetooth and select "MUSE M-198DAB" from the Device List. (Refer to the user manual of the device to be connected for detailed operations.) If the Bluetooth device prompts for a pass code, use "0000". Some Bluetooth devices will ask you to accept the connection. You will hear an indication sound when pairing is successful. Then the LCD of the car audio system will display "BT READY".
Noted: If you have made Bluetooth connectivity before, a list of the previous search results is displayed. Select "MUSE M-198DAB" and confirm.
Answer/ Reject a call
When there is incoming call, the phone number appears on display.
Press P23 answer a call, "TALK IN" will appear on the display. Rotate volume knob to adjust the BT VOL.
Press to reject a coming call.
Dialing a Phone Call
To redial the last number retained in the memory of the mobile phone, press the BAND button twice. Notes:
- Re-dialing function is unavailable if there is no dial record feature in your mobile phone.
- If the conversation is not clear, try to move closer to the microphone.
Transfer the call between mobile phone and the unit
During the talking mode, you can press and hold "2/INT" button to transfer the phone call between the mobile phone and the unit. When making an outgoing call, it's not possible to transfer if the call is not being answered yet.
BLUETOOTH AUDIO
The unit supports Bluetooth audio function. If your mobile phone can play stereo music, when pairing successful, press access Bluetooth audio mode, "MEDIA" appears on display. The audio file in your mobile phone starts to play via the car radio.
Play/pause: Press the 1▶|| button to pause playback. Press again to resume playback.
Skip to next or previous track:
- Press ▶ skip forward to next track.
- Press to play the previous track.
Notes:
- This system will not operate or may operate improperly with some Bluetooth mobile phones/audio players.
- There are many mobile phones in the market. We cannot guarantee the compatibility of all mobile phones together with the unit.
- If you found the conversation is not clear, try to move closer to the microphone.
Hereby, NEW ONE S.A.S, declares that this MUSE M-198 DAB is in compliance with the essential requirements and other relevant provisions of Directive 2014/53/EU. The declaration of conformity may be consulted at www.muse-europe.com
MAINTENANCE
Precaution
- Clean the front panel with a soft cloth, or damp chamois leather. Never use solvents.
- Do not expose to rain or water;
- Do not drop or apply shock.
- Make sure that you keep your set away from high temperatures.
- The use of apparatus in moderate climates.
- Do not be exposed to dripping or splashing, and that no object filled with liquids, such as vases, shall be placed on the apparatus.
- No naked flame sources such as lighted candles should be placed on the apparatus.
Replacing the Fuse
Make sure the amperage matches the specified value when replacing the fuses. If the fuse is blown, check the power connection and replace with a new one. If the same problem occurs, it would be subjected to the malfunction in-house. In such cases, please consult the nearest service dealer.
GB - 9 GB - 10


TROUBLE SHOOTING GUIDE
| SYMPTOM CAUSE SOLUTION | ||
| No power. | The car ignition switch is not on. | If the power supply is connected to the car accessory circuits, but the engine is not moving, switch the ignition key to "ACC". |
| The fuse is blown. Replace the fuse. | ||
| No sound. | Volume is in minimum. Adjust volume to a desired level. | |
| Wiring is not properly connected. Check wiring connection. | ||
| The operation keys do not work. | The built-in microcomputer is not operating properly . | Press the RES button. Front panel is not properly fixed into its place. |
| The radio does not work. The automatic radio station selection does not work. | The antenna cable is not connected. | Insert the antenna cable firmly. |
| The signals are too weak. Select a station manually. | ||
SPECIFICATIONS
General
Power Requirement
Load Impedance
Max. Power Output
Tone Controls
12V DC (11-16V allowable)
4 ohms
40W x 4
±10 dB
Bass at 100 Hz
Treble at 10 kHz
Dimensions
Weight Approx.
Approx. 58 x 140 x 180 (h / w / l)
Approx. 0.550 kg
RADIO
FM: 87.5 -108 MHz
DAB+: 174.928-239.2 MHz
Usable Sensitivity (-30dB)
Signal-to-noise Ratio
Stereo Separation
12 dBuV
50 dB
30 dB (1 kHz)
USB/MP3 Section
Signal-to-noise Ratio
Separation
Distortion
Frequency Response
60 dB
50 dB
< 0.5%
20 - 20000 Hz
GB - 11 GB - 12
BLUETOOTH
Bluetooth Version: V2.1 with EDR
Bluetooth: 2.402-2.48GHz
RF Output Power: 4 dBm
Working Distance: Up to 10 meters measured in open space (wall and structures may affect range of device)
Note: Design and specification are subject to change without notice.
SAFETY INFORMATION
CAUTION
RISK OF ELECTRIC SHOCK
DO NOT OPEN
ATTENTION: To reduce the risk of electric shock, do not remove the
cover. There are no user serviceable parts inside the unit. Refer all
servicing to qualified personnel.

The lightening flash with arrowhead symbol within the triangle is a warning sign alerting the user of "dangerous voltage" inside the unit.

The exclamation point within the triangle is a warning sign alerting the user of important instructions accompanying the product.
WARNING - To reduce the risk of fire or electric shock, do not expose this appliance to rain or moisture.

If at any time in the future you should need to dispose of this product please note
that Waste electrical products should not be disposed of with household waste. Please recycle where facilities exist. Check with your Local Authority or retailer for
recycling advice. (Waste Electrical and Electronic Equipment Directive)
NEW ONE S.A.S
10, Rue de la Mission, 25480 Ecole Valentin, France



AUTO-RÁDIO DAB+/FM COM BLUETOOTH E USB/SDPT
INSTRUÇÕES DE SEGURANÇA IMPORTANTES
Connect your USB device to the USB port on front panel. It will switch to "USB" mode and start playback automatically.
CLASSIC ROCK POP EQ off.
DE-3 DE-4


- EON (Enhanced Other Networks Information)
text_image
Control panel interface with buttons and display screen, labeled 'Control Panel' in ChineseReinicio
CONTENIDO DE LA CAJA
FM → USB → CARD → DAB → BT → AUX
UW APPARAAT UIT DE VERPAKKING HALEN
FLAT CLASSIC ROCK POP EQ off.
natural_image
Color gradient bar transitioning from black to white, no text or symbols present