Osyrion Spot - Parasol Glatz - Free user manual and instructions
Find the device manual for free Osyrion Spot Glatz in PDF.

User questions about Osyrion Spot Glatz
0 question about this device. Answer the ones you know or ask your own.
Ask a new question about this device
Download the instructions for your Parasol in PDF format for free! Find your manual Osyrion Spot - Glatz and take your electronic device back in hand. On this page are published all the documents necessary for the use of your device. Osyrion Spot by Glatz.
USER MANUAL Osyrion Spot Glatz
natural_image
Simple line drawing of a ceiling lamp with wires, no text or symbols presentEN Installation and operating instructions 22
text_image
1.2 Click 1.31
Spots montieren
- OSYRIION Spot Set of 2
- OSYRIION Spot Set of 4
text_image
1.3 indirect 1.4 direct 1.51
text_image
1.2 Click 1.3①
Montage des spots
Optional accessories 23
Technical data 23
Safety information 24
Device overview / Included in delivery 26
Charging the spots 27
Changing the battery in the remote control 27
Assembly and commissioning 28
Use 28
Pairing of additional spots 29
What to do if... 30
Warranty 30
EU Declaration of Conformity 31
Disposal 31
Intended use
The product serves as an umbrella lighting. The product may only be used in private households, in the catering and hotel sector or in a comparable environment. The product may only be used in accordance with these installation and operating instructions. Any use other than the uses described in these installation and operating instructions shall be considered improper use. We reserve the right to make modifications due to technical advances. In these instructions the OSYRION Spot may also be referred to as 'the product' or 'accessory'.
Warning words used
!DANGEROUS Immediately dangerous situation which can result in death or severe injuries.
!CAUTION Potentially dangerous situation which can result in minor or moderate injuries.
!NOTICE A situation that can lead to property damage.
23
Welcome
Congratulations on the purchase of your new OSYRION Spot umbrella lamp. You have purchased a high quality parasol. These instructions forms part of this product. It contains important safety, usage and disposal information for users of the product. Please familiarise yourself with all the information listed before using the product. The product may only be used as described herein and for the use scenarios stated. If you continue to use it and care for it properly, your OSYRION Spot parasol will serve you well for many years to come.
Optional accessories
The OSYRION Spot can be supplemented with additional sets of the OSYRION Spot. The additional spots can be added to the existing remote control up to a maximum of 8 spots.
The following sets can be used as an extension:
- OSYRIION Spot 2er Set
- OSYRION Spot Set of 4
Technical data
Spots
| Size | ø10 cm |
| Battery type | Li-Ion |
| Specifications | 3.7V, 2.5 Ah, 9.25 Wh |
| Charging port | USB-C (5V / 1A) |
| Colour temperature | 2,700 K |
| Maximum brightness | 400 lumens (per spot) |
| Illumination duration at recommended brightness | 4 h |
| Illumination duration at maximum brightness | 2 h |
| Charging time to full charge | 4 h |
| IP protection class | IP54 |
| Operating temperature during charging | 0 - 35 °C |
| Operating temperature when discharging | -10 - 35 °C |
Remote
| Battery | CR 2032 |
| Operating frequency band | 2400 - 2483.5 MHz |
| Transmitting power | ≤ 10 mW |
Safety information
READ ALL THE SAFETY INFORMATION CAREFULLY AND MAKE SURE THAT YOU UNDERSTAND THEM.
- Follow all the instructions to avoid accidents, fire, explosions, electric shock or other hazards that could cause property damage and / or severe or fatal injuries.
- Ensure that each person using the product has read and observes these warnings and instructions.
- Keep these installation and operating instructions for the future. It must be passed on to subsequent users of the product.
- The manufacturer is not liable for material damages or injuries caused by incorrect use or the failure to observe the safety instructions. The warranty becomes invalid in such cases.
• Children must not play with the product.
- !DANGER Always keep children away from packaging material - this constitutes a choking hazard. Children underestimate risks. This product is not a toy.
- Children aged 8 years or over and persons with reduced physical, sensory or mental capabilities, lack of experience or knowledge may only use the appliance if they are supervised by a person who is responsible for their safety or if they have been shown how to use the appliance safely and they have understood the risks inherent in its use. Cleaning and maintenance tasks may not be carried out by children without supervision.
- Do not allow the product to fall or knock against anything.
- Only use original accessories / spare parts.
- Product and technical modifications are not permitted.
- Check accessories regularly to be sure that no undue wear and tear or damage has occurred. If defects are found, have them repaired before further use.
- Mains connection: The voltage must correspond to the specifications on the rating plate of the charger.
- Repairs to the charger / spot should only be carried out by a qualified technician. Do not open the spot. Unprofessional repairs can entail serious risk to the user.
- Never use the charger near water (bathtubs, wash basin, etc.). Do not expose to rain or moisture.
- If the charger/spot falls into water, before removing it first pull out the mains plug. The device must be checked by a qualified technician before being used again.
- Charge individual spots completely (approx. 4 h) before first use.
- Charge spots after longer periods of non-use / after 6 months / before storing. Avoid deep discharging at all costs.
- Children and animals must not be allowed to play with the spot or the charger.
- If smoke appears, switch off the unit immediately and pull out the plug.
- In case of abnormal noises, smells, overheating, smoke or leaking liquid, switch off the spot immediately, disconnect the mains plug, remove the spot from the charger and bring it into the open air.
- Do not touch or swallow leaking liquids. If contact with skin/clothing occurs, lather immediately with soap and rinse with plenty of water. If the liquid is swallowed or comes into contact with the eyes, contact a toxicological institute immediately.
- Never use or charge swollen, leaking or damaged spots. If your spot is abnormal in any way, please contact a technician.
- Keep magnet away from magnetic data carriers (credit cards, etc...) and other sensitive devices.
- Keep magnet away from pacemakers, it may affect the function of the pacemaker.
26
Device overview / Included in delivery
* Set of 4
1 × Instruction manual
2 × Adapter plate (4 ×*)
Magnet
On/off switch
USB-C charging port
2 × LED light (4 ×*)
1 × Remote control
1×2-way USB charger (2×*)
2 × USB-C cable (4 ×*)
8 × Rubber bands (16 ×*)
58 mm
- TEAKWOOD
- CASTELLO® Pro
- AMBIENTE Nova
- AURA
39mm
- ALEXO ^®
- PENDALEX® P+
51mm
- ALU-SMART
- ALU-TWIST
- PIAZZINO
- SUNGWING® Casa
- FORTINO® Riviera
- FORTANO®
- SOMBRANO ^® S+
- FORTERO®
- FORTELLO® LED
27
Charging the spots
- Use the supplied USB charger or a commercially available USB charger to charge the OSYRION Spot.
- If smoke appears, switch off the unit immediately and pull out the plug.
- In case of abnormal noises, smells, overheating, smoke or leaking liquid, switch off the spot immediately, disconnect the mains plug, remove the spot from the charger and bring it into the open air.
1
1.2
1.1
loading full
- Connecting the charger
- Plug in the charger
Connect the mains plug of the charger to a suitable socket. The mains voltage must correspond to the value on the rating plate.
Changing the battery in the remote control
- Always keep batteries out of the reach of children. If a battery is swallowed, a doctor should be consulted immediately.
- Incorrect usage creates a risk of explosion.
- Always wrap batteries during storage or disposal to avoid discharge, ignition or damage.
• Always dispose of batteries properly in accordance with applicable laws.
1
Open cover
! Unlock cover carefully.
Remove foil before first use
2
CR 2032
Replace battery, Close cover
! Use battery type CR 2032 and ensure correct polarity!
Assembly and commissioning
text_image
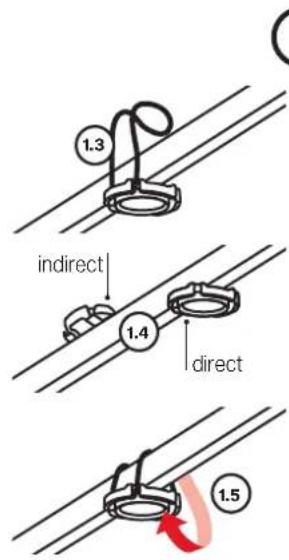
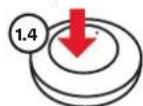
1.3 indirect 1.4 direct 1.51
Mounting on the open sunshade
- Unpack spots
- Check scope of delivery (page 26)
- Select suitable rubber band (page 26)
- Position adapter plate at suitable place on sunshade frame Select direct / indirect lighting
- Tighten rubber band
! Mount adapter plate and spot only at locations that do not collide with either the shade or the fabric.
! Dispose of packaging materials properly and keep away from children.
Do not install defective material.
In case of damage, please inform the transport service provider immediately.
Use
text_image
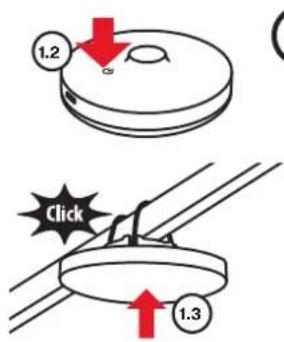
1.2 Click 1.31
Mounting the spots
- Open shade according to separate instructions
- Switch on spot (with the button on the back)
- Mount spots
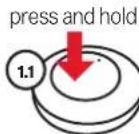
After 72 hours of non-use, the spot will automatically go into sleep mode. Switch on the spotlight using the button on the back.
press and hold 1 sec.

2
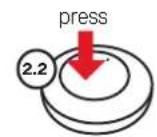
- Control the light
To control the functions, tap the buttons several times or keep them pressed down. - Switch on the light / Adjust brightness
Press button (start brightness 50%) Press key several times, each Each press of the button changes the brightness: 50% > 70% > 100% > 10% > 30%. - Switch off the light
Press and hold the key for one second.
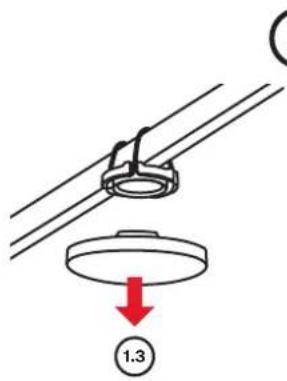
text_image
1.33
Dismantling the spots
- Remove the spots
- Store in a dry place
- Close the sunshade according to the separate instruction manual
! The adapter plates can remain mounted on the sunshade when the lighting is not in use.
Load the spots if necessary
Pairing of additional spots
press and hold

press
D
! Charge single spots completely (approx. 4h) before first use.
1. Prepare the remote control
Press and hold the button for 5 seconds
(control lamp flashes)
2. Prepare the spot
Press and hold the button for 5 seconds (spot flashes)
3. Pairing successful
The Spot shines continuously
4. Check the pairing
Press the button several times, each button press changes the brightness
! Maximum 8 spots per remote control.
! The remote control remains in pairing mode for 2 minutes or until the button is pressed. Repeat step 3 for each additional OSYRION Spot.
OSYRION Spot can only be paired with one remote control at a time.
What do you have to do if...
| Problem | Solution approaches |
| Spot does not respond to remote control | Charge the Spot completely. Switch the Spot on using the button on the back. Change the battery of the remote control. |
| Spot does still not respond | Pair the lamp and the remote control again according to page 29. |
| The adapter plate is loose on the sunshade | Use a smaller rubber band. |
| Sunshade will not close | Remove the Spot before closing the parasol. Mount the adapter plate only in places that cannot collide with the parasol. |
Warranty
Please contact your GLATZ partner before returning the product. The warranty on the accessories lasts for 24 months from the date of purchase. The warranty expires in the following cases:
• External application of excessive force
- Inappropriate operation or maintenance of the accessories
• Damage arising from force majeure
Improper positioning of the adapter plate and thus the OSYRION Spot may result in fabric damage. Make sure that the selected position does not cause a collision with the parasol frame or fabric. OSYRION Spot must be removed before closing the parasol, otherwise it will fall down.
EC Conformity declaration
We, Glatz AG, Langfeldstrasse 113, CH-8500 Frauenfeld, SWITZERLAND, hereby declare that this product complies with the directives of the European Community. The applicable declarations of conformity can be found on our Download area at www.glatz.com.
Disposal

This symbol on the product, accessories or packaging indicates that the product must not be treated as unsorted domestic waste but must be disposed of separately. Dispose of the product at a designated recycling collection point. The disposal of electrical and electronic equipment within the EU and in other
European countries is carried out through collection points that have systems for the separate collection of electrical and electronic equipment. By disposing of the product correctly, you will help to avoid possible environmental and health hazards that may be caused by improper treatment of waste equipment. Recycling materials helps to conserve natural resources. So please do not dispose of old electrical or electronic equipment with unsorted domestic waste.
The packaging is made of environmentally friendly materials that can be disposed of at your local recycling facilities. By disposing of the product correctly, you will help to avoid possible environmental and health hazards. The product is made of metal and synthetic parts. End-of-life disposal must be carried out in accordance with regional environmental and waste regulations.
32
Indice
Benvenuti 33
text_image
1.2 Click 1.31