
Vita Torna - Parasol Glatz - Free user manual and instructions
Find the device manual for free Vita Torna Glatz in PDF.

User questions about Vita Torna Glatz
0 question about this device. Answer the ones you know or ask your own.
Ask a new question about this device
Download the instructions for your Parasol in PDF format for free! Find your manual Vita Torna - Glatz and take your electronic device back in hand. On this page are published all the documents necessary for the use of your device. Vita Torna by Glatz.
USER MANUAL Vita Torna Glatz
natural_image
Line drawing of a simple outdoor umbrella with a flat roof and support structure (no text or symbols)EN Installation and operating instructions 22
natural_image
Line drawing of various umbrella parts including case, handle, and base (no text or symbols))
Schirm auspacken
Lieferumfang:
text_image
Diagram showing two mechanical or electrical component configurations with red arrows and circled magnified view highlighting a section labeled 1.4.Schirm öffnen
text_image
Diagram illustrating a hand operating a device with red directional arrows indicating rotation or movement, alongside a mechanical setup.Schirmdach neigen
natural_image
Line drawings of various umbrella parts including case, handle, and base (no text or symbols)The image is too blurry to recognize any text content.
Déballer le parasol
text_image
Diagram showing mechanical assembly with numbered parts and red directional arrows indicating motion or force
Ouvrir le parasol
text_image
Diagram illustrating a hand operating a device with red directional arrows indicating motion or force, alongside a stand-mounted device.
Optional accessories 23
Technical data
23
Safety information 24
Installation and initial operation 26
Use 28
Care and maintenance 30
Disassembly 30
Warranty
31
Disposal 31
Intended use
The product serves as a device for the protection of the human body from solar radiation. The product may only be used in private households, in the catering and hotel sector or in a comparable environment. The product may only be used in accordance with these installation and operating instructions. Any use other than the uses described in these installation and operating instructions shall be considered improper use. We reserve the right to make modifications due to technical advances. In these instructions the VITA Torna may also be referred to as «the product» or «parasol».
Warning words used
!DANGEROUS Immediately dangerous situation which can result in death or severe injuries.
!CAUTION
Potentially dangerous situation which can result in minor or moderate injuries.
!NOTICE
A situation that can lead to property damage.
23
Welcome
Congratulations on the purchase of your new VITA Torna. You have purchased a high quality parasol. These instructions forms part of this product. It contains important safety, usage and disposal information for users of the product. Please familiarise yourself with all the information listed before using the product. The product may only be used as described herein and for the use scenarios stated. If you continue to use it and care for it properly, your VITA Torna parasol will serve you well for many years to come.
Optional accessories
A high quality range of accessories is included with your parasol: It includes, among other things, the following products, which go perfectly with your parasol:
- Base - Ground Socket
- Wall console - Lawn spikes
- Support pipes
- OSYRION Spot
Consult your GLATZ dealer about this.
Technical data
| Size [cm] | Base area [ m^2 ] | Closing height [cm] | Passage height [cm] | Overall height [cm] |
| ø 270 | 5.2 | 100 | 205 | 235 |
| ø 300 | 6.4 | 90 | 205 | 240 |
| ø 330 | 7.7 | 75 | 205 | 240 |
| 240×240 | 5.8 | 70 | 205 | 240 |
| 210×150 | 3.2 | 105 | 205 | 230 |
| 250×200 | 5.0 | 80 | 205 | 240 |
Details when using the ground socket.
Safety information
READ ALL THE SAFETY INFORMATION CAREFULLY AND MAKE SURE THAT YOU UNDERSTAND THEM.
- Follow all the instructions to avoid accidents, fire, explosions, electric shock or other hazards that could cause property damage and / or severe or fatal injuries.
- Ensure that each person using the product has read and observes these warnings and instructions.
- Keep these installation and operating instructions for the future. It must be passed on to subsequent users of the product.
- The manufacturer is not liable for material damages or injuries caused by incorrect use or the failure to observe the safety instructions. The warranty becomes invalid in such cases.
- The protective effect against hazardous UV radiation varies depending on the environment. Additional measures to protect your skin are possibly also necessary.
• Children must not play with the product. - !DANGER Always keep children away from packaging material - this constitutes a choking hazard. Children underestimate risks. This product is not a toy.
- Children aged 8 years or over and persons with reduced physical, sensory or mental capabilities, lack of experience or knowledge may only use the appliance if they are supervised by a person who is responsible for their safety or if they have been shown how to use the appliance safely and they have understood the risks inherent in its use. Cleaning and maintenance tasks may not be carried out by children without supervision.
- Do not use the device if you are suffering from a lack of concentration /attention or under the influence of drugs, alcohol or medication.
- The product must be placed in a base or a ground sleeve that is firmly anchored.
- Do not allow the product to fall or knock against anything.
- Check the span of the parasol before opening / closing it.
- Make sure there are no persons / objects in the movement area when opening / closing it. Otherwise, injuries / damage may occur.
- !DANGER Close the parasol when the wind picks up, in stormy weather conditions and / or when snow is falling.
- Observe the specifications concerning the maximum per-
missible wind speed for a fixed ground anchorage (ground sleeve inserted in concrete). The permissible wind speed is reduced if a different anchorage method is used.
- Unattended parasols may not remain opened. Any damage is not covered by the warranty. Always secure closed parasols with a binding belt / ribbon.
- Only use original accessories / spare parts.
- Product and technical modifications are not permitted.
- The parasol must be monitored during opening and closing.
- Check parasol and accessories regularly to be sure that no undue wear and tear or damage has occurred. If defects are found, have them repaired before further use.
- Do not use any solvents or abrasive cleaning agents.
- Dismantled parasols should only be stored lying down.
- When using a fixed floor anchorage, the installation must be performed by specially trained persons in accordance with the separate installation instructions.
- Do no ignite a naked flame in the proximity of, or under, the parasol.
Assembly and commissioning
natural_image
Line drawings of various umbrella parts including handle, seat, and base (no text or symbols)•
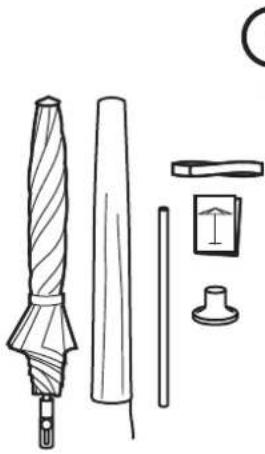
Unpack the parasol
Supplied with:
- Upper pole with shade canopy
- Lower pole
- Support tube cover
- Tie-rope (fabric quality 4 + 5)
- Protective cover
- Operating instructions
! Dispose of packaging materials properly and keep away from children. Do not install defective material. In case of damage, please inform the transport service provider immediately.

text_image
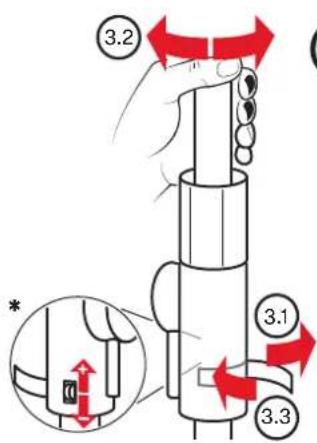
3 1. 2. 3. 4. 3.1 3.2 3.3 *Put the parasol together
- Open clamping lever
- Slide upper pole with parasol over lower pole
- Tighten clamping lever
* The clamping force can be varied by means of an adjusting wheel. The clamping lever must be open during this process.
- Check that it is firmly attached
text_image
2.1 2.2 2.4 2.52
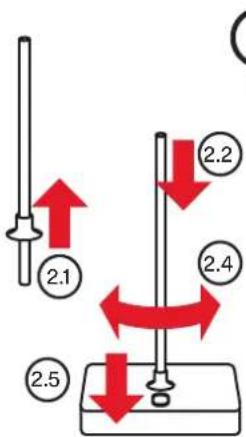
Setting up the lower pole
- Slide the support tube cover over the lower pole
- Slowly push the lower pole over the stand tube until it reaches the height of the locking pin
- Press the locking pin, lower the lower pole as far as it will go
- Turn the lower pole until the locking pin engages in the hole at the lower pole
- Lower the support tube cover
! Caution, do not pinch fingers during step 2.4!
Minimal base weights:
| Size [cm] [kg] [km/h (Bft.)] | minimum weight | maximum wind speed* |
| ø270 40 55 (7) | ||
| ø300 40 50 (7) | ||
| ø330 55 45 (6) | ||
| 240 x 240 40 45 (6) | ||
| 210 x 150 30 55 (7) | ||
| 250 x 200 40 45 (6) | ||
| * maximum wind speed when it is securely anchored in the ground. | ||
Use
text_image
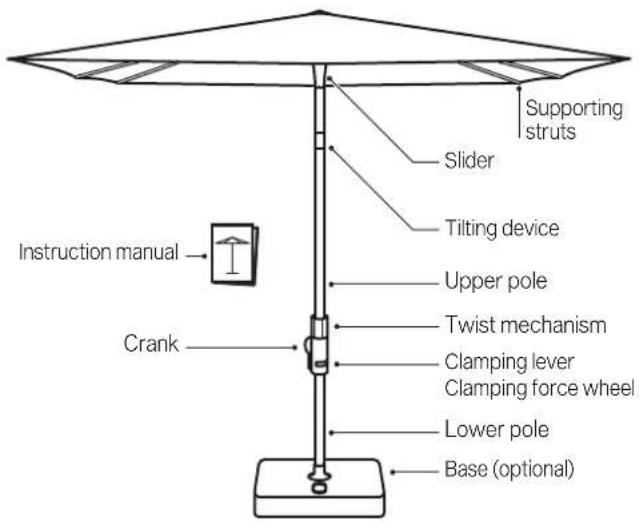
Supporting struts Slider Tilting device Instruction manual Crank Upper pole Twist mechanism Clamping lever Clamping force wheel Lower pole Base (optional)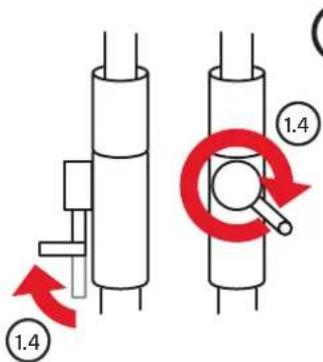
text_image
Diagram showing two mechanical or electrical component configurations with red arrows and circled magnified view highlighting a specific section.①
Open parasol
- Remove any protective cover
- Release binding belt / ribbon
- Pull the ribs outwards slightly
- Completely open the parasol through use of the crank
When tipping, pull the handle of the crank down slightly.
text_image
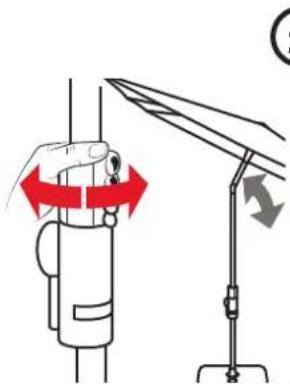
3.2 3.1 3.3 *3
Align the parasol
- Open clamping lever
- Set the appropriate direction
- Tighten clamping lever
* The clamping force can be varied by means of an adjusting wheel. The clamping lever must be open during this process.
text_image
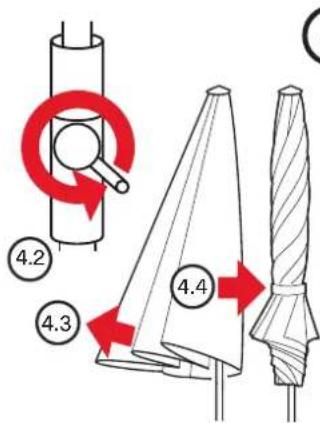
4.2 4.3 4.44
Close parasol
- Parasol canopy in an upright position
- Turn the hand crank until the parasol is closed
- Pull out / wrap fabric segments
- Apply binding belt/ribbon
- Apply protective cover if necessary
! Only wrap / pack completely dry parasols.
natural_image
Illustration of a hand holding a device with red directional arrows indicating rotation or movement (no text or symbols))
Tilt the parasol canopy
Adjust the tilt of the parasol canopy by turning the twist mechanism.
Rotate the twist mechanism until desired parasol tilt is reached.
Handling and maintenance
- Allow the parasol to dry when open to prevent the formation of mould and discolouration.
- A protective sleeve protects the parasol and will extend its service life.
- Only pull the protective sleeve over the dry parasol when it is dry.
- Do not clean the protective sleeve in the washing machine. Do not use chemicals.
- Clean the parasol cover when needed with lukewarm water, fine detergents and a sponge.
- Do not use any bleach or sharp objects, to avoid damage to the cover.
- Check the tightness of all screws from time to time and tighten them if necessary.
- If the parasol is located in a highly exposed position, increased wear and tear must be expected. In such cases we recommend more intensive care and maintenance.
- In most cases, defective parasols can be repaired by your GLATZ partner. Only use original replacement parts FROM GLATZ.
Disassembly
Dismantle the parasol if it is not going to be used for a long time.
DANGER! DANGER OF TIPPING DANGER OF INJURY IF THE PARASOL TOPPLES OVER
- Close and tie the parasol properly.
- Dismantle the parasol in reverse mounting direction.
- Store the parasol in lying position together with all accessories in a dry place.
Warranty
Please contact your GLATZ partner before returning the product. The warranty on the parasol lasts for 24 months from the date of purchase. The warranty expires in the following cases:
• External application of excessive force
- Inappropriate operation or maintenance of the parasol
• Damage arising from force majeure
The wind guarantee for an open parasol is limited. The maximum permissible wind speeds always require a fixed anchorage in the ground. If there are several parasols, a minimum distance of 20 cm must be maintained between any two of them. Likewise, a minimum distance of 20 cm must be maintained between the parasol and walls.
Disposal
This symbol on the product, accessories or packaging indicates that the product must not be treated as unsorted domestic waste but must be disposed of separately. Dispose of the product at a designated recycling collection point. The packaging is made of environmentally friendly materials that can be disposed of at your local recycling facilities. By disposing of the product correctly, you will help to avoid possible environmental and health hazards. The product is made of metal and synthetic parts. End-of-life disposal must be carried out in accordance with regional environmental and waste regulations.
natural_image
Line drawings of various umbrella parts including handle, base, and base mount (no text or symbols)-
natural_image
Pure mechanical diagram showing a cylindrical component with a red arrow indicating direction (no text or symbols)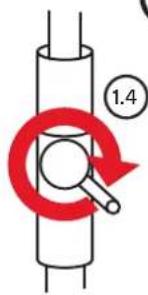
text_image
1.4①
Apertura ombrellone
text_image
Diagram showing a hand holding a device with red directional arrows indicating rotation or movement, alongside a crane-like structure with arrows.2
natural_image
Line drawing of various umbrella parts including handle, base, and socket (no text or symbols)Desempaquetar la sombrilla
text_image
Diagram showing a hand holding a device with red directional arrows indicating rotation or movement, alongside a mechanical arm.2