
PVQ820H26E - Cooker BOSCH - Free user manual and instructions
Find the device manual for free PVQ820H26E BOSCH in PDF.

| Product type | Cooktop with integrated extractor (built-in) |
| Brand | Bosch |
| Model | PVQ820H26E |
| Category | Cooker |
| Appliance weight | 25 kg (maximum) |
| Worktop load capacity | 60 kg (minimum) |
| Electrical connection | Connection 1N, 2N, 3N or 2L/2N (according to diagram) |
| Extraction modes | External extraction and recirculation (with adapter) |
| Extraction duct diameter | 150 mm (round) or equivalent flat duct 177 cm² |
| Filters supplied | Grease filter, anti-odor filter (recirculation), acoustic filter (extraction) |
| Compatible worktop material | Natural stone, Corian, solid wood (not plywood) |
| Safety distance for implants | 10 cm minimum (permanent magnets) |
| Maximum cabinet temperature | 90 °C |
| Air outlet area in recirculation mode | 400 cm² (minimum) |
| Table ventilation area | 200 cm² (minimum) |
| Installation type | Flush-mounted or surface-mounted |
| Accessories included | Gasket, recirculation adapter, ducts, diffuser, retaining brackets |
Frequently Asked Questions - PVQ820H26E BOSCH
User questions about PVQ820H26E BOSCH
0 question about this device. Answer the ones you know or ask your own.
Ask a new question about this device
Download the instructions for your Cooker in PDF format for free! Find your manual PVQ820H26E - BOSCH and take your electronic device back in hand. On this page are published all the documents necessary for the use of your device. PVQ820H26E by BOSCH.
USER MANUAL PVQ820H26E BOSCH
m = 311
18
m = 311
20


29
m = 311
31

13/14
33
35
m = 311
36
37
39
38
41
43
44
45
m = 311
47
m = 311


55
56
es
Volumen de太少istro
After unpacking all parts, check for any damage in transit and completeness of the delivery.
Fig. 1
QR code for the installation video
This is were you will find the QR code for the installation video.
Fig. 2
Appliance dimensions
You will find the dimensions of the appliance here Fig. 3
Installation dimensions for flat duct bends
This is where you can find an overview of the installation dimensions for the flat duct bends.
Side view:
→Fig.4,→Fig.5,→Fig.6
Front view:
Fig. 7
Installation variants
This is where you can find an overview of the different installation variants.
Odour filter and adapter for circulating-air mode:
Fig. 8
Odour filter, diffuser and seal for circulating-air mode:
Fig. 9
Acoustics filter and seal for air extraction mode:
→Fig.10
Note: Channels suitable for installation can be obtained from customer service, our website or from specialist retailers.
Safety clearances
Comply with the safety clearances for the appliance.
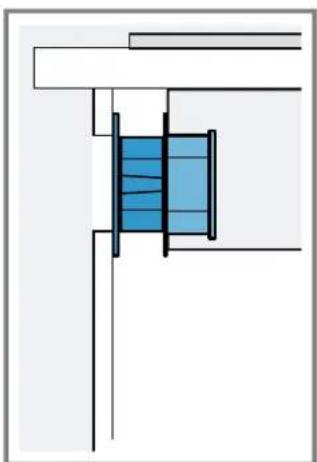
Clearances to the overflow container:
Fig. 11
Position of the overflow container:
→Fig. 12
The performance is optimal at a clearance of 50~mm between the unit back panel and the wall. The performance is reduced at a smaller clearance.
→Fig.
Observe the safety clearances for the worktop cutout.
Do not place any objects in the drawer which exceed the maximum height of the drawer. The objects may come into contact with the base of the appliance and thus disrupt the functions.
Fig. 14

General information
- Read this instruction manual carefully.
Only a licensed expert may connect the appliance. - Switch off the power supply before carrying out any work.
- Never use this appliance in boats or in vehicles.
- Follow the worktop manufacturer's recommendations.
Safe installation
Follow these safety instructions when installing the appliance.
The appliance can only be used safely if it is correctly installed according to the safety instructions.
The installer is responsible for ensuring that the appliance works perfectly at its installation location.

WARNING - Danger: Magnetism!
The appliance contains permanent magnets. They may affect electronic implants, e.g. pacemakers or insulin pumps.
- Persons with electronic implants must stand at least 10cm away from the appliance.
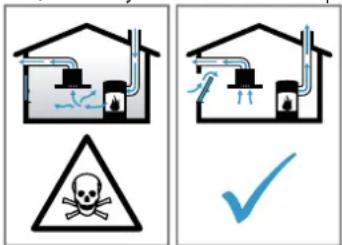
WARNING - Risk of poisoning!
Risk of poisoning from flue gases being drawn back in. Room-air-dependent heat-producing appliances (e.g. gas, oil, wood or coal-operated heaters, continuous flow heaters or water heaters) obtain combustion air from the room in which they are installed and discharge the exhaust gases into the open through an exhaust gas system (e.g. a chimney). With the extractor hood switched on, air is extracted from the kitchen and the adjacent rooms. Without an adequate supply of air, the air pressure falls below atmospheric pressure. Toxic gases from the chimney or the extraction shaft are sucked back into the living space.
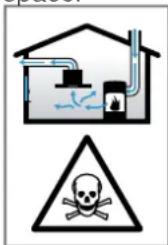

Always ensure adequate fresh air in the room if the appliance is being operated in exhaust air mode at the same time as a room-air-dependent heat-producing appliance is being operated.
- It is only possible to safely operate the appliance if the pressure in the room in which the heating appliance is installed does not fall below 4Pa (0.04 mbar). This can be achieved whenever the air needed for combustion is able to enter through openings that cannot be sealed, for example in doors, windows, incoming/exhaust air wall boxes or by other technical means. An incoming/exhaust air wall box alone is not sufficient to ensure compliance with the limit.
In any case, consult your responsible chimney sweep. They are able to assess the house's entire ventilation setup and will suggest the suitable ventilation measures to you.
Unrestricted operation is possible if the appliance is operated exclusively in circulating-air mode.
WARNING - Risk of fire!
The grease deposits in the grease filter may catch fire.
- Never work with naked flames close to the appliance (e.g. flambéing).
- Do not install the appliance near a heat-producing appliance for solid fuel (e.g. wood or coal) unless a closed, non-removable cover is present. There must be no flying sparks.
WARNING - Risk of injury!
Changes to the electrical or mechanical assembly are dangerous and may lead to malfunctions.
- Do not make any changes to the electrical or mechanical assembly.
Parts that are accessible during installation may have sharp edges and may lead to cutting injuries.
Wear protective gloves.
The appliance is heavy.
To move the appliance, two people are required.
- Use only suitable tools and equipment.
WARNING - Risk of suffocation!
Children may put packaging material over their heads or wrap themselves up in it and suffocate.
- Keep packaging material away from children.
Do not let children play with packaging material.
WARNING - Risk of poisoning!
Risk of poisoning from flue gases being drawn back in.
- Do not emit the exhaust air into a smoke or exhaust gas flue that is in operation.
- Do not emit the exhaust air into a shaft that is used to ventilate installation rooms for heat-producing appliances.
If the exhaust air is to be conveyed into a smoke or exhaust gas flue, you must obtain the consent of the heating engineer responsible.
Risk of poisoning from flue gases being drawn back in.
If an extractor hood with an open-flued heat production source is installed, the power supply for the extractor hood must be provided with a suitable safety switch.
Information about the electrical connection
In order to safely connect the appliance to the electrical system, follow these instructions.
WARNING - Risk of electric shock!
It must always be possible to disconnect the appliance from the electricity supply. The appliance must only be connected to a mains socket that has been installed correctly.
An all-pole isolating switch must be integrated into the permanent electrical installation in accordance with the conditions of overvoltage category III and in accordance with the installation regulations.
The permanent electrical installation must only be wired by a professional electrician. We recommend installing a residual-current circuit breaker (RCCB) in the appliance's power supply circuit.
- Do not kink or trap the connection cable, and keep it away from sharp edges.
- Route the connection cable in such a way that it does not touch the hot casing.
Use only the connection cable that is supplied with the appliance or is provided by technical after-sales service.
This appliance complies with the EC interference suppression regulations.
- The appliance corresponds to protection class 1. You should therefore only use the appliance with a protective earth connection.
The manufacturer shall assume no liability for malfunctions or damage resulting from incorrect electrical wiring.
Preparing the electrical connection
Requirement: Only after-sales service staff who have been trained accordingly may carry out work on the inside of the appliance or replace the power cord.
- Observe the information about the electrical connection.
An incorrect installation, an improper installation or connection invalidates the warranty. - If a longer mains power cable is required, contact the after-sales service. Connecting cables up to 2.20m are available.
- On appliances without a preinstalled cable, insert the power cable into the mains socket.
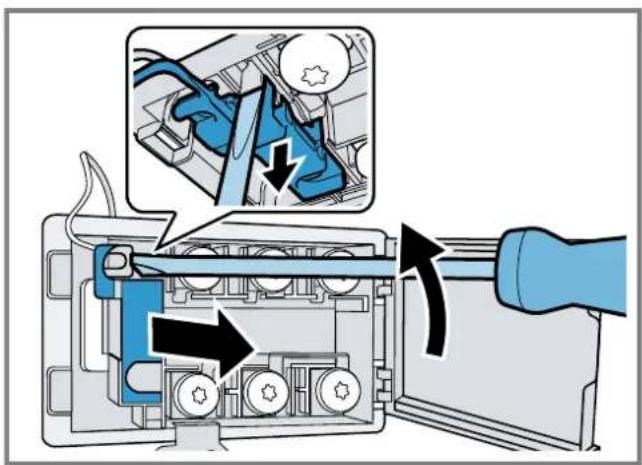
Opening the mains socket
- Use a screwdriver to lift the cover of the mains outlet.
$$ \rightarrow F i g. 1 5 $$
Preparing the mains socket
- Undo the screw.
$$ \rightarrow F i g. \quad \text {A} $$
- Use a screwdriver to lift the strain relief.
$$ \rightarrow F i g. 1 7 $$
- Loosen the strain relief.
$$ \rightarrow \text {F i g .} 1 8 $$
Connecting the cable to the mains socket
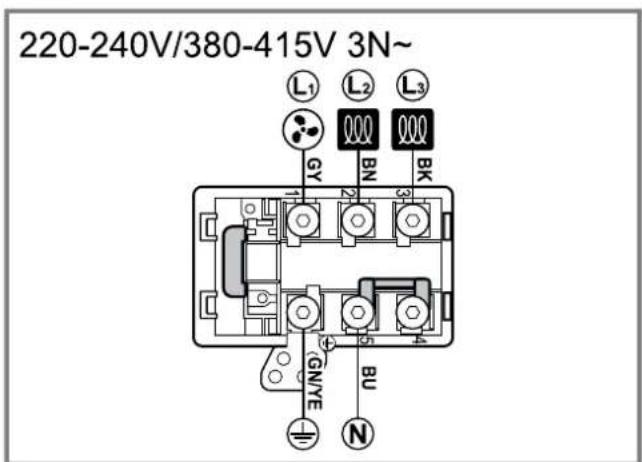
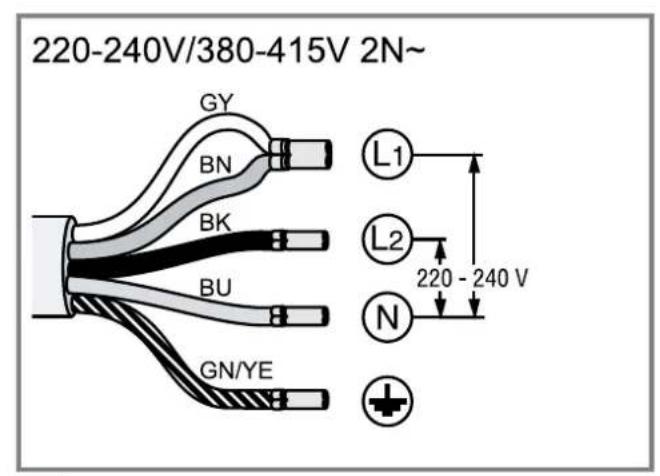
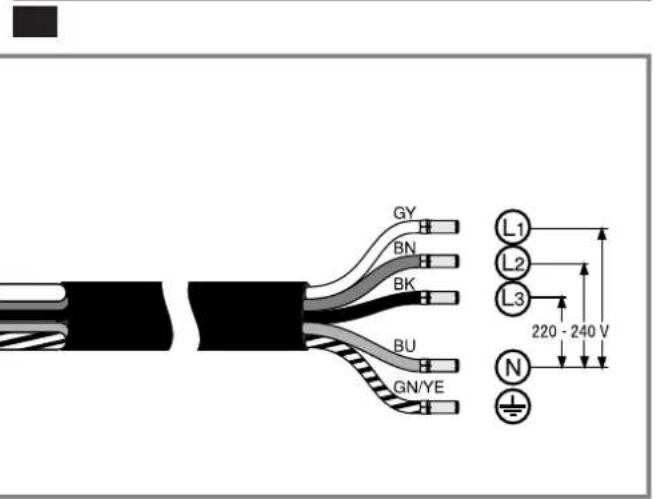
- For 3N connect the cable to the mains socket in accordance with the following figure.
$$ \rightarrow \text {F i g .} $$
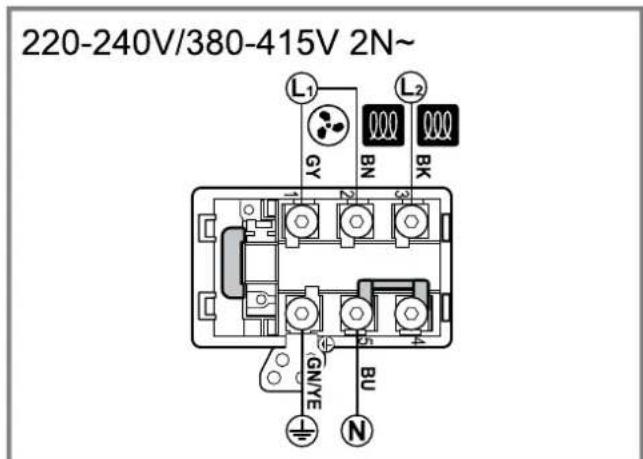
- For 2 N ,connect the cable to the mains socket in accordance with the following figure.
$$ \rightarrow \text {F i g .} 2 0 $$
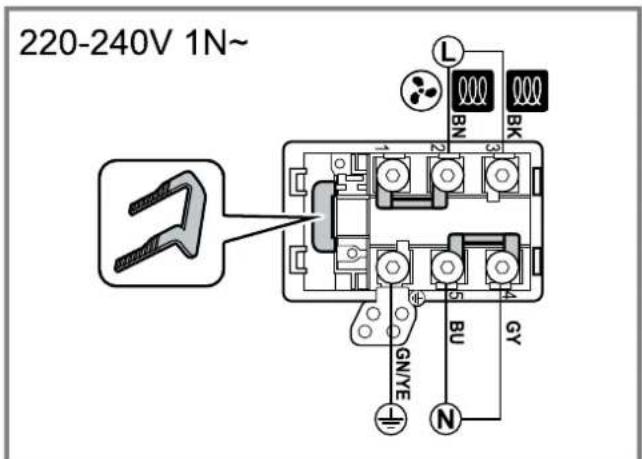
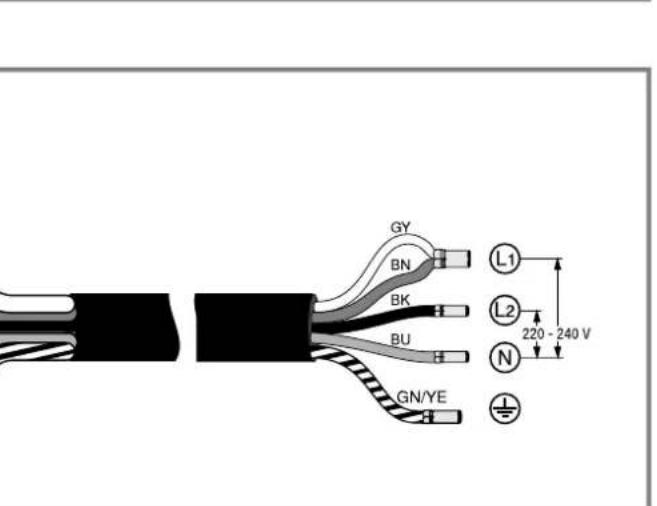
- For 1 N, connect the cable to the mains socket in accordance with the following figure.
$$ \rightarrow \text {F i g .} 2 1 $$
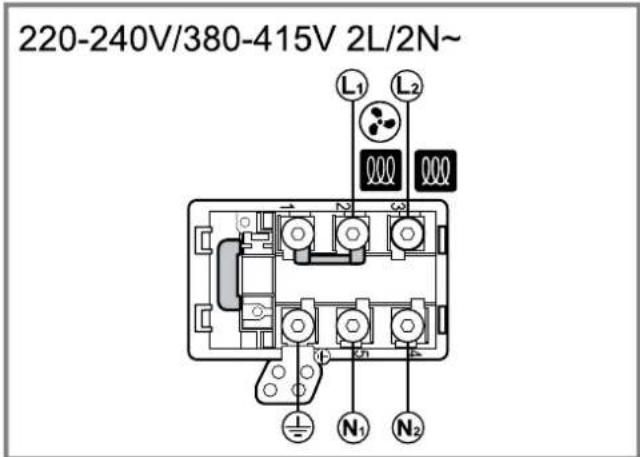
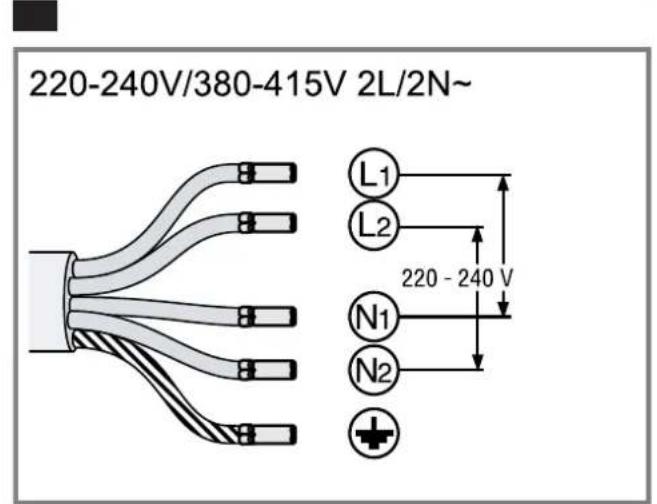
- For 2L / 2N connect the cable to the mains socket in accordance with the following figure.
$$ \rightarrow \text {F i g .} 2 2 $$
-
Note the colours of the cables.
-
BN: Brown
- BU: Blue
- GN/YE: Yellow and green
- BK: Black
-
GY: Grey
-
If required, install the enclosed copper bridges in accordance with the connection diagram.
- Connect the cables and then tighten the screws of the mains socket.
- For a 1N^ or 2L/2N connection in accordance with the connection diagram, 1 corresponds to the fan motor.
- For a 2N^ / 3N^ connection, phase L1 (grey) corresponds to the fan motor.
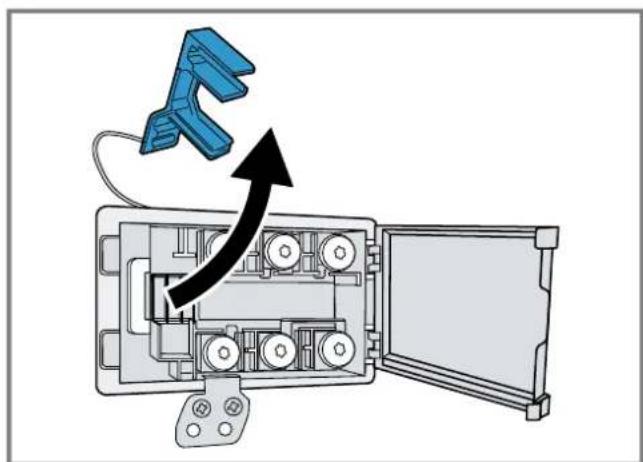
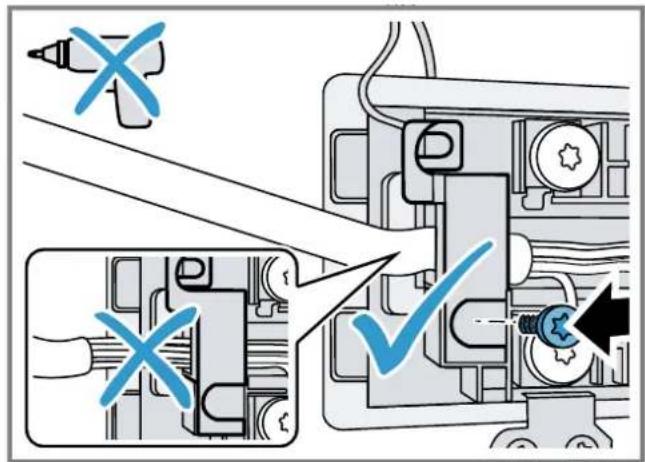
Secure the cable in the mains socket
- Use the strain relief to secure the power cable in place.
-
Tighten the screw at the correct position.
-
Do not use a cordless screwdriver.
$$ \rightarrow \text {F i g .} 2 8 $$
- To facilitate closing the mains socket, arrange the cables in the central area of the mains socket.
- Close the cover on the mains socket.
Instructions for the exhaust air pipe
The appliance manufacturer does not provide any warranty for faults attributable to the pipeline.
Use a short, straight exhaust air pipe with as large a pipe diameter as possible.
- Long, rough exhaust air pipes, many pipe bends or small pipe diameters reduce the suction power and increase the fan noise.
Use an exhaust air pipe that is made of non-combustible material.
To prevent condensate from returning, fit the exhaust pipe with a 1^ gradient from the appliance.
Flat ducts
Use flat ducts with an inner cross-section that corresponds to the diameter of the round pipes:
Diameter of 150~mm corresponds to approx. 177~cm^2
Use sealing strips for different pipe diameters.
- Do not use any flat ducts with sharp bends.
Round pipes
Round pipes with an inner diameter of 150~mm
Instructions for the air extraction mode
For air extraction mode, a one-way flap should be installed.
Notes
If a one-way flap is not included with the appliance, one can be ordered from a specialist retailer.
If the exhaust air is conveyed through the external wall, a telescopic duct should be used.
Checking the units
- Check whether the fitted unit is level and has sufficient load-bearing capacity.
The maximum weight of the appliance is approx. 25kg
The worktop into which you are fitting the appliance must be able to withstand loads of approx. 60kg
- Ensure that the stability of the fitted unit is also guaranteed following cut-out work.
-
Use suitable substructures to ensure the load-bearing capacity and stability, particularly in the case of thin worktops.
-
Take the appliance weight, including additional load, into consideration.
-
Use heat-resistant and moisture-resistant reinforcement material.
-
Ensure that the fitted unit is heat-resistant up to 90^ .
- Do not support any other appliances, e.g. ovens, refrigerators, dishwashers or washing machines.
- Only check that the appliance is level once it has been installed in the installation opening.
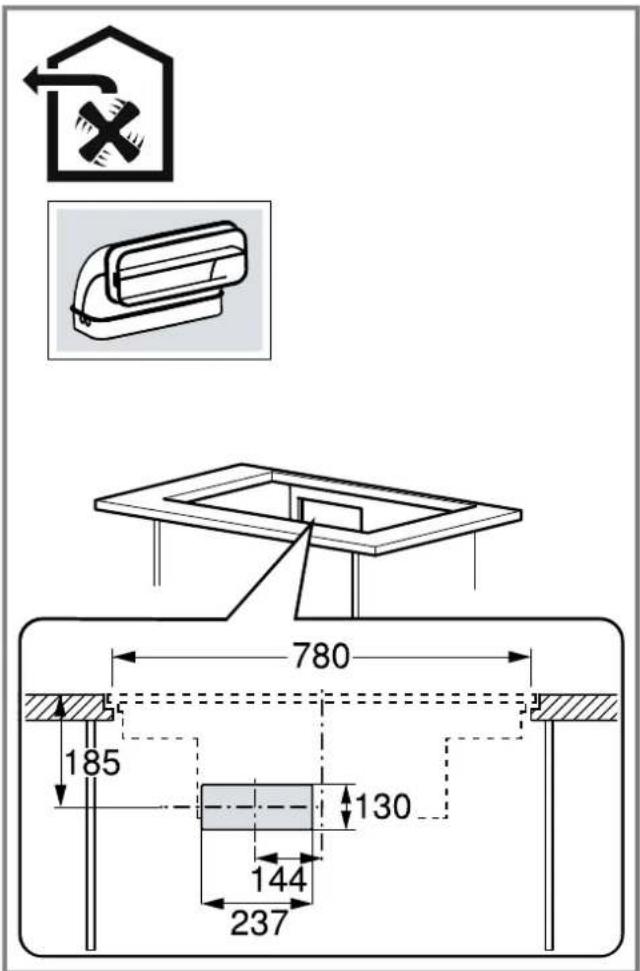
- You can freely select the clearance to a top cabinet. In doing so, take into consideration the ease of use and ergonomics when using the plate.
Flush installation
With the flush installation, the appliance and worktop are on one level. There is no unattractive stepping between the appliance and the worktop.
You can install the appliance in the following temperature-resistant and waterproof worktops:
Stone worktops
Plastic worktops, e.g. Corian®
Solid wood worktops
Installation in compressed-wood worktops is not possible.
Preparing the units
Requirement: The fitted units are heat-resistant up to 90^
$$ \rightarrow \text {F i g .} 1 4 $$
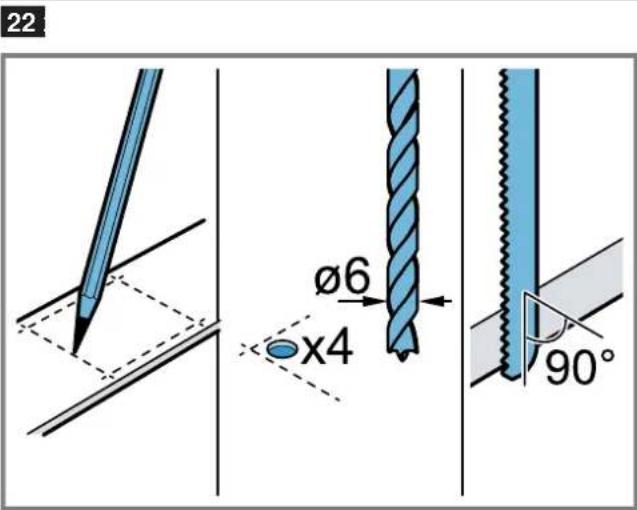
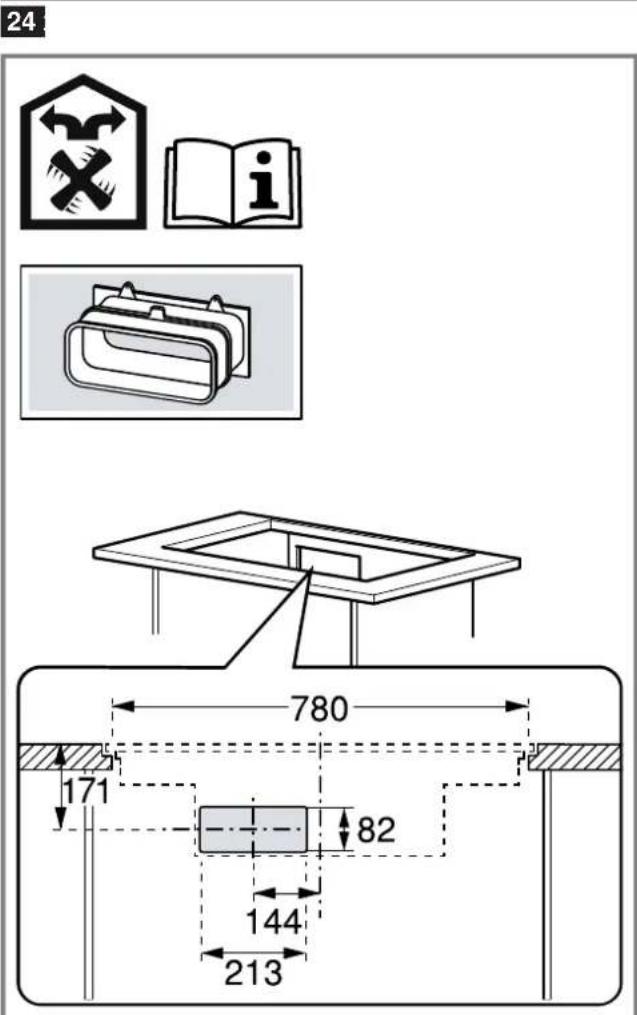
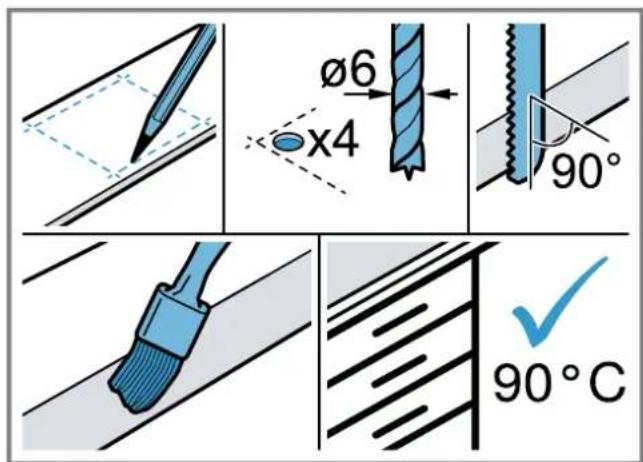
- Mark the unit cut-out in accordance with the installation diagram.
- Drill four holes with a diameter of 6mm Fig. 24
- Ensure that the angle of the cut surface to the worktop is 90^ Fig. 24
Observing the minimum clearances when installing above a drawer
- When removing the overflow container on integrated appliances, take the minimum clearances into consideration.
$$ \rightarrow \text {F i g .} \mathbf {M} $$
- Observe the position of the overflow container.
$$ \rightarrow \text {F i g .} $$
Attaching adhesive tape
- Attach the supplied long adhesive tape to the edge of the worktop.
$$ \rightarrow F i g. \quad 2 5 $$
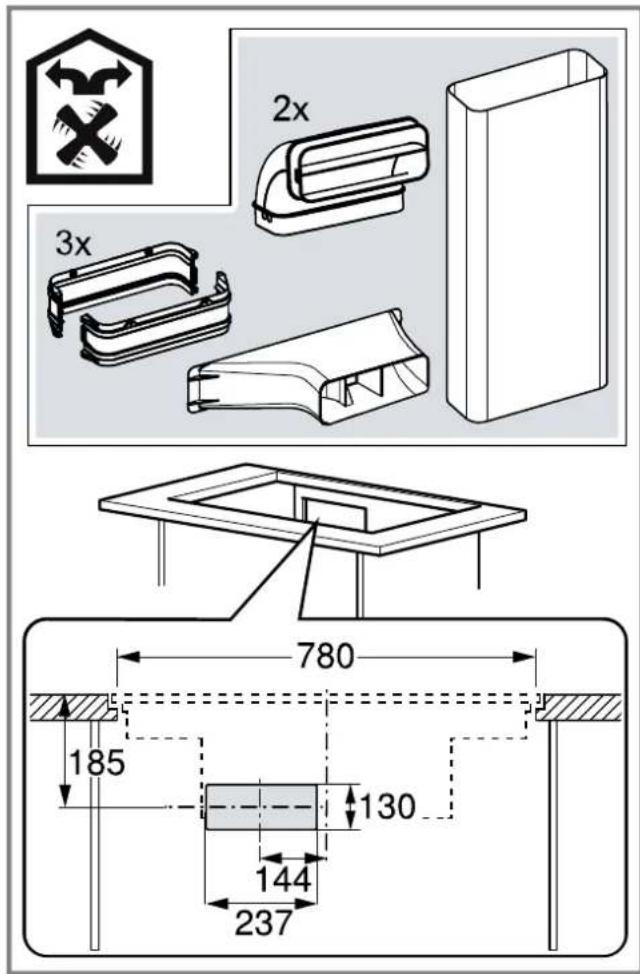
Preparing the unit for circulating-air mode with the adapter
Notes
We do not recommend to install on a nonthermally insulated outer wall or above a cold floor ( ≥ 0.5W / m^2 ^ C)
Air outlets must not be directed at other appliances, they should be parted by a separation panel. If you cannot install any separation panels, refer to other installation types..
- Observe the relevant dimensions when combining with the adapter for the cut-out in the back wall. Fig. 26
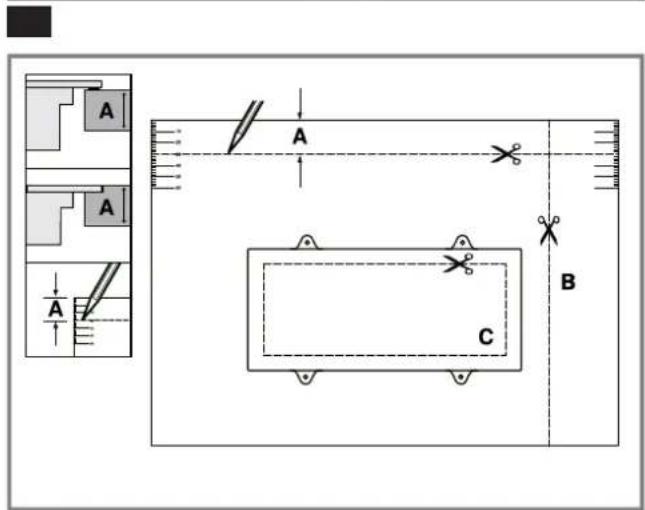
- Measure the thickness of the worktop. Transfer the measurement to the template and draw a line that corresponds to it.
$$ \text {F i g .} $$
- Cut the template along the marked line for worktop thickness A, the cut centre line B and the reference line to the inner air outlet C.
- Mark the centre of the cut-out in the worktop as the centre line on the back panel of the unit. Fig. 28
- Align the template to the centre line of the back panel of the unit and to the lower edge of the work surface.
- Use the template to make the cut-out in the back panel.
- After making the cut-outs, remove any shavings.
- Seal the cut surfaces so that they are heat-resistant and waterproof.
$$ \rightarrow \text {F i g .} 2 4 $$
Ventilation
-
In circulating-air mode, establish an air outlet in the unit's plinth.
-
Provide a minimum air outlet cross-section of approx. 400cm^2
- Make the outlet opening in the base panel as large as possible in order to keep draughts and noise to a minimum.
-
Make the outlet opening by shortening the plinth or by using suitable ventilation grilles or a lamellar plinth.
-
To guarantee that the appliance works correctly, ventilate the hob appropriately via an air outlet with a minimum cross-section of 200~cm^2 in the base unit.
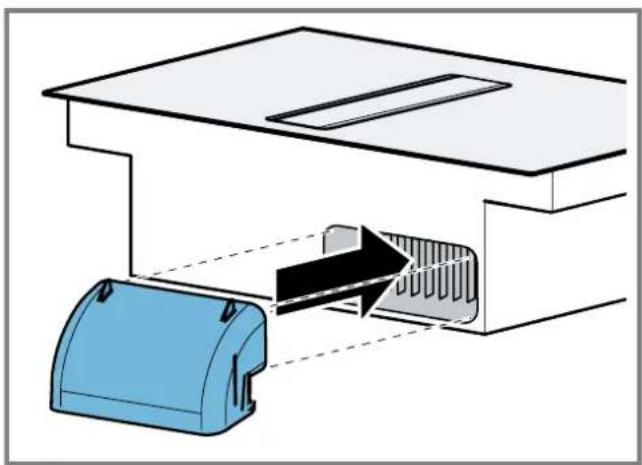
Installing an appliance featuring circulating-air mode with adapter
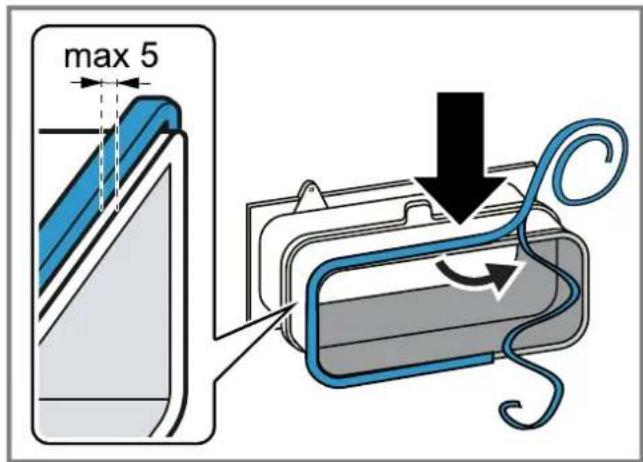
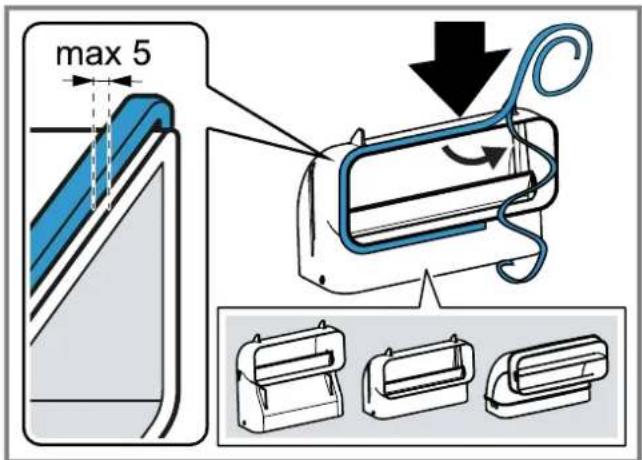
Attaching the seal to the adapter
- Attach the seal to the adapter with max. 5 mm to the edge.
$$ \rightarrow \text {F i g .} 2 3 $$
Attaching the adapter
- Clean and degrease the adhesive surface around the cut-out in the unit's back panel.
- Insert the adapter into the outlet opening on the rear of the hob.
$$ \rightarrow \text {F i g .} \quad 3 0 $$
- Remove the adhesive tape's protective film from the adapter.
$$ \rightarrow \text {F i g .} \quad 3 1 $$
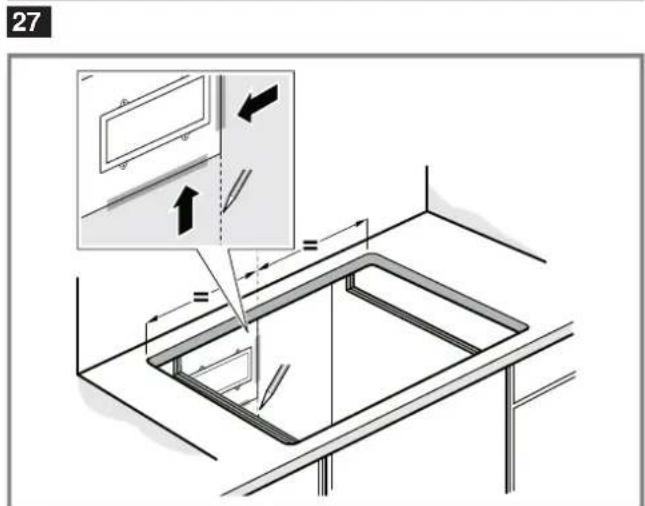
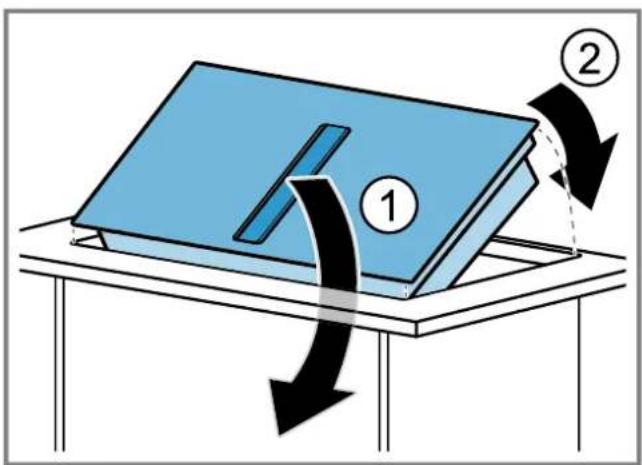
Inserting the appliance into the worktop cut-out
-
Ensure that the connection cable is connected to the appliance.
-
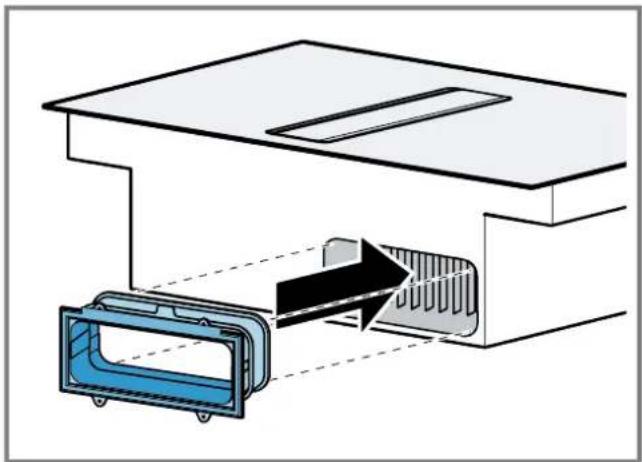
Carefully insert the appliance into the worktop cutout.
→Fig.32
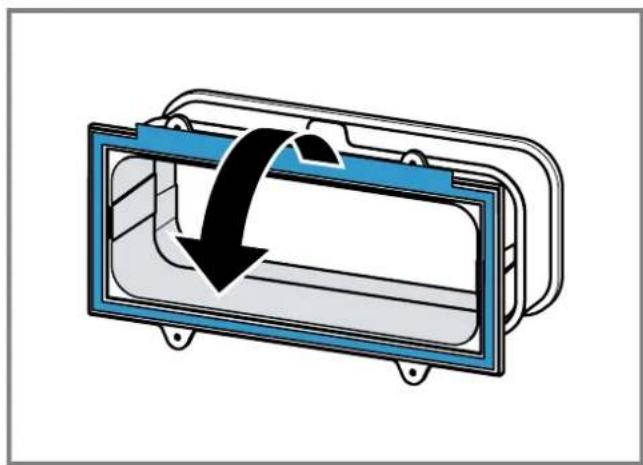
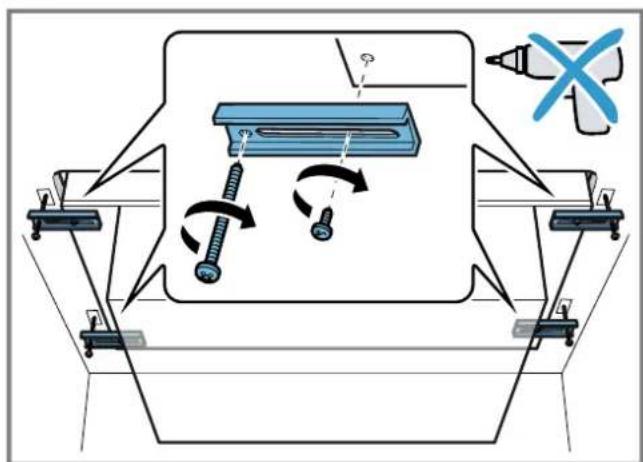
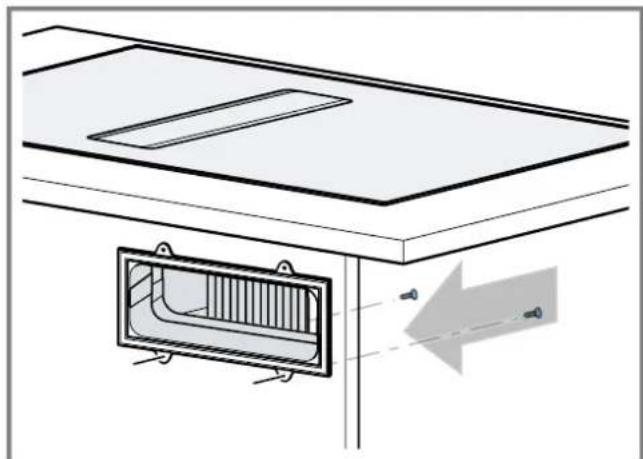
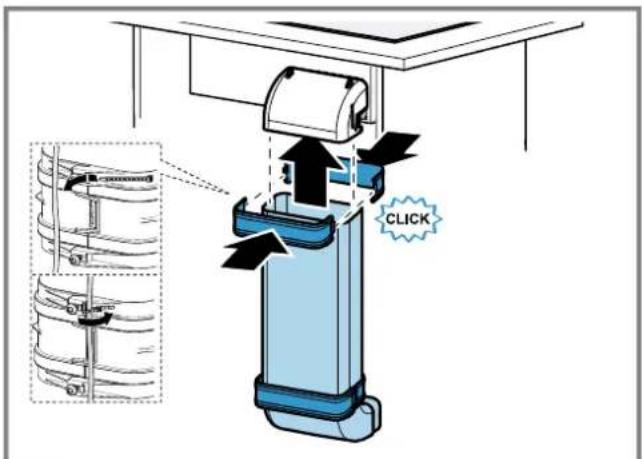
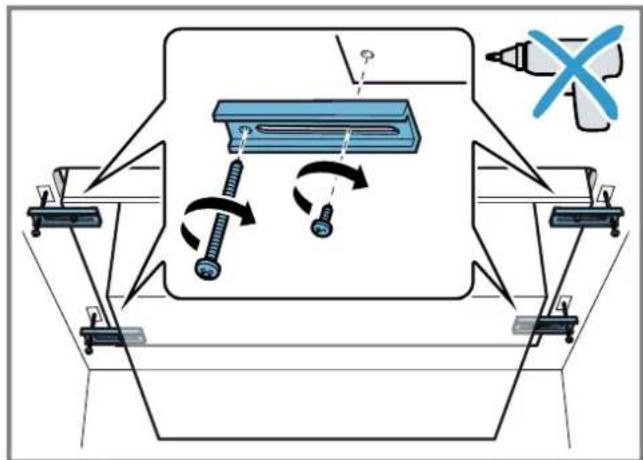
Screwing the retaining clips in place
- Screw the enclosed retaining clips onto the worktop and carefully onto the appliance.
- Ensure that the hob is at the same height as the worktop and the appliance does not slip.
- Do not use an electric screwdriver.
→Fig. 33
Securing the adapter
- Hold the adapter at the central holder and use the side holders to slide it towards the unit's back panel in the base unit, then affix it.
Fig. 34 - If required, also use screws to secure it.
Fig. 35
Preparing the unit for circulating-air mode with a circulating-air duct
- If required, remove the unit's back wall.
- Observe the relevant dimensions when combining with the flat duct elbow for the cut-out in the back wall.
Fig. 36
-
In circulating-air mode, establish an air outlet in the unit's plinth.
-
Provide a minimum air outlet cross-section of approx. 400~cm^2
- Make the outlet opening in the base panel as large as possible in order to keep draughts and noise to a minimum.
-
Make the outlet opening by shortening the plinth or by using suitable ventilation grilles or a lamellar plinth.
-
To guarantee that the appliance works correctly, ventilate the hob appropriately via an air outlet with a minimum cross-section of 200~cm^2 in the base unit.
-
After making the cut-outs, remove any shavings.
- Seal the cut surfaces so that they are heat-resistant and waterproof.
→Fig.24
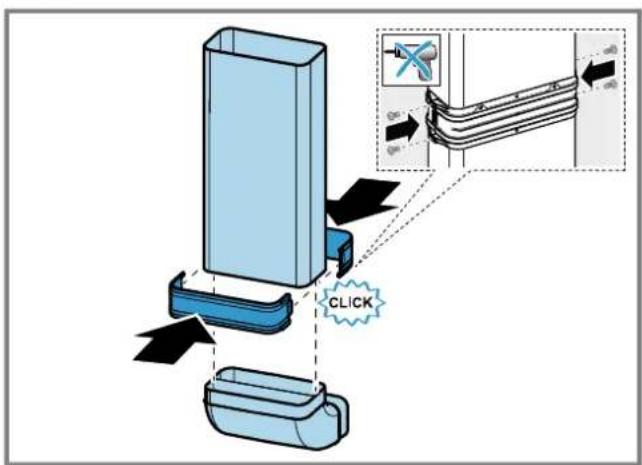
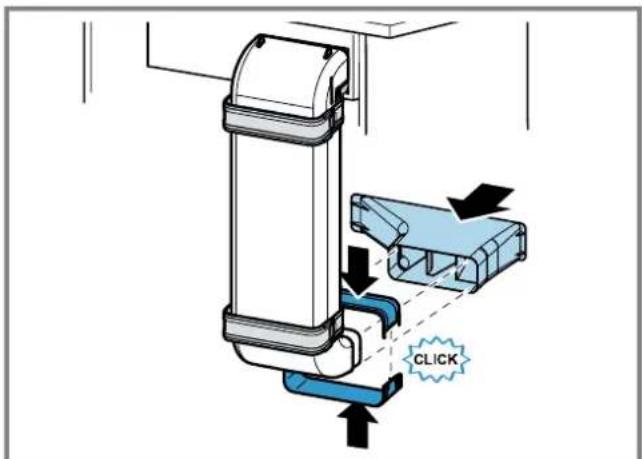
Installing the appliance for air recirculation mode with circulating-air duct
- For circulating-air mode, use the seal, the circulating-air duct, the diffuser and the odour filter.
- Observe the dimensions for the different flat duct bends. Page 21
Securing the seal
- Secure the enclosed seal on the flat duct elbow at a maximum of 5mm from the edge.
Fig. 37
Inserting the flat duct elbow
- Insert the flat duct elbow into the outlet opening on the rear of the appliance.
→Fig. 38
Inserting the appliance into the worktop cut-out
- Ensure that the connection cable is connected to the appliance.
- Carefully insert the appliance into the worktop cutout.
Fig. 89
Establishing the pipework between the appliance and the diffuser
-
Connect the components of the circulating-air duct to each other.
-
Secure the flat duct pipe connector by engaging it in place.
- For an additional fixing, screw the flat duct pipe connector together using 4 × PT 4 × 8 ~mm screws for plastic.
Fig. 40
- Connect the circulating-air duct to the flat duct elbow on the rear of the hob.
Fig. 41
- Connect the diffuser to the circulating-air duct.
→Fig.49
Screwing the retaining clips in place
- Screw the enclosed retaining clips onto the worktop and carefully onto the appliance.
- Ensure that the hob is at the same height as the worktop and the appliance does not slip.
- Do not use an electric screwdriver.
→Fig.48
Preparing the unit for air extraction mode
- If required, remove the unit's back wall.
- Observe the relevant dimensions when combining with a flat duct elbow for the cut-out in the back wall.
→Fig.44
- After making the cut-outs, remove any shavings.
- Seal the cut surfaces so that they are heat-resistant and waterproof.
Fig. 45
Install the appliance for air extraction mode
- For air extraction mode, use the seal and the acoustics filters.
- Observe the instructions for the exhaust air pipe.
Page 22
Securing the seal
- Secure the enclosed seal on the flat duct elbow at a maximum of 5mm from the edge.
→Fig.37
Establishing the piping
- Insert the flat duct elbow into the outlet opening on the rear of the appliance.
→Fig. 38 - If required, install additional piping elements.
Inserting the appliance into the worktop cut-out
- Ensure that the connection cable is connected to the appliance.
- Carefully insert the appliance into the worktop cutout.
→Fig. 39
Screwing the retaining clips in place
-
Screw the enclosed retaining clips onto the worktop and carefully onto the appliance.
-
Ensure that the hob is at the same height as the worktop and the appliance does not slip.
-
Do not use an electric screwdriver.
→Fig. 33
Connecting the exhaust air pipe
- Secure the exhaust air pipe to the flat duct bend.
- Establish the connection to the exhaust air opening.
- Seal the joints appropriately.
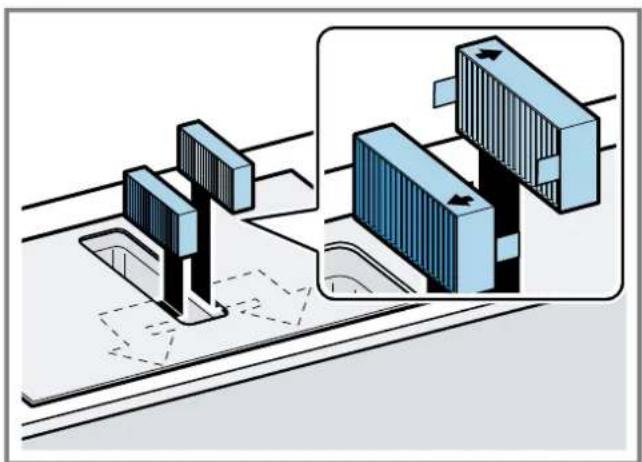
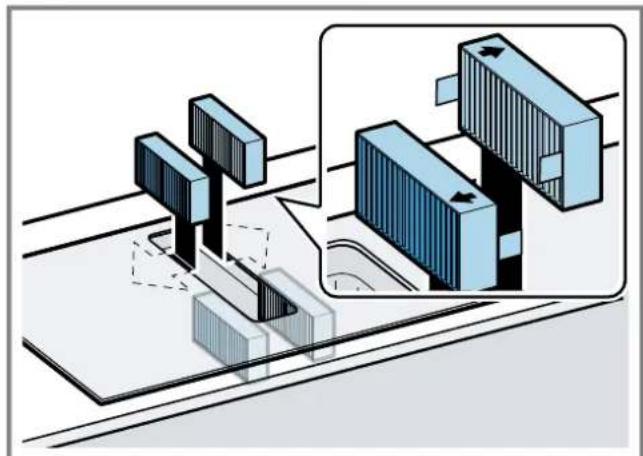
Inserting filters
Note: For circulating-air mode, insert the odour filters.
For air extraction mode, insert the acoustics filters.
-
Observe the filters' air flow direction.
-
Insert two of the filters into the left and right of the appliance, and slide them forwards.
$$ \rightarrow \text {F i g .} 2 6 $$
- Insert the other filters into the left and right of the appliance.
$$ \rightarrow F i g. 2 7 $$
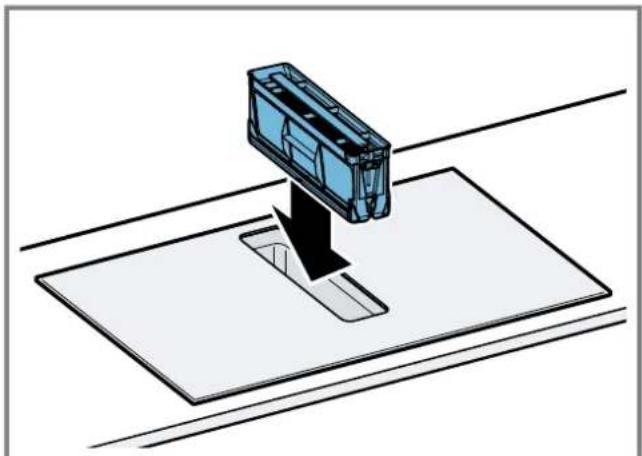
Inserting grease filters
- Insert the grease filter.
→Fig. 48
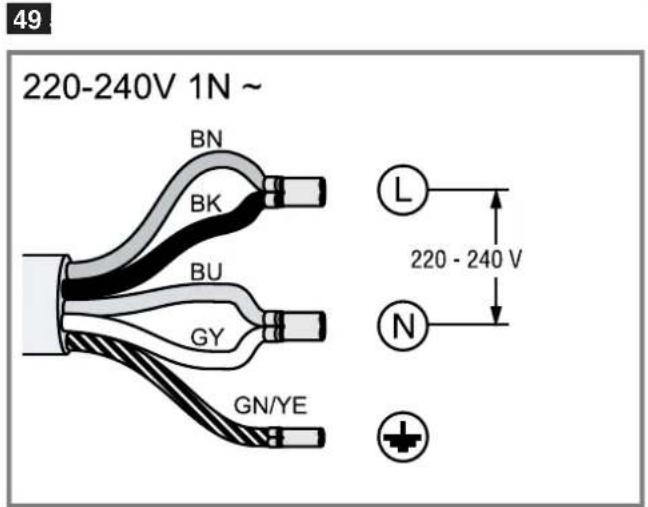
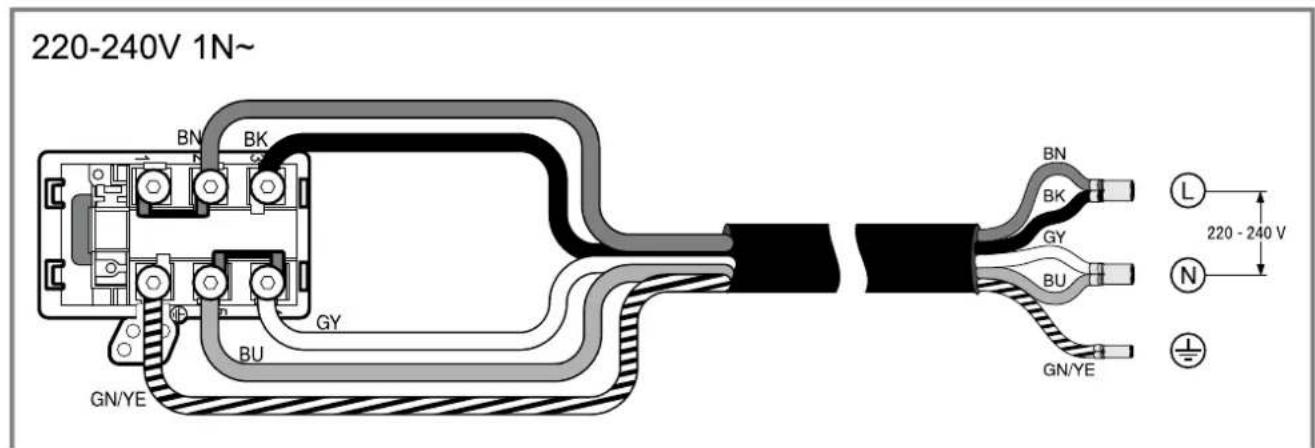
Establishing the connection to the power supply
-
Observe the connection data on the rating plate.
-
For 3N connect the cable to the mains socket in accordance with the figure.
$$ \rightarrow \text {F i g .} 4 9 $$
- For 2N connect the cable to the mains socket in accordance with the figure.
$$ \rightarrow \text {F i g .} 5 0 $$
- For 1 N, connect the cable to the mains socket in accordance with the figure.
$$ \rightarrow F i g. \boxed {5 1} $$
- For 2L / 2N connect the cable to the mains socket in accordance with the figure.
$$ \rightarrow \text {F i g .} \boxed {5 2} $$
-
Note the colours of the cables.
-
BN: Brown
- BU: Blue
- GN/YE: Yellow and green
- BK: Black
-
GY: Grey
-
If required, arrange the supplied wire end ferrules differently depending on the type of connection.
- To connect two cables, if required, use a wire end ferrule.
Shorten the wires.
- Remove the insulation.
Checking the function
- Switch on the appliance.
- If 408 E0916 up the appliance is not connected correctly. "Checking and correcting the electrical connection", Page 25
- If no faults appear in the appliance's display, use the operating instructions to check that the ventilation is working.
Checking and correcting the electrical connection
- Disconnect the appliance from the power supply.
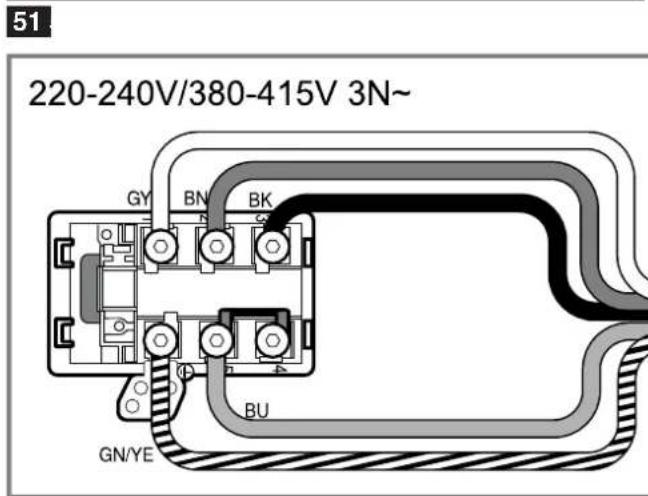
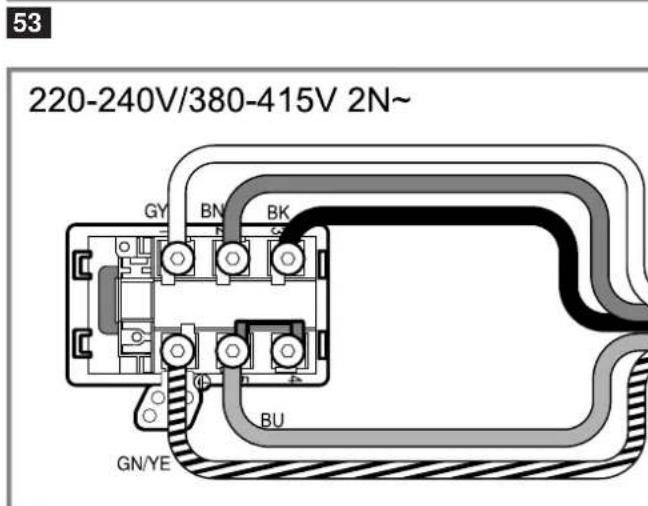
- Check whether the connection to the appliance and the building-side connection correspond to the connection diagram in these installation instructions. "Preparing the electrical connection", Page 22 "Establishing the connection to the power supply", Page 25
3.For 3N_i observe the following figure. Fig.53
4.For 2 N, observe the following figure. Fig.54
5.For 1 N, observe the following figure. Fig.55
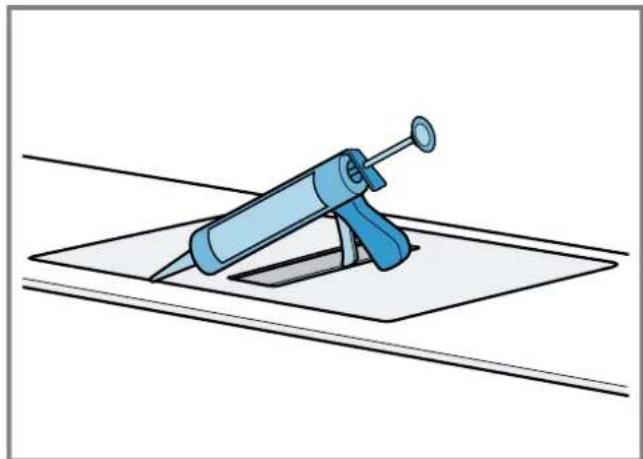
Sealing crevices
Requirement: You must carry out a function test before sealing the joint.
- Seal the gap around it using suitable, heat-resistant silicone, e.g. Novasil® S70 or Ottoseal® S70. → Fig. 56
Unsuitable silicone adhesive causes permanent discoloration to natural stone worktops.
- Use the smoothing agent recommended by the manufacturer to smooth the crevice.
- Observe the usage instructions for the silicone adhesive.
- Leave the silicone adhesive to dry for at least 24 hours.
The drying time depends on the ambient temperature.
5. Do not operate the appliance until the silicone has dried completely.
Switching the display for air extraction mode
- If required for the air extraction mode and the air recirculation mode, change the display of the electronic control in the basic settings.
- Observe the basic settings section in the instruction manual.
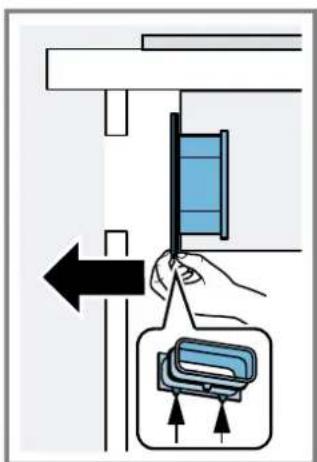
Removing the appliance
ATTENTION!
Tools may damage the appliance frame.
Do not perish out the appliance from above.
- Disconnect the appliance from the power supply.
- Remove the exhaust air duct or undo the circulating-air connections.
- Remove the silicone joint.
- Push out the appliance from below.
fr
ADVARSEL-Fare for forgiving!
ADVARSEL - Brandfare!
Fedtaflejringer i fedtfiltret kan blive antaendt.
ADVARSEL-Fare for forgiving!
Placering of adapter
Fastgoring at adapter
Fastgoring at taeling
- Fastgor den medfologende taeling pa fladkanalbogen maks. 5 mm fra kanten.
→Fig.37
Fastgoring at taeling
Monteringsmal for flat rorbend
Her finner du en oversikt over monteringsmalene for flate rorbend.
Sett fra sider:
→Fig.4→Fig.5→Fig.6
Sett fortra:
Fig. 71
ADVARSEL-Fare for forgiving!
ADVARSEL-Fare for forgiving!
Sette inn flatt rorbend
→EIK.4,→EIK.5,→EIK.6
Mnpootivn oyn:
→EIK.7
Iapaaayec ykataoTaoonc
Edw 80a BpEITe mia Etnioktonon yia TIC dIaopec npapaaayec ykataoanc.
ΦIAtpo Ooμov Kai Npooaepoyεαγia Tn λεIoupyia αvakukloφopiac αεpa:
→EK. 3
Ynoeic yia Tov aywyo aaywync Tou aepa
O kataaekuaoTnC oukeuCdeltavaalapavei kaia eunvnyia Tic diaputiec, nou ofeiaovta oTo tmuTsw oAynwv.
Xpnaioioiote evav kovto, euoypaumoo oAynva Eepiaou u e mka to duvatov yvAn n daeTpo oAynva.
Oi eyaai, traxeic oawhvec aatawyng tou aepa, oi noaae kaunuec n iikpec diapetpoi oawnyw ueiwovtnvixuc avappononc kai auqavouv tov 0puo tou avmuotnpa.
Xpnoiopoiohtoe evov oAivva Eaepiaou ano u n EukEKO uIKO.
Tia va aioofouyete nV eIIOATPOOH ouuNTUKWUATOC, TOnOeTeNOte Tov oAInva EEAepiOpou ano Tn uepia Tnc ouokcunc me kian 1°.
EniEaKavlaia
XpnoiOnoieite e niiEa kavai, tw oTooiw n EOWTE pikn diatoum avTIOxei OTN dIaETPO TWV Otpoyu- Awov
3necb npBBeDeH o63Op BnIOB pa3NHybIX BapnaHTOB yCTaHOBKN.
ФиьтдууаленяларховиадanTpдуpeжmaцнkyлсИВO3dYxa:
$$ \rightarrow P u c. \quad 8 $$
HnIbTp dIy ydaeneHH 3aNaXOB, HNΦy3Op nynlnotHTeIb dIpeKHaMa cnpkpyuauu BO3dyxa:
$$ \rightarrow P n c. \quad 9 $$
UymonorIOTHTeH yNIOHTHTeB dIpa pexHMa OTBOa BO3dyxa:
$$ \rightarrow P _ {M C}. \quad 1 0 $$
3ametka: PtoxOJIuHne BO3dyXoBOJb Ia YcTaHOBKn BmOKeTe npno6peCTn B cepBncHO ClyKoe, Ha HaeM Be6caIte NnB CneunnaHnpOBaHHbIX Maarhax.
БezonauchblepacToHHN
Co6nIpaTa 6e3oNacHbIe paccToaHHaIra BaWero np6o-
PacToaHHe Do EMKoCTn DnA CInBa NmUHeN KnDKoCTn:
$$ \rightarrow P _ {U C}. \quad 1 1 $$
PacnoIoxHeHne EMKoCTn DnA CnBa NnHNe KxNkoCTn:
$$ \rightarrow P _ {U C}. \quad 1 2 $$
OnTImaJIbHaM MoUHOCb DoCTnraeTCa, ecn paCctOHaHne MeKdY 3aHHei CTeHKoM Me6En H CTeHO CoCTaBnAeT 50 MM. Pn HeIOCTaTOHOM paCCTOHHM MOUHOCTb CHHXaETcR.
$$ \rightarrow P u c. \quad 1 3 $$
BbIepKnBaIte 6e3oNaChIbe paCCTOaHH npN BblOnHeHH Bblpe3a B cTolJeHHIe.
He knaIte B bIDBnKHO npMeTb, BbICota KOTOpbIX pBeBbIaet MaKcHMaJIbHyIO BbICOTy Rnka. TaKe npeMetb MOrY yNpaTbcB OCHOBaHne npnbopa, Tem caMbIM MeWAr erO pa6ote.
$$ \rightarrow P _ {M C}. \tag {14} $$

O6uNe yka3aHnra
BHHMaTeIbHo npouHTaIte daHHe pyKOBODCTBO.
ToIbKO KBaIIHnΦnHpOBAHHbI CneuaJIaNCT MoKET BblONHHTb NODKnHoueHne npnbopa.
Ipeed npoBeHnem IIO6bix pa6OT OTKIHOHTe noauy 3JKeKtpo3Heprn.
3anpeaaetca nCnoB3ObaTb npH6op Ha noKax HnB aBTOMo6nax.
Co6nOdaIte peKOMeHdauIN npOn3BOUnteTnCToJeuHnCbI.
Be30nacHocTb npn MOHTaHe
Pnp yctaHOBKe np60pa co6nOdaTe daHHbIe yka3aHnA NO texHnke 6e3oNaChocTn.
Be3onacHocTb 3Kcnnyataaun rapaHTnpyETca TOnBko npn KbaNfNpOBAHHoY cTaHOBKe C co6NIOHeHNm INHCTpyKuIN NO MOHTaKy. 3a npaBnIbHOCTb YcTAHOBKN OTBeTCTBeHHOCt b HecET YcTAHOBUNK.
1NPEyIPEXJDEHNE-OnachOCTb:MarHeTHn3M!
Pn6bOp cOepKHT nocToHHbIe MaHHTbl. OHN MoYr Bo3-DeiCTBOBaTb Ha BxHbJIeHHbIe 3JeKTpoHHbIe np6Opbl, NaHpIMep, Ha KapDIOcTHMylrTObpbl INHcYlnHOBbIe NOMbl.
- Iinuam C 3JIeKToHHbIMN IMnIaHTaTaMn 3anpeuaetc np6bnkaTbcra K np6bopy 6Jnxke, yem Ha 10 cm.
NPEUYIPEXKDEHNE -OnachocbOprabJeHnA!
Brahytbe 6batho Otpabotabwne ra3bMoYr cTaTB npuHnO hO TpaBHeHH. NcToUHNK nIaMeHn C NOBODOM Bo3dyXa H3 NOMEeHH (HaNPmep, pa6oTaIOUIne Ha r3e, KNDKOM TonIIBe, ApOBax IINy yIre HarpeBaTeH, IpOTouHbE BoHOHarpeBaTeH, BOnIepbl) NOLyauT BO3dyx DnA CKNHaHH TONIIBa H3 NOMEeHH, rDe OHN yCTaHOBHeHb, a OTPa6oTabWne Ra3bl OTXoJATYePe3 BByTKHyO CnCTeMy (HaNPmep, BByTKHyTO Tpy6y) H3 NOMEeHH Ha yLIuCy. Bo Bpemra Pa6oTb BlTAAKKn H3 KXYHn PacNoLaIaOUInxCpADOM NOMeHH yDAnReTcBA 03dyx. Be3 DocTaOtuHOro pInTOka atMocfepHoro BO3dyxA B NOMEeHH DaBLeHne MoKet
ymehbshntbcra, n TOKCNHbIe r3bI n3 dbIMOXOJa nn BeHTINJRAUHN HauHyT BcAcBbATbcr OpaTHo B JnIOe NOMeUeHne.
Bcerda oecneuBaTe npitOK doCTaTOHOro KOJIueCTBa BO3dyxa, ecn np6Op nIcTOUHK PnAmEH C NOBODOM BO3dyxa H3 NOMEeHHra pa6OtaHT OHOBpeMeHHo B peKIMe OTbOda BO3dyxa.
Be3onacbIM IINKcnnyataunnpnbopa cOTKpbItbIM nIamaHem ABnreTcN IOHNKeHne DaBHeHH He 6OJIe Yem Ha4Pa(0,04Mbap).3TO MoKet 6bITb DOCTnHyTO,ecNI Tpe6yEmblIIN CxHraHHBO3dyx 6yDet NOCTynatbYepe3 He3aKpbBaemble OTBepCTn,HanpImep,B DBeprx,OK-Hax,C NOMoCbIO CTEHHO KOpOa CNCTMebl pINToka/OT-BoDa BO3dyxa ININ HbIX TEXNHuecknx MEP.Bcero OINH npHTOHO-BBtAAHKnIaNaH He ObecneHT rapaHTIO CO6IIIODeHH PpeDEnbHOrO 3HaueHH.
B liobocntyaunn 6paanTecb 3a coBeTom K KOMTeHTHOMy NLIuy,OTBEcTBeHHOMy 3a 3KcNpyaTuHIO OouCTky Tpy6,CnoCObHOMy OueHNb BEHTNIJIauOHHUo CNTeMy Bcero Doma n IpeJNOKHTb Bam peJeHne no PnHRTNU COOTBeTCTByUOxMx MEP.
Ecni npnbop pa6oTaET NCKIIOHTeBHO B peKHMe UINPKyJIaUN BO3Dyxa,TO 3KcNpyataunn BO3MOxHa 6e3 OrpaHIn-ueHIn.
I NPEUYPEXKDEHNE -Onachoctb Bo3ropaHn!
OTIOKHeHnKa Hnpa B KInpoyIaNBaIOUeM FmIbTpE MoYT BCINbIXHyTb.
Hikorda He pa6oTaIe C oTKpbITbIM pIaMeHem prdOM c np6opom (Haipmep, pIamboPobAHne).
Pn60p MoKHO yCTaHaBnBaTb B6I3N nCTOuHnKa dIcKnraHn TBepDOro TOnnBa (HanpIMep, pOba nnyrolb), ecIn npEycmTopeHa uehHa HecbEmHa 3a- uHTha naHeB. He donKHO 6bITb pa3netaOuxxCnKp.
I PNEUYPEJKDEHNE -OnacHocTb TpaBMnpoBaHHa!
H3MeHeHne MexaHuecko Hn 3JeKtpuecko KOHCtpyKcHMOKET CTaTb NCTOCHKOM ONaCHOCTN IN PpNBecTN K BblXOdy pnp6opa n3 cTpor.
13MeHHeMexaHnueckoN INI 3eKtpnuecko KOHCTpyKcnn 3aIpeUeHO.
Ieta,OTkpblte npMOHTaKe,MOyT 6bITbOCTpbIMn I npBecTN K nope3aM.
HcnoJb3yIte 3aunTHbIe nepuATKn.
Pn6op TaKJIbI.
Iraero nepemeenu HnnoTpebyotc 2eNoBeka.
- IcnoIb3yIe ToIbKO NoIxDOJIuNE BCNOMOraTeJIbHbIe cpeIcTBA.
I PEPdUYPEJKDEHNE -Onachocb ydyub!
TeMOry3aBepHyTbCByynakoBOUHbMaTePnAn HnHa-DeTberoce6eHa roLOByN3aOxHyTbCra.
He noDnyckaIte Detet K yNakOBOHOMy MaTePnAny.
He no3BOJnTe DeTm nIpaTb C ynaKOBuHbIM MaTePnA- nom.
I NPEUYPEXKDEHNE -Onachoctb OTPaBJeHHA!
Brahytble o6paTHOBnmeHne Otpa6oTaBUnne ra3bl MoryT CTaTB npuHHoN OtpaBHeHn.
BbITaXHOBo3DyHX He OJKeH BbIXOHTbYepe3 DbIMOBYTOpy6y HnB03DyXOBoD npn INx EKnpyataun.
IgnoBdoBaBtJxHOroBo3DyHaHeCneDyETNcNoIb3O-BaTbBeHTKaHAn,CnykaunI DnBBeHTnlaunNOMeueHn,BKOTOpbixYCTaHOBHeHbNCTOuyHNKnPiMaHn.
- Ppi NIOKJIIOUeHIN BbITJAKK IN HeNCNoJIb3yeMOMy DbIMOxOy, Heo6XoJIMNO NOnyUHTb pa3peUHeN E CneuaJIbHOI INCTaHcHIN, OTBeuAIOSe 3a 3KcPnyatauH IO YnCTKy Tpy6.
Brahytbe 6bpatHO B nomeeHne Otpa6oTabuHne ra3bl MoryT CTaTB npuHNO OTpaBHeHH.
Pn yctaHOBKe BbTTAAKKN B NOMeueHnax, rIe npcyTCTByeNTocuHNIaMeHH C NOBbOOM Bo3dyXa H3 NOMEeHNA, CNCTema NODaUHN PHTAHN BbTTAAKKN DOJHKHa 6bITbOBOpyIDoBaHa FyHKUne aBapuHOrO OTKIOUeHnA.
Yka3aHnno no noKnIOueHHIO K 3JIeKTPocetN
Дябзогио рнкючен np6opa K 3neKtpocetn co6IoDAaTe daHHbIe INCTpyKcun.
I PEPdVNPEXKDEHNE -OnacHocTb npaHexnAJIeKtpuueckm TOKOM!
CneIyET o6ecneuHTB 03MOXHOCbT OTKHOUeHn Ipn6opaOT 3JIeKTPocetN B JHOOIMoMeHT. 3TO T np6Op MOxHo IOKIIIOUaTb K cTeN TObKO Upe3 npaBnIbHO yCTaHOBNeHHyO paCnpedeIInTeBHyO Kopo6Ky.
B ctaioHapHO 3neKtpoPBOOKe Heo6xoDnMo npedyCMOTpeb CteuaJIbHi BblIOUaTeIb Ipa3MbKaHnBCex NOJIOCB corlaCHO ycIOBnM KaterOpn NepeHaipRaeHn III n corlaCHO ycIOBnM MoTaJa.
IopKnloueHne ctaunohapHoro 3eKtpoobopyoBaHHn DOJHKHO pOn3BOIDNTBCR TObKO KBaINHpOBoAHHBIM 3eKtpnKOM.Mb peKomeHdyem yCTaHOBt b yCTpoCTBO 3aHTHO OTKIOUeHn (Y3O) B 3eKtpnuecko nen Chabxehn npnbopOB.
PpocneHte, yTo6bI cTeBOH Ka6eJIb He 6bln 3aKaT, H nepeRbAncH HaxOuINcB DJaH NT OCTpbIX KpOMOK.
- Покладыbaite ceTeBoi Ka6eIb TaK,ЧTo6bl OH He Ka-caIcHarpeTOrO Kopnyca npnbopa.
IcnoB3yTe TOnbKO cTeBOK Ka6eJIb, BXOJaUIM B KOMnJEKT NOCTaBKn PnIOoopa HIN NocTAbIReMbI CepBNCHOH CnyKoB.
3TOT npnbop cooBtCTByeT Tpe6BaHnM npaBn EC no NOdaBneHHo paHnonomex.
Pn6bop COOTBeTCTByeT KAnccy 3aunIb1 I, No3Tomy OH DoJKeH 3KcPiyaTnpoBaTbcra TOnbKO c 3a3emHIOUIM npoBODOM.
IpoH3BOIDTeHbHeHecETOTBeTCTBeHHOCTH3aHeHCnPaBHOCTNINB03MOKHBIEIOBpeKJDeHNA,KOTOpbE MOrYT 6bITCB83aHbIC HeCOOTBetCTByIOUIM 3JIeKTPnueCKM MOHTaXOM.
IodrotOBka K 3JIeKTpponoKnIOHueHnIO
Tpe6obahn:Pa6oTaB C BHyTpEHHMn YactmN pnp6opa nn PpOu3BODNTb 3aMeHy CeTeBOro Ka6eIa MOry TOnbKO npOeJUne ObyeHne CneuaAnCTb CepBnChOH cnYk6bl.
- C6bIouaIte yka3aHnno NO NOkNIOUeHNIO K 3neKTPocetn. B clyuae HeKOppeKTHoC6OpKn, HecooTBeTCTByHOueyctahOBKn IIN NoNOKIIOeHnraPaaHTnHa npbOp nepeCTaet DeNcTBoBaTb.
2 EcnB Bam Tpe6yetc 60one nnHHb CTeBOB Ka6eB, 6paTntecb B cepBuChyIO cnJx6y. B HAnuH NMeIOTc Ka6eHn DnHOH Do 2,20 M. - Пиу усановке пиборов бeз прдварпелho CMOHTno-pobaHHoro Ka6eЯ Heo6xOДИМо пpoBeCTn ceTeBOI Ka-6eNB KpacnppeJenTIELHoi Kopo6ke.
OTkpbBaHne pacnpedeHtEnbHOn Kopo6Kn
PpHnOaHmHMe KpbIuKy paCnppeJeNtBHOJ Kopo6Kn c NOMoUbO OTBepTK.
→Puc.15
Poirotobka pacnpedeJInteJIbHOJ Kopo6Kn
1.Ocna6bTe BnHT.
→PNC.16
2.Пиндимпе kaбьнь amOpTN3aTOp OTBepTKoI.
→PnC.17
3. Ocna6bTe Φɪkcauŋ Ko6eBHo r o amOpTn3aTopa.
→PnC.18
PoiKluoyeHne Ka6eJn K pacnpedeHntb-HoN Kopo6Ke
1.ПоДКЛЮЧИТЕКLEММУ3NKa6БЯкpacпepeДиTeJBHOB Kopo6Ke,ΚΑΚΝΟΚa3aHoHa cneуHcE m pncyHke. →Pnc.19
2.ПоДКЛЮЧИТКLEММу 2N ka6eЯн КpacnpedeNTeHNoI Kopo6Ke, KaK pOKa3aHo Ha cNeDyHOUeM pncyHKe. P_NC 20
3.ПоДКЛЮЧИТКLEММу1Nka6ЯнpacпepeДиTeьнов Коробke,кakpoKa3aHoHa cneDyHUsem pncuHke. →PnC.21
4.ПоДКЛIOUHTe KIeMMy 2L/2N Ka6eR KpacpepeHnteB-HoH Kopo6Ke, KaK nOKa3aHo Ha cNeyHOuE M pncyHke. P C 22
5. YyTbBaIe TcBET KaBeJe.
- BN: KOpHHeBbI
- BU: cnHH
-
GN/YE: Jęjǎtbiu H 3eJéHbI
-BK:YeHbI
-GY:cepbii -
Пи HeOxOIMOCn YcTaHOBnTe NocTaBnReMbIe B KOMJIeKTe MeHbIe NpeMbIcN CoTlaCHO CXEm NOJ-KJIIOUeHnR.
7.ПоДКЛIOHHTe Ka6JIIn,а 3aTeM 3aTAHHTe BnHTbI Ha paCnpedeJIteNtBJHOJ Kopo6Ke. - Cornaccho cxeme noDKIIOueHnnoDKIIOueHnIO 1 N\~nn2 L/2N cooTBeTcTByeT faa1 3neKtpoBnraTeJI BENTIaTopa.
9.ПОДКЛЮЧЕНIO 2N-/3N-COOTBETCTByeT φa3a L1 (cepbi) 3JIeKTKPOdBHrTaTeIe BEHTINrTopa.
Фнкаця КбеляВpacnpeДЛТьhoeKopo6ke
- 3aФнсчуTe cTeBOI Ka6eJIb Ka6eJIbHbIM amOpTN3aToPOM.
2.3aTAHHTe BnHT B npaBnBHom NOIOKeHHN.
He nCnoB3yIte aKKMyJIaTOpHbI raIKOBePT.
→PUC.23
- TTo6bI yInpOCTnTb 3aKpbIBaHHe paCnPpeJenlTeBHO KoP06Kn, paCNoIOXHTe Ka6eIN B cpeDHe YacTn Kopo6Kn.
- 3akpoTe KpbIuKy po3eKn.
YkaHnnoOTbOyBO3dyXa
PpOINBIOInTeIb npHbopa He daet rapaHTn B cnyae peKnaMaun, KacaHOuNXcYyactKOB Tpy6oNPOBOda drr OTOBa BO3dyxa.
IcnoIb3yIte KopoTkyIO npAmyIO BbITaXHyIO Tpy6y, HMeIOUIO NO BO3MOxHOCHTo 60JIbWoINaMaTeP.
IINHHbIe WepoxOBaTbe BbITaXHbIe TpybI,60nbUoe KOJIuYeCTBO KOneH NnTpybMaJOrO dnaMeTp aymeHbTaIOT MOUHOCTb BbITAAKNI yBeJIuNBAIoT Wym OT paBoTbI BeHTnIATopa.
IcnoB3yTe BbITaKHbIe Tpy6bI N3 HeBOcPnAmEHHOuX-Cr MaTePnaIOB.
TTo6bl npedOTbpaNTb BO3bpaT KOHeHcata,yCTaHOBnTe BbITKHyIO Tpy6y noI yrnom 1° K npnbopy.
ПлOCKи Каналы
NcnoJb3yIte nIOCKHe KaHAnbl, BHyTppeHHee CeeyHe KeTOp bIX COOTBETCTByet DnAmEtpy KpyIbIX Tpy6:
Dnametp 150 MM COOTBETCTByET npm. 177 cm².
Pn HecooBtCTBnn DnaMeTPOB Tpy6 NcnoJb3yIte repMeTH3HpyOuOy IeHTy.
He nCnonb3yTe nIocKne KaHaJIcpe3kMm n3r6aMn.
KpyrIbIe Tpy6bl
PekomehyembI BHyTppeHHn DnaMeTp Kpyrblx Tpy6- 150 MM.
Yka3aHnIypeKnMaOTB0aBO3NyXa
BpeKIMe OTObOa BO3dyxa DOJIkHa 6bITb yCTaHOBJeHa 3acNoHka 6paTHoN Tn.
PnmuMeaHn
Ecnn 3acnoHka o6paTHoN Tn He BXOaNT B KOMnneKT noCTaBKn npnbopa, e MoXHo PnpObpeCt N CneuaIIN3n-poBaHHOM MaarXiHe.
Ecnn BbTTJHKHOB03dyX OTBOIDTCHpe3 HApyKHyO CTeHy, cNeDyeT NcNoJIb3OBaTb TeteCKONuCeCKN BeHTINRAUOnHHbI KaHaI, npoxOJaunB CTeHe.
PpOBePKa Me6eJH
- Y6eIntecb, yTO Me6eIb IINB RACTPANBaHnYcTaHOBNeHaPOBHO nCnoc6Ha BblpeKAtb HArpy3Ky.
MaKcMaJIbHbI BEc np6opa COCTaBnEe npM.25Kr CToneuHa,BA KOTOpyo BCTpaBaeTc np6Op,doJKHBaBIDepKnBaTb Harpy3Ky npM.60Kr. - NocIe BbInOJIHeHnBblpe3a npOBepbTe yCTOnuBOcTb Me6eIN DnBVCpaBaHn.
-
CnEduT oBecneuHb HecCyUIO cnOCo6HOCTb uYcToHBOCTb c NOMOUsb IOxOAnuX ONOpHbIX KOHCTpyKcN, OcOBeHHo Y TOHkX CTJeUHNU.
-
YuHTbIaIe Bec npI6opa, BKJIouaJ DOONHITeIbHyIO Harpy3Ky.
-
NcnoIb3yIte JapOpnpOHyB I BlaarOCToIKM MaTePn-an.
-
Y6eIntecb, yTo Me6eIb IINBCTpaBHaN CnOcOHa Bbl- depXkBaTb TemnepaTy p 90 ^ C
5.He BCTpaBaNte DyXOBbIe Wkafo, XOIOINbHnKn, NocyDOMoeuHbIe MaunHbI, CTnpaJIbHbIe MaunHbI n DpyryoTexHNky NOI npN6opom. - Tocnoctb pacnoJoxhen npboa B ropu3oHTaIbHOI pIOCKOCTn CneDyET PPOBepNTb NocIe erO yCTaHOBKn B MOHTaKHi Ipoem.
- PacToHHe Do HaBeCHOro ⅢKaΦa MoXHo BbIbpaTb NcBOeMy yCMOTpeHIO. Pn IcNoJIb3OBaHm NaHeHn YUHTbBaIte Ydo6CTBO n 3pRoHOMKy.
BctpaBaHne 3anOpnlo
Pny yctaHOBe 3anOJInIO np6Op DoJIKeH pacNoJaTaBcHa OndHom ypOBHe co cToneuHnue. MeJy np6Opom nCToneuHnue He dONJHo 6bITb MeJauOux XeMeHTOB.
YcTaHaBnBaTb np6Op MOxHO B CJeDyUOJIne
TepMOCTOJKne IN BODoHEnpOHnuaeMbIe CTOneJHHNcIbI:
Kamehhhe CTOJIeUHnUbl
CTOJIeWHnIbH3 NCKyCcTBeHHbIX MaTePnaIOB (HaNPmEp, Corian@)
CTOJIeHHHbI H3 MacCHBa DepeBa
BCTpAnBaHnE B CTOneUHNuI N3 npeccOBaHHoN dpeBeCNbI HeBO3MOXHO.
Poirotobka Me6eHn
Tpe6oBaHHe:Me6enBnBCTpaBHaHn BbIepeKnBaet Temnepatypydo 90^
- Pa3MeTbTe MeCTo BbIpe3a B Me6eHN B COOTBeTCTBHN CO CXEMO yCTaHOBKN.
→PnC. 14
2.ПрсеверпгечыpeOTВерснДиametpOM6MM.
→PUC.24 - Y6eHntecb, yTO yrO1 cpe3a oTHoCHTeIbHO NOBepxHocTn CToneuHnUcI coCTaBnAET 90°
→PUC.24
Pn yCTaHOBKe HaI BblBHHbIM RAnKOM BblepKHNBaIe MHHMaJIbHbIe OTCTynbl.
- Пи сгтпс EMKOCTN ДЯ снва ЛшненжИКOCTN Ha yctaHOBHeHOM npIbope co6IIOaTe MInHMaJIbHbIe OTCTybl.
→PUC.11
2.YuHTbBaIte paCnOJKeHHe EMKoCTn DJIa CInBa JINJHHe JNIDKOCTn.
→PNC.12
KpenneHne KneiKoJ NeHTbI
PnKneIe npnaIarOuSyOc dINHHyIO KNeIkyIO JeHTy Ha BHyTpEHHN TOpeC Bblpe3a B CToneWHNue.
→PnC.25
IoprotobKa Me6eN K yctaHOBKe np6opa JnI npKpyauHH Bo3dyXca aanTepom
PpIMeuaHn
YcTaHOBka Ha BHeUHei CTeHe 6e3 TeIPOH3OJIaUNn HnHaI HeOTaIIINBaEMbIM IOnOM He peKOMeHdyETCA ( ≥ 0,5BT / M^2 C)
He nodklouaHTe CTOpOHy Ha BbIyB HAnpMyIO KdpYrMn np6opam 63 neperopoOK. EcnH HeBO3MOxHO yCTaHOBtB neperopoKn CM. "pyrHne cnocobbl yctaHOBKn".
1.ПиКOM6HINHPOBAHNc aadantepom yuHTbIbAte COOTBeTCTBHe pa3MepOB BbIpe3a B 3aDHeI CTeHKe.
→PUC.26
2.ИЗмербтToIинHy cToIeшиMbI.IpeHecnte 3aMepHa 甲6NoH n pOBeIDTe COOTBETCTByIOUyIO JINHIO.
→PUC.27
3. BbipeKbte 1a6IOH no pa3MeueHHo HINn Ia TOnuHbI cToJeUHnucB A, UeHTpaNbHOH INn HbIpe3a B n KOHTpOJIbHOJ INHn Ia BHyTpEHHero BblNyCKHOrO OTBepCTnC.
4.OTMeTbTe CEHTP BbIpe3a B CToneUHnue CEHTpaJIbHOJ NHNHe Ha 3aDHeN CTeHKe Me6eHn.
→PUC.28
- BbipOBHnTe WApNoH No ceHTpaBHOJ HnHnHa 3aHne CTeHKe Me6eNn IIO HxKHeMy KpaO CToneuHnIbl.
- CdeJaIe BbIpe3 B 3aHHe cTeHKe B COOTBeTCTBHN C WJ-6JIOHOm.
- NocJe BbInONHeHnB Bipe3a ydaJIte ONnKn
- 3aRepMeTH3npyIte CTbIKN TepMOCTOKNM IN BOHOHePONHuaembIM TepMeTNIKOM.
→PNC.24
BeHTnlaun
- YcTaHOBnTe Bo3DyHbI KlaNaH B LOKONE nIpeKIMa CnpKyJUeIN BO3Dyxa.
MHHMaIbHoe IonepeuHoe CeueHne BO3dUshoro KlaHaDOnJHo 6bItb npm.400 cm².
BbIyckHoe OTBepCTHe BcOKoJIe DOnJHKo 6bITb IOCTaTOHO 60JIbWIM, YTO6bl CHN3NTb MOUHOCTb TARn I OBeCneHTb Hn3KIn yPoBeHb Wyma.
CdeNaTe BixoHoe OTBepCTne, yKopoTnB 0OKoJIbHbIe peKiN, nIONoJIb3yIte COOTBeTCTBYOUIne BEHTNIaIuONHbIe peWeTKN nn PInNTyCa.
- TTo6bI npH6Op fHyHKUHOHPOBaI npaBnIbHo, o6ecneYbTe npITOK Bo3dyxa K BapOuHoi NaHei Nepe3 OTBepCTne DnB BixOda Bo3dyxa C MINHMajlbHbIM NpopeyHbIM Ce-ueHem 200cM² B HnKHeM uKaΦy.
YcTaHOBka np6opa c peKHMOM cnRpyLauu BO3dyxa C aadantepom Kpenenne yNLOTHHTeHa aadantpe
3aKpeHnTe yIIOTHnTeIb Ha aIaIaTepe Ha paccToHHn He 60Jee 5 MM OT Kpa.
→PNC.29
YcTaNOBKa aDantepa
- OuHCTHe n 06e3KnPbTe NOBepxHOctb npNKJEnBaHN BOKpyr Bbipe3a B 3aDHe cTHeKe Me6eN.
2.YcTaHOBHeAaIaTepB BbInyckHoe OTBepCTne B 3aAnHeuactn BapOHyoHaHEH.
→PnC.30
- CHIMMITE 3aunTHyO nIeHky caanTepa.
→PUC.31
YcTaHOBbI npH6opa B Bblpe3 B CToJeHHnCe
- Y6eIntecb, yTO cTeBoi KaebIb NpIKJIIOUeH K npIbOpy.
2.AKKypaTHO yCTaHOBNTe np6Op B BVipe3 cToJeWHuCbI.
→PNC.32
3aTARHBAHHe 3aHHMOB
YcTaHOBtE 3aKIMbI IN3 KOMPnEKeTaNocTaBKn Ha cToJeHnUy NOCTOPOXHO pNkpyTNTe INK pNp6OpY.
CneIte 3a Tem, YTO6bI BApOuHaN paHEnb HaxOduIacb Ha Toi JxE Blicote, YTO N CToneUHnua, n npnbop He CMeuaetca.
He nCnoIb3yIte 3JIeKtpOoTBePtKy.
→PNC.33
ΦHKcaunraanTepa
1.YepKnBa CpeHnI DepKaTeIb aAnTepa, CdbNbTe ero 60KobIMN DePKaTeIaMNI K 3aDHe cTeHKe B HxKHeM uKafty npKnneTe.
→PNC.44
2. Pn Heo6xOIMOCTN DOONHHTeIbHO 3aΦHKcpyTe aDaNTep BINTAmN.
→PNC.35
IodrotOBka Me6eHN K yctaHOBKe npn6opa JIIA cHpKyJIaUNB03dUxac HbIM KaHaJOM
1.Пин HeobxOДMOCTH CHIMITE 3aHIOCTeHKy Me6eHn.
2.ПиКOM6HINHPOBAHN CПLOCKIM KaHAnOM yuHTbIaTe COOTBETCTBNE pa3MepOB BbIpe3a B 3aDHeN CTeHKe.
→PNC.3
3.YcTaHOBHTe BO3DyUHbI KJIaHaN B COKone DnIpeKHMa CInPKyJUcIN BO3DyXa.
MHHMaJIbHoe NOppeuHoe CeueHne Bo3dUshoro KnaHaHdoJXHO 6bIb npHM.400 cm².
BbIyckHoe OTBepCTne BcOKOE DOnJHo 6bITb DOCTaTOHO 60JIbWHM, YTObCHN3HTb MOUHOCTb TARn IObecneuHTb Hn3Kn ypoBeHb Wyma.
CdeNaIe BbIXoHoe OTBepCTne, yKOpOTNB 0OKoNbHbIe peKn, nIO6 IOcONb3yTe COOTBeTCTBYOuINE BEHTINrA UHOHbIe peWetKn nn nnHTyca.
-
TTo6bI np66op fynKUHOHPOBaI npaBnIbHo, o6ecneYbTe npTOK Bo3Dyxa K BapOuHoi NaHei Ype3 OTBepCThe DnB BixOda Bo3Dyxa C MInHMaJIbHbIM NOpEpuHbIM ce-ueHem 200cM² B HxKHeM uKaФy.
-
Посл e Випон He rь Вир eэа yДaJIne OПИКИ.
- 3aRepeMeTHN3HpyIe CTbIKN TepMOCTOKNM IN BOHOHePONHuaemMbIM TepMeTNIKOM.
PUC.24
YcTaHOBka npnbopa IJIpa6OtBI BpeHXMe CnRPKylAunn BO3dyXa C nRPKylAunOHbIM KaHaJOM
- HcnoIb3yIte yIINOTHInTeI, cIpyKJIaIIOHHb KaHaI, dIΦ-Фу3Op IФИbTp IЯ yIaIeHnI 3aIaxOB BpeKIMpeIuPkyJIaIuN BO3dyxa.
2 YHTbBaIte pa3MepbI pa3NHybIX nIOCKNX BO3dyXOBO- IOB. CtpaHua 80
ΦHKcaunyNtHTnTeJIa
3aKpeNITE BxOJaIINB KOMnJIeKT NocTaBKN yNIOHTHeB Ha NIOCKOM KaHane He daJbWe 5 MM OT Kpa.
→PNC.37
YctaHOBKa IIOCKORO KaHaJa
- YctaHOBNTe pIOCKn KaHaN B BbInyCKHoe OTBepCTne Ha 3aDHei CTeHKe npNo6opa.
→Pnc.38
UctahOBka np6opa B bIpe3 CTOJeHHne
1.Y6eIntecb,yTO cTeBoi Ka6eBnIOKJIIOUeH K npnbOpy.
2 AkkypaTHO ycTaHOBITE np60B V Bblpe3 cToJeuHnUb.
→PNC.39
YcTaHOBbKa CnCTeMbI Tpy6 MeHdI npH6OpOM nDnΦΦy3OpOM
- CoeHNHTe KOMNHOENTbI UINPKyNAUHNOHOrO KaHaJa MeKdy co6oJ.
3aKpeHnTe CoeHHHTeIN PIOCKNX BO3DyXOBODB, 3a-ΦHKcnpoBaB IN CO UeNkOM.
ДлгболгеНаджногиФИКсauипprИкpyтITEcoeINHITeIbПLOCKOROBO3dYxOBoDA4BHTAMNДлгПlaCTnKaPT4X8MM.
→PnC.40
2.ПодсоeннHTe UINPKyIaHNoHHb KaHaN C ПLOCKM BO3-ухOBODM K 3aДнeЧаTи BapOuHoi NaHelen.
P_HC 41
3.ПодсоeДинHTe ДИФуЗОКЦИРУЛЯUNHOMу KaHaIy.
→PUC.
3aTARHBAHHe 3aHHMOB
YcTaHOBnTe 3aKIMbI N3 KOMnEKeTaNocTaBn Ha cToeHnUy nOCTOpOxHo npNkpyTne IN K npN6opy.
Cleinte 3a Tem, yTo6bI BapouHaa NaHeIb HaxOdiNacb Ha Toi JxE Blicote, YTO I CTOneUHnua, N npnbop He CMeuaeTc.
He nCnoJb3yIte 3JIeKTpOoTBepTKy.
→PUC.43
IodrotOBKa Me6eJn IJIy yCTaHOBKn peKHaMa OTBOda BO3dyXa
1.ПиНeoБхODHmOCTNCHIMITE3aHIOTOCTeHKyMe6eHn.
2.ПиКOM6HINHPOBaHNcПLOCKIMKaHaJOMyHTbIaNTe COOTBETCTBnpepa3MePOB BbIpe3aB3aJIHe CTeHKe.
→PUC.44
- Nocne BbInonHeHnB bIpe3a ydaJIte onnIKN.
- 3aRepeMeTHN3HpyIe CTbIKN TePMOCTOKNM IN BOHOHeNPOHNuCAeMbIM TepMeTNIKOM.
→PUC.45
YcTaHOBbI npH6opa IJIpa6OtBI B peKHMe OTBODa BO3dYxa
- B pexnme OTbOa Bo3dyxa HcNoIb3yIe yIyIOTHInTeIb IyMOnorIooiaOUIne FJIbTpbl.
- Co6IIOJaIte yka3aHn no pa6Ote B peKIme OTbOda BO3dyxa. CtpaHnua 82
ФнкациулnotHTteJIa
3aKpeNITe BXOJHUNB KOMNIEKT NocTaBN yNIOHTeJIb Ha NIOCKOM KaHane He daJIbwe 5 MM OT Kpa.
→PUC.37
YctaHOBka CnCTembl Tpy6
- YctaHOBtTe NIOCKn KaHaN B BbInyCKHoe OTBepCTHe Ha 3aDHeN CTeHKe np60pa.
→PUC.38
2.Пи Heo6xOdMocT MoHTnpyTe DoNoHHTeNbHbIe 3neMeHTbI CnCTeMbI Tpy6.
YctaHOBKa np6opa B Bbipe3 B cToJeHHne
- Y6eIntecb, yTO cTeBoi KaebIb NpIKJIIOUeH K npIbOpy.
2.AKKypaTHO yCTAHOBNTe np6Op B BBpe3 CToneWHnUbl. P_NC 39
3aTARHBAHHe 3aHHMOB
- YcTaHOBnTe 3aKIMbI n3 KOMnJIeKTA nocTaBn Ha cToJIuHnUy nOCTOpOxHo npNKpyTne IN K npN6opy.
CJIeIte 3a TeM, YTO6bI BApOuHaN paHeIb HaxOdiIacb Ha Toi JxE Blicote, YTO I CToneUHnua, I npBop He CMeIaetc.
-He nCnoIb3yIte 3eKtpoOTBepTky.
→PUC. 33
POncoeHHeHne BbITaHHoN Tpy6bl
- 3aKpeHNTe BbITAAKHyTO Tpy6y Ha KOJIeHe NIOCKORO BO3dYXOBoJa.
-
BbINOHNHe coeINHeHne C BbITAKHBIM OTBepCTnEM.
-
3aRepeMeTHn3HpyTe MeCTa COeINHeHH COOTBcTcByIOuIM O6pa3OM.
YcTaHOBkaΦHbTpOB
3aMeKa:BpeKHeMgUpKyIaCmN yCTaHOBnTeΦnIbTpbl, nOrrloaIOuJe 3anax.
BpeKIMe OTOBa BO3dyxa ycTaHOBtne UyMONOrnOuaHOUne fHbTpbl.
- 06paTHe BnMaHHe Ha HAnpaBHeHne BO3DyUHoro NotoKa ΦNtPoB.
2.BctaBbTe B npn6op Dba fNtpa CneBa n Cnpaba N CdBnHbTe IN Bnpeq.
Pnc. 46
- BctaBbTe B np6Op dpyTne DBa fNbTpbl cIeBa n cnpaBA.
→Pnc.47
YcTaHOBKa HnpoyNaBnBaIOUeO ΦNlbTpa
YcTaHOBnTe KInpoynabINBaIOuIINΦNtP.
PNC.48
3NeKtpnueckoe nokJIIOyeHne
- YuHTbBaIe npaMeTpbl NOdkJIIOueHnHa TINOBO Ta-6JNvKe.
2.ПоДКЛЮЧИТЕКЛEMМУ3NKa6eJIЯKpacnppeJNTeHOBKopo6Ke,KaK pOKa3aHoHa pncyHke.
→PNC.49
3.ПодключITEКлему2NkaбелЯрспpeДELNTeьног Коробke,КakпokазанHa рсунke.
→PUC.50
4.ПодключITEКлемmy1NkaбелЯраспедentьног Коробke,KaKпokа3aHoHa pncyHke.
→PUC.51
5.ПодклioчnteКлeMMу 2L/2Nka6eЯKpacnpedentel- HOI Kopo6ke, KaK noka3aHoHa pncyHke.
→PUC.52
6. YuHTbBaIte UBeT KaBeJeI.
- BN: KOpHHeBbI
- BU: cnHn
-
GN/YE: JkHtBn 3eHbI
-BK:YeHbI
-GY:cepbl -
B 3aBnCmOCTn OT Tnna NODKIIIOHHeN, npi Heo6xOIMOCTn paCNOJIOXHTe Ka6eJIbHbIe 3aKIMbI, NOCTaBnREMbIe B KOMPnEKeTe, No-pa3HOMy.
8.Пи Heo6xOaHmocTn HcNoIb3yIte Ka6eJIbHbIe 3aKIMbl dna coeINHeHH DByX Ka6eIeN. -
YkopoTte XnIbI kaBenei.
- YdaIaIte H3OJIaIIO.
PpOBepka pa6oTbI
- BkHouTe npn6op.
- Ecnn 3aropaeTc8 C08E EOp n6KnIu-ueH HeKOppeKTHo. "PpOBePKa N OTnAdka NODKluOe-HNRA K 3NeKtpocTeN", CtpaHnua 84
3.EcnHaDnCnnee np6opa He noBnHcTcHnDnKaun OoN6ok, npOBepbTe paOTo BENTnAun, cneDy pyKOBOCTBy NO 3KcNpyaTuN.
PpOBeRka N OTJaDKa NOdkJIIOUeHnK 3JNeK- TpOcETn
- OToeDHHTe npH6Op oT cEtN.
- Y6eIntecb, yTO NOKIIIOueHHe Ha npBope n NOKIIIOueHHe Ha CTeHe COOTBeTCTByIOT CXEme NOKIIIOueHnB INHCTpykUINo MOHTaKy. "NoIroTOBka K 3NeKTpONoI KIIIOueHnO", CtpaHnua 81 "3NeKTpUneCKe O NoKIIIOueHnE", CtpaHnua 84
3.ДЯ3N O6paTnTe BHNMaHHe Ha CneIyUOuIn pncyHOK. →PnC.581
4.ДЯ2N O6paTHTe BHIMaHHe Ha cIeIyHOuIN pUCyHOK. →Pnc.54
5.ДЯ1N O6paTHTe BHIMaHHe Ha cIeIyHOuIN pncyHOK. →PnC.55
YnIOtHeHne 1B0B
Tpe6oBaHne: IpeE 3aIeKoI WBOB o6raTeIbHo npOBepbTe fynKuOnHpoBaHne np6opa!
- 3arepMeTn3npyTe IOB No nepmEpTy NOxOaHm KaPonpoHybIM CnIKoHOM (HaepMep, Novasil® S70 nnn Ottoseal® S70).
→PUC.56
PnHcNoJIb3OBAHNHeNODXODIeRO CINIKOHOBORKJER CToneUHnua n3 HaTpyaIbHOrO KAMHRA B HEKOTOpbIX MeCTax MOKeT N3MeHHTb ZBET. - OTnoInpyuTe WBBi peKOMeHDoBaHHbIM npOn3BOaHTeMeM CpeDCTBOM.
- Ctporo co6nOdaIte HNCTpyKcnn IIO NcNoIb3oBaHnO cnJIHKOHOBORKJER.
4.Даite CINIKHOBOMY KLEIO BICOXHyTb He MeHee CYTOK. BpeM BAICbIXaHn3aBNCHT OT TeMnepaTypbl OKpyKaHO- uei cpebl. - ΕΚΝΥΑΤΑΟ Πρήσα Ανούγκαετη Κόβκο Μος ΤΟ,ΚΑΚ ΣΝΙΝΚΟ ΘΟΙΗΘυ Βυίακχει.
IpepeHaCTpOJa HnDnKaun Ha peKm OTBOda BO3dyxa
- Пи Heo6xOINMOCTn NepeHAcTpoTe COOTBcTByIOUIM 6pa3OM 3neKToPHHOe ynpaBHeHne B 6a3OBbIX yCTaHOB-KaxДЯ peKIMa OTbOda BO3dYxa.
- CM. rnaBy "Ba30BbIe yCTaHOBKn" B pyKOBoIDCTBe no 3Kc- nlyaTaunn.
DEmoHTaH npH6opa
BHIMAHHE!
Pn HcNoIb3OBAHn INCTpyMeHTOB MOxHO NOBpeDntb paMy np6opa.
He n3BneKaIte npn6op cBepxy.
1. OToeDHHte npH6Op ot 3JeKTPocetn.
2. CHIMTE BbITXHON KaHAn nIOcna6Be coeHNHeHne DnIaCpKyJIaUN BO3Dyxa.
3. Pa3peKbTe cnJIKHOHbI IIOB.
4.N3BNEKeNTpe np6Op,BbToJKNHyBero CHN3y.
- es
- Volumen de太少istro
- QR code for the installation video
- Appliance dimensions
- Installation dimensions for flat duct bends
- Installation variants
- Odour filter and adapter for circulating-air mode:
- Odour filter, diffuser and seal for circulating-air mode:
- Acoustics filter and seal for air extraction mode:
- Safety clearances
- General information
- Safe installation
- WARNING - Danger: Magnetism!
- WARNING - Risk of poisoning!
- WARNING - Risk of fire!
- WARNING - Risk of injury!
- WARNING - Risk of suffocation!
- Information about the electrical connection
- WARNING - Risk of electric shock!
- Preparing the electrical connection
- Opening the mains socket
- Preparing the mains socket
- Connecting the cable to the mains socket
- Secure the cable in the mains socket
- Instructions for the exhaust air pipe
- Flat ducts
- Round pipes
- Instructions for the air extraction mode
- Notes
- Checking the units
- Flush installation
- Preparing the units
- Observing the minimum clearances when installing above a drawer
- Attaching adhesive tape
- Preparing the unit for circulating-air mode with the adapter
- Ventilation
- Installing an appliance featuring circulating-air mode with adapter
- Attaching the seal to the adapter
- Attaching the adapter
- Inserting the appliance into the worktop cut-out
- Screwing the retaining clips in place
- Securing the adapter
- Preparing the unit for circulating-air mode with a circulating-air duct
- Installing the appliance for air recirculation mode with circulating-air duct
- Securing the seal
- Inserting the flat duct elbow
- Establishing the pipework between the appliance and the diffuser
- Preparing the unit for air extraction mode
- Install the appliance for air extraction mode
- Establishing the piping
- Connecting the exhaust air pipe
- Inserting filters
- Inserting grease filters
- Establishing the connection to the power supply
- Checking the function
- Checking and correcting the electrical connection
- Sealing crevices
- Switching the display for air extraction mode
- Removing the appliance
- ATTENTION!
- ADVARSEL-Fare for forgiving!
- ADVARSEL - Brandfare!
- Placering of adapter
- Fastgoring at adapter
- Fastgoring at taeling
- Monteringsmal for flat rorbend
- Sette inn flatt rorbend
- Iapaaayec ykataoTaoonc
- ΦIAtpo Ooμov Kai Npooaepoyεαγia Tn λεIoupyia αvakukloφopiac αεpa:
- Ynoeic yia Tov aywyo aaywync Tou aepa
- EniEaKavlaia
- ФиьтдууаленяларховиадanTpдуpeжmaцнkyлсИВO3dYxa:
- HnIbTp dIy ydaeneHH 3aNaXOB, HNΦy3Op nynlnotHTeIb dIpeKHaMa cnpkpyuauu BO3dyxa:
- UymonorIOTHTeH yNIOHTHTeB dIpa pexHMa OTBOa BO3dyxa:
- БezonauchblepacToHHN
- O6uNe yka3aHnra
- Be30nacHocTb npn MOHTaHe
- 1NPEyIPEXJDEHNE-OnachOCTb:MarHeTHn3M!
- NPEUYIPEXKDEHNE -OnachocbOprabJeHnA!
- I NPEUYPEXKDEHNE -Onachoctb Bo3ropaHn!
- I PNEUYPEJKDEHNE -OnacHocTb TpaBMnpoBaHHa!
- I PEPdUYPEJKDEHNE -Onachocb ydyub!
- I NPEUYPEXKDEHNE -Onachoctb OTPaBJeHHA!
- Yka3aHnno no noKnIOueHHIO K 3JIeKTPocetN
- I PEPdVNPEXKDEHNE -OnacHocTb npaHexnAJIeKtpuueckm TOKOM!
- IodrotOBka K 3JIeKTpponoKnIOHueHnIO
- OTkpbBaHne pacnpedeHtEnbHOn Kopo6Kn
- Poirotobka pacnpedeJInteJIbHOJ Kopo6Kn
- PoiKluoyeHne Ka6eJn K pacnpedeHntb-HoN Kopo6Ke
- Фнкаця КбеляВpacnpeДЛТьhoeKopo6ke
- YkaHnnoOTbOyBO3dyXa
- ПлOCKи Каналы
- KpyrIbIe Tpy6bl
- Yka3aHnIypeKnMaOTB0aBO3NyXa
- PnmuMeaHn
- PpOBePKa Me6eJH
- BctpaBaHne 3anOpnlo
- Poirotobka Me6eHn
- Pn yCTaHOBKe HaI BblBHHbIM RAnKOM BblepKHNBaIe MHHMaJIbHbIe OTCTynbl.
- KpenneHne KneiKoJ NeHTbI
- IoprotobKa Me6eN K yctaHOBKe np6opa JnI npKpyauHH Bo3dyXca aanTepom
- PpIMeuaHn
- BeHTnlaun
- YcTaHOBka np6opa c peKHMOM cnRpyLauu BO3dyxa C aadantepom Kpenenne yNLOTHHTeHa aadantpe
- YcTaNOBKa aDantepa
- YcTaHOBbI npH6opa B Bblpe3 B CToJeHHnCe
- 3aTARHBAHHe 3aHHMOB
- ΦHKcaunraanTepa
- IodrotOBka Me6eHN K yctaHOBKe npn6opa JIIA cHpKyJIaUNB03dUxac HbIM KaHaJOM
- YcTaHOBka npnbopa IJIpa6OtBI BpeHXMe CnRPKylAunn BO3dyXa C nRPKylAunOHbIM KaHaJOM
- ΦHKcaunyNtHTnTeJIa
- YctaHOBKa IIOCKORO KaHaJa
- UctahOBka np6opa B bIpe3 CTOJeHHne
- YcTaHOBbKa CnCTeMbI Tpy6 MeHdI npH6OpOM nDnΦΦy3OpOM
- IodrotOBKa Me6eJn IJIy yCTaHOBKn peKHaMa OTBOda BO3dyXa
- YcTaHOBbI npH6opa IJIpa6OtBI B peKHMe OTBODa BO3dYxa
- ФнкациулnotHTteJIa
- YctaHOBka CnCTembl Tpy6
- YctaHOBKa np6opa B Bbipe3 B cToJeHHne
- POncoeHHeHne BbITaHHoN Tpy6bl
- YcTaHOBkaΦHbTpOB
- YcTaHOBKa HnpoyNaBnBaIOUeO ΦNlbTpa
- 3NeKtpnueckoe nokJIIOyeHne
- PpOBepka pa6oTbI
- PpOBeRka N OTJaDKa NOdkJIIOUeHnK 3JNeK- TpOcETn
- YnIOtHeHne 1B0B
- IpepeHaCTpOJa HnDnKaun Ha peKm OTBOda BO3dyxa
- DEmoHTaH npH6opa
- BHIMAHHE!
Brand : BOSCH
Model : PVQ820H26E
Category : Cooker