
FOLDON OB200 - Vacuum Cleaner Eldom - Free user manual and instructions
Find the device manual for free FOLDON OB200 Eldom in PDF.

| Product type | Cordless vacuum cleaner |
| Brand | Eldom |
| Model | FOLDON OB200 |
| Nominal power | 150 W |
| Supply voltage | 100-240 V ~ 50/60 Hz |
| Operating voltage | 22.2 V |
| Battery type | Li-Ion 22.2 V, 2200 mAh |
| Runtime (high power) | Up to 20 min |
| Runtime (low power) | Up to 40 min |
| Charging time | Approximately 5 h |
| Dust tank capacity | 1 L |
| Noise level | < 80 dB |
| Filters | HEPA filter (washable) + inlet filter (washable) |
| Supplied accessories | Motorized brush, dual-function nozzle, tube, cleaning tool, wall mount, charger |
| Weight | Approximately 2.5 kg (estimated) |
| Dimensions (L x W x H) | Approximately 110 x 25 x 20 cm (assembled, estimated) |
| Intended use | Domestic, floors, curtains, upholstered furniture, car interior |
| Safety features | Roller overheating protection, automatic shutdown if jammed |
| Maintenance | Empty the bin after each use, clean filters regularly, wash HEPA filter if very dirty (dry for 24 h) |
| Warranty | Private domestic use, warranty void if used professionally or not in accordance with instructions |
Frequently Asked Questions - FOLDON OB200 Eldom
User questions about FOLDON OB200 Eldom
0 question about this device. Answer the ones you know or ask your own.
Ask a new question about this device
Download the instructions for your Vacuum Cleaner in PDF format for free! Find your manual FOLDON OB200 - Eldom and take your electronic device back in hand. On this page are published all the documents necessary for the use of your device. FOLDON OB200 by Eldom.
USER MANUAL FOLDON OB200 Eldom
natural_image
Black and silver compact vacuum cleaner with handle and control panel (no visible text or symbols)natural_image
Four-step diagram of a mechanical component with arrows indicating assembly or transformation (no text or symbols present)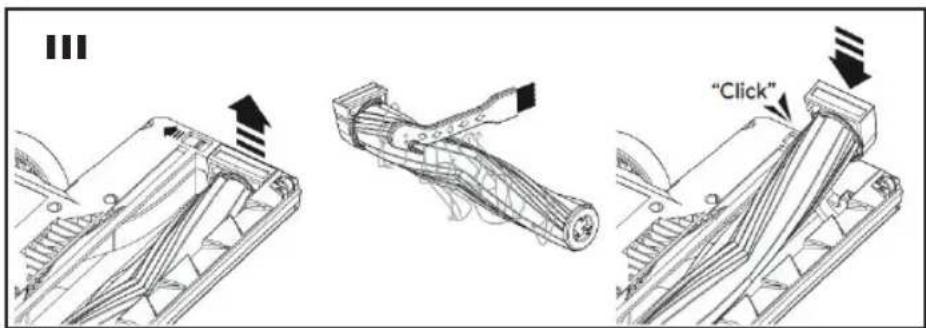
flowchart
graph TD
    A["Vehicle 1"] --> B["Transmission Line"]
    B --> C["Stage 1"]
    C --> D["Transmission Line"]
    D --> E["Stage 2"]
    E --> F["Transmission Line"]
    F --> G["Stage 3"]
    G --> H["Transmission Line"]
    style A fill:#f9f,stroke:#333
    style B fill:#ccf,stroke:#333
    style C fill:#cfc,stroke:#333
    style D fill:#fcc,stroke:#333
    style E fill:#cff,stroke:#333
    style F fill:#ffc,stroke:#333
    style G fill:#cfc,stroke:#333
    style H fill:#fcc,stroke:#333
INSTRUKCJE DOTYCZĄCE BEZPIECZEŃSTWA
Before first use, carefully read read the entire contents of this manual.
Retain all warnings and safety instructions for future reference.
- The appliance is intended for private household use only.
- Do not use outdoors.
- Connect the connection cable to an outlet with the parameters specified in the manual.
- Keep the power cord away from heated surfaces.
- Do not pick up with the hoover:
- hot ashes,
– cigarette butts and matches,
– sharp objects (e.g. glass fragments), - plaster, cement, stone dust and flour etc,
- debris,
- water and other liquids.
- Do not operate the appliance if the filter is damaged.
- Do not cover the ventilation openings.
- Do not block the inlet opening.
- Do not use the hoover to vacuum wet carpet surfaces, e.g. after washing with laundry shampoos. Allow the foam to fully dry and the vacuumed surface to dry.
- Do not vacuum people or animals with the hoover and, in particular, do not bring the nozzle close to their eyes or ears.
- Always unplug the appliance from the mains by pulling the plug, not the power cord.
- Unplug the appliance before cleaning or replacing parts and for the time when it is not in use.
- Always switch off the hoover after cleaning or before placing it in the charging station.
- Do not handle the appliance with wet hands.
- Do not immerse the appliance in water.
- Protect the hoover from moisture.
-
Never leave the hoover switched on unattended.
-
This appliance may be used by children of at least 8 years of age and by persons with reduced physical and mental capabilities and persons with inexperience
- and knowledge of the equipment, if supervision or instruction is provided on how to use the equipment safely so that the associated risks are understood. Children should not play with the equipment. Unsupervised children should not carry out cleaning and maintenance of the equipment. Take special care when using the equipment near children.
- Do not use the hoover without the filters and waste container in place.
- Use only with the originally supplied accessories and power adapter.
- Unplug the appliance from the mains before each cleaning and emptying the bin.
- Do not use if the power cord is damaged or if the unit has been damaged in any other way.
- Repairs to the equipment may only be carried out by an authorised service centre. Any upgrade or use of non-original spare parts or components of the appliance is prohibited and compromises the safety of use. For information on how to service, please refer to the warranty card and www.eldom.eu.
- When vacuuming certain types of floors or floor coverings, electrostatic discharge may occur, which is not hazardous to the user.
WARNING: Improper use of the appliance may cause injury.
CAUTION: The plastic bag can be a hazard - to avoid suffocation with the bag, keep it away from babies and small children.
INSTRUCTION MANUAL
VACUUM CLEANER OB200
EN
• GENERAL DESCRIPTION
- Charging socket
- On/off switch
- Battery indicator
- Power control
- Battery
- Battery lock button
- Body
- Socket for tube (10) and brush (15)
- Tube (10) and brush (15) lock button
- Pipe
- Brush socket (15)
- Brush lock button (15)
- Brush illumination
- Brush roller
- Brush
- Dual-function nozzle
- Tip lock button
- Pipe joint lock button
- Container lid lock button (21)
- Dust container cover
- Dust container
- Handle
- HEPA filter
- Inlet filter
- Clean tool
- Hanger
- Suction lock button (16)
- Shaft lock button (14)
- Shaft lock (14)
- Power Supply
• TECHNICAL DATA
– Rated power: 150W
– Supply voltage: 100-240V\~ 50/60Hz
– Operating voltage: 22.2V
– Charging voltage: 26.0V
- Volume: <80dB
– Operating times after full charge
■ at high speed for up to 20 minutes,
■ at low speed for up to 40 minutes.
– Dust-container capacity: 1 l
– Battery: Li-ION 22.2V, 2200mAh
• SPECIFICATIONS POWER SUPPLY
- Model: CZH013260050EUWH
– Eldom Sp. z o.o.,
ul. Pawła Chromika 5a, 40-238 Katowice - Input voltage: 100-240V\~
– Input AC frequency: 50/60Hz - Output voltage: 26,0V DC
- Output current: 0,5A
- Output power: 13W
– Average active efficiency: >83,39%
– Efficiency at low load (10 %):
115V/84.33%; 230V/84.45% - No-load power consumption: <0,10W
- INTENDED USE
OB200 cordless vacuum cleaner is intended for vacuuming floors, but also curtains, upholstered furniture, etc. Thanks to its universal design, it can easily remove dust both at home and in the car.
Use of the hoover is only possible after charging the internal battery.
- BATTERY (5)
- After unpacking and assembling the device, charge the battery (5).
- The vacuum cleaner can only be used after charging the internal battery. Charging time is approximately 5 hours.
- The battery (5) can be charged when it is mounted in the body (7) or disconnected from the body (7).
- To disconnect the battery (5), press the button (6).
- To start charging, connect the power supply cable (30) to the charging socket (1), and then connect the power supply (30) to a power socket with parameters consistent with those given in the manual.
- Battery charging is indicated by the indicator (3). During charging, the indicator (3) flashes, and when the battery is charged, it lights up continuously.
- The vacuum cleaner should be charged at room temperature.
- To extend the battery life, the first 3 charges should be made in uninterrupted cycles, after the battery is completely discharged.
- A fully charged vacuum cleaner will operate at full power for about 20 minutes. Then the suction power will drop dramatically and you will need to recharge it.
- If the vacuum cleaner is not used for a long time, it should be charged at least once every 3 months.
- ASSEMBLY
– Unpack the device and check whether any of the elements have been damaged.
- Press the button (19) and open the container lid (20).
- Place the HEPA filter (23) in the inlet filter (24) and secure it by turning it clockwise. Then put the filter (24) into the container (21) and fix it by turning it to the right - Fig. 2. Close the cover (13).
ATTENTION. Do not use the vacuum cleaner without filters (23, 24).
- In the brush (15), slide the lock button (28), remove the lock (29) and insert the roller (14) - Fig. 3.
ATTENTION. Do not use a vacuum cleaner with a brush (15) without a properly installed roller (14).
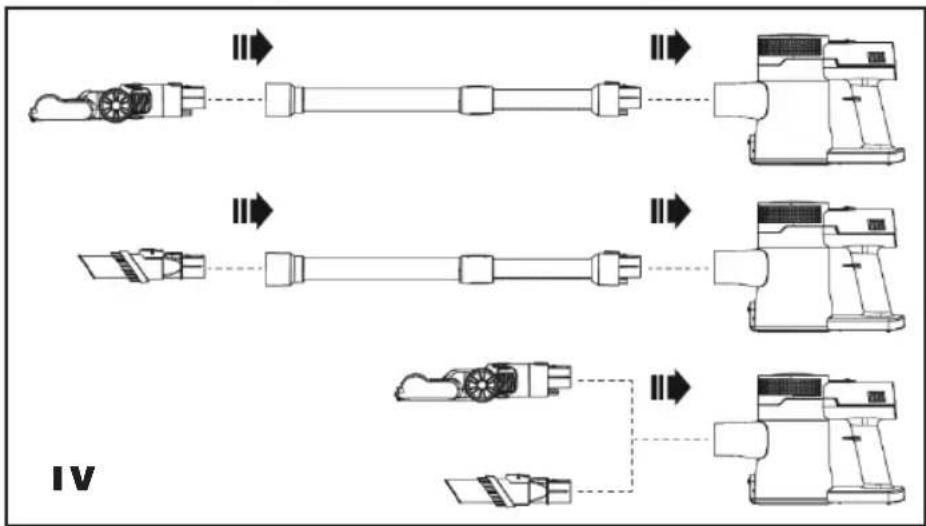
- The vacuum cleaner can be used in several configurations - Fig. 4.
- Check whether the battery (5) is installed in the body (7) and whether it is charged.
- Make sure that filters (23, 24) are installed in the container (21).
- Assemble the vacuum cleaner according to your current needs - Fig. 4.
- The vacuum cleaner starts working after pressing the switch (2).
- The suction force can be adjusted using the button (4).
- The pipe (10) is equipped with a joint, which allows for easy vacuuming under furniture. To bend the pipe (10), press the lock button (18).
- Monitor the filling level of the container (21). If the container (21) is half full, empty it (see EMPTYING THE CONTAINER).
- To turn off the vacuum cleaner, press the button (2).
- After finishing work, the vacuum cleaner should be cleaned (see CLEANING AND MAINTENANCE).
NOTE
The roller (14) in the brush (15) rotates at a very high speed - to avoid damaging the cleaned surface, do not leave the brush (9) in the same place for too long.
The brush (15) is equipped with an overheating protection function that can cut off power to the roller drive (14) if it becomes blocked. In this case, turn off the vacuum cleaner and clean the roller. Do not turn on the device until it has cooled down.
Do not cover the outlet holes in the body (7) while the device is operating.
• CLEANING AND MAINTENANCE
– Before any maintenance or repair work, turn off the device
– and disconnect them from the power supply.
- Correct operation of the device is guaranteed by regular cleaning (preferably after each use) of the filters (23, 24) and the container (21).
- The casing, accessories and power cord should be cleaned with a soft, slightly damp cloth with a little dishwashing detergent.
- Wipe the inside of the container (21) with a damp cloth.
WARNING. Do not immerse the device body (7) in water.
- Do not use any harsh cleaning agents for cleaning as this may damage the housing surface.
Filters (23, 24)
- The condition of the filters (23, 24) should be checked regularly.
– The HEPA filter (23) should be replaced periodically. - The inlet filter (24) can be washed with water and dried thoroughly.
- Do not wash the HEPA filter (23) with water every time you clean it, only if it is very dirty. In this case, dry it very thoroughly (at least 24 hours) before using it again.
NOTE
The HEPA filter (23) must be thoroughly dried before reuse. Do not use high temperature for drying to avoid deformation of the material.
Filters (23, 24) are consumable elements and are subject to natural wear, therefore they are not replaced under warranty.
Emptying the dust container (21)
- It is recommended to empty the container (21) after each vacuuming. Emptying the container (21) regularly ensures proper operation of the vacuum cleaner and maintains optimal suction power.
- Make sure the device is turned off.
- Open the container cover (21) above the basket and remove the garbage.
- Then, above the basket, remove the filter (24) and the HEPA filter (23) and clean them according to the instructions above.
- Place the filters (23, 24) in the container (21) and close the cover (20).
Cleaning the brush (15)
- Regularly check the condition of the brush (15) and especially the roller (14).
- Make sure the device is turned off.
- Press the lock button (9 or 12) and remove the brush (15).
- In the brush (15), slide the lock button (28) and remove the shaft (19) with the lock (29).
– Clean the roller (14). To cut tangled hair, use the knife (25) - Fig. 3.
– Clean the brush (15) with a soft, slightly damp cloth with a little dishwashing detergent.
WARNING. The brush (15) must not be immersed in water.
- After cleaning, place the roller (14) with the lock (29) in the brush (15).
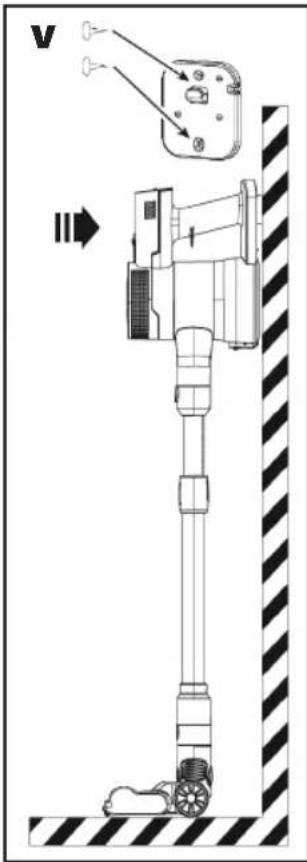
- STORAGE
- The device is not a self-standing structure, so it should be stored unfolded.
- The device can also be hung on a hanger (26) previously mounted on the wall - Fig. 5.
• DISPOSAL OF BATTERIES
– Before disposing of the product or returning it to the specified collection point, ensure that the battery is removed from the product.
– Before removing the battery, run the hoover and wait until the battery is discharged. Removal of the battery will be ensured by an authorised service centre.
- Batteries contain substances which are harmful to the environment. They should therefore not be disposed of with the normal household waste. Their correct disposal will be ensured by a suitable collection site.
• ENVIRONMENTAL PROTECTION
– the appliance is made of materials which can be recovered or recycled,
– the appliance should.
- WARRANTY
– the appliance is intended for personal use at a household,
– it is not intended for professional purposes,
– in case of misuse, the warranty is rendered null and void.
– the appliance is intended for personal use at a household,
– it is not intended for professional purposes,
– in case of misuse, the warranty is rendered null and void.
_
| _
一
1

KARTA GWARANCYJNA
WAŻNA Z DOWODEM ZAKUPU
ODKURZACZ OB200

- INSTRUKCJE DOTYCZĄCE BEZPIECZEŃSTWA
- Before first use, carefully read read the entire contents of this manual.
- Retain all warnings and safety instructions for future reference.
- INSTRUCTION MANUAL
- VACUUM CLEANER OB200
- • GENERAL DESCRIPTION
- • TECHNICAL DATA
- • SPECIFICATIONS POWER SUPPLY
- - INTENDED USE
- - BATTERY (5)
- - ASSEMBLY
- ATTENTION. Do not use the vacuum cleaner without filters (23, 24).
- ATTENTION. Do not use a vacuum cleaner with a brush (15) without a properly installed roller (14).
- NOTE
- • CLEANING AND MAINTENANCE
- WARNING. Do not immerse the device body (7) in water.
- Filters (23, 24)
- Emptying the dust container (21)
- Cleaning the brush (15)
- WARNING. The brush (15) must not be immersed in water.
- - STORAGE
- • DISPOSAL OF BATTERIES
- • ENVIRONMENTAL PROTECTION
- - WARRANTY
- KARTA GWARANCYJNA
Brand : Eldom
Model : FOLDON OB200
Category : Vacuum Cleaner