
SkiErg 2 - Fitness Equipment Concept2 - Free user manual and instructions
Find the device manual for free SkiErg 2 Concept2 in PDF.


| Brand | Concept2 |
| Model | SkiErg 2 |
| Category | Fitness machine |
| Resistance type | Air resistance (flywheel) |
| Resistance adjustment | Resistance lever from 1 to 10, simulating different snow conditions |
| Monitor | PM (Pace Monitor) with display of pace, watts, calories, cadence, heart rate belt compatible |
| Ski techniques | Simultaneous and classic (alternating arms) skiing |
| Dimensions (approx.) | Height: 2.10 m, Width: 0.80 m, Depth: 1.20 m (platform version) |
| Weight (approx.) | 42 kg (platform version) |
| Power supply | None (manual operation) |
| Users | Adults, not recommended for children without supervision |
| Regular maintenance | Straighten the ropes, clean the handles, inspect the ropes and the bungee every 50 hours |
| Cleaning | Non-abrasive cleaner for surfaces; do not spray on the monitor; clean the flywheel grill if necessary |
| Safety | Regularly check wear parts; use only original parts; secure wall mounting (wall version); do not release handles under tension |
| Spare parts | Original Concept2 parts only (ropes, bungees, handles, etc.) |
| Warranty | 2 years (parts), 5 years (frame) |
| Website | www.concept2.fr |
Frequently Asked Questions - SkiErg 2 Concept2
User questions about SkiErg 2 Concept2
0 question about this device. Answer the ones you know or ask your own.
Ask a new question about this device
Download the instructions for your Fitness Equipment in PDF format for free! Find your manual SkiErg 2 - Concept2 and take your electronic device back in hand. On this page are published all the documents necessary for the use of your device. SkiErg 2 by Concept2.
USER MANUAL SkiErg 2 Concept2
PRODUCT MANUAL
concept 2
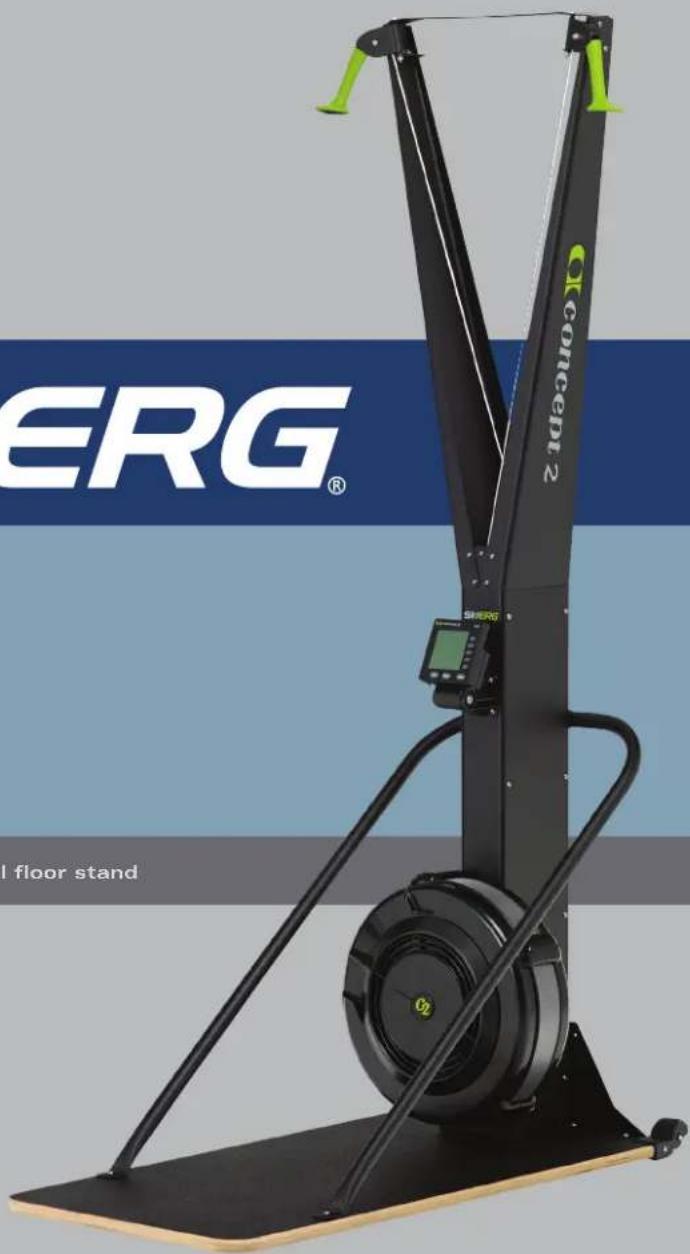
SkiERG®
Shown with optional floor stand
concept 2
SkiERG®
PRODUCT MANUAL
IMPORTANT NOTE:
For additional information about Concept2, complete warranty details, or to register to receive product updates, please visit concept2.com/registration.
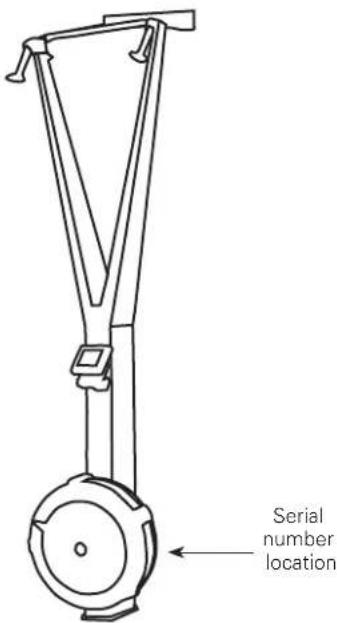
RECORD YOUR SERIAL NUMBER HERE
EN ENGLISH 3-6
SV SVENSKA 7-10
NO NORSK 11-14
DE DEUTSCH....15-18
NL NEDERLANDS 19-22
FR FRANÇAIS 23-26
FI SUOMI 27-30
DK DANSK 31-34
ES ESPAÑOL....35-38
P PORTUGUÊS 39-42
中 简体中文 43-46


www.sux.com ID: 1111237648

Manufactured by:
Concept2, Inc.
105 Industrial Park Drive
Morrisville, Vermont 05661 USA
concept2.com/contact
EU Sales & Service Headquarters:
22041 Hamburg, Germany
Wall mounted With optional floor stand
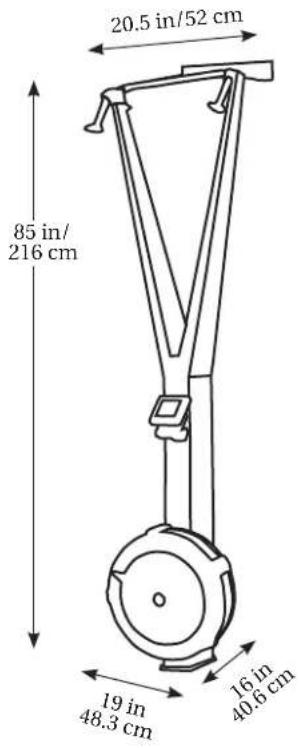
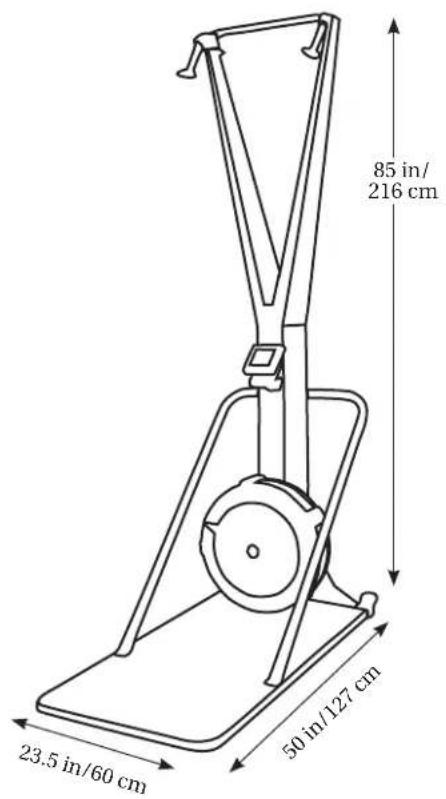
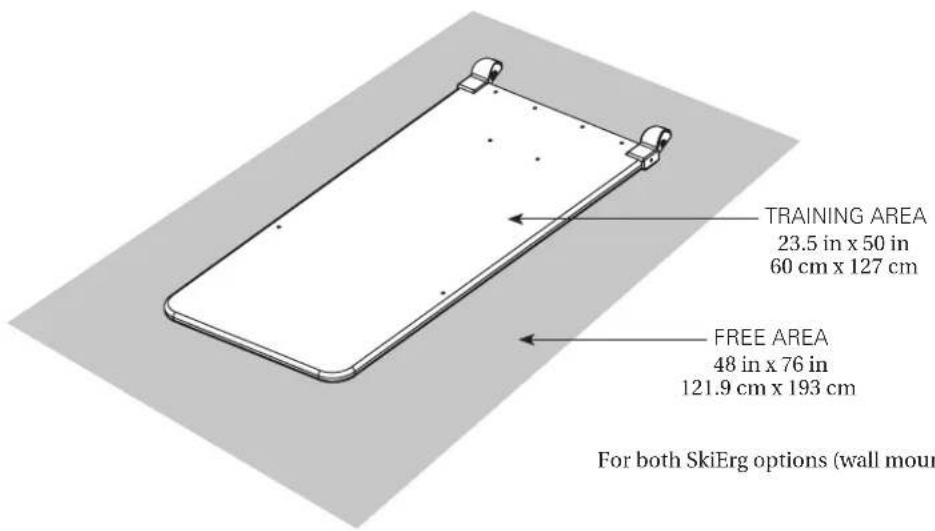
For both SkiErg options (wall mounted or with floor stand)
USE & TRAINING
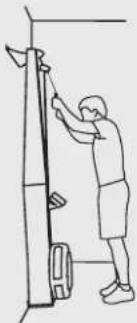
Double-Pole Technique
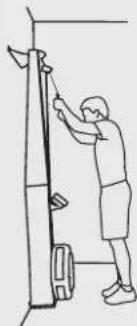
Begin with your hands shoulder-width apart at about eye level. Your arms should be bent. Your feet should be shoulder-width apart.
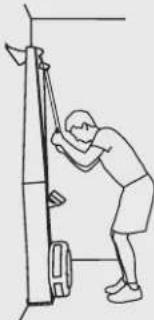
Drive the handles downward by engaging your abdominal muscles and bending your knees. Maintain the bend in your arms to keep the handles fairly close to your face.

Finish the drive with knees slightly bent, and arms extended down alongside your thighs.
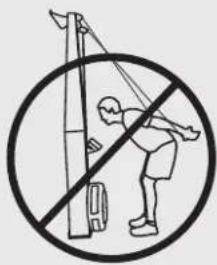
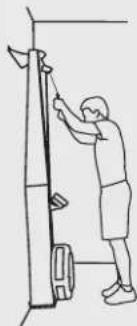
Bring your arms back up and straighten your body to return to the start position.
The SkiErg offers terrific exercise for the entire body. Each pull engages the legs, arms, shoulders and core in a downwards "crunch," using body weight to help accelerate the handles. Each pull finishes by extending the arms down along the hips with knees partly bent.
The SkiErg enables you to train with the double-pole motion that is essential to both skate and classic skiing.
Classic skiing technique (alternating arms) is also possible.
Important Safety Notes
XWARNING!
The safety level of the machine can be maintained only if it is examined regularly for damage and wear. Replace defective components immediately to ensure safety and performance or keep machine out of use until repaired.
- Use of this machine with worn or weakened parts (pulleys, cords, spools) may result in injury to the user. When in doubt about the condition of any part, Concept2 strongly advises that it be replaced immediately. Use only genuine Concept2 parts. Use of other parts may result in injury or poor performance of your machine.
- The SkiErg with optional floor stand must be used on a stable, level surface.
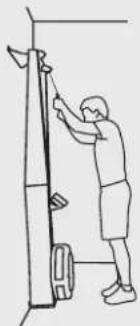
- The wall-mounted SkiErg must be securely fixed to the wall at the top and bottom brackets. Be sure that your mounting bolts are going into a solid material such as wood or concrete, and that you are using the proper hardware for the wall material.
- Do not twist or cross cords, and avoid pulling cords all the way out to the point at which they stop.
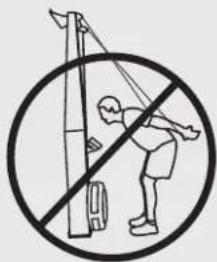
- Do not release handles when they are in the pulled out position. Bring handles back to the top position before releasing them.
- Perform regular inspection and maintenance as recommended.
- Keep unsupervised children away from the SkiErg.
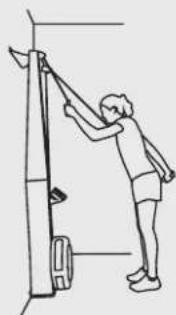
Classic Skiing Technique (alternating arms)
Begin with one arm raised and slightly bent.
Pull down with the top arm, while gradually raising the lower arm.
Continue to alternate arm pulls, keeping some bend in the pulling arm, as it is a stronger position.
WORKOUT INTENSITY
User-Controlled Resistance
The harder you pull, the more resistance you will feel. This is because the SkiErg uses air resistance, which is generated by the spinning flywheel. The faster you get the wheel spinning, the more resistance there will be. You can ski as hard or as easily as you wish. The SkiErg will not force you to ski at any set intensity level.
Damper Setting
The SkiErg features a spiral damper with settings from 1 to 10. The damper setting is like bicycle gearing. It affects the feel of the skiing but does not directly affect the resistance. By changing the damper setting, you can simulate the range of skiing speeds that occur on snow. Higher numbers feel more like skiing in slow
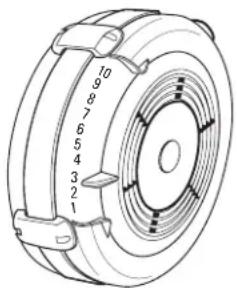
conditions or uphill. Lower numbers feel like skiing in faster snow conditions, on flat terrain and downhill. For general fitness and a good aerobic workout, use a damper setting between 1 and 4.
Note: The 1–10 damper setting scale is a handy reference for setting the “gearing.” Using the drag factor on the Performance Monitor (PM) is a more accurate way to set gearing. Visit concept2.com/pm.
Cadence (Strokes Per Minute = SPM)
Cadence (or tempo) is displayed in strokes per minute (SPM) in the upper right corner of the PM.
If you are skiing for general fitness using the double-pole technique, aim for a cadence between 30 and 40 SPM. Your cadence will probably be lower for long steady workouts, and higher for short intense work intervals. You may vary your cadence to match your poling tempo for the range of conditions that occur on snow.
Your cadence for classic ski technique (alternating arms) will be roughly twice your double-pole cadence.
Immediate, Accurate Feedback
The PM displays your output in a choice of units (pace, watts, or calories) and display options. Choose the units and displays that work best for you. You may press UNITS or DISPLAY at any time during or after your workout.
Visit concept2.com/pm.
GETTING STARTED
Before Your First SkiErg Workout
- Consult your physician. Be sure that it is not dangerous for you to undertake an exercise program.
- Carefully review the skiing technique information. Improper technique can result in injury.
- Warm up before each workout with several minutes of easy skiing, then stretch for a few minutes before continuing with your workout. Stretch again after your workout.
- Start gradually. Ski no more than five minutes the first day to let your body adjust to the new exercise.
WARNING!
Over exercising may result in serious injury or death. If you feel faint, stop exercising immediately.
Your First SkiErg Workout
- Begin with a minute or two of easy skiing to learn the technique. (Follow the technique steps on page 3, or view the technique video at
concept2.com/skiergtechnique.) Start with the double-pole technique as it uses more muscle groups and gives you a better overall workout. Keep the cadence between 25 and 30 SPM (slower if you prefer). - Ski steadily and easily for 3 minutes at a cadence between 30 and 35 SPM. Continue to practice good technique while also settling into a comfortable rhythm. Watch the PM, which will show you how hard you are pulling on each stroke, how many meters (or watts or calories) you have skied, how long you have been skiing, your cadence and, if you are connected via a HR monitor, your heart rate.
- Rest for several minutes and review the PM instructions, walk or stretch.
- Ski easily again for 3–5 minutes. Depending on your comfort, your cadence may be anywhere between 30 and 45 SPM.
- Rest again for 1–2 minutes.
- Repeat Step 4 two or three times.
Gradually increase your skiing time and intensity over the first two weeks. Do not ski at full power until you are comfortable with the technique and have skied for at least a week. Like any physical activity, if you increase the volume and intensity too rapidly, fail to warm up properly, or use poor technique, you will increase the risk of injury.
Monitor your progress and start a training log. Create a free online log at concept2.com/logbook.
Visit concept2.com/ski for more training instructions.
MAINTENANCE

WARNING!
The safety level of the machine can be maintained only if it is examined regularly for damage and wear. Replace defective components immediately to ensure safety and performance or keep machine out of use until repaired.
On a Regular Basis
Untwist the Cords
When you grasp the handles to use your SkiErg, you may be inadvertently twisting the cords, much like what would happen to the cord on a telephone handset. Over time, this may cause the cords to twist around each other inside the SkiErg resulting in a lumpy feeling when you pull on the handles. This may cause premature wear of the cord.
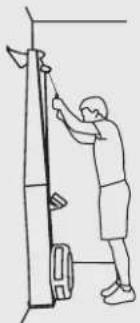
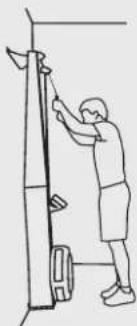
To avoid this, check the cords regularly and untwist them as needed. You will be able to see the twist in the cord; simply untwist by turning the handle in the opposite direction to the twist.
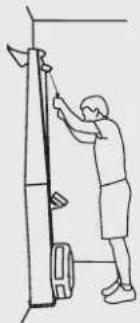
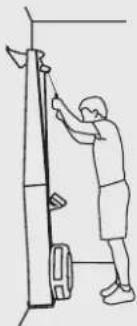
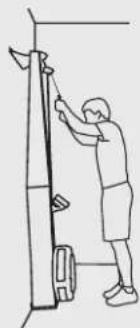
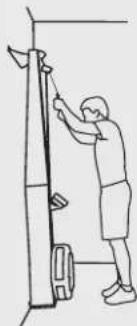
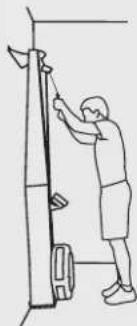
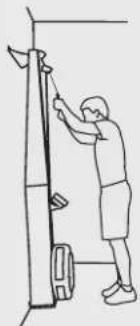
Periodically untwist the cords. It will be easier if you have another person help you.
- Pull out both handles as far as they go
- Hold the cords at the top bracket allowing the handles to dangle and spin freely.
- Run your hand down the length of each cord to untwist the cord.
- Return the handles to the top position.
- Repeat the process starting at step 1 at least two times.
Clean Grips
Use a mild soap or cleaning product to clean the grips every few workouts as needed.
Every 50 Hours of Use
Inspect the Cords
There are two separate cords and two bungee cords to inspect.
Important! Each cord is of a specific type and should be replaced with the appropriate Concept2 replacement cord if significant wear or damage is observed.
Cord Inspection:
- The handle cords can be easily inspected by pulling the handles all the way out and visually checking for wear.
- Inspect the cords working inside the vertical frame.
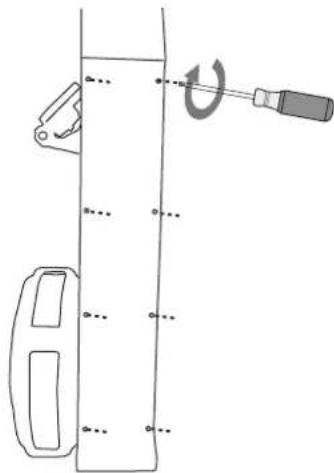
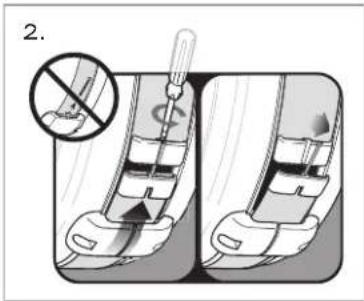
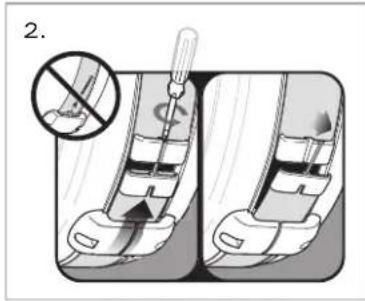
Start by removing the lower right side cover by removing 8 screws, using the 6 lobe driver provided with your SkiErg. See illustration. Once the cover is removed, all cords and pulleys will be visible.
- Have a helper slowly pull the handles all the way out and observe the condition of the handle cords and the bungee cord. You should be able to see the entire working length of all cords.
A Description of Cord Wear/Damage:
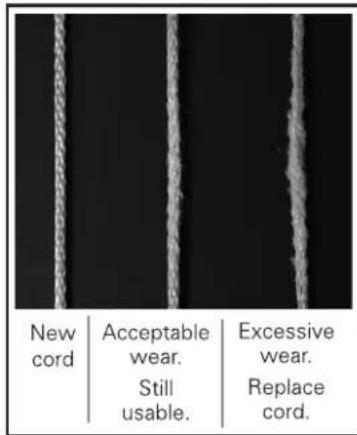
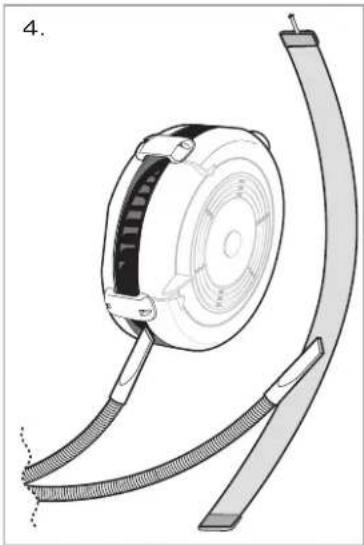
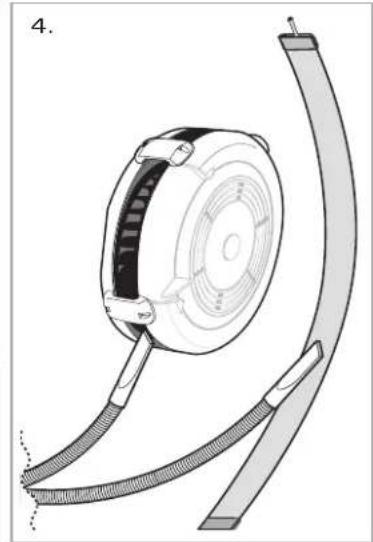
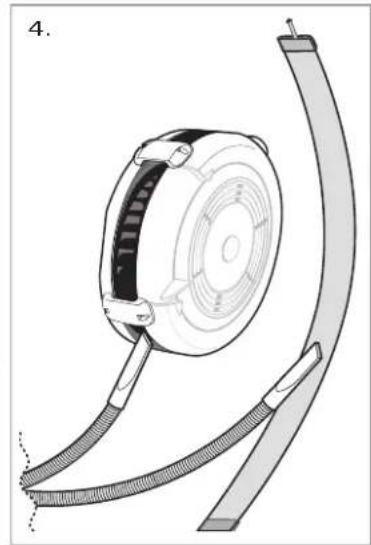
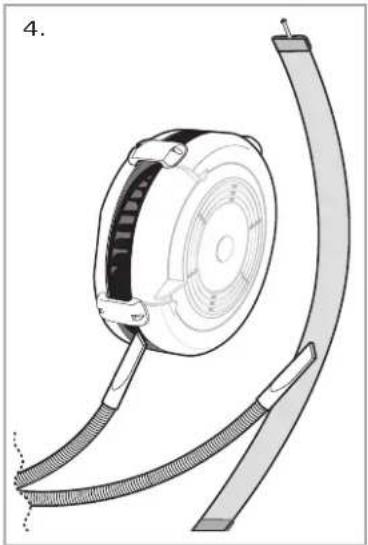
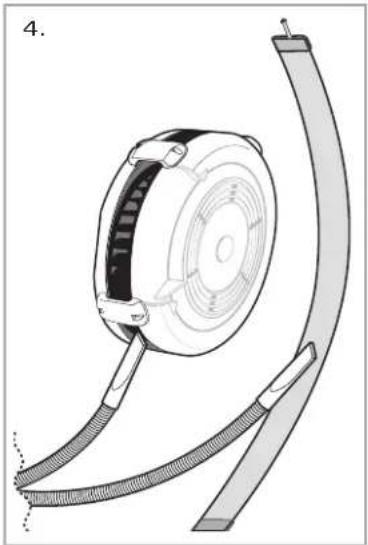
- The cords consist of a solid braid (not a covering over inner fibers). Over time the surface will show "fuzzing." If this "fuzzing" becomes worse in a localized spot on the cord it is time to replace the cord. See photo. We recommend replacing both cords at the same time.
- The bungee cord consists of elastic fibers encased in a braided covering. Some "fuzzing" of the covering is normal, but once the white fibers are exposed the cord should be replaced immediately.
Inspect the Fasteners
Be sure all fasteners are tight and have not become loose during use. If your SkiErg is wall mounted, examine the wall mount fasteners carefully.
Inspect the Top Bracket Pulleys
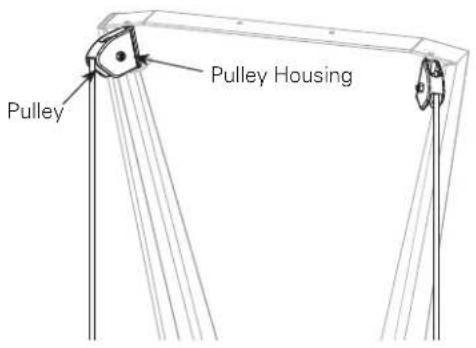
Be sure the pulleys spin freely in the pulley housings and that the pulley housings swing freely in the pulley brackets.
As Needed
- Clean surfaces of the SkiErg, including floor or floor stand base, with any non-abrasive household cleaner. DO NOT spray any fluid onto the PM.
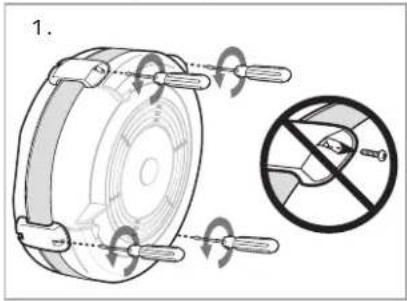
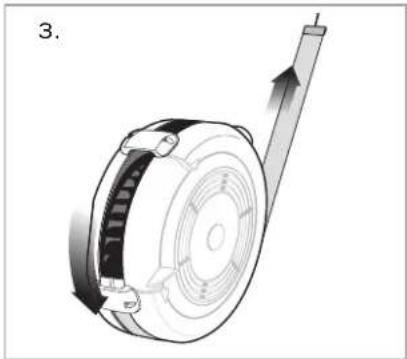
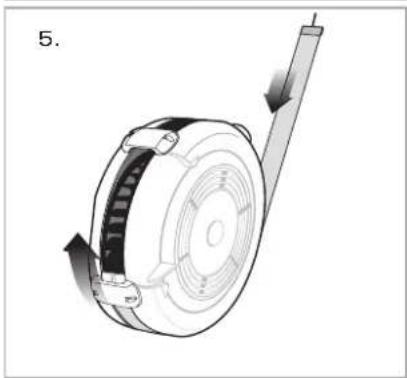
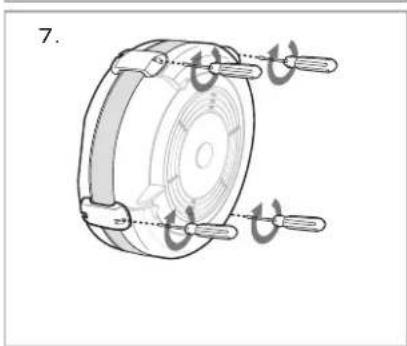
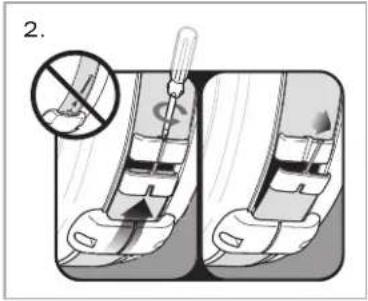
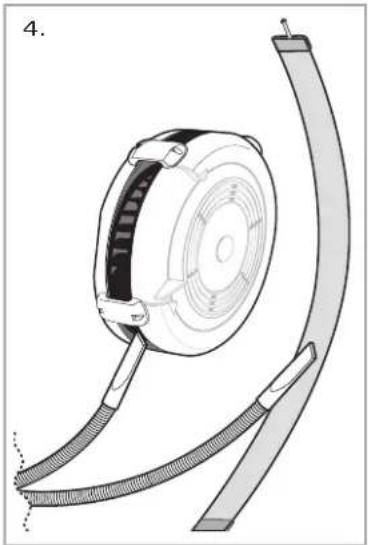
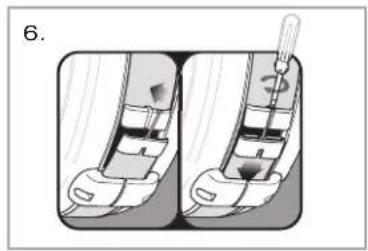
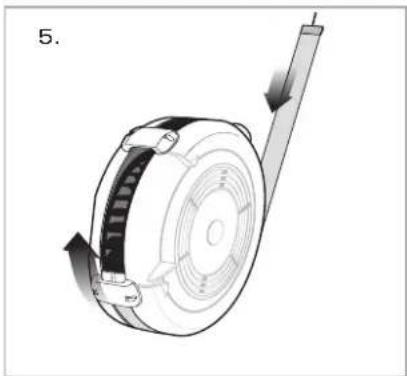
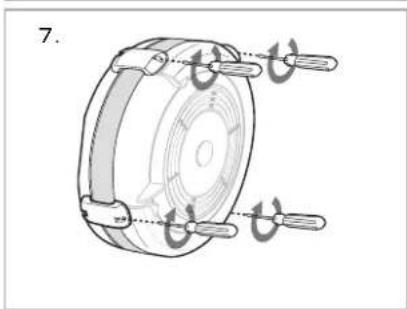
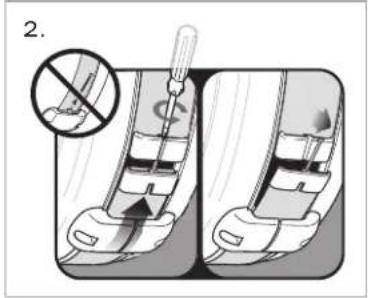
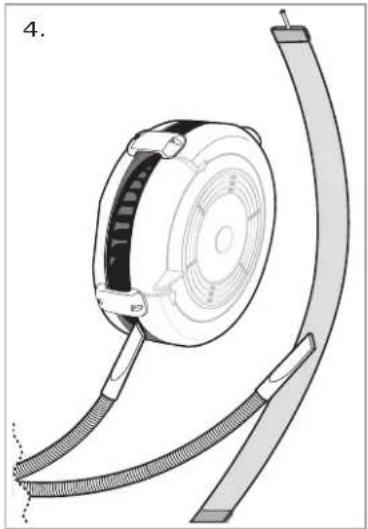
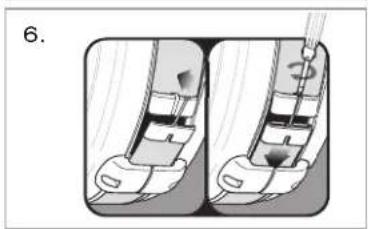
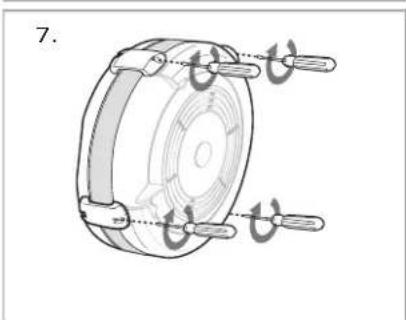
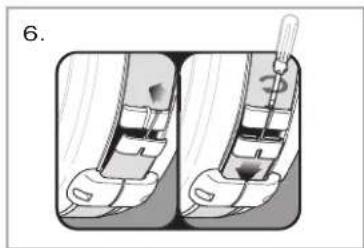
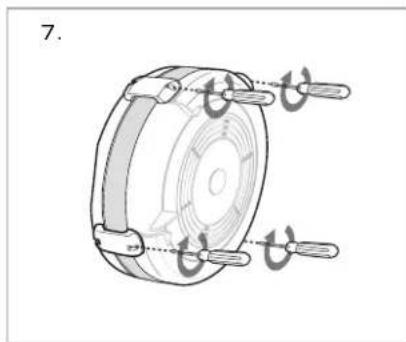
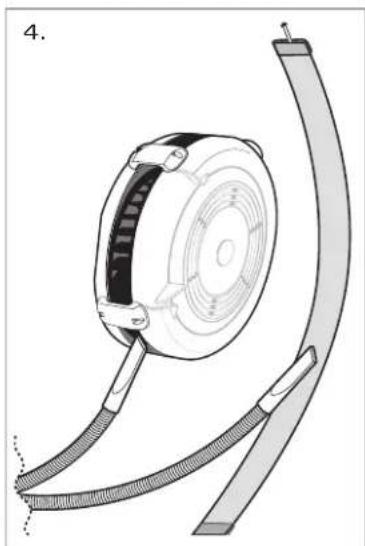
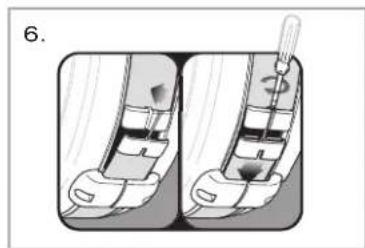
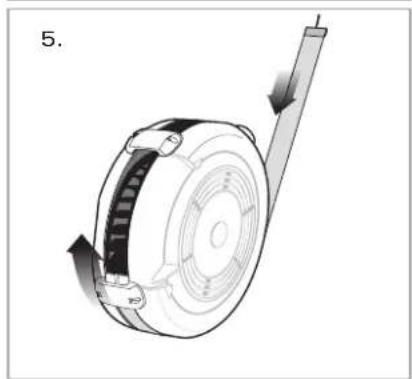
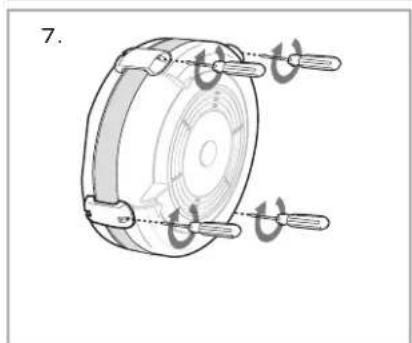
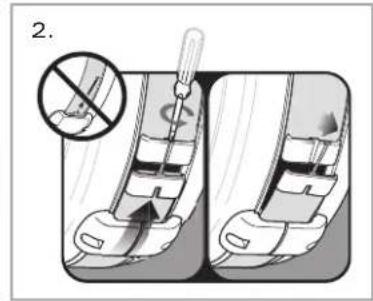
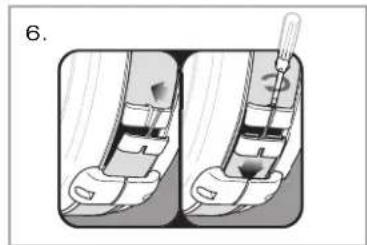
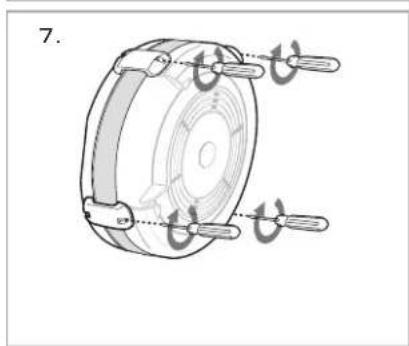
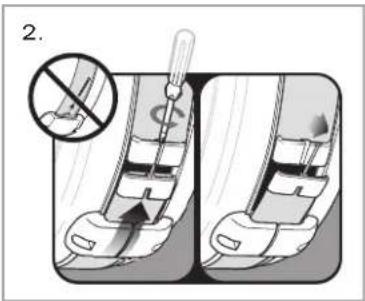
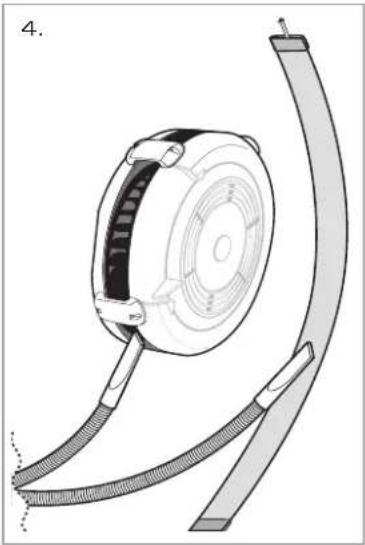
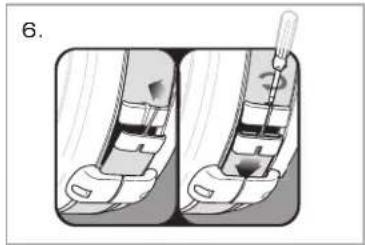
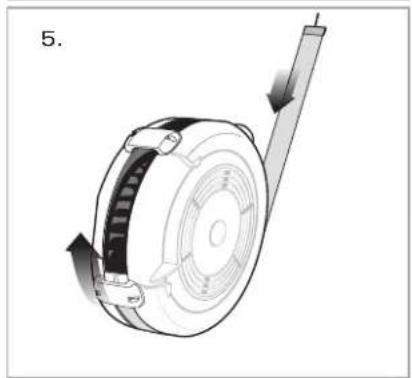
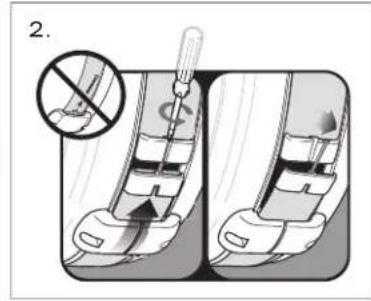
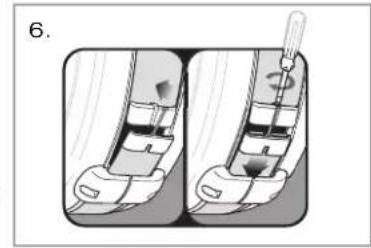
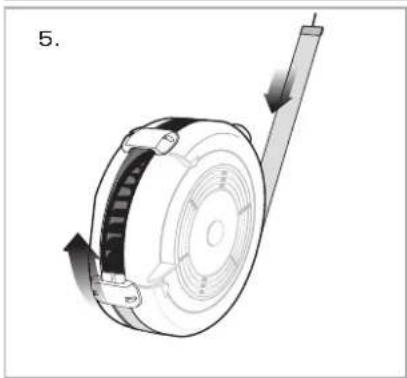
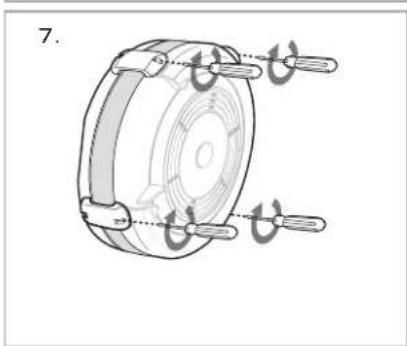
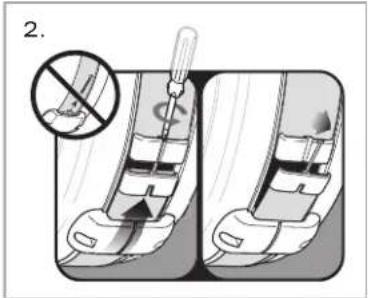
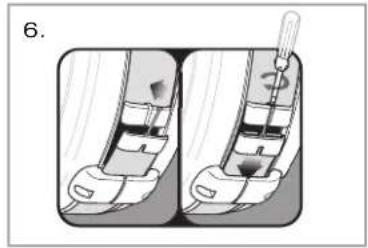
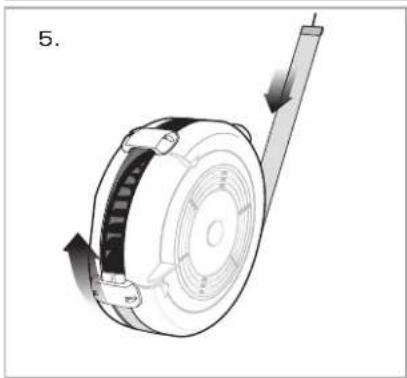
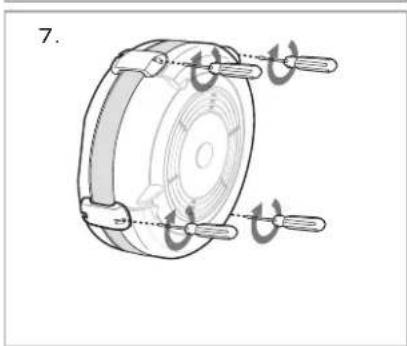
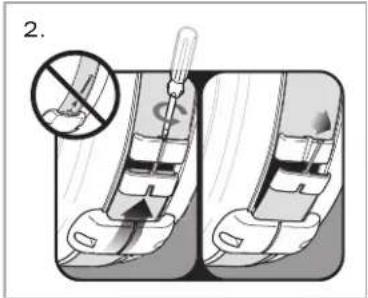
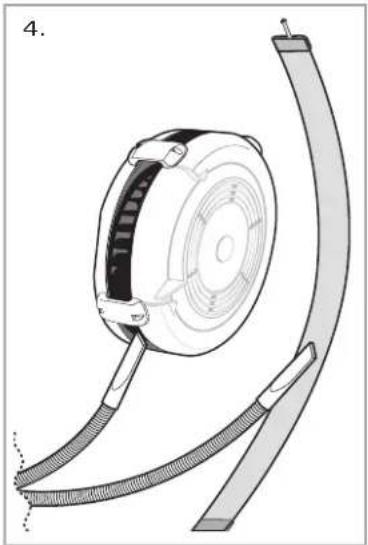
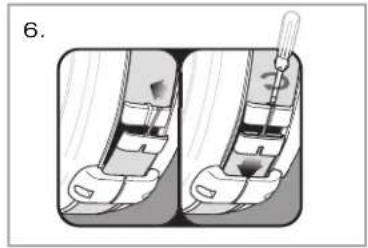
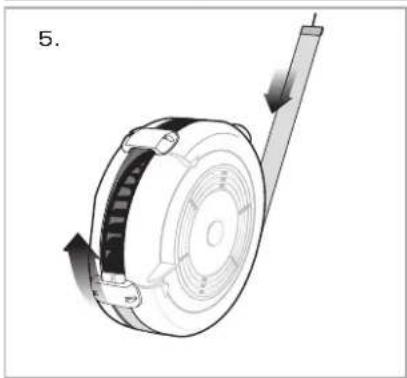
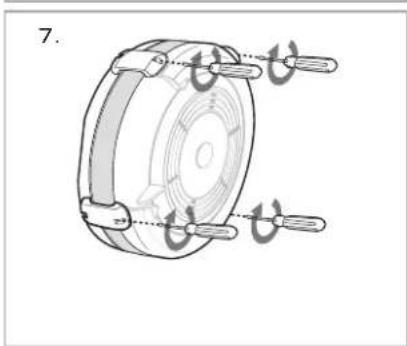
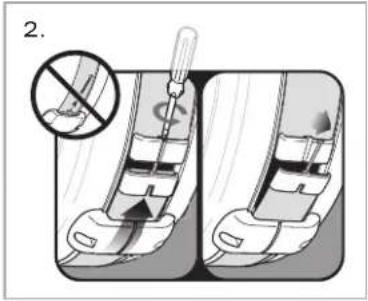
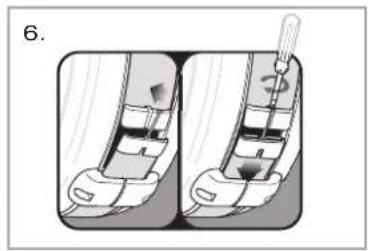
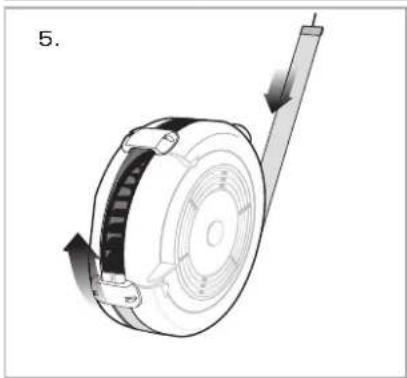
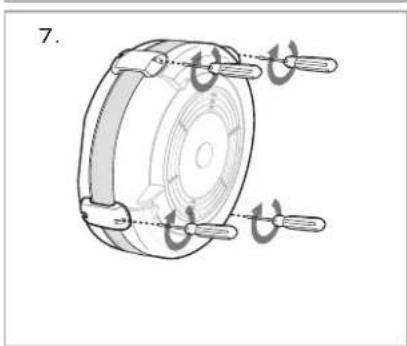
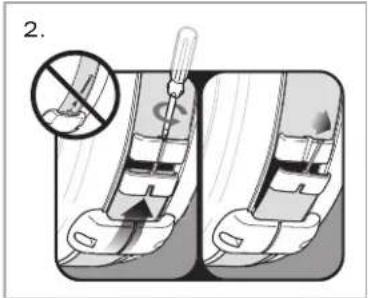
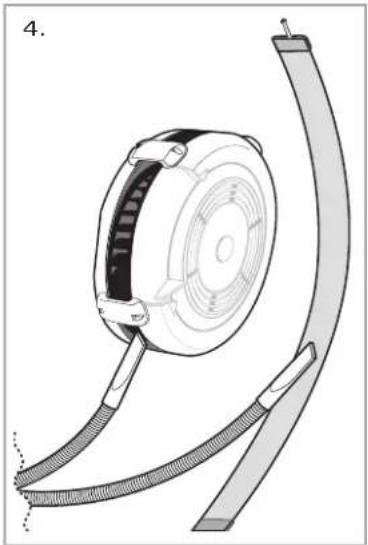
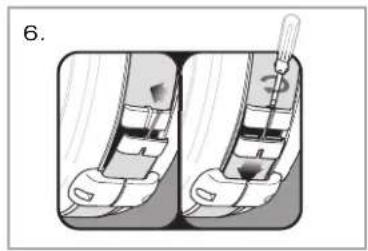
- Dust and lint can collect inside of the flywheel enclosure. This buildup can restrict airflow reducing the resistance of the fan. The outer cover of the fan enclosure can be removed for cleaning by removing the four screws that hold the cover together. See illustrations.
Flywheel Opening and Cleaning
WARRANTY
Concept2 SkiErgs are backed by a limited 2 year and 5 year warranty. For complete warranty information in the U.S. and Canada, visit concept2.com/warranty.
For complete warranty information outside the U.S. and Canada, contact the authorized Concept2 Preferred Reseller in your territory. A list of authorized Concept2 Preferred Resellers can be found at concept2.com/international. If you do not find a Preferred Reseller in your territory visit concept2.com or email c2global@concept2.com.
ANVÄNDNING OCH TRÄINIG
Dubbelstakning
Klassisk stakteknik
Ny lina
Acceptabelt slitage.
GARANTI INFORMATION

GARANTI
Concept2 SkiErgs er støttet av en begrenset 2 års og 5 års garanti.
Doppelstocktechnik

Dubbelstok techniek

Nieuw koord
Indien nodig
GARANTIE INFORMATIE
Cadence (Coups / Minute = SPM)
Nouveau cordon
Usure acceptable.
Encore
utilisable.
Usure excessive.
Remplacer
le cordon.

GARANTIE
Tasatyöntöteknikka
Uusi naru

TAKUUTIEDOT
Dobbelt Stavtag, Teknik
Efter behov
GARANTI INFORMATIONER
Técnica Doble-Tiro
Visite concept2.com/pm.
Visite concept2.com/pm.
PARA COMEÇAR
双杆
训练
结束时膝盖稍弯, 双臂沿大腿向下伸。
收回双臂,身体站直, 返回开始位置。
经典滑雪练习
(双臂交替)
开始时,一条手臂上举微曲。
用上臂力量向下拉,同时慢慢抬起下臂。
绳索磨损/损坏说明:
保修声明



- CONCEPT 2
- SKIERG®
- PRODUCT MANUAL
- IMPORTANT NOTE
- USE & TRAINING
- DOUBLE-POLE TECHNIQUE
- IMPORTANT SAFETY NOTES
- XWARNING
- CLASSIC SKIING TECHNIQUE (ALTERNATING ARMS)
- WORKOUT INTENSITY
- USER-CONTROLLED RESISTANCE
- DAMPER SETTING
- CADENCE (STROKES PER MINUTE = SPM)
- IMMEDIATE, ACCURATE FEEDBACK
- GETTING STARTED
- BEFORE YOUR FIRST SKIERG WORKOUT
- WARNING
- YOUR FIRST SKIERG WORKOUT
- MAINTENANCE
- ON A REGULAR BASIS
- UNTWIST THE CORDS
- CLEAN GRIPS
- EVERY 50 HOURS OF USE
- INSPECT THE CORDS
- INSPECT THE FASTENERS
- INSPECT THE TOP BRACKET PULLEYS
- AS NEEDED
- FLYWHEEL OPENING AND CLEANING
- WARRANTY
- ANVÄNDNING OCH TRÄINIG
- DUBBELSTAKNING
- KLASSISK STAKTEKNIK
- GARANTI INFORMATION
- GARANTI
- DOPPELSTOCKTECHNIK
- DUBBELSTOK TECHNIEK
- INDIEN NODIG
- GARANTIE INFORMATIE
- CADENCE (COUPS / MINUTE = SPM)
- GARANTIE
- TASATYÖNTÖTEKNIKKA
- TAKUUTIEDOT
- DOBBELT STAVTAG, TEKNIK
- EFTER BEHOV
- GARANTI INFORMATIONER
- PARA COMEÇAR
- 保修声明
Brand : Concept2
Model : SkiErg 2
Category : Fitness Equipment