SkiErg 1 - Rowing Machine Concept2 - Free user manual and instructions
Find the device manual for free SkiErg 1 Concept2 in PDF.


User questions about SkiErg 1 Concept2
0 question about this device. Answer the ones you know or ask your own.
Ask a new question about this device
Download the instructions for your Rowing Machine in PDF format for free! Find your manual SkiErg 1 - Concept2 and take your electronic device back in hand. On this page are published all the documents necessary for the use of your device. SkiErg 1 by Concept2.
USER MANUAL SkiErg 1 Concept2
105 Industrial Park Drive
Morrisville, Vermont USA 05661
concept2.com/contact
SKIERG USE MANUAL
EN English
SV Svenska
NO Norsk
DE Deutsch
NL Nederlands
FR Français
FI Suomi
EN Table of Contents
Use & Training 3
Skiing Technique.... 3
Workout Intensity 4
Getting Started 4
Maintenance.... 5
SkiErg Warranty 6
text_image
88 in/ 223.5 cm Serial number location 10 in 25.5 cm 19 in 48.3 cm Wall mounted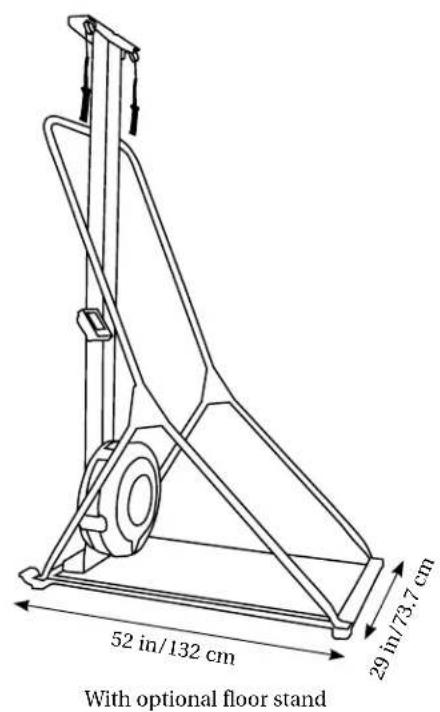
text_image
52 in/132 cm 29 in/73.7 cm With optional floor stand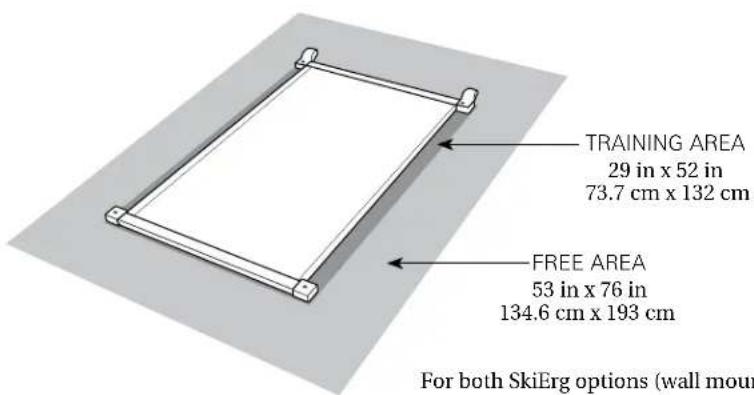
text_image
TRAINING AREA 29 in x 52 in 73.7 cm x 132 cm FREE AREA 53 in x 76 in 134.6 cm x 193 cm For both SkiErg options (wall mount)For both SkiErg options (wall mounted or with floor stand)
RECORD YOUR SERIAL NUMBER HERE
IMPORTANT NOTE:
For complete warranty details, additional information about Concept2 or to register to receive important product updates, visit:
concept2.com/registration
USE & TRAINING
The SkiErg offers terrific exercise for the entire body. Each pull engages the legs, arms, shoulders and core in a downwards "crunch," using body weight to help accelerate the handles. Each pull finishes by extending the arms down along the hips with knees partly bent.
The SkiErg is designed to be pulled with both hands at the same time. The SkiErg enables you to train using the motion that is essential to all techniques of skate and classic skiing.
Important Safety Notes

ARNING!
The safety level of the machine can be maintained only if it is examined regularly for damage and wear. Replace defective components immediately to ensure safety and performance or keep machine out of use until repaired.
- Use of this machine with worn or weakened parts (pulleys, cords, handle or shock cord) may result in injury to the user. When in doubt about the condition of any part, Concept2 strongly advises that it be replaced immediately. Use only genuine Concept2 parts. Use of other parts may result in injury or poor performance of your machine.
- The SkiErg with optional floor stand should be used on a stable, level surface.
- The wall-mounted SkiErg must be securely fixed to the wall at the top and bottom brackets. Be sure that your mounting bolts are going into a solid material such as wood or concrete, and that you are using the proper hardware for the wall material.
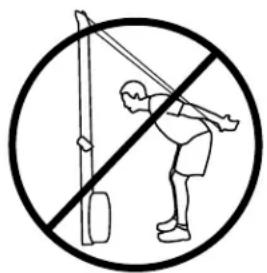
- Do not twist or cross cords, and avoid pulling cords all the way out to the point at which they stop.
- Always pull with both handles at the same time. Do not pull with one handle only, as the machine is not designed for this use.
- Do not release handles when they are in the pulled out position. Bring handles back to the top position before releasing them.
- Perform regular inspection and maintenance as recommended.
SKIING TECHNIQUE
Grips
Use the strap and grip as you would use a Nordic ski pole. Slip your hand up through the loop and then come down over the strap and grasp the handle.
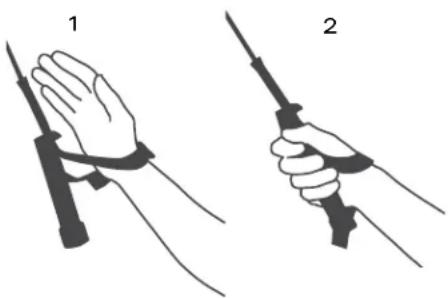
natural_image
Illustration of two hands holding a rifle, labeled 1 and 2 (no text or symbols on the images)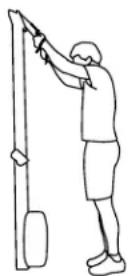
How to Ski
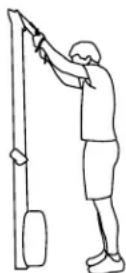
Begin with your hands shoulder-width apart and slightly above your head. Your arms should be bent. Your feet should be shoulder-width apart.
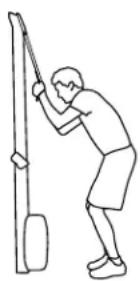
Drive the handles downward by engaging your core abdominal muscles and bending your knees. Maintain the bend in your arms to keep the handles fairly close to your face.
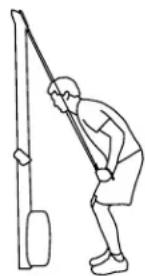
natural_image
Line drawing of a person using a pole to lift a vertical pole (no text or symbols)Finish the drive with knees slightly bent, and arms extended down alongside your thighs.
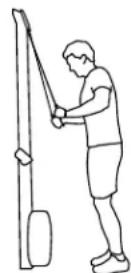
Bring your arms back up and straighten your legs.
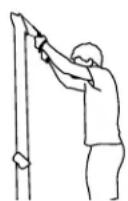
Extend your arms upward and straighten your body to return to the start position.
natural_image
Symbol of a person shooting a vertical rod, crossed out by a diagonal line (no text or labels)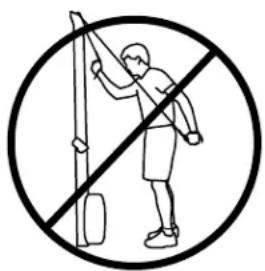
natural_image
Prohibition sign showing a person using a pole with a diagonal line crossing through it (no text or symbols)[1]concept 2.
WORKOUT INTENSITY
User-Controlled Resistance
The harder you pull, the more resistance you will feel. This is because the SkiErg uses wind resistance, which is generated by the spinning flywheel. The faster you get the wheel spinning, the more resistance there will be. You can ski as hard or as easily as you wish. The SkiErg will not force you to ski at any set intensity level.
Damper Setting
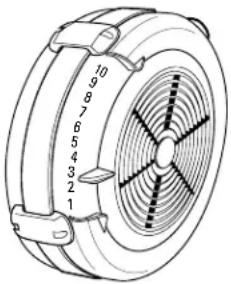
The SkiErg features a spiral damper with settings from 1 to 10. The damper setting is like bicycle gearing. It affects the feel of the skiing but does not directly affect the resistance. By changing the damper setting, you can simulate the range of skiing speeds that occur on snow. Higher numbers feel more like skiing in slow conditions or uphill. Lower numbers feel like skiing in faster snow conditions, on flat terrain and downhill. For general fitness and a good aerobic workout, use a damper setting between 1 and 4.
Note: The 1–10 damper setting scale is a handy reference for setting the "gearing." Using the drag factor on the Performance Monitor (PM) is a more accurate way to set gearing. See the Performance Monitor section for more information on drag factor.
natural_image
Technical line drawing of a circular mechanical component with internal blades and numbered slots (no text or symbols)Cadence (Strokes Per Minute = SPM)
Cadence (or tempo) is displayed in strokes per minute (SPM) in the upper right corner of the PM.
If you are skiing for general fitness, aim for a cadence between 30 and 40 SPM. Your cadence will probably be lower for long steady workouts, and higher for short intense work intervals. You may vary your cadence to match your poling tempo for the range of conditions that occur on snow.
Immediate, Accurate Feedback
The PM displays your output in a choice of units (pace, watts, or calories) and display options. Choose the units and displays that work best for you. You may press CHANGE UNITS or CHANGE DISPLAY at any time during or after your workout.
See the Performance Monitor section for more information on the PM.
GETTING STARTED
Before Your First SkiErg Workout
- Consult your physician. Be sure that it is not dangerous for you to undertake an exercise program.
- Carefully review the skiing technique information. Improper technique can result in injury.
- Warm up before each workout with several minutes of easy skiing, then stretch for a few minutes before continuing with your workout. Stretch again after your workout.
- Start gradually. Ski no more than five minutes the first day to let your body adjust to the new exercise.

WARNING!
Over exercising may result in serious injury or death. If you feel faint, stop exercising immediately.
Your First SkiErg Workout
- Begin with a minute or two of easy skiing to learn the technique. Follow the technique steps on page 5, or view the technique video at concept2. com/ski. Keep the cadence between 25 and 30 SPM (slower if you prefer).
- Ski steadily and easily for 3 minutes at a cadence between 30 and 35 SPM. Continue to practice good technique while also settling into a comfortable rhythm. Watch the PM, which will show you how hard you are pulling on each stroke, how many meters (or watts or calories) you have skied, how long you have been skiing, your cadence and, if you are connected via a HR monitor, your heart rate.
- Rest for several minutes and review the PM instructions, walk or stretch.
- Ski easily again for 3–5 minutes. Depending on your comfort, your cadence may be anywhere between 30 and 45 SPM.
- Rest again for 1–2 minutes.
- Repeat Step 4 two or three times.
Gradually increase your skiing time and intensity over the first two weeks. Do not ski at full power until you are comfortable with the technique and have skied for at least a week. Like any physical activity, if you increase the volume and intensity too rapidly, fail to warm up properly, or use poor technique, you will increase the risk of injury.
Monitor your progress and start a training log. Create a free online log at concept2.com/logbook.
Visit concept2.com/ski for more training instructions.
MAINTENANCE

WARNING!
The safety level of the machine can be maintained only if it is examined regularly for damage and wear. Replace defective components immediately to ensure safety and performance or keep machine out of use until repaired.
A minimal amount of periodic maintenance will assure proper function and prolong the life of your SkiErg. The PM will keep track of accumulated, or total, meters. This will help you determine when to perform maintenance procedures. To view total meters on the PM push Main Menu/More Options/Utilities/Product ID/More Information.
On a Regular Basis
Untwist the Cords
When you grasp the handles to use your SkiErg, you may be inadvertently twisting the cords, much like what would happen to the cord on a telephone handset. Over time, this may cause the cords to twist around each other inside the SkiErg resulting in a "lumpy" feeling when you pull on the handles. This may cause premature wear of the cord.
To avoid this, check the cords regularly and untwist them as needed. You will be able to see the twist in the cord; simply untwist by turning the handle in the opposite direction to the twist.
Periodically untwist the cords. It will be easier if you have another person help you.
- Pull out both handles as far as they go
- Hold the cords at the top bracket allowing the handles to dangle and spin freely.
- Run your hand down the length of each cord to untwist the cord.
- Return the handles to the top position.
- Repeat the process starting at step 1 at least two times.
Inspect/Clean Grips and Straps
Check the handle straps for signs of excessive fraying or damage, especially near the attachment point to the handle. Replace immediately if excessive fraying is visible.
Use a mild soap or cleaning product to clean the grips and straps every few workouts as needed.
Every 500,000 meters (approximately 50 hours of use)
Inspect the Cords
There are three separate cords and one bungee cord to inspect.
Important! Each cord is of a specific type and should be replaced with the appropriate Concept2 replacement cord if significant wear or damage is observed.
Cord Inspection:
-
The handle cord is a single cord connected to both handles and can be easily inspected by pulling the handles all the way out and visually checking for wear.
-
To inspect the cords working inside the vertical frame, the lower rear cover must be removed. If the SkiErg is mounted to a wall it must be removed for this inspection.
-
Remove the lower rear cover by removing the six screws. This will expose the cord that winds onto the flywheel spool, the handle cord that winds onto the spool (this is a separate cord from the one attached to the handles), and the bungee cord.
- Have a helper slowly pull the handles all the way out and observe the condition of the cords. Pulling the handles out will allow you to see the entire working length of these three cords.
A Description of Cord Wear/Damage:
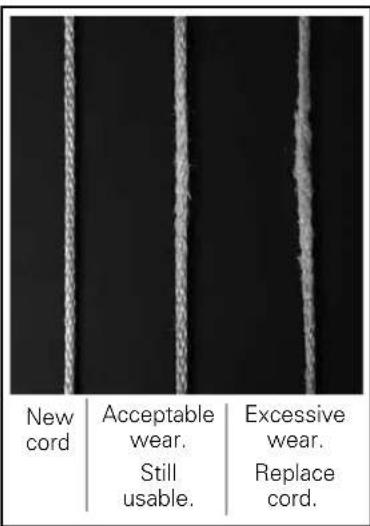
- The cords consist of a solid braid (not a covering over inner fibers). Over time the surface will show "fuzzing." If this "fuzzing" becomes worse in a localized spot on the cord it is time to replace the cord. See photo.
- The bungee cord consists of elastic fibers encased in a braided covering. Some "fuzzing" of the covering is normal, but once the white fibers are exposed the cord should be replaced immediately.
text_image
New cord Acceptable wear. Still usable. Excessive wear. Replace cord.Inspect the Fasteners
Be sure all fasteners are tight and have not become loose during use. If your SkiErg is wall mounted, examine the wall mount fasteners carefully.
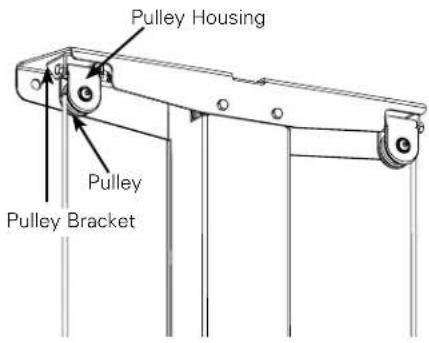
Inspect the Top Bracket Pulleys
Be sure the pulleys spin freely in the pulley housings and that the pulley housings swing freely in the pulley brackets.
text_image
Pulley Housing Pulley Pulley BracketAs needed
- Clean surfaces of the SkiErg, including floor or floor stand base, with any non-abrasive household cleaner. DO NOT spray any fluid onto the PM.
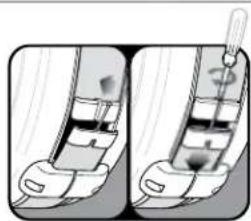
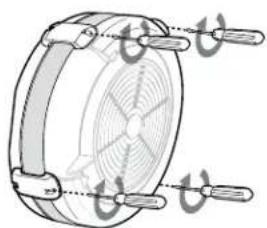
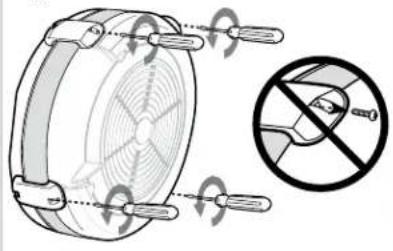
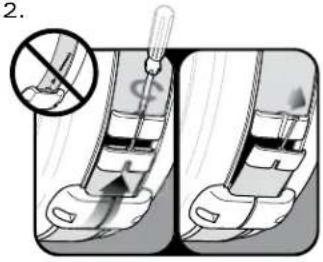
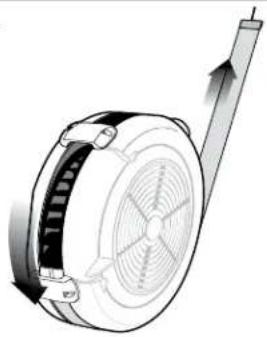
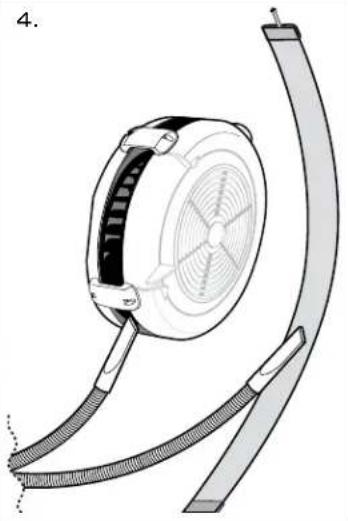
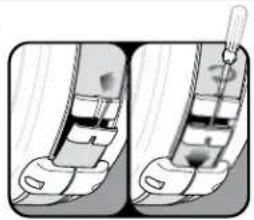
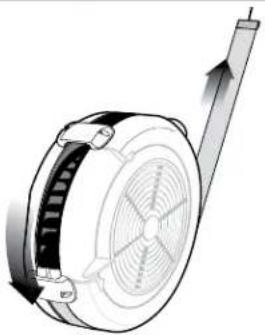
- Dust and lint can collect inside of the flywheel enclosure. This buildup can restrict airflow reducing the resistance of the fan. The outer cover of the fan enclosure can be removed for cleaning by removing the four screws that hold the cover together. See illustrations.
Flywheel Opening and Cleaning
text_image
Diagram showing a circular device with rotating components and a prohibition symbol indicating no protection.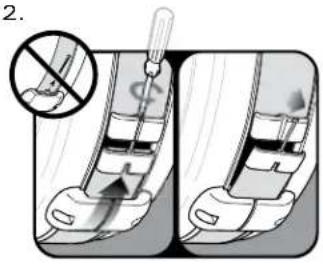
text_image
Diagram illustrating a mechanical or fluidic process with labeled components and a magnified inset showing a tool interacting with a component.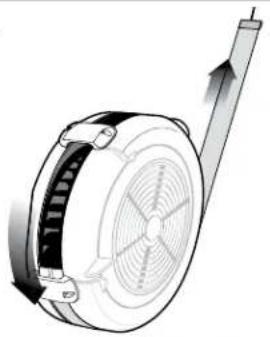
natural_image
Diagram of a mechanical component with a rotating fan and directional arrow (no text or symbols)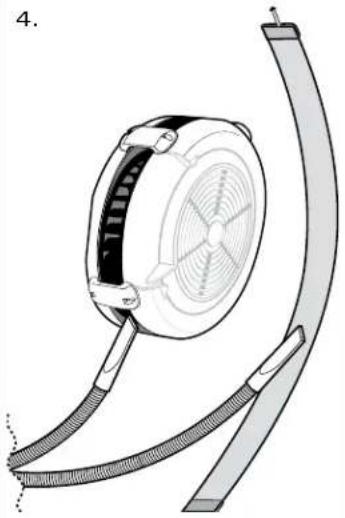
natural_image
Technical line drawing of a mechanical device with coiled cable and fan (no text or symbols)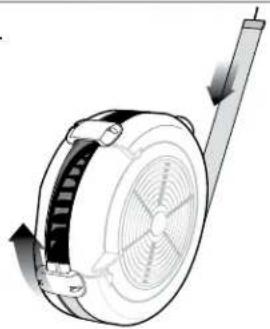
natural_image
Diagram of a mechanical component with rotating fan and directional arrows indicating motion (no text or symbols)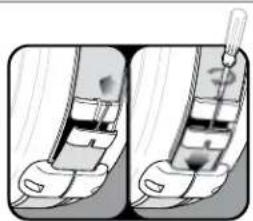
natural_image
Illustration of a hand holding a tool, showing two different states of a mechanical or electrical component (no text or symbols present)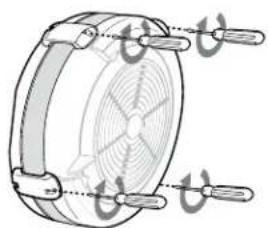
natural_image
Diagram of a circular fan or impeller with four curved arrows indicating rotation or force application (no text or symbols present)IMPORTANT:
The Performance Monitor (PM) is a sealed unit. DO NOT TAKE APART. Any attempt to dissassemble will void warranty. Contact Concept2 if there are problems with the PM.
SKIERG WARRANTY
Concept2 SkiErgs are backed by a limited 2 year and 5 year warranty. For complete warranty information in the U.S. and Canada, visit concept2.com/ski. For warranty information outside the U.S. and Canada, contact the authorized Concept2 dealer in your territory. A list of authorized Concept2 dealers can be found at concept2.com/international. If you do not find a local dealer in your territory visit concept2.com/ski or email info@concept2skierg.com.
ANVÄNDNING OCH TRÄINIG
natural_image
Illustration of two hands holding a rifle, labeled 1 and 2 (no text or symbols on the images)
Staka så här
text_image
Prohibition sign showing a person shooting with a diagonal line, enclosed in a circle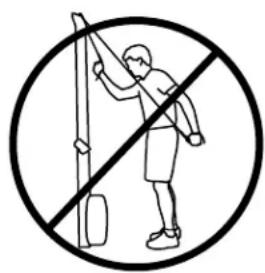
natural_image
Prohibition sign showing a person using a pole with a diagonal line crossing it, enclosed in a circle (no text or symbols)【concept 2.
TRÄNINGSITENSITET
natural_image
Diagram of a circular mechanical component with rotating arms and a prohibition symbol (no text or labels)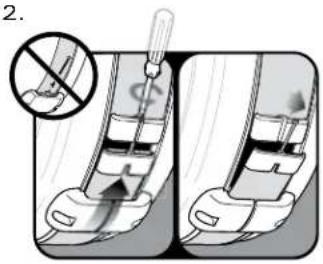
text_image
Diagram illustrating a mechanical device with a magnified inset showing a disassembly or disassembly process.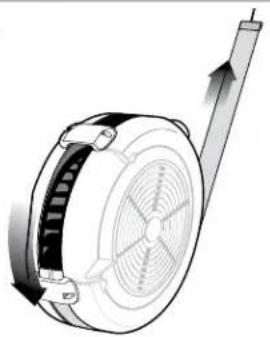
natural_image
Diagram of a mechanical component with a curved arrow indicating direction (no text or symbols present)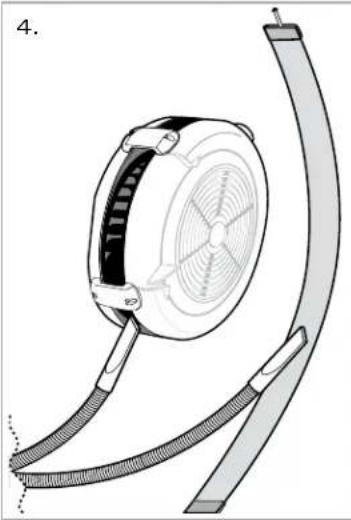
natural_image
Technical line drawing of a mechanical component with coiled tubing and a circular fan-like structure (no text or symbols)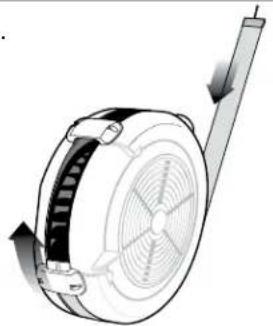
natural_image
Diagram of a mechanical component with directional arrows indicating motion or force (no text or symbols)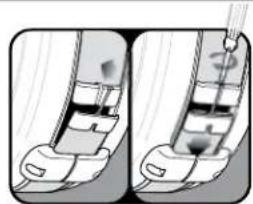
natural_image
Two-panel illustration showing a mechanical component with a tool inserted, no visible text or symbols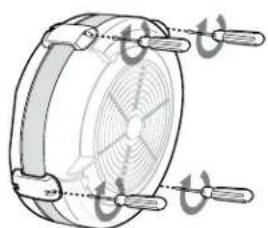
natural_image
Diagram of a mechanical component with rotating arms and concentric rings (no text or symbols)VIKTIGT:
natural_image
Illustration of two hand gestures: one with a grip and the other holding a rifle (no text or symbols)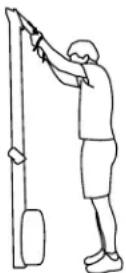
Hvordan du staker
natural_image
Symbol of a person shooting a pole with diagonal lines, enclosed in a circle (no text or labels)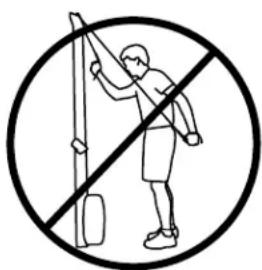
natural_image
Prohibition sign showing a person using a tool to clean or stop, enclosed in a circle (no text or symbols)TRENINGSINTENSITET
Brukerkontrollert motstand
natural_image
Close-up of three parallel metallic rods against a dark background (no text or symbols visible)Nytt tau
Akseptabel slitasje.
Fremdeles brukelig.
Overdreven slitasje.
Skift ut ledningen.
Inspiser fester
natural_image
Diagram of a mechanical component with a rotating shaft and gear mechanism (no text or symbols)
natural_image
Technical line drawing of a mechanical component with a circular base and curved shaft (no text or symbols)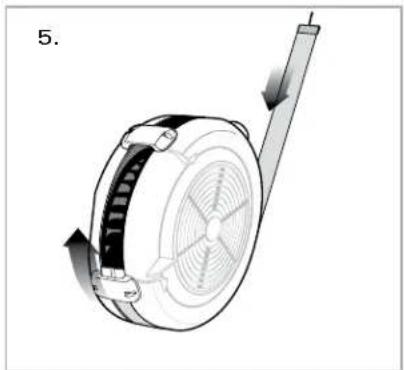
natural_image
Diagram of a mechanical device with rotating components and directional arrows indicating motion (no text or symbols)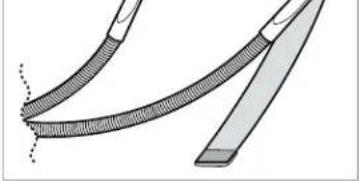
natural_image
Diagram of two curved mechanical components with textured surfaces, no text or symbols present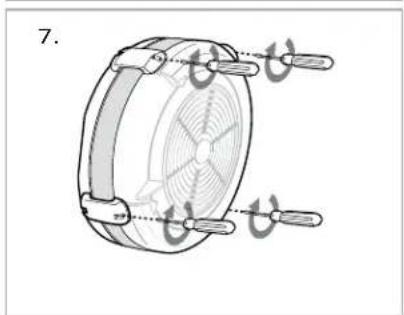
natural_image
Diagram of a circular mechanical component with four curved arms and internal concentric rings, no text or symbols present.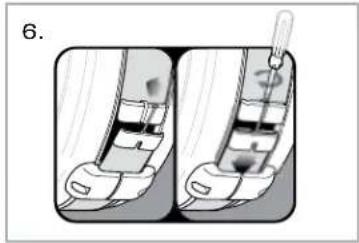
natural_image
Illustration of a medical procedure showing two steps of catheter insertion (no text or labels)SKIERG GARANTI
natural_image
Illustration of two hands holding rifles, one with bandages and the other with a string (no text or symbols)2
15
natural_image
Line drawing of a person using a pulley system to lift a pole (no text or symbols)natural_image
Prohibition sign showing a person shooting a bow with a diagonal line crossing through it, enclosed in a circle (no text or symbols)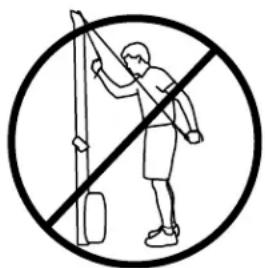
natural_image
Prohibition sign showing a person cleaning a pole with a diagonal line (no text or symbols)【concept 2.
TRAININGSINTENSITÄT
natural_image
Technical line drawing of a circular mechanical component with internal blades and numbered parts (no text or symbols)text_image
Diagram showing a circular device with rotating components and a prohibition symbol for no disc protection.3.
text_image
2.
natural_image
Diagram of a mechanical component with a rotating shaft and fan, showing motion direction (no text or symbols)5.
natural_image
Technical line drawing of a mechanical device with coiled tubing and a circular component (no text or symbols)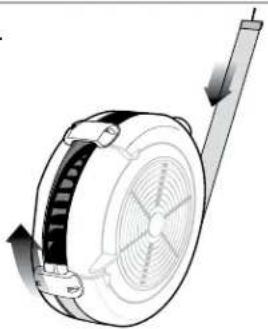
natural_image
Diagram of a mechanical component with directional arrows indicating motion or force (no text or symbols)7.
natural_image
Illustration of a hand holding a small object, showing internal components and motion (no text or symbols)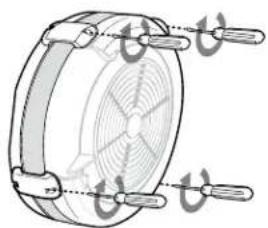
natural_image
Diagram of a circular fan or impeller with four curved arrows indicating rotational direction (no text or symbols)WICHTIG:
natural_image
Illustration of two hands holding a rifle, labeled 1 and 2 (no text or symbols on the figures)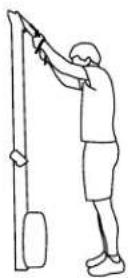
natural_image
Line drawing of a person using a pole to lift a vertical pole (no text or symbols)natural_image
Symbolic illustration of a person shooting a bow with a diagonal line, enclosed in a circle (no text or labels)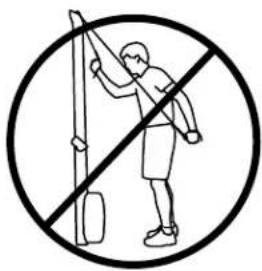
natural_image
Prohibition sign showing a person climbing a pole with a diagonal line (no text or symbols)【concept 2.
INTENSITEIT VAN DE TRAININGSSESSIE
text_image
Katrolbehuizing Katrol Katrol ophang beugelIndien nodig
text_image
Diagram illustrating a mechanical device with rotating components and a prohibition symbol for safety.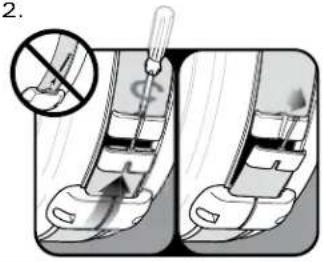
text_image
Diagram illustrating a mechanical or fluidic process with a magnified inset showing a tool interacting with a component, labeled with number 2.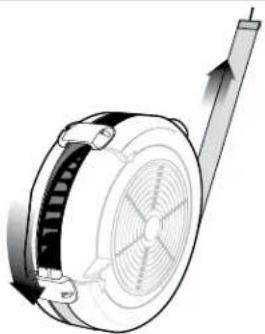
natural_image
Diagram of a mechanical component with a rotating shaft and fan, showing motion direction (no text or symbols)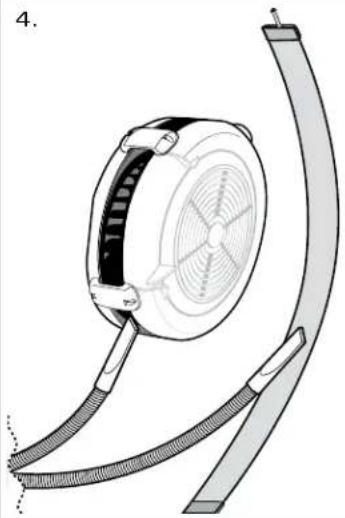
natural_image
Technical line drawing of a mechanical device with coiled tubing and a circular component (no text or symbols)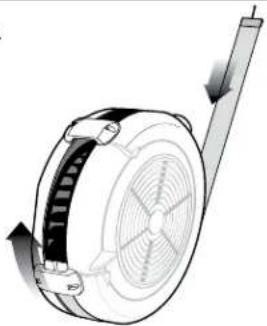
natural_image
Diagram of a mechanical component with directional arrows indicating motion or force (no text or symbols)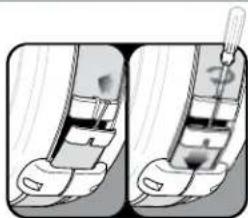
natural_image
Illustration of a mechanical device with a handle and internal components, shown in two different angles (no text or symbols)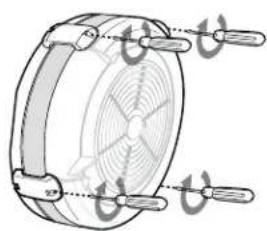
natural_image
Technical line drawing of a circular mechanical component with four curved arms and central fan (no text or symbols)BELANGRIJK:
natural_image
Illustration of two hands holding a rifle, labeled 1 and 2 (no text or symbols on the images)23
Comment Skier
text_image
Prohibition sign showing a person using a pole with diagonal lines, crossed out by a diagonal line and crossed out by a diagonal line.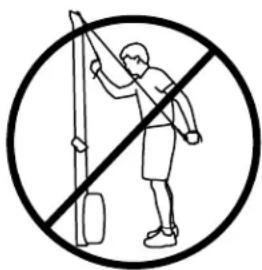
natural_image
Prohibition sign showing a person using a pole with a diagonal line crossing through it (no text or symbols)[1]concept 2.
INTENSITÉ D'ENTRAÎNEMENT
natural_image
Technical line drawing of a circular mechanical component with internal blades and mounting flanges (no text or symbols)Cadence (Coups / Minute = SPM)
natural_image
Diagram of a mechanical device with a rotating fan and directional arrow, no text or symbols present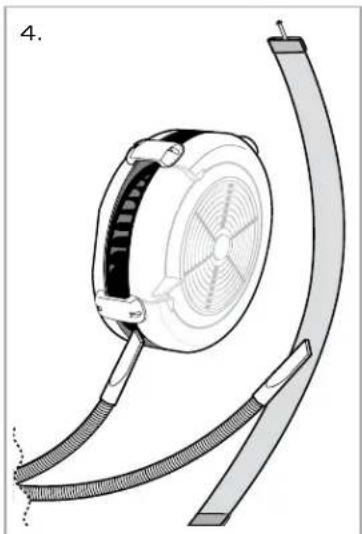
natural_image
Technical line drawing of a mechanical device with coiled tubing and a circular component (no text or symbols)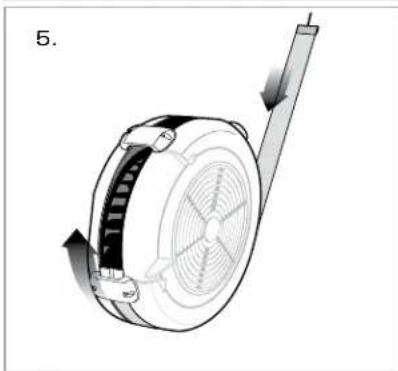
natural_image
Diagram of a mechanical device with rotating components and directional arrows indicating motion (no text or symbols)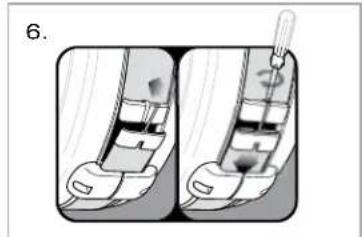
natural_image
Illustration of a medical procedure showing two steps of catheter insertion (no text or symbols present)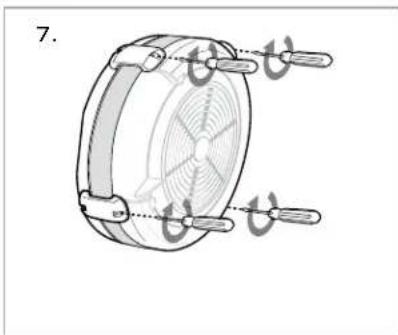
natural_image
Technical line drawing of a circular mechanical component with four protruding pins (no text or symbols)IMPORTANT:
natural_image
Illustration of two hands holding a rifle, labeled 1 and 2 (no text or symbols on the images)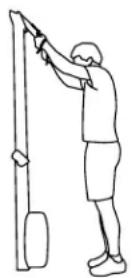
Kuinka hiihdät?
Aloita kädet
natural_image
Line drawing of a person using a pole to lift a vertical pole (no text or symbols)natural_image
Symbol of a person shooting a ray, no text or numbers present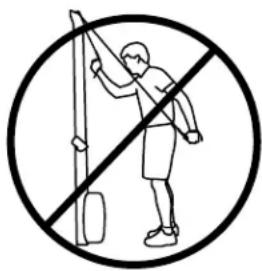
natural_image
Prohibition sign showing a person cleaning a wall with a diagonal line (no text or symbols)HARJOITUKSEN TEHO
Vastuksen säätö
natural_image
Technical line drawing of a circular mechanical component with concentric rings and numbered slots (no text or symbols)natural_image
Diagram of a circular mechanical component with rotating arms and a magnified inset showing a cross-section of a device (no text or symbols present)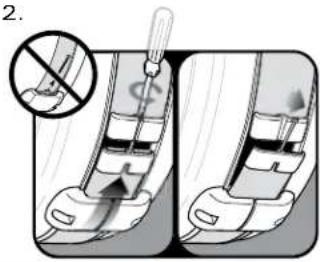
text_image
2.
natural_image
Diagram of a mechanical component with a rotating shaft and fan, showing motion direction (no text or symbols)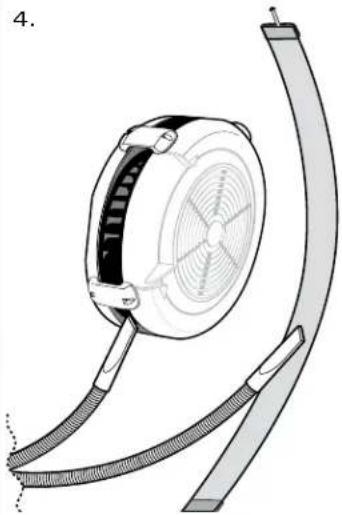
natural_image
Technical line drawing of a mechanical device with a circular component and coiled tubing (no text or symbols)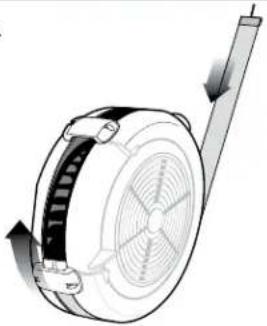
natural_image
Diagram of a mechanical fan or impeller assembly with directional arrows indicating motion (no text or symbols)6