
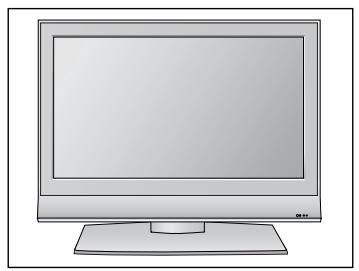
422000 - Television LG - Free user manual and instructions
Find the device manual for free 422000 LG in PDF.
| Product type | LCD TV |
| Brand | LG |
| Model | 422000 |
| Screen size | 19 to 52 inches depending on variant (19/22/26/32/37/42/47/52) |
| Resolution | Full HD 1920x1080 (LG50 models) / HD 1366x768 (LG30 models) |
| Weight with stand | 5.1 to 29.2 kg depending on model |
| Weight without stand | 4.6 to 24.6 kg depending on model |
| Power supply | AC 100-240V, 50/60Hz |
| Power consumption | Check the rear label (varies by model) |
| Input connectors | HDMI (x2), SCART (x2), Component, S-Video, Composite, PC (RGB), RF Antenna |
| Audio output | Optical digital audio output (except 19/22LS4D) |
| Headphone jack | Yes (except 19/22LS4D) |
| Main functions | Automatic channel memory, Teletext, Timer, Parental lock |
| Included accessories | Remote control, AAA batteries (x2), CD-ROM with user manual, stand, screws |
| Wall mounting | Possible (bracket not included, minimum 10 cm clearance around) |
| Screen maintenance | Soft cloth slightly dampened with warm water and mild detergent |
| Cabinet maintenance | Soft, dry, lint-free cloth |
| Safety | Grounding required, disconnect during storms, do not expose to moisture |
| Installation precautions | Flat and stable surface, avoid heat sources, good ventilation |
| Operating temperature | Not specified, standard household use |
| Warranty | Check with retailer |
Frequently Asked Questions - 422000 LG
User questions about 422000 LG
0 question about this device. Answer the ones you know or ask your own.
Ask a new question about this device
Download the instructions for your Television in PDF format for free! Find your manual 422000 - LG and take your electronic device back in hand. On this page are published all the documents necessary for the use of your device. 422000 by LG.
USER MANUAL 422000 LG
| User's Guide Specification | Gbng | Gang li jat | ||||||
| CHOI MJ08.01.24 | KIM JO08.01.24 | |||||||
| 1. Model Description | ||||||||
| MODEL | 19/22LS4D-ZC, 19/22/26/32/37/42LG3000-ZA,32/37/42/47/52LG5000-ZA | BRAND | LG | Part No. | MFL34441622(0801-REV00) | |||
| SUFFIX | EU | Product Name | 19/22LS4D*, 19/22/26/32/37/42LG30**, 32/37/42/47/52LG50** | |||||
| 2. Printing Specification | ||||||||
| 1. Trim Size (Format): 185 mm x 260 mm2. Printing Colors: 1 Color (BLACK)3. Stock (Paper)- Cover: Coated paper, S/W 150 g/m2- Inside: Uncoated paper, darkstige 60 g/m4. Printing Method: Off-set5. Bindery: Perfect bind6. Language: EN/ GE/ FR/ IT/ SP/ PO/ NE/ GR/ HU/ PL/ CZ/ SK/ BO/ SW/ NO/DA/ FI/ ES/ LI/ LA/ SV (22)7. Number of pages: 400 pages | ||||||||
| NOTES | “This part contain Eco-hazardous substances (Pb, Cd, Hg, Cr6+, PBB, PBDE, etc.) within LG standard level,Details should be followed Eco-SCM management standard[LG(56)-A-2524].Especially, Part should be followed and controlled the following specification.(1)Eco-hazardous substances test report should be submittedwhen Part certification test and First Mass Production.(2) Especially, Don't use or contain lead(Pb) and cadmium(Cd) in ink. | |||||||
| 3. Special Instructions | ||||||||
| (1) Origin Notification* LGEIN: Printed in Indonesia * LGEWA: Printed in U.K. * LGEMA: Printed in Poland* LGESP: Printed in Brazil * LGEMX: Printed in Mexico* LGEND: Printed in China * LGEIL: Printed in India* Other Oversea Factories: NON | ||||||||
| 3. Changes | ||||||||
| 10 | ||||||||
| 9 | ||||||||
| 8 | ||||||||
| 7 | ||||||||
| 6 | ||||||||
| 5 | ||||||||
| 4 | ||||||||
| 3 | ||||||||
| 2 | ||||||||
| 1 | ||||||||
| REV.NO. | MM/DD/YY | SIGNATURE | CHANGE NO. | CHANGE CONTENTS | ||||
Pagination sheet
| Front Cover (EN) P/NO. | 2 | 3 | 4 | ... | 19 | Back Cover (EN) |
| Front Cover (GE) | 2 | 3 | 4 | ... | 16 | 17 |
| Front Cover (FR) | 2 | 3 | 4 | ... | 16 | 17 |
| Front Cover (IT) | 2 | 3 | 4 | ... | 19 | Back Cover (IT) |
| Front Cover (SP) | 2 | 3 | 4 | ... | 16 | 17 |
| Front Cover (PO) | 2 | 3 | 4 | ... | 16 | 17 |
| Front Cover (NE) | 2 | 3 | 4 | ... | 16 | 17 |
| Front Cover (GR) | 2 | 3 | 4 | ... | 16 | 17 |
| Front Cover (HU) | 2 | 3 | 4 | ... | 16 | 17 |
| Front Cover (PL) | 2 | 3 | 4 | ... | 16 | 17 |
Pagination sheet
| Front Cover (CZ) | 2 | 3 | 4 | ... | 16 | 17 | Back Cover (CZ) |
| Front Cover (SK) | 2 | 3 | 4 | ... | 16 | 17 | Back Cover (SK) |
| Front Cover (RO) | 2 | 3 | 4 | ... | 16 | 17 | Back Cover (RO) |
| Front Cover (BU) | 2 | 3 | 4 | ... | 16 | 17 | Back Cover (BU) |
| Front Cover (SW) | 2 | 3 | 4 | ... | 16 | 17 | Back Cover (SW) |
| Front Cover (NO) | 2 | 3 | 4 | ... | 16 | 17 | Back Cover (NO) |
| Front Cover (DA) | 2 | 3 | 4 | ... | 16 | 17 | Back Cover (DA) |
| Front Cover (FI) | 2 | 3 | 4 | ... | 16 | 17 | Back Cover (FI) |
| Front Cover (ES) | 2 | 3 | 4 | ... | 16 | 17 | Back Cover (ES) |
| Front Cover (lith) | 2 | 3 | 4 | ... | 16 | 17 | Back Cover (lith) |
Pagination sheet


LCD TV OWNER'S MANUAL
LCD TV MODELS
19LS4D 42LG30*
22LS4D 32LG50*
19LG30 37LG50
22LG30 42LG50
26LG30 47LG50
32LG30 52LG50
37LG30**

ENERGY STAR

Digital Video
Broadcasting
Trade Mark of the DVB Digital Video
Broadcasting Project (1991 to 1996)
ID Number(s): 5018:22LS4D-ZC
5088:19LG3000-ZA
5080:26LG3000-ZA
5087:37LG3000-ZA
5085:32LG5000-ZA
5083:42LG5000-ZA
5081: 52LG5000-ZA
5019: 19LS4D-ZC
5090:22LG3000-ZA
5089:32LG3000-ZA
5086:42LG3000-ZA
5084:37LG5000-ZA
5082:47LG5000-ZA
Please read this manual carefully before operating your TV.
Retain it for future reference.
Record model number and serial number of the TV.
Refer to the label on the back cover and quote this information.
To your dealer when requiring service.
Extended Owner's Manual that contains advanced features of these LG TV-sets is located on CD-ROM in electronic version.
To read it You need to open chosen files by using
Personal Computer (PC) equipped with CD-ROM drive.
P/NO: MFL34441622 (0801-REV00)
Printed in Korea
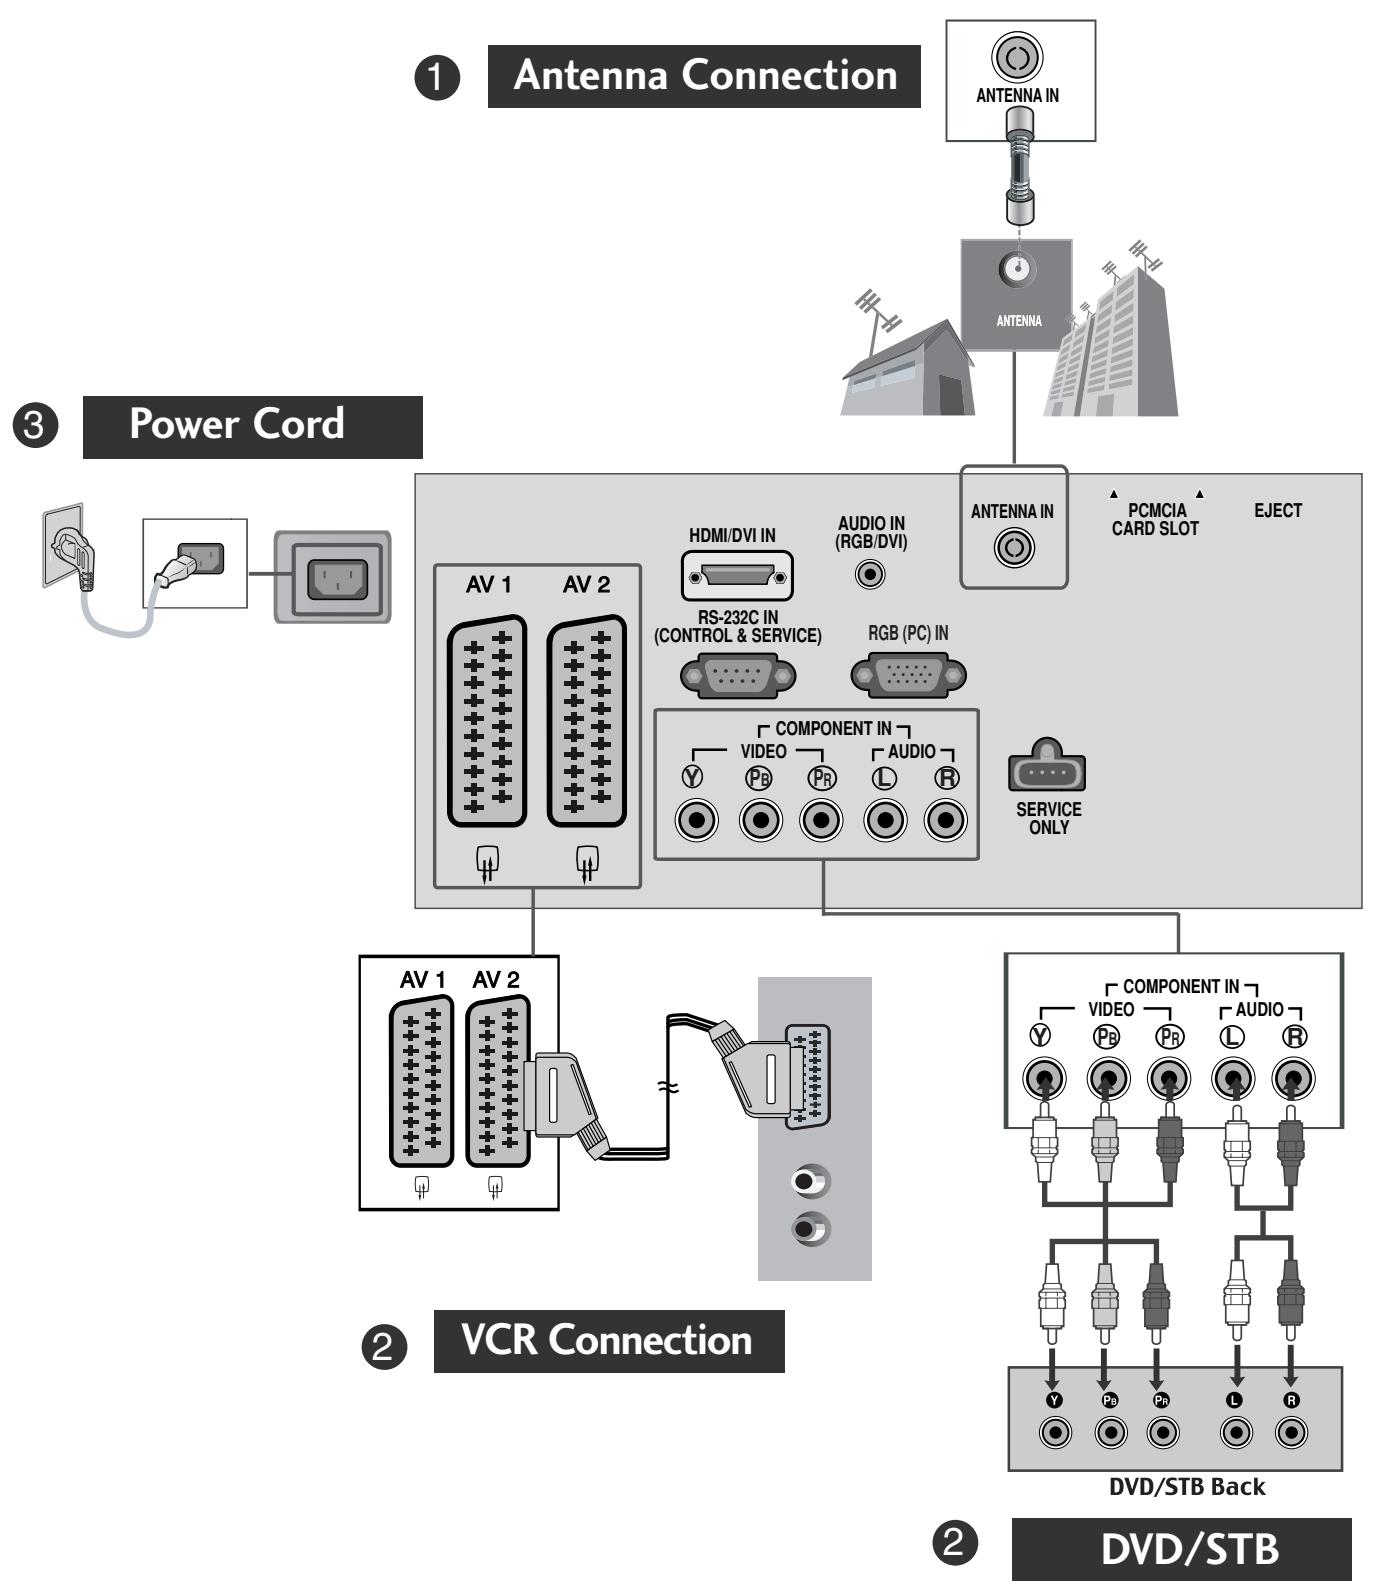
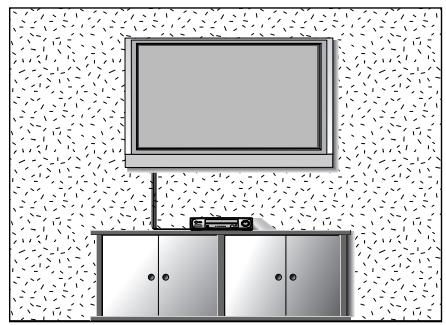
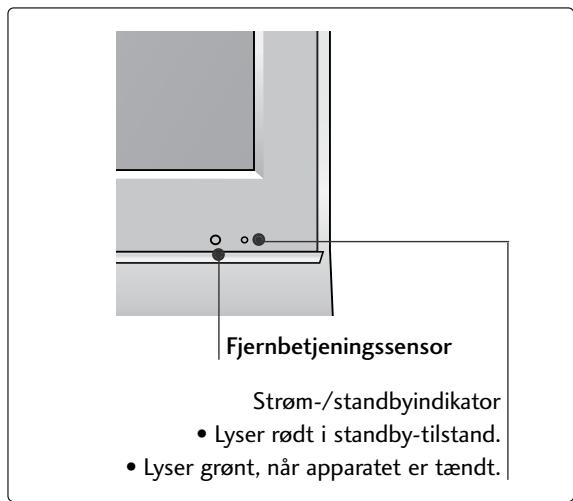
CONNECTING YOUR UNIT
Image shown may differ from your TV.

- To connect an additional equipment, see the External equipment Setup section in CD Manual.
Image shown may differ from your TV.
- To connect an additional equipment, see the External equipment Setup section in CD Manual.
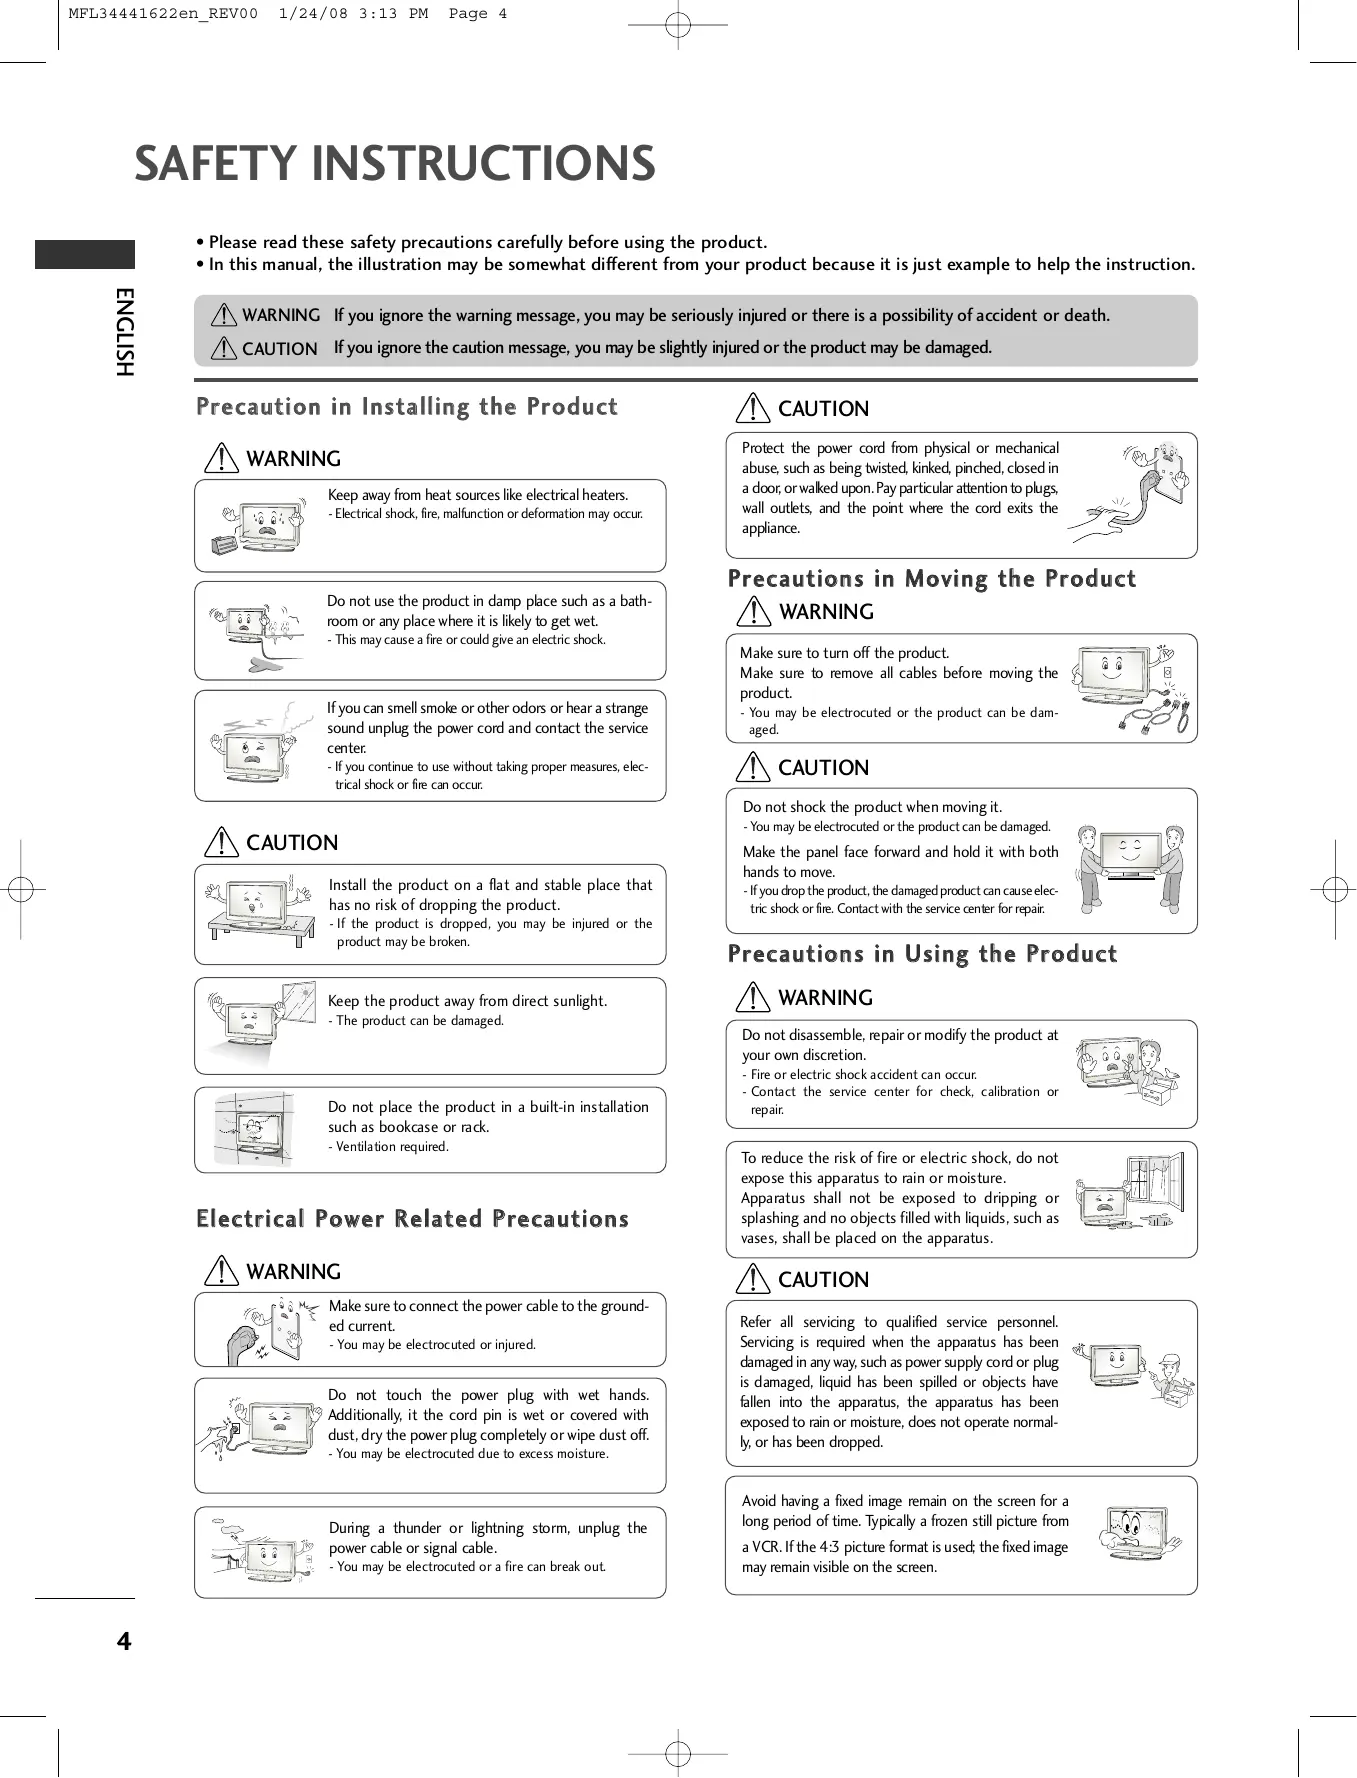
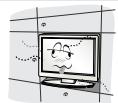
SAFETY INSTRUCTIONS
- Please read these safety precautions carefully before using the product.
- In this manual, the illustration may be somewhat different from your product because it is just example to help the instruction.
WARNING If you ignore the warning message, you may be seriously injured or there is a possibility of accident or death.
CAUTION If you ignore the caution message, you may be slightly injured or the product may be damaged.
Precaution in Installing the Product
WARNING

Keep away from heat sources like electrical heaters.
- Electrical shock, fire, malfunction or deformation may occur.

Do not use the product in damp place such as a bathroom or any place where it is likely to get wet.
- This may cause a fire or could give an electric shock.

If you can smell smoke or other odors or hear a strange sound unplug the power cord and contact the service center.
- If you continue to use without taking proper measures, electrical shock or fire can occur.
CAUTION

Install the product on a flat and stable place that has no risk of dropping the product.
- If the product is dropped, you may be injured or the product may be broken.

Keep the product away from direct sunlight.
- The product can be damaged.
Do not place the product in a built-in installation such as bookcase or rack.
- Ventilation required.
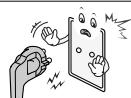
Electrical Power Related Precautions
WARNING
Make sure to connect the power cable to the grounded current.
- You may be electrocuted or injured.

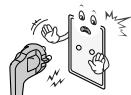
Do not touch the power plug with wet hands. Additionally, it the cord pin is wet or covered with dust, dry the power plug completely or wipe dust off.
- You may be electrocuted due to excess moisture.

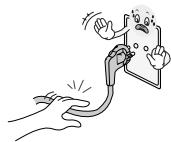
During a thunder or lightning storm, unplug the power cable or signal cable.
- You may be electrocuted or a fire can break out.
CAUTION
Protect the power cord from physical or mechanical abuse, such as being twisted, kinked, pinched, closed in a door, or walked upon. Pay particular attention to plugs, wall outlets, and the point where the cord exits the appliance.
Precautions in Moving the Product
WARNING
Make sure to turn off the product.
Make sure to remove all cables before moving the product.
- You may be electrocuted or the product can be damaged.

CAUTION
Do not shock the product when moving it.
- You may be electrocuted or the product can be damaged.
Make the panel face forward and hold it with both hands to move.
- If you drop the product, the damaged product can cause electric shock or fire. Contact with the service center for repair.

Precautions in Using the Product
WARNING
Do not disassemble, repair or modify the product at your own discretion.
- Fire or electric shock accident can occur.
- Contact the service center for check, calibration or repair.

To reduce the risk of fire or electric shock, do not expose this apparatus to rain or moisture.
Apparatus shall not be exposed to dripping or splashing and no objects filled with liquids, such as vases, shall be placed on the apparatus.

CAUTION
Refer all servicing to qualified service personnel. Servicing is required when the apparatus has been damaged in any way, such as power supply cord or plug is damaged, liquid has been spilled or objects have fallen into the apparatus, the apparatus has been exposed to rain or moisture, does not operate normally, or has been dropped.

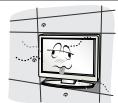
Avoid having a fixed image remain on the screen for a long period of time. Typically a frozen still picture from a VCR. If the 4:3 picture format is used; the fixed image may remain visible on the screen.

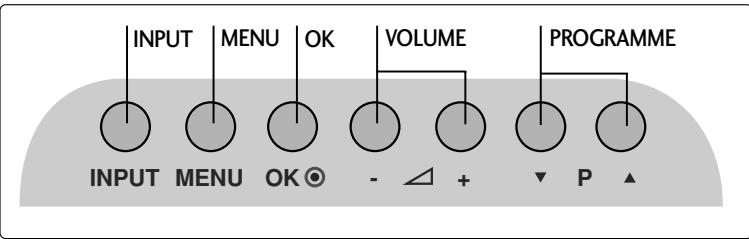
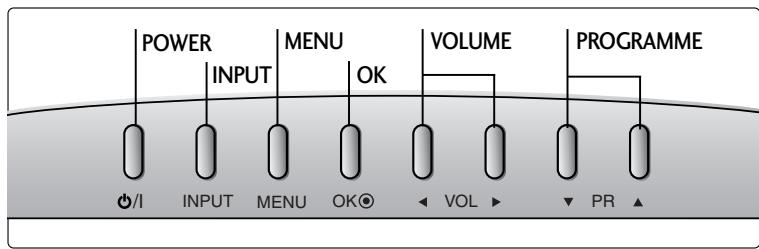
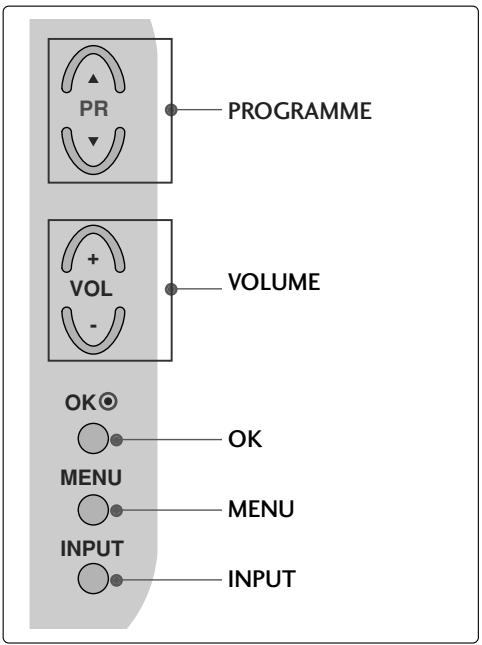
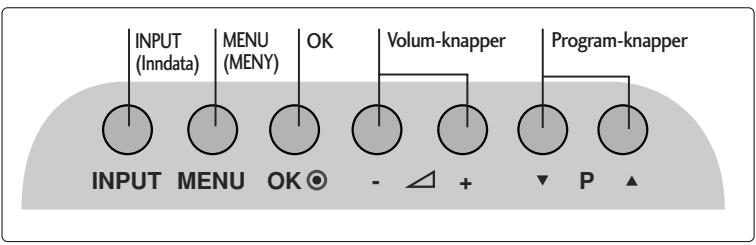
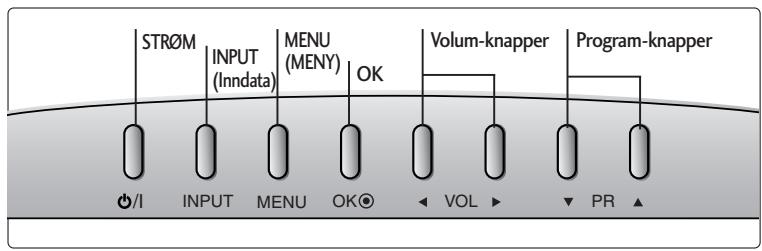
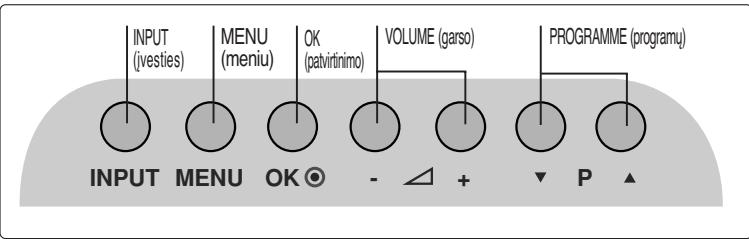
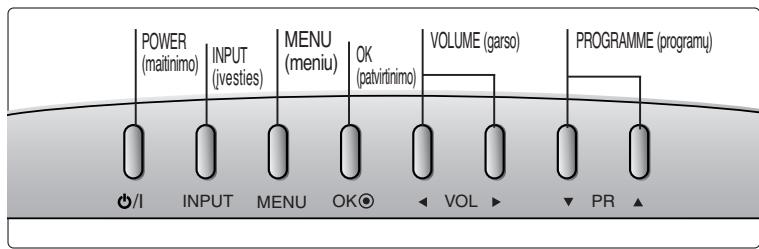
PREPARATION
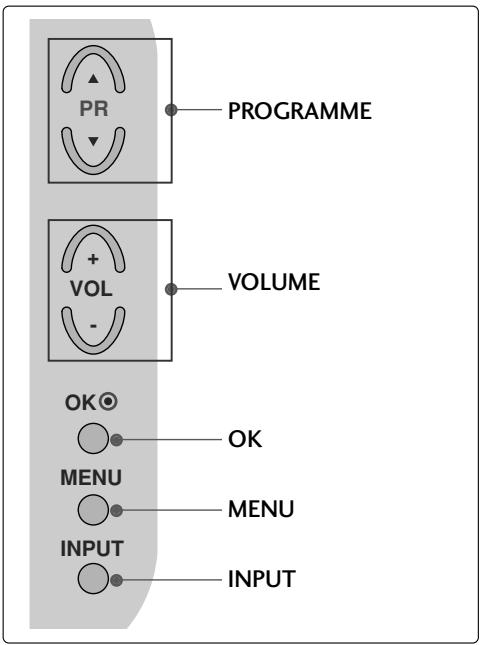
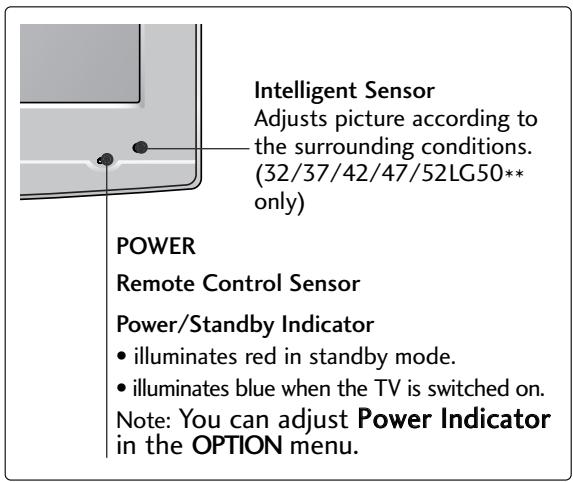
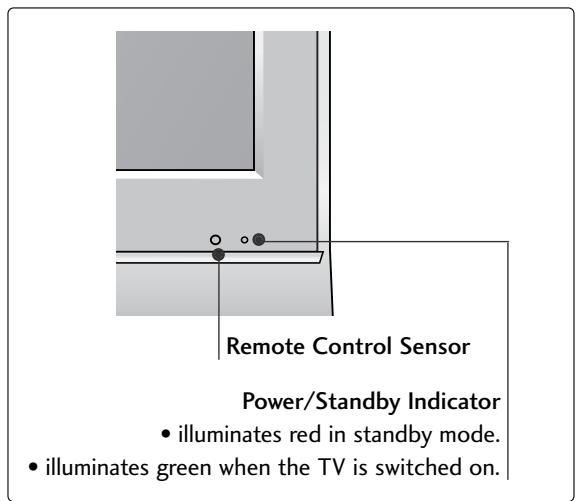
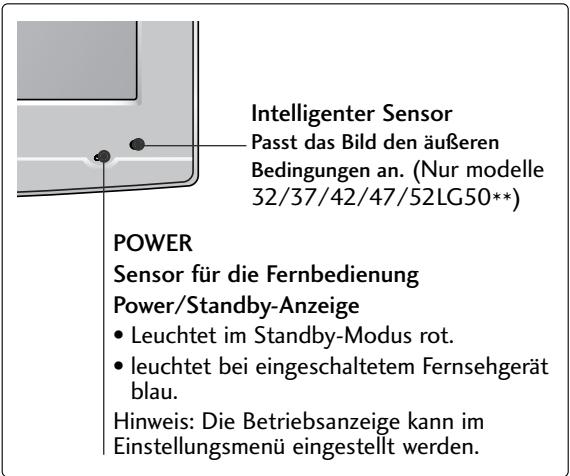
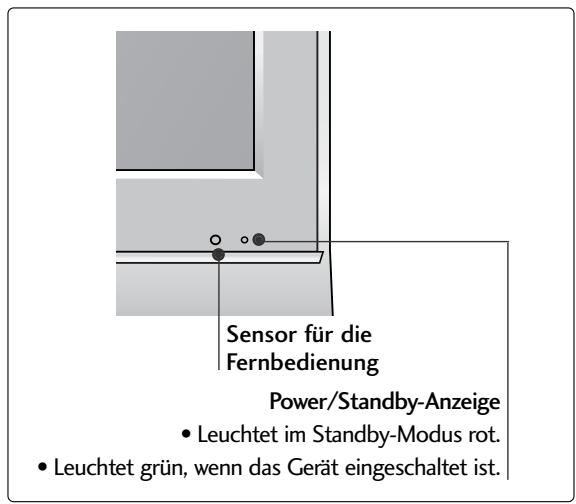
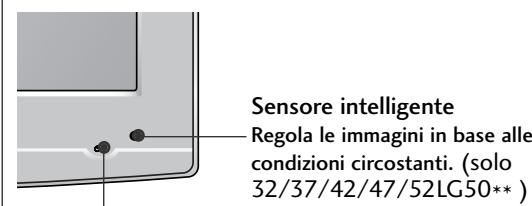
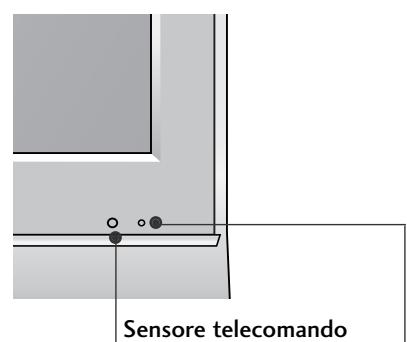
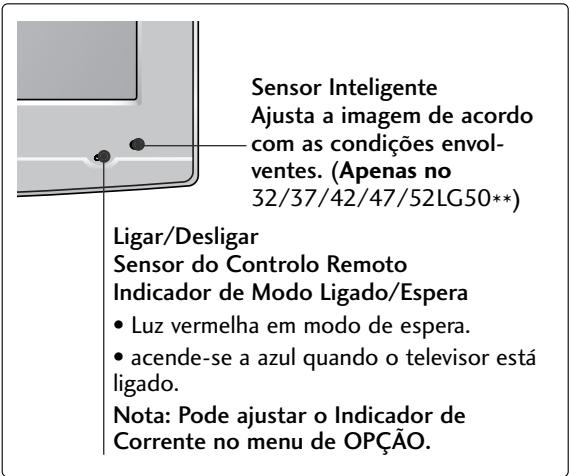
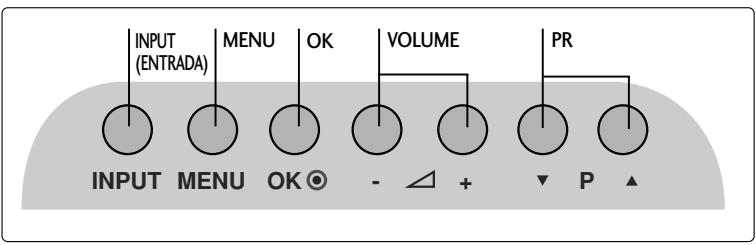
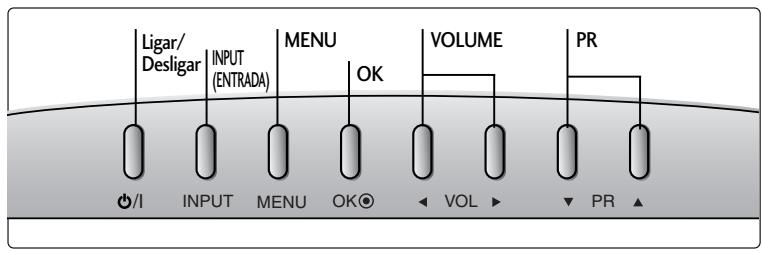
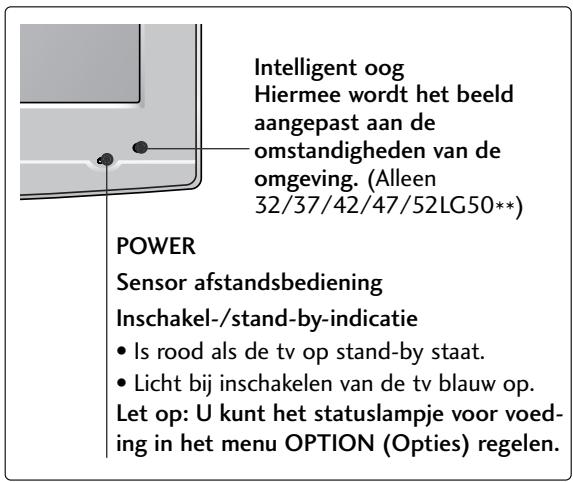
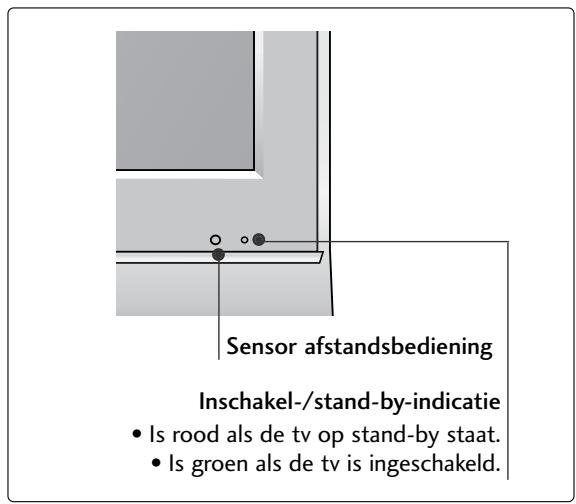
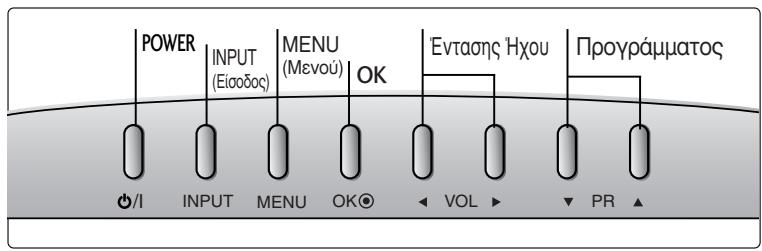
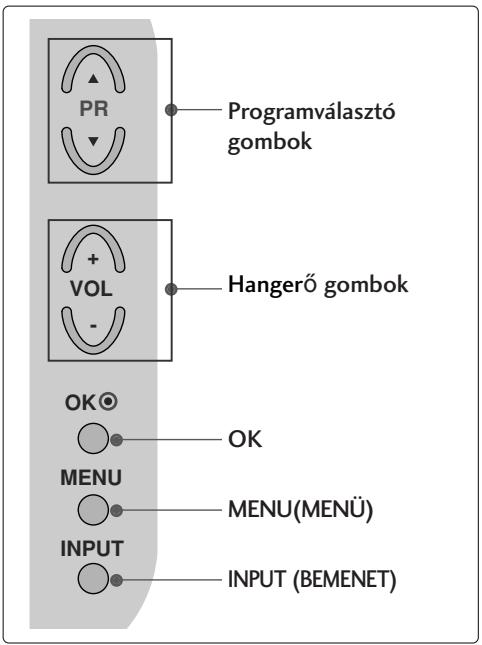
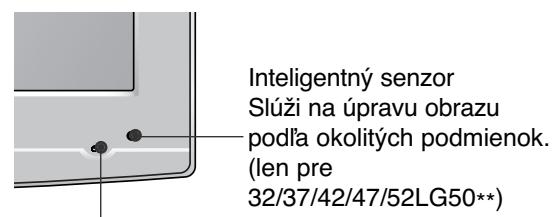
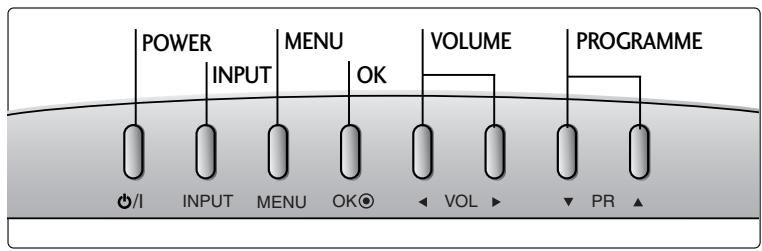
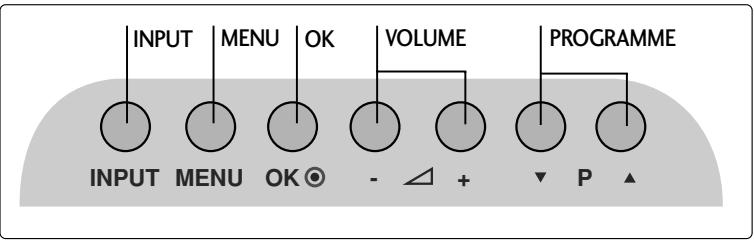
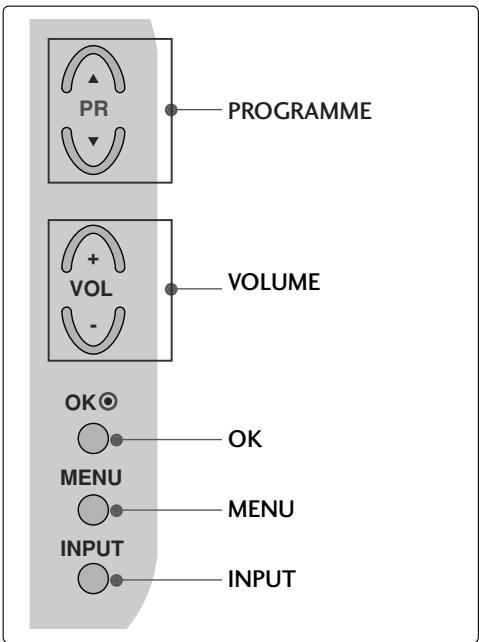
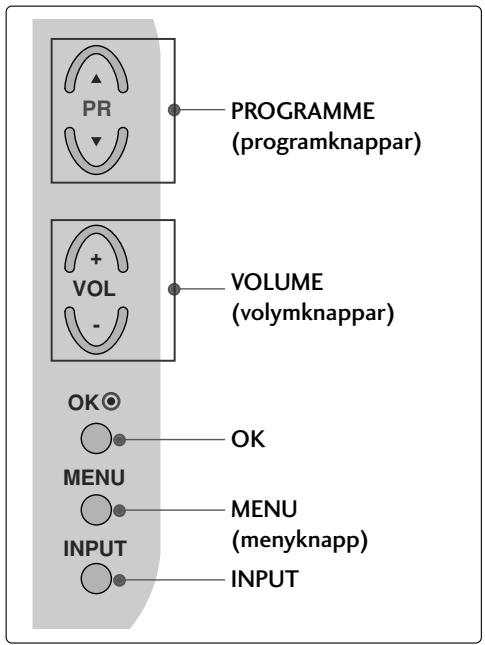
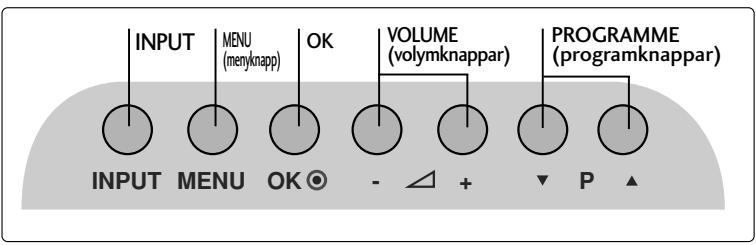
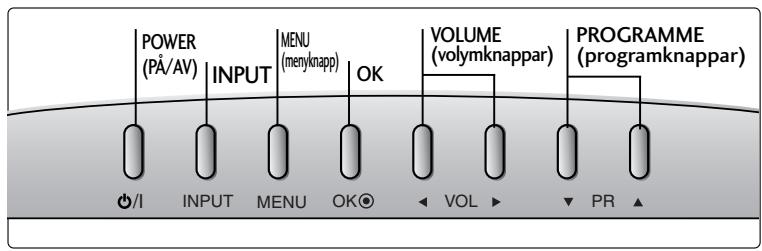
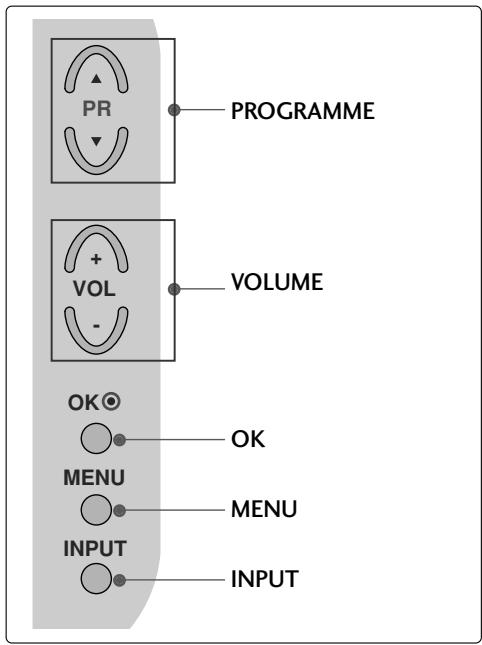
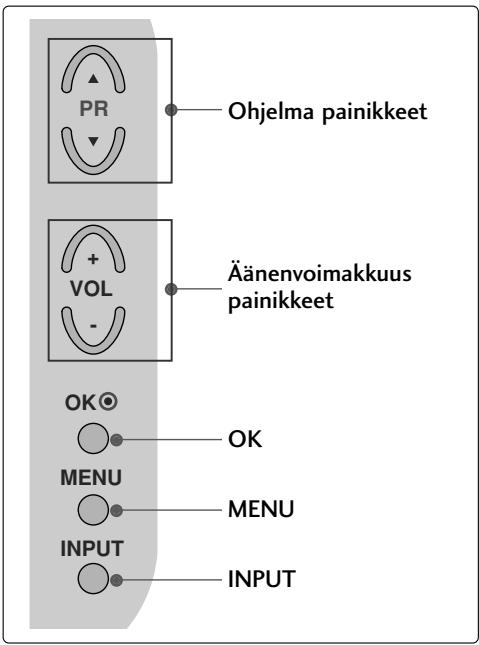
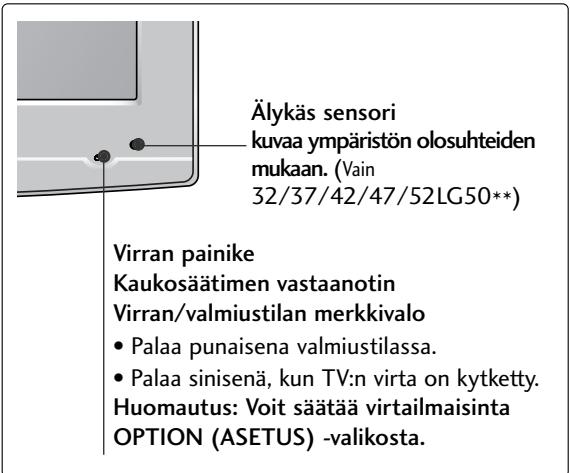
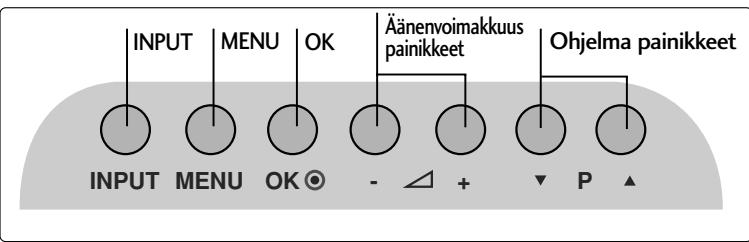
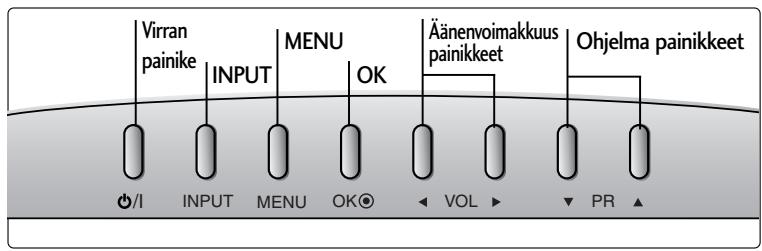
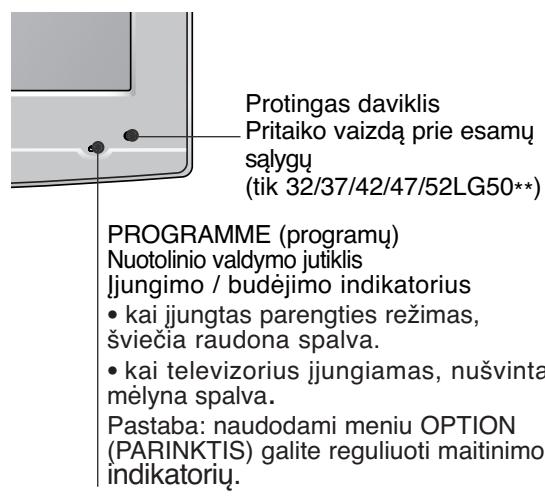
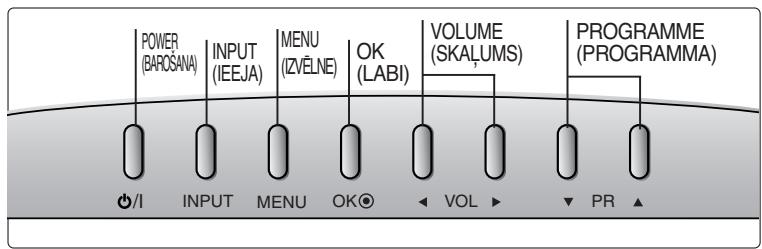
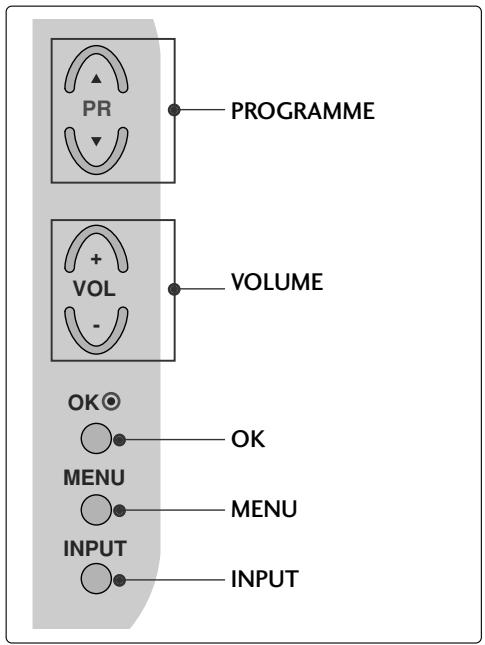
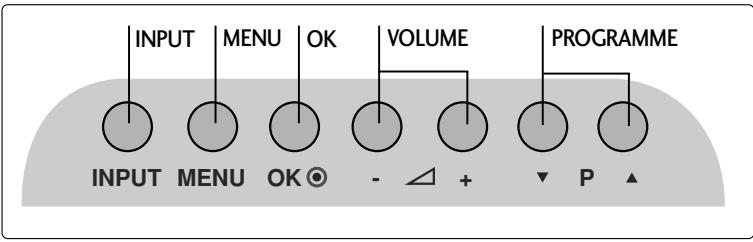
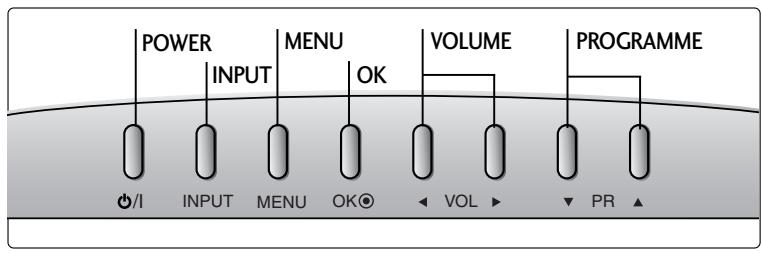
FRONT PANEL CONTROLS
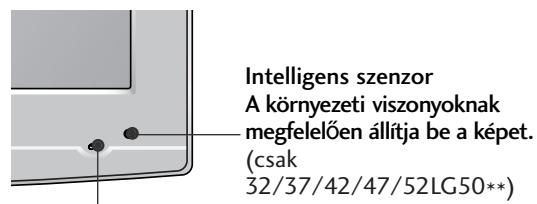
Image shown may differ from your TV.
If your TV has a protection film attached, remove the film and then wipe the TV with a polishing cloth.
LCD TV Models :
26/32/37/42LG30, 32/37/42/47/52LG50
LCD TV Models : 19/22LG30**

LCD TV Models : 19/22LS4D*

PREPARATION
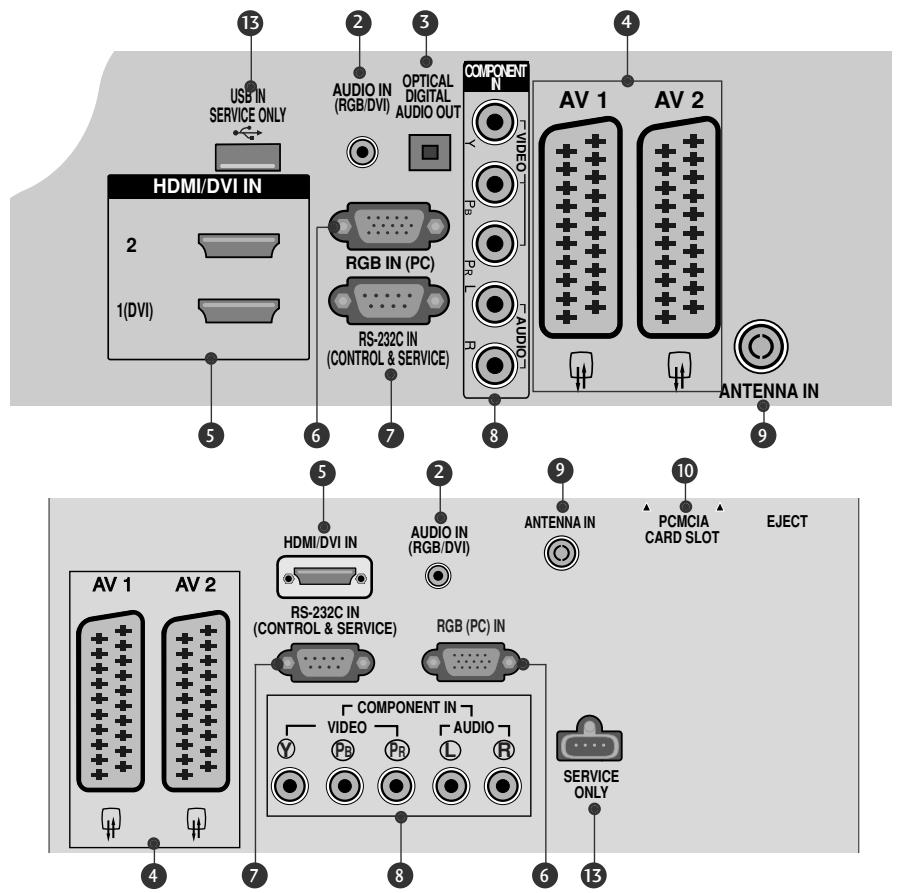
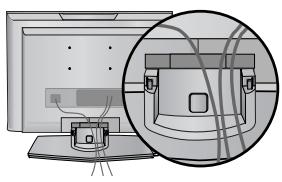
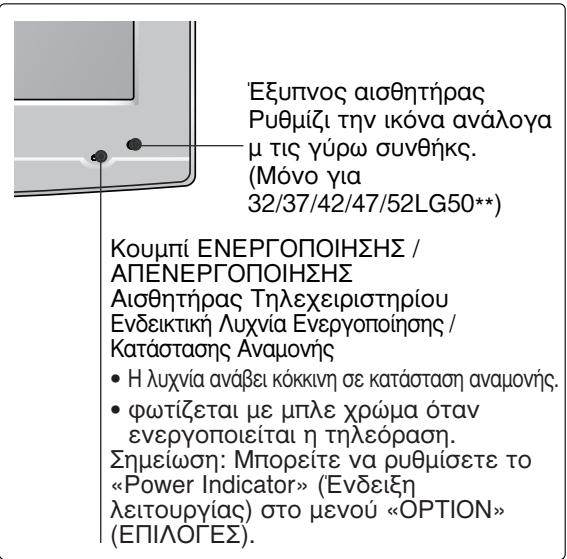
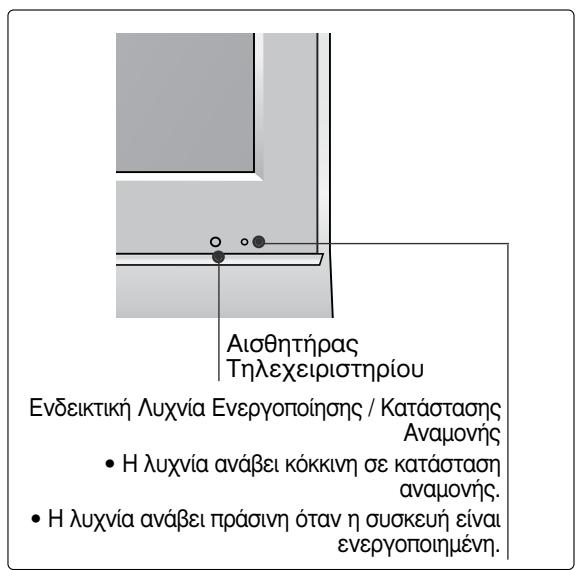
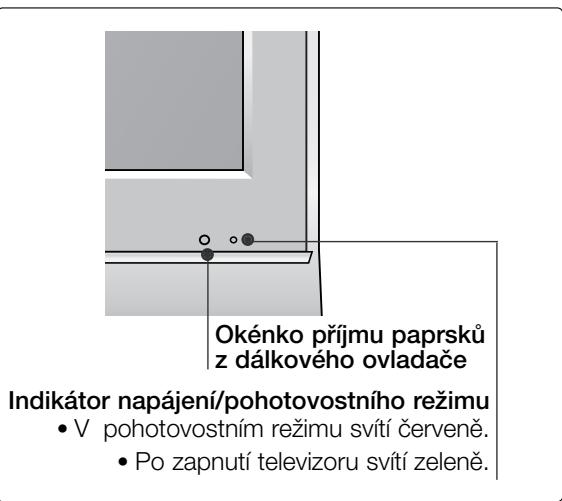
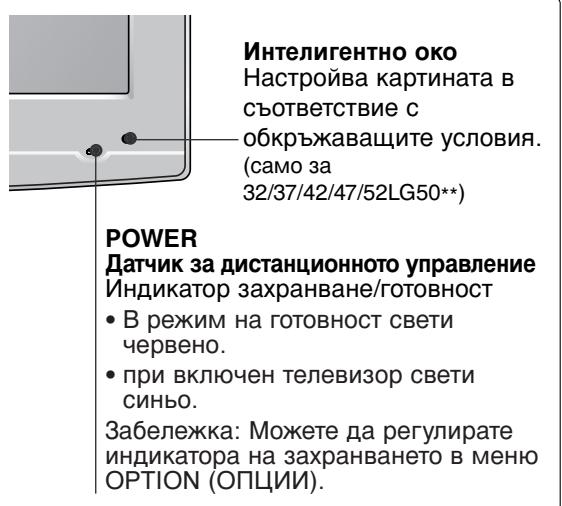
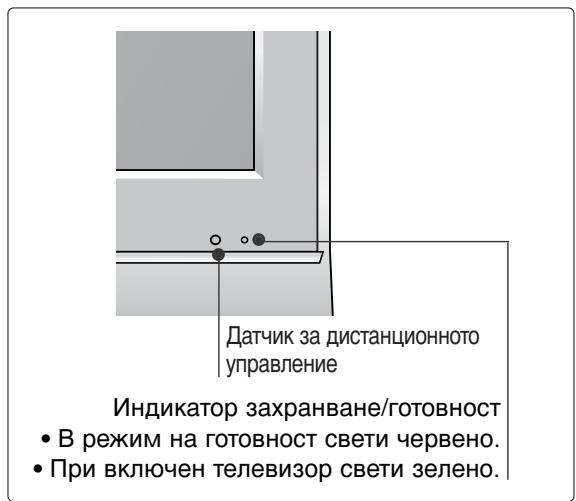
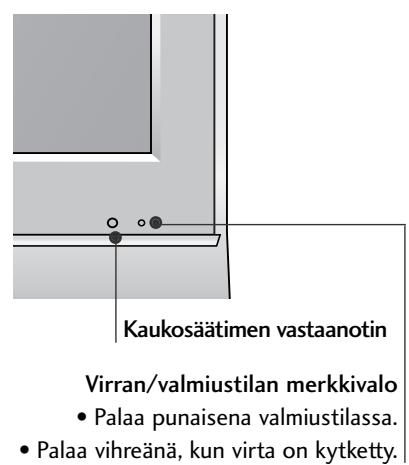
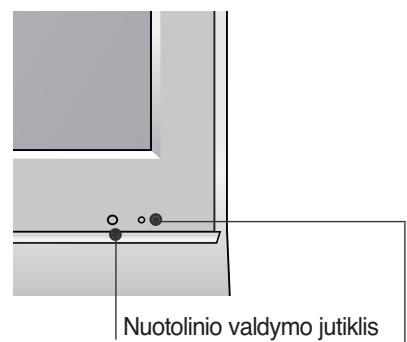
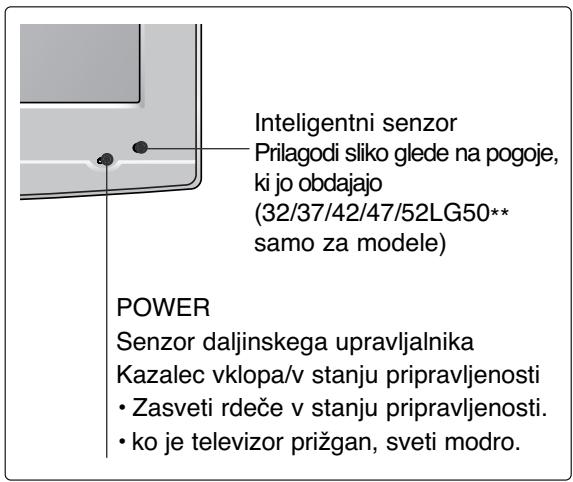
BACK PANEL INFORMATION
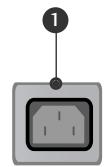
Image shown may differ from your TV.
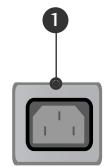

Power Cord Socket
This TV operates on an AC power. The voltage is indicated on the Specifications page. Never attempt to operate the TV on DC power.
RGB/DVI Audio Input
Connect the audio from a PC or DTV.
3 DIGITAL AUDIO OUT OPTICAL (Except for 19/22LS4D*)
Connect digital audio from various types of equipment.
Note: In standby mode, these ports do not work.
Euro Scart Socket (AV1/AV2)
Connect scart socket input or output from an external device to these jacks.
HDMI Input
Connect a HDMI signal to HDMI IN. Or DVI (VIDEO) signal to HDMI/DVI port with DVI to HDMI cable.
RGB IN (PC)
Connect the output from a PC.
RS-232C IN (CONTROL & SERVICE) PORT
Connect to the RS-232C port on a PC.
Component Input
Connect a component video/audio device to these jacks.
Antenna Input
Connect RF antenna to this jack.
10 PCMCIA (Personal Computer Memory Card International Association) Card Slot
(This feature is not available in all countries.)
Audio/Video Input (Except for 19/22LS4D*)
Connect audio/video output from an external device to these jacks.
S-VIDEO
Connect S-Video out from an S-VIDEO device.
12 Headphone Socket (Except for 19/22LS4D*)
Connect the headphone plug to this socket.
SERVICE ONLY PORT
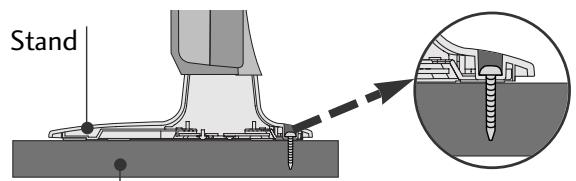
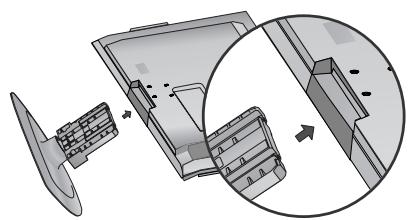
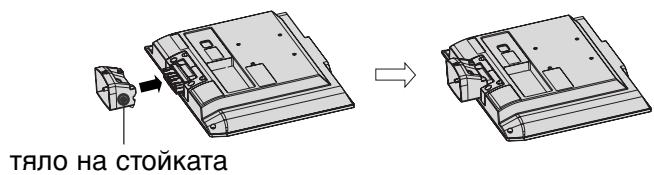
STAND INSTALLATION
LCD TV Models: 26/32/37LG30, 32/37/42LG50
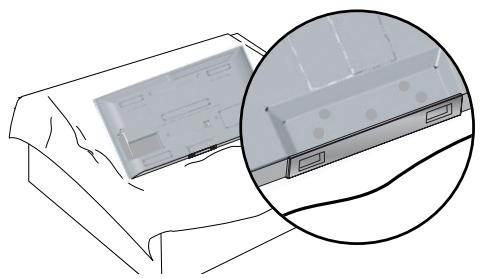
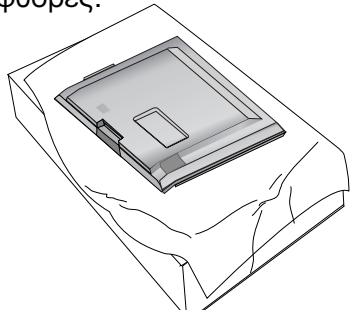
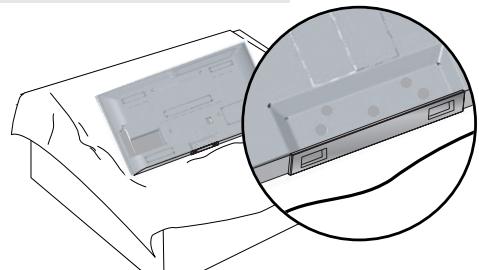
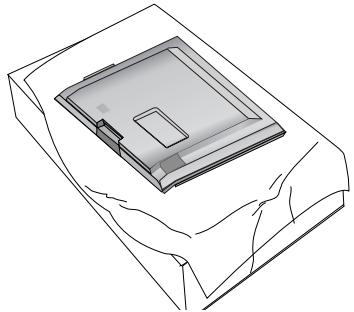
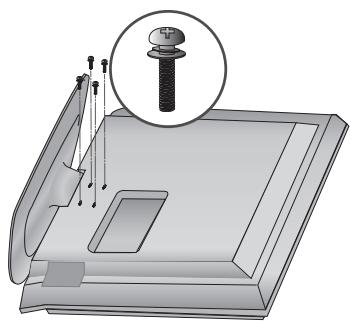
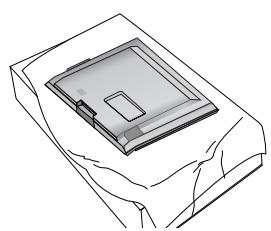
1 Carefully place the TV screen side down on a cushioned surface to protect the screen from damage.
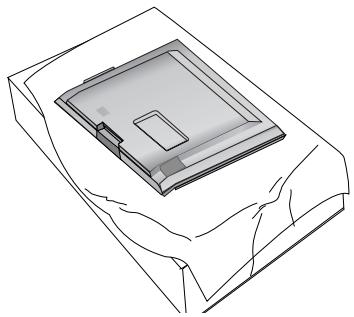
2 Assemble the parts of the Stand Body with the Cover Base of the TV.
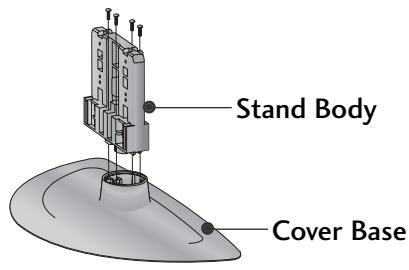
3 Assemble the TV as shown.

Fix the 4 bolts securely using the holes in the back of the TV.

STAND INSTALLATION (LCD TV Models: 19/22LG30**)
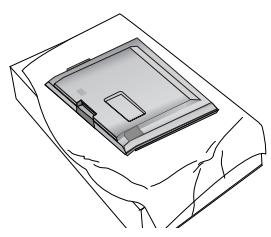

1 Carefully place the TV screen side down on a cushioned surface to protect the screen from damage.
2 Assemble the TV as shown.
Fix the 4 bolts securely using the holes in the back of the TV.
PREPARATION
HS17DN3
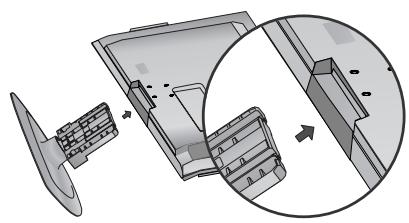
STAND INSTALLATION
(Only 19/22LS4D*)
Image shown may differ from your TV.
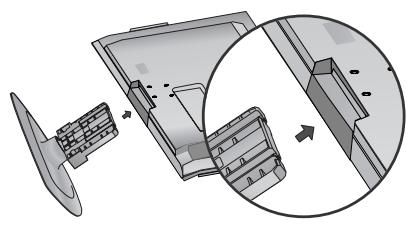
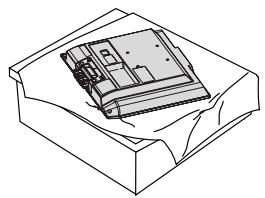
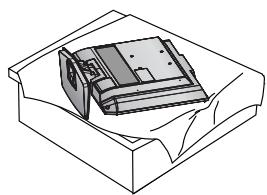
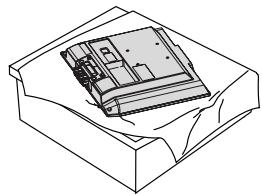
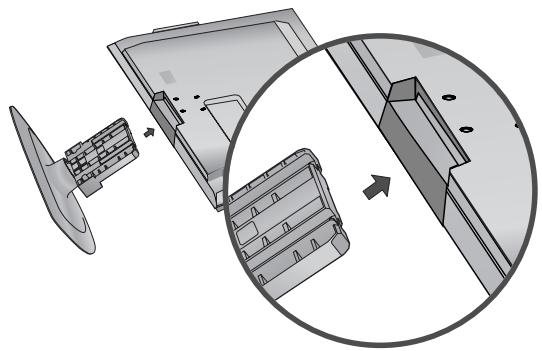
1 Carefully place the TV screen side down on a cushioned surface to protect the screen from damage.
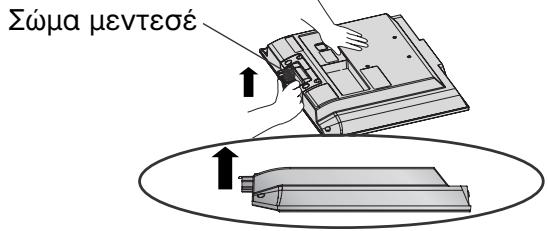
Hold the Hinge Body and bend it upward.
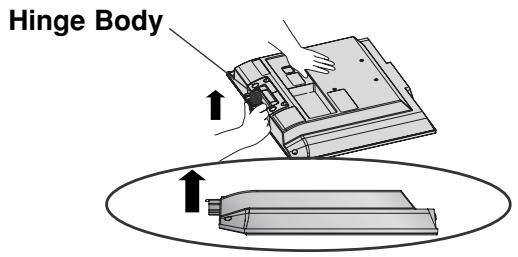
3 Insert the Stand Body into the TV until clicking sound.
Stand Body
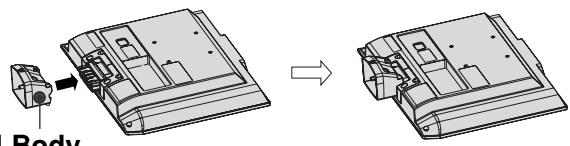
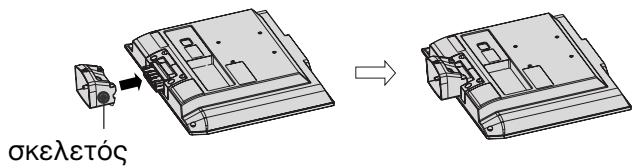
4 Assemble the parts of the Stand Body with the Cover Base of the TV.
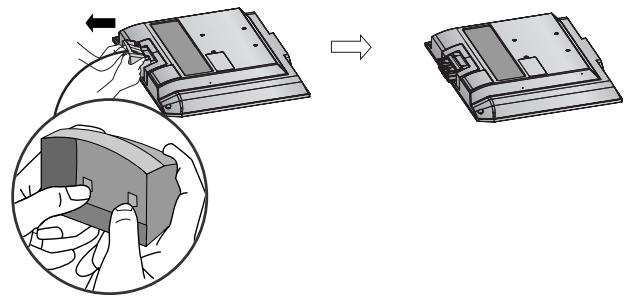
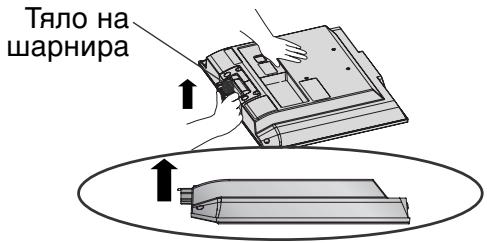
DETACHING STAND
(Only 19/22LS4D*)
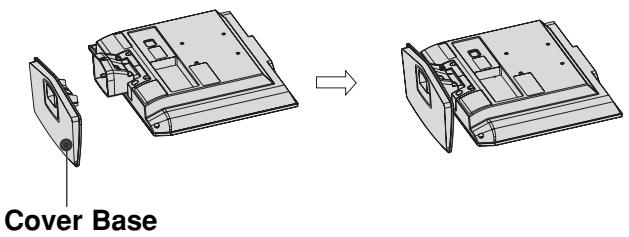
1 Place the tv with its front facing downward on a cushion or soft cloth.
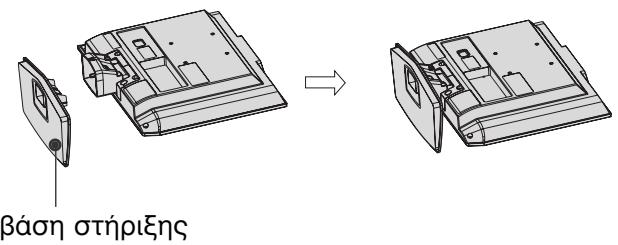
Pull the Cover Base backward during pressing a button on the Stand Body.
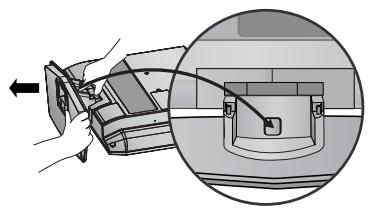
Hold the Cover Base and pull with shake it backward to separate from the Stand Body.
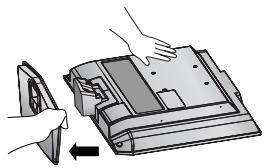
Hold the Stand Body and bend it upward.
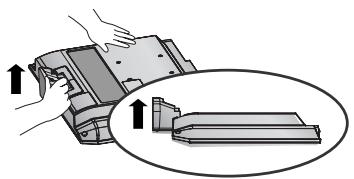
Pull stand body to separate from the TV during pressing 2 latches.
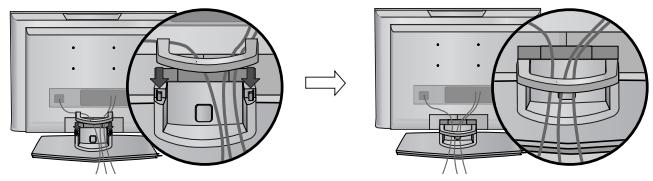
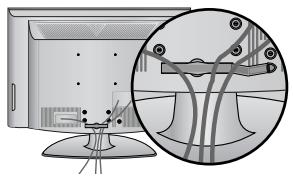
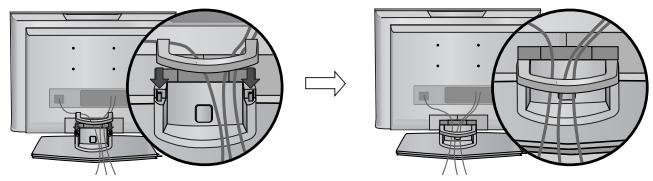
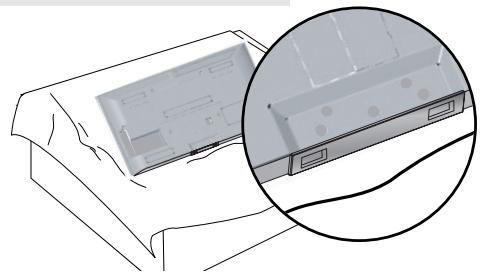
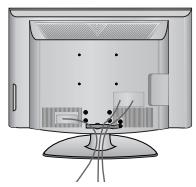
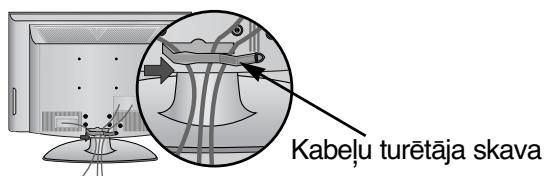
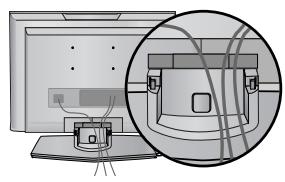
BACK COVER FOR WIRE ARRANGEMENT
LCD TV Models:
19/22/26/32/37/42LG30**
32/37/42/47/52LG50**

Connect the cables as necessary.
To connect additional equipment, see the External
Equipment Setup section of the manual.


Open the CABLE MANAGEMENT CLIP as shown and manage the cables.


Fit the CABLE MANAGEMENT CLIP as shown.

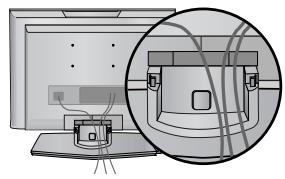
LCD TV Models : 19/22LS4D*

Connect the cables as necessary.
To connect additional equipment, see the External Equipment Setup section.

Install the CABLE MANAGEMENT CLIP as shown.
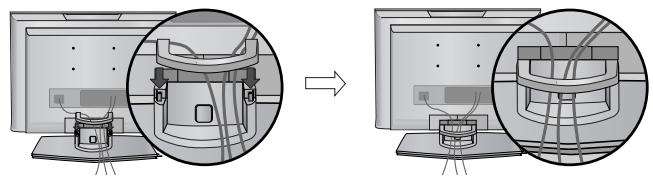
How to remove the cable management clip (LCD TV Models : 19/22LS4D*)
First, press the cable management. Hold the CABLE MANAGEMENT CLIP with both hands and pull it upward.
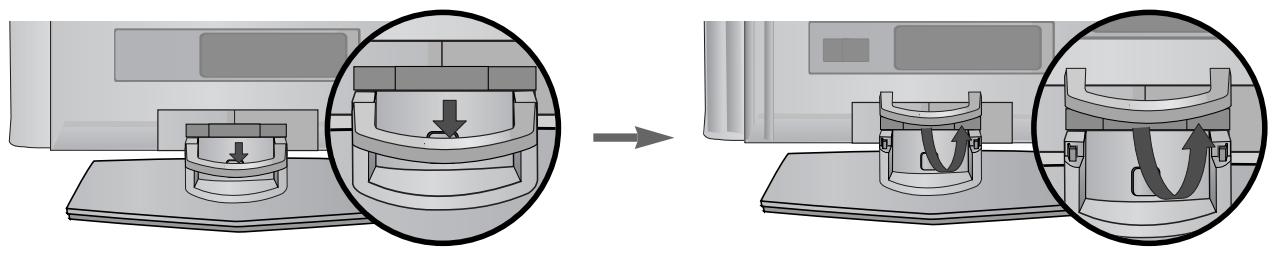

NOTE
Do not use the CABLE MANAGEMENT CLIP to lift the TV.
- If the TV is dropped, you may be injured or the TV may be damaged.
PREPARATION
PLEASE SET IT UP CAREFULLY SO THE PRODUCT DOES NOT FALL OVER.
- You should purchase necessary components to fix the TV to the wall on the market.
Position the TV close to the wall to avoid the possibility of it falling when pushed. - The instructions shown below are a safer way to set up the TV, which is to fix it to the wall, avoiding the possibility of it falling forwards if pulled. This will prevent the TV from falling forward and causing injury. This will also prevent the TV from damage. Ensure that children do not climb or hang from the TV.
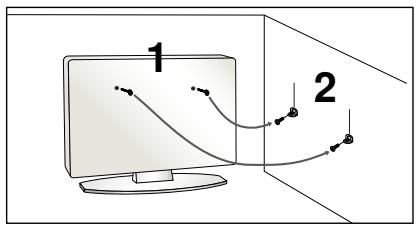
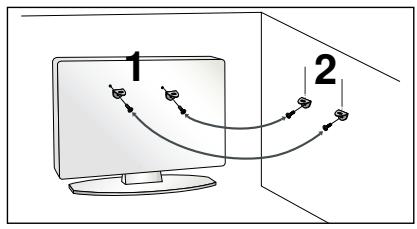
Use the eye-bolts or TV brackets/bolts to fix the TV to the wall as shown in the picture. (If your TV has bolts in the eyebolts, loosen these bolts.)
* Insert the eye-bolts or TV brackets/bolts and tighten them securely in the upper holes.
Secure the wall brackets with the bolts on the wall. Match the height of the bracket that is mounted on the wall.
3 Use a sturdy rope to tie the TV. It is safer to tie the rope so it becomes horizontal between the wall and the TV.
NOTE
When moving the TV undo the cords first.
▶ Use a platform or cabinet strong and large enough to support the size and weight of the TV.
To use the TV safely make sure that the height of the bracket on the wall and on the TV is the same.
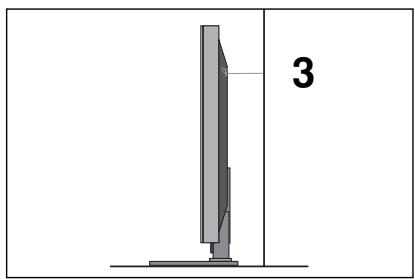
The TV can be installed in various ways such as on a wall, or on a desktop etc.
The TV is designed to be mounted horizontally.
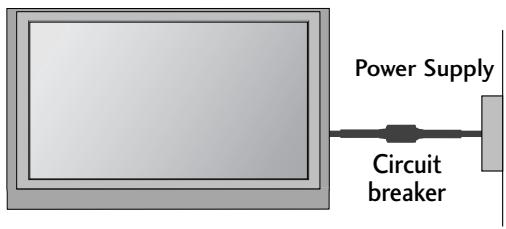
EARTHING
Ensure that you connect the earth wire to prevent possible electric shock. If grounding methods are not possible, have a qualified electrician install a separate circuit breaker.
Do not try to earth the TV by connecting it to telephone wires, lightening rods or gas pipes.
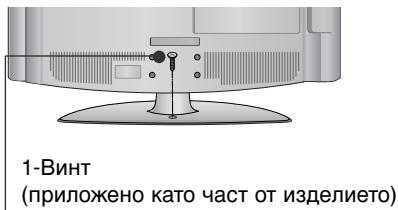
DESKTOP PEDESTAL INSTALLATION
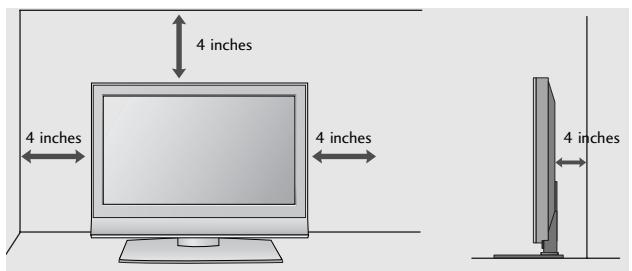
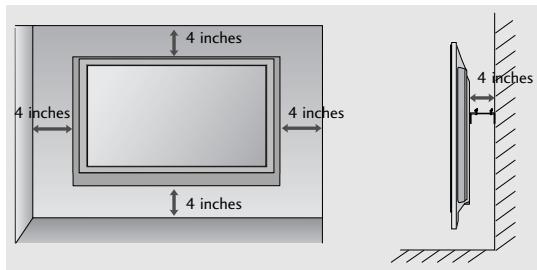
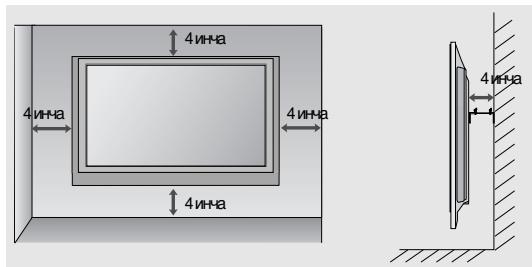
For adequate ventilation allow a clearance of 4^ (10cm) all around the TV.
Attaching the TV to a desk (Only 26/32LG30**, 32LG50**)
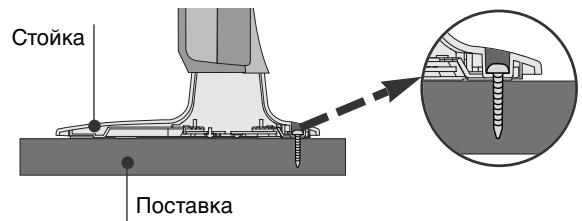
The TV must be attached to desk so it cannot be pulled in a forward/backward direction, potentially causing injury or damaging the product. Use only an attached screw.
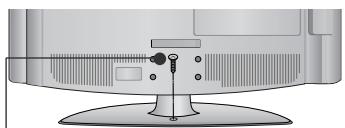
1-Screw
(provided as parts of the product)
Desk
WARNING
To prevent TV from falling over, the TV should be securely attached to the floor/wall per installation instructions. Tipping, shaking, or rocking the machine may cause injury.
WALL MOUNT: HORIZONTAL INSTALLATION
For adequate ventilation allow a clearance of 4" (10cm) all around the TV. Detailed installation instructions are available from your dealer, see the optional Tilt Wall Mounting Bracket Installation and Setup Guide.
Not using the desk-type stand (Except for 19/22LS4D*)
When installing the wall-mounted unit, use the protection cover for desk-type stand installation.
PREPARATION
- To prevent damage do not connect to the mains outlet until all connections are made between the devices.
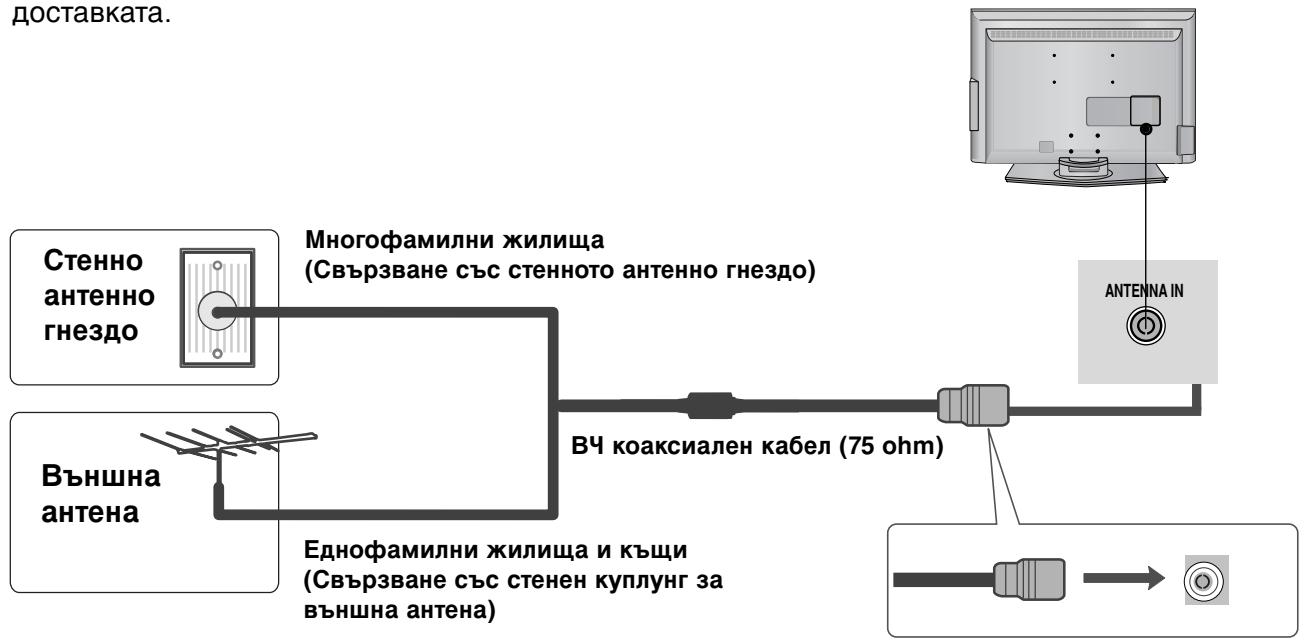
ANTENNA CONNECTION
For optimum picture quality, adjust antenna direction.
An antenna cable and converter are not supplied.
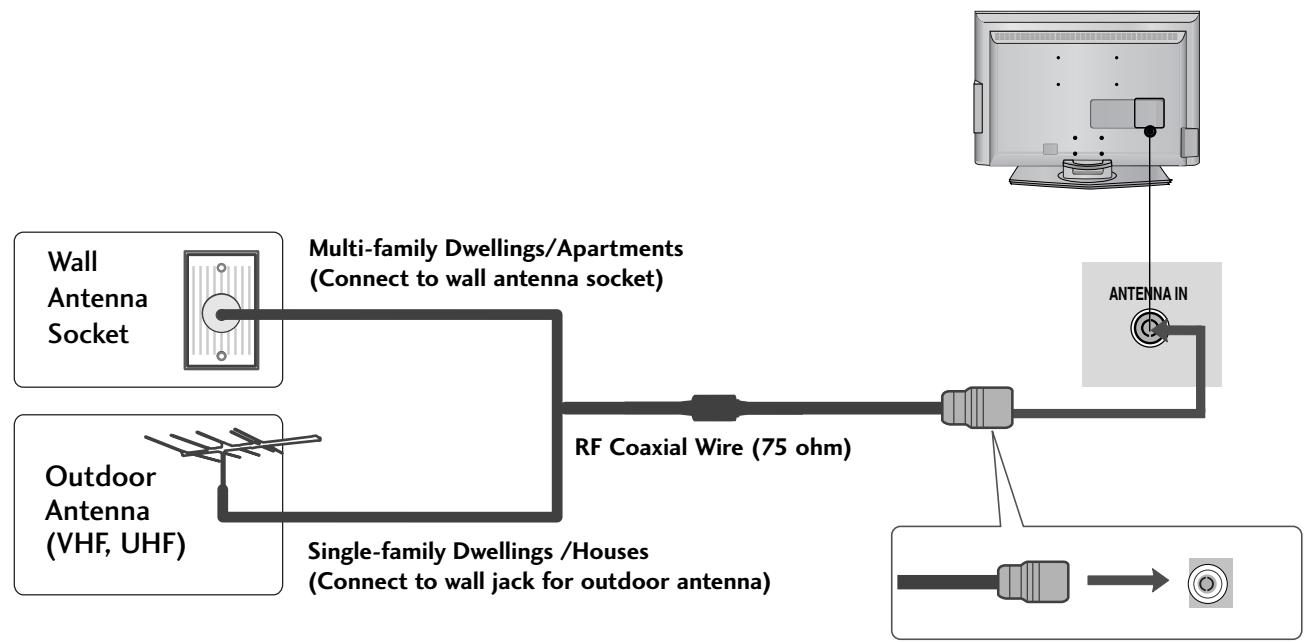
Take care not to bend the bronze wire when connecting to an antenna port.

In poor signal areas, to achieve better picture quality it may be necessary to install a signal amplifier to the antenna as shown above.
If signal needs to be split for two TVs, use an antenna signal splitter for connection.
WATCHING TV /PROGRAMME CONTROL
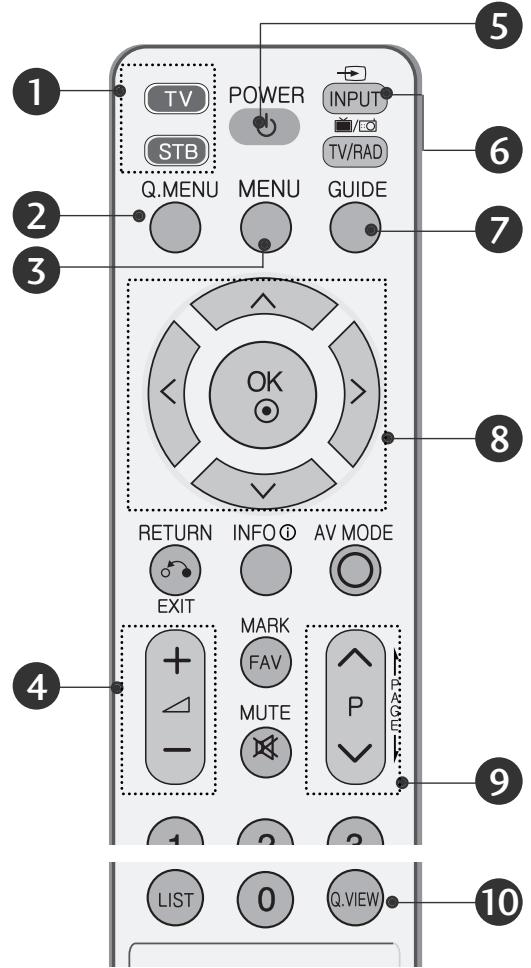
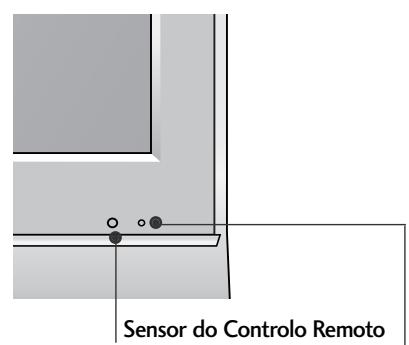
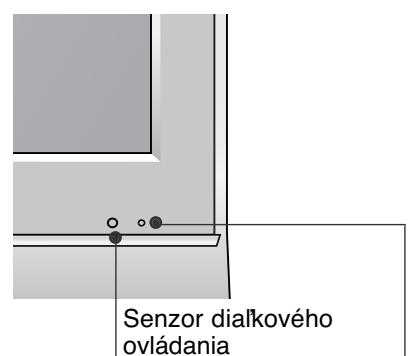
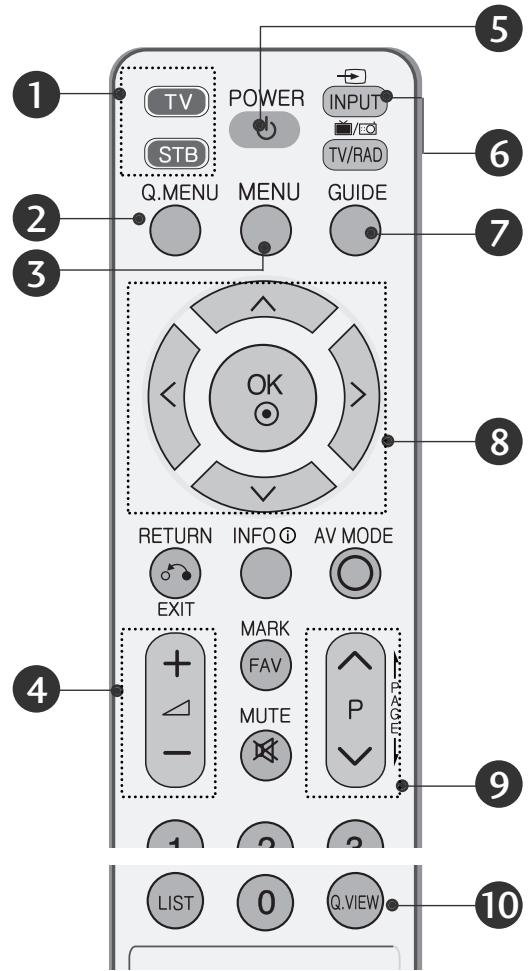
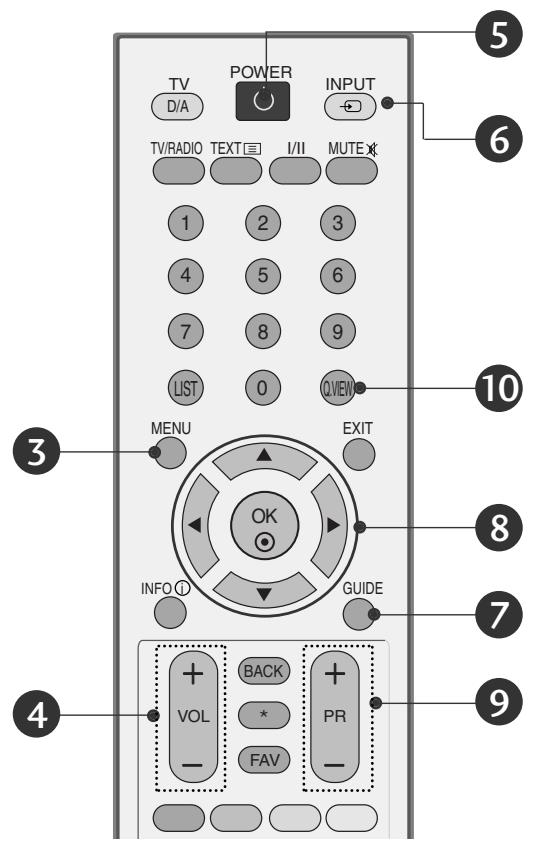
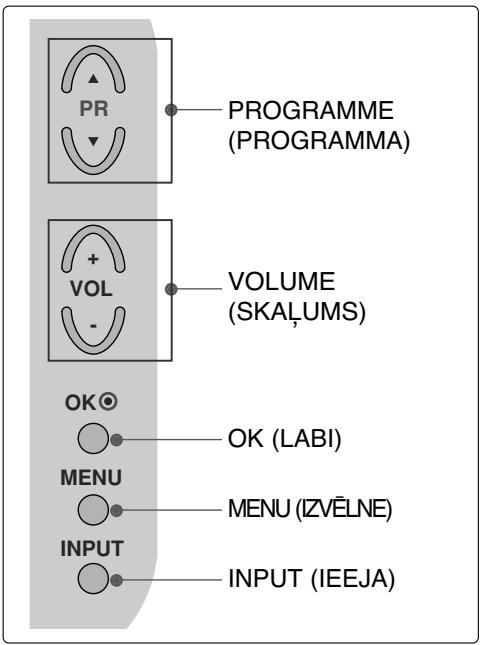
REMOTE CONTROL KEY FUNCTIONS
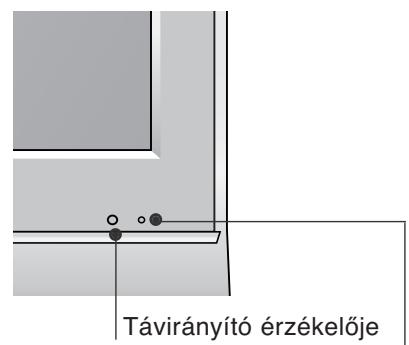
When using the remote control, aim it at the remote control sensor on the TV.
or

1 MODE
Selects the remote operating modes.
Q.MENU
Select the desired quick menu source.
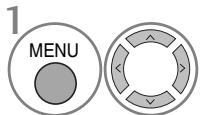
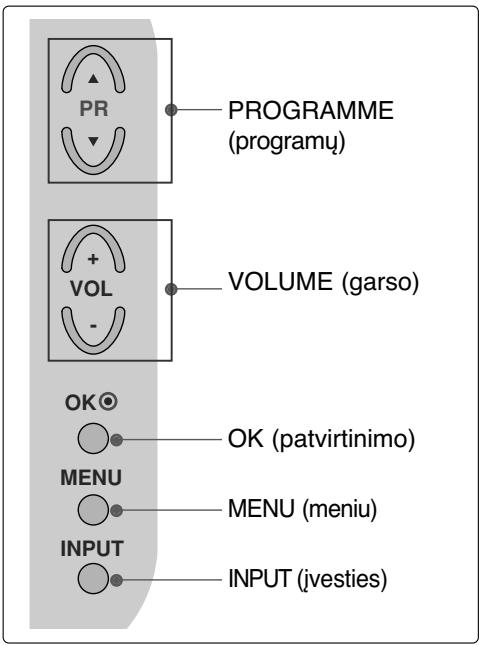
3 MENU
Selects a menu.
Cleared all on-screen displays and returns to TV viewing from any menu.
VOLUME UP /DOWN
Adjusts the volume.
5 POWER
Switches the TV on from standby or off to standby.
6 INPUT
External input mode rotate in regular sequence.
Switches the TV on from standby.
GUIDE
Shows programme schedule.
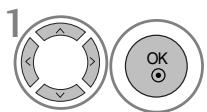
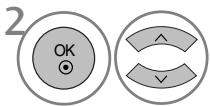
⑧ THUMBSTICK(Up/Down/LeftRight)
Allows you to navigate the on-screen menus and adjust the system settings to your preference.
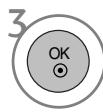
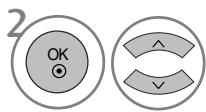
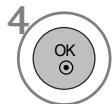
OK
Accepts your selection or displays the current mode.
9Programme UP/DOWN
Selects a programme.
10 Q.VIEW
Returns to the previously viewed programme.
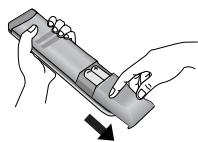
Installing Batteries
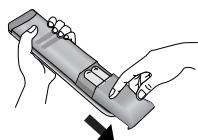
- Open the battery compartment cover on the back and install the batteries matching correct polarity (+with +,-with -).
Install two 1.5V AAA batteries. Do not mix old or used batteries with new ones.
Close cover.
WATCHING TV /PROGRAMME CONTROL
TURNOING ON THE TV
- When your TV is turned on, you will be able to use its features.

Firstly, connect the power cord correctly.
At this stage, the TV switches to standby mode.

In standby mode to turn TV on, press the / , INPUT or P (or PR ▲▼) button on the TV or press the POWER, INPUT, D/A, P (or PR + -) or NUMBER button on the remote control and the TV will switch on.
Initializing setup
If the OSD (On Screen Display) is displayed on the screen after turning on the TV, you can adjust the Language, Select Mode (LCD TV Only), Country, Time Zone, Auto programme tuning.
Note:
a. It will automatically disappear after approx. 40 seconds unless a button is pressed.
b. Press the BACK or RETURN button to change the current OSD to the previous OSD.
c. "In Store" mode is only for shop display and not for general customer use. (LCD TV Only)
d. For those countries without confirmed DTV broadcasting standards, some DTV features might not work, depending on the DTV broadcasting environment.
ON-SCREEN MENU LANGUAGE / COUNTRY SELECTION
The installation guide menu appears on the TV screen when it is switched on for the first time.
Select your desired language.

Select your country.
- If you want to change Language/ Country selection

Select OPTION.
Select Menu Language or Country.
Select your desired language or country.
Save it.
NOTE
If you do not finish the set-up Installation Guide by pressing EXIT or RETURN or if you time out on the OSD (On Screen Display) the installation menu will continuously appear until the set up is completed whenever the TV is switched on
If you select the wrong local country, teletext may not appear correctly on the screen and some problems may occur during teletext operation.
The CI (Common Interface) function may not be applied based on country broadcasting circumstances.
DTV mode control buttons may not function based on country broadcasting circumstances.
In country that Digital broadcasting regulation isn't fixed, some DTV function may not work depending on digital broadcasting circumstances.
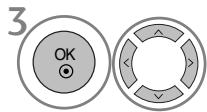
ON SCREEN MENUS SELECTION AND ADJUSTMENT
Your TV's OSD (On Screen Display) may differ slightly from what is shown in this manual.
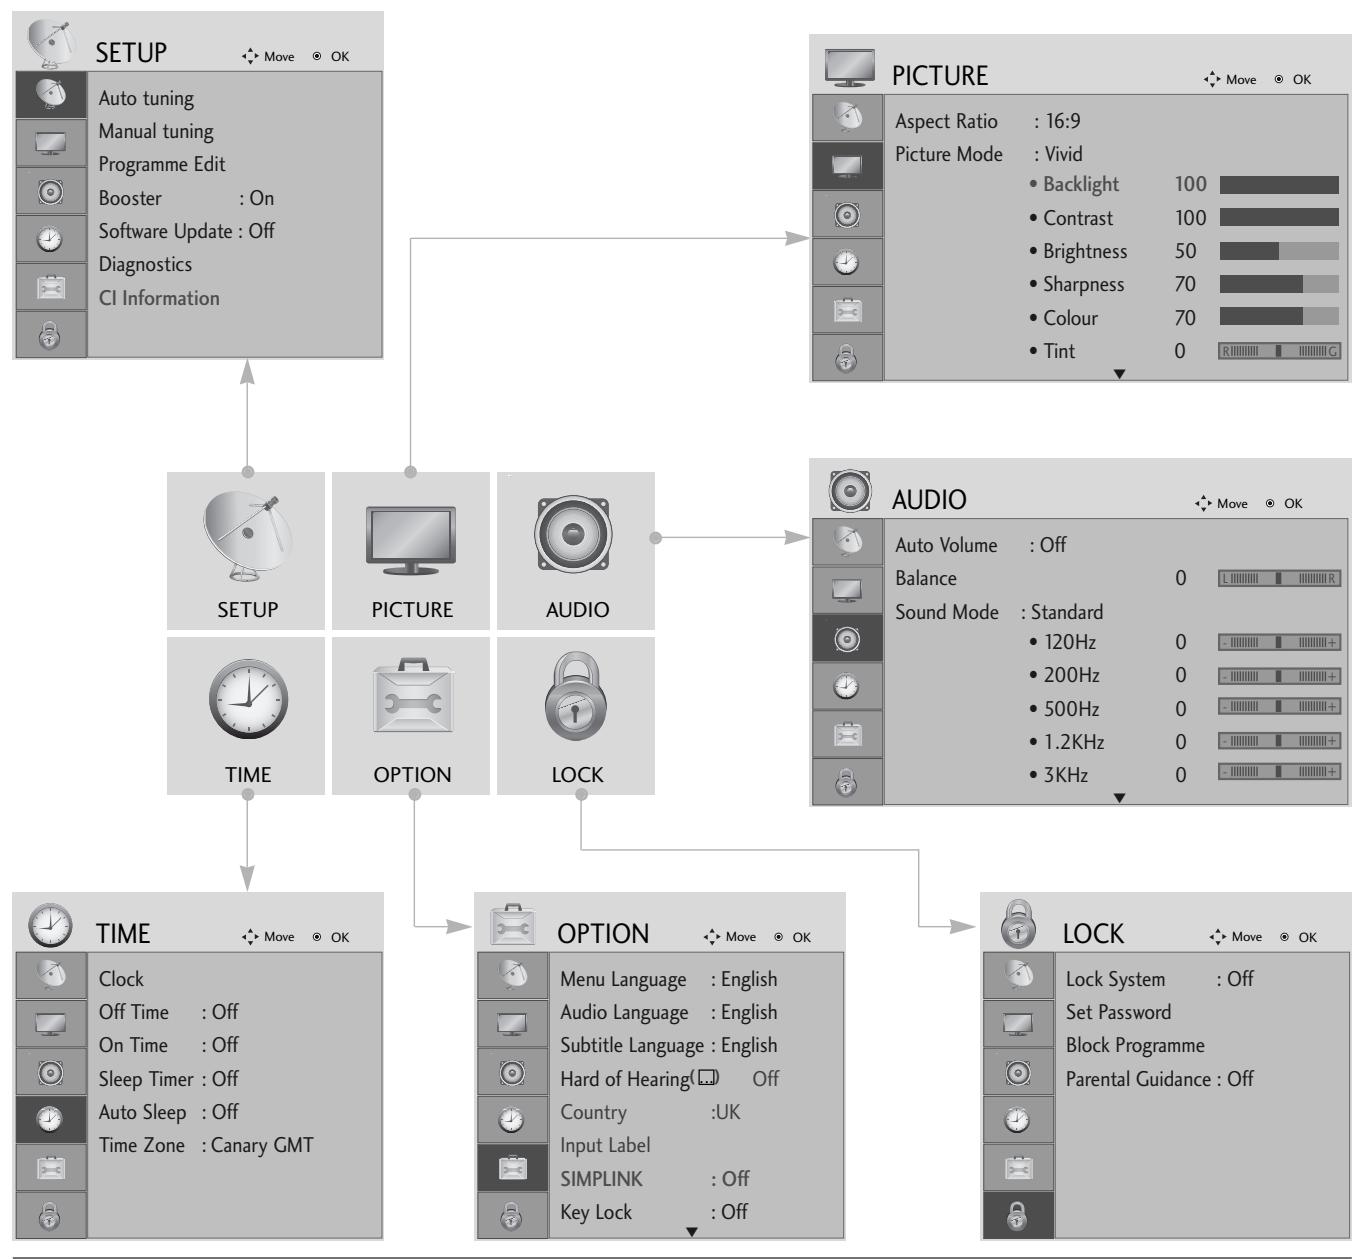


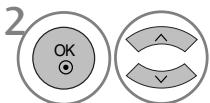
Display each menu.

Select a menu item.
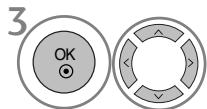
Move to the pop up menu.
- Press the MENU or EXIT button to return to normal TV viewing.
- Press the BACK or RETURN button to move to the previous menu screen.
WATCHING TV /PROGRAMME CONTROL
AUTO PROGRAMME TUNING
Use this to automatically find and store all available programmes.
When you start auto programming in digital mode, all previously stored service information will be deleted.
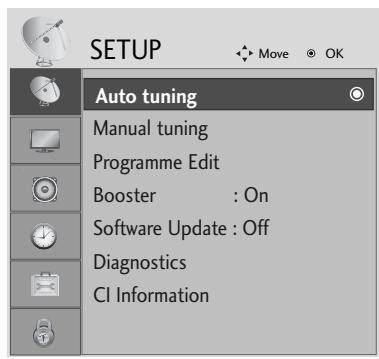

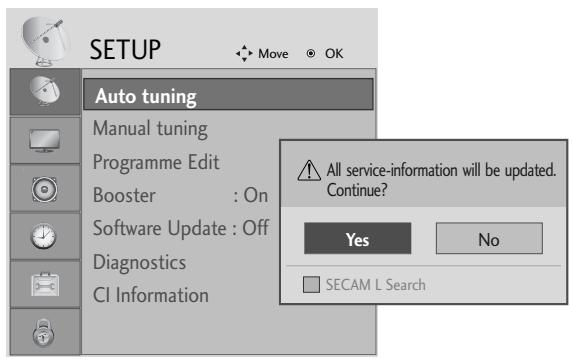
Select SETUP.
Select Auto Tuning.
- Use NUMBER buttons to input a 4-digit password in Lock System 'On'.
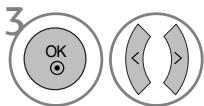
- If you wish to keep on auto tuning select YES using the < button. Then, press the OK button. Otherwise select NO.
Select Yes.
Run Auto tuning.
- Press the MENU or EXIT button to return to normal TV viewing.
- Press the BACK or RETURN button to move to the previous menu screen.
APPENDIX
MAINTENANCE
Early malfunctions can be prevented. Careful and regular cleaning can prolong the life of your new TV.
Caution: Be sure to switch the power off and unplug the power cord before you begin any cleaning.
Cleaning the Screen
A good way to keep the dust off your screen for a while is to wet a soft cloth in a mixture of lukewarm water and a little fabric softener or dish washing detergent. Wring the cloth until it is almost dry, and then use it to wipe the screen.
2 Ensure there is no excess water on the screen. Allow any water or dampness to evaporate before switching on.
Cleaning the Cabinet
To remove dirt or dust, wipe the cabinet with a soft, dry, lint-free cloth.
Do not to use a wet cloth.
Extended Absence
CAUTION
If you expect to leave your TV dormant for prolonged periods (such as a holiday), unplug the power cord to protect against possible damage from lightning or power surges.
TO VIEW THE USER'S GUIDE ON THE CD-ROM
To view the User's guide on the CD-ROM, Adobe Acrobat Reader must be installed on your PC. The "ACRORD" folder on the CD-ROM contains the installation program for Acrobat Reader. If you want to install Acrobat Reader, Open "My Computer" Open the folder "LG" Open the folder "ACRORD" double-click your language.
To view the User's guide
The User's guide files are included in the supplied CD-ROM.
Load the supplied CD-ROM into the CD-ROM drive of your PC.
After a while, the web page of the CD-ROM will open automatically.(Windows users only)
If the web page does not appear automatically, open the User's guide file directly.
Open "My computer" Open the folder "LG" Double click the "index.htm" file.
APPENDIX
TROUBLESHOOTING
| The TV does not operate properly. | |
| The remote control does not work | ■Check to see if there is any object between the TV and the remote control causing an obstruction. Ensure you are pointing the remote control directly at the TV.■Ensure that the batteries are installed with correct polarity (+ to +, - to -).■Ensure that the correct remote operating mode is set: TV, STB etc.Install new batteries. |
| Power is suddenly turned off | ■Is the sleep timer set?■Check the power control settings. Has the Power supply been interrupted.Is Auto sleep activated on this station? |
| The video function does not work. | |
| No picture & No sound | ■ Check whether the TV is switched on. ■ Try another channel. The problem may be with the broadcast. ■ Is the power cord inserted correctly into the mains? ■ Check your antenna direction and/or location. ■ Test the mains outlet by plugging another product into the same outlet. |
| Picture appears slowly after switching on | ■ This is normal, the image is muted during the TV startup process. Please contact your service centre, if the picture has not appeared after five minutes. |
| No or poor color or poor picture | ■ Adjust Colour in menu option. ■ Allow a sufficient distance between the product and the VCR. ■ Try another channel. The problem may be with the broadcast. ■ Are the video cables installed properly? ■ Activate any function to restore the brightness of the picture. |
| Horizontal/vertical bars or picture shaking | ■ Check for local interference such as an electrical appliance or power tool. |
| Poor reception on some channels | ■ Station or cable channel experiencing problems, tune to another station. ■ Station signal is weak, reposition the antenna to receive weaker stations. ■ Check for sources of possible interference. |
| Lines or streaks in pictures | ■ Check antenna (Change the position of the antenna). |
| The audio function does not work. | |
| Picture OK & No sound | Press the VOLUME button. Sound muted? Press MUTE button. Try another channel. The problem may be with the broadcast. Are the audio cables installed properly? |
| No output from one of the speakers | Adjust Balance in menu option. |
| Unusual sound from inside the product | A change in ambient humidity or temperature may result in an unusual noise when the product is switched on or off and does not indicate a fault with the product. |
WEIGHT
| MODELS | 19LS4D* | 22LS4D* | 19LG30** | |
| 19LS4D-ZC | 22LS4D-ZC | 19LG3000-ZA | ||
| Weight | with stand | 5.1 kg / 11.3 lbs | 6.1 kg / 13.5 lbs | 5.1 kg / 11.3 lbs |
| without stand | 4.6 kg / 10.2 lbs | 5.7 kg / 12.6 lbs | 4.6 kg / 10.2 lbs | |
| MODELS | 22LG30** | 26LG30** | 32LG30** | |
| 22LG3000-ZA | 26LG3000-ZA | 32LG3000-ZA | ||
| Weight | with stand | 5.6 kg / 12.4 lbs | 9.4 kg / 20.8 lbs | 13.2 kg / 29.1 lbs |
| without stand | 5.35 kg / 11.8 lbs | 7.7 kg / 17.0 lbs | 11.5 kg / 25.4 lbs | |
| MODELS | 37LG30** | 42LG30** | 32LG50** | |
| 37LG3000-ZA | 42LG3000-ZA | 32LG5000-ZA | ||
| 32LG5010-ZD | ||||
| 32LG5020-ZB | ||||
| 32LG5030-ZE | ||||
| Weight | with stand | 18.8 kg / 41.5 lbs | 23.5 kg / 51.9 lbs | 14.1 kg / 31.1 lbs |
| without stand | 16.2 kg / 35.7 lbs | 20.0 kg / 44.1 lbs | 12.6 kg / 27.8 lbs | |
| MODELS | 37LG50** | 42LG50** | 47LG50** | |
| 37LG5000-ZA | 42LG5000-ZA | 47LG5000-ZA | ||
| 37LG5010-ZD | 42LG5010-ZD | 47LG5010-ZD | ||
| 37LG5020-ZB | 42LG5020-ZB | 47LG5020-ZB | ||
| 37LG5030-ZE | 42LG5030-ZE | 47LG5030-ZE | ||
| Weight | with stand | 18.3 kg / 40.4 lbs | 26.2 kg / 57.8 lbs | 29.2 kg / 64.4 lbs |
| without stand | 15.6 kg / 34.4 lbs | 23.5 kg / 51.8 lbs | 24.6 kg / 54.3 lbs | |
The specifications shown above may be changed without prior notice for quality improvement.
LG Electronics Inc.
26/32/37/42LG30, 32/37/42/47/52LG50

LCD TV-MODELLE : 19/22LG30**


LCD TV-MODELLE : 19/22LS4D*
VORBEREITUNG
(LCD TV-MODELLE: 26/32/37LG30, 32/37/42LG50)

19/22/26/32/37/42LG30**
32/37/42/47/52LG50**

LCD TV-MODELLE : 19/22LS4D*

(MODES DE TV LCD: 26/32/37LG30, 32/37/42LG50)
INSTALLATION DU SOCLE (MODELES DE TV LCD: 19/22LG30**)


(Seulement 19/22LS4D*)
(Seulement 19/22LS4D*)

MODELES DE TV LCD: 19/22/26/32/37/42LG30 32/37/42/47/52LG50
POSER (Sauf 19/22LS4D*)
26/32/37/42LG30, 32/37/42/47/52LG50

MODELLI DI TV AL LCD : 19/22LG30**
POWER
Sensore telecomando

MODELLI DI TV AL LCD : 19/22LS4D*
19/22/26/32/37/42LG30**
32/37/42/47/52LG50**
26/32/37/42LG30, 32/37/42/47/52LG50
Modelos de TV LCD : 19/22LG30**
Modelos de TV LCD : 19/22LS4D*
(Modelos de TV LCD: 26/32/37LG30, 32/37/42LG50)
(Apenas no 19/22LS4D*)
(Apenas no 19/22LS4D*)
Modelos de TV LCD: 19/22/26/32/37/42LG30 32/37/42/47/52LG50
26/32/37/42LG30, 32/37/42/47/52LG50

LCD-tv-modelen : 19/22LG30**

LCD-tv-modelen : 19/22LS4D*

VOORBEREIDING
INFORMATIE ACHTERZIJDE
19/22/26/32/37/42LG30**
32/37/42/47/52LG50**

26/32/37/42LG30, 32/37/42/47/52LG50
MONTEA THAEOPAEQN LCD: 19/22LG30**
MONTEA THAEOPAÇEÇN LCD: 19/22LS4D*
ПОНTOIMА经
(MONTEA THAEOPAÇE.ON LCD: 26/32/37LG30, 32/37/42LG50)

TooTheTnTe Tnv TnAeopaon Me Tnv oOvN Poc Ta KaTOW eMaakn Epiavla yia va PooTaEuOeTe Tnv OboV ano tuxov PhOpEc.

(Móvo yia 19/22LS4D*)
Aφaipεση βασης
(Móvo yia 19/22LS4D*)
H Eikova nou napatiEeata vEdeltaEeata va eival diapopetikn ano tyn tnlaopaon oac.
1 TonooetnoTe Tnv tnLepaon uTv oovn npoc ta katw oE maakn Epiavia yia va npootatEuOeTe Tnv oovn ano tuxov opeC.
KpatnoTe To owa Taou uevteoekai LuyioTe Tov npoc ta navw.
EioayETo oWma TnS BaoNc OTO npoiov mexpa va akouoTE TOV xapakntpiotiko nxo klik.
4 SuvapuoloynoTe Ta mepn Tou oomegaTc Tc BaoNc MTo KaLmuMa Tc BaoNtou npoiovtoc.
1 TOnoTeTnToE TnV TnAeopaon Oe Eva maElaapi n Oe EVA mAlako UpaOma, Ee TnV npooosn Otpaumevn npoc Ta KaTaw.

MONTEA THAEOPAEQN LCD: 19/22/26/32/37/42LG30 32/37/42/47/52LG50
1 Suvodot Ta kaawda onwcaatai. Tia va ouvdoetkai aaln ouokuen, avatpeTe OTNv Evotnta Eykaotaon EeTepikwv OUKeUwV

AvoiETo SYNAEEMOTAKTOnOIHsKAAOIONoN onwoc paivetai oTo Oxma kaia taktonoiotc ta kalwaia.

3 ToioeTnoTeTo SYNDEEMO TAKTOIOHHSKAANQIQN onwoc paivetai oTo oxnua.
MONTEAA THAEOPAEQN LCD: 19/22LS4D*
1 Suvodot Ta Kaalwia onwc anaitai. Tia va ouvdoTe kai aAAn OoKeu, avatpeEte OTNV EvOTnTa EYkaTaoaon 8eWTEPIKWV OoKEUWV
ToioeTnOte KAIIN DIAXEIPIISH KAANION onwocpaivetai otynv Eikova.
ПОБAPTHESH THS THAEOPAHSE E PAPEIO
(Móvo yla 26/32LG30, 32LG50)
(Móvo yia to μοντέλo 19/22LS4D*)
Kata tvtotheon TNS eitoixiac movaas, Xpoiooionote to npootateutiko kaumua TnC EITpaneizac baoons.
ΠΡΕΤΟΙΜΑΣΙA
Ia TnV anopuyn 3Aabns twv ouakeuwv, note uouvdeet Ta kaowia tropodooia c otnv npoxn pemuatoC npotou ooknpwote tn ouvdoon oawv twv ouakeuwv.
Σύνδεση Κεραιας
26/32/37/42LG30, 32/37/42/47/52LG50
LCD TV-TIPUSOK : 19/22LG30**
POWER
LCD TV-TIPUSOK : 19/22LS4D*
(LCD TV-TIPUSOK: 26/32/37LG30, 32/37/42LG50)
19/22/26/32/37/42LG30**
32/37/42/47/52LG50**

LCD TV-TIPUSOK : 19/22LS4D*

26/32/37/42LG30, 32/37/42/47/52LG50
MODELE TELEWIZORÓW LCD : 19/22LG30**
Zasilanie
MODELE TELEWIZORÓW LCD : 19/22LS4D*

Wskaznik zasilania/czuwania
(MODELE TELEWIZORów LCD: 26/32/37LG30, 32/37/42LG50)
MODELE TELEWIZORÓW LCD: 19/22/26/32/37/42LG30 32/37/42/47/52LG50
MODELE TELEWIZORÓW LCD: 19/22LS4D*
(MODELE TELEWIZORÓW LCD: 19/22LS4D*)
26/32/37/42LG30, 32/37/42/47/52LG50
LCD televizory : 19/22LG30**

LCD televizory : 19/22LS4D*
PřÍPRAVA
INFORMACE O ZADNÍM PANELU
(LCD televizory: 26/32/37LG30, 32/37/42LG50)
19/22/26/32/37/42LG30**
32/37/42/47/52LG50**

26/32/37/42LG30, 32/37/42/47/52LG50
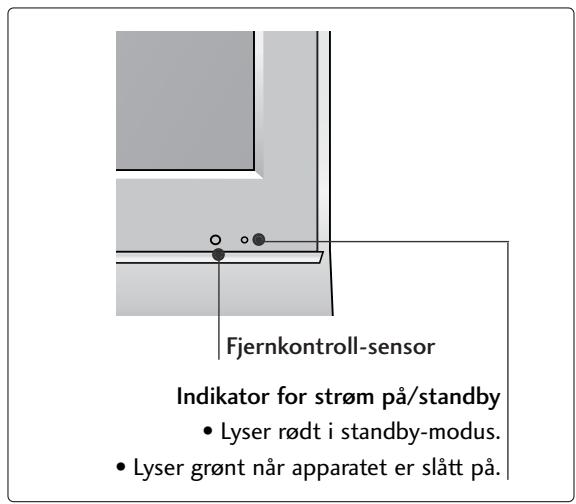
Modely LCD TV : 19/22LG30**
POWER
Senzor dialkového ovládania
Kontrolka zapnutia a pohotovostného režimu
- V pohotovostnom režime svieti na Červeno.
- po zapnuti televizora svieti na modro.
Poznámka. Kontrolku napájania možete nastavit' v. ponuke OPTION
(MOZNOSTI).

Modely LCD TV : 19/22LS4D*
(Modely LCD TV : 26/32/37LG30, 32/37/42LG50)
(Modely LCD TV : 19/22LG30**)

(len pre 19/22LS4D*)
(len pre 19/22LS4D*)
Modely LCD TV : 19/22/26/32/37/42LG30 32/37/42/47/52LG50
Pripojte kable podla potreby.
Ak chcete pripjit'dalsie
zariadenia, pozrite si cast'
Nastavenie externych
zariaden.
2 Podla uvedeného obrázka otvorte UCHYTKU NA KÁBLE a usporiadajte káble.
3 UCHYTKU NA KÁBLE pripevnite podla obrázka.

Modely LCD TV : 19/22LS4D*
Pripojte káble podla potreby.
Ak chcete pripjit'dalsie zariadenia, pozrite si'cast'Nastavenie externych zariaden.
Pripevnite UCHYTKU NA KÁBLE podla obrázka.
VYTIAHUTIE VEDENIA KÁBLA (Modely LCD TV : 19/22LS4D*)
Najskór stlacré uchytku na káble. Uchopte ÜCHYTKU NA KÁBLE oboma rukami a zatlačte jusmerom nahor.

POZNÁMKA
Pri premiestnovani vyrobku ho nedržte za VEDENIE KÁBLA.
- Ak by vyrobok spadol, mohli by ste sa zranit alebo vyrobok by sa mohol zničit
PRIPRAVA
TELEVÍZOR UMIESTNITE BEZPEČNE, ABY SA NEPREVRÁTIL.
26/32/37/42LG30, 32/37/42/47/52LG50

Modèle de televizioare cu LCD : 19/22LG30**
(Cu exceptia 19/22LS4D*)
THUMBSTICK (Sus/Jos/Stånga Dreapta)
HNTaIpaIte npOyKaTa Ha paBHO n CTaBnHO MACTO, KbTeTO HMA ONaCHOCT OT NaDaHe.
- Ako npodkytb6bde n3nychat,MOKe da ce HapaHnTe INI da ro CuynTe.

He n3naarTe npOyKta Ha npKa cNbHueBa CBETnHa.
-TaMOKeJa rO noBpeiN.
He noctabraIte npoaykta BvB BrpaedHa HnCTaJIaun, HanpImep 6n6nnteKa nn CekUna.
- Heo6xOaMa e BHTnlaun.
ПредпаЗн Меркп NO OTHошенье на щелекtpo3axpaHbaHeto
! PPEyPExJdeHMe
3axpaHbauT Ka6e Tp6Ba da 6bJe Cbbp3aH KbM 3a3eMeHa Bepira.
He pa3rIIO6BaIte, He peMOHTnpaIte n He npaBETe IPOIN3BOJHn N3MeHEHn NO PpOvKTA.
- Toba MoKe Da npEiN3BnKa ToKap Nm 3IOnOlyka OT KToKoY yIap.
-CbpykeTe cBeCc sebpn3a 3a npobepka, KaJIb6pnpaHe nIIN pEMoHT.

3a Da HamaJIne ToaCHOCTTa OT NOxKap IIN TOKOB yUap, He N3IaraiTe TOBa yCTPoICTBO Ha DJIbXd IIN BILA.
YctpoMCTBOTO He 6bMa da 6bIe I3naraHO Ha kanIKu N npBcKn H NkakBn PbHn C TeHNOCTPipeIMETn, BAsn Hapmep, He 6bMa da 6bDat NoCTABAHN Bbpxy Hero.

BHIMAHNE
3a BCaKaBn peMOHTH DeHocTn Ce 06pbUaIte KbM KBaINpHcIpaH cepBaIeN nepcoHaI. C cepB3HO Oc2NyKbaHe e Heo6XoIMMo, KOrato anaparTb e 6nIO nobpeDe NO HKAkBb HAuHIn, HAnPIMep NOBpeDe 3axpaHbua Ka6en IIN UenCeN, IN3KeNa THeOCH nIN nAadHn PpeMeTN b Anapara, anaparTb e 6nIN IN3IOJeHN HaDbKn IIN Bnara, He pa60Tu HopMaJIHo INI e 6nIN IN3pyCKaH.

N36BraIte aocTabaTe HEnoDBrJxHO N36bpaXeHne Ha ekpHa 3a dIbIbr nepIOO OT BpeM. OSeKHOBeHO TOBa e BInDEkAcTeTOPOHOTAOBHe HA Na3ya.AKOeNoJI3Ba bOPMAT HA KapTINHata 4:3, ToBa HEnoDBrJxHO N36bpaXeHne MoKe Da IpoDbJnxI da c OToEJIa3Ba Ha ekpHa.

ПОДГOTOBKA
OPRAHn 3A UYPABJIEHNE HA JIuceBna PAHEJ
Ioka3aHOTOMOKeJacepa3nUyabaOTBaunTeJeBn3Op.
Ako Bbpxy Baunu ypei nMa NoctaBeHo npedna3HO fOJIO,OTCTpaHete fOJNOTO u CneI TOBa n36bpwe Te ypea c Kbpna 3a NOUcTbaHe.
MODEJI N TEJIEBN3OPN C TEUHOKPNUCTAJEN DINCPJEN :
26/32/37/42LG30, 32/37/42/47/52LG50
MODEJI N TEJIEBN3OPN C TEYHOKPNC
TALEN DINGPIE:19/22LG30**

MOIDEJI N TEJIEBN3OPN C TEUHOKPNC
TALEN DINGPJIEN:19/22LS4D*

ПОДГOTOBKA
26/32/37LG30, 32/37/42LG50)

IocTaBeTe BnMaTeJHo TeJeBn3Opa C ekpaHa HaOny BbPxMy MeKa NOBbpxHOCT, 3a Da npEdJa3nTe ekpHa OT NOBpeJa.

MOnTpaIte Yactnte Ha HoceIaTa BnIka KbM OCHOBaTa Ha TeJIeBn3Opa.

IocTabete TeleBn3opa, KaKTo e noka3aHO.

3aTeHHeTe HaedKdNo 4-Te 6oJTa Ha rbp6a Ha TeJeBn3Opa B IpeDvIeHInTe OTbOpN.
MOHTAX HA CTOIKA
(MOДЕЛТЕЛEBИЗОПС TEЧHOKРИCTАЛЕн ДИСПЛЕй: 19/22LG30**)


IocTabeTe BnMaTeJIHo TeJeBn3Opa C ekpaHa HaIoJy Bbpxy MeKa NOBbpxHOCT, 3a da npedna3nte ekpapa O T NobpeJa.

IocTaBte TeIeBn3Opa, KaKTo e noka3aHo.

3aTeHHeTe HaJeXdNo 4-Te 6oJTa Ha rbp6a Ha TeJeBn3opa B npEbnIeHInTe OTbOpn.
ПОДГOTOBKA
MOHTAX HA CTOIKA
(camo 19/22LS4D*)
■ Noka3aHOTOMOKeIa ce pa3nUaBa OT Baunr TeJIeBn3Op.
1 NocTaBeTe BHNMaTeJIHo TeJIeBn3Opa C ekpaHa NaIOny BbPxy MeKa IOBbPxHOCT, 3a da IpeDna3Ite ekpaHa OT NOBpeDa.

XbaHete TJIATO Ha shapHnpa I rO orbHete Harope.
BkapaTe TAnTo Ha CToiKaTa B npOdyKta Do UpaKaBaHe.
(camo 26/32LG30, 32LG50)
TeneBn3OpbT Tp6Ba Da ce pa3noJaHa NoCTaBKa TaKa, Ye da He MoKe Da Ce TerIi B NocOka Hanpei/Ha3aI, KOeTO NotEHuaJIHo PruHnHbHa HApUbaHe IJIi NobPeHa Ha N3deJIneto. Da ce N3NoJ3Ba cAmO PnKauEHHr TBnHT.
1 PENEYPEXKDEHNE
3a Na npedotbpatnte nanahe Ha TeleBn3opa, ToT Tp6Ba Da 6bJe 3dpaBO 3akpeen KbM POna/CTeHaTa CnpoeYka3aHnraTa 3a MoNTaK. HauNaHHe, KlaTeHe nn IIOJIeEne Ha ypea MoKe Da npedn3BnKa HapaHBAHe.
Стень моHTаЖ:ХориоHTаЛноCTавянe
3a da ima do6po oxnaqdahe, octabete pa3ctoHne 10 cm mejdy BCa kCTpaHa u CTeHaTa. Ioppo6n yka3aHn 3a noCTaBHeTO MOKeTe Da nOlyuHTe OT BaIIM TbproBeU. BIXTe DOnbHInTeHOTO pKOBODCTBO "IOCTaBHe HAcTPOJa Ha NaKJHOHaTa KOH3OJa 3a CTeHem MoHTaX".

AKO HE ИЗПОЛ3ВATE HAC TOЛHATA CTОИKA
(Be3 19/22LS4D*)
Korato MoHTupaTe n3dEJIneTo Ha cTeHa, 3aTbPHeTe HAcTOJHaTa CToIka, 3a Da r IpeDnA3nTe.
ПОДГOTOBKA
3a da n36eHHeTe NOBpeHa Ha yCTpoiCTBaTa, He BKHIOuBaIte HnKaKBN 3axpaHbAun KaBeJIN, npEi Da CTe pNkHouNJn Cbbp3BaHTo Ha BCNUKN yCTPOiCTBa.
Cbbp3BaHe ha aHTeHa
- PerулираиTe nocokata Ha aHTeHata 3a Na-Добpo KaueCTBO Ha obpa3a.
- Antehen Ka6en n ppeo6pa3yBaTeJ He ca BkIHOyeHn B IOCTaBkata.

B 30H, B KOnTO CnHaJIbTe cIa6, 3a No-IO6po KaueCTBO Ha o6pa3a MOHTnpaIte aHTeHEn ycINBaTeJI KbM aHTeHaT, KaKTo e IOKa3aHO BdACHO.
Ako cnHaJIbT Tp6Ba Da 6bIe pa3dJeH MExdy DBA TeNeBn3Opa, 3a Cbbp3BaHe nOJI3BaIte aHTeHEn cIIInTeP.
ГледаHE HA TEJIEBN3Я /УпРавЛЕнE HA ПОТРAMITE
10 Q.VIEW (bIbp3 npereed)
Bpbuca KbM nporpaMaTa, KOaTO cTe rIeJaHn HeNoCpeDCTBeHO npei ToBa.
Посраваяне на застенье
OTbOpete KaNaka Ha rHe3I0To 3a 6aTePmN OT 3aHaTa CTpaHa.
IocTaBete DBe 6aTePn1,5V AAA,KaTo Cpa3BaTe NOJrPHoCTTa (+c + , - c - ) He cMeCBAite CTapn nn yNtpe6BaHn 6aTePn C HOBn TaKInBa.
3aTbOpTe KaNaka.
ГLEДАНЕ HA TEJIEBN3Я /УпРавЛЕнE HA ПОГРAMNTE
ВКЛЮУBAHE HA TEJIEBN3OPA
Korato TeIeBn3OpbT Bn e BKnIOueH, MoKeTe Da Ce Bb3NoJ3BaTe OT cyHKuInTE My.
1 Πьрв, CBьржete npabuHno Ka6eJa 3a eIeKtpo3axpaHbaHeto. BTO3n MOMENT TeJIeBn3OpbT npemHaBaВ peJIM Ha rOTOBHOCT
OT peKIM Ha roTOBHOCT, 3a da BkIIOUHTe TeJIeBn3Opa HATNCHETe 6yToH / I , INPUT nIIN P (nIIN PR ▲▼) Ha TEJIeBn3Opa, nIIN HATNCHETe 6yToH POWER(EJEKTPO3AXPAHBAHE), INPUT(BXOD), D/A, P (nIIN PR + -) nIIN cIcPobN 6yToHn(0~9) a dIcTaHcNoHHOTO, nTEJIeBn3OpBT ΜE CE BkIIOUH.
HnuaJn3npaHe HacTpoKata
Ако след, Вкlioочане на телевизора на ekрана с пожке OSD (On Screen Display, ekpanно Meню), можete на有很大 заи Teчпоги Стату Language (Eзик), Select Mode (Избор на ржим) (Само модени на телевизори с тунhoeкрисален дислес (LCD)), Country (Страна), Time Zone (Часова зona), Auto programme (Автоматуна有很大 заи На погами).
BENEXKKA
a. EkpaHHOTo MeHIO aBTOMaTHUHO Ie N3Ye3He OT ekpaHa cIeI OkOIO 40 cekyHn, aKO He 6bIe HaTUCHAT 6yToH.
6. Hanchete 6yToHa RETURN, 3a da Cmehnte TekyuToTo ekpaHNo MeHIO Ha npednHIO ekpaHHO MeHIO.
c. PeximbT "In Store" (Mara3nH) e npedha3Haueh 3a n3no3BaHe BvB BVtpnHa, a He e 3a o6ua yntpe6a. (Camo Moden Ha TeJebu3Opn C TeUHOKpncTaIeH DnCnJei (LCD))
d. 3a CTpaHnTe 6e3 NOTBbPdEHN CTAHdApTN 3a DTV n3NbUbaHe, HRAKoN DTV pYHKcIM MoKe I da He pa60rT, KOEtO 3aBnCn OT HaunHa Ha DTV n3NbUbaHe.
E3nk Ha ekpaHHOTO MeHIO/ N36Op Ha nbpXkaBa
Korato TeLeBn3OpbT Ce BkHOnu 3a IIpbBn IIbT, Ha ekpaHa Ce NOBRA Ba MeHOTo Ha p'koBOODCTBOTO 3a IHCTaJIIPAhe.

I36epete JeklaHnO T BAc e3NK.

I36epeTe BaWata CTpaHa.
* Ako peuHte da npomehnte n36opa Ha e3nK / nbpXkBa:
I36epete OPLNA.
I36epete E3nk ha MeHIOTo IIN CtpaHa.
I36epeTe XeJaanO T Bace3NK NnCtpaHa.
3aONmHeTe.
!BEJIEXKKA
Ako nHCTaJaunTa Ha Installation guide (PbKOBOcTBOTo 3a nHCTaJnpaHe) He 6bJe 3aBbpSeHa ype3 HATNCKaHe Ha 6byTOH EXIT nIN CNeI d IN3TuHa He BApeMeTo 3a IN3aKBAHe Ha ekpaHHn DaCJIe, To Ie Ce NOBBA BCEKn nT, KOraTO BKNIOHTe ypeDa.
Ako Cte n36paHn NOrpeuHNo CtpaHaT, TeJeTeKCTbT MoKe Da He Ce NOKa3Ba npabNHO Ha ekpaHa I NO Bpeme Ha pa6Ota C TeJeTeKCT MoKe Da CE NOHBt HrKOn PpO6JIeMn.
ΦyHKUraTiA CI (O6u, nHTeppeic) MoKe Da He e npJIOKmA 3aBnMCOT OT yCJIOBnTa Ha n3JIbYBaHe B CTPaHaTa.
ByToHInTe 3a ynpabNeHHe Ha peKIM DTV MoKe Da He pa6OTB 3aBnCmOcT OT ycJIOBnTa Ha n3JIbUbaHe B CTpaHaTa.
B cTpaHn, B KOnTo He ca npneTu pa3npope6n 3a UcΦpOBO n3JIbYBaHe, HraKoN DTV cyHKuM OMe Da He pa60rT B 3aBNCIMOC T OT KOHKpeTHnte YcNoBn Ha UcΦpOBO To n3JIbYBaHe.
XOpH3OHTaJIH INI BepTnKaJIHIN IBNlU, INI TpENTHe Ha KapTHata
IpoBepTe DaJIH Na6JIH3O IMa CMyUaBaUu yCTpOJcTBA - eJIeKTpOpyeI, 6OpMaUHH N IpyrN POnObHn IHCTpyMeHTN.
KaptnHaTa e do6pe, HO HAma 3ByK
HaTnchTe 6yToHa VOLUME.
Ja He u3KJIIOueH 3ByKbT? HaTnCHete 6yToH MUTE.
OnntaTe npyr kaHaJI. PpObJeMbT MoKe Ja e B n3IbYBaHTo.
IpaBnHNo IIn ca nocTaBeHn ayDnOka6eIte?
HacptoTe Balance (BaJiaHc) B MeHIOTo.
Пюмяна В OKолнata Влжноct Или Temпература може за довец ДО HeobиuaehшуM, KORATO npodukta 6bde BKluoyeh Или n3Kluoyeh, HO TOBa He O3Haayaba NOBpeHa Na npodukta.
Terno
| MOДЕЛN | 19LS4D* | 22LS4D* | 19LG30** | |
| 19LS4D-ZC | 22LS4D-ZC | 19LG3000-ZA | ||
| Терло | Сыс StОйka w6e3 StОйka | 5,1 kg / 11,3 Фунта 4,6 kg / 10,2 Фунта | 6,1 kg / 13,5 Фунта 5,7 kg / 12,6 Фунта | 5,1 kg / 11,3 Фунта 4,6 kg / 10,2 Фунта |
| MOДЕЛN | 22LG30** | 26LG30** | 32LG30** | |
| 22LG3000-ZA | 26LG3000-ZA | 32LG3000-ZA | ||
| Терло | Сыс StОйka w6e3 StОйka | 5,6 kg / 12,4 Фунта 5,35 kg / 11,8 Фунта | 9,4 kg / 20,8 Фунта 7,7 kg / 17,0 Фунта | 13,2 kg / 29,1 Фунта 11,5 kg / 25,4 Фунта |
| MOДЕЛN | 37LG30** | 42LG30** | 32LG50** | |
| 37LG3000-ZA | 42LG3000-ZA | 32LG5000-ZA 32LG5010-ZD 32LG5020-ZB 32LG5030-ZE | ||
| Терло | Сыс StОйka w6e3 StОйka | 18,8 kg / 41,5 Фунта 16,2 kg / 35,7 Фунта | 23,5 kg / 51,9 Фунта 20,0 kg / 44,1 Фунта | 14,1 kg / 31,1 Фунта 12,6 kg / 27,8 Фунта |
| MOДЕЛN | 37LG50** | 42LG50** | 47LG50** | |
| 37LG5000-ZA 37LG5010-ZD 37LG5020-ZB 37LG5030-ZE | 42LG5000-ZA 42LG5010-ZD 42LG5020-ZB 42LG5030-ZE | 47LG5000-ZA 47LG5010-ZD 47LG5020-ZB 47LG5030-ZE | ||
| Терло | Сыс StОйka w6e3 StОйka | 18,3 kg / 40,4 Фунта 15,6 kg / 34,4 Фунта | 26,2 kg / 57,8 Фунта 23,5 kg / 51,8 Фунта | 29,2 kg / 64,4 Фунта 24,6 kg / 54,3 Фунта |
Ioka3aHaTa no-rope cneuФkauaMоKe da 6bde npomeHa 6e3 npedn3BeCTne C ceI NOBnBaHc KaueCTBOTo.
LG Electronics Inc.
LCD-TV BRUKSANVISNING
LCD-TV, MODELLER
19LS4D 42LG30
22LS4D 32LG50
19LG30 37LG50
22LG30 42LG50
26LG30 47LG50
32LG30 52LG50
37LG30
26/32/37/42LG30, 32/37/42/47/52LG50
LCD-TV, Modeller : 19/22LG30**
LCD-TV, Modeller : 19/22LS4D*
FÖRBEREDELS
INFORMATION PÅ BAKSIDAN
(LCD-TV, Modeller: 26/32/37LG30, 32/37/42LG50)
19/22/26/32/37/42LG30**
32/37/42/47/52LG50**

LCD-TV, Modeller : 19/22LS4D*

BORDSSTATIVET (Utom 19/22LS4D*)
26/32/37/42LG30, 32/37/42/47/52LG50
LCD-TV Modeller : 19/22LG30**
LCD-TV Modeller : 19/22LS4D*
FORBERDELSER
INFORMASJON OM BAKPANELET
3 OPTICAL DIGITAL AUDIO OUT (OPTISK DIGITAL LYD UT) (Bortsett fra 19/22LS4D*)
(LCD-TV Modeller : 26/32/37LG30, 32/37/42LG50)
LCD-TV modeller : 19/22/26/32/37/42LG30 32/37/42/47/52LG50
Koble til kablene etter behov. Hvis du vil koble til ekstra utstyr, se avsnittet om eksternt utstyr.
SE PÅ TV / PROGRAMSTYRING
TASTEFUNKSJONER PÅ FJERNKONTROLLEN
Fjernkontrollen rettes mot fjernkontrollsensoren på TV-en.
or
1 MODE
Velger bruksmodi for fjernkontrollen.
Q.MENU
Velg oneself hurtigmenykilde.
3 MENU
Slár lyden på eller av.
Gár tilbake til TV-modus fra hvilken som helst meny.
4 VOLUME + /-
Jesterer volumet.
5 POWER
Slár apparatet på fra standby-modus eller av til standby-modus.
6 INPUT
Ekstern inngang-modus byttes etter fastrekefolge.
SE PÀ TV / PROGRAMSTYRING
SLÅ PÅ TV-EN
SE PÅ TV / PROGRAMSTYRING
AUTOMATISK KANALSØKING OG LAGRING
Brukdentilafinneoglagreallekanalerautomatisch.
Kjør Aut. innstilling.
26/32/37/42LG30, 32/37/42/47/52LG50
LCD-TV MODELLER : 19/22LG30**


LCD-TV MODELLER : 19/22LS4D*
KLARGØRING
BAGPANELET
(LCD-TV MODELLER: 26/32/37LG30, 32/37/42LG50)
SE TV/PROGRAMSTYRING
FJERNBETJENINGSKNAPPERNES FUNKTION
SE TV/PROGRAMSTYRING
TÄENDE TV'ET
SE TV/PROGRAMSTYRING
AUTOMATISK PROGRAMINDSTALLING
Brugdenne indstillingtilatfindeog gemmealleprogrammerne.
Abn "My computer" → abn "LG" → abn filen "index.htm".
APPENDIKS
FEJLFINDING
26/32/37/42LG30, 32/37/42/47/52LG50
LCD-TELEVISIONALLIT: 19/22LG30**
LCD-TELEVISIONALLIT: 19/22LS4D*
VALMISTELU
TAKAPANEELIN TIEDOT
(LCD-TELEVISIONALLIT: 26/32/37LG30, 32/37/42LG50)
19/22/26/32/37/42LG30**
32/37/42/47/52LG50**

KAUKOSÄÄTIMEN NÄPPÄINTOIMINNOT
19/22/26/32/37/42LG30**
32/37/42/47/52LG50**
Avage "My computer" -> avage "LG" -> avage"index.htm" fail.
LISA
TörKEOTSING
26/32/37/42LG30, 32/37/42/47/52LG50
SKYSTUJKRISTALTELEVIZORI
MODELIAI : 19/22LG30**
SKYSTUJKRISTALTELEVIZORI
MODELIAI : 19/22LS4D*
Jungimo / budèjimo indicatorius
26/32/37LG30, 32/37/42LG50)
SUMONTUOKITE ATIDžIAI, KAD GAMINYS NEAPVIRSTU.
LCD TV modeli: 26/32/37/42LG30, 32/37/42/47/52LG50
LCD TV modeli : 19/22LG30**
POWER (BARO SANA)
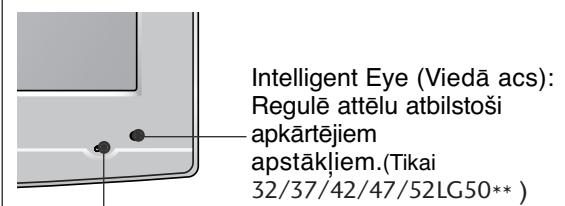
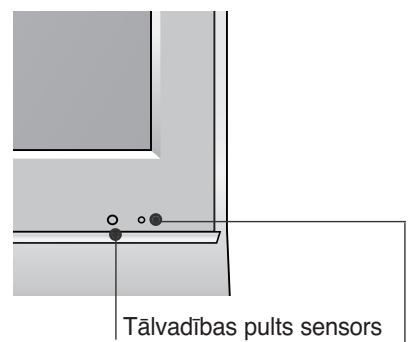
Talvadibas pults sensors
Barošanas/nodroses režima indicators
Piezime: lespejams regulet Power
LCD TV modeli : 19/22LS4D*
Barosanas/nodroses rezima indicators
- nodroses režimā deg sarkana krāsa.
- kad displejs ir ieslegt, deg zağa gaisma.
SAGATAVOSANAS
AIZMUGUREJAPANELA INFORMACIJA
Redzamais attels var atskirties no jusu televizora.
Kontaktligzda barošanas vada pieslēgšanai Šos TV modelus darbina mainstrāva. Spriegums ir norādīts specifikáciju lapā. Nedarbiniet TV ar lidzstrāvu.
RGB/DVI audio ieeja Pievienojiet audio no PC vai DTV.
3 OPTISKÁ DIGITÁLÁ AUDIO IZVADE (Paredzëts tikai 19/22LS4D*) lauj savienot digitálo audio no dažădu tipu apríkojumiem. Piezime: Nodroses režimă šīs ligzdas nestrād
Ligzda Euro Scart (AV1/AV2) Sim ligzdām pievienojiet Scart ligzdas ieeju vai izeju no ārejas ierices.
HDMI ieeja
HDMI signalu pievienojiet HDMI IN ieejai.Vai DVI (VIDEO) signalu pievienojiet HDMI/DVI portam, izmantojot DVI-HDMI kabeli.
RGB ieeja Pievienojiet izvadi no PC.
RS-232C ieejas (CONTROL&SERVICE) (VADIBA&APKOPE) ports RS-232C ligzdai pievienojiet vadibas iericu serialo portu.
Component (Kombinētais signās) ieeja Šīm ligzdām pievienojiet kombinētā signāla video/ audio ierīci.
Antenna Input Pievienojiet sim spraudnim RF antenu.
10 PCMCIA (Personalā datora atminas karšu starptautiskā asociacija) kartes ligzda. (Kai kuriose šalyse nebus galima išrinkti teleteksto funkcijos.)
Audio/Video ieeja (Paredzets tikai 19/22LS4D)
Šim ligzdām pievienojiet audio/video izeju no ārejas ierices.
S-Video ieeja
Pievienojiet S-Video izeju no S-VIDEO ierices
Austinu ligzda (Paredzets tikai 19/22LS4D) Pievienojiet austinu kontaktspraudni atbilstošaja austinu ligzdae.
⑥ TIKAI SERVISAM PAREDZETA PIESLEGVIETA
PAMATNES PIESTIPRINÅŠANA
(LCD TV modeli : 26/32/37LG30, 32/37/42LG50)
Uzmanigi novietojiet televizora ekrana pusi uz polsteretas virsmas, lai nepiejautu ekrana bojajumus.

LCD TV modeli : 19/22/26/32/37/42LG30 32/37/42/47/52LG50
1 Pievienojiet kabelus pec vajadzibas. Papildu aparaturas pievienosanu skatit sadaÅ Arejas aparaturas iestatisana.
2 Atveriet KABELU TURETAJA SKAVU kā paradits attelā un iznemiet kabelus.
LCD TV modeli :19/22LS4D*
Pievienojiet kabelus pec vajadzibas. Papildu aparaturas pievienošanu skatit sadala ARejas aparaturas iestatišana.
26/32/37/42LG30**, 32/37/42/47/52LG50**
LCD TELEVIZIJSKI MODELI : 19/22LG30**
LCD TELEVIZIJSKI MODELI : 19/22LS4D*
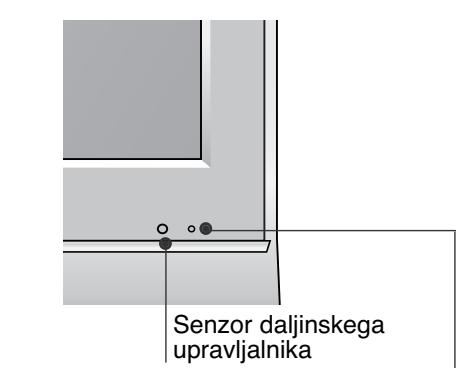
Kazalec vklopa/v stanju pripravljenosti
(LCD TELEVIZIJSKI MODELI:26/32/37LG30,32/37/42LG50)

LCD TELEVIZIJSKI MODELI : 19/22/26/32/37/42LG30 32/37/42/47/52LG50
Uredite kable.
- Pagination sheet
- LCD TV OWNER'S MANUAL
- CONNECTING YOUR UNIT
- SAFETY INSTRUCTIONS
- Precaution in Installing the Product
- WARNING
- CAUTION
- Electrical Power Related Precautions
- Precautions in Moving the Product
- Precautions in Using the Product
- PREPARATION
- FRONT PANEL CONTROLS
- BACK PANEL INFORMATION
- STAND INSTALLATION
- STAND INSTALLATION (LCD TV Models: 19/22LG30**)
- HS17DN3
- (Only 19/22LS4D*)
- DETACHING STAND
- BACK COVER FOR WIRE ARRANGEMENT
- LCD TV Models : 19/22LS4D*
- How to remove the cable management clip (LCD TV Models : 19/22LS4D*)
- NOTE
- PLEASE SET IT UP CAREFULLY SO THE PRODUCT DOES NOT FALL OVER.
- EARTHING
- DESKTOP PEDESTAL INSTALLATION
- Attaching the TV to a desk (Only 26/32LG30**, 32LG50**)
- WALL MOUNT: HORIZONTAL INSTALLATION
- Not using the desk-type stand (Except for 19/22LS4D*)
- ANTENNA CONNECTION
- WATCHING TV /PROGRAMME CONTROL
- REMOTE CONTROL KEY FUNCTIONS
- Installing Batteries
- TURNOING ON THE TV
- Initializing setup
- Note:
- ON-SCREEN MENU LANGUAGE / COUNTRY SELECTION
- ON SCREEN MENUS SELECTION AND ADJUSTMENT
- AUTO PROGRAMME TUNING
- APPENDIX
- MAINTENANCE
- Cleaning the Screen
- Cleaning the Cabinet
- Extended Absence
- TO VIEW THE USER'S GUIDE ON THE CD-ROM
- TROUBLESHOOTING
- LG Electronics Inc.
- VORBEREITUNG
- LCD TV-MODELLE : 19/22LS4D*
- INSTALLATION DU SOCLE (MODELES DE TV LCD: 19/22LG30**)
- POWER
- (Apenas no 19/22LS4D*)
- VOORBEREIDING
- INFORMATIE ACHTERZIJDE
- ПОНTOIMА经
- Aφaipεση βασης
- ПОБAPTHESH THS THAEOPAHSE E PAPEIO
- ΠΡΕΤΟΙΜΑΣΙA
- Σύνδεση Κεραιας
- LCD TV-TIPUSOK : 19/22LS4D*
- MODELE TELEWIZORÓW LCD: 19/22LS4D*
- PřÍPRAVA
- INFORMACE O ZADNÍM PANELU
- (len pre 19/22LS4D*)
- Modely LCD TV : 19/22LS4D*
- VYTIAHUTIE VEDENIA KÁBLA (Modely LCD TV : 19/22LS4D*)
- POZNÁMKA
- PRIPRAVA
- TELEVÍZOR UMIESTNITE BEZPEČNE, ABY SA NEPREVRÁTIL.
- ПредпаЗн Меркп NO OTHошенье на щелекtpo3axpaHbaHeto
- ! PPEyPExJdeHMe
- BHIMAHNE
- ПОДГOTOBKA
- OPRAHn 3A UYPABJIEHNE HA JIuceBna PAHEJ
- MOHTAX HA CTOIKA
- (MOДЕЛТЕЛEBИЗОПС TEЧHOKРИCTАЛЕн ДИСПЛЕй: 19/22LG30**)
- (camo 19/22LS4D*)
- PENEYPEXKDEHNE
- Стень моHTаЖ:ХориоHTаЛноCTавянe
- AKO HE ИЗПОЛ3ВATE HAC TOЛHATA CTОИKA
- Cbbp3BaHe ha aHTeHa
- ГледаHE HA TEJIEBN3Я /УпРавЛЕнE HA ПОТРAMITE
- Q.VIEW (bIbp3 npereed)
- Посраваяне на застенье
- ГLEДАНЕ HA TEJIEBN3Я /УпРавЛЕнE HA ПОГРAMNTE
- ВКЛЮУBAHE HA TEJIEBN3OPA
- HnuaJn3npaHe HacTpoKata
- BENEXKKA
- E3nk Ha ekpaHHOTO MeHIO/ N36Op Ha nbpXkaBa
- !BEJIEXKKA
- LCD-TV BRUKSANVISNING
- FÖRBEREDELS
- INFORMATION PÅ BAKSIDAN
- LCD-TV, Modeller : 19/22LS4D*
- FORBERDELSER
- INFORMASJON OM BAKPANELET
- SE PÅ TV / PROGRAMSTYRING
- TASTEFUNKSJONER PÅ FJERNKONTROLLEN
- SE PÀ TV / PROGRAMSTYRING
- SLÅ PÅ TV-EN
- AUTOMATISK KANALSØKING OG LAGRING
- KLARGØRING
- BAGPANELET
- SE TV/PROGRAMSTYRING
- FJERNBETJENINGSKNAPPERNES FUNKTION
- TÄENDE TV'ET
- AUTOMATISK PROGRAMINDSTALLING
- APPENDIKS
- FEJLFINDING
- VALMISTELU
- TAKAPANEELIN TIEDOT
- KAUKOSÄÄTIMEN NÄPPÄINTOIMINNOT
- LISA
- TörKEOTSING
- SKYSTUJKRISTALTELEVIZORI
- SUMONTUOKITE ATIDžIAI, KAD GAMINYS NEAPVIRSTU.
- SAGATAVOSANAS
- AIZMUGUREJAPANELA INFORMACIJA
- PAMATNES PIESTIPRINÅŠANA
- 26/32/37/42LG30**, 32/37/42/47/52LG50**
- LCD TELEVIZIJSKI MODELI : 19/22LG30**
- LCD TELEVIZIJSKI MODELI : 19/22LS4D*
Brand : LG
Model : 422000
Category : Television