
FC 40-255 - Grass trimmer ATIKA - Free user manual and instructions
Find the device manual for free FC 40-255 ATIKA in PDF.

| Product type | Grass trimmer / Brush cutter / Edger |
| Brand | ATIKA |
| Model | FC 40-255 |
| Cutting diameter (blade) | 255 mm |
| Cutting diameter (line) | 330 / 380 mm |
| Line diameter | 2.5 mm |
| Line length | Approx. 170 mm |
| Blade thickness | 2.8 mm |
| Weight (without battery) | ≈ 3.6 kg (brush cutter) / 3.5 kg (edger) |
| Power supply | Li-ion battery 36 V (max 40 V) – battery not included |
| Compatible batteries | AP 40-2000 (2000 mAh) or AP 40-4000 (4000 mAh) |
| Compatible charger | ALG 40-1800 (not included) |
| Cutting tool speed | 6500 rpm (idle/max) |
| Sound pressure level | 82 dB(A) (K=3 dB(A)) |
| Guaranteed sound power level | 96 dB(A) |
| Hand-arm vibration | < 2.0 m/s² (K=1.5 m/s²) |
| Functions | Brush cutting, edging, grass cutting |
| Operating modes | Normal and energy-saving |
| Safety equipment | Start lock, protective cover, quick-release strap, transport protection |
| Maintenance | Cleaning after use, sharpening or replacing blade, replacing cutting line |
| Spare parts | Original parts available (blade, line, covers, handles, etc.) |
| Repairability | Repairs by manufacturer's after-sales service or approved workshop |
| Warranty | Manufacturer's warranty – duration according to enclosed statement |
| Storage | Dry, closed, frost-free place, out of reach of children |
| Minimum age of use | 16 years |
Frequently Asked Questions - FC 40-255 ATIKA
User questions about FC 40-255 ATIKA
0 question about this device. Answer the ones you know or ask your own.
Ask a new question about this device
Download the instructions for your Grass trimmer in PDF format for free! Find your manual FC 40-255 - ATIKA and take your electronic device back in hand. On this page are published all the documents necessary for the use of your device. FC 40-255 by ATIKA.
USER MANUAL FC 40-255 ATIKA
Original instructions – Safety instructions – Spare parts
natural_image
Product photo of a power tool with attached blade and wire, no visible text or symbols on the main subject.
① Keep the operating instructions in a safe place for future use.
i Pass the operating instructions on to all persons who work with the machine.

You may not start to operate the machine until you have read these original instructions, observed all the instructions given and installed the machine as described!

This machine must not be operated / used by children, persons with restricted physical, sensory or mental abilities or a lack of experience and/or know-how or by persons who are not familiar with the instructions.

The unit and the charger must not be operated by children or young people under 16 years of age.
National and local regulations may determine a different age restriction for the user.

Keep children away from the battery since they cannot estimate the hazards of the battery.
Contents
| Extent of delivery | 16 |
| EC Declaration of Conformity | 17 |
| Operating times | 17 |
| Symbols operating manual | 17 |
| Symbols | 17 |
| Normal intended use | 18 |
| Residual risks | 18 |
| Vibrations (Hand- Arm Vibrations) | 18 |
| Safety instructions | 19 |
| Description of device / spare parts | 21 |
| Assembly | 21 |
| Before starting up | 21 |
| Start-up | 22 |
| Working with the device | 22 |
| Maintenance and cleaning | 24 |
| Transport | 24 |
| Storage | 25 |
| Possible faults | 25 |
| Technical specifications | 26 |
| Disposal | 27 |
| Guarantee | 27 |
Extent of delivery
After unpacking, check the contents of the box for
▶ completeness
▶ possible transport damage.
Report any damage or missing items to your dealer or the manufacturer immediately. Complaints made at a later date will not be acknowledged.


1 1x tube shaft upper part
2 1x tube shaft lower part
3 1x cutting blade guard
4 1x guard extension for dual trimming thread
5 1x guide handle upper part
6 1x guide handle lower part
7 1x Carrying strap
8 1x thread head
9 10x cutting threads
10 1x cutting blade with transport guard
11 1x Rubber sleeve
12 1x Cover
13 1x Protective cover
14 1x Spacer washer
15 1x Fixing nut
16 1x Installation wrench
17 1x angle key
18 4x screw (Torx) M5x35
19 3x screw (Philips) M5x12
20 4x screw (Torx) M4x15
22 1x original operating instruction manual
23 1x assembly and operating instruction sheet
24 1x Warranty declaration


The following parts are not included in the scope of delivery. These accessories are available from your dealer or manufacturer:
28 Charger ALG 40-1800 (order no.: 365500)
29 Battery AP 40-2000 (order no.: 365501)
Or:
30 Battery AP 40-4000 (order no.: 365503)
EC Declaration of Conformity
No. (S-No.): 25477
according to EC directive: 2006/42 EC
We,
ATIKA GmbH
Josef-Drexler-Str. 8 – 89331 Burgau – Germany
herewith declare under our sole responsibility that the product
Freischneider / Grastrimmer (Brushcutter / grass trimmer) FC 40-255
Serial number: 000001 - 020000
is conform with the above mentioned EC directive as well as with the provisions of the guidelines below:
2014/30/EU, 2000/14/EC+2005/88/EC and 2011/65/EU
Following harmonized standards have been applied:
EN 60335-1:2012+A11:2014; EN 50636-2-91:2014;
EN ISO 11806-1:2011
EN 55014-1:2006+A1:2009+A2:2011; EN 55014-2:2015
Brushcutter
Conformity assessment procedures
2000/14/EC Appendix V and 2005/88/EC:
measured sound power level L_WA 93.4 dB (A)
guaranteed sound power level L_WA 96 dB (A)
Grass trimmer
Conformity assessment procedures
2000/14/EC - Appendix VI and 2005/88/EC:
measured sound power level L_WA 93.4 dB (A)
guaranteed sound power level L_WA 96 dB (A)
Duly authorised person for the compilation of technical documents:
ATIKA GmbH – Technical department
Josef-Drexler-Str. 8 – 89331 Burgau – Germany

Burgau, 04.07.2018
Engineering design management
Operating times
Please adhere to the regional regulations.
Information on how to avoid noise:
Some noise exposure from this machine is unavoidable. Schedule noisy work to times during which it is allowed. Respect all rest times and restrict the work duration to the minimum. You as the operator and bystanders should wear a suited hearing protection.
Symbols operating manual

Potential hazard or hazardous situation. Failure to observe these instructions may lead to injuries or cause damage to property.

Important information on proper handling. Failure to observe these instructions may lead to malfunction.

User information. This information helps you to use all the functions optimally.

Assembly, operation and servicing. Here you are explained exactly what to do.

Please refer to the attached assembly and operating instruction sheet for references to figure numbers in the text.
Symbols
Memorise the meaning to be able to operate the device more safely and to protect yourself and other from possible injuries.
Refer to the respective "Operating instructions" for the meaning of the "Symbols" of the batteries and the charger.

Warning! The brushcutter / grass trimmer may cause serious injury.
Carefully read the operating manual and the safety instructions before starting the machine and observe the instructions when operating.
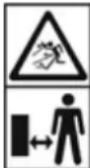
Danger – objects may be thrown out at high speed when motor is running.
Keep people, pets and domestic animals out of the danger area.
i.A.
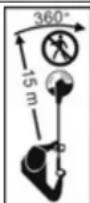
Keep children, bystanders and animals at a distance from your working area. Safety distance at least 15 m.

Pull out the battery
⇒ before starting any work (cleaning, maintenance, repair, etc.) on the device.
⇒ when interrupting work, during transport and storage.

Risk by kickback!

Make sure that the cutting head cannot contact any foreign objects during starting and operation

Risk of injury at feet by contact with the cutting tool at a no-covered area.

Wear hard hat if there is a risk of falling parts.
Wear eye and ear protection

Wear protective gloves.

Wear safety shoes.

Do not expose to rain. Protect against humidity.

Do not use saw blades.

Idle speed / max. speed of the cutting tool 6500 rpm
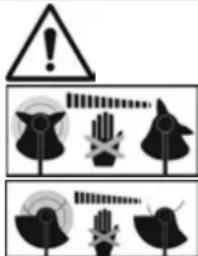
Attention! The cutting tool continues to rotate for a few seconds after the unit is switched off. Keep hands and feet at a safe distance from the cutting tool and wait until it has come to a standstill.

Rotational direction of the cutting tool

Device in normal mode
Device in economy mode

This product complies with European regulations specifically applicable to it.

Electrical devices do not go into the domestic rubbish.
Give devices, accessories and packaging to an ecofriendly recycling.
According to the European Directive 2012/19/EU on electrical and electronic scrap, electrical devices that are no longer serviceable must be separately collected and brought to a facility for an environmentally compatible recycling.
Normal intended use
- The brushcutter is suitable for thinning out and removing tall grass, weeds and undergrowth in private home and hobby gardens.
- This grass trimmer is designed for cutting grass and similar soft vegetation and for trimming lawn edges in private and hobby garden areas which are not accessible with a lawnmower.
- The brushcutter / grass trimmer must not be used
- for cutting and shredding hedges, shrubs, bushes, flowers and in the sense of compost.
– for levelling ground elevations, e.g. Molehills.
Otherwise, there is a risk of injury.
- Equipment that is not used in public areas, parks, sports facilities as well as in agriculture and forestry is regarded as brushcutters/ grass trimmers for private home gardens and hobby gardens.
- This machine must not be used in an explosive environment or exposed to rain.
- The intended usage also includes compliance with the operating, servicing and repair conditions prescribed by the manufacturer and following the safety instructions included in the instructions.
- The relevant accident prevention regulations for the operation as well as the other generally acknowledged occupational medicine and safety rules must be complied with.
- Any other use is deemed not to be use as prescribed. The manufacturer is not liable for any type of damage resulting from this: the user bears the sole risk.
- Unauthorised modifications on the device exclude a liability of the manufacturer for damages of any kind resulting from it.
- Only persons who are familiarised with the device and informed about possible risks are allowed to prepare, operate and service this device. Repair works may only be carried out by us or by a customer service agent nominated by us.
Residual risks
Even if used properly, residual risks can exist even if the relevant safety regulations are complied with due to the design determined by the intended purpose.
Residual risks can be minimised if the “Safety advices” and the “Intended usage” as well as the whole of the operating instructions are observed.
Observing these instructions, and taking proper care, will reduce the risk of personal injury or damage to the equipment.
- Risk of injuries of fingers and hands by contact with the rotating cutting tool.
- Risk of injury at feet by contact with the cutting tool at a no-covered area.
■ Risk of injury from stones and earth flung away. - Impairment of hearing when working on the machine for longer periods of time without ear protection.
■ Eye injury when failing to wear safety goggles or visor.
Electric shock.
■ Touching live parts of opened electrical components.
Risk of fire
■ Health impairment resulting from exposure to hand arm vibration if the machine is used too long or is not properly guided and maintained. - Warning! This device generates an electromagnetic field during operation. Such a field may affect active or passive medical implants under certain circumstances. To reduce the risk of serious injuries we recommend persons who carry medical implants to consult their doctor and the manufacturer of the medical implant before operating this device.
In addition, in spite of all the precautionary measures taken, non-obvious residual risks can still exist.
Vibrations (hand arm vibrations)
Hand arm vibration ah <2,0 m/s²
Measuring uncertainty K = 1,5 m/s ^4
The indicated vibration emission level has been measured according to a standardised test method and can be used to compare power tools.
It can also be used for an initial estimate of the vibration exposure.

The actual vibration emission level during the use of machine may differ from that indicated in the operating ructions or indicated by the manufacturer.
This may be caused by the following factors to be minded before and during the use
— Proper use of the machine
— Correct cutting or machining of material
— Proper condition of the machine for use
— Use of the correct and sharp cutting tool
- Handles and optional anti-vibration handles properly mounted on the machine body
When you feel uncomfortable or notice discoloration of skin on your hands during the use of the machine, stop working immediately. Observe sufficient break times to rest. Failure to have sufficient break times may result in a hand-arm vibration syndrome.
The extent of exposure depending on the type of work or machine use should be estimated and appropriate breaks taken. In this way, the extent of exposure can be considerably reduced over the entire work time. Minimise the risk caused by vibrations. Maintain this machine according to the instructions in the manual. If you intend to use this machine frequently, contact your local authorised dealer and purchase anti-vibration accessories if required. Avoid the use of this machine at temperatures under 10^ C. Create a work schedule in order to minimise vibration exposure.
Safety instructions

Observe the following advices in order to protect yourself and other persons against possible injuries.
Before starting this device, read and keep to the following advice. Also observe the preventive regulations of your professional association and the safety provisions applicable in the respective country, in order to protect yourself and others from possible injury.
National regulations can restrict the use of this machine.
i Pass the safety instructions on to all persons who work with the machine.
① Keep these safety instructions in a safe place.
- Familiarise yourself with the unit, the adjustment elements and the proper use of the unit before using it by referring to the original operating instructions.
- Do not use the machine for unsuitable purposes (see 'Normal intended use').
- Be attentive. Be careful what you do. Behave sensibly when working. Do not use a power tool while you are tired or under the influence of drugs, alcohol or medication. A moment of inattention while operating power tools may result in serious personal injury.
- The operator is responsible for accidents or risks which occur to other persons or their properties.
Personal protective equipment
- Always wear suitable work clothing when operating the machine:
— no loosely fitting clothing or jewellery, they could be caught by movable parts - no loose clothing or such with hanging bands or drawstrings
— Hainet in case of long hair - Approved helmet in situations where head injury has to be expected
— Eye and ear protection
— Cut-proof trousers and gloves - Anti-slipping cut-proof boots (safety shoes) with steel-toes
Safety instructions – before working
Carry out the following checks before the initiation and regularly during the working process. Observe the relevant sections in the operating instruction manual:
• Is the device assembled completely and properly?
• Is the device in good and safe condition?
Never use the device with a damaged cover or protective device or without a cover or protective device.
• Are the handles clean and dry?
- Check the machine for loose fasteners and damaged parts such as cracks in the tool.
• Before starting your work make sure that:
- no other persons, children or animals stay within the working area,
— youcan always step back without any barriers, - you standing area is free from foreign objects, brushwood and branches,
— you have always a secure standing position.
- Is workplace free of risks to stumble? Keep your workplace in an orderly condition! Untidiness can result in accidents - risk of stumbling!
- Before trimming, remove all foreign objects (e.g. stones, branches, wires, etc.). While working watch out for further foreign objects.
• Take environmental influences into consideration:
- Do not work under inadequate lighting conditions (e.g. during fog or dusk) but only in daylight or good artificial lighting. Otherwise, you will no longer be able to see details within the falling area – risk of accident!
- Do not work in bad weather conditions (e.g. rain, risk of lightning, snow flurry).
- Do not use this machine near inflammable liquids or gases - risk of fire!
Safety instructions – operating
- Never work with only one hand. Firmly hold the machine with both hands when working.
- Never work
– with stretched arms
— on hardly accessible places
— above shoulder height
— standing on a ladder, a staging or a tree.
• Always work on nonskid and flat ground.
- Avoid abnormal posture. Provide a safe standing position and keep at any time the balance.
- When working on slopes always make sure to have a safe standing position.
- Only operate the machine at walking speed, never run with it.
- Change your working posture from time to time.
- To have a break stop the machine and place it so that nobody is at risk. Secure the device against unauthorized access.
Safety instructions – while working
- Never work alone. Keep acoustic and visual contact to other persons at all times to allow immediate first aid in emergency cases.
- Wear eye protection and solid shoes the whole time you are using the machine.
- Immediately stop the engine at imminent danger or in emergency cases.
- Never leave the device running unattended.
- Immediately stop working when you feel unwell (e.g. headache, dizziness, nausea, etc.). Otherwise there is an increased risk of accidents.
- Make sure that the cutting tool is free before starting the engine.
- Before starting the engine, make sure that your hands and feet are kept at a safe distance to the cutting tool.
- Caution! The cutting tool may after-run. Do not try to slow down it by the hand.
- Start cutting only when the cutting tool has reached the full rotational speed.
- Do not overload the machine! You work better and safer in the given performance range.
- Take breaks when working so that the motor/battery can cool down.
- Do not place a hot machine in dry grass or onto inflammable objects.
- Never bring the cutting tool in contact with rigid objects (stones, trunks).
General safety instructions
- Switch off the device and pull out the battery when:
- the cutting tool comes in contact with stones, nails or other foreign objects, to check the device for damages
- Carrying out repair work.
— Performing maintenance and cleaning work.
– Removing malfunctions and blockages
— Check if the unit starts to vibrate excessively -
Transporting or storing
– Replacing the cutting tool
— Leaving of machine (also for short-term interruption) -
Do not touch dangerous moving parts before the battery has been pulled out of the device and such moving parts have come to a standstill.
- Maintain the machine carefully:
– Follow the maintenance instructions and the instructions for tool exchange.
- Keep handles dry and free of oil, resin and grease.
• Always keep the machine including tool in a good condition.
- Make sure to check the machine before any use and after dropping or other impacts to ensure that it is in a proper condition.
- Check the machine for possible damage:
- Before further use of the machine the safety devices must be checked carefully for their proper and intended function. Only operate the device with complete and correctly attached safety equipment and do not alter anything on the device that could impair its safety.
- Check whether movable parts function perfectly and do not stick or whether parts are damaged. All parts must be correctly installed and fulfil all conditions to ensure perfect operation.
- Damaged safety devices and parts must be properly repaired or exchanged by a recognized, specialist workshop; insofar as nothing else is stated in the instructions for use.
— Damaged or illegible safety labels have to be replaced.
- Do not allow any tool key to be plugged in!
Before switching on, checking always that all tools are removed.
- Store unused equipment in a dry, locked place out of the reach of children.
- Note that a failure to maintain the unit properly, any use of non-conform spare parts or a removal / modification of safety devices can result in damages to the machine and to serious injuries of the person who works with it.
Do not carry out repair operations on the machine other than those described in section "Maintenance and cleaning" but contact the manufacturer or authorized customer service centres.
Use only original spare parts and accessories parts. Accidents can arise for the user through the use of other spare parts. The manufacturer is not liable for any damage or injury resulting from such action.
① Refer to the respective “Operating instructions” for notes on the “Safety” of the battery and the charger.
Behaviour in an emergency situation
- Initiate all required first aid measures suited for the injury and seek qualified medical advice as quick as possible.
- Protect the injured person against further injuries and immobilise the injured person.
Description of device / spare parts

| Pos. | Designation: | Order number |
| 1 | Tube shaft upper part | ✕ |
| 2 | Tube shaft lower part | ✕ |
| 3 | Cutting blade guard | 385939 |
| 4 | Guard extension for dual trimming thread | 385938 |
| 5 | Guide handle upper part | ✕ |
| 6 | Guide handle lower part | ✕ |
| 7 | Carrying strap | 385805 |
| 8 | Thread head | 385940 |
| 9 | Set of cutting threads (10 pieces) | 385933 |
| 9A | Cutting thread | ✕ |
| 10 | Cutting blade with transport guard | 385934 |
| 10A | Cutting blade | ✕ |
| 10B | Transport guard | ✕ |
| 11 | Rubber sleeve | ✕ |
| 12 | Cover | 385941 |
| 13 | Protective cover | 385942 |
| 14 | Spacer washer | 385861 |
| 15 | Fixing nut | 385834 |
| 16 | Installation wrench | ✕ |
| 17 | Angle key | ✕ |
| 18 | Screw (Torx) M5x35 | ✕ |
| 19 | Screw (Philips) M5x12 | ✕ |
| 20 | Screw (Torx) M4x15 | ✕ |
| 21 | Thread knife | ✕ |
| 25 | Safety label 1 | 385935 |
| 26 | Safety label 2 | 385936 |
| 27 | Safety label 3 | 385937 |
| 28 | Charger ALG 40-1800 | 365500 |
| 29 | Battery AP 40-2000 (2000 mA) | 365501 |
| 30 | Battery AP 40-4000 (4000 mA) | 365503 |
Assembly

Always start the machine when it is completely assembled.
Mounting the guide handle
3 Push the rubber sleeve (11) over the tube shaft upper part (1).
4 Plug the guide handle lower part (6) and the guide handle upper part (5) onto the rubber sleeve.
5 Secure both parts with 4 screws M5 x 35 (18).
Mounting the cutting blade guard
6 Plug the guard (3) on the drive unit (A).
7 Secure it with 3 screws M5 x 12 (19).
Mounting the cutting blade
8 First plug the guard (13) on the drive shaft (B), then in sequence the cutting blade (10), spacer disc (14) and cap (12). Screw the mounting nut M10 (15) counterclockwise on the drive shaft.
9 Now rotate the hole (X) of the guard (13) over the recess in the drive unit (A).
10 Lock the drive shaft (B) using the angle key (17). →① Tighten the mounting nut (15) using the assembly wrench (16). →②
Mounting the guard extension for the thread head
11 Fasten the guard extension (4) to the guard (3) using 4
12 screws M4 x 15 (20).
Mounting the thread head and cutting threads
13 Screw the thread head (8) counterclockwise on the drive shaft (B).
14 Now rotate the hole (X) of the guard (13) over the recess in the drive unit (A).
15 Lock the drive shaft using the angle key (17).→①
Now tighten the thread head. →②
16 Guide two cutting threads (9) through the holes in the thread head.
Cutting diameter of the cutting threads
17 The cutting diameter of the cutting threads can be changed by turning the thread blade (21) over.
Position "A": ∅ 330 mm
Position "B": ∅ 380 mm
Connecting the tube shafts
18 Insert the tube shaft upper part (1) into the tube shaft lower part (2) as far as it will go.
i Note the marks (▶◀).
19 Slide the locking nut (C) over the plug connection and turn it tight
Fastening and adjusting the carrying strap
20 Hook the carrying strap (7) in the suspension eye (D). Make sure that the snap hook (E) of the carrying strap is assembled and hooked in as shown.
Before starting up
The lithium ion batteries AP 40-2000 (Article No. 365501) or AP 40-4000 (Article No. 365503) as well as the charger ALG 40-1800 (Article No. 365500) are not included in the scope of delivery and must be purchased separately.
Use only an original battery.
Do not use any other charger to charge the batteries. The charger is optimally matched to the batteries.
GB
Using an unsuitable charger may present a risk of shock, overheating or escape of caustic battery fluid.
Refer to the respective "Operating instructions" for further information on the batteries and the charger.
You only need to charge the battery before starting the device and insert it into the device.
Charging the battery:
i See operating instructions for the battery and/or the charger.
21 Inserting the battery:
Slide the battery into the guide of the battery holder until the contacts of the battery are firmly seated on the contact plugs of the device (audible click).
Start-up
Caution! Prior to starting the machine learn how to put it out of action in emergency cases.
You may not start to operate the machine until you have read these original instructions, observed all the instructions given and installed the machine as described!
Check the device before each use for
– possible damages,
– loose fastening elements
- correctly assembled and faultless covers and protective devices.
23 Make sure before each startup that the switch lock (G) and the ON / OFF switch (H) on the operating handle (F) work properly.
Do not use the device if it can be switched on only with the ON / OFF switch. The unit must be checked and repaired immediately by the customer service.
Switching on:
The brushcutter / grass trimmer features a safety circuit that prevents unintended activation.
① Make sure the cutting tool does not lie on the ground when switching the device on.
22 Hold the device firmly with both hands; the left hand always encloses the guide handle (5) and the right hand the operating handle (F). This applies also to left-handed persons!
23 Press the switch lock (G) and then the ON/OFF switch (H). You can let go of the switch lock (G) during the cutting process.
To protect the battery the machine automatically switches off at a low battery.
Never continue operating the ON / OFF switch; this may damage the battery.
Charge the lithium ion battery (→ ("Battery" operating instructions).
√ Speed control of the cutting tool
The speed of the cutting tool can be adjusted infinitely variable with the ON / OFF switch (H).
23 When pressing the ON / OFF switch only slightly, the cutting tool turns at low speed. The further the ON / OFF switch is pressed, the faster the cutting tool will turn.
Switching off
Release the ON / OFF switch to switch off the device.
The cutting tool continues to rotate for a few seconds after the unit is switched off.
Economy / Normal mode
23

The device may be operated in economy mode or in normal mode.
The device always starts in normal mode.
You can only change the mode when the device is switched on.
Changing the mode

Press the green button:
The device runs in economy mode.
→ The battery charge will last longer.
The middle indicator lights up green when the device is operated in economy mode.

Press the yellow button:
The device runs in normal mode.
→ The battery life becomes shorter.
Working with the device
You may not start to operate the machine until you have read these original instructions, observed all the instructions given and installed the machine as described!
Always keep your hands and feet at a safe distance to the cutting tool.
Transport guard for cutting blade
24 To avoid injuries to the fingers, the cutting blade (10A) is equipped with a transport guard (10B).
Remove the transport guard (10B) before switching on the device.
Carrying strap
25 ⚠️ Always apply the carrying strap (7) when working with this machine.
Never wear the carrying strap diagonally over shoulder and chest, but only on one shoulder. In this way, you can quicker remove the machine from your body if you get in a dangerous situation.
Adjusting the carrying strap
20 Make sure the carbine (E) of the carrying strap is correctly assembled and hooked in.
Adjust the carrying strap so that
- the carbine is approx. one hand width below the right hip.
- ergonomic and secure carrying of the device is guaranteed.
① Immediately replace a damaged carrying strap.
Quick-acting closure (J)
26 There is an easily accessible quick acting closure on the carrying strap. It ensures that you can quickly remove the machine from the carrying strap in a dangerous situation. To disconnect it jerkily pull on the strap end (K) of the quick acting closure.
Correct working position
Assume a secure stand, hold the device firmly with both hands; the left hand always encloses the guide handle and the right hand the operating handle. This applies also to left-handed persons!
→ Position the guide handle to allow you guiding the device securely and conveniently.
Hold the device during cutting so that
— it is at an adequate distance from the body.
— the guide tool is always guided below the waist.
→ Make sure the cutting tool does not lie on the ground when switching the device on.
Working with the brush cutter:
Kickback – backstroke
When working with metal blades, a kickback of the whole machine or a sudden pull forwards may occur if fixed objects (trees, branches, stones or the like) are hit. Such a kickback occurs abruptly without advance warning and may result in loss of control of the machine and hazards to the operator. There is a particular hazard in badly visible and overgrown areas.
To keep the control in case of kickback
- Always hold the machine firmly with both hands when working.
- Make sure that you have a safe stand. Keep your feet conveniently spread and be always alert to a possible kickback.
- Do not overestimate your abilities and always keep your balance when working.
- The cutting blade should have reached its full speed before cutting.
When brushcutting, stones and debris may be thrown up and cause serious injuries. Make sure that the safety guard is safely mounted.
Failure to install rotating parts (cutting blades) correctly may result in severe accidents. Check the cutting tool for secure seating before starting work.
Mowing
27 Check before starting work whether you have mounted the right guard.
- 29 Tilt the device slightly toward the front and guide it with quiet and steady movements in a curve from the right to the left. This way, the cut material falls on the already mowed area.
- 30 Cut higher grass and denser growth in several passes. For this, shorten the upper portion of the material to be cut at first by moving the device to the right. Then, move the device to the left and cut the lower portion of the material to be cut.
- 31 When working on slopes mow in stripes. Mow a stripe parallel to the slope. Move then back on the mowed area and mow the next stripe.
- 32 Larger, level areas are best worked from the outside to the inside. Start mowing at the left outer edge of the area and move in a square spiral movement toward the middle.
Adjust the engine speed and cutting height to the prevailing conditions. If the engine speed is too low, scrub can entangle in the cutting tool or get stuck.
If grass, scrub or other objects entangle in the cutting tool or if the device vibrates abnormally, immediately stop the engine and check the machine.
- Never remove jammed material while the cutting blade is still rotating. Wait until the cutting blade stands still.
- If the cutting blade is dull, broken or bent, replace it by a genuine spare part.
Working with the grass trimmer
Trimming
33 Check before starting work whether you have mounted the right guard.
- Switch on the grass trimmer on a level, already moves area.
- 35 During the cutting process, keep the grass trimmer at a sufficient distance from your body, tilt the machine slightly forward and move it smoothly and evenly from left to right.
- You will get the best trimming results when you cut dry grass.
① Wet grass is harder to cut and causes blockages more quickly. - 36 Cut higher grass and denser growth in several passes to avoid blockages.
- Start along walls, trees, fences, lawn edges or other obstacles at a certain distance from the obstacle and work forward step by step. Do not guide the cutting thread directly at walls and paving stones. Otherwise it will prematurely wear off.
- Guide the product around trees and shrubs so that the plants are not damaged.
Adjust the engine speed and cutting height to the prevailing conditions. If the engine speed is too low, scrub can entangle in the cutting tool or get stuck.
GB
⚠️ If grass, scrub or other objects entangle in the cutting tool or if the device vibrates abnormally, immediately stop the engine and check the machine.
- The cutting thread is after-running once the lawn trimmer has been cut off. Therefore wait until the thread is stationary before you restart the product.
- Replace the cutting thread by an original spare part if it is worn or damaged.
Maintenance and cleaning

Before each maintenance and cleaning work
- Switch off device.
- Wait until the cutting device does not longer move.
- Remove the battery.

Wear protective gloves during maintenance and cleaning work in the area of the cutting tool to avoid possible injuries.
Maintenance and repair work other than those described in this chapter is only allowed to be carried out by service staff.
For maintaining and cleaning, removed security devices must unconditionally be mounted properly and proved again.
Only use genuine spare parts. Other than genuine parts may result in unpredictable damages and injury.
Maintenance
- The cutting tool will not come to a standstill immediately after cut-off. Before starting any service work wait until all parts are stationary.
To guarantee a long and reliable usage of the product carry out the following maintenance works regularly.
Check the device for obvious defects such as
– loose fastening elements
- worn or damaged components
— bent, broken or damaged cutting tool
Necessary repair works or maintenance have to be carried out before using the machine.
Cutting blade
⚠️ Safe and efficient working is only possible with a correctly sharpened and intact cutting blade.
Therefore, check the cutting blade for dull edges, bents, cracks or other damages on a regular basis.
Have dull cutting blades sharpened by a specialist/service workshop.
Both sides of the cutting blade may be used. Turn round the cutting blade once and continue to work with the brush cutter until both sides of the cutting blade are dull-edged.
⚠️ Replace damaged cutting blade by new one.
Replacing the cutting thread
During cutting, the cutting threads wear or break off so that grass can no longer be cut.
Pull out the damaged cutting thread and insert the new one through the hole.
To ensure that the cutting threads are flexible in use and last longer, they should absorb moisture before use. Put cutting threads that were stored for a longer period or purchased new in water for 1 - 2 days before use so that they can absorb moisture.
Cleaning
i Clean the machine thoroughly after each application so that the faultless function is kept.
- After work, remove grass, dirt, plant residues and moisture (plant sap) with a brush or a damp cloth from the area of the cutting tool and the guard.
- Clean the case with a soft brush or a dry cloth.
- 38 Clean the contact plug (L) in the battery well with a soft brush.
- Do not clean the machine under running water or using a high-pressure cleaner.
- Do not use solvents (gasoline, alcohol, etc.) for plastic parts, otherwise such parts may be damaged.
- Keep the handles free of oil and grease.

Water, solvents and polishing agents shall not be applied.
- Make sure the ventilation slots are free from foreign objects (risk of overheating).
① For information on “Maintenance and cleaning” of the battery and the charger, please refer to the respective “Operating Instructions”.
Transport

Before each transport
- Switch off device.
- Wait until the cutting device does not longer move.
-
Remove the battery.
-
37 Secure the cutting blade (10A) with the transport guard (10B) against touching to avoid injuries or damages.
- Carry the device balanced on the shaft or hanging from the carrying strap. Hold the cutting tool toward the back at this.
- When transporting the product within a car put it in the boot or on a separate loading area.
- You may pull the device apart to save space.
- Do not throw the device when loading it. Secure the device against tipping over or damages.
Check the device for damages if it was subjected to hard jolts during transport.
① For information on “Transport” of the battery and the charger, please refer to the respective “Operating Instructions”.
Storage

Before each storage
- Switch off device.
- Wait until the cutting device does not longer move.
-
Remove the battery.
-
Store machines that are not in use in a dry locked place protected against frost and outside the reach of children and unauthorized persons.
- Secure the cutting blade (10A) with the transport guard (10B).
- Do not rest the device on the guard when storing it to avoid deformation of the guard.
- Best store the device suspended. An opening (M) for hanging it up is provided in the housing.
① Note the following to extend the service life of the device and to ensure smooth operation:
— Carry out a thorough cleaning and maintenance.
i Remove the cutting blade or the thread head to make cleaning it and the guard easier.
→ Check the cutting tool and the guard for damages during cleaning.
→ Apply corrosion protection on the cutting blade.
→ Have the cutting blade resharpened if necessary.
- Check the device for perfect condition to ensure reliable use.
① For information on "Storage" of the battery and the charger, please refer to the respective "Operating Instructions".
Possible faults

Before each fault elimination:
- Switch off device.
— Wait until the cutting device does not longer move. - Remove the battery.
— Wear protective gloves.
After each fault clearance, put into operation and recheck all security installations.
| Fault code | Possible Cause | Corrective action |
| Machine does not start after switching on | Lithium ion battery run down | Charge the lithium ion battery |
| Lithium-ion battery not engaged correctly | Insert the lithium-ion battery correctly | |
| Lithium ion battery defectiveON/OFF switch on operating handle defectiveDrive unit defectiveInternal fault | Contact the customer service | |
| Machine does not work with full performance | Lithium ion battery run down | Charge the lithium ion battery |
| Lithium ion battery defective | Contact the customer service | |
| Machine does not cut properly | Cutting blade dull or damaged | Turn the cutting blade over or have it resharpened or replaced |
| Cutting thread damaged or too short | Replace the cutting thread | |
| Machine cuts with interruptions | ON/OFF-switch on operating handle defectiveInternal fault | Contact the customer service |
| Device shuts off on its own | Lithium ion batteries too hot (45 °C) | Allow lithium-ion battery to cool down |
| Battery charge too low | Charge the lithium ion battery | |
| Device does not run quietly, vibrates strongly | Mounting nut of the cutting blade loose | Tighten the mounting nut |
| Cutting blade not properly mounted | Mount the cutting blade properly; make sure the cutting blade is positioned correctly in the recess of the guard | |
| Cutting blade damaged | Replace the cutting blade | |
| Cutting thread torn | Replace the cutting blade | |
| Cutting blade / head / device dirty | Clean |
GB
| Fault code | Possible Cause | Corrective action |
| Poor cutting results | Grass, weeds, undergrowth too long | Trim in several passes |
| Grass, weeds, undergrowth too dense | Reduce the cutting width | |
| Foreign material, grass wrapped around the cutting blade | Check / clean the cutting blade | |
| Cutting blade dull | Turn the cutting blade over or have it resharpened or replaced | |
| Cutting thread too short | Replace the cutting thread | |
| Cutting time with fully charged battery too short | Rechargeable battery is low | Charging the rechargeable battery |
| Battery service life exhausted | Replace the rechargeable battery | |
| Operating mode cannot be selected | Economy / normal mode toggle buttons defective | Contact the customer service |
① In case of further faults or inquiries please contact your local dealer.
Technical specifications
| Type / Model | FC 40-255 | ||
| year of construction | see last page | ||
| Idle speed n_0/n_max 6500 rpm | |||
| Cutting diameter with thread spool | ∅ 330 / 380 mm | [72w5] | |
| Thread diameter / thread length | ∅ 2,5 mm / ca. 170 mm | ||
| Cutting diameter with cutting blade | ∅ 255 mm | ||
| Blade thickness | 2.8 mm | ||
| Sound pressure level L_PA Measuring uncertainty K_PA | 82 dB (A)3 dB (A) | ||
| measured sound power level L_WA Measuring uncertainty K_WA (according to regulation 2000/14/EC) | 93.4 dB (A)0.93 dB (A) | ||
| guaranteed sound power level L_WA (according to regulation 2000/14/EC) | 96 dB (A) | ||
| Hand arm vibration (measured as per ISO 22867)Measuring uncertainty K | < 2,0 m/s ^2 1,5 m/s ^2 | ||
| Weight (without battery)Brush cutterGrass trimmer | ≈ 3.6 kg≈ 3.5 kg | ||
| Compatible battery voltage | 36 V (max 40 V) | ||
Refer to the respective "Operating instructions" for "Technical specifications" of the batteries and the charger.
Disposal
Dispose of brushcutter / grass trimmer, battery, charger, accessories and packaging in an environmentally friendly manner according to regulations.
For EU countries only.
Electrical devices do not go into the domestic rubbish.
According to the European Directive 2012/19/EU on electrical and electronic scrap, electrical devices that are no longer serviceable must be separately collected and brought to a facility for an environmentally compatible recycling.
For information on "Disposal" of the battery and charger, please refer to the respective "Operating Instructions".
Guarantee
Please note the attached guarantee declaration.
F
Inden hver transport
conform Directivei UE 2006/42/UE
Prin prezenta noi,
ATIKA GmbH
Josef-Drexler-Str. 8 – 89331 Burgau – Germany
Modul economic / normal


Vibrationer (Hand-arm-vibration)
Hand-arm-vibration a_h<2,0 m/s^2


- Extent of delivery
- EC Declaration of Conformity
- Operating times
- Symbols operating manual
- Symbols
- Normal intended use
- Residual risks
- Vibrations (hand arm vibrations)
- The actual vibration emission level during the use of machine may differ from that indicated in the operating ructions or indicated by the manufacturer.
- Safety instructions
- Observe the following advices in order to protect yourself and other persons against possible injuries.
- Personal protective equipment
- Safety instructions – before working
- Carry out the following checks before the initiation and regularly during the working process. Observe the relevant sections in the operating instruction manual:
- Safety instructions – operating
- Safety instructions – while working
- General safety instructions
- Behaviour in an emergency situation
- Description of device / spare parts
- Assembly
- Mounting the guide handle
- Mounting the cutting blade guard
- Mounting the cutting blade
- Mounting the guard extension for the thread head
- Mounting the thread head and cutting threads
- Cutting diameter of the cutting threads
- Connecting the tube shafts
- Fastening and adjusting the carrying strap
- Before starting up
- GB
- Start-up
- Working with the device
- Carrying strap
- Adjusting the carrying strap
- Quick-acting closure (J)
- Correct working position
- Working with the brush cutter:
- Kickback – backstroke
- Mowing
- Working with the grass trimmer
- Trimming
- Maintenance and cleaning
- Maintenance
- Check the device for obvious defects such as
- Cutting blade
- Replacing the cutting thread
- Cleaning
- Transport
- Storage
- Before each storage
- Possible faults
- Before each fault elimination:
- Disposal
- Guarantee
- F
- Inden hver transport
- Modul economic / normal
- Vibrationer (Hand-arm-vibration)
Brand : ATIKA
Model : FC 40-255
Category : Grass trimmer