
MOD-71 - Vacuum Cleaner MPM - Free user manual and instructions
Find the device manual for free MOD-71 MPM in PDF.

| Product type | Cordless stick vacuum cleaner |
| Brand | MPM |
| Model | MOD-71 |
| Filtration technology | Bagless cyclonic, steel mesh filter, sponge filter, HEPA filter |
| Battery type | Lithium-ion, 29.6 V |
| Runtime | Up to 60 min in ECO mode, approx. 50 min in AUTO mode, 15 min in MAX mode |
| Charging time | Approximately 5 to 5.5 hours |
| Operating modes | AUTO (smart), MAX (intensive), ECO (economical) |
| Dust bin capacity | Not specified, estimated 0.5 L |
| Included accessories | Multifunctional electric brush with LED lighting, velvet roller, crevice tool, upholstery tool, brush tool, wall mount, charger |
| Tube | Foldable aluminum tube |
| Digital display | Dust collection rate, charge status, blockage indicator, operating mode |
| Weight | Approximately 2.8 kg |
| Dimensions (H x W x D) | Not specified, estimated 115 x 25 x 20 cm |
| Power supply | Mains charger (adapter provided) |
| Usage | Indoor, dry surfaces only |
| Safety | Overload protection, automatic shut-off, do not vacuum liquids or sharp objects |
| Maintenance | Clean filters regularly (wash sponge and HEPA filter, wipe mesh filter and dust bin), empty dust bin after each use |
| Repairability | Battery not replaceable by user, contact authorized service |
| Warranty | Not specified, standard 2 years |
Frequently Asked Questions - MOD-71 MPM
User questions about MOD-71 MPM
0 question about this device. Answer the ones you know or ask your own.
Ask a new question about this device
Download the instructions for your Vacuum Cleaner in PDF format for free! Find your manual MOD-71 - MPM and take your electronic device back in hand. On this page are published all the documents necessary for the use of your device. MOD-71 by MPM.
USER MANUAL MOD-71 MPM
EN We wish you satisfaction from using the product and invite you to check a wide range of other MPM appliances
natural_image
Exterior view of a black and silver MPM vacuum cleaner (no text or symbols visible on the device body)MOD-71
VERTIKAIN VYSAVAC VERTIKALERSTAUESAUCER VERTIKAA N° TO MUMFIA KAGEIHHAEKPIKH2KOYIA UPRIGH VACUUMCLANER
ASPIRADOR VERTICAL ASPHATEUR VERTICAL LUGGOLI CLSPORSIVO ASPIRAPOLVERLE VERTICAL VERTIKALUS DULK Q SURBLYS
VERTICAL STOI ZUCER ODKURZACZ PIOKOWY ASPIRATOR VLETICAL ВЕРТИКАЛЬЕНИЙ ПИЛОСОС VERTICALNY VYSÁVÁC ВЕРТИКАЛЬЕНИЙ ПИЛОСОС
cz NÁVOD K OBSLUZE 3
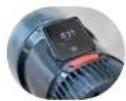
Control panel with display indicating covering mode and battery level

AUTO noise - sickment of working noise to the type of situated surface and threemed or overnight
Well-world stocks
N. the second electric field
Operating knowledge
62 minutes to dealings
Eversing thickness in Geography: 0.5

natural_image
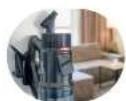
Interior scene with a vacuum cleaner cleaning tiled floor near a window (no text or symbols visible)GoFlex Technology -
Bendable Tube System
BEZPEČNOSTNÍ POKYNY PŘI POUŽÍVÁNÍ

NABÍJENÍ BATERIE
natural_image
Line drawing of a vacuum cleaner with directional arrows indicating motion (no text or symbols)obr. 3

natural_image
Technical line drawing of a mechanical device with three views showing internal components and motion indicators (no text or symbols)natural_image
Line drawing of a portable thermosier with attached power outlet and cable (no text or symbols)obr. 5
natural_image
Technical line drawing of a vacuum cleaner with directional arrows indicating assembly or movement (no text or symbols present)natural_image
Technical line drawing of a mechanical device with three views showing internal components and wiring (no text or symbols)natural_image
Line drawing of a portable electric vacuum cleaner with attached power outlet and load arrow (no text or symbols)natural_image
Technical line drawing of a vacuum cleaner with attached components and directional arrows indicating assembly (no text or symbols)Joonis 3
natural_image
Technical line drawing of a mechanical device with three views showing internal components and motion indicators (no text or symbols)natural_image
Line drawing of a portable thermosier with attached power outlet and cable (no text or symbols)natural_image
Technical line drawing of two mechanical devices with arrows indicating motion or assembly (no text or symbols)natural_image
Technical line drawing of a vacuum cleaner with attached components and directional arrows indicating assembly (no text or symbols)natural_image
Technical line drawing of a mechanical device with two views showing internal components and wiring (no text or symbols)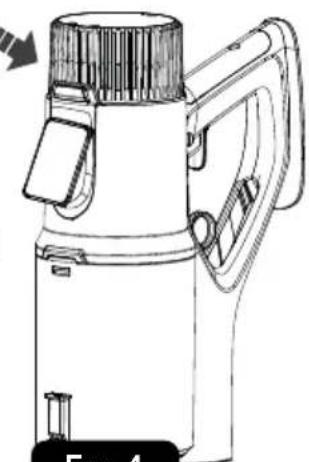
natural_image
Line drawing of a portable thermospan device (no text or symbols)Eik. 4
natural_image
Line drawing of a portable thermosifier with attached power outlet and cable (no text or symbols)natural_image
Diagram of two hand pumps with arrows indicating flow direction (no text or symbols)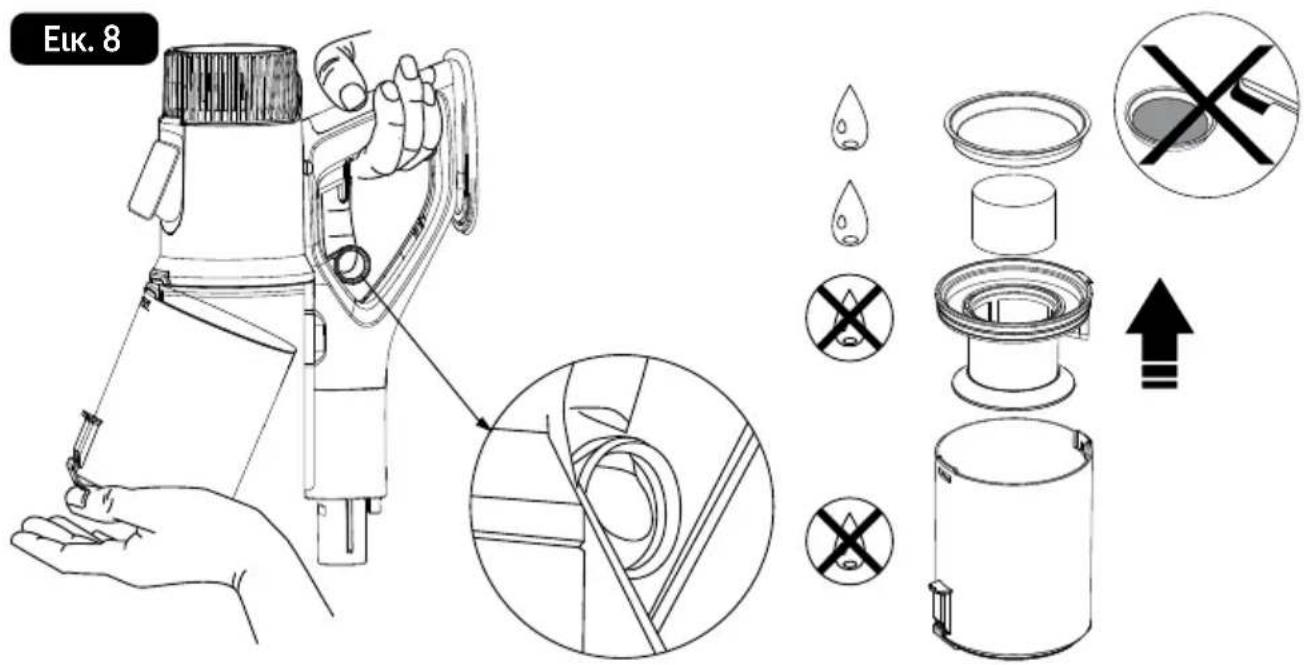
Read the instructions carefully before use.
The unit may only be used with the power supply supplied with the whole set.
- The appliance is intended for domestic use only.
- Use the vacuum cleaner only indoors and only for vacuuming dry surfaces. Dry wet cleaned carpets before vacuuming.
- Do not use the appliance for purposes other than those for which it was intended.
- Do not use the unit to suck up liquids, ash, cigarette butts, oils and sharp objects, etc. This can damage the appliance or even cause fire! Do not vacuum near flammable liquids or substances either!
- Do not point the suction elements of the vacuum cleaner towards people or animals. Pay particular attention not to bring the suction elements close to your eyes, ears and hair.
- Do not use the unit without correctly mounted filters.
- Take special care when children are near the appliance.
- Do not immerse the unit, electric brush, cable or plug in water or other liquids!
- Do not leave the appliance unattended during operation.
- Always unplug the unit when not in use.
- Always remove the plug from the mains socket before cleaning/maintenance.
- Check the housing regularly for damage.
- Never use a damaged appliance, including one with a damaged cord or plug, in which case have it repaired at an authorised service centre.
- Use of accessories not recommended by the manufacturer may cause damage to the appliance, fire or personal injury.
- Do not use the appliance outdoors.
- Do not cover the appliance during operation, do not cover the inlet/outlet holes.
- Keep the vacuum cleaner away from all heat sources (radiators, cookers, etc.) due to its plastic housing.
- Do not bend or hang the cord on sharp edges.
-Only several surfaces are intended to be touched during the appliance operation, i.e. handles, adjustment knobs, etc. - This equipment may be used by children of at least 8 years of age and by persons of diminished physical, mental capacity and lack
of experience and knowledge of the equipment if supervision or instruction is provided regarding the safe use of the equipment so that the hazards involved are understood. Unsupervised children should not perform cleaning and maintenance of the equipment.
- Keep the appliance and its cord out of reach of children under 8 years of age.
- The appliance is not a toy and should not be used as such by children.
- Check that the power parameters on the appliance's rating plate correspond to the parameters of your power supply network.
- Do not connect the plug to the power socket with wet hands.
- Do not pull the plug out of the power socket by pulling the cord.
- Do not pull the appliance by its cord.
- The appliance is equipped with a battery consisting of several cells connected in one unit, its replacement may only be carried out by suitably trained persons.
- Do not try to open the battery housing on your own.
- Do not expose the battery to fire, extreme temperatures (below -10, above + 50C°), water, humidity or prolonged sunlight.
- Do not store the battery together with metal objects, e.g. paper clips, nails, coins, etc., or intentionally short-circuit the negative and positive terminals - risk of ignition, explosion.
- Do not allow a situation that may result in deformation of the battery, e.g. significant shocks, vibrations, mechanical pressure, etc. - do not use the battery if it has been damaged (mechanical damage, substance leakage, etc.).
- Do not allow the deep battery discharge.
- Check the battery charge regularly - do not leave the battery without control for a longer period of time.
- If there is any leakage from the battery, do not touch the substance that has leaked out of the battery.
- Packaging is not a toy! Please keep packaging components (plastic bags, cartons, styrofoam, etc.) out of the reach of children.
- WARNING! Do not allow children to play with the film. Danger of suffocation!
DEVICE DESCRIPTION
- Holder
- Motor module
- Dust container release lever
- Aluminium pipe
- Multi-purpose illuminated electric brush
- 29.6V lithium-ion battery
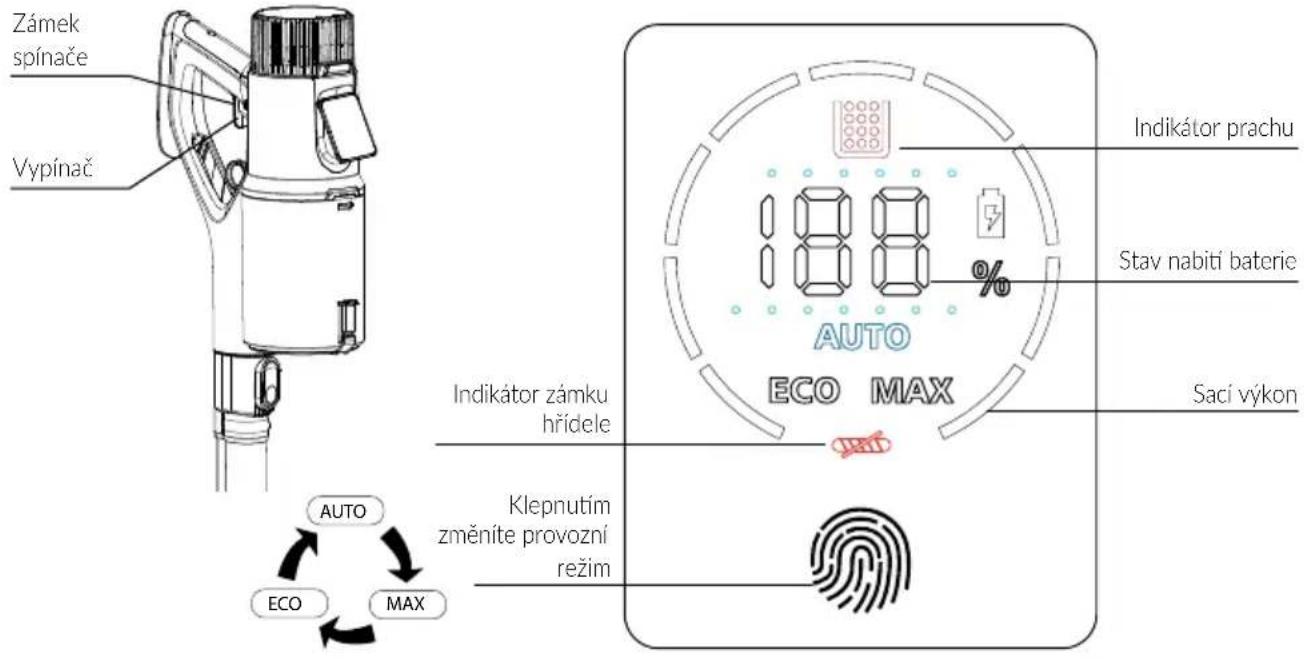
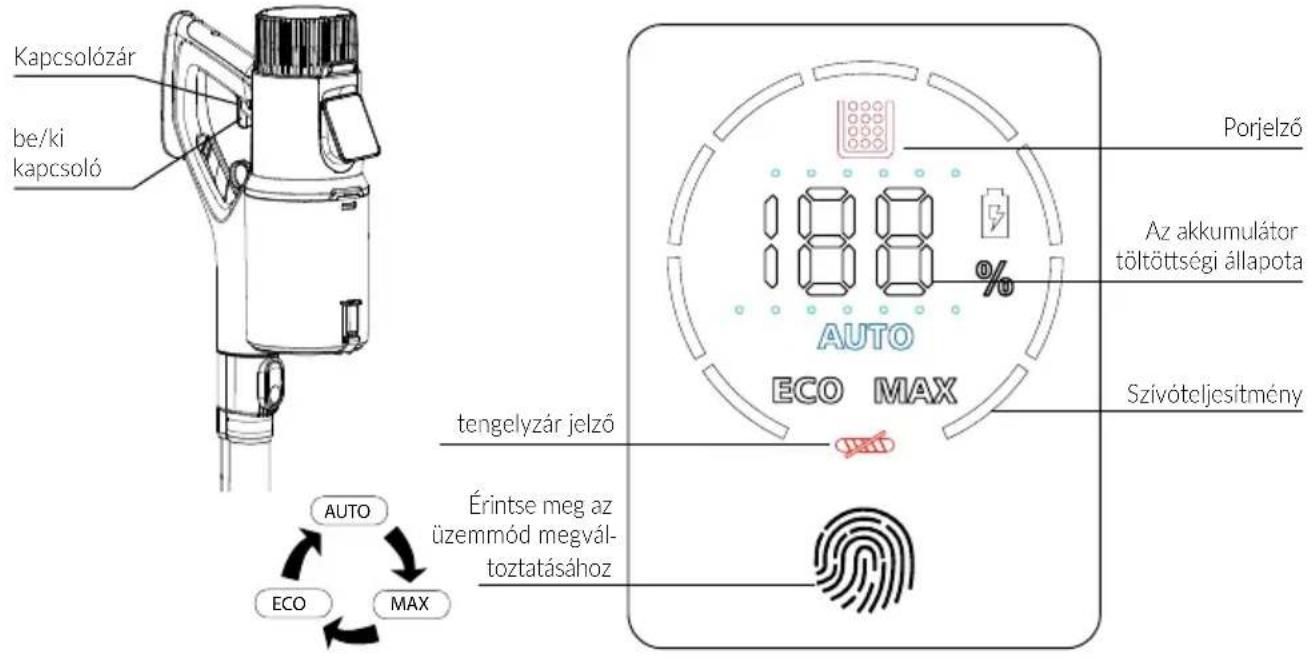
- Digital display
- Dust container
- Aluminium pipe release button
- Pipe folding button
- Electric brush release button
- Crevice attachment
- Upholstery attachment
- Attachment with hair
- Handle for assembly on the wall with a set of dowels and screws.
- Velour electric brush roller
- Battery charger
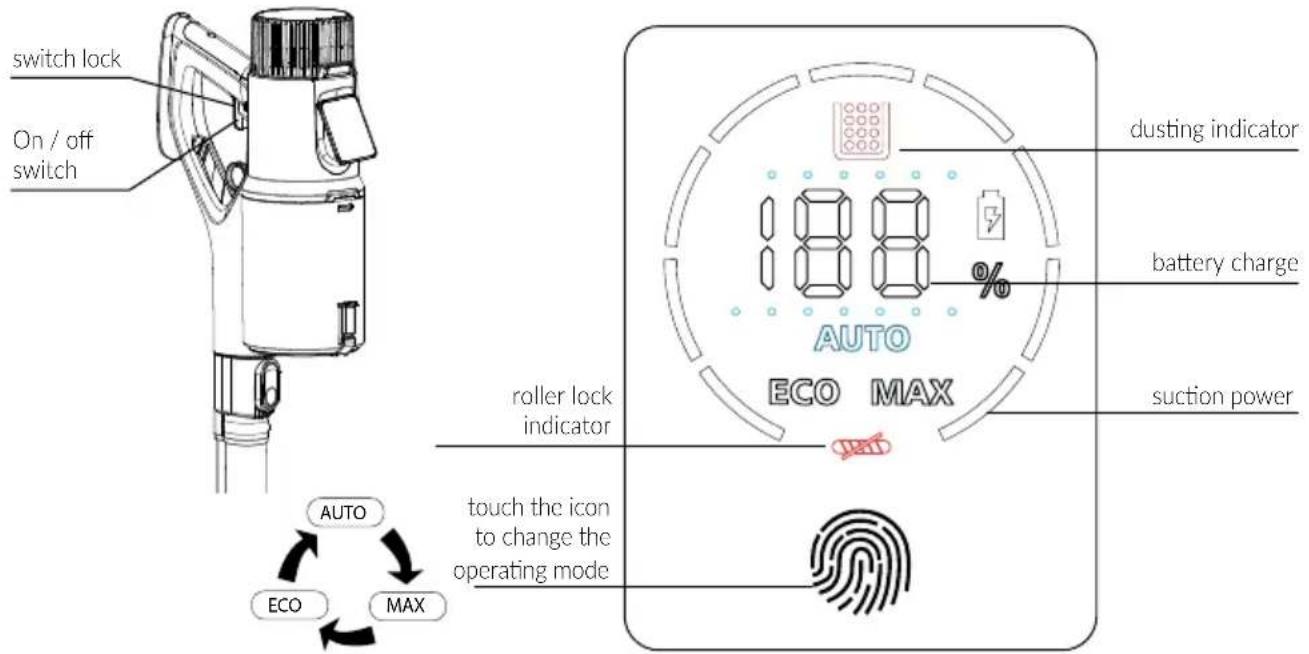
The MOD-71 vacuum cleaner combines the convenience of a cyclonic and cordless vacuum cleaner. Cyclone technology allows you to filter dust without using a dust bag by means of centrifugal force, which means you only need to empty the dust container over the dustbin. The lithium-ion rechargeable battery with one of the highest ratios of stored energy to its weight makes the appliance lightweight and ensures a long operating time after charging. The vacuum cleaner is equipped with a three-stage suction power adjustment: AUTO, MAX and ECO.
AUTO - the SMART technology used automatically switches the suction mode depending on the amount and type of dirt and type of floor, in addition, the dust sensor used determines the suction power itself. The operating time is approx. 50 min. depending on the amount of soiling.
MAX – intense cleaning of the dirty surface using maximum suction power. The operating time is approx. 15 min. depending on the amount of soiling.
ECO – allows for the long-lasting vacuuming of the surface with minimised soiling. The maximum operating time is approx. 60 min. depending on the amount of soiling; it will allow the whole apartment to be cleaned.
BEFORE FIRST USE
- Charge the vacuum cleaner battery (see chapter: "BATTERY CHARGING").
- Check the vacuum for any damages that might have occurred during transport. If you have any doubts contact the seller.
- Make sure the electrical mains parameters match the data on the charger's name plate.
- Remove the vacuum from the box; remove all stickers, transport protectors, bags and fillers.
- Assemble the vacuum cleaner correctly (see chapter: "ASSEMBLY OF THE VACUUM CLEANER").
ASSEMBLY (DISASSEMBLY) OF THE VACUUM CLEANER
CAUTION! Do not operate the vacuum cleaner when it is not assembled!
CAUTION! Make sure that you do not damage the delicate connectors powering the electric brush while assembling the pipe and accessories.
- Assemble the electric brush (5) to the aluminium pipe (4). Then assemble the aluminium pipe (4) with the motor module (2). Finally, assemble the battery (6) with the motor module (2) (fig. 1).
- In order to disassemble the vacuum cleaner act similarly to the first point.
ASSEMBLY AND PARKING OF THE VA-CUUM CLEANER SWITCH ON THE HANDLE
The MOD-71 vacuum cleaner is provided with a handle that allows the vacuum cleaner to be fixed to the wall. In order to use the handle, fix it to the wall.
- Choose a suitable place at the right height to accommodate the vacuum cleaner together with the pipe and the electric brush. Makes sure that no electrical cables have been laid in the wall at the chosen location.
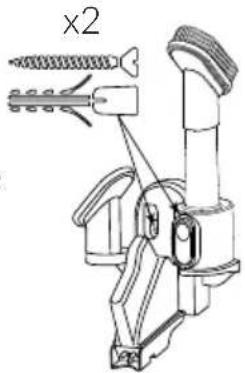
- Place the bracket on the wall and mark the hole positions on the wall with a pencil (fig.2)
- Drill holes at the marked locations, insert the wall plugs, apply the handle and screw in the screws. Park the vacuum cleaner and accessories on the screwed handle.
BATTERY CHARGING
CAUTION! Charge the battery before using the vacuum cleaner for the first time. The time required to charge the battery is approximately 5 – 5.5 hours.
CAUTION! Only charge the battery with the supplied charger. While the battery is charging, the vacuum cleaner cannot be started.
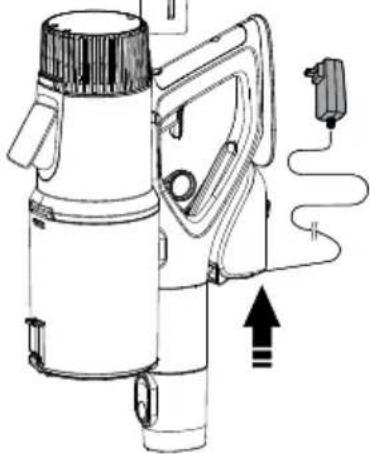
The vacuum cleaner has three options for connecting a charger to charge the battery: charging the battery in the motor module, charging the battery itself or charging the vacuum cleaner in the wall-mount bracket.
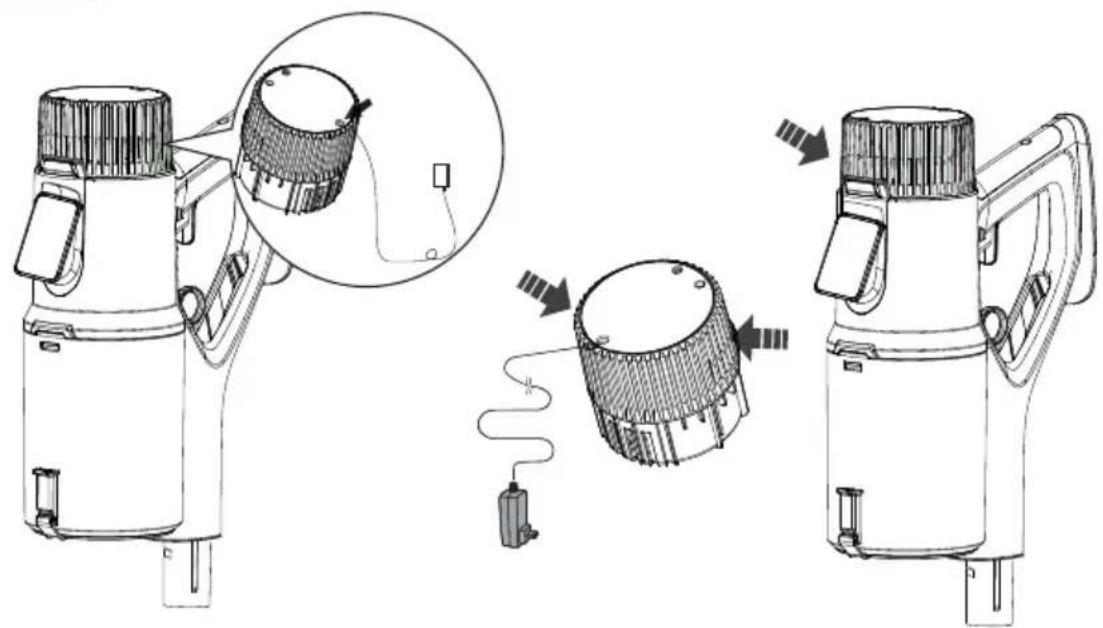
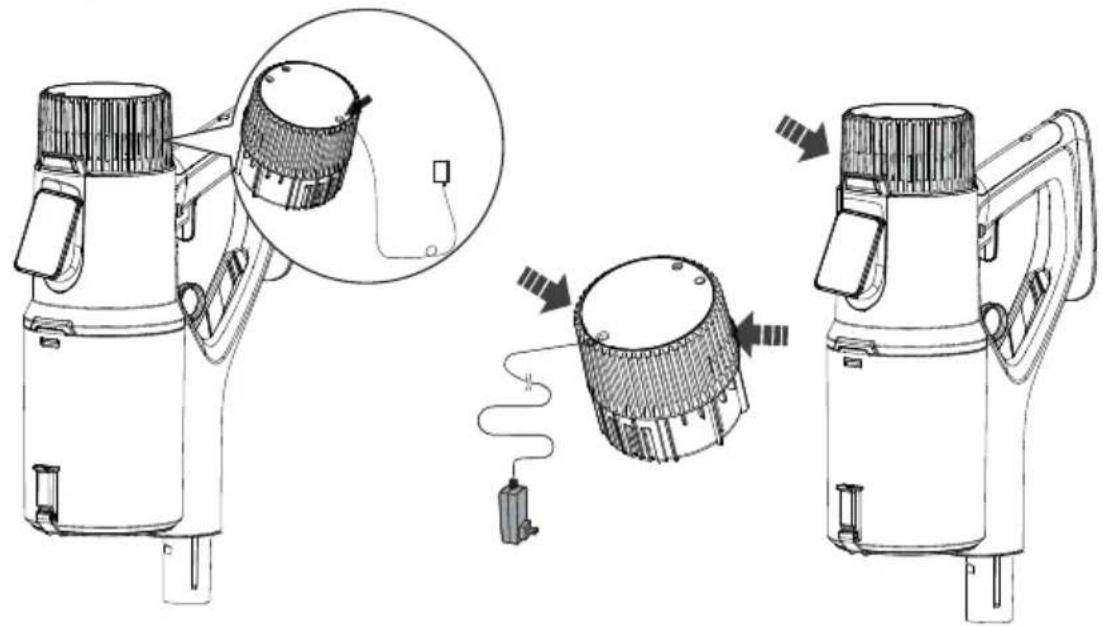
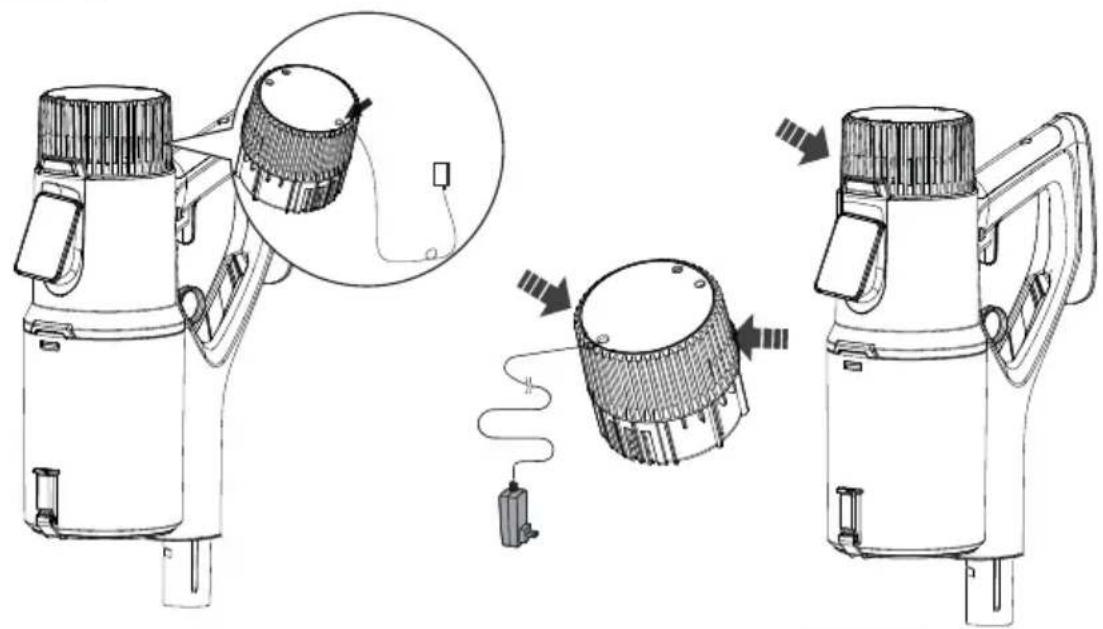
- Connect the charger (17) to the battery (6) in the motor module (2) or press the key on the battery and slide the battery (6) out of the motor module (2) (fig.3).
- Connect the charger (17) to the mains socket and the charger cord to the socket in the battery (6) (fig. 3) A red light signalling the charging process will begin to flash.
- The charging completion process will be signalled with a red light on the battery.
fig. 1

natural_image
Technical line drawing of a vacuum cleaner with attached components and directional arrows indicating assembly (no text or symbols)fig. 2
natural_image
Technical line drawing of a mechanical assembly with screws and brackets (no text or symbols)- Disconnect the charger (17) from the mains supply and the charger cable from the battery (6).
Fig. 3
natural_image
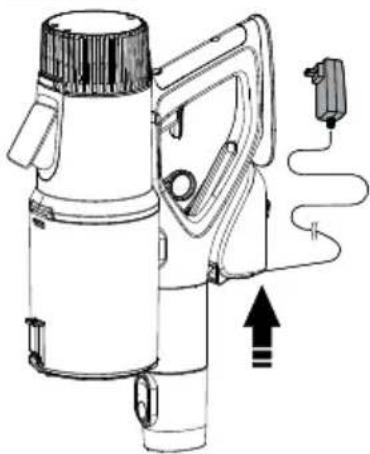
Technical line drawing of a mechanical device with three views showing internal components and wiring (no text or symbols)- Connect the charger (17) to the mans supply and then to the handle (15) fixed on the wall (fig.4).
- Slide the vacuum cleaner to bracket mounted on the wall (15); the battery charging process will begin (6).
- Once fully charged, the appliance will automatically stop the charging process, so the charger can be plugged in for a long time without damaging the battery.
USING THE VACUUM CLEANER
- Make sure the vacuum cleaner is properly assembled and the battery is charged.
- Connect the relevant equipment:
- multi-purpose electric brush with illumination (5) - for all types of hard surfaces and carpets, LEDs illuminate the surface to be cleaned for perfect vacuuming. An additional velour roller is included with the electric brush for vacuuming smooth surfaces.
- crevice attachment (12) – vacuuming of corners, spaces under the furniture and anywhere where access to free use of other accessories is limited.
- upholstery attachment (13) – dedicated to vacuuming couches, sofas, armchairs and car upholstery, etc.
- attachment with hair (14) – is used for removing dust from books, lampshades, frames, decorations, curtains, etc. Brush hairs additionally detach extremely stubborn dirt from the surface to be cleaned
Depending on the needs, connect the equipment to the suction pipe or motor unit (2).
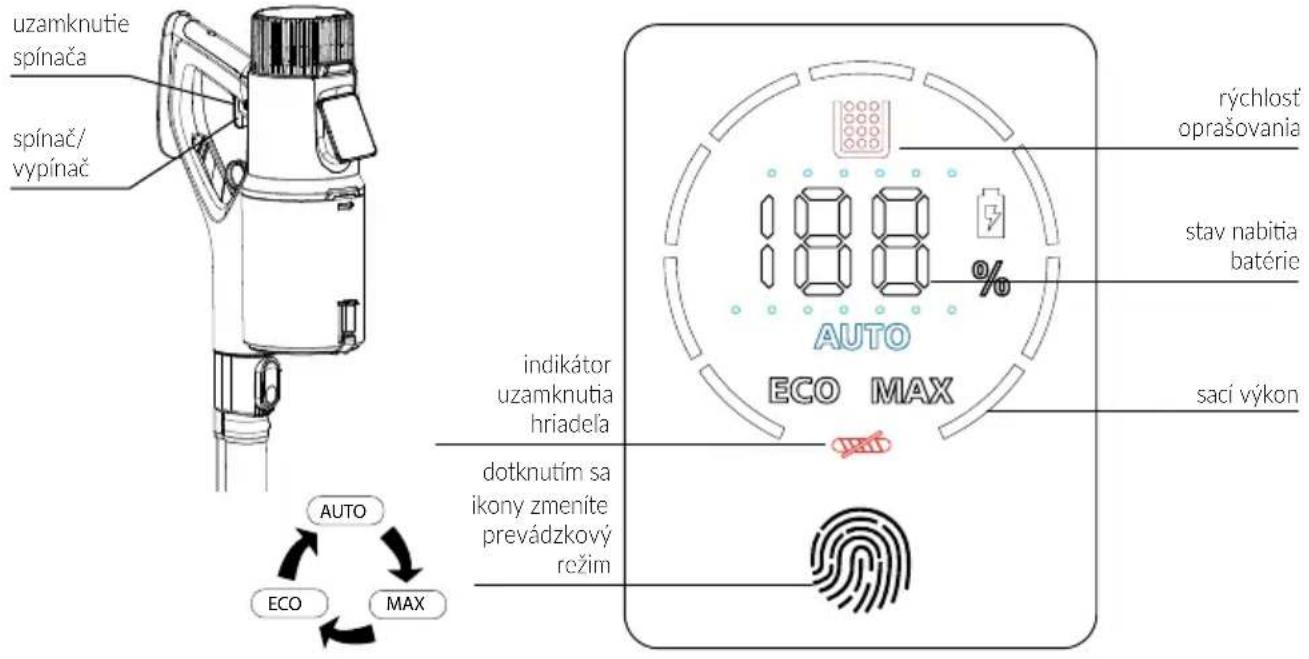
- Start the vacuum cleaner with a switch. The vacuum cleaner will operate in the AUTO mode. While the vacuum cleaner is running, the switch can be locked by moving the locking switch key to the left or right (fig.5).
- In order to switch to one of the operating modes (AUTO, MAX or ECO), touch the "papillary line" icon.
Fig. 4
natural_image
Line drawing of a portable electric vacuum cleaner with attached power outlet and cable (no text or symbols)After the vacuuming is finished, switch off the vacuum cleaner with a switch (fig. 5).
Fig. 5
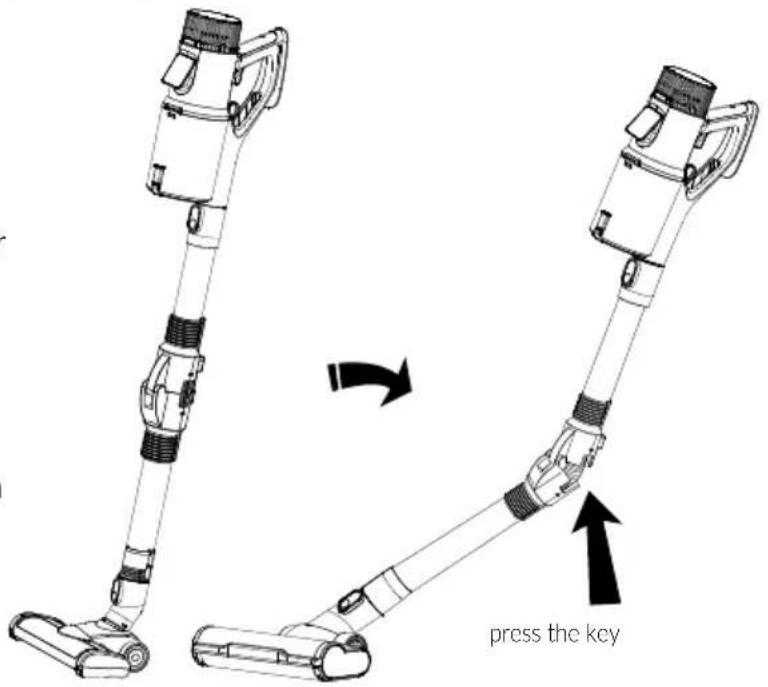
The vacuum cleaner is provided with a flexible aluminium pipe (4) in order to get to hard-to-reach areas.
- Place the vacuum cleaner on the floor, holding the motor module handle (2) (fig. 6) with one hand.
- Press the key located in the rear part of the aluminium pipe (4) with your other hand. The pipe will bend auto -matically which will facilitate the vacuuming of hard-to-reach places, e.g. floor under the couch.
- In order to fold back the pipe, raise the vacuum cleaner. The aluminium pipe will lock itself automatically in the straight position.
Fig. 6
CLEANING AND MAINTENANCE
CAUTION! Keep the dust container level under regular control. An overfilled container reduces vacuuming efficiency, increases energy consumption and causes the filters to become dirty more quickly.
CAUTION! Do not submerge the vacuum cleaner, battery charger and battery in water! CAUTION! To achieve the best possible performance of the vacuum cleaner, clean the filters and the dust container after each use.
CAUTION! Maintenance work must be carried out with the vacuum cleaner switched off and the charging cable disconnected!
- Clean the outer surfaces of the vacuum cleaner with a damp cloth and then wipe it dry. Use a mild cleaning agent for stubborn dirt.
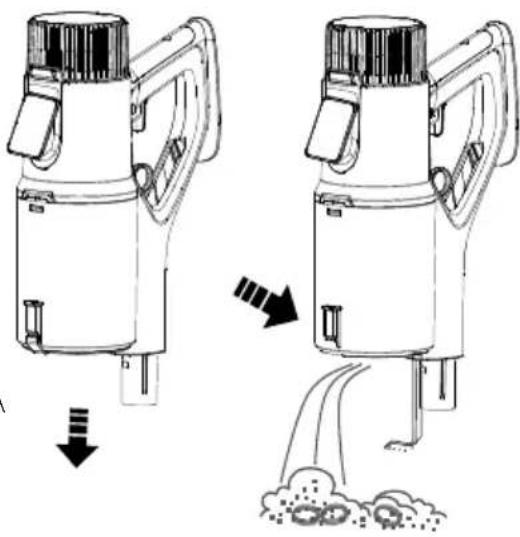
- In order to empty the dust container, switch off the vacuum cleaner with a switch. Place the dust container over the dustbin, push down the bottom opening button and dump the contents of the container into the dustbin. Close the bottom (fig.7).
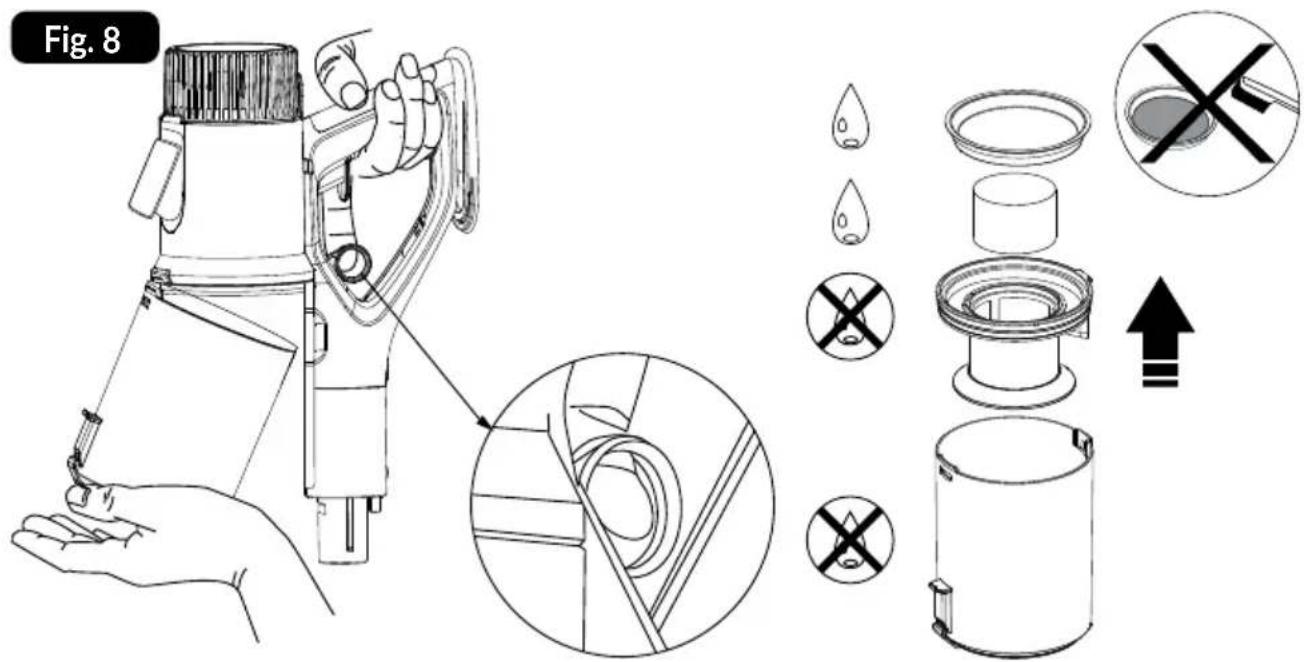
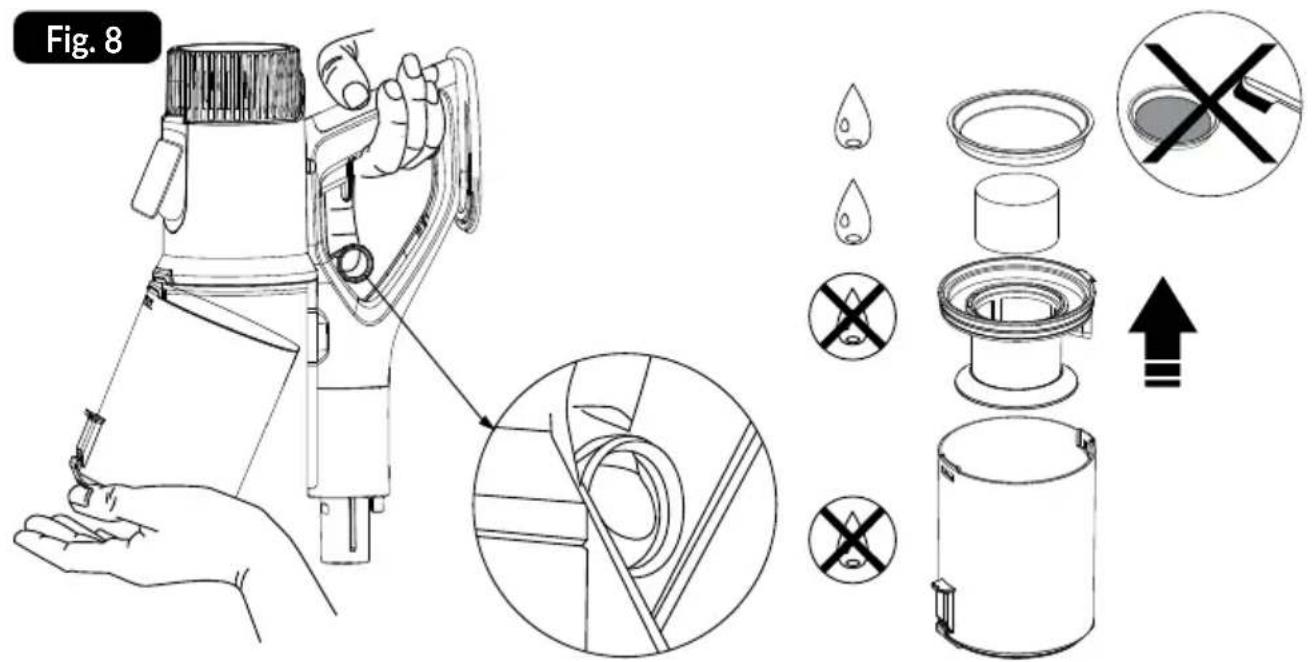
- To clean the filters, hold the dust container with one hand and the handle with the other, then pull upwards on the lever with your index finger (fig.8).
- Remove the filters (steel-mesh filter, sponge filter, EPA filter) from the dust container Clean all the filters of dust. Clean the filter sponge filter and EPA filter under running water and dry them thoroughly before assembling them in the vacuum cleaner. You must not submerge the steel-mesh filter and dust container in water as this may result in a container and the steel-mesh filter with a dry cloth (fig. 8).
Fig. 7
natural_image
Diagram of two identical hand pumps with arrows indicating flow direction, no text or symbols presentCAUTION! Do not assembly wet filters – risk of damage to the vacuum cleaner!
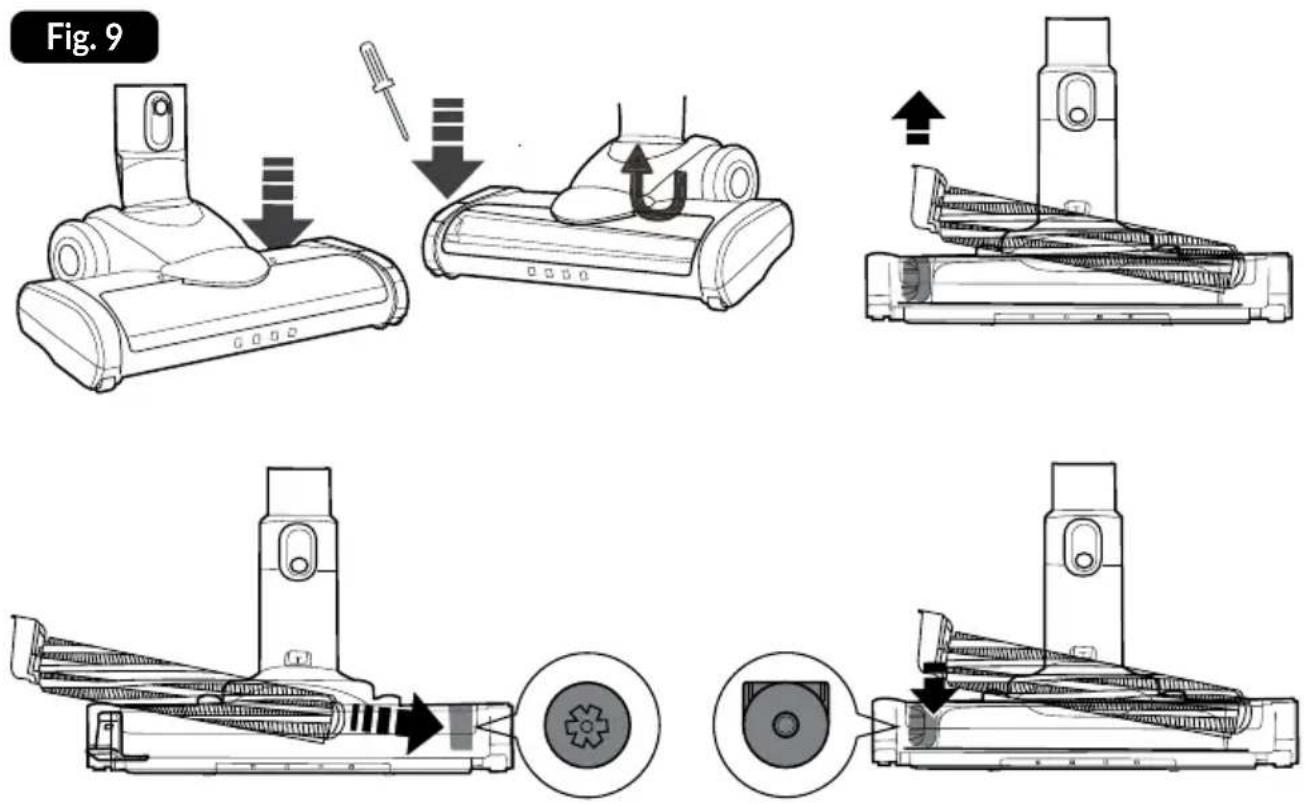
- Periodically clean the rotating electric brush roller. You can remove the roller after releasing the top transparent cover, then use a flathead screwdriver to bend the left side of the roller away from the housing and remove the roller for cleaning. After cleaning the roller, place it back in the electric brush and put on the transparent housing (fig. 9).
CAUTION! Proper and regular cleaning ensures safety of use and extends the life of the appliance.
TROUBLESHOOTING
PROBLEMCAUSESOLUTION
| The vacuum cleaner is not working | Battery discharged Charge the battery |
| Charging process in progress Wait until the charging process is completed | |
| Low suction power | Clogged pipe or brush Remove the cause of clogging |
| Dust container full Empty the dust container | |
| Dirty dust filters Clean the filters | |
| The rotating electric brush roller is no longer operable. | Blocked electric brush roller Clean/unblock the electric brush roller |
| The charging indicator is not illuminated | The charging cable is damaged | Return the product to the retailer or service centre in order to have it repaired. |
| Power is not supplied to the charging station. | Check whether the power supply is connected to the mains socket. | |
| Foul smell from the vacuum cleaner air outlet. | Filters are dirty Clean the filters under running water and dry them up | |
TECHNICAL DATA
Technical specifications are given on the product nameplate.
CAUTION! MPM agd S.A. reserves the right to technical changes.

Proper disposal of the product (waste electrical and electronic equipment)
Marking on the product indicates that after the service-life of the product expires, it should not be disposed with other type of municipal waste. Used equipment may have a negative impact on the environment and health of people due to potentially containing hazardous substances, mixtures and components. Mixing electric waste with other types of waste or disassembling those in an unprofessional manner may cause a release of substances that are hazardous to the environment and health.
Used equipment should be handed-over to a point for collection of electric waste. In order to obtain detailed information regarding the electric waste collection points, the user should contact the municipal point of electric waste collection or used equipment processing department.
Proper removal of product (batteries and//or accumulators)
The icon with a crossed out trash can indicate that accumulators/batteries are subject to selective collection and recycling. Pursuant to Directive 2006/66/WE, batteries and/or accumulators must not be thrown away together with other waste coming from households after their service life comes to an end. To prevent possible damage to the environment or human health resulting from uncontrolled
waste disposal, accumulators/batteries should be collected, disposed of or recycled in accordance with applicable laws. A used battery should be placed in a special container at separate collection points for this type of waste.
natural_image
Line drawing of a vacuum cleaner with directional arrows indicating motion (no text or symbols)natural_image
Technical line drawing of a mechanical device with three views showing internal components and wiring (no text or symbols)natural_image
Line drawing of a portable thermosifier with attached power outlet and cable (no text or symbols)natural_image
Line drawing of a vacuum cleaner with directional arrows indicating motion (no text or symbols)natural_image
Technical line drawing of a mechanical device with three views showing internal components and motion indicators (no text or symbols)natural_image
Line drawing of a portable thermosifier with attached power outlet and cable (no text or symbols)natural_image
Technical line drawing of a vacuum cleaner with attached components and directional arrows indicating assembly (no text or symbols)natural_image
Technical line drawing of three different types of electronic devices with internal components, showing wiring and connection (no text or symbols)natural_image
Line drawing of a portable electric heater with attached power outlet and load arrow (no text or symbols)5. ábra
natural_image
Line drawing of two identical mechanical devices with arrows indicating flow or movement, no text or symbols present.natural_image
Technical line drawing of a vacuum cleaner with attached components and directional arrows indicating assembly (no text or symbols)natural_image
Technical illustration of a device with three views: top view, side view showing internal components, and bottom view with electrical connections (no text or symbols)natural_image
Line drawing of a portable thermosifier with attached power outlet and cable (no text or symbols)USO DELLA SCOPA ELETTRICA
natural_image
Diagram of two identical portable devices with arrows indicating flow or movement, no text or symbols present.natural_image
Technical line drawing of a vacuum cleaner with attached components and directional arrows indicating motion (no text or symbols)natural_image
Technical line drawing of three different types of electrical devices with internal components, showing wiring and grounding (no text or symbols)natural_image
Technical line drawing of a portable vacuum cleaner with attached electrical outlet (no text or symbols)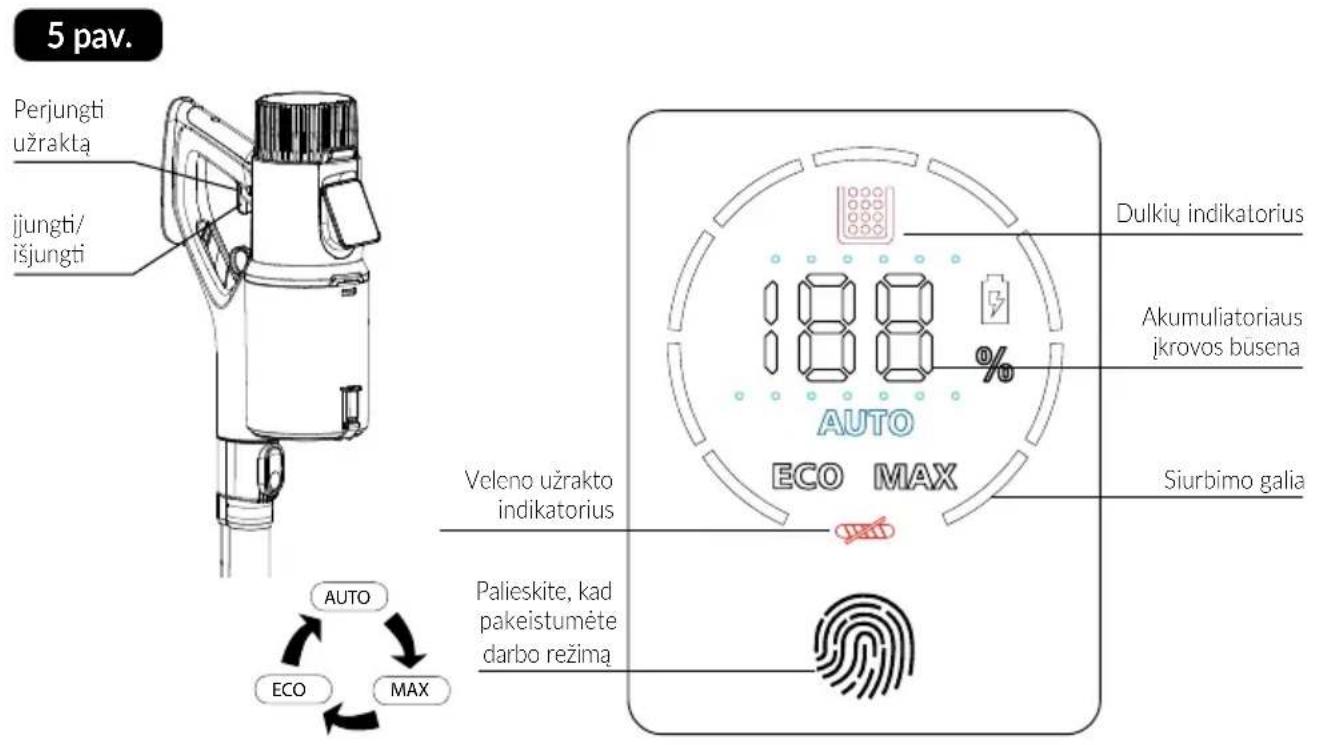
natural_image
Technical line drawing of two mechanical devices with arrows indicating flow or movement, no text or symbols present.
natural_image
Technical line drawing of a vacuum cleaner with attached device and mounting base (no text or symbols)natural_image
Technical line drawing of a mechanical device with three views showing internal components and motion indicators (no text or symbols)natural_image
Line drawing of a portable thermosifier with attached power outlet and cable (no text or symbols)5. att

natural_image
Diagram of two hand pumps with arrows indicating flow direction, showing internal components and exhaust flow (no text or symbols)BESCHRIJVING VAN HET APPARAAT
natural_image
Line drawing of a vacuum cleaner with directional arrows indicating motion (no text or symbols)natural_image
Technical line drawing of three different handheld devices with internal components and wiring, showing mechanical assembly (no text or symbols)natural_image
Line drawing of a thermosier device with attached power outlet and load arrow (no text or symbols)natural_image
Technical line drawing of a vacuum cleaner with attached device and mounting base (no text or symbols)natural_image
Technical line drawing of a mechanical device with three views showing internal components and motion indicators (no text or symbols)natural_image
Line drawing of a portable electric vacuum cleaner with attached power outlet and cable (no text or symbols)UŻYCIE ODKURZACZA
natural_image
Technical line drawing of two mechanical devices with arrows indicating motion or assembly (no text or symbols)PROBLEMY I SPOSÓB ICH USUWANIA
natural_image
Technical line drawing of a vacuum cleaner with directional arrows indicating assembly or movement (no text or symbols present)natural_image
Technical line drawing of a device with three views showing internal components and wiring (no text or symbols)natural_image
Line drawing of a portable electric heater with attached power outlet and cable (no text or symbols)natural_image
Diagram of two identical portable air purifier devices with arrows indicating flow direction (no text or symbols)ATENTIE! Nu instalați filtre umede - risc de deteriorare a aspiratorului!
PROBLEMĂCAUZASOLUȚIE
natural_image
Technical line drawing of a vacuum cleaner with attached device and mounting base (no text or symbols)natural_image
Technical line drawing of a mechanical device with three views showing internal components and motion indicators (no text or symbols)рис. 4

natural_image
Line drawing of a portable electric heater with attached power outlet and cable (no text or symbols)natural_image
Line drawing of a vacuum cleaner with directional arrows indicating motion (no text or symbols)- Odpojte nabijačku (17) od elektrickej siete a kábel nabijačky od batérie (6).
obr. 3
natural_image
Technical line drawing of a mechanical device with three views showing internal components and wiring (no text or symbols)natural_image
Line drawing of a portable thermosifier with attached power outlet and cable (no text or symbols)obr. 5
natural_image
Technical line drawing of a vacuum cleaner with directional arrows indicating assembly or movement (no text or symbols present)natural_image
Technical line drawing of a device with three views showing internal components and a cable being inserted (no text or symbols present)natural_image
Diagram of two identical portable devices with arrows indicating flow direction, no text or symbols presentLegible signature of the buyer


- MOD-71
- BEZPEČNOSTNÍ POKYNY PŘI POUŽÍVÁNÍ
- NABÍJENÍ BATERIE
- obr. 3
- Joonis 3
- DEVICE DESCRIPTION
- BEFORE FIRST USE
- ASSEMBLY (DISASSEMBLY) OF THE VACUUM CLEANER
- ASSEMBLY AND PARKING OF THE VA-CUUM CLEANER SWITCH ON THE HANDLE
- BATTERY CHARGING
- USING THE VACUUM CLEANER
- CLEANING AND MAINTENANCE
- TROUBLESHOOTING
- TECHNICAL DATA
- Proper disposal of the product (waste electrical and electronic equipment)
- Proper removal of product (batteries and//or accumulators)
- ábra
- USO DELLA SCOPA ELETTRICA
- att
- BESCHRIJVING VAN HET APPARAAT
- UŻYCIE ODKURZACZA
Brand : MPM
Model : MOD-71
Category : Vacuum Cleaner