
MOD-49 - Vacuum Cleaner MPM - Free user manual and instructions
Find the device manual for free MOD-49 MPM in PDF.


| Product Type | Washing Vacuum Cleaner (Carpet Cleaner) |
| Brand | MPM |
| Model | MOD-49 |
| Color | Yellow and Black |
| Main Functions | Dry vacuuming, wet vacuuming, cold water wash, hot water wash, steam cleaning, steam sterilization, blower |
| Power Cord Length | 4.10 m |
| Remote Control Frequency | 433.050 – 434.790 MHz |
| Remote Control Max Power | ≤ 10 dBm |
| Remote Control Battery | 23A 12V alkaline |
| Filter System | HEPA filter (dry), sponge filter (wet), paper dirt bag |
| Attachments Included | Floor/carpet brush, crevice tool, large steamer attachment with microfiber, small washing attachment with bristles, 2 aluminum tubes |
| Suction Control | High/Low adjustable via remote |
| Water Heating | Yes (for hot water and steam modes) |
| Blower Function | Yes, by connecting hose to air outlet |
| Safety Features | Float chamber with safety valve, anti-electrostatic design |
| Maximum Continuous Operation | 2 hours |
| Container Material | Plastic with clamps |
| Care Instructions | Wash filters with warm water, dry completely; do not use dishwasher or dryer |
| Intended Use | Domestic only, not for commercial use |
| Storage | Accessories stored on base |
Frequently Asked Questions - MOD-49 MPM
User questions about MOD-49 MPM
0 question about this device. Answer the ones you know or ask your own.
Ask a new question about this device
Download the instructions for your Vacuum Cleaner in PDF format for free! Find your manual MOD-49 - MPM and take your electronic device back in hand. On this page are published all the documents necessary for the use of your device. MOD-49 by MPM.
USER MANUAL MOD-49 MPM
EN We wish you satisfaction from using the product and invite you to check a wide range of other MPM appliances.
natural_image
Yellow and black vacuum cleaner with handle and control panel (no visible text or symbols)MPM agd S.A.
flowchart
graph TD
    A["1: Surface coating"] --> B["2: Temperature measurement"]
    B --> C["3: Solar panel with 17 kPa and 2400 W filters"]
    C --> D["4: Heat transfer range 6 m"]
    D --> E["5: Filtered system with 17 kPa and 2400 W filters"]
SICHERHEITSHINWEISE
natural_image
Close-up of a white and black electronic device with a textured surface and a black handle (no visible text or symbols)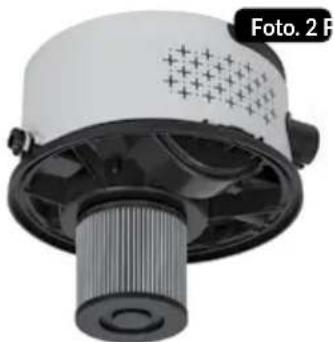
natural_image
Close-up of a white industrial vacuum cleaner with a perforated lid and threaded shaft (no visible text or symbols)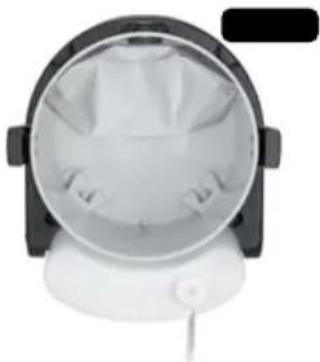
natural_image
Top-down view of a white spherical object with a transparent dome and internal patterns, no visible text or symbols.natural_image
Mechanical device with a lever and adjustment knob, no visible text or symbols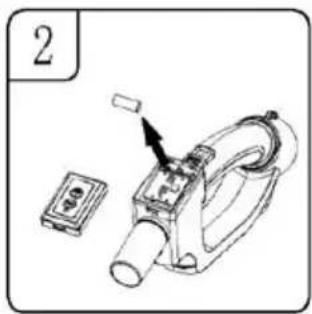
natural_image
Illustration of a handheld device with a cylindrical component and a small inset device (no text or symbols)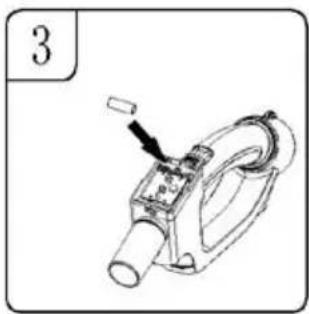
natural_image
Technical illustration of a mechanical device with a cylindrical component and a handle (no text or symbols)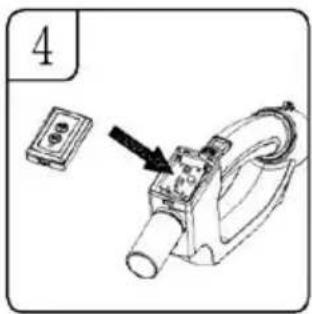
natural_image
Line drawing of an electrical plug with a socket and connectors (no text or symbols)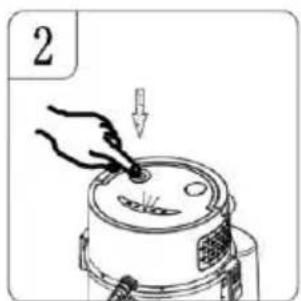
natural_image
Illustration of a smiling face inside a camera frame with a finger pointing to the mouth (no text or symbols)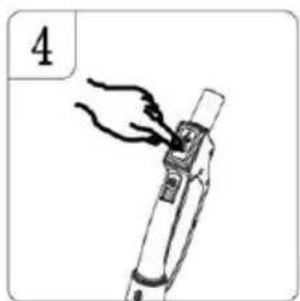
natural_image
Illustration of a hand holding a small object with motion lines, no text or symbols presentRead the instructions carefully before use.
- The device is intended for domestic use only and is not dedicated to commercial applications.
- Do not use the device for any other purpose than it was intended – follow the guidelines given later in this manual.
- Do not use the unit to suck up liquids, ash, cigarette butts, oils and sharp objects, etc. This can damage the appliance or even cause fire! Do not vacuum near flammable liquids or substances either!
- Do not direct the water/steam jet directly at devices containing electrical components, e.g. the inside of an oven.
- Do not point air intake/exhaust components towards people or animals. Be especially careful not to bring these items close to your eyes, ears and hair.
-Do not use the unit without correctly mounted filters.
-Take special care when children are near the appliance. - Do not immerse the unit, electric brush (optional), cable or plug in water or other liquids!
-Do not leave the appliance unattended during operation. - Do not leave the device unattended while it is connected to a power source.
-Always unplug the unit when not in use. - Always remove the plug from the mains socket before cleaning/maintenance.
-Check the housing regularly for damage. - Do not use the appliance if it has been dropped, contains visible signs of damage, or is leaking.
-Never use a damaged appliance, including one with a damaged cord or plug, in which case have it repaired at an authorised service centre.
-Use of accessories not recommended by the manufacturer may cause damage to the appliance, fire or personal injury.
-Do not use the appliance outdoors. - Do not cover the appliance during operation, do not cover the inlet/outlet holes.
-Store the device in a dry area.
-Keep the vacuum cleaner away from all heat sources (radiators, cookers, etc.) due to its plastic housing.
-Do not bend or hang the cord on sharp edges.
- Only several surfaces are intended to be touched during the appliance operation, i.e. handles, adjustment knobs, etc.
- The appliance may be used by people with reduced physical, sensory or mental abilities, as well as those without prior knowledge or experience in using such types of appliance, provided that they either are supervised or have been instructed and fully understood the training content. Unsupervised children should not perform cleaning and maintenance of the equipment.
- The appliance must be kept away from children. Keep the appliance and cable out of the reach of children.
-The appliance is not a toy and should not be used as such by children.
- Check that the power parameters on the appliance's rating plate correspond to the parameters of your power supply network.
-CAUTION! Batteries contain substances that can cause environmental pollution. Do not dispose of the used battery with ordinary household waste.
- Do not expose the battery to fire, extreme temperatures, water, moisture or prolonged exposure to sunlight.
- Do not store the battery together with metal objects, e.g. paper clips, nails, coins, etc., or intentionally short-circuit the negative and positive terminals – risk of ignition, explosion.
- Do not allow a situation to develop which may result in deformation of the battery, e.g. significant shocks, vibrations, mechanical pressure, etc. – Batteries must not be used if they are damaged (mechanical damage, substance leakage, etc.).
- If a battery leak occurs, do not touch the leaking substance.
-Do not connect the plug to the power socket with wet hands.
- Do not pull the plug out of the power socket by pulling the cord.
-Do not pull the appliance by its cord.
- Packaging is not a toy! Please keep packaging components (plastic bags, cartons, styrofoam, etc.) out of the reach of children.
- WARNING! Do not allow children to play with the film. Danger of suffocation!
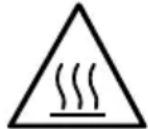
CAUTION! Hot surface! The symbol placed on the appliance indicates that its compo-may become hot during operation.

WARNING! Risk of scalding. The symbol on the appliance indicates that the appliance component marked with the symbol emits
hot steam during operation. Be careful when using the appliance, do not direct the steam jet towards people or animals. Avoid physical contact with the emitted steam and the part of the appliance that emits steam.
ELECTROSTATICS
Vacuuming certain surfaces in low humidity conditions may cause the unit to become slightly electrified. This is a natural phenomenon, which does not damage the device and is not a defect. In order to minimise this phenomenon, it is recommended to: discharge the device by frequently touching metal objects in the room with the pipe, increase the air humidity in the room, use generally available anti-electrostatic agents.
DEVICE DESCRIPTION
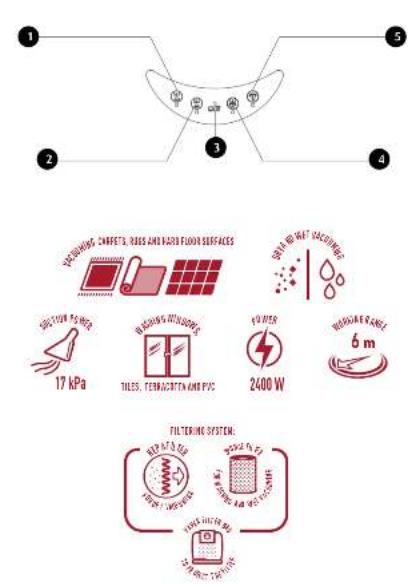
- Button with indicator light for cold water wash
- Button with indicator light for hot water wash
- Preheat/no water indicator light
- Button with indicator light for hot steam cleaning
- Button with indicator light for steam sterilisation
- Top cover
- Socket for the washing liquid hose outlet
- Air suction inlet
- Tank clamps
- Container
- Base
- Small rolling wheels
- Power on / off switch
- Carrying handle
- Air exhaust
-
Power cable
-
Socket for the washing liquid hose inlet
- Hose with a mesh filter and a nut
- Washing liquid container
- Large plastic wheels
- Suction hose with fluid hose and remote control panel in handle (suction mode and spray mode)
- Aluminium tubes
- Float chamber
- HEPA filter
- Sponge filter
- Floor and carpet brush
- Large steamer attachment for floors with removable microfibre
- Small washing attachment with bristles and applied microfibre
- Crevice attachment
- Paper dirt bag
- Washing liquid feeding hoses seals
- 23A 12V battery
CAUTION! The remote control panel is powered by a 23A 12V battery. The battery is included in the MOD-49 device.
ASSEMBLING AND CONNECTING OF THE VACUUM CLEANER
CAUTION! Make sure that the power cord plug is disconnected from the power supply when assembling the vacuum cleaner.
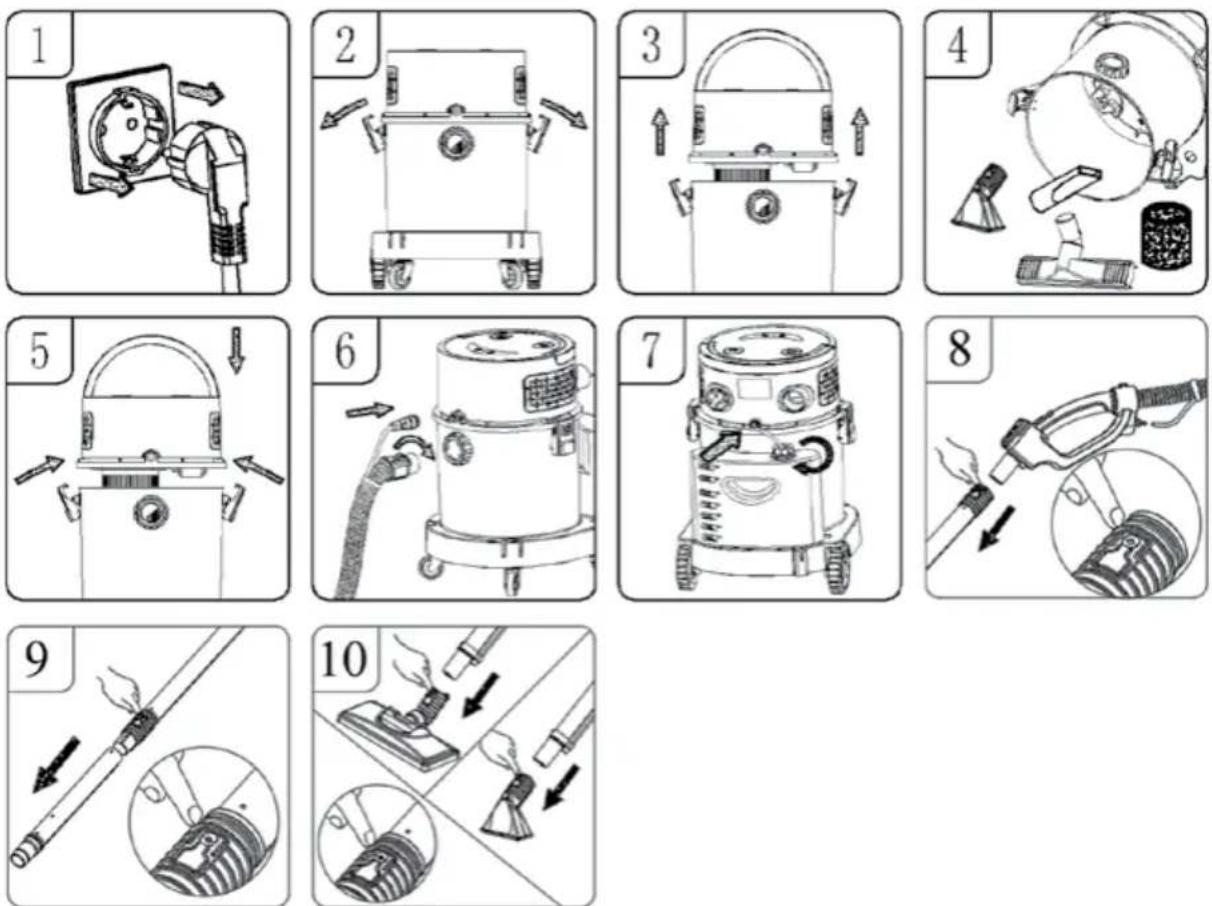
- Ensure the power cord is disconnected from the power socket (Fig. 1).
- Loosen the container clamps (Fig. 2).
- Lift the top cover off the container (Fig. 3).
- Remove all accessories from the container (Fig. 4).
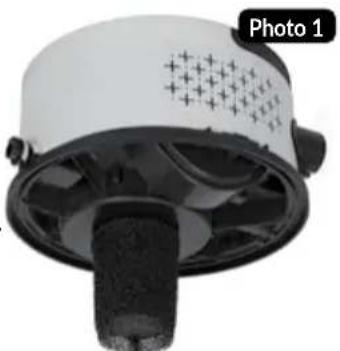
- Put the cover on the container, having previously mounted the appropriate filter (for wet washing or for collecting water: put the sponge filter of the water filter on the float chamber of the vacuum cleaner (Fig. 1) or for dry vacuuming, install a HEPA filter (Fig. 2) and put a paper dirt bag on the internal air sucking inlet Fig. 3) and close the clamps on both sides of the tank (Fig. 5).
- Insert the suction hose into the air suction inlet and tighten it clockwise. Then, insert the washing liquid supply hose into the washing liquid hose outlet socket. Check whether the appliances have been properly installed (Fig. 6).
CAUTION! The hose for feeding the washing liquid enters the appropriate outlet socket' "click" ensures the proper mount. Press the white button for dismantling it.
natural_image
Close-up of a white and black electronic device with a perforated lid and ventilation slots (no visible text or symbols)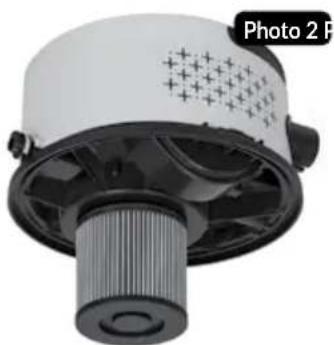
natural_image
Close-up of a white and black industrial vacuum cleaner with a textured grille and cylindrical base (no visible text or symbols)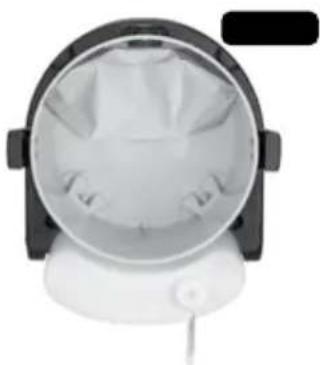
natural_image
Top-down view of a white spherical object with a transparent dome and internal structure, possibly a lamp or device (no visible text or symbols)- Mount the detergent container, then insert the hose with the mesh filter into the container and tighten the cap clockwise. Connect the hose to the washing liquid hose inlet socket. Check whether it has been properly installed (Fig. 7).
- Connect the aluminium tube with the suction hose holder, and then connect the washing liquid supply hose correctly (Fig. 8).
- Connect the two aluminium tubes, as shown here (Fig. 9).
- Connect the washing attachment to the aluminium tube and connect the liquid supply hose to the socket (Fig. 10).
BATTERY INSTALLATION AND REPLACEMENT IN THE REMOTE CONTROL PANEL
natural_image
Mechanical device with a lever and handle, showing an arrow indicating motion (no text or symbols)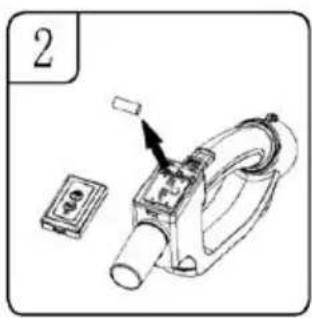
natural_image
Illustration of a handheld device with a cylindrical component and a small inset device (no text or symbols)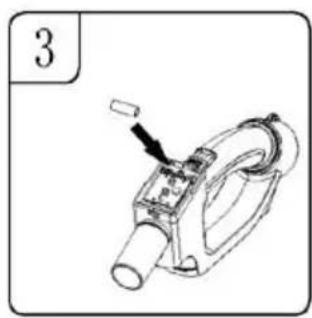
natural_image
Technical illustration of a mechanical device with a cylindrical component and a handle (no text or symbols)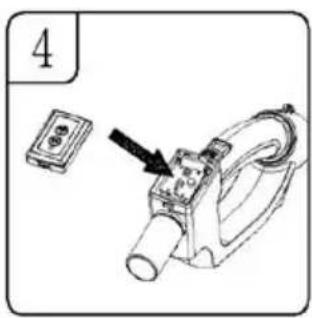
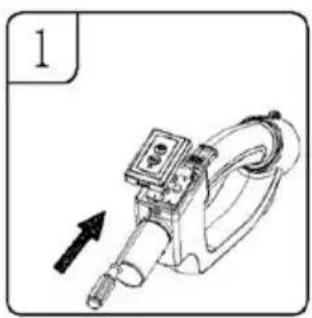
- The battery cover can be opened by pressing the fastening on the front of the battery compartment with a screwdriver (Fig. 1).
- Remove the old batteries from the remote control panel (Fig. 2).
- Replace with a new 23A 12V alkaline battery, paying attention to the proper polarity of anode and cathode during mounting (Fig. 3).
- Mount the remote control panel cover (Fig. 4).
CAUTION! The remote control panel can only be used with a 23A 12V alkaline battery. Do not use batteries with different parameters to avoid damaging the module. The battery constitutes an integral part of the MOD-49 washing vacuum cleaner set.
PAIRING THE REMOTE CONTROL PANEL WITH THE VACUUM CLEANER
natural_image
Line drawing of an electrical plug with a socket and connectors (no text or symbols)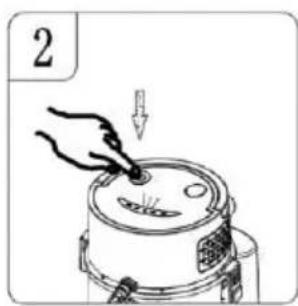
natural_image
Hand placing a smiley face into a circular device with a camera mount (no text or symbols)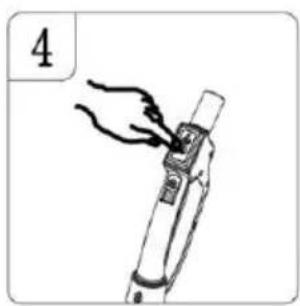
natural_image
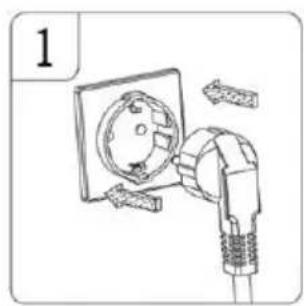
Illustration of a hand holding a pen or tool, no text or symbols present- Ensure the connection between the plug and the power source.
- Press the power switch and the cold water wash indicator light on the top cover panel will illuminate (Fig. 2).
-
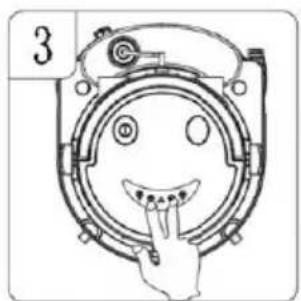
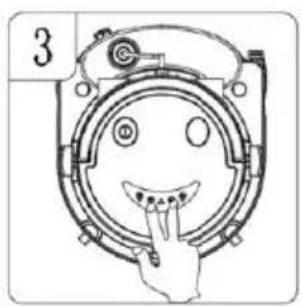
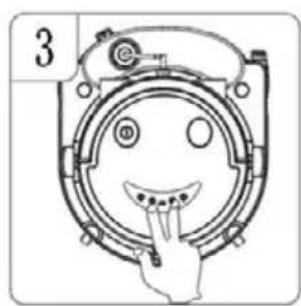
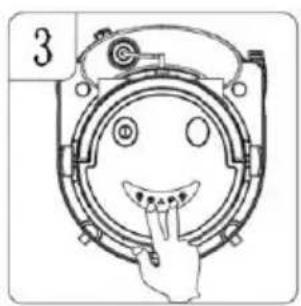
Simultaneously press the button with the hot water wash indicator light and the button with the hot steam cleaning indicator light on the top cover panel, and the cold water wash indicator light will go out and the centre heat/no water indicator light will flash (Fig. 3).
-
Press one of the buttons on the handle of the remote control panel – the suction button or the spray button. The indicator light on the top cover panel will flash once and return to normal, indicating the completion of the panel pairing (Fig. 4).
CAUTION! Before using the vacuum cleaner, please pair the remote control panel with the vacuum cleaner!
DRY VACUUMING
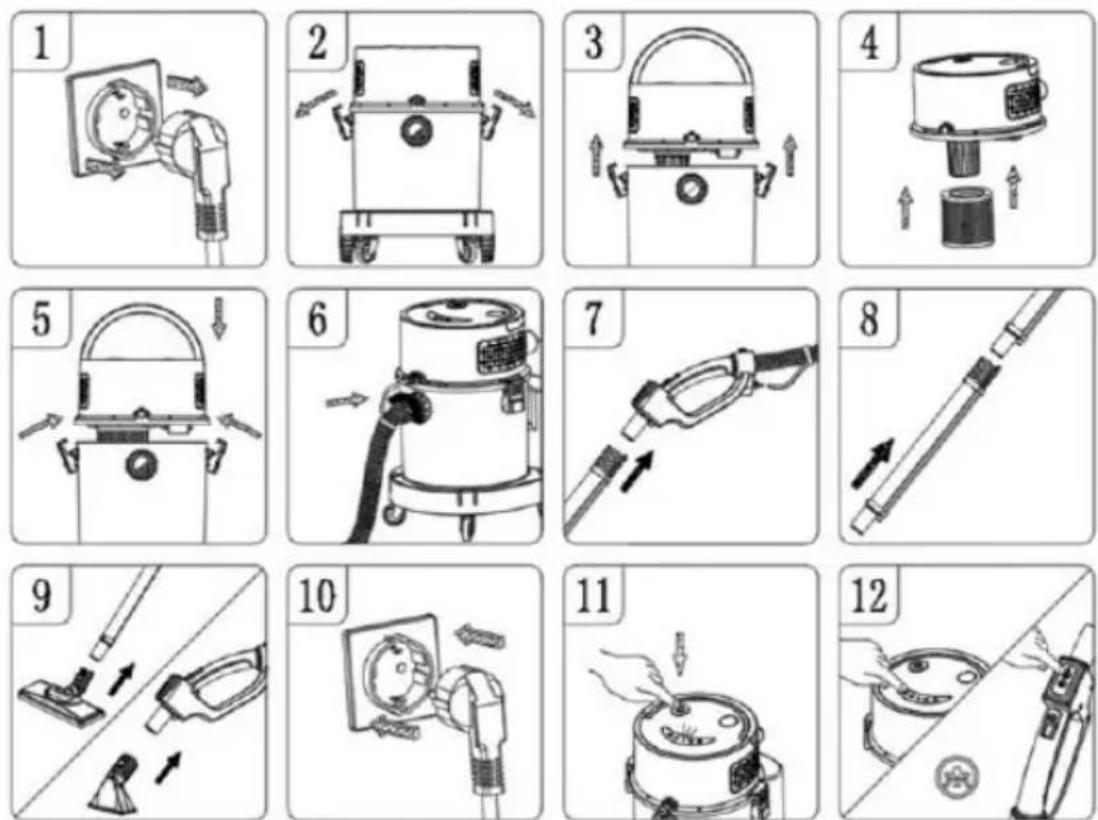
- Ensure the power cord is disconnected from the power socket (Fig. 1).
- Loosen the container clamps (Fig. 2).
- Lift the top cover off the container (Fig. 3).
- Mount the HEPA filter on the float chamber by pressing it to the top cover firmly (Fig. 4) and put the paper dirt bag on the inner air sucking inlet (Fig. 3).
- Place the top cover on the container and lock it using the container clamps on both sides of the vacuum cleaner (Fig. 5).
- Mount the suction hose by screwing it to the right to the air suction inlet and the washing liquid supply hose to the hose installation socket (Fig. 6).
CAUTION! The hose for feeding the washing liquid enters the appropriate outlet socket' "click" ensures the proper mount. Press the white button for dismantling it.
- Connect the aluminium tube with the suction hose holder, properly connect the washing liquid supply hose to the appropriate sockets (Fig. 7).
- If necessary, select two connected aluminium tubes in order to increase the operating radius (Fig. 8)
-
Connect the floor and carpet brush or crevice attachment to the aluminium tube (Fig. 9).
-
Plug in the power cable (Fig. 10).
-
Press the power switch and the cold water wash indicator light on the top cover panel will illuminate (Fig. 11).
-
Press the suction button on the handle of the remote control panel and the unit will start working. The suction mode works in two ways: high and low; when working in high mode, press the suction button and vacuuming switching to low mode, press the button again and the suction will stop working (Fig. 12).
WET VACUUMING AND CLEANING
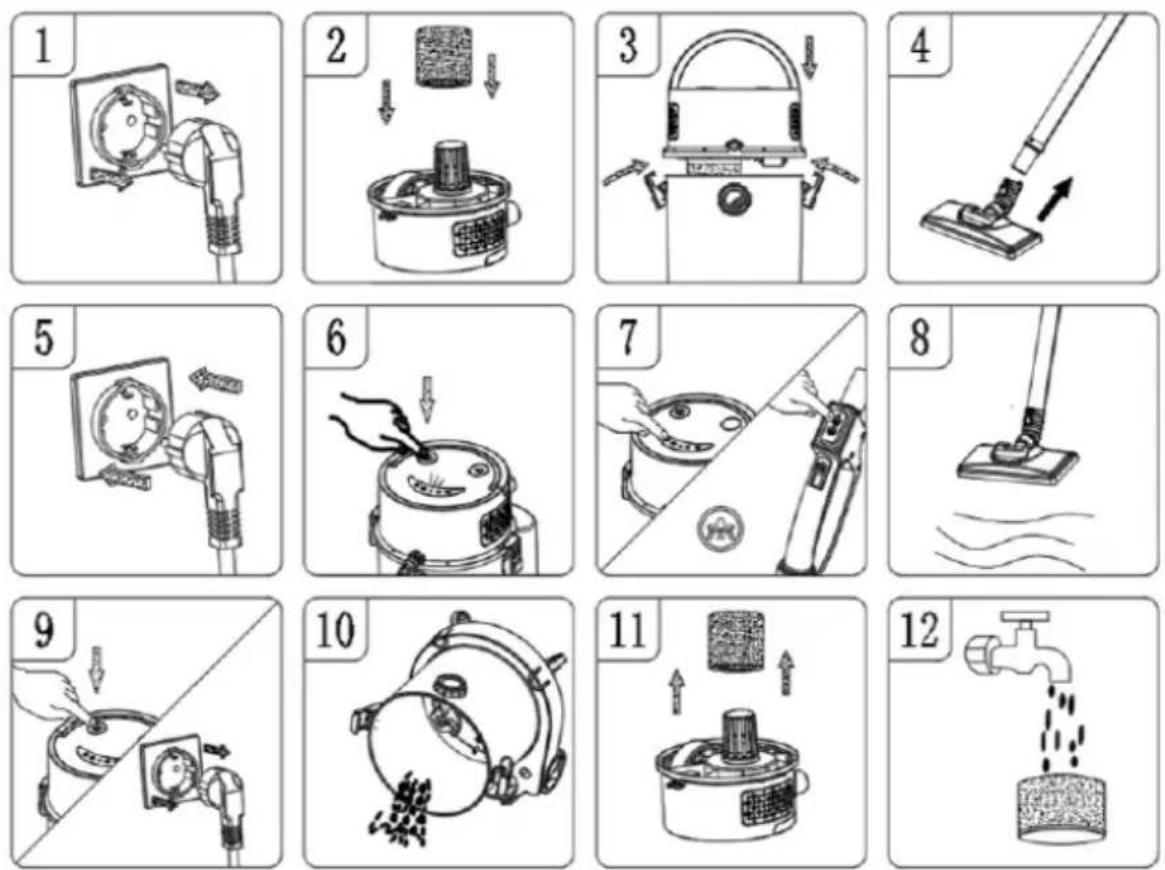
- Ensure the power cord is disconnected from the power source (Fig. 1).
- Place the sponge filter on the float chamber, ensuring that it completely covers the entire float chamber (Fig. 2).
- Place the top cover on the container and lock using with clamps situated on both sides (Fig. 3).
- Mount the selected accessories on the aluminium tube (Fig. 4).
- Plug in the power cable (Fig. 5).
- Press the power switch and the cold water wash indicator light on the top cover panel will illu minate. Select the appropriate washing mode on the top cover panel (Fig.6). There are 4 washing modes: cold water washing, hot water washing, hot steam cleaning and steam sterilisation.
- Press the suction and spray button on the remote control panel in the handle, the unit will start working. The suction mode operates in two modes: high and low. When working in high mode, pressing the suction switch results with vacuum switching to low mode, by pressing the button again and the vacuum cleaner stops working (Fig. 6-7).
- Once the water has been absorbed to its maximum capacity, the safety valve will operate and the unit will no longer aspirate liquids. It will stop working. (Fig. 8)
- Turn off the power and disconnect the power cord from the socket (Fig. 9).
- Pour out the dirty water and wash the tank thoroughly (Fig. 10).
-
To ensure the best wet vacuuming and cleaning performance, remove the sponge filter after its use (Fig. 11).
-
After each use of wet vacuuming and cleaning mode, the sponge filter should be washed with water and dried prior to next use (Fig. 12).
CAUTION! Do not pour water into the tank when using the wet vacuuming and cleaning function! This container will gradually fill with water during the process of its collection.
FUNCTIONS MANUAL
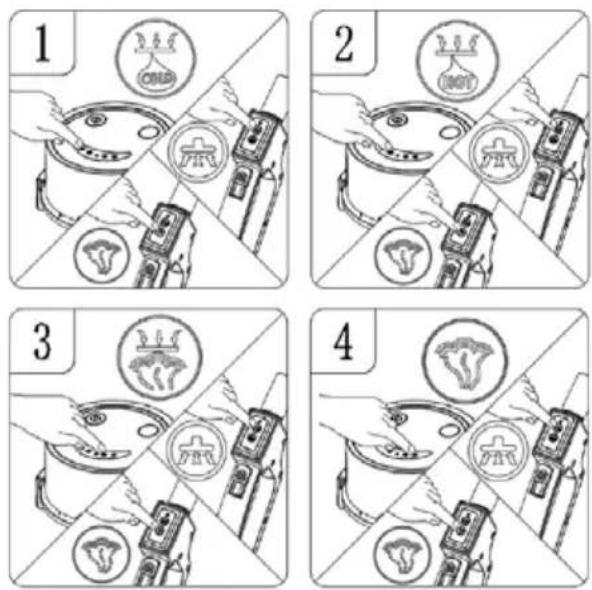
- Press the cold water wash button on the main cover panel, the indicator light will illuminate. Press the suction mode button on the handle of the remote control and the unit will start vacuuming. Then press the spray button on the handle of the remote control and the nozzle of the large steam attachment or the small washing attachment will start spraying water. Due to the large distance of water from the tank to the attachment, wait about 5 seconds while the unit sprays water and absorbs clean/dirty water at the same time (Fig.1).
CAUTION! Lacking level of cleaning liquid in the container during the washing mode should be immediately filled. Do not turn the liquid feeding process at idle (without liquid) in order to prevent pump damage.
- Press the hot water wash button on the main cover panel, the indicator light will illuminate. Press the suction mode button on the handle of the remote control and the unit will start vacuuming. Then press the spray button on the handle of the remote control and the nozzle of the large steam attachment or the small washing attachment will start spraying water. Due to the large distance of water from the tank to the attachment, wait about 5 seconds while the unit sprays hot water and absorbs clean/dirty water at the same time (Fig.2).
CAUTION! Lacking level of cleaning liquid in the container during the washing mode should be immediately filled. Do not turn the liquid feeding process at idle (without liquid) in order to prevent pump damage.
- Press the hot steam wash button on the top cover panel, the indicator light will illuminate. Press the suction mode button on the handle of the remote control and the unit will start vacuuming. During this time, the central heating/no water indicator light on the main cover panel is flashing, the water is pre-heating. Wait approximately 15 seconds, the central heating/no water indicator light will go out. Then press and hold the water spray button on the handle of the remote control without releasing (release the water spray button, the washing attachment will stop spraying steam), the large steam attachment or the small washing attachment will start spraying steam. The unit will simultaneously spray hot steam and absorb clean/dirty water (Fig.3).
CAUTION! In steam cleaning mode, only water needs to be poured into the container. When the small/large steamer attachment is emitting steam, do not bring your hands close to the steam to avoid burns!
- Press the steam sterilisation button on the main cover panel, the indicator light will illuminate. Press the suction mode button on the handle of the remote control. During this time, the central heating/no water indicator light on the main cover panel is flashing, the water is pre-heating. Wait approximately 15 seconds, the central heating/no water indicator light will go out. Then press and hold the water spray button on the handle of the remote control without releasing (release the water spray button, the washing attachment will stop spraying steam). The large steam attachment or the small washing attachment will start to spray steam (fig. 4).
CAUTION! The steam sterilisation function only works in spray mode.
WARNING!
When cleaning/washing carpets, use a low-sudsing cleaning agent and add the appropriate anti-foam evenly, otherwise the air outlet may cause foam to escape!
Do not use cleaning agents in steam cleaning mode. In addition, if the liquid dispensing system has not been previously cleaned of detergent residues, we recommend that the vacuum cleaner works for about. 5 min. in the washing mode before starting the steam cleaning mode.
It is recommended to empty the container frequently during intensive washing / liquids collecting works, in order to prevent a liquid level in the container exceeding critical levels and creating the possibility of producing foam from the air outlet.
When the dust container is full or the safety valve is blocked, the motor noise will become louder and the unit will stop sucking. At this point, the vacuum cleaner should be immediately turned off and container emptied.
BLOWER OPERATION
natural_image
Illustration of a plug inserted into a socket with a magnified view (no text or symbols)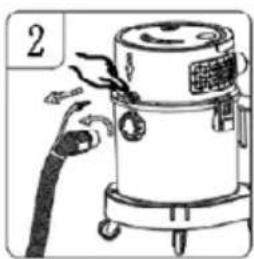
natural_image
Illustration of a vacuum cleaner with attached hose and valve (no text or symbols)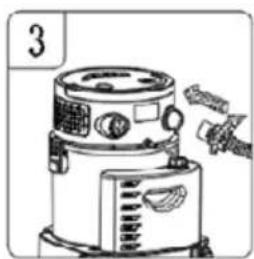
natural_image
Illustration of a kitchen appliance with a fan and handle (no text or symbols)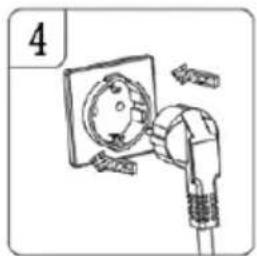
natural_image
Illustration of a plug inserted into a socket with a magnified view (no text or symbols)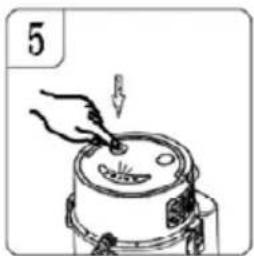
natural_image
Illustration of a hand using a tool to press or inspect a cylindrical object with a handle (no text or symbols)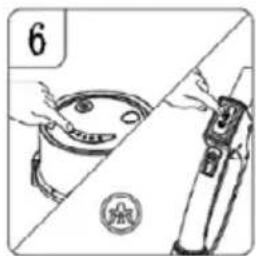
natural_image
Illustration of a hand holding a bowl and a tool on a surface, with no visible text or symbols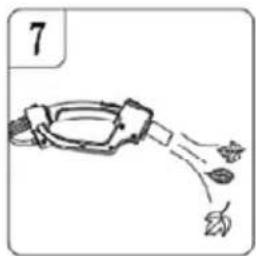
natural_image
Simple line drawing of a robotic arm with arrows indicating motion or movement (no text or symbols)CAUTION! Always wear safety goggles when using the blower.
CAUTION! Do not allow debris to be blown onto people standing nearby.
Wear a dust mask if blowing produces dust that might be inhaled.
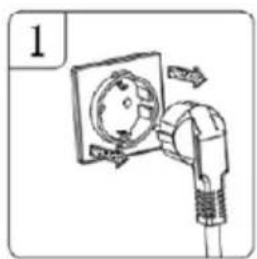
- Ensure the power cord is disconnected from the power source (Fig. 1).
- Unscrew and remove the suction hose from the container by turning it counterclockwise (Fig. 2).
- Insert the suction hose into the air outlet at the back of the container and tighten it by turning it clockwise (Fig. 3).
-
Connect the power cord to the mains (Fig. 4).
-
Blowing can be started by pressing the power switch (Fig. 5).
- Then press the suction mode on the handle of the remote control (Fig.6).
- Direct the suction hose at leaves or other debris (Fig.7).
STORAGE OF ACCESSORIES
- Aluminium tubes and accessories should be stored on the base of the vacuum cleaner
CLEANING AND MAINTENANCE
CAUTION! After completing the cycle of the carpet washing mode with detergents, we recommend changing the water in the tank to a clean one and running the vacuum cleaner for about 5 minutes to clean the liquid dispensing system.
- Each time, prior to start any maintenance or cleaning activities, turn off the device and remove the plug from the socket.
- After using the device, empty, clean and dry the tank as well as the detergent container. Moisture and contamination may cause unpleasant odours to develop inside the container and tank.
- Wash the microfibre pads with similar items according to the washing instructions below:
-Maximum washing temperature in the washing machine is 60^ .
-Do not bleach.
-Do not tumble dry.
-Do not iron.
-Do not dry clean.
FILTER CLEANING
a. To maintain filters efficiency, a periodical check-in is required.
b. If the dust being sucked is very fine, the HEPA filter may need to be cleaned more often or replaced with a new one.
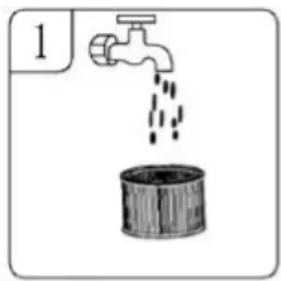
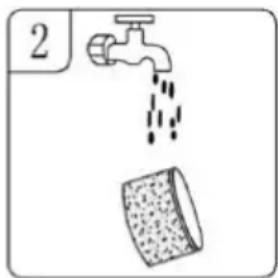
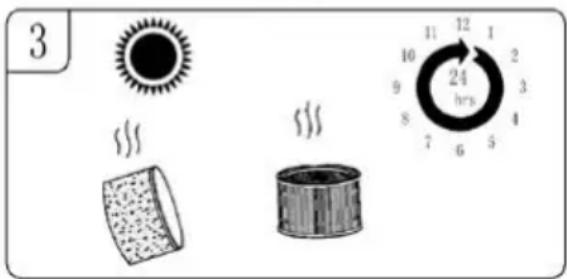
c. Wash the sponge filter and the HEPA filter with warm water without using detergent (Fig. 1, Fig. 2)
d. Cleaned filters should be allowed to dry completely before reuse.
CAUTION! Do not put the filter in the dishwasher, washing machine, tumble dryer, oven, microwave oven or open fire (Fig. 3).
-
Do not let the device work for a long time; the working time should not exceed 2 hours or otherwise it will shorten the device usability period.
-
Stop using the device immediately if any unusual vibration, noise or smell is experienced, and perform maintenance.
CAUTION! To achieve the best possible performance, clean the filters and the container after each use.
CAUTION! Do not assembly wet filters – risk of damage to the vacuum cleaner.
CAUTION! Each time, prior to any maintenance or cleaning activities, turn off the device and remove the plug from the socket. Do not submerge the device into water!
CAUTION! Do not use sharp objects, abrasive polishes, solvents or other strong chemicals for cleaning since their use may cause damages to the device.
TECHNICAL DATA
Technical specifications are given on the product nameplate.
Length of mains cable: 4.10 m
RADIO REMOTE CONTROL COMMUNICATION PARAMETERS
| Frequency range 433.050-434.790 Mhz | |
| Maximum power output ≤ 10dBm |
SIMPLIFIED EU DECLARATION OF CONFORMITY
MPM agd S.A. hereby declares that the washing hoover, model MOD-48, complies with the requirements and standards contained in European Union directives and national regulations. As a radio device, it conforms to the Directive 2014/53/EU of 16 April, 2014 on the harmonisation of the laws of the Member States relating to the making available on the market of radio equipment and repealing Directive 1999/5/EC.
The full text of the declaration is available at:
https://mpm.pl/odkurzacze/3572-odkurzacz-pioracy-mod-49-5903151061324.html
CAUTION! MPM agd S.A. reserves the right to technical changes.
Proper disposal of the product (waste electrical and electronic equipment)
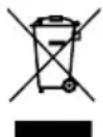
Marking on the product indicates that after the service-life of the product expires, it should not be disposed with other type of municipal waste. Used equipment may have a negative impact on the environment and health of people due to potentially containing hazardous substances, mixtures and components.
Mixing electric waste with other types of waste or disassembling those in an unprofessional manner may cause a release of substances that are hazardous to the environment and health. Used equipment should
be handed-over to a point for collection of electric waste. In order to obtain detailed information regarding the electric waste collection points, the user should contact the municipal point of electric waste collection or used equipment processing department.
Proper removal of product (batteries and/or accumulators)
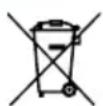
The icon with a crossed out trash can indicate that accumulators/batteries are subject to selective collection and recycling. Pursuant to Directive 2006/66/WE, batteries and/or accumulators must not be thrown away together with other waste coming from households after their service life comes to an end.
To prevent possible damage to the environment or human health resulting from uncontrolled waste dispo-
sal, accumulators/batteries should be collected, disposed of or recycled in accordance with applicable laws. A used battery should be placed in a special container at separate collection points for this type of waste
WSKAZÓWKI DOTYCZĄCE BEZPIECZEŃSTWA UŻYTKOWANIA
natural_image
Close-up of a white industrial vacuum cleaner with a perforated lid and threaded shaft (no visible text or symbols)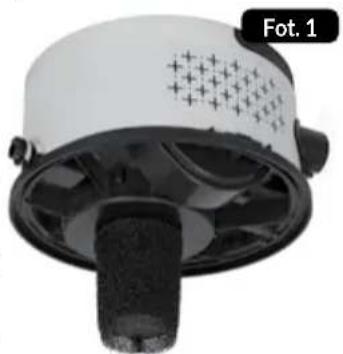
natural_image
Close-up of a white and black industrial fan or scrubber with perforated grille (no visible text or symbols)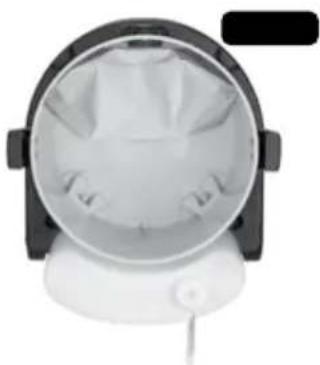
natural_image
Top-down view of a white spherical object with a transparent dome and internal structure, possibly a lamp or device (no visible text or symbols)natural_image
Illustration of a mechanical device with a lever and handle, showing an arrow indicating direction (no text or symbols present)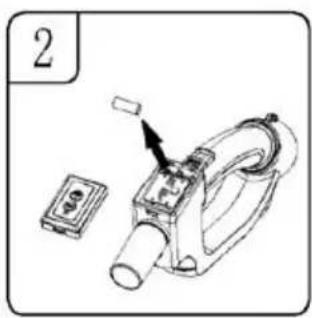
natural_image
Illustration of a handheld device with a cylindrical component and a small rectangular base, no text or symbols present.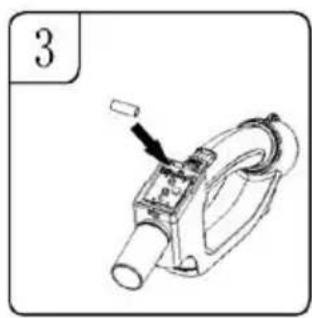
natural_image
Technical line drawing of a mechanical device with a cylindrical component and a handle (no text or symbols)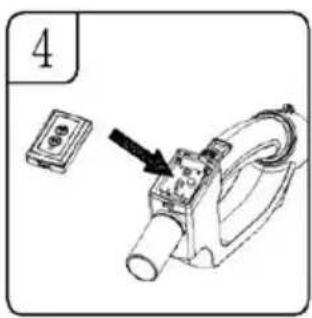
natural_image
Line drawing of a plug-in socket with connectors and screwdriver (no text or symbols)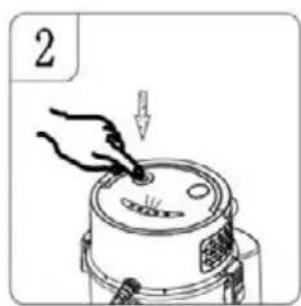
natural_image
Illustration of a smiling face inside a circular device with a hand touching the nose (no text or symbols)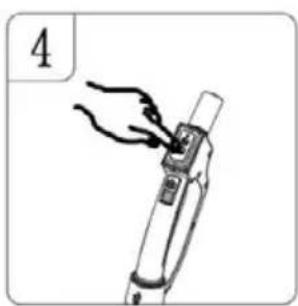
natural_image
Illustration of a hand holding a pen or tool, with no visible text or symbolsnatural_image
Diagram of a plug inserted into a socket, showing wiring and a directional arrow (no text or symbols)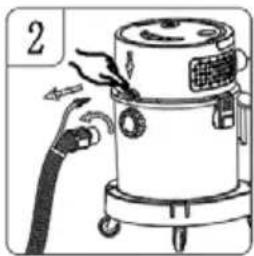
natural_image
Illustration of a vacuum cleaner with attached tubing and a flame, labeled with number 2 (no text or symbols on the device itself)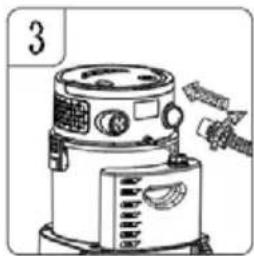
natural_image
Illustration of a kitchen vacuum cleaner with control panel and handle (no text or symbols)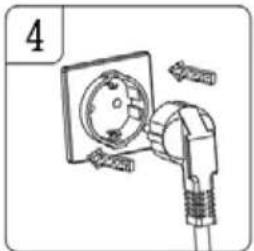
natural_image
Illustration of an electric plug with a circular component inserted, showing wiring and components (no text or symbols)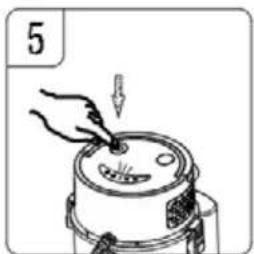
natural_image
Illustration of a hand using a tool to press or inspect a food item on a steamer (no text or symbols)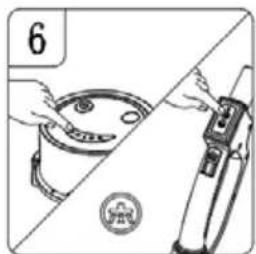
natural_image
Illustration of a cooking step with a pot and a tool, no text or symbols present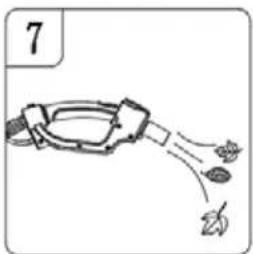
natural_image
Diagram of a mechanical device with arrows indicating flow or movement, no text or symbols presentnatural_image
Close-up of a white and black industrial fan or filter unit with a perforated lid (no visible text or symbols)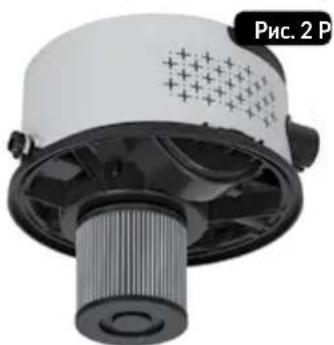
natural_image
Close-up of a white industrial vacuum cleaner with a perforated lid and mesh structure (no visible text or symbols)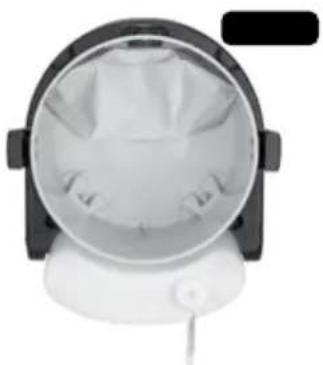
natural_image
Top-down view of a spherical object with internal structure, possibly a lamp or device (no visible text or symbols)natural_image
Illustration of a mechanical device with a lever and handle, showing an arrow indicating direction (no text or symbols present)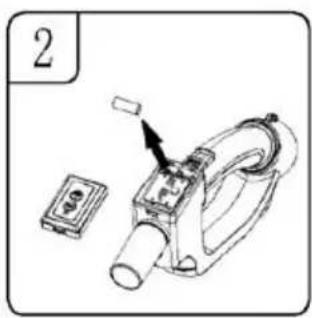
natural_image
Illustration of a handheld device with a cylindrical component and a small inset showing a plug (no text or symbols)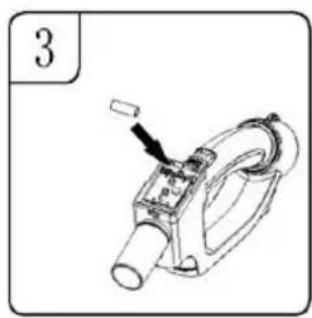
natural_image
Technical line drawing of a mechanical device with a cylindrical component and a handle (no text or symbols)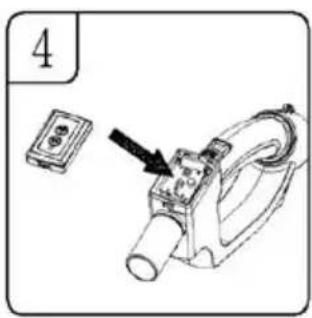
natural_image
Diagram of an electrical plug with a socket and connectors, no text or symbols present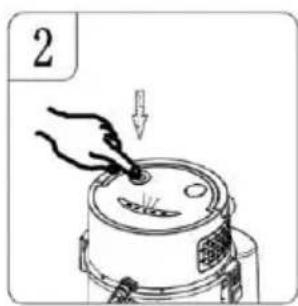
natural_image
Illustration of a smiling face inside a camera frame with a finger pointing to the mouth (no text or symbols)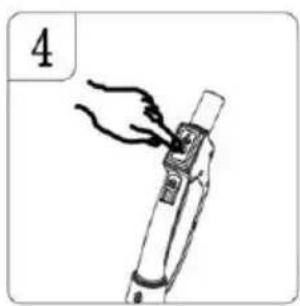
natural_image
Illustration of a hand holding a pen or stylus, no text or symbols presentnatural_image
Simple line drawing of a sun and a cube with steam, no text or symbols present
- SICHERHEITSHINWEISE
- CAUTION! Hot surface! The symbol placed on the appliance indicates that its compo-may become hot during operation.
- WARNING! Risk of scalding. The symbol on the appliance indicates that the appliance component marked with the symbol emits
- ELECTROSTATICS
- DEVICE DESCRIPTION
- ASSEMBLING AND CONNECTING OF THE VACUUM CLEANER
- CAUTION! Make sure that the power cord plug is disconnected from the power supply when assembling the vacuum cleaner.
- BATTERY INSTALLATION AND REPLACEMENT IN THE REMOTE CONTROL PANEL
- PAIRING THE REMOTE CONTROL PANEL WITH THE VACUUM CLEANER
- DRY VACUUMING
- CAUTION! The hose for feeding the washing liquid enters the appropriate outlet socket' "click" ensures the proper mount. Press the white button for dismantling it.
- WET VACUUMING AND CLEANING
- FUNCTIONS MANUAL
- WARNING!
- BLOWER OPERATION
- STORAGE OF ACCESSORIES
- CLEANING AND MAINTENANCE
- FILTER CLEANING
- TECHNICAL DATA
- SIMPLIFIED EU DECLARATION OF CONFORMITY
- Proper disposal of the product (waste electrical and electronic equipment)
- Proper removal of product (batteries and/or accumulators)
- WSKAZÓWKI DOTYCZĄCE BEZPIECZEŃSTWA UŻYTKOWANIA
Brand : MPM
Model : MOD-49
Category : Vacuum Cleaner