303457 - Weather Station Bearware - Free user manual and instructions
Find the device manual for free 303457 Bearware in PDF.


User questions about 303457 Bearware
0 question about this device. Answer the ones you know or ask your own.
Ask a new question about this device
Download the instructions for your Weather Station in PDF format for free! Find your manual 303457 - Bearware and take your electronic device back in hand. On this page are published all the documents necessary for the use of your device. 303457 by Bearware.
USER MANUAL 303457 Bearware
natural_image
Red stylized graphic of a bear and a pig (no text or symbols)BEARWARE
text_image
1 2 3 4 5 6 ALARM CHANNEL/+ ALARM/SN00ZE MEM/-Thank you for choosing a BEARWARE product. Please read the following user manual carefully so as to get the most from the product you have purchased. Before using the product, first check if the delivered item is complete, accurate and undamaged.
1. Scope of delivery
- Projection weather station
- User manual
2. Technical data
| Power supply | Main unit: 1 DC 5V, min. 500mA coaxial power adapter (3.5 mm / 1.25 mm) /// polarity: - --- (o --- + or three AAA 1.5V batteriesSensor: Two 1.5V AA battery |
| Temperature range | Main unit: -5°C to 50°CSensor: -40°C to +60°C |
| Temperature resolution | 0.1°C |
| External sensor protection class | IPX4 |
| Transmitting power | Main unit: 0dBmSensor: 7dBm |
| Frequency range 433MHz | |
| Dimensions (WxHxD) | Main unit: 168mm x 105mm x 41mmSensor: : 61mm x 113mm x 40mm |
3. Additional information about this device
Do not use this device if it is damaged. Do not expose the main unit to moisture and also direct sunlight. The outdoor sensor is splash-proof and should not be exposed to continuous and direct rain. An ideal location might be covered and in the shade. Before using the product, ensure that the available supply voltage corresponds to the operating voltage indicated on the specification plate. Before using the product, ensure that the cables are not damaged.
The device has to be connected to an easily accessible socket so that it can be disconnected in case of an emergency.
This product is suitable for use only with a 5V DC mains adapter. Please refer to the technical data under point 2 for the polarity and connector size.
This device is intended only for private use and not for medical purposes or for public information.

Caution!
Keep the batteries and the device out of reach of children. Batteries contain harmful acids. Weak batteries should be replaced as soon as possible to prevent leakage! Never use new and old batteries or batteries of different types together. Never throw batteries into the fire and do not short-circuit them. Do not recharge the batteries and do not take them apart. There is a risk of explosion!
- Product details
text_image
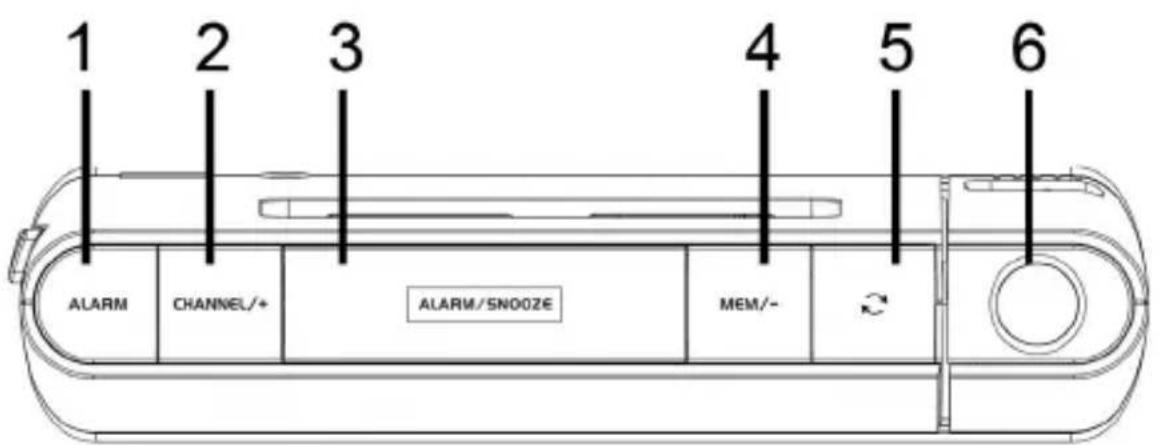
1 2 3 4 5 6 ALARM CHANNEL/+ ALARM/SN00ZE MEM/- →| No. Button | |
| 1 "Alarm" button | |
| 2 "Channel / +" button | |
| 3 "Alarm / Snooze" button | |
| 4 | "MEM/-" button |
| 5 "Projection flip" button | |
| 6 Projection |
text_image
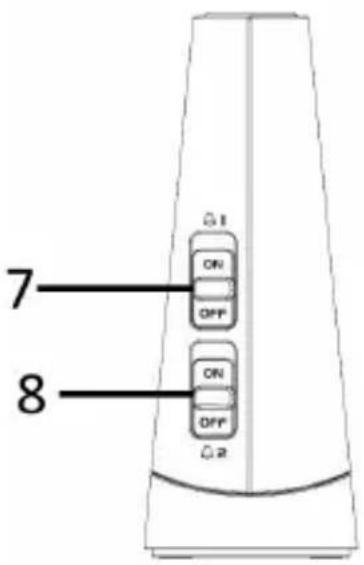
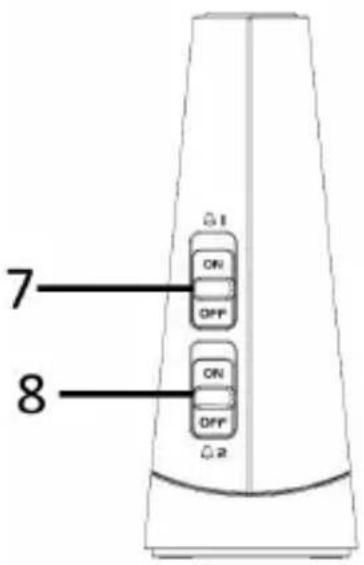
7 ON OFF ON OFF 8| No. Button | |
| 7 Alarm 1 ON / OFF | |
| 8 Alarm 2 ON / OFF |
text_image
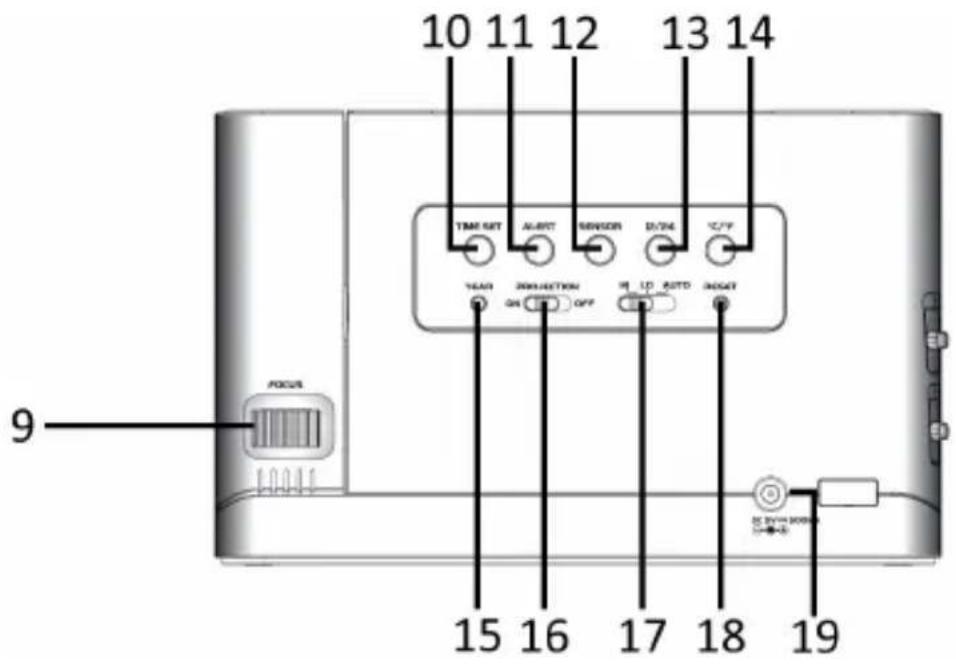
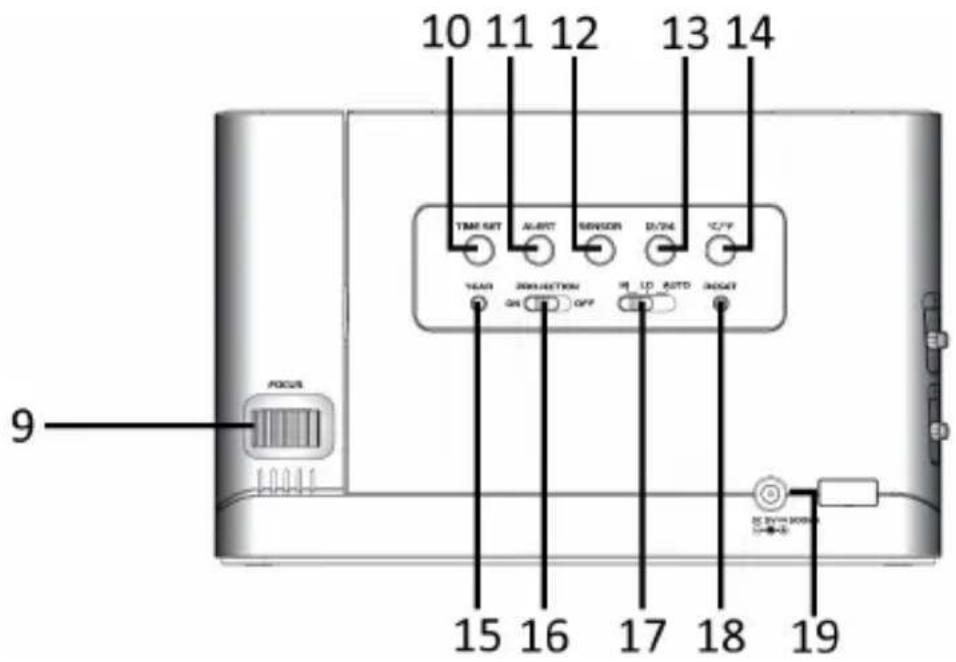
10 11 12 13 14 TMI SET ALERT SENSOR D/DC TC/F YEAR PRODUCTION IR LD RDTD KEY QH OFF 9 FOCUS 15 16 17 18 19| No. Description | |
| 9 Focus adjustment | |
| 10 "TIME SET" button | |
| 11 "ALERT" button | |
| 12 "SENSOR" button | |
| 13 "12/24" button | |
| 14 "°C / °F" button | |
| 15 "YEAR" button | |
| 16 "PROJECTION" switch | |
| 17 "Backlight" switch | |
| 18 "RESET" button | |
| 19 Power supply |

text_image
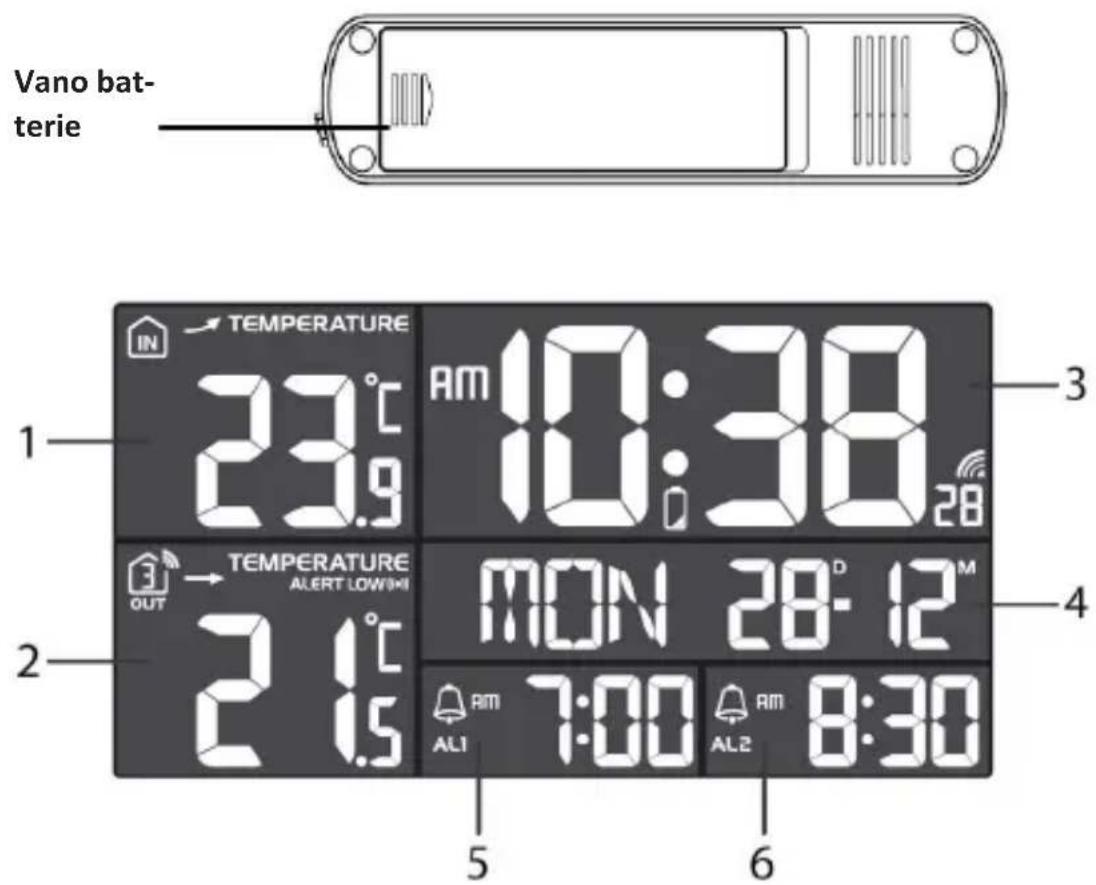
Battery compart- ment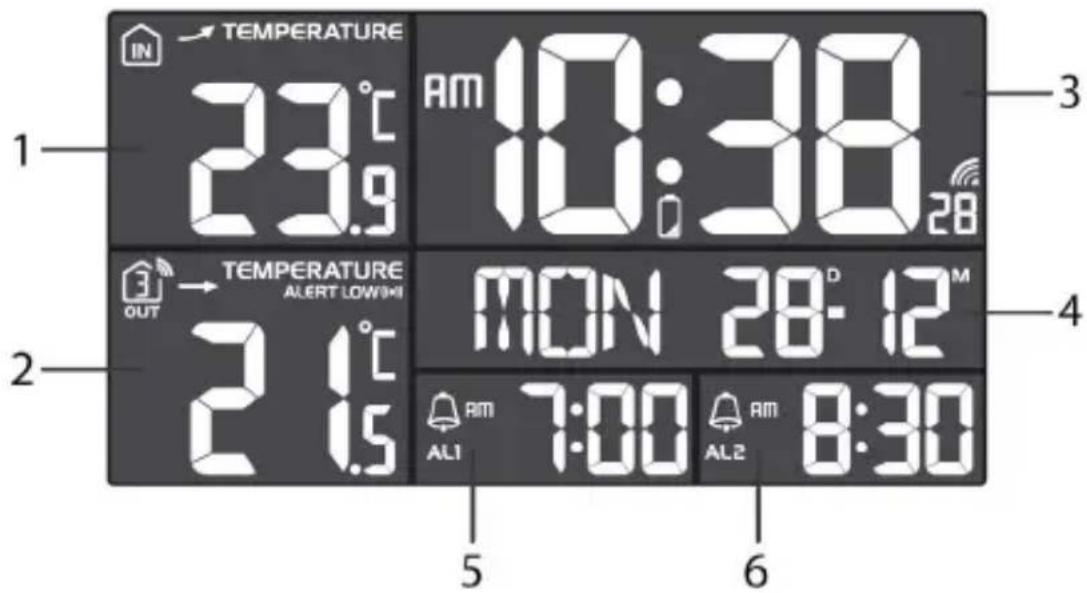
text_image
1 IN TEMPERATURE 23.9°C AM 10:38 28 23.9°C OUT TEMPERATURE ALERT LOW!M 21.5°C MON 28-12° 5 6 AM 7:00 AL2 AM 8:30 3 4| No. | Description |
| 1 Indoor temperature | |
| 2 Outdoor temperature | |
| 3 Time display | |
| 4 Date display | |
| 5 Alarm 1 | |
| 6 Alarm 2 |
text_image
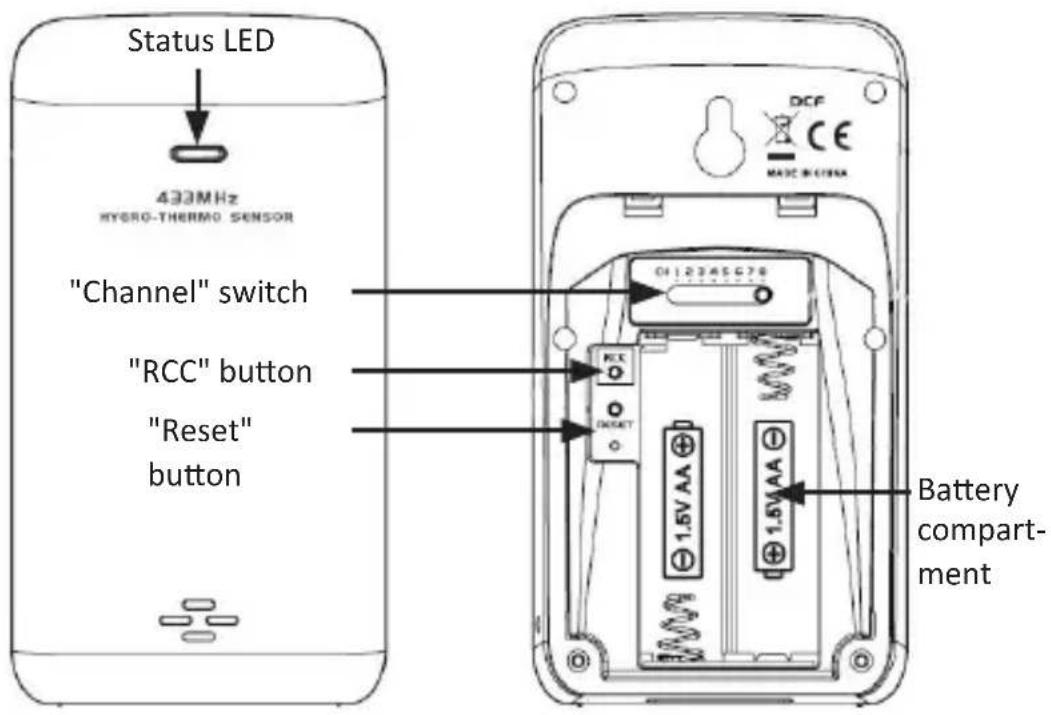
Status LED 432MHz HYDRO-THERMO SENSOR "Channel" switch "RCC" button "Reset" button DCF CE MASC BIOMINA 0112345G78 RESET 1.6V AA 1.6V AA Battery compa- ment5. Commissioning
- Take the product out of the package and remove all the packaging material. Open the battery compartment of the outdoor sensor and insert two 1.5V AA batteries. Pay attention to the correct polarity of the contacts.
- Open the battery compartment on the weather station and insert three 1.5V AAA batteries. Pay attention to the correct polarity of the contacts. Alternately, connect the provided 5V DC coaxial power adapter to the weather station.
- For this purpose, connect the power adapter to a properly installed socket.

Note: If the weather station is used only with 1.5V AAA batteries, the backlight is not permanently switched on. Press the "ALARM/SNOOZE" button to briefly turn on the backlight.
5.1 Connection with the outdoor sensor
- Select the desired channel using the "Channel" button in the battery compartment of the outdoor sensor.
- After start-up, the weather station attempts to connect with the outdoor sensor. Make sure that both the devices are with each other's range. The connection icon "I" starts flashing in the "Outdoor temperature" display of the main unit. Press the "Sensor" button to start searching automatically.
If the main unit cannot establish a connection with the outdoor sensor within 2 minutes, then it stops searching. The connection icon stops flashing and the temperature display shows "--._°C" on the display.
If a connection cannot be established, then this could be, for example, due to thick walls, or to a long distance of the sensor from the main unit. In this case, position the sensor and the main unit closer to each other. To restart scanning, press and hold the "Sensor" button on the back of the main unit for 2 seconds until the connection symbol in the display starts flashing.
6. DCF signal
You can enable (auto) or disable (off) this function as the last item in the basic settings.
The DCF signal is a time signal which is sent out by one of the most accurate clocks in the world. It is located near Frankfurt am Main. Under ideal conditions, your weather station can receive the signal from a distance of up to 1500 km.
If the weather station has detected the signal, then it displays the current Central European Time, the date, and the day of the week depending on the basic settings. The DCF symbol " is then shown on the display.
The weather station scans for a signal and attempts to synchronise every day at 02:00 and 17:00 hrs.
You can start the signal scan automatically by pressing the "RCC" button in the battery compartment of the outdoor sensor.
Once the attempt to receive a signal fails, the weather station stops scanning after about 5 minutes. The DCF symbol disappears from the display.
Caution! Remember that some devices may be sources of interference for receiving the signal, such as televisions, computers, etc. You may have problems in receiving the signal in closed areas such as an airport, factories, cellars etc.
7. Basic settings

Note: When the backlight is switched off ("backlight" switch in Off position), the backlight can be turned on for approximately 5 seconds by pressing the large "SNOOZE / LIGHT" button at the top of the housing.
Press and hold the "TIME SET" button for about 3 seconds to modify the basic settings. With the "CHANNEL/+" and "MEM / −" buttons you can change the values accordingly.
By briefly pressing the "TIME SET" button, you can confirm the entry and proceed to the next option. In this way, you can change and customise the following settings in the sequence mentioned below:
• 12/24 hour format
• Hour
- Minute
- Second
• Year
• Month / Day format
- Month
Day
- Time zone - Note: If you set the time zone, for example, to +01 and the weather station is actuated using the DCF-signal, then the clock displays one hour later than the DCF-signal.
- Language setting - To set the day on the display. The following codes can be configured and selected using the "UP" and "DOWN" buttons: EN (English), RU (Russian), NL (Dutch), IT (Italian), ES (Spanish), DE (German), FR (French)
- RC - Enable or disable the DCF signal function.
- DST - Enable or disable automatic switching to daylight saving time.
7.2 Alarm setting
Setting the alarm
Press the "ALARM" button for about 2 seconds till "Alarm 1" starts flashing. You can make the desired settings using the "CH/+" and "-" buttons. Then press the "ALARM" button again to save the alarm setting. "Alarm 2" starts flashing subsequently. Set it as desired and confirm by pressing the "ALARM" button. The alarm is activated automatically after setting the alarm time.
Turning the alarm on / off
There is a "ALARM 1 ON / OFF" and "ALARM 2 ON / OFF" switch on the side of the device. You can turn Alarm 1 or Alarm 2 on and off using this switch.
Switching off the alarm
When the alarm is activated at the configured time, the backlight also turns on automatically. The alarm is active for 2 minutes before it turns off automatically.
Press the "SNOOZE/LIGHT" button to cancel the alarm. If a snooze symbol is shown on the display, this means that the snooze function is activated and the alarm will go off again in 5 minutes.
Press and hold the "Snooze / Light" button. The alarm will go off again on the next day at the same time. Alternatively, set the "Alarm" switch to "OFF" position to turn off the alarm.
7.3 Backlight
Move the "Backlight" switch to the desired position:
• AUTO = Backlight automatically
- LO = Backlight level 1
• HI = Backlight level 2
If the device is used without the power adapter and exclusively with batteries, the backlight is activated only when you press the "ALARM / SNOOZE" button. The backlight turns off again after 5 seconds.
7.4 Projection
The "PROJECTION ON / OFF" switch at the back of the device allows you to turn on the projection permanently (ON position) or by pressing a button (OFF position).
In the "OFF" position", you can turn on the projection for 5 seconds by pressing "ALARM / SNOOZE".
Press the "Projection Flip" button to rotate the projection by 180^ . You can move the projector forward or backward to obtain the desired projection angle.
8. Display
Time display:
The time can be displayed in a 12-hour or 24-hour format. The desired format can be selected in the basic settings.
Date and day:
The weather station has a date and day display. The day is marked with "D" and the month with "M".
DCF symbol:
The weather station synchronises the time every night. The symbol begins flashing during synchronisation. If the time has been successfully received, then the symbol glows continuously until the next synchronisation.
Indoor temperature display:
The indoor temperature is measured by the base station and is shown to an accuracy of one tenth of a degree. The configured temperature unit is displayed to the right of the measured value. The temperature unit can be changed between ^ C and ^ F. To do this, slide the ^ C / ^ F switch on the back of the weather station to the desired position.
Low battery:
If the battery symbol appears, then the inserted batteries are discharged and should be replaced with new batteries as soon as possible. This applies to the outdoor sensor as well as to the base station. If the empty battery icon appears next to the inside temperature, the battery of the weather station is empty.
Outdoor temperature display:
The outdoor temperature is measured by the outdoor sensor and shown to an accuracy of one tenth of a degree. The configured temperature unit is shown to the right of the measured value. The temperature unit can be changed between ^ C and ^ F. To do this, slide the ^ C / ^ F switch on the back of the weather station to the desired position.
Channel display
The weather station receives the signal of the outdoor sensor automatically. You can switch between the different channels using the "CHANNEL/+" button. Select the same channel, which you select for the outdoor sensor. The channels of the outdoor sensor can be selected on the device directly using a toggle switch. The Auto Cycle mode can be turned on by pressing and holding the "CHANNEL /+" button for about 2 seconds.
Receiving the outdoor sensor signal
The outdoor sensor sends a signal twice a minute, which is automatically received by the base station. You can also manually enable the signal reception. Press the "Sensor" button on the back of the device until the scan icon ("") starts flashing. Once the signal has been successfully received, the animation of the symbol disappears and the received temperature is shown on the display of the weather station.
Frost icon
With the temperature alarm, the base station shows a "★" icon in the display when the temperature falls below the 3°C mark in the outdoor display.
10. Temperature settings
- Press the "°C / °F" button to shift between Celsius and Fahrenheit.
- When the temperature drops below -40^ , "Lo" is displayed. If the temperature rises above 70^ , "Hi" is displayed.
Temperature trend
The temperature trend shows the possible weather changes as a trend.

indicates "rising"
indicates "constant"
indicates "falling"
RECORDING MAX / MIN TEMPERATURE
The main unit stores the MAX / MIN temperatures recorded since the last manual reset.
- Press the "MEM / -" button once In time mode to display the maximum temperature measured in the current channel
- Press the "MEM / -" button repeatedly to display the MAX / MIN value in the following sequence: The maximum temperature of the current channel -> The minimum temperature of the current channel -> The maximum indoor temperature -> The minimum indoor temperature.
- When the MAX / MIN readings are displayed, the display returns back to normal mode after 5 seconds.
- To clear the MAX / MIN indoor readings or that of the current channel, press and hold the "MEM / -" button for 2 seconds once the device is switched on and is in the MAX/MIN display.
Temperature alarm setting
The device can set the temperature HI / LO alarm for indoors and up to 8 outdoor channels.
-
Press and hold the "ALERT" button for about 2 seconds in time mode to access the alarm settings. The "IN" icon starts flashing. Press the "CHANNEL /+" or "MEM /-" button again to select the outdoor channel.
-
Press the "ALERT" button to switch between the "HI" and "LO" temperature channels.
- Press the "CHANNEL / +" button or the "MEM / -" button to change the value.
- To set the temperature value "Hi" or "Lo", press the "ALARM" button at the top of the weather station to turn the HI / LO alarm on or off.
- Once you finish, press and hold the "ALERT" button for about 2 seconds. The display changes back to the time mode. Alternatively, the device automatically returns to the time mode after about 60 seconds after the last button is pressed.
- The setting sequence: Channel --> "Hi" temperature alarm --> "Lo" temperature alarm --> Channel
When the alarm is activated, it can be heard audibly and the icon flashes on the display. Press the "ALARM / SNOOOZE", "ALARM" or "ALARM" button to stop the alarm. If you ignore the alarm, it stops after 2 minutes.
Note: You cannot enter contradictory HI / LO values in the setting. If the HI temperature value, for example, is 40^ C, you cannot set the LO alarm to more than 39.9^ C, etc.
When an alarm is activated in Auto Cycle mode, the display switches to the corresponding channel. You can press "ALARM / SNOOZE", "ALARM" or "ALERT". Alternatively, the alarm stops automatically after 2 minutes. The display returns to Auto Cycle mode.

Caution!
11. Safety instructions and disclaimer
Never try to open the device to repair or make modifications. Avoid contact with the mains voltage. Do not short-circuit the product. The device is not waterproof, therefore please use it only in dry surroundings. Protect it from high humidity, water and snow. Do not expose the appliance to high temperatures.
Do not expose the appliance to sudden changes in temperature or strong vibrations, as this could damage the electronic components. Check the appliance for any damage before using it. The appliance should not be used if it was subject to impact or has been damaged in some other manner. Please comply with the local regulations and restrictions. Do not use the appliance for purposes other than those described in the user manual. This product is not a toy. Keep it out of the reach of children or mentally disabled persons.
Any repairs or modifications to the appliance not carried out by the original supplier will void any warranty and guarantee claims. The appliance should be used only by persons who have read and understood this user manual. The specifications of the device may be changed without special prior notice.

12. Disposal instructions
In line with the European WEEE directive, electrical and electronic devices should not be disposed of along with domestic waste. Their components have to be separately sent for recycling or disposal, because improper disposal of toxic and dangerous components may permanently damage the environment. According to the electrical and electronic equipment act (ElektroG), you are obliged (as a consumer) to return (free of charge) all electrical and electronic devices to the manufacturer, the point of sale, or public collection points at the end of their service life. The relevant local laws regulate the details in this regard. The symbol displayed on the product, in the user manual or/and on the packaging refers to these regulations. With this manner of sorting, recycling and disposal of used devices, you make an important contribution towards protecting our environment.

13. Instructions for battery disposal
In conjunction with the sale of batteries along with the supply of devices that include batteries, the supplier is obliged to point out the following to the customer: The customer is legally obliged to return used batteries. He can return used batteries which the supplier offers or has offered as new batteries in his assortment free of charge to the supplier's dispatch warehouse (shipping address). The symbols shown on the batteries mean the following: Pb = battery contains more than 0.004 percent lead by weight, Cd = battery contains more than 0.002 percent cadmium by weight, Hg = battery contains more than 0.0005 percent mercury by weight.

The symbol of the crossed-out dustbin means that the battery must not be disposed of in household waste.

WEEE directive 2012/19/EU
WEEE Register no.: DE 67896761
The company WD Plus GmbH hereby certifies that the device 303457/20181031HK016 complies with the fundamental requirements and all other relevant stipulations of the guideline 2014/53/EU. A complete conformity statement can be obtained from: WD Plus GmbH, Wohlenbergstraße 16, 30179 Hannover, https://downloads.ganzeinfach.de/
text_image
1 2 3 4 5 6 ALARM CHANNEL/+ ALARM/SN00ZE MEM/- →text_image
1 2 3 4 5 6 ALARM CHANNEL/+ ALARM/SN00ZE MEM/- →| N. Tasto | |
| 1 Tasto “Alarm” | |
| 2 Tasto "Channel" | |
| 3 Tasto “Alarm/Snooze” | |
| 4 | Tasto "MEM" |
| 5 Tasto „Projektion-Flip“ | |
| 6 Proiezione |
text_image
7 ON OFF ON OFF 8| N. Tasto | |
| 7 Alarm 1 ON/OFF | |
| 8 Alarm 2 ON/OFF |
text_image
10 11 12 13 14 TIME SET ALERT SENSOR D/DC °C/F YEAR CONNECTION HLD AUTO ENDAY ON OFF 9 FOCUS 15 16 17 18 19| N. Descrizione | |
| 9 Rotella della messa a fuoco | |
| 10 Tasto „TIME SET“ | |
| 11 Tasto „ALERT“ | |
| 12 Tasto „SENSOR“ | |
| 13 Tasto "12/24" | |
| 14 Tasto “°C / °F” | |
| 15 Tasto „YEAR“ | |
| 16 Interruttore “PROJECTION” | |
| 17 Interruttore „Retroilluminazione“ | |
| 18 Tasto „RESET“ | |
| 19 Alimentazione elettrica | |