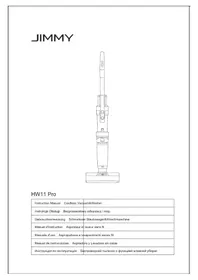
HW11 Pro - Vacuum Cleaner JIMMY - Free user manual and instructions
Find the device manual for free HW11 Pro JIMMY in PDF.


| Product Type | Cordless Vacuum and Mop |
| Brand | JIMMY |
| Model | HW11 Pro |
| Rated Power | 420 W |
| Battery Type | Lithium-ion 4000 mAh |
| Rated Voltage | 21.6 V |
| Input Voltage | 220-240 V ~ 50-60 Hz |
| Charging Time | 5 h ± 0.5 h |
| Cleaning Modes | Auto, Floor, Carpet |
| Water Spray Function | Automatic and Manual |
| Hot Air Drying Function | Yes (approx. 3 h) |
| Self-Cleaning | Yes (brush roll and air duct) |
| Display | LED (battery and mode display) |
| Voice Guidance | 5 languages (English, German, Italian, French, Russian) |
| Removable Handheld Vacuum | Yes (with accessories: crevice tool, upholstery brush, electric mattress head) |
| Clean Water Tank Capacity | Not specified (approx. 200 ml estimated) |
| Dirty Water Tank Capacity | Not specified (approx. 400 ml estimated) |
| Filters | HEPA filter and foam filter |
| Waterproof Rating (floor head) | IPX4 |
| Maintenance | Regular cleaning of tank, filter and brush roll |
| Weight | Not specified (approx. 4 kg estimated) |
| Warranty | 2 years |
| Manufacturer | Kingclean Electric Co., Ltd, China |
Frequently Asked Questions - HW11 Pro JIMMY
User questions about HW11 Pro JIMMY
0 question about this device. Answer the ones you know or ask your own.
Ask a new question about this device
Download the instructions for your Vacuum Cleaner in PDF format for free! Find your manual HW11 Pro - JIMMY and take your electronic device back in hand. On this page are published all the documents necessary for the use of your device. HW11 Pro by JIMMY.
USER MANUAL HW11 Pro JIMMY
natural_image
Line drawing of a vacuum cleaner device with handle and mounting base (no text or symbols)HW11 Pro
| Instruction Manual Cordless Vacuum&Washer |
| Instrukcja Obsługi Bezprzewodowy odkurzacz i mop |
| Gebrauchsanweisung Schnurloser Staubsauger&Waschmaschine |
| Manuel d'instruction Aspirateur et laveur sans fil |
| Manuale d'uso Aspirapolvere e lavapavimenti senza fili |
| Manual de instrucciones Aspiradora y Lavadora sin cable |
| Инструкция по эксплуатации Беспроводной пылесос с функцией влажной уборки |

Contents
English 2
Polski
16
32Deutsd
Français
Italiano 64
Español
русский язык 93
Important Safety Instructions
- Read all instructions and warnings before using this appliance. Failure to follow the warnings and instructions may result in electric shock, fire or serious injury.
- When using appliances, basic precautions should always be followed to reduce the risk of fire, electric shock and injury.
Warning!
- The appliance is only for household use.
- Before use the product, check whether the local voltage is consistent with the voltage marked on the power adaptor.
- Inspect the product before use, stop use if the product or adaptor is damaged.
- Use only as described in this manual.
- This appliance can be used by children aged from 8 years and above and persons with reduced physical, sensory or mental capabilities or lack of experience and knowledge if they have been given supervision or instruction concerning use of the appliance in a safe way and understand the hazards involved children shall not play with the appliance cleaning and user maintenance shall not be made by children without supervision.
- Do not use this product as a toy. Keep this product away from the reach of children. Take care of children and make sure they will not regard this product as a toy.
- Do not touch plug with wet hand.
- Use extra care when cleaning on stairs to prevent falling.
- Do not use or disassemble or replace any component if there is damage on power cord, plug, battery or conductive parts. Disassembly or replacement of the components by yourself may cause electric shock or fire. JIMMY will not take responsibility. Once damaged, the product need to be repaired or replaced by JIMMY, JIMMY's distributor or qualified person designated by JIMMY to avoid injury.
- Recharge only with the adaptor specified by JIMMY.
- Only to use the battery pack specified by JIMMY. Use of any other battery pack may cause explosion, injury and or product damage.
- If the product does not operate in accordance with the instructions, is seriously impacted, falls from a height, is damaged, or falls into the water, do not use it and contact JIMMY or JIMMY distributor.
- Only use JIMMY specified replacement parts or attachments.
- Do not pull or press the cable. Keep cable away from heated surfaces. Do not place the cable in a closed door or pull it through a sharp edge or corner. Keep the cable away from walking area. Do not operate product across the cable.
- Unplug the product when it is not used or before repairing.
- Do not drag the cord or carry cord to move the product, or use cord as handle.
- The product is a rechargeable electric appliance. Do not leave the machine to run unattended
- Remove battery pack when the product is cleaned, repaired or long idled.
- Do not get close to heating appliance or expose under sunshine longtime, to prevent over heating causing housing deformation.
- Keep objects that may obstruct air path from air inlet and outlet to prevent machine overheating.
- Product mainbody and floorhead have electric components, cannot be washed under water.
- Do not clean or disassemble brushroll cover or brushroll when the machine is power on or under working to prevent injury.
- Do not use the product to pick up flaming objects like burning charcoal or cigarette etc.
- Do not use the product to pick up sharp objects like broken glass.
- Do not use the product to pick up lime, cement, toner, gypsum powder, flour and other ultra-fine substances.
- Do not use the product to pick up acid-base cleaning liquid, washing powder and other corrosive liquids.
- Do not use the product to pick up inflammable and explosive objects like gasoline, alcohol, perfume, paint, etc.
- Do not disassemble the closed machine, and do not try to change the performance of the machine. Only get help from the professional personnel of the manufacturer, its maintenance department or similar departments, otherwise it will cause danger.
-
Turn off power and unplug charger if the products is long idled.
-
Product technical specification of this manual are based on results from lab tests of JIMMY or designated third parties. The company reserves all rights for final explanations.
About use of the product
- This product is suitable for hard floor in indoor environment, including waxed floor, rubber floor, tile floor and sealed wood floor, solid wood floor and other flat surface, use of the product on unflat ground may not achieve the best effect.
- Do not turn on the machine before dirty water tank and clean water tank are assembled in place according to instruction.
- Do not shake the product up and down or collide violently to prevent dirty water from flowing into the motor; when the product is turned on, do not lift or carry the machine up and down, and do not tilt the product to one side or lay it flat on the floor to prevent dirty water from flowing into the motor.
- Do not run the product for a long time with the float blocking the air inlet to avoid damage.
- After using the product, clean the dirty water tank, suction nozzle, air path and store it in ventilated and dry place. Wet place will affect the insulation and life of electrical appliances.
About Cleaning Solution
- A large amount of cleaning solution entering into the motor may cause damage to the appliance.
- Mix the solution with clean water according to the instructions (the ratio of solution to clean water is 1:50). It is recommended to use provided cleaning solution. Do not use cleaning solution contains acid, alkali, alcoholic solution or substances harmful to the environment.
- Keep cleaning solution out of reach of children. If any solution gets into the eyes, immediately flush them with clean water. If any solution is swallowed by accident, see medical care immediately.
- Dirty water and solution disposal should comply with local environmental regulations.
About disposal of battery
- The battery in the product contains materials harmful to the environment. Take out the battery pack from the product before disposal.
- Turn off the product and unplug adaptor before taking out battery pack.
- Handle the waste battery pack safely and properly. Do not put it into fire, water or soil.
- If the disposed battery leakage causes pollution to skin or clothes, Wash with clean water and see medical care immediately.
The product may have following signs, which have following meanings:
| Sign Meaning | |
 | Pay attention to high-temperature surfaces, as they may become hot during use. Be careful of burns. |
 | Do not use during bathing or showering. |
 | Powered head of water vacuuming device |
 | Do not cover up |
| IPX4 | Water proof grade |
Chapter 1 Product Assembly
Part Name
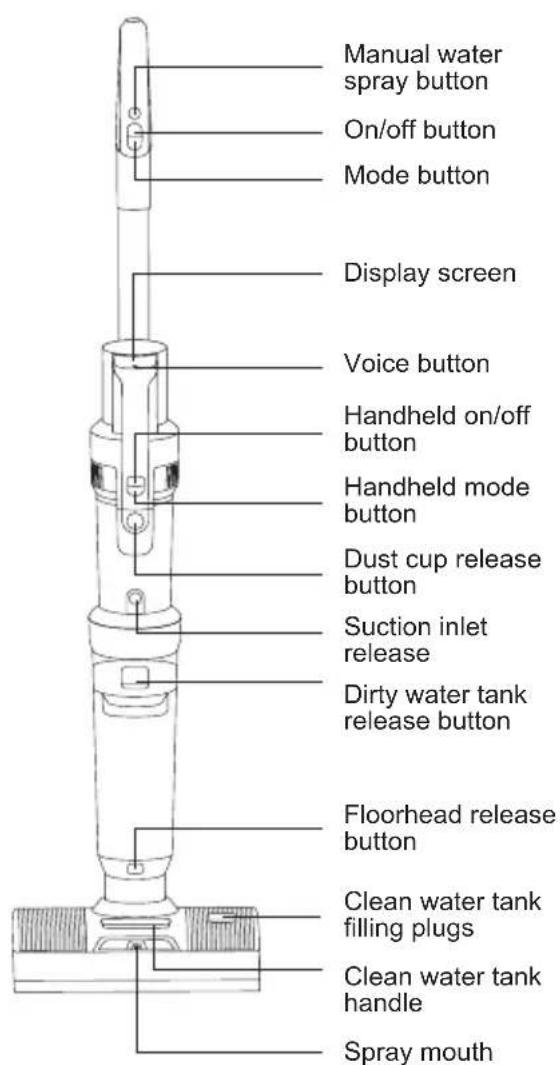
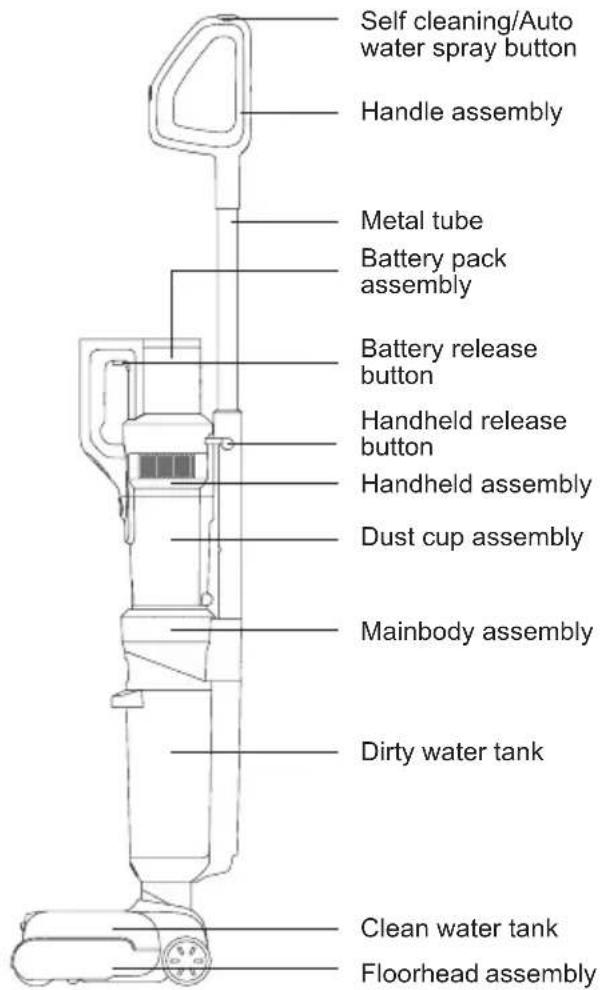
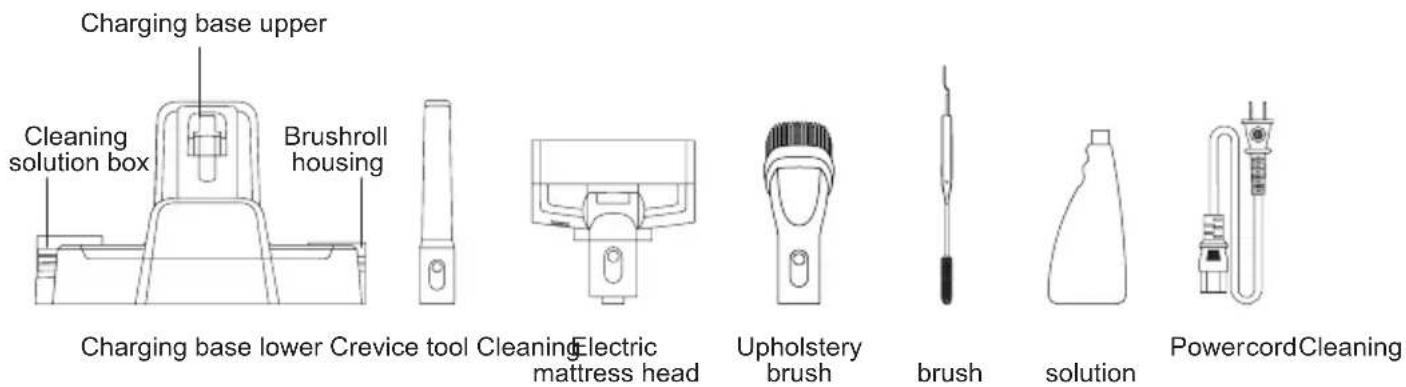
Packing List
| Name | Handle assembly | Battery pack assembly | Handheld assembly | Mainbody assembly | Floorhead assembly |
| Quantity 1 1 1 1 1 | |||||
| Charging base upper | Charging base lower | Brushroll box | Cleaning solution housing | Crevice tool | Electric mattress head |
| 1 1 1 1 1 1 | |||||
| Upholstery brush | Cleaning brush | Cleaning solution | Power cord | Instruction manual | |
| 1 1 1 1 1 |
Product assembly and disassembly
Noted: Cut off electricity before product assembly and disassembly.
Floorhead assembly and disassembly
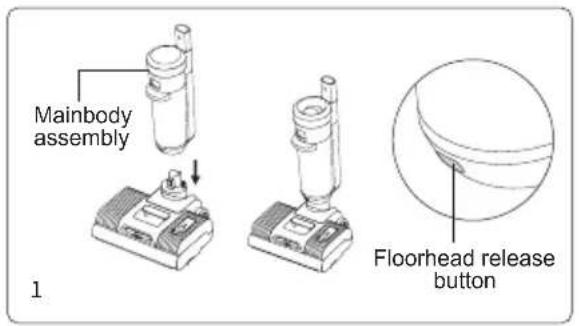
To install the floorhead assembly, first align the bottom of the mainbody assembly with the head of the floorhead assembly, insert it down on the floorhead, and push it in until a "click" sound is heard; To take out the floorhead, place the machine on the ground, hold the floorhead with one hand and press floorhead release button with the other hand, lift the mainbody up.(Fig 1)
Handle assembly and disassembly
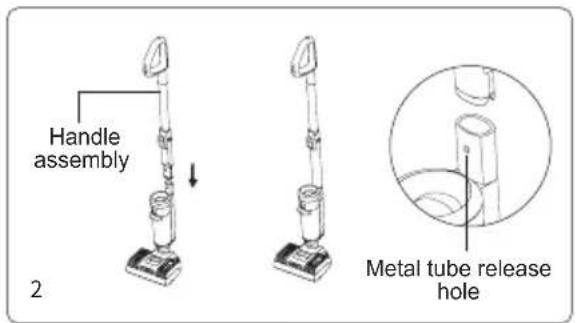
Insert the end of the metal tube vertically to the port of the mainbody assembly until hearing a "click" sound, ensure that the metal tube is tight and not loose. To remove the metal tube, insert a hard tool such as a screwdriver into the metal tube release hole, and pull the metal tube upwards. (Fig 2)
Battery pack assembly and disassembly
-
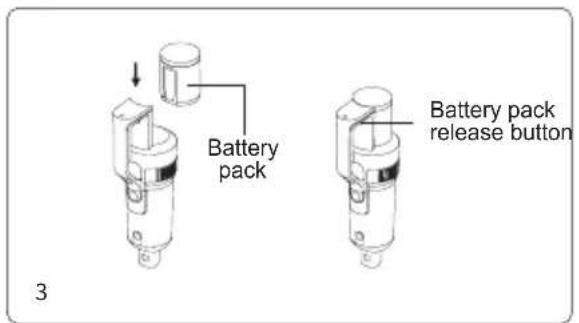
Slide battery pack along the slot and press the battery pack down firmly until a "click" sound is heard. The battery pack is locked. (Fig 3)
-
Press the battery pack release button and pull the battery pack in the direction opposite to the assembly to unlock the battery pack
Note: Except for the replacement of the battery pack, the battery pack doesn't need to be taken out frequently.
Handheld assembly and disassembly
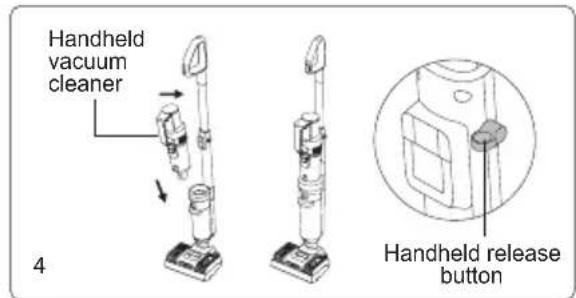
Take the handheld vacuum cleaner installed with the battery pack, first insert the dust cup suction mouth into the groove of the mainbody cover, then press the handheld body to the installed metal tube, after hearing a "click", the handheld vacuum cleaner is successfully installed. and the product is used as an upright vacuum cleaner in this status. To remove the handheld vacuum separately, simply press and hold the handheld release button and lift handheld vacuum cleaner diagonally upwards. (Fig 4)
Charge base assembly
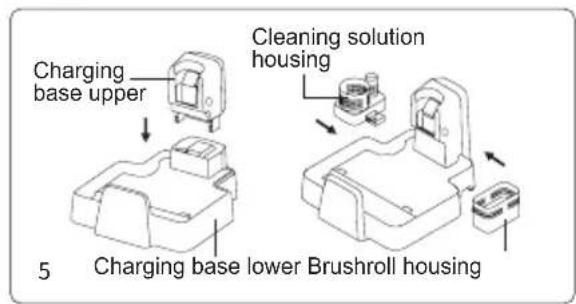
Press charging base upper, cleaning solution housing, and brushroll housing to the charging base lower along the illustrated position until a "click" sound is heard. (Fig 5)
Place machine to charging base
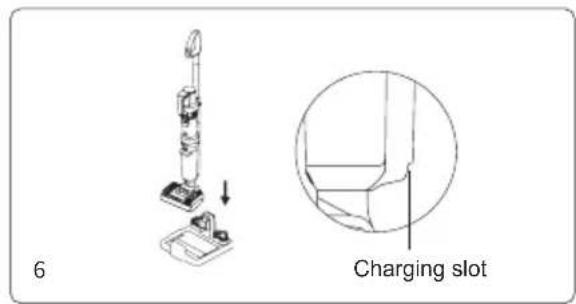
Make sure floorhead is in upright position, hold machine handle to lift the machine, aim charging slot on bottom of machine to the charging socket on charging base and put the machine into charging base. To use the machine, hold machine handle and lift out machine from charging base (Fig 6)
Dirty water tank assembly and disassembly
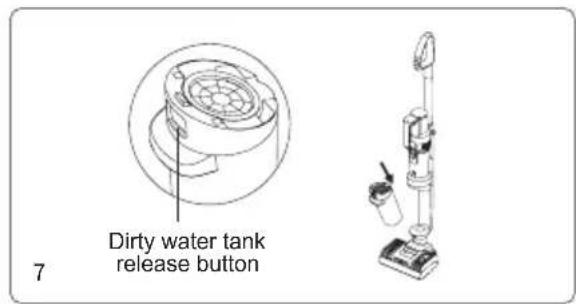
To assemble dirty water tank, place dirty water tank bottom into mainbody, push dirty water tank towards mainbody until a "click" sound is heard.
To take off dirty water tank, hold machine with one hand and hold dirty water tank with another hand, press dirty water tank release button to pull out dirty water tank. (Fig 7)
Clean water tank disassembly and assembly
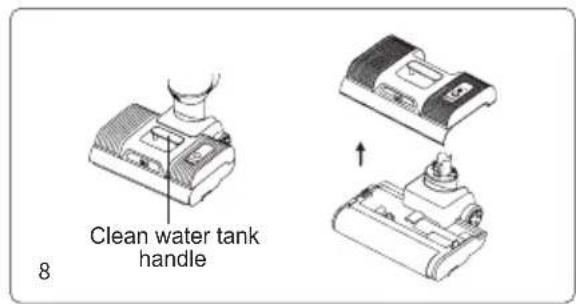
To take off clean water tank, hold the clean water tank handle and pull out the clean water tank.
To assemble clean water tank, put the clean water tank back to nozzle, align with the brushroll window. (Fig 8)
Brushroll assembly and disassembly
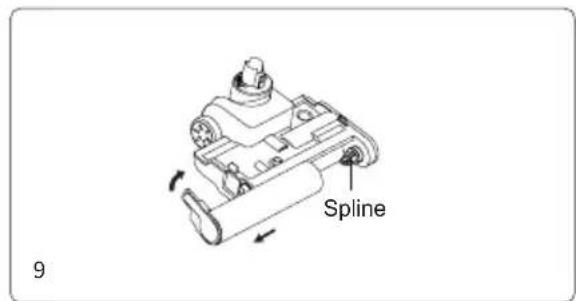
To remove the brushroll assembly, remove the clean water tank assembly as detailed in (Fig 8), hold the floorhead down with one hand, rotate the brushroll end cap upwards with the other hand, and remove the brushroll outward;
When installing the brushroll assembly, first align the other end of the brushroll with the spline, rorate the brushroll to the end, and then push the brushroll inward, rotate the brushroll end cover down and install it in place, align brushroll cap with the floorhead top surface. (Fig 9)
Chapter 2 Use of the Product
Note: Please fully charge the machine before using it, if there is no power, please charge it in time and use it after it is fully charged.
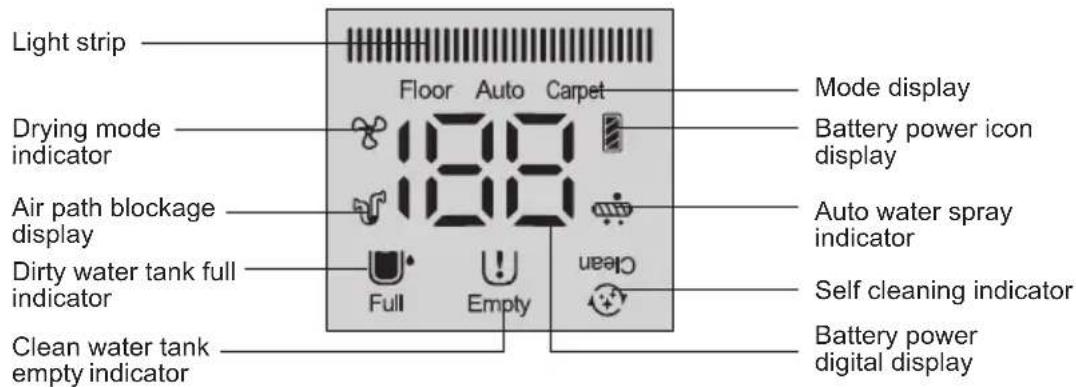
Dispaly screen and instructions for use
Machine charging
Connect the power cord to the power supply, put the upright vacuum cleaner into the charging base, and start charging.
Note:
- Before the first use, please fully charge the battery pack, and before the second charge, please empty the battery to ensure the life of the battery pack;
- If the product is to be long idled, please charge it once every three months. (Be sure to use the power cord of this product for charging)
- When not charging, please unplug power cord from the socket to prevent the danger of accidental touching.
Low battery power indicator
- When the upright cleaner is working, if the voice reminds "Low battery. Please charge the battery", Please use it after charging.
- When the upright cleaner is working, if the voice reminds "Low battery. Machine will be turned off soon. Please charge the battery ", the power is about to be exhausted, and it will automatically shut down. Need to charge for use.
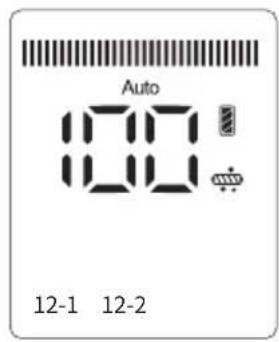
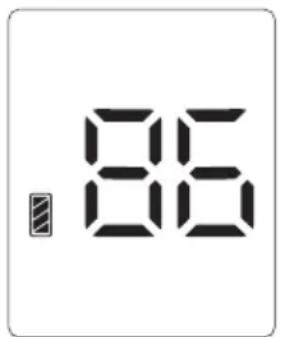
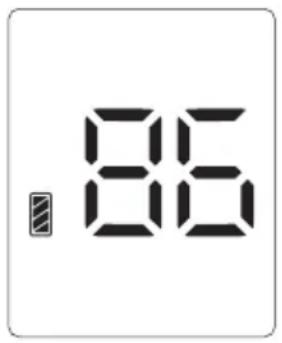
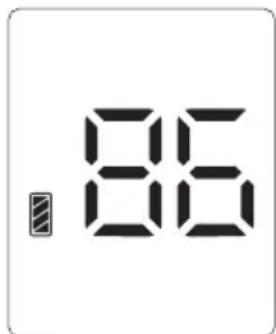
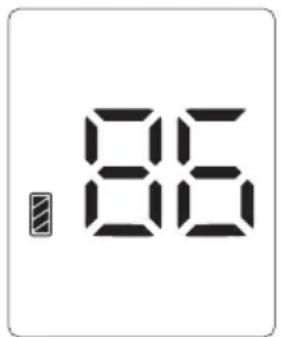
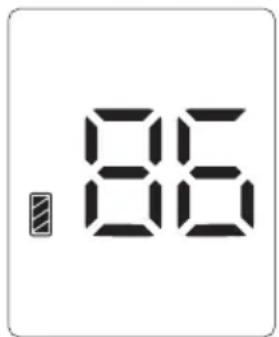
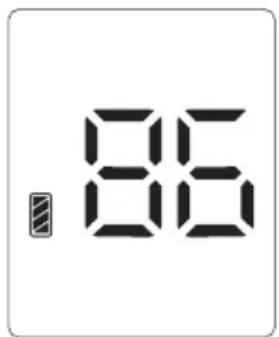
- When using vacuum cleaner, The LED screen displays left working minutes under current working mode. The icon on top right corner of the screen shows left battery power, full grid means 75% to 100% battery; 3/4 grid means to 50% to 75% battery; 1/2 grid means 25% to 50% battery; 1/4 grid means 1% to 25% of the battery; the blank means the battery being empty, and it needs to be charged before use.
Use of upright vacuum cleaner
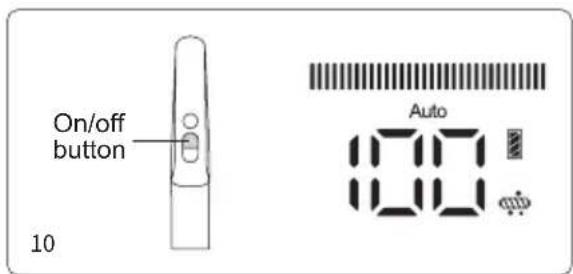
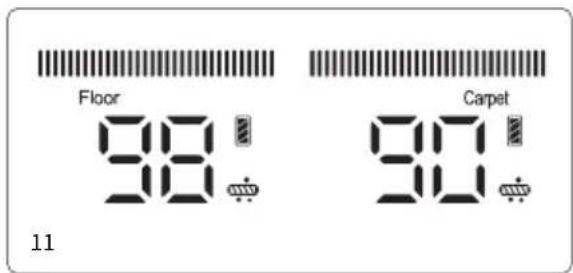
Press the handle on/off button, the display screen and decorative lights will light up, default is in Auto mode(Fig 10), press the mode button to switch to Floor mode, press the mode button again to switch to Carpet mode (Fig 11). Press the handle on/off button again to turn off the machine, the display screen and
the decorative lights go out.
In Auto mode, the machine power changes automatically basing on how much dirty water or dust is detected. And LED light colour changes accordingly. The more dirty water or dust is detected, the more red lights. And the less dirty water or dust is detected, the more blue lights.
Note:
- When cleaning carpet, please clean the floorhead first (refer to "Cleaning and Maintenance, Floorhead Cleaning" for details) and to deep clean carpet it is recommended to replace the carpet brush. (Carpet brush can be selected according to your own needs and sold at JIMMY distributors)
- When the battery level is lower than 20%, it cannot be switched to Carpet mode.
Water spray function
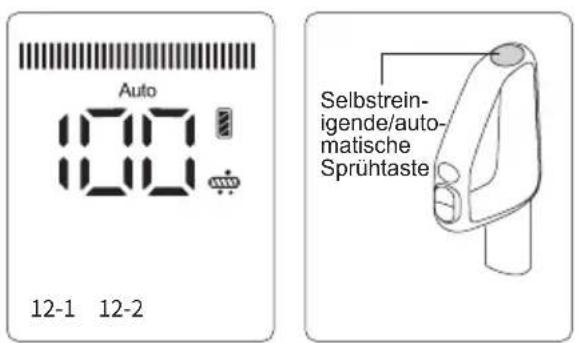
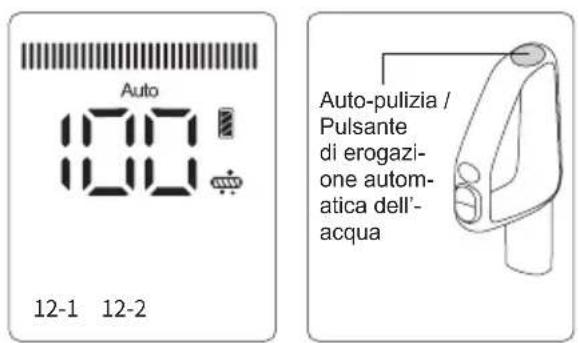
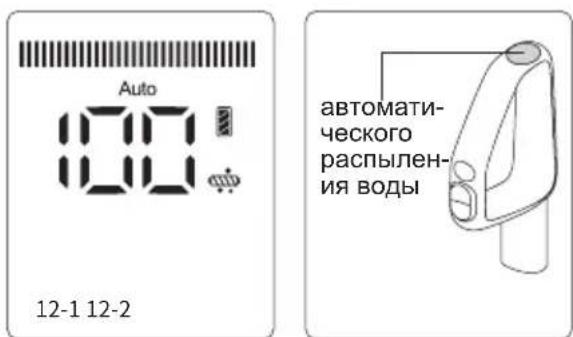
When upright vacuum cleaner is working, press the water spray button, the auto water spray function is open by default. LED screen will show auto spray indicator and clean water will be sprayed to brushroll automatically. (Fig 12-1). To turn off auto water spray function, keep pressing the self cleaning button for over 3 seconds when product is on. To turn on auto water spray function again, keep pressing the self cleaning button for over 3 seconds when product is on.(Fig 12-2)
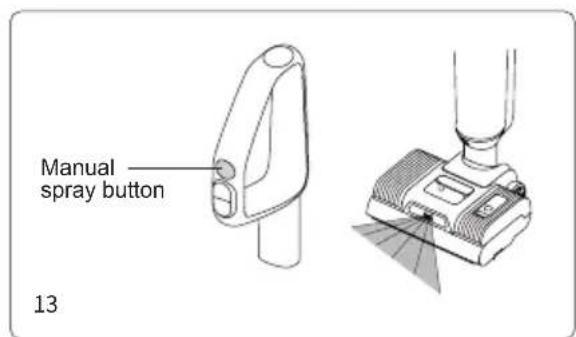
If floor is very dirty, you can choose to spray more water to floor by using manual water spray function to improve floor washing effect. With the machine turned on, press manual water spray button, spray mouth sprays fan-shaped water; release the water spray button to stop spraying water. Manual water spray function can be activated no matter whether auto water spray function is turned on or off. (Fig 13)
Note:
- The manual water spray button cannot be used with the on/off button or the mode button at the same time.
-
It is recommended to use carpet mode when there is heavy pollution or water stain.
-
When cleaning carpet, please turn off auto water spray function.
-
Please use the low-foam cleaning solution with this product for cleaning, do not put the easy foaming cleaning solution into the clean water tank for use, otherwise more foam will be generated during use, which may penetrate into the machine and cause danger.
Use of handheld vacuum cleaner
Take off handheld cleaner, press the handheld on/off button, the display screen will light up, default is in Floor mode, press the handheld mode button to switch to Carpet mode. Press the handheld on/off button again to turn off the machine, the display screen go out.
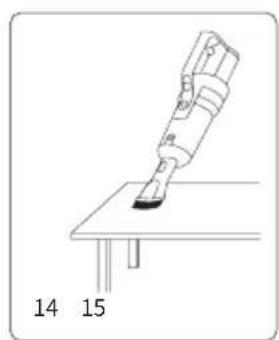
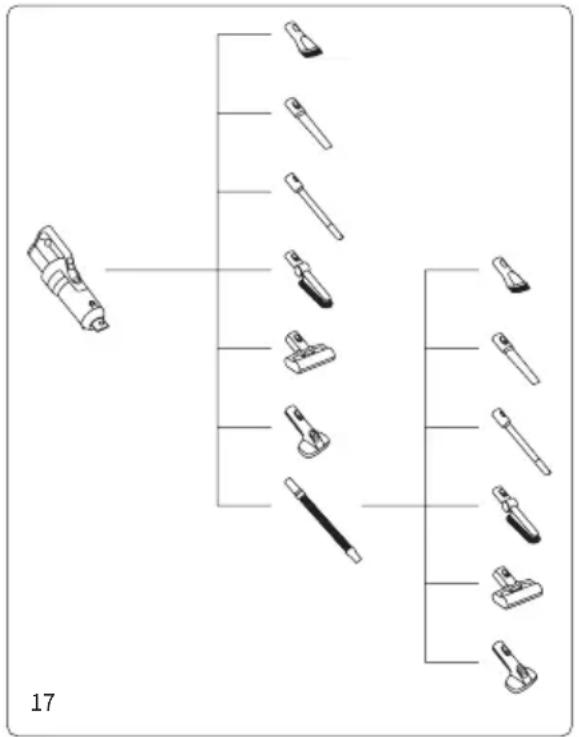
The handheld vacuum cleaner can be assembled with accessories such as crevice tool, upholstery brush, electric mattress head for cleaning different areas (Fig 14-16)

natural_image
Simple line drawing of a handheld device on a table with pins, labeled 14 and 15 (no text or symbols on the device itself)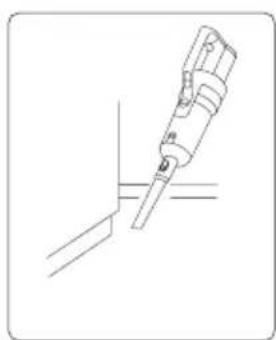
natural_image
Line drawing of a medical or laboratory device with a pipette inserted into a vertical tube (no text or symbols)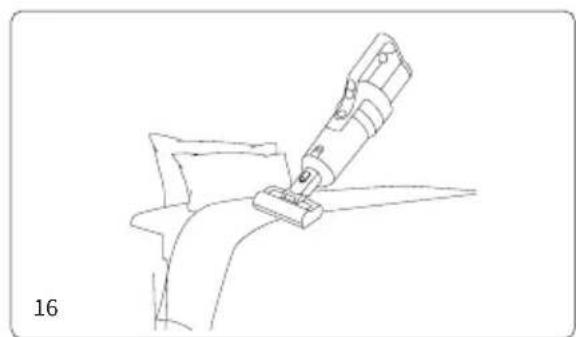
natural_image
Line drawing of a robotic arm gripping a curved object, labeled with number 16 (no text or symbols on the diagram itself)Align accessory mouth with handheld vacuum air inlet and push upward until a "click" sound is heard. To remove the accessory, press the button on accessory and pull out the accessory.
For more functions of connection between handheld vacuum cleaner and accessories please refer to accessories connection details.(Fig 17)
Note:
- Only crevice tool, upholstery tool and electric mattress head are included in package. Other accessories like stretch hose, pet brush can be selected according to your own needs, and accessories are available at JIMMY distributors.
- When the battery is lower than 20%, it cannot be switched to carpet mode;
- When using handheld vacuum cleaner separately, do not vacuum water.
Voice function
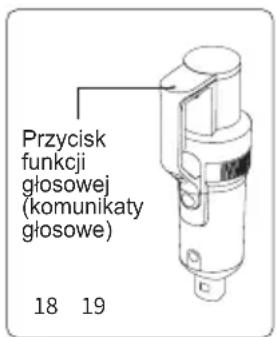
The product includes voice reminding of 5 different language: English, German, Italian, French and Russian. Voice of the new machine is turned on and in English by default, press the voice button to switch to other language, keep pressing the voice button to turn off the voice function; press the voice button again to turn on the voice function. (Fig 18)
Note: When using handheld vacuum cleaner, there is no voice function.
Hot drying function
Under charging mode, press mode button to enter hot dry mode. Hot air will dry entire air path including burshroll, dust cup and dirty water tank for about 0.5 hour and then only dry brushroll for another 2.5 hours. In the first 0.5 hour full air path drying, vacuum motor will work to send hot air through the full air path. (Fig 19)
To stop drying air path and only keep brushroll drying for silent drying mode, press on/off button, vacuum motor will not work in this mode.
flowchart
graph TD
    A["Component 1"] --> B["Subcomponent 1"]
    A --> C["Subcomponent 2"]
    A --> D["Subcomponent 3"]
    A --> E["Subcomponent 4"]
    A --> F["Subcomponent 5"]
    A --> G["Subcomponent 6"]
    A --> H["Subcomponent 7"]
    A --> I["Subcomponent 8"]
    A --> J["Subcomponent 9"]
    A --> K["Subcomponent 10"]
    style A fill:#f9f,stroke:#333
    style B fill:#ccf,stroke:#333
    style C fill:#ccf,stroke:#333
    style D fill:#ccf,stroke:#333
    style E fill:#ccf,stroke:#333
    style F fill:#ccf,stroke:#333
    style G fill:#ccf,stroke:#333
    style H fill:#ccf,stroke:#333
    style I fill:#ccf,stroke:#333
    style J fill:#ccf,stroke:#333
    style K fill:#ccf,stroke:#333

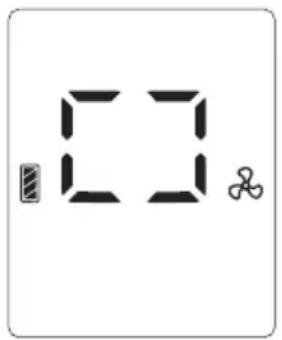
To turn on and turn off hot air drying function, press mode button.
Brushroll & air path self-cleaning function
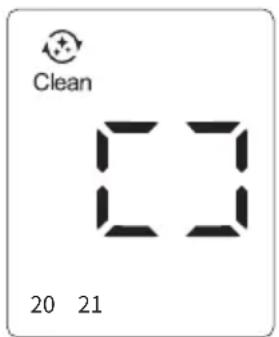
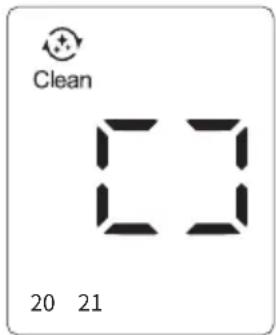
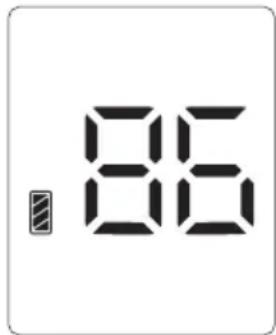
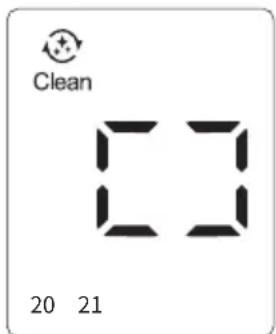
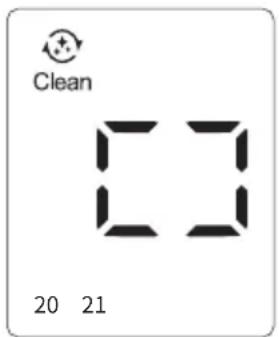
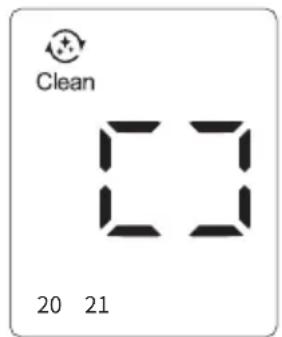
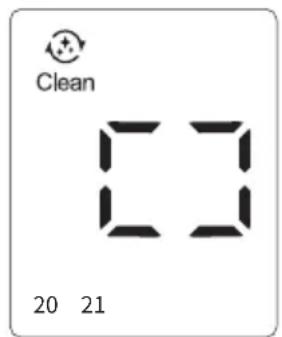
In charging mode, press the self-cleaning button to enter cleaning mode (Figure 20), and after completing self-cleaning, the machine enters the brushroll hot drying mode automatically; Self-cleaning process can be stopped in advance by pressing on/off button or mode button, and product will return to the charging mode. Fan will be turned off with a delay of 3mins. (Fig 21)
Note:
- Self-cleaning mode is only to clean floorhead air path and hardfloor brushroll.
- Before turning on the cleaning mode, please empty the dirty water in the dirty water tank, check that the
machine is firmly placed on the charging base, the power cord is plugged into the power socket, the power cord is connected to the charging base, and the clean water tank retains at least 1/2 of the water; After completing the self-cleaning, clean the dirty water tank again;
- When the battery is less than or equal to 10% power, the self-cleaning mode cannot be turned on, and it can be turned on normally after charging for a period of time.
Clean water tank empty indicator
- When using the water spray function, the voice/screen shows "No clean water, fill in water", please turn off the machine and add water to the clean water tank.
- When using the self-cleaning mode, if it is detected that there is no water in the clean water tank, the brushroll self cleaning will be stopped. To continue self cleaning, please add water to the clean water tank and empty the dirty water tank, then restart self clean mode.
Fill up clean water tank
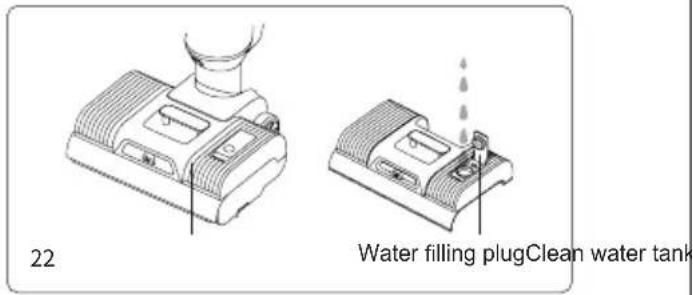
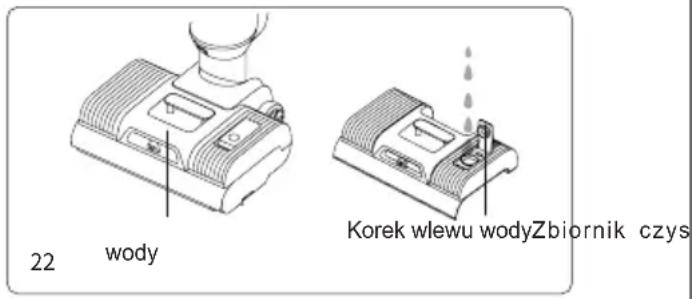
Fill up clean water tank: Remove the clean water tank and lift the water filling plug of the clean water tank or directly open the water filling plug of the clean water tank, expose the water inlet hole, pour clean water and cleaning solution in,, and press the water filling plug down to install it to the end, and install it back into the clean water tank. (Fig 22)
Note: When adding clean water, you can add the equipped cleaning solution in the ratio of about one bottle cap to one full tank of clean water.
Dirty water tank full indicator
When the upright vacuum cleaner detects that the dirty water tank is full, the machine will stop and give a voice reminder. Please clean the full dirty water tank and put it back.
Dirty water tank cleaning
Take out dirty water tank upper cover and filter frame, dump the dirty water, assemble the dirty water tank after washing, and put it back on the floorhead (refer to Chapter 3 "Cleaning of dirty water tank" for details).
Brushroll stuck indicator
When the cleaner is in working or cleaning mode, if the brushroll is stuck, the machine will stop and give a voice reminder. Please take out the brushroll, clean up the foreign matter or entangled hair on the brushroll.
Brushroll cleaning
After removing the clean water tank, pull out brushroll, use the cleaning brush to cut off and remove the hair winded around the brushroll, and clean the foreign matter attached to the brushroll and floorhead, Install brushroll and clean water tank back (refer to Chapter 3 "Cleaning of Floorhead assembly" for details).
Air path blocked indicator
- When the upright cleaner is working /self cleaning mode, if the air path is blocked, the machine will stop working and give a voice reminder. Please clean the possible blockage of the handheld dust cup, floorhead air path and handheld HEPA, check and clean up in turn before continuing to work.
- When handheld vacuum cleaner is working, if the air path is blocked, cleaner will automatically stop. At this time, the dust cup and HEPA need to be cleaned.
Air path cleaning
Disassemble the dirty water tank, take out dirty water tank upper cover and filter, wash all parts and them assemble back.
Use pipe brush to clean the dirt, foreign objects and hair inside air path of floorhead. and then load the dirty water tank back into the floorhead assembly.
Remove the dust cup, empty the dust cup, remove HEPA, then take out cyclone and disassemble it, clean all parts and reassemble the dust cup. (Refer to Chapter 3 "Cleaning and Maintenance" for details)
Chapter 3 Cleaning and Maintenance
Dust cup cleaning
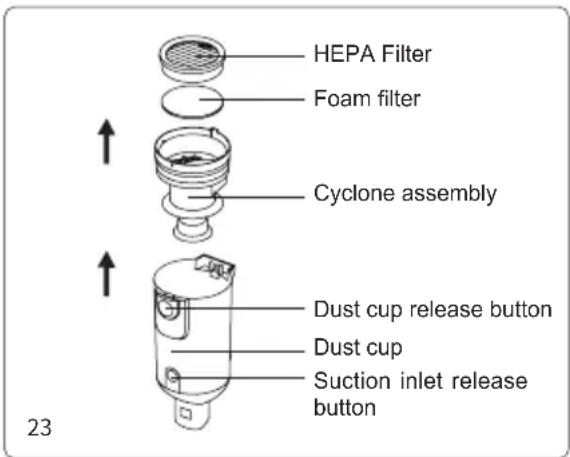
Press the dust cup release button to remove the dust cup from the handheld vacuum cleaner; press the suction inlet release button to open the suction inlet and empty the dust cup; take out cyclone assembly and HEPA filter. Hold the metal mesh, rotate in the direction of the arrow to unlock the metal mesh, and then remove it downward. After cleaning, wiping and drying the parts, assemble all parts back into dust cup, and then installed dust cup back to handheld vacuum cleaner. (Fig 23)
Dirty water tank cleaning
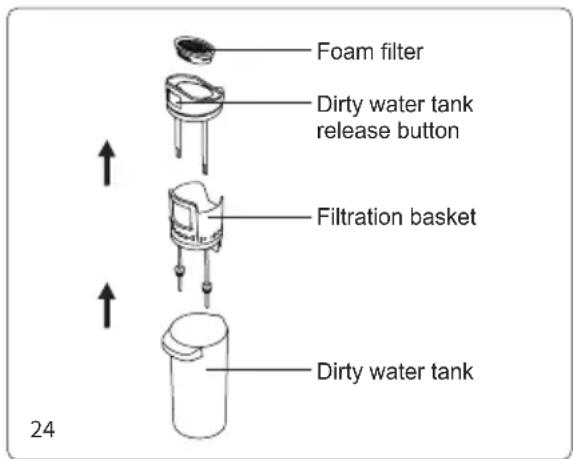
After turning off the vacuum cleaner, remove the dirty water tank, lift the water tank top cover, and remove the foam filter frame from it, open the flip cover of the foam filter frame, take out the foam filter. Pour out dirty water and dirt in the water tank, then wash dirty water tank, water tank cover, foam filter frame and foam filter. If there is foreign matter in the dirty water tank pipe, it can be cleaned with the cleaning brush; dry the above parts after washing. Then reassemble all the parts back into dirty water tank, and then load the dirty water tank into the mainbody and continue to use.(Fig 24)
Note:1. After using upright vacuum cleaner, it is recommended to clean the dirty tank immediately;2. When reinstalling the filter, do not fold the black soft rubber under the filter.
Floorhead cleaning
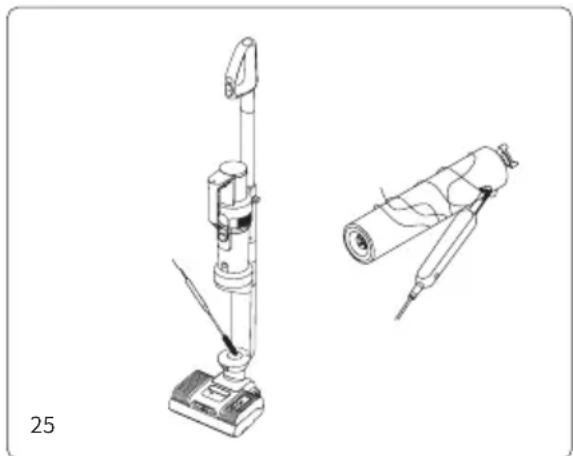
After removing the brushroll window, brushroll, clean water tank, and dirty water tank, insert the multifunctional cleaning brush through the circular hole below the installation position of the dirty water tank to clear foreign matter and scales in the pipe, and the clogged hair; Use the multi-functional cleaning brush to cut off the tangled hairs on the brushroll; Wipe the machine and the dirty parts removed with a rag, and then put it back on the machine separately (the brushroll can also be put into
natural_image
Technical line drawing of a vacuum cleaner with a cylindrical component and a separate cylindrical device (no text or symbols)the brushroll box to dry); Rinse off the dirt attached to the multi-function cleaning brush and place it in the brushroll box.(Fig 25)
Note: Do not wash floorhead!
Maintenance and Storage
It is recommended to clean the dirty water tank, filter, brushroll and brushroll window after each use. If there is any of below situation: ( ① Remove dust cup and find HEPA filter leaks dust; ② Foam filter severely damaged; ③ The brushroll has serious hair loss, or has strong vibration and abnormal noise during use), it is recommended to purchase consumables and replace it to avoid machine performance. When not using the machine for a long time, please keep the machine in a cool and dry place, never in direct sunlight or humid environment. If you need to pack the machine into a box, be sure to clean the machine and dry the parts to prevent damage to the machine.
Chapter 4 Troubleshooting
Please check the following points before contacting the after sale service.
Note: If the above troubleshooting guide fails to provide a solution or the screen displays error code F1 to F8, please contact after service or local distributor for support.
| Problem Possible cause | Solution | |
| Can not start or stop during use | No or Low battery power Recharge and use in time | |
| On/off button is not pressed down Press down on/off button | ||
| Brushroll is entangled Clean brushroll in time | ||
| Dirty water tank full Clean dirty water tank | ||
| Battery pack not assembled properly Reassemble battery pack | ||
| Suction inlet blocked Clean suction inlet and filter | ||
| Battery pack is not in place Install the battery pack | ||
| Weak suction | Suction inlet blocked Clean suction inlet and filter | |
| No HEPA assembled Assemble HEPA | ||
| Abnormal noise | Suction inlet blocked Clean suction inlet and filter | |
| No HEPA assembled Assemble HEPA | ||
| Spray mouth does not spray water | Clean water tank empty Fill clean water tank | |
| Water spray button not pressed Press water spray button | ||
| Spray mouth does not spray water | Clean water tank not assembled properly | Reassemble clean water tank |
| Water spray out from air path. | Filter is not assembled in the dirty water tank | Assemble filter in dirty water tank |
| Soft plastic folds under the filter | Reassemble the filter, the soft glue must not be folded | |
| HEPA and dust cup are put to use without fully dry | Dry the HEPA and dust cup after washing before use | |
Chapter 5 Product Specification
Technical parameters
| Product Name Cordless Vacuum&Washer | |
| Model HW11 Pro | |
| Rated Power 420W | |
| Battery Capacity 4000mAh | |
| Charging Time 5h±0.5 | |
| Rated Input 220-240V | ~ 50-60Hz |
| Rated Voltage 21.6V | --- |
Circuit Diagram
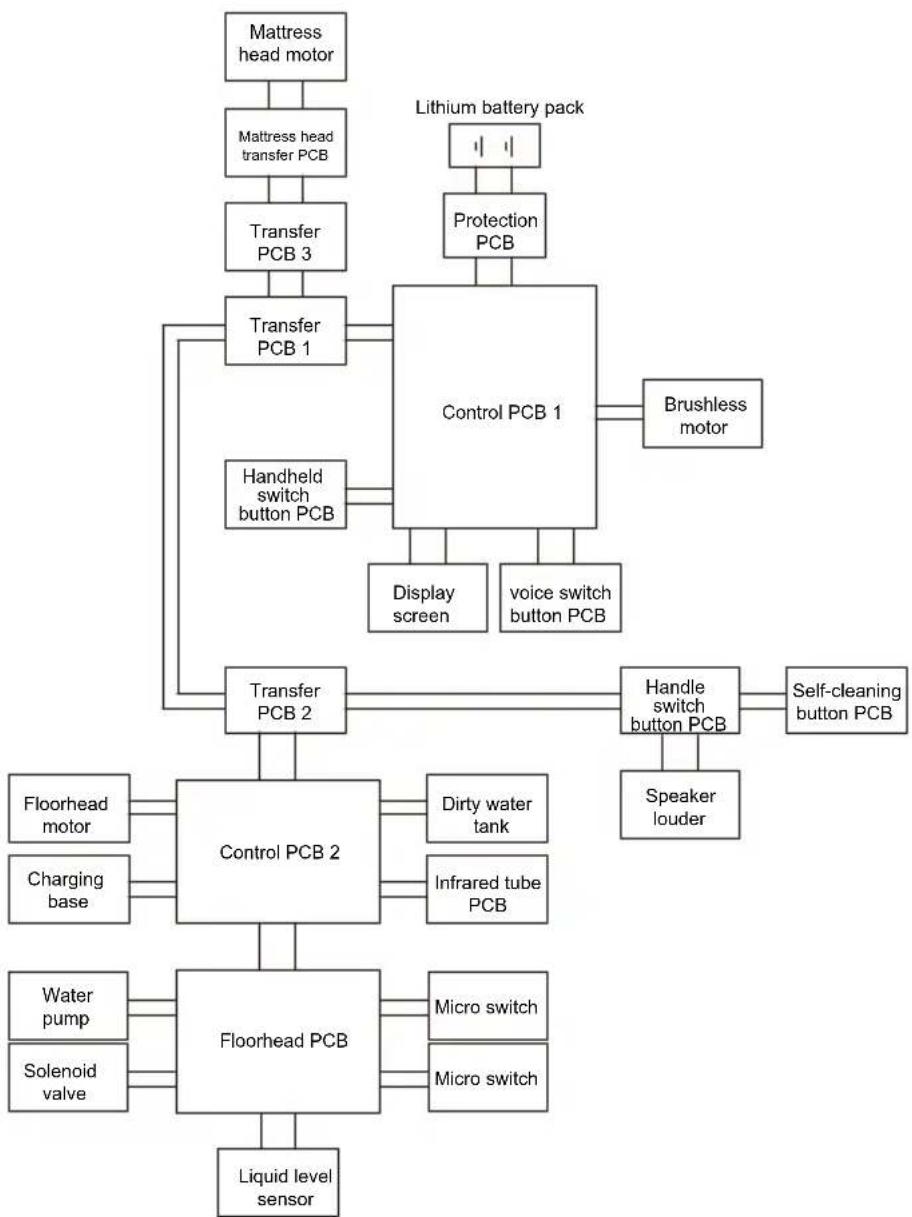
flowchart
graph TD
    A["Mattress head motor"] --> B["Mattress head transfer PCB"]
    B --> C["Transfer PCB 3"]
    C --> D["Transfer PCB 1"]
    D --> E["Control PCB 1"]
    F["Lithium battery pack"] --> G["Protection PCB"]
    G --> E
    E --> H["Brushless motor"]
    E --> I["Display screen"]
    E --> J["voice switch button PCB"]
    K["Handheld switch button PCB"] --> E
    L["Transfer PCB 2"] --> M["Handle switch button PCB"]
    M --> N["Self-cleaning button PCB"]
    O["Floorhead motor"] --> P["Control PCB 2"]
    Q["Charging base"] --> P
    R["Water pump"] --> S["Floorhead PCB"]
    T["Solenoid valve"] --> S
    U["Liquid level sensor"] --> S
    V["Dirty water tank"] --> P
    W["Infrared tube PCB"] --> P
    X["Micro switch"] --> P
    Y["Micro switch"] --> P
    Z["Speaker louder"] --> M
Manufacturer Information
| Manufacturer | Kingclean Electric Co., Ltd |
| Address | No.1 Xiangyang Road, Suzhou New District, Jiangsu Province 215009, China |

Disposal
The machine, accessories and packaging should be sorted for environmental-friendly recycling.

Do not dispose of the machine into household waste!
Only for EC countries:
According to the European Guideline 2012/19/EU, machine that are no longer usable, and according to the European Guideline 2006/66/EC, defective or used battery packs/batteries, must be collected separately and disposed of in an environmentally correct manner.
Battery packs/batteries:
Integrated batteries may only be removed for disposal by qualified personnel. Opening the housing shell can damage or destroy the machine.
Do not dispose of battery packs/batteries into household waste, fire or water. Battery packs/batteries should, if possible, be discharged, collected, recycled or disposed of in an environmental-friendly manner.
Subject to change without notice.
Warranty Information:
This product enjoys two years warranty from the date of purchase.
Excluded from the guarantee is normal wear, commercial use, alterations to the appliance as purchased, cleaning activities, consequences of improper use or damage by the purchaser or a third person, damage, that can be attributed to external circumstances.
Zasady użytkowania
Uwaga:
natural_image
Simple line drawing of a handheld device on a table with labeled parts 14 and 15 (no text or symbols on the device itself)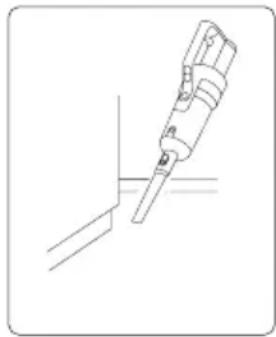
natural_image
Line drawing of a handheld tool or probe inserted into a channel (no text or symbols)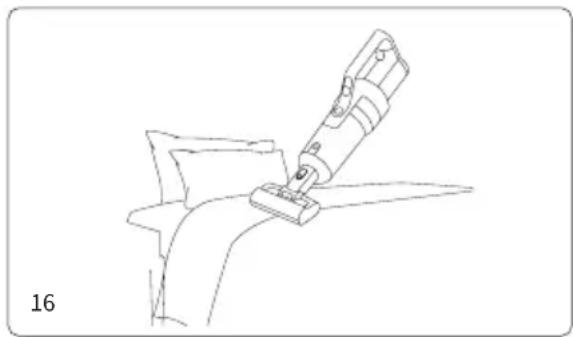
natural_image
Line drawing of a robotic arm gripping a piece of material, no text or symbols present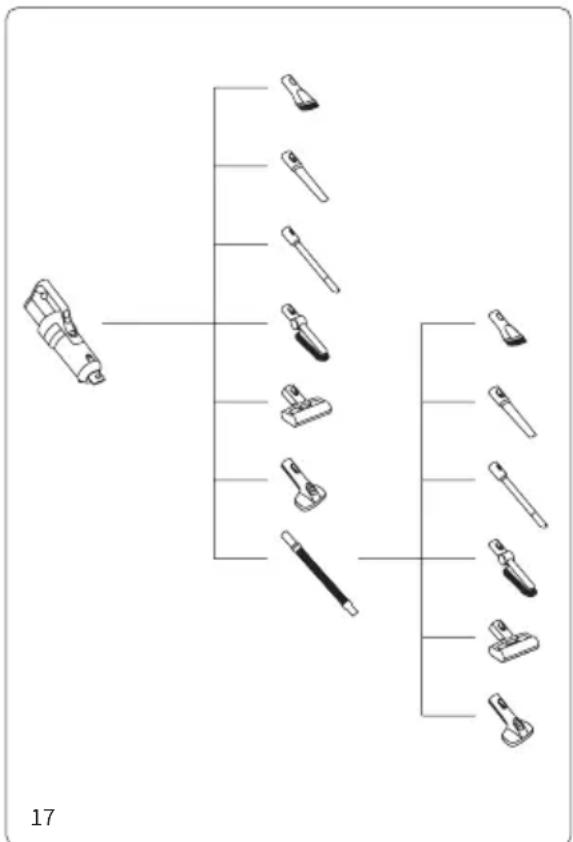
flowchart
graph TD
    A["Main Component"] --> B["Component 1"]
    A --> C["Component 2"]
    A --> D["Component 3"]
    A --> E["Component 4"]
    A --> F["Component 5"]
    A --> G["Component 6"]
    A --> H["Component 7"]
    A --> I["Component 8"]
    A --> J["Component 9"]
    A --> K["Component 10"]
    A --> L["Component 11"]
    A --> M["Component 12"]
    A --> N["Component 13"]
    A --> O["Component 14"]
    A --> P["Component 15"]
natural_image
Technical line drawing of a vacuum cleaner with a cylindrical component and a separate cylindrical device (no text or symbols)Chapter 4 Troubleshooting
Please check the following points before contacting the after sale service.
natural_image
Line drawing of a robotic arm gripping a piece of material, labeled with number 16 (no text or symbols on the diagram itself)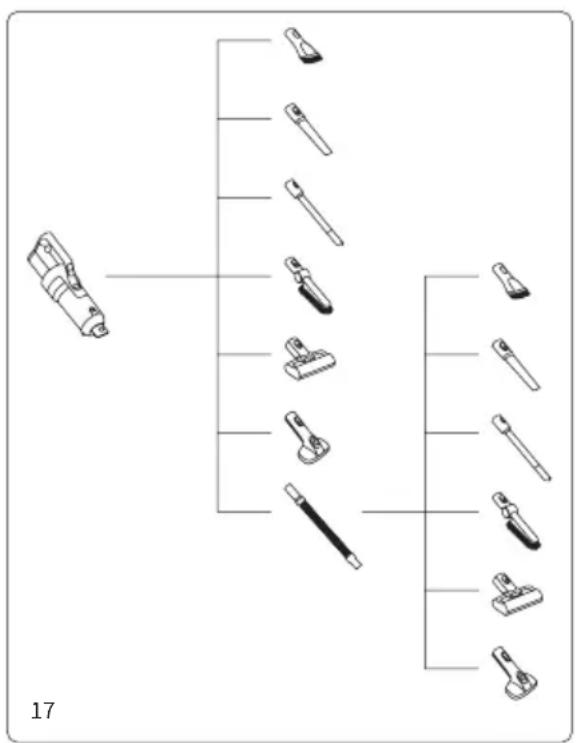
flowchart
graph TD
    A["Main Component"] --> B["Pin 1"]
    A --> C["Pin 2"]
    A --> D["Pin 3"]
    A --> E["Pin 4"]
    A --> F["Pin 5"]
    A --> G["Pin 6"]
    A --> H["Pin 7"]
    A --> I["Pin 8"]
    A --> J["Pin 9"]
    A --> K["Pin 10"]
    A --> L["Pin 11"]
    A --> M["Pin 12"]
    A --> N["Pin 13"]
    A --> O["Pin 14"]
    A --> P["Pin 15"]
Anmerkung:
natural_image
Technical line drawing of a vacuum cleaner and a cylindrical device (no text or symbols)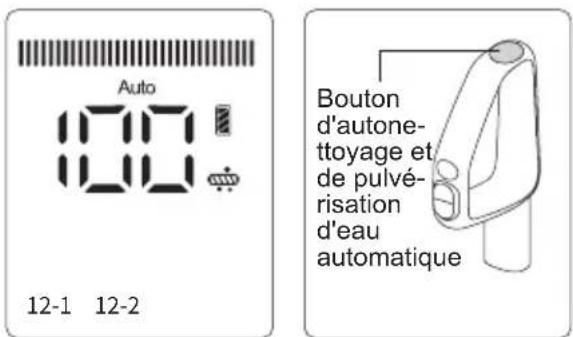
natural_image
Simple line drawing of a handheld device on a table with labeled parts 14 and 15 (no text or symbols on the device itself)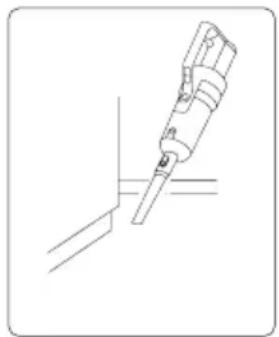
natural_image
Line drawing of a mechanical tool or probe inserted into a vertical pipe (no text or symbols)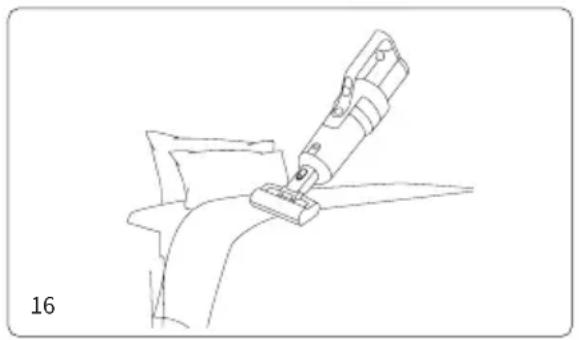
natural_image
Line drawing of a robotic arm gripping a curved object, labeled with number 16 (no text or symbols on the diagram itself)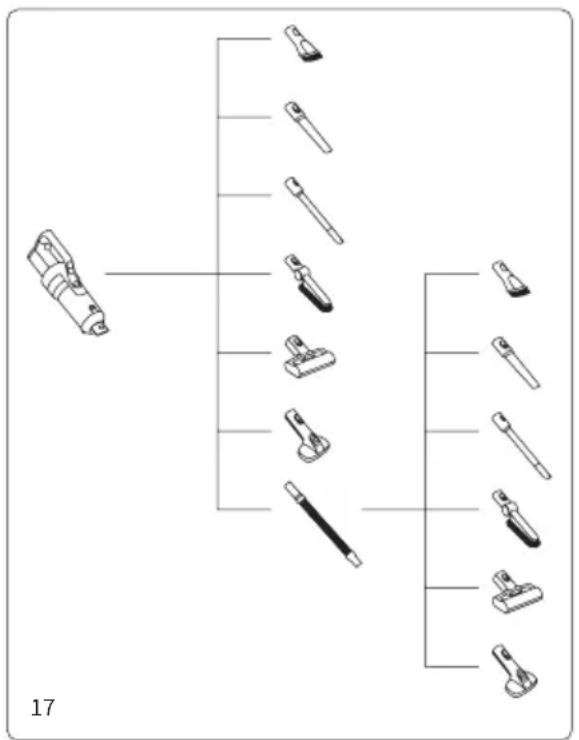
flowchart
graph TD
    A["Component 1"] --> B["Subunit 1"]
    A --> C["Subunit 2"]
    A --> D["Subunit 3"]
    A --> E["Subunit 4"]
    A --> F["Subunit 5"]
    A --> G["Subunit 6"]
    A --> H["Subunit 7"]
    A --> I["Subunit 8"]
    A --> J["Subunit 9"]
    A --> K["Subunit 10"]
    B --> L["Component 11"]
    C --> M["Component 12"]
    D --> N["Component 13"]
    E --> O["Component 14"]
    F --> P["Component 15"]
    G --> Q["Component 16"]
    H --> R["Component 17"]
    I --> S["Component 18"]
natural_image
Technical line drawings of two mechanical devices: a vertical support device and a cylindrical device with a handle (no text or symbols present)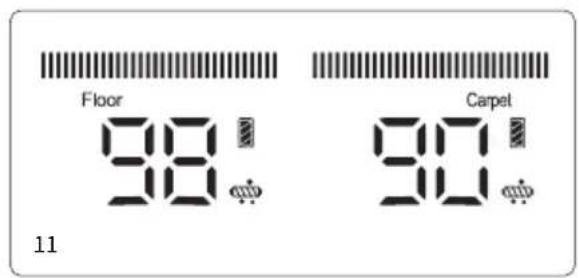
natural_image
Line drawing of a robotic arm gripping a curved object, labeled with number 16 (no text or symbols on the diagram itself)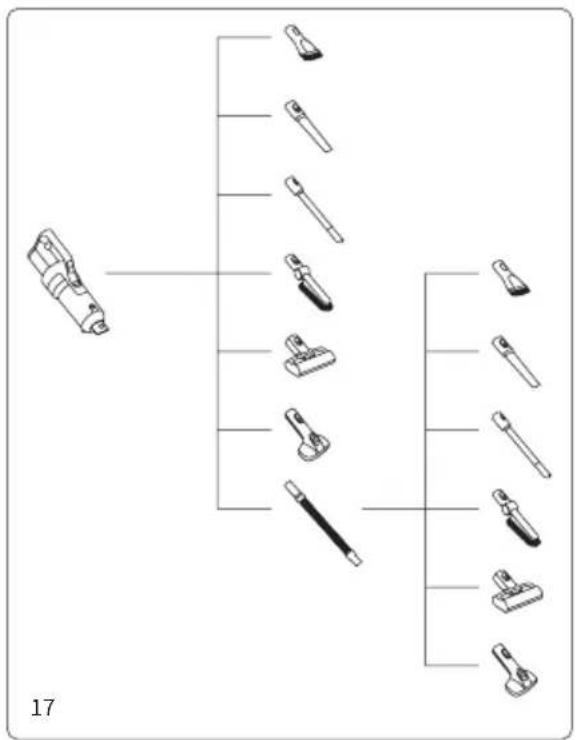
flowchart
graph TD
    A["Main Component"] --> B["Component 1"]
    A --> C["Component 2"]
    A --> D["Component 3"]
    A --> E["Component 4"]
    A --> F["Component 5"]
    A --> G["Component 6"]
    A --> H["Component 7"]
    A --> I["Component 8"]
    A --> J["Component 9"]
    A --> K["Component 10"]
    A --> L["Component 11"]
    A --> M["Component 12"]
    A --> N["Component 13"]
    A --> O["Component 14"]
    A --> P["Component 15"]
Funzione voce
natural_image
Technical line drawing of a vacuum cleaner with a cylindrical device and a separate cylindrical component (no text or symbols)Dirty water tank release button
natural_image
Line drawing of a robotic arm gripping a piece of material, with no visible text or symbols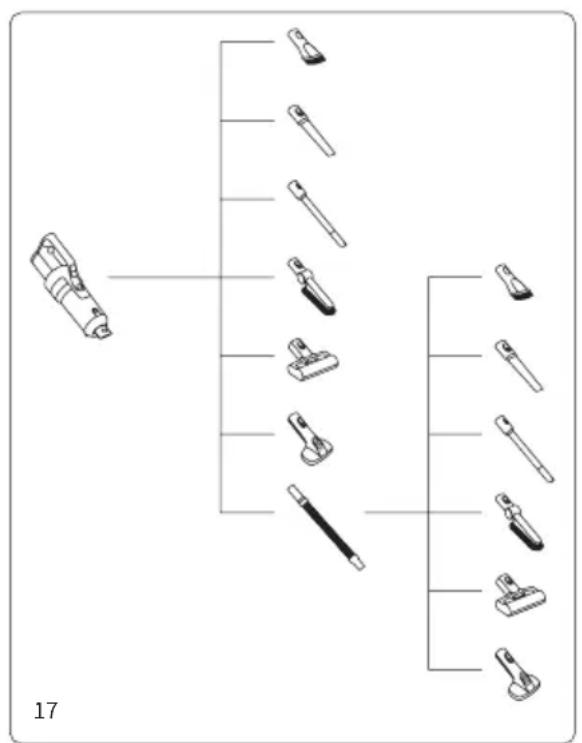
flowchart
graph TD
    A["Component 1"] --> B["Component 2"]
    A --> C["Component 3"]
    A --> D["Component 4"]
    A --> E["Component 5"]
    A --> F["Component 6"]
    A --> G["Component 7"]
    A --> H["Component 8"]
    A --> I["Component 9"]
    A --> J["Component 10"]
    B --> K["Subcomponent 1"]
    C --> L["Subcomponent 2"]
    D --> M["Subcomponent 3"]
    E --> N["Subcomponent 4"]
    F --> O["Subcomponent 5"]
    G --> P["Subcomponent 6"]
    H --> Q["Subcomponent 7"]
    I --> R["Subcomponent 8"]
Nota:
natural_image
Technical line drawings of a vacuum cleaner and a cylindrical device (no text or symbols)24
25
Do not dispose of the machine into household waste!
natural_image
Technical line drawings of a mechanical device with labeled parts (14 and 15), no readable text or symbols beyond labels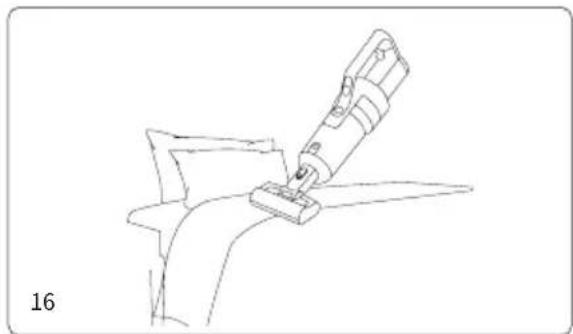
natural_image
Line drawing of a robotic arm gripping a device, no text or symbols present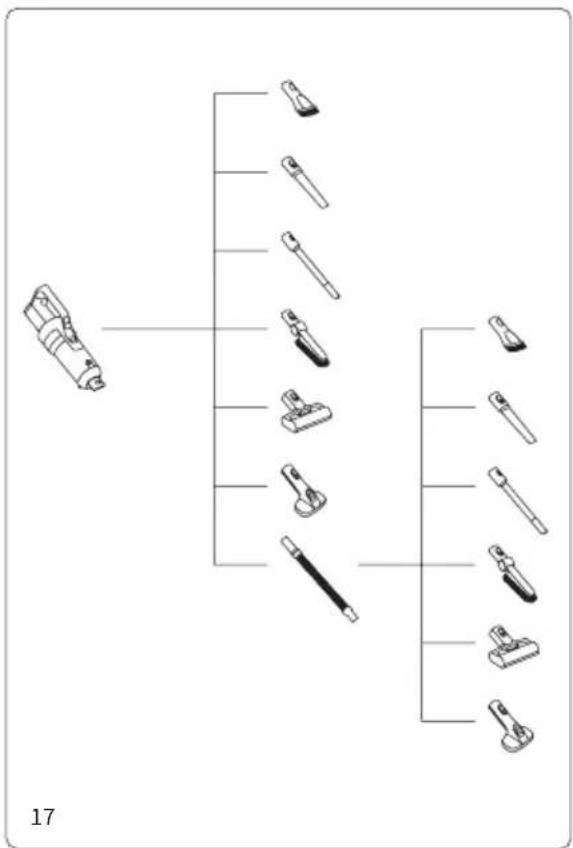
flowchart
graph TD
    A["Tool Icon"] --> B["Branch 1"]
    A --> C["Branch 2"]
    A --> D["Branch 3"]
    A --> E["Branch 4"]
    A --> F["Branch 5"]
    A --> G["Branch 6"]
    A --> H["Branch 7"]
    A --> I["Branch 8"]
    A --> J["Branch 9"]
    A --> K["Branch 10"]
    style A fill:#f9f,stroke:#333
    style B fill:#ccf,stroke:#333
    style C fill:#ccf,stroke:#333
    style D fill:#ccf,stroke:#333
    style E fill:#ccf,stroke:#333
    style F fill:#ccf,stroke:#333
    style G fill:#ccf,stroke:#333
    style H fill:#ccf,stroke:#333
    style I fill:#ccf,stroke:#333
    style J fill:#ccf,stroke:#333
    style K fill:#ccf,stroke:#333
natural_image
Technical line drawing of a vacuum cleaner with a cylindrical device and a separate cylindrical component (no text or symbols)
- Contents
- Important Safety Instructions
- Warning!
- About use of the product
- About Cleaning Solution
- About disposal of battery
- Chapter 1 Product Assembly
- Part Name
- Packing List
- Product assembly and disassembly
- Floorhead assembly and disassembly
- Handle assembly and disassembly
- Battery pack assembly and disassembly
- Handheld assembly and disassembly
- Charge base assembly
- Place machine to charging base
- Dirty water tank assembly and disassembly
- Clean water tank disassembly and assembly
- Brushroll assembly and disassembly
- Chapter 2 Use of the Product
- Dispaly screen and instructions for use
- Machine charging
- Note:
- Low battery power indicator
- Use of upright vacuum cleaner
- Water spray function
- Use of handheld vacuum cleaner
- Voice function
- Hot drying function
- Brushroll & air path self-cleaning function
- Clean water tank empty indicator
- Fill up clean water tank
- Dirty water tank full indicator
- Dirty water tank cleaning
- Brushroll stuck indicator
- Brushroll cleaning
- Air path blocked indicator
- Air path cleaning
- Chapter 3 Cleaning and Maintenance
- Dust cup cleaning
- Floorhead cleaning
- Maintenance and Storage
- Chapter 4 Troubleshooting
- Chapter 5 Product Specification
- Circuit Diagram
- Manufacturer Information
- Disposal
- Only for EC countries:
- Battery packs/batteries:
- Warranty Information:
- Zasady użytkowania
- Uwaga:
- Anmerkung:
- Funzione voce
- Nota:
Brand : JIMMY
Model : HW11 Pro
Category : Vacuum Cleaner