
H11 Pro - Vacuum Cleaner JIMMY - Free user manual and instructions
Find the device manual for free H11 Pro JIMMY in PDF.


| Product type | Cordless stick vacuum |
| Model | H11 Pro |
| Brand | JIMMY |
| Rated voltage | 28.8 V |
| Rated power | 700 W |
| Floor head power | 50 W |
| Power supply | Lithium-ion battery 3000 mAh |
| Charger | Input 100-240 V~ 50/60 Hz, output 34.2 V 0.6 A |
| Charging time | 4 to 5 hours |
| Runtime | Variable depending on mode (LED display of remaining time) |
| Filter | Washable HEPA |
| Operating modes | Auto, Eco, Turbo, Max |
| Floor types | Hard floors, tile, carpet, rug |
| Included accessories | Flexible flat crevice tool, upholstery tool, soft brush, extension hose, electric mattress head, connector, adapter, storage stand, additional carpet brush |
| Maintenance and cleaning | Clean the dust bin after each use; wash the HEPA filter with water and dry completely; clean the brush roll regularly |
| Safety | Protection against brush blockage, automatic shutdown in case of overcurrent, fault warning with error code |
| Warranty | 2 years |
Frequently Asked Questions - H11 Pro JIMMY
User questions about H11 Pro JIMMY
0 question about this device. Answer the ones you know or ask your own.
Ask a new question about this device
Download the instructions for your Vacuum Cleaner in PDF format for free! Find your manual H11 Pro - JIMMY and take your electronic device back in hand. On this page are published all the documents necessary for the use of your device. H11 Pro by JIMMY.
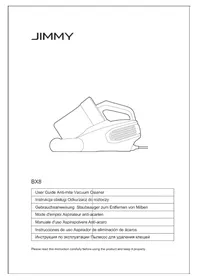
USER MANUAL H11 Pro JIMMY
natural_image
Line drawing of a vertical vacuum cleaner device with attached mounting base (no text or symbols)H11 Pro
| Instruction Manual Vacuum Cleaner | |
| Instrukcja obsługi Odkurzacz Jimmy | |
| Bedienungsanleitung Staubsauger | |
| Manuel d'instruction Aspirateur | |
| Manuale D’Uso Scopa elettrica senza filo | |
| Manual de instrucciones Aspirador | |
| Руководство по эксплуатации | Пылесос |
Please read this instruction carefully before using the product and keep it properly.
Contents
English 2
Polski 17
Deutsch 32
Français 47
Italiano 62
Español 77
Русский язык 92
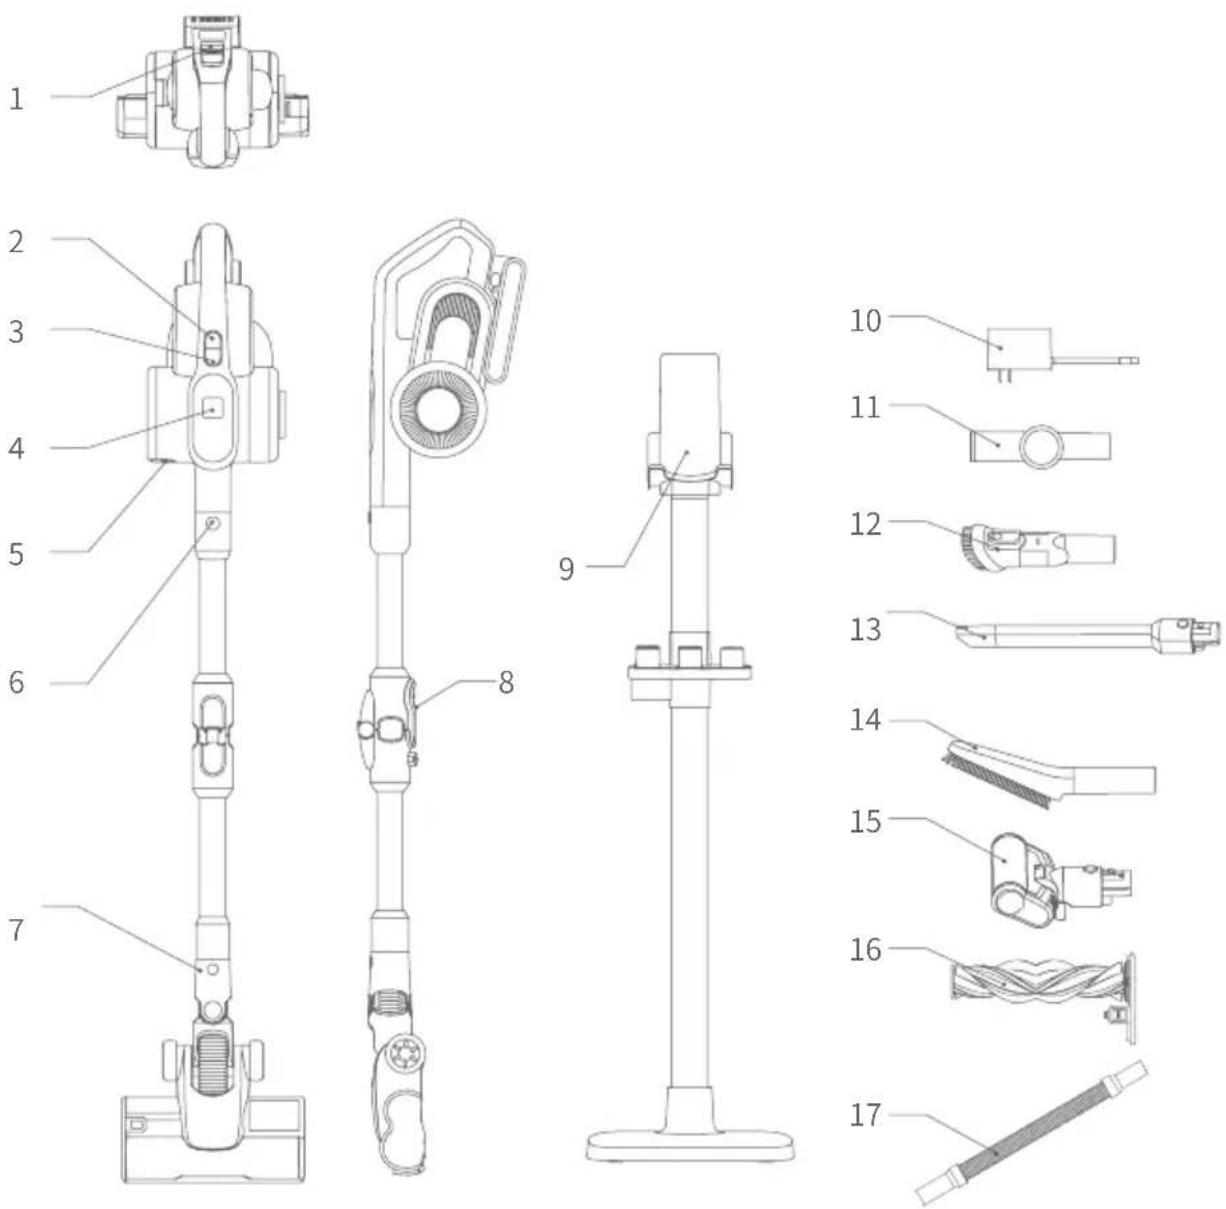
Parts Name
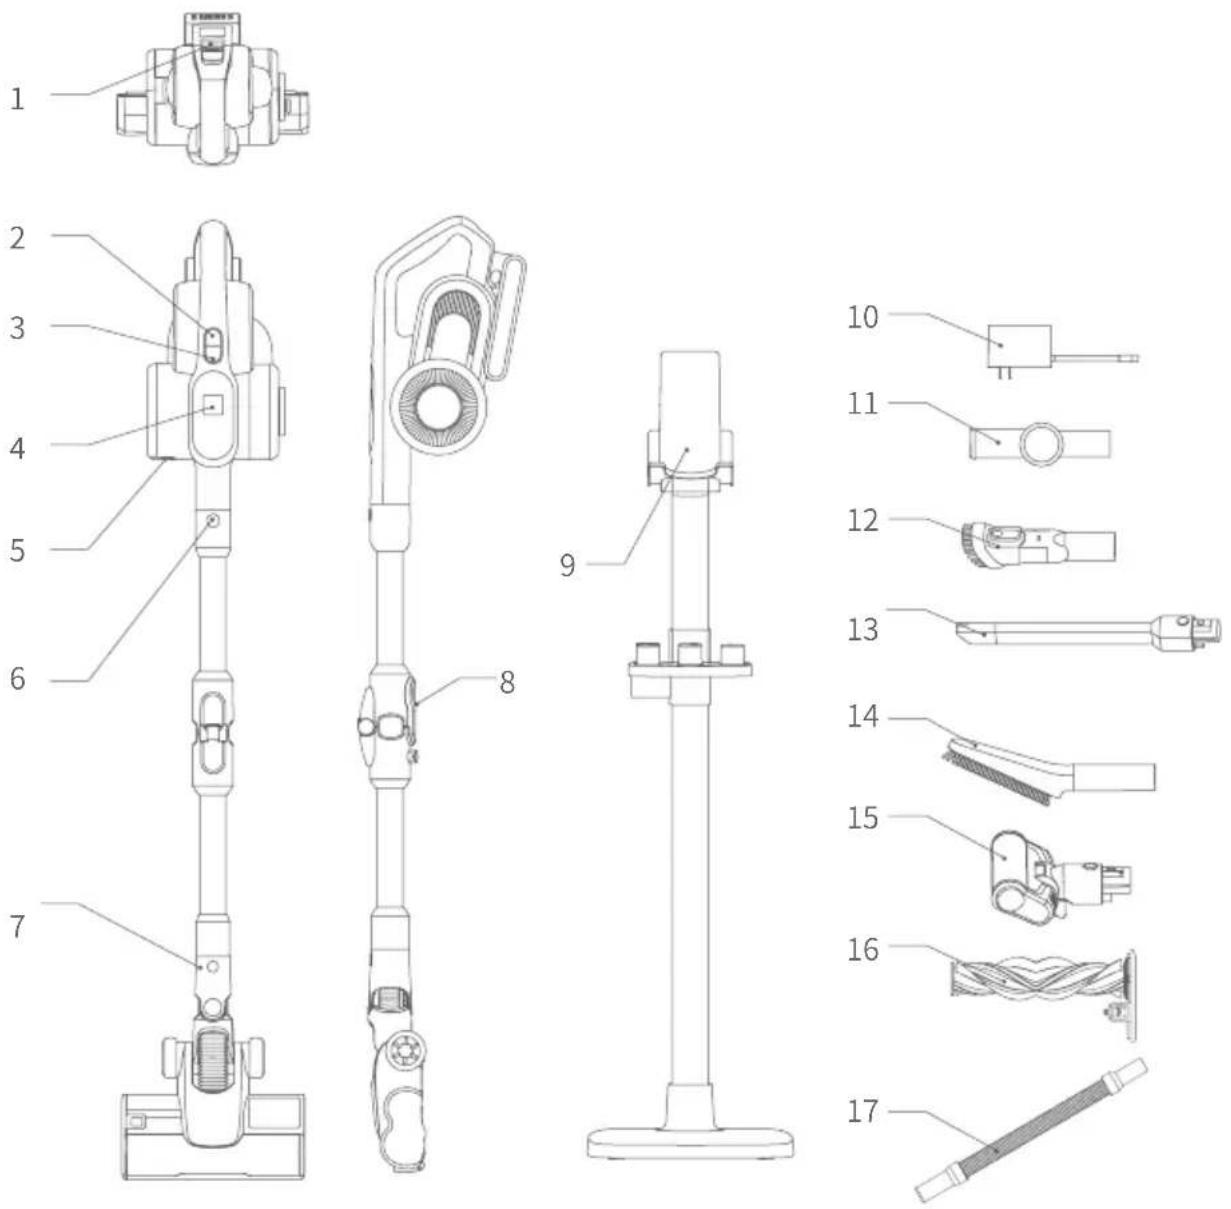
- Battery pack release button
3.Mode button
5.Dust cup bottom release button
7.Floorhead release button
9.Storage holder - Connector
13.Flexible crevice tool - Electric mattress head
-
Stretch hose
-
On/off switch
4.LED screen - Metal tube release button
- Metal tube bending release button
10.Charger
12.Upholstery tool - Soft brush
16.Carpet brushroll
Storage holder parts name
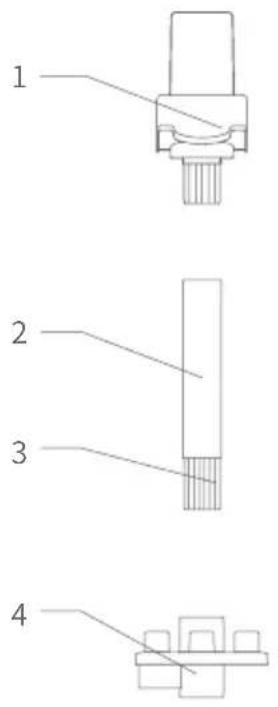
- Front cover assembly
- Metal tube upper sleeve
- Metal tube lower
7.Screw*8
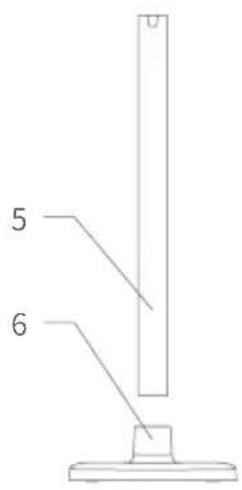
- Metal tube upper
- Accessories holder
6.Base assembly
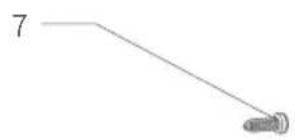
natural_image
Simple line drawing of a tool or bracket with a numbered label '7' (no text or symbols on the object itself)Accessories storage holder assembly
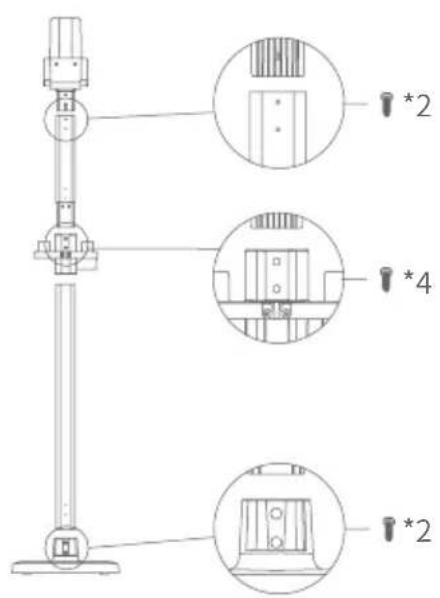
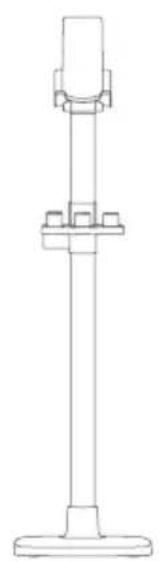
- Put base on floor, insert metal tube lower into base and fasten 2pcs screw.
- Insert accessories holder into top of metal tube lower, put metal tube upper and metal tube upper sleeve assembly into accessories holder, fasten 4pcs screw as the picture.
- Put front cover assembly into metal tube upper and fasten 2pcs screw as the picture.
natural_image
Technical line drawing of a vertical support structure with mounting base (no text or symbols)Packing List
| Part name | Handheld vacuum | Electric floor head | Flexible metal tube | Battery pack | Flexible crevice tool |
| Quantity 1 | 1 1 1 | ||||
| Part name Soft brush Connector Upholstery tool Stretch hose Carpet brushroll | |||||
| Quantity 1 | 1 1 1 | ||||
| Part name Electric mattress head | Adapter | Front cover assembly | Metal tube upper | Accessories holder | |
| Quantity 1 | 1 1 1 | ||||
| Part name Metal tube lower Base assembly Screw User manual | |||||
| Quantity 1 | 1 8 1 | ||||
Machine assembly
Assemble and disassemble electric floor head with flexible metal tube
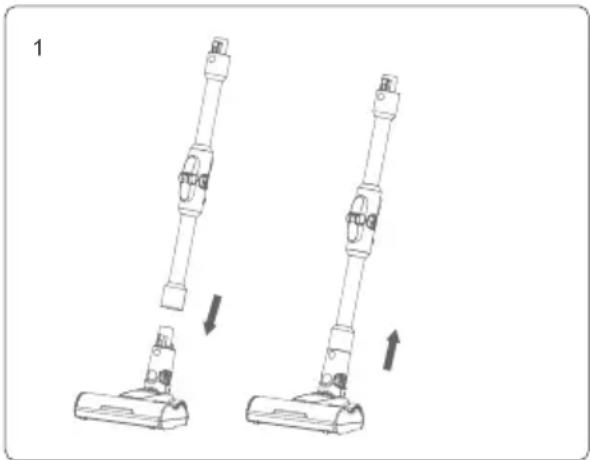
Hold the floor head with left hand, use right hand to insert the metal tube vertically into floor head, align with the conductive needle, press the tube until a “click” sound is heard.
Attention: Keep the handle and floor head in the same direction, conductive needle shall align with the socket.
When packing, storing or cleaning, if the electric floor head needs to be removed, press the brush release button and pull the metal tube in the direction shown in the picture to take out floor head.
Assemble battery pack with handheld vacuum
natural_image
Diagram of two different vacuum cleaner designs with arrows indicating motion (no text or symbols)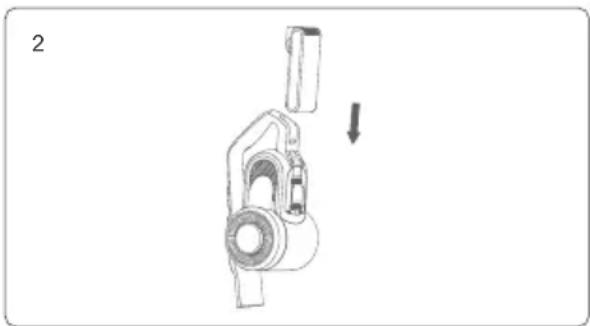
natural_image
Diagram of a mechanical device with a downward arrow indicating motion or force (no text or symbols present)Hold battery pack, align with guiding slot on handheld vacuum body, slide in battery pack in the arrow direction in the picture. And then pull the battery pack after installation to make sure it does not get loose.
Attention: when the vacuum cleaner is long idled, please remove the battery, pack the machine and store it in a cool and dry place, avoid direct sunlight or humid environment.
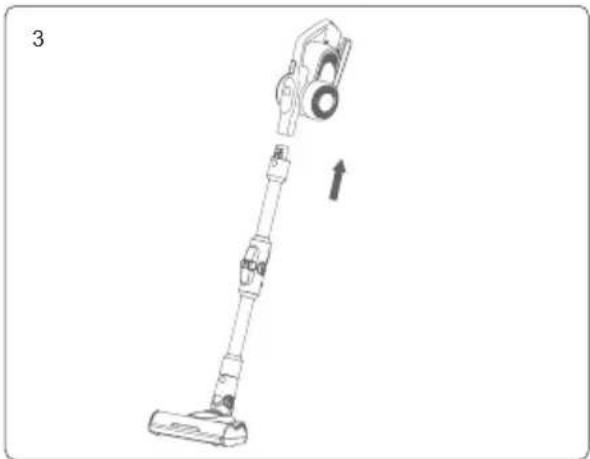
Assemble floor head and metal tube assembly with handheld vacuum
First, assemble floor head and metal tube according to the method of assembling electric floor head with metal tube.
Then, as shown by the arrow, align the conductive needle of the metal tube with the coupler of the handheld vacuum suction nozzle, push metal tube upward until a "click" sound is heard.
natural_image
Line drawing of a vacuum cleaner with a directional arrow indicating motion (no text or symbols)Assembly of accessories
For the convenience of use, this product is specially equipped with some accessories for the hand-held part of the vacuum cleaner. When you use the handheld vacuum cleaner alone, you can directly connect the accessories according to your needs or connect the accessories through the stretch hose.
| Name\model | H11 Pro |
| Electric mattress brush | 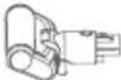 |
| Upholstery tool | 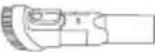 |
| Flexible crevice tool |  |
| Dusting brush | 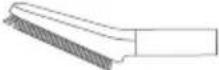 |
| Stretch hose |  |
| Connector | 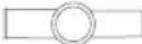 |
| Carpet brushroll | 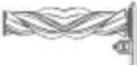 |
Accessories Connection List
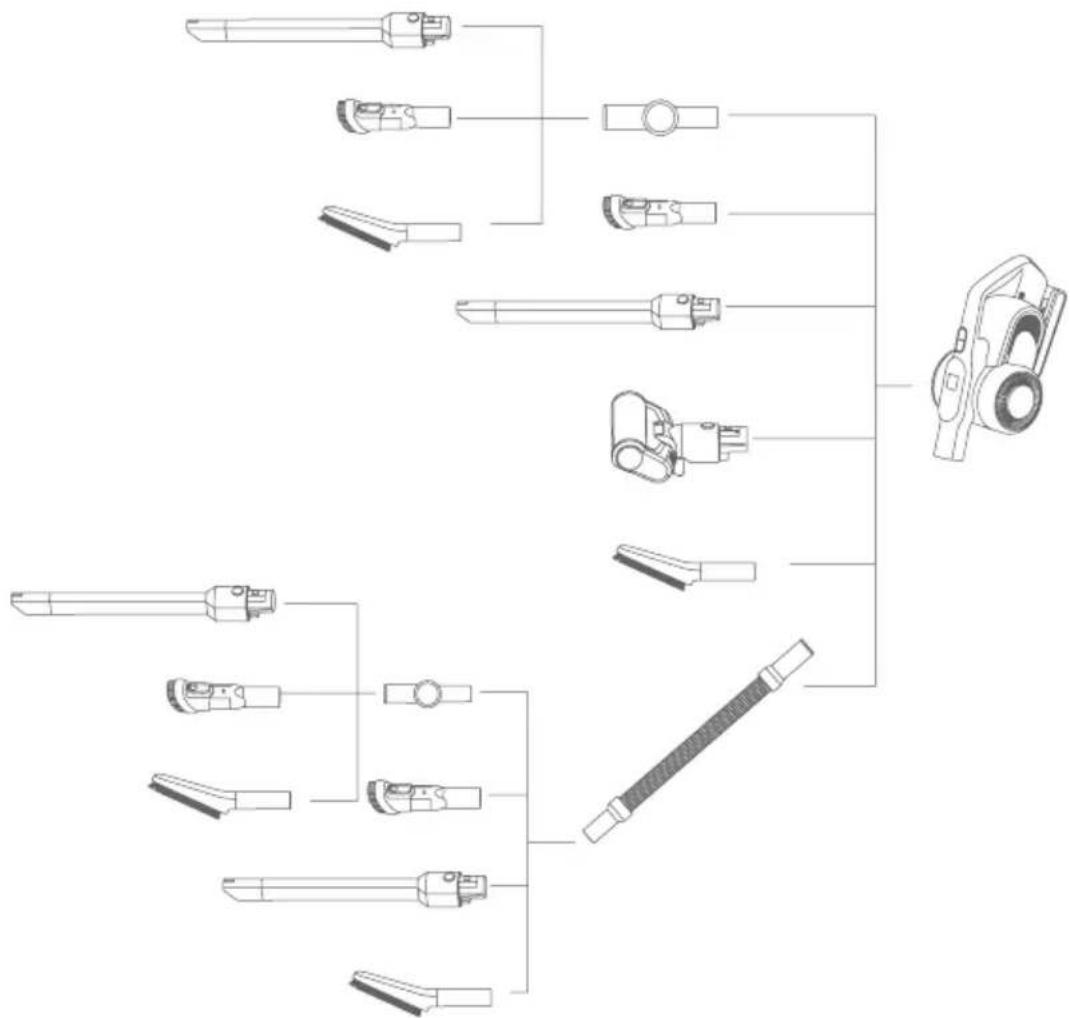
flowchart
graph TD
    A["Tool"] --> B["Bracket"]
    A --> C["Bracket"]
    A --> D["Bracket"]
    B --> E["Component 1"]
    B --> F["Component 2"]
    C --> G["Component 3"]
    C --> H["Component 4"]
    D --> I["Component 5"]
    D --> J["Component 6"]
    E --> K["Assembly"]
    F --> K
    G --> K
    H --> K
    I --> K
    J --> K
    K --> L["Final Assembly"]
Use of vacuum cleaner
Charging
Attention:
- When use the product for first time, battery power is not full. Need to charge the vacuum before using.
- If power cord is damaged, to avoid danger, it must be replaced by a professional people of the manufacturer, repairing agent or similar department.
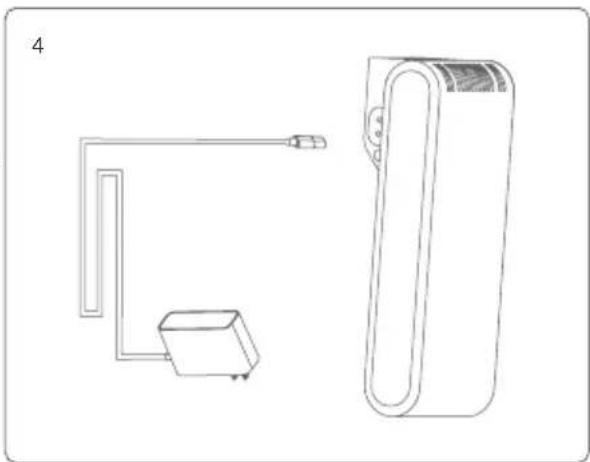
The product can be charged in two ways:
- Charge the battery pack separately: Plug one end of charger to battery pack connector and another end of charger to power socket to charge the battery directly. In this way when under charging the indicator on the side of battery pack is in red and turns green when charging is completed.
natural_image
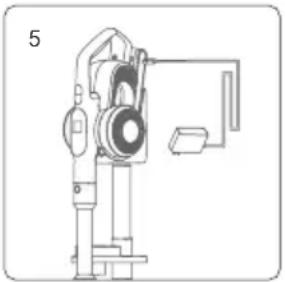
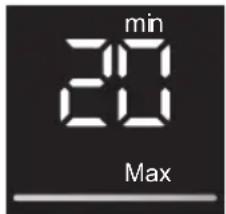
Line drawing of a device with a plug and a rectangular housing, no text or symbols present- Charge the battery on machine: lug one end of charger to battery pack connector and another end of charger to power socket to charge the battery when battery pack is assembled in the vacuum cleaner. Machine LED screen will show battery power percentage. When charging is completed it will show 100% as the pictures shows.
Attention:
- When battery power is below ≤20% , If machine is working in Max mode in this status, it will change to Eco mode automatically. When battery power runs off, machine will turn off.
- If vacuum cleaner is long idled, charge the battery every three months to avoid battery failure.
Use of handheld vacuum and LED screen contents
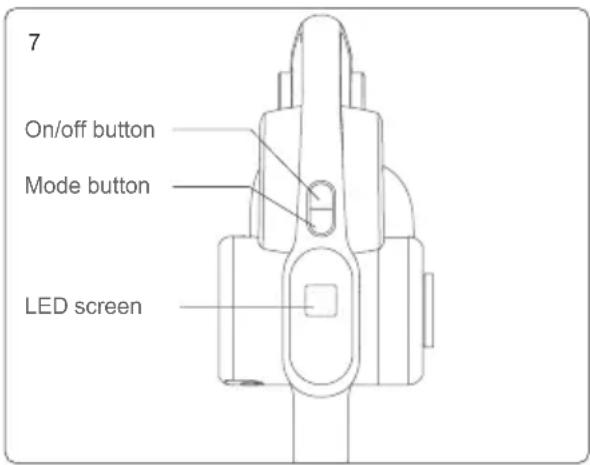
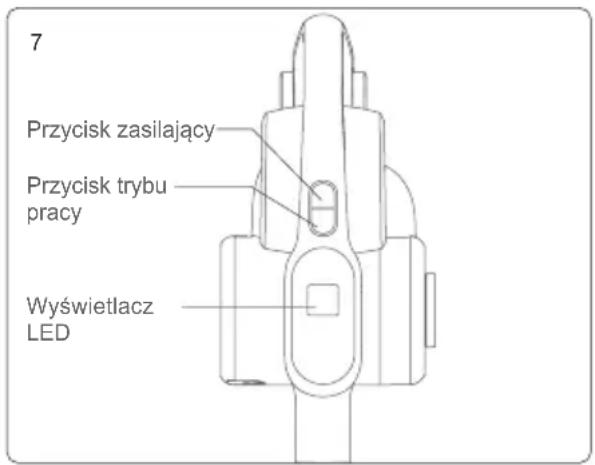
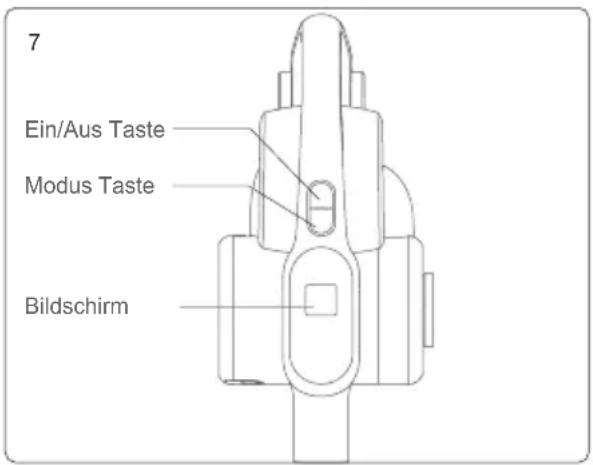
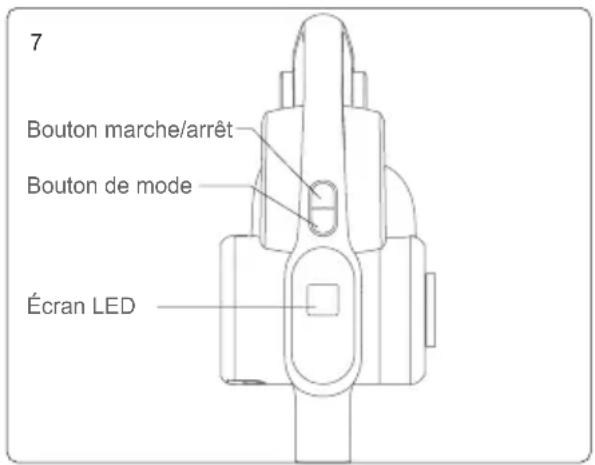
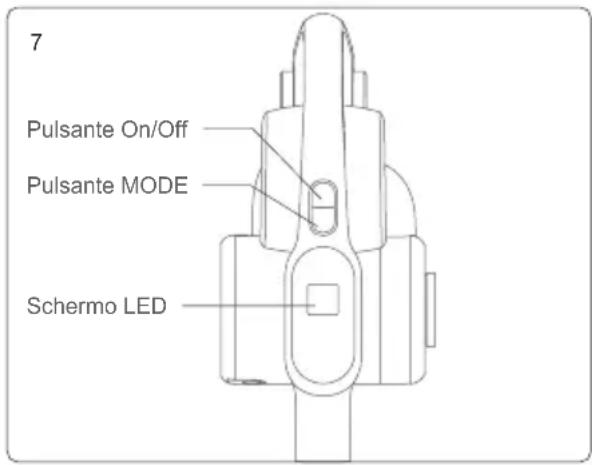
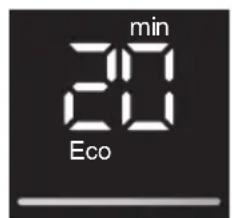
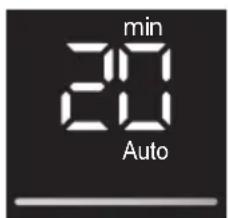
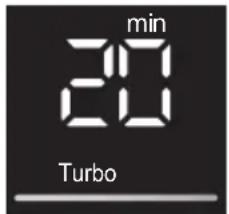
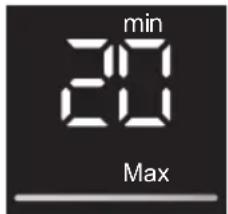
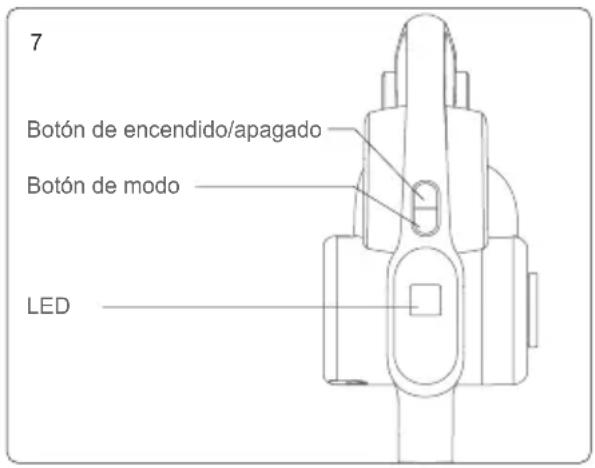
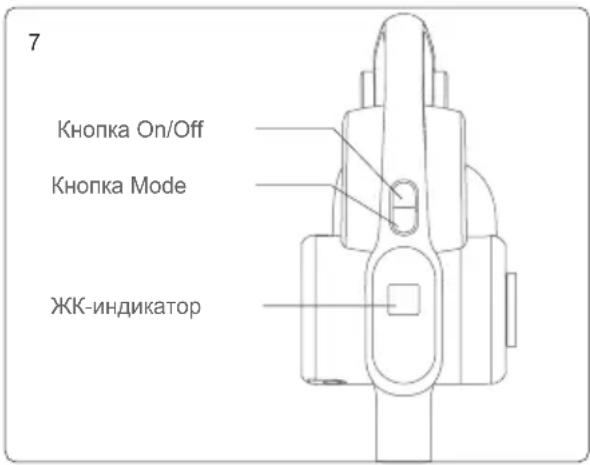
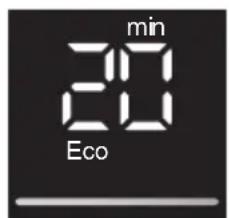
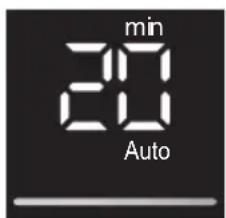
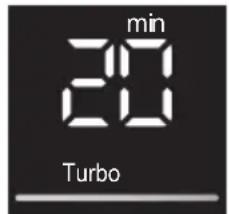
Take the vacuum cleaner off the storage holder, press the on/off button to start or stop the vacuum cleaner. Mode button can adjust working mode. When machine is turned on, it works in Auto mode, press the mode button to switch to the sequence of Turbo- Max - Eco-Auto mode.
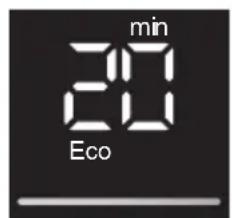
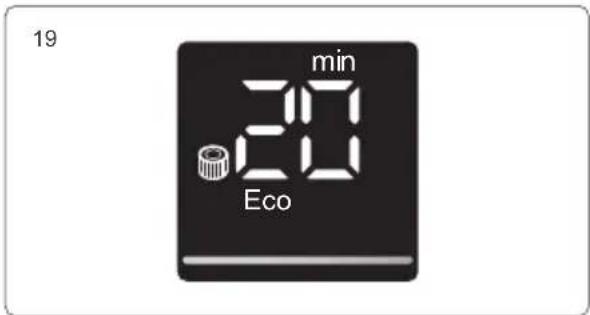
Middle of LED screen displays product run time left in current mode. When mode is changed, left run time will also change accordingly.
When product works in Max mode and battery power drops below 20%, to extend product run time, product will automatically switch from Max to Eco mode. After battery is charged to higher than 20% power, product can work in Max mode.
natural_image
Technical line drawing of a mechanical device with no visible text or symbols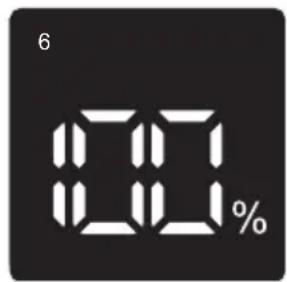
8
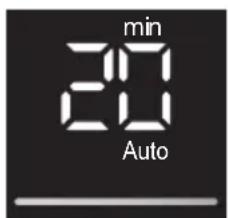
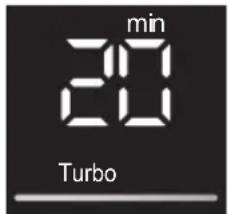
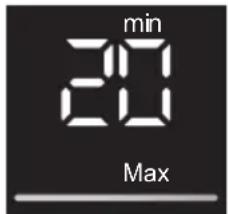
When the product is working in Auto mode, it will adjust working power basing on the dust content and the floor type it detects, in order to achieve higher cleaning efficiency. Under Auto mode, LED screen display Auto regardless how high the working power is.
The product is equipped with dust content sensor. On LED screen bottom there is a light strip to display the dust content. As dust content decreases from high to low, the red colour decreases and blue colour increases. When the strip is completely blue, the cleaning surface is clean. Cleanness of the cleaning surface can be visually displayed through LED screen.
Use of flexible metal tube
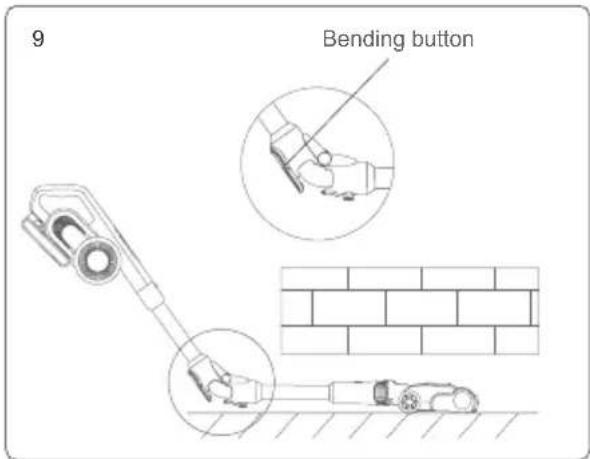
The flexible metal tube has two modes: vertical and bending. The vertical mode is equivalent to the normal metal tube. The bending mode can be used for cleaning under the sofa, table or bed, etc. When the bending mode is needed, press the release button and the metal tube can achieve 0-90°bending angle.
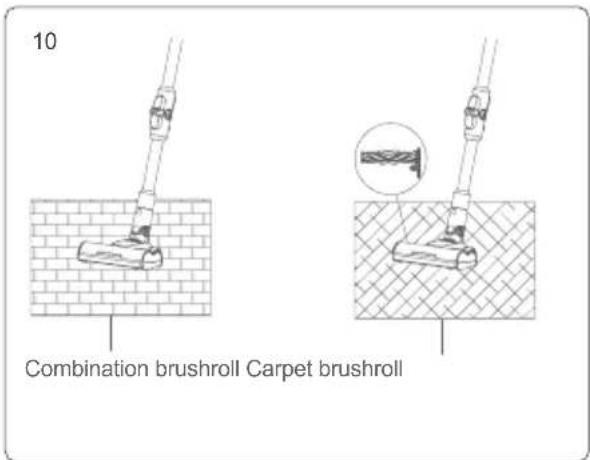
Use of electric floor head
Electric floor head is suitable to clean all kinds of floor like hard floor, tile and carpet etc. Product comes with an extra carpet brushroll can be replaced to the floor head to deep clean carpet. Attention: During the operation of the electric floor head, if there is a large volume of foreign matter inhaled or too much fiber wound, or even a child in the play of the machine mistakenly put his hand into the nozzle, resulting in the brushroll abnormal stop, the electric floor head will stop working, in order to protect personal safety and brush motor.
Use of accessories
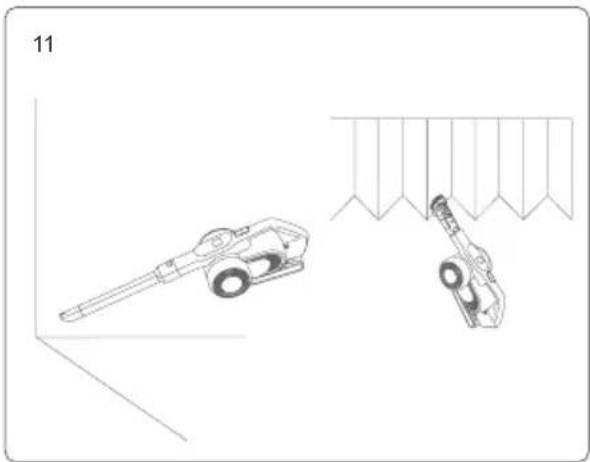
Flexible crevice tool : The crevice tool can be bent into angle with LED light in the head. Suitable for cleaning crevice, door, window corners and other narrow gap as well as hard to reach areas.
Upholstery tool: suitable for cleaning closet, windowsill, sofa and table surface.
Soft brush: suitable for cleaning easy to scratch furniture like bookshelf, handicraft etc.
Stretch hose: suitable for connecting with other tools to clean hard to reach areas.
natural_image
Technical line drawing of two mechanical components with no visible text or symbols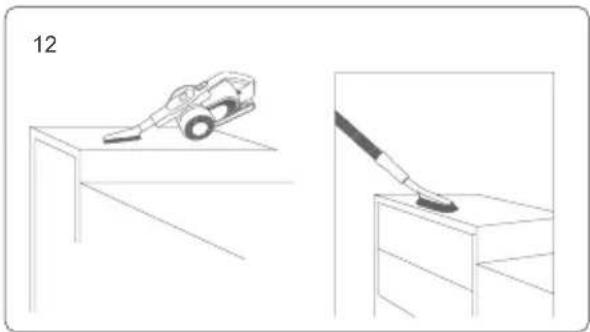
natural_image
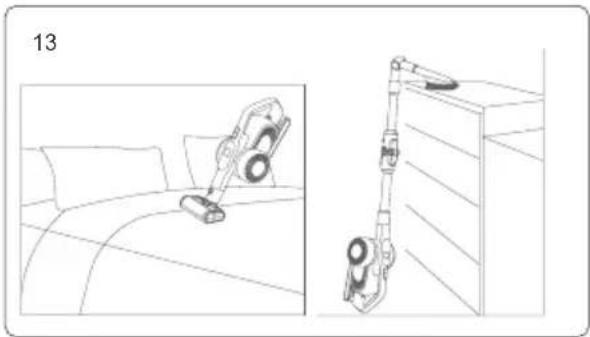
Illustration showing a hand cleaning a car on a table and a paintbrush applying paint to a surface (no text or symbols)Electric mattress head: Suitable for sofa and bed mattress. The brushroll beats out and then cleans the dust mite and allergen from deep sofa or bed.
Connector: Can be connected to other tools and bend to different angle to clean dust on top of high cabinets or dust on the roof.
Cleaning and Replacing Parts
Attention:
- HEPA filter is available for sale from local vacuum cleaner distributors.
- It is recommended to clean the dust cup after each use; When the dust cup is full or the HEPA filter is clogged, it needs to be cleaned and replaced if necessary.
- Electric floor head brushroll might be entangled with hair after long time use. It needs to be cleaned in time to keep the vacuum working more efficiently.
Clean dust cup and filters
- Press down the dust cup bottom cover to open dust cup bottom cover. Fig ①
- Dump dust into trash can. Fig ②
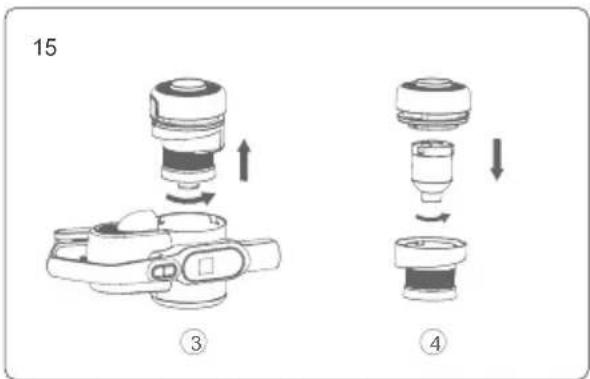
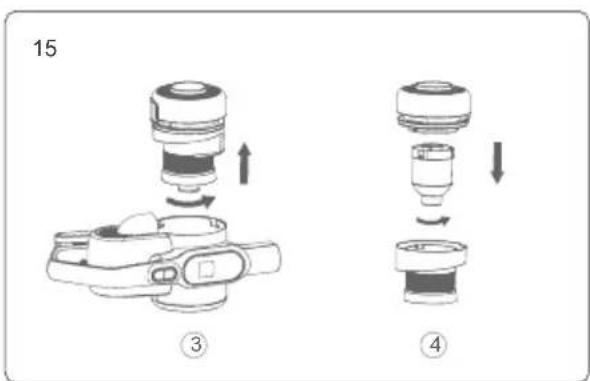
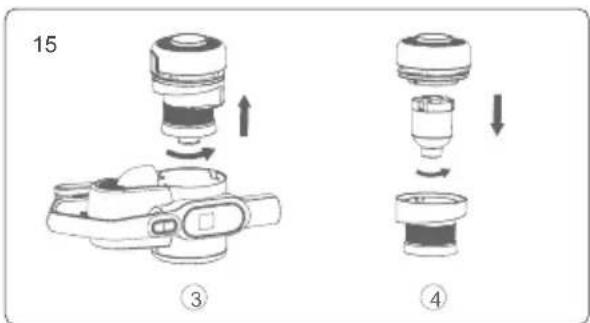
3.Hold dust cup lid and rotate anti-clockwise, remove cyclone assembly from dust cup for cleaning.Fig ③ - Rotate cyclone anti-clockwise, disassemble cyclone to clean. Fig ④
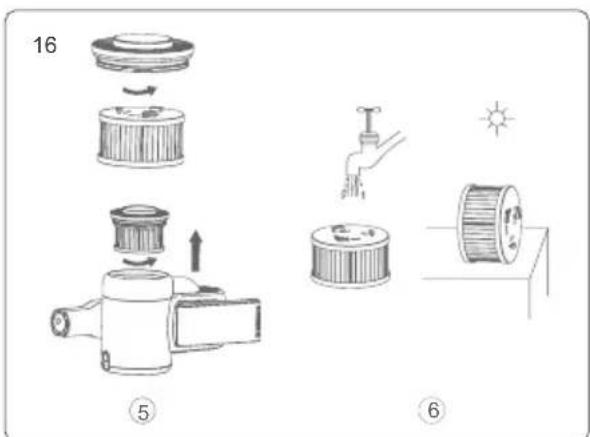
5.Hold HEPA lid and rotate anti-clockwise, remove HEPA assembly from top cover and then rotate HEPA lid to remove HPEA from the lid for cleaning.Fig ⑤ - If HEPA needs wash, hold the HEPA and rotate clockwise, remove it from HEPA lid for washing. HEPA needs completely dry before reuse. Fig 6
- After cleaning, assemble the parts back in the opposite sequence of disassembly.
natural_image
Line drawing of a washing machine on a bed and a wall-mounted device, both shown in technical line drawings without any text or symbols.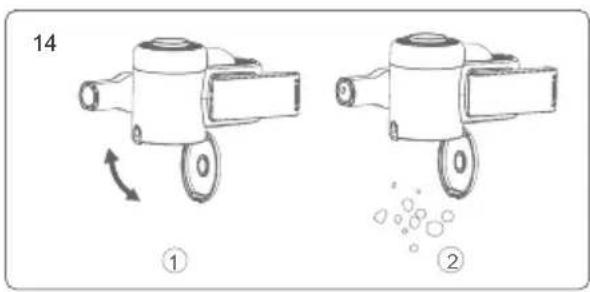
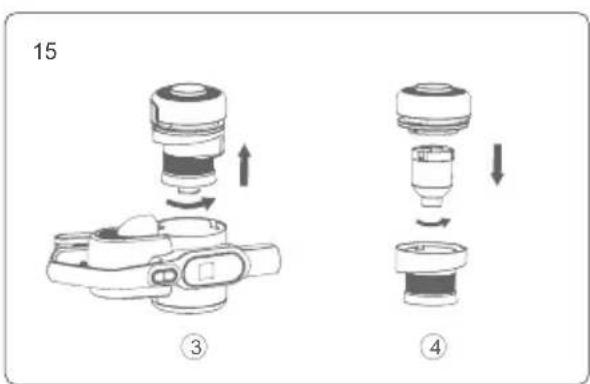
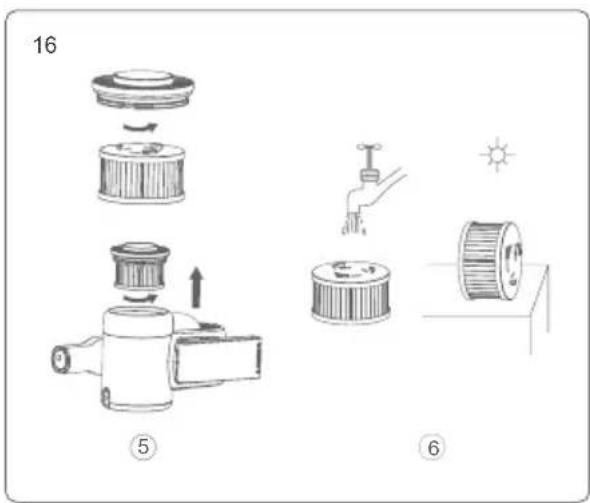
Clean brushroll
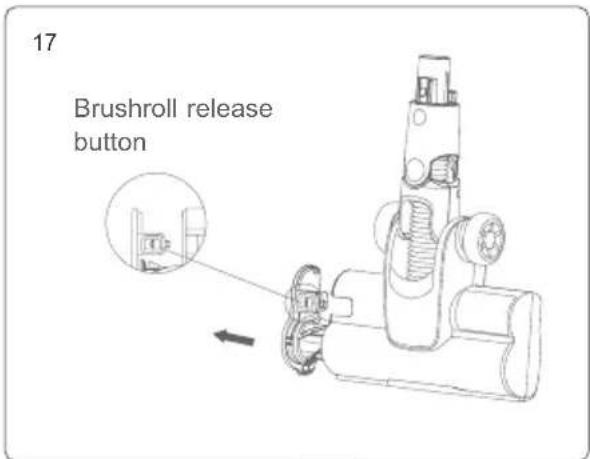
- Press brushroll release button, hold brushroll cover and pull brushroll out along the arrow direction. Take out brushroll from floorhead for cleaning or replacement.
- After cleaning or replacing brushroll, assemble it back in opposite sequence of disassembly.
Vacuum cleaner storage
Battery pack disassembly
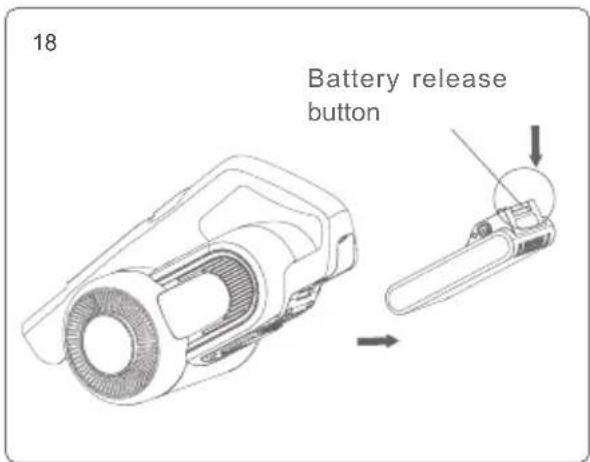
Press the battery release button, pull battery pack out backward and place the battery in a plastic bag, then store it in a dry place.
Product storage
When the vacuum is long idled, remove the battery, pack the machine and store it in a cool and dry place, do not put in direct sunlight or humid environment.
Safety Notes
This vacuum cleaner is designed for home use. Do not use it for commercial or other purposes.
Please read this instruction manual carefully before use, properly save and store it for future use.
Do not put the vacuum close to fire or other high temperature facility.
Do not use or store the machine under extreme bad conditions, for example, extreme temperature. It is recommended to use it indoors between the temperature of 5 °C to 40 °C . Store the machine in dry place and avoid direct sunlight.
Fully charge the battery before first use or after long storage.
Before using the vacuum, make sure brushroll is assembled, otherwise, it may lead to motor fan blockage, causing motor burn out.
Please do not use the vacuum to pick up detergent, oil, glass slag, needle, cigarette ash, wet dust, water, matches, etc.
Please do not use the vacuum to pick up tiny particles such as cement, gypsum powder, wall powder, or large objects such as paper balls, otherwise it will cause malfunctions such as blockage and motor burnout.
Avoid blockage to air inlet or brushroll, it may cause motor failure.
Do not put your hand or foot into floorhead inlet to avoid body hurt.
Do not pour or splash water or other liquids into the machine to avoid short circuit to burn out the machine.
If the brushroll is not working, please check whether the brushroll is entangled with hair or other long fiber, clean it in time.
When storing the machine for a long time, ensure that the battery is fully charged before storage and charge the machine at least every three months.
Unplug the charger to clean or repair the machine. Hold the charger when plugging or unplugging it, and do not pull the charging cord.
Use a dry cloth to clean the machine. Liquids like gasoline, alcohol, lacquer thinner will cause crack or colour fading and cannot be used.
If the machine is not working after fully charged, it must be checked and repaired in our designated office, please do not dismantle the machine on your own.
Discarded machine contains batteries. They should be recycled safely. Do not discard them randomly.
If there is damage on power cord, to avoid danger, it should be replaced or repaired by manufacturer, repairing agency or professional person.
This appliance can be used by children aged from 8 years and above and persons with reduced physical, sensory or mental capabilities or lack of experience and knowledge if they have been given supervision or instruction concerning use of the appliance in a safe way and understand the hazards involved.
The appliance is only to be used with the power supply unit provided.
Trouble Shooting
Please check the following issues before sending to designated repair agent.
| Trouble Possible Causes Solutions | ||
| Motor does not work | Battery has no power Charge the vacuum cleaner | |
| Metal tube,floorhead, battery pack and vaccum cleaner is not assembled correctly | Check the accessories are assembled correctly to the vacuum cleaner | |
| Suction drops | Dust cup full Clean dust cup | |
| Filter blocked Clean or replace filter | ||
| Floorhead air path blocked Clean floorhead air path | ||
| Short working time after charging | Machine not fully charged | Follow instruction manual to fully charge the battery |
| Battery old aging | New batteries can be bought from local distributor | |
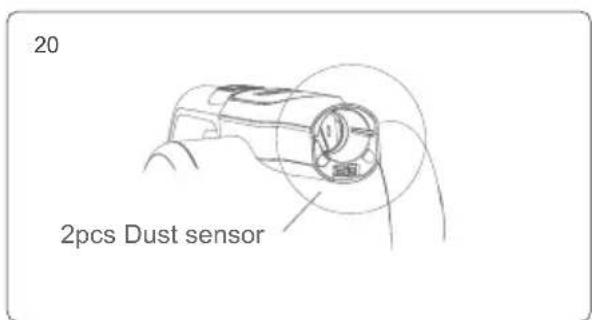
| Dust content indicator is always red | Dust sensor covered by dust | Clean the dust on the dust sensor which is located in the suction inlet of the handheld vacuum cleaner |
Warning reminding
-
When air path or HEPA filter is clogged or dust cup is full, there will HEPA cleaning reminding Icon on LED screen. If machine is working in Max mode, it will change to Eco mode automatically until blockage is cleaned.
-
When brushroll is tangled by foreign objects, continue to use the product will activate brushroll blockage protection. LED screen will display F0 and product will stop to work until brushroll is cleaned.
-
If the dust level light on screen is always red, dust sensor might be covered by dust, please clean the dust on the dust sensor which is located in the suction inlet of the handheld vacuum cleaner.
-
When there is electric components defect, which needs professional after service person for instruction or repairing, Screen will display the defect warning with error code of F0 to F9. Please contact after service of local agent and provide error code.
Defect of F0 to F9 is as following:
| Code Defect Solutions | ||
| F0 Brushroll blocked | Take out brushroll to clean | |
| F1 Battery pack nickel strip broken | Replace or repair battery pack | |
| F2 Charger defect | Replace charger | |
| F3 Vacuum motor | short circuit Replace vacuum motor | |
| F4 Battery cell defect | Replace or repair battery pack | |
| F5 | Vacuum motor 2nd over current protection | Replace vacuum motor |
| F6 | Vacuum motor 1st over current protection | Replace vacuum motor |
| F7 | PCB defect or PCB leadwire loose | Replace PCB or PCB leadwire |
| F8 Battery pack NTC abnormal | Turn off the vacuum and turn on again after battery pack cools down. If error code still appears, replace battery pack. | |
| F9 Brushroll motor | short circuit Replace floorhead | |
Attention: If any other failures occurred, which need professional tools, in order to avoid danger, the machine must be repaired or replaced by manufacturer, other maintenance offices or professionals from similar offices.
Technical specification
| Model No H11 Pro | |
| Rated voltage 28.8V | --- |
| Rated power 700W | |
| Adaptor Input Voltage | 100-240V ~ 50/60 Hz 0.8A |
| Adaptor Output Voltage | 34.2V--- 0.6A |
| Electric Floorhead Model No | EB117E |
| Electric floor head rated power | 50W |
| Battery pack capacity | 3000mAh |
| Charge time | 4-5h |
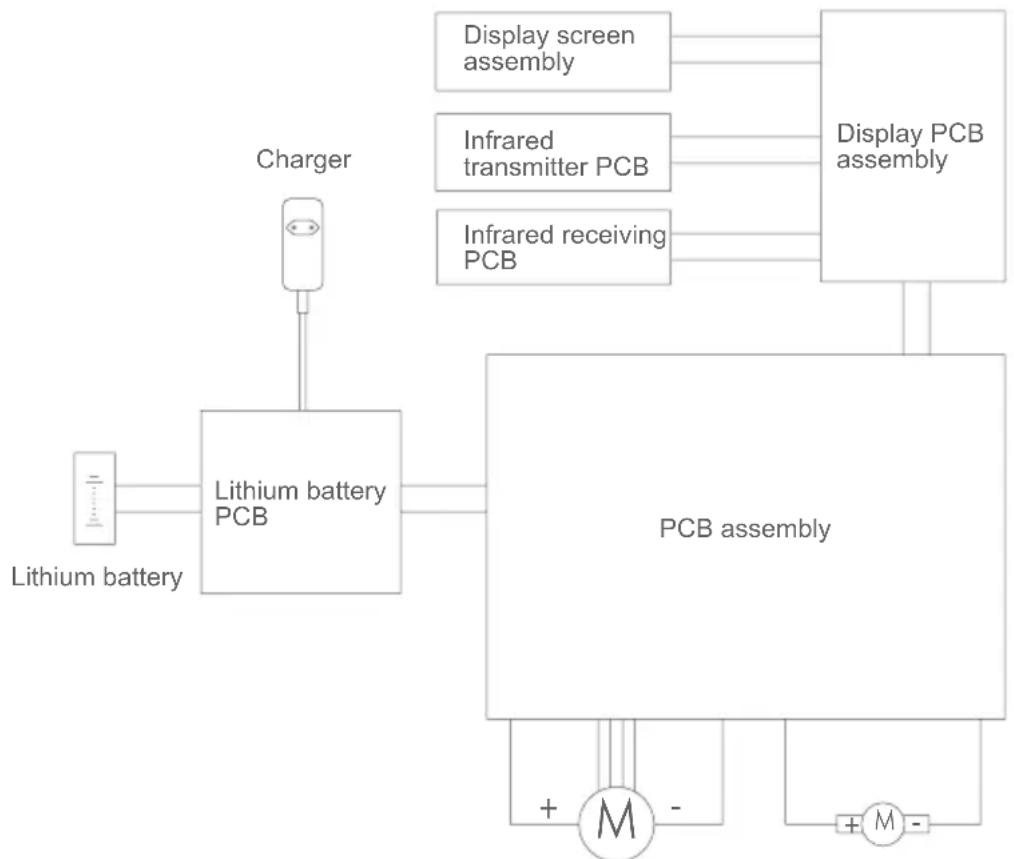
Circuit Diagram
flowchart
graph TD
    A["Lithium battery"] --> B["Lithium battery PCB"]
    C["Charger"] --> B
    B --> D["PCB assembly"]
    D --> E["Display screen assembly"]
    D --> F["Infrared transmitter PCB"]
    D --> G["Infrared receiving PCB"]
    E --> H["+ M -"]
    F --> I["+ M -"]
    G --> J["+ M -"]
Vacuum motor Floor head motor
Manufacturer Information
| Manufacturer Kingclean | Electric Co., Ltd |
| Address | No.1 Xiangyang Road, Suzhou New District, Jiangsu Province 215009, China |
CE EAC
Disposal
The machine, accessories and packaging should be sorted for environmental-friendly recycling.
Do not dispose of the machine into household waste!
Only for EC countries:
According to the European Guideline 2012/19/EU, machine that are no longer usable, and according to the European Guideline 2006/66/EC, defective or used battery packs/batteries, must be collected separately and disposed of in an environmentally correct manner.
Battery packs/batteries:
Integrated batteries may only be removed for disposal by qualified personnel.
Opening the housing shell can damage or destroy the machine.
Do not dispose of battery packs/batteries into household waste, fire or water. Battery packs/batteries should, if possible, be discharged, collected, recycled or disposed of in an environmental-friendly manner.
Subject to change without notice.
Warranty Information
This product enjoys two years warranty from the date of purchase.
Excluded from the guarantee is normal wear, commercial use, alterations to the appliance as purchased, cleaning activities, consequences of improper use or damage by the purchaser or a third person, damage that can be attributed to external circumstances.
Elementy produktu
natural_image
Simple line drawing of a tool or connector with a numbered label '7' (no text or symbols on the diagram itself)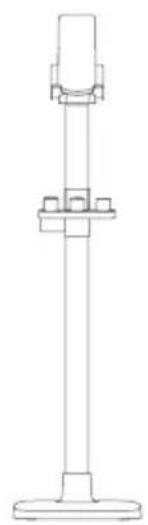
natural_image
Technical line drawing of a vertical support structure with mounting flanges (no text or symbols)Zawartość zestawu
natural_image
Diagram of two different vacuum cleaner designs with arrows indicating motion (no text or symbols)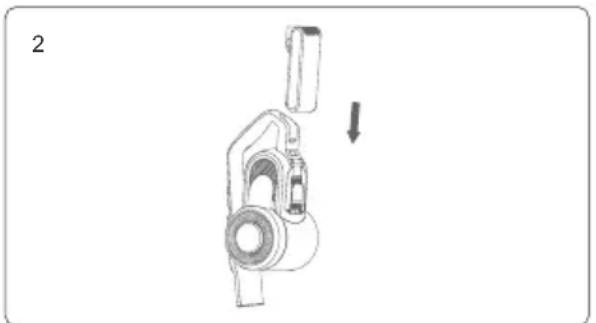
natural_image
Technical line drawing of a mechanical device with a downward arrow indicating motion (no text or symbols)natural_image
Line drawing of a vacuum cleaner with a directional arrow indicating motion (no text or symbols)Montaż akcesoriów
natural_image
Line drawing of a medical device with tubing and a rectangular device (no text or symbols)natural_image
Technical line drawing of a mechanical device with no visible text or symbols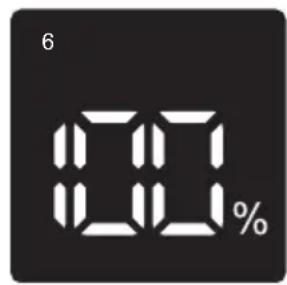
natural_image
Technical line drawing of two mechanical components with no visible text or symbols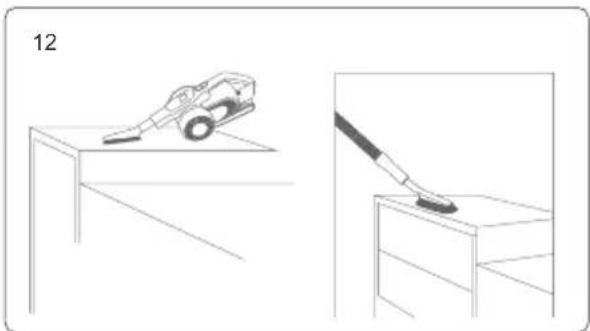
natural_image
Illustration showing a toy car on a table and a paintbrush touching its surface (no text or symbols)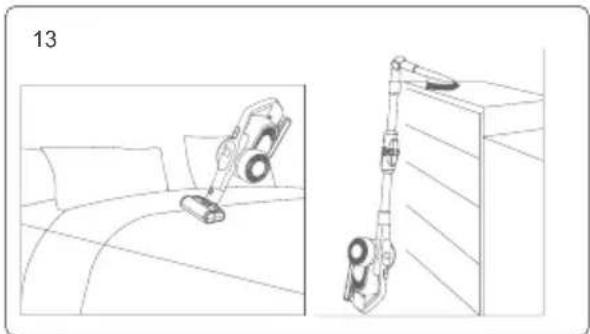
natural_image
Line drawing of a desk with a handbag and a wall-mounted device, showing front and side views (no text or symbols)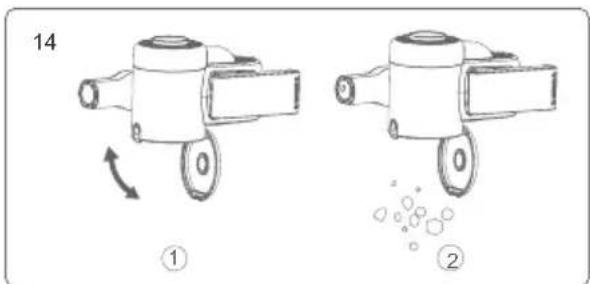
| Producent Kingclean Electric Co., Ltd | |
| Adres | No.1 Xiangyang road, Suzhou New District,Jiangsu province, 215009, China |
CE EAC
natural_image
Simple line drawing of a mechanical component with a numbered label (7) and a small protrusion at the end (no text or symbols on the object itself)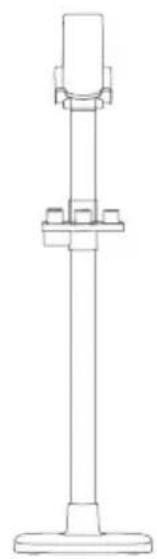
natural_image
Technical line drawing of a vertical mechanical device with mounting base (no text or symbols)Packliste
natural_image
Diagram of two different vacuum cleaner designs with arrows indicating motion (no text or symbols)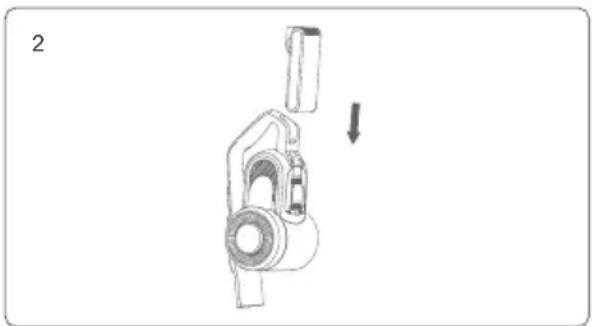
natural_image
Mechanical component diagram showing a piston-like structure with a downward arrow indicating motion (no text or symbols)natural_image
Line drawing of a vacuum cleaner with a directional arrow indicating motion (no text or symbols)natural_image
Line drawing of a device with a plug, circuit board, and cylindrical housing (no text or symbols)natural_image
Technical line drawing of a mechanical device with no visible text or symbols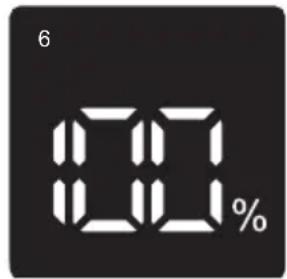
natural_image
Technical line drawing of two mechanical components with no visible text or symbolsnatural_image
Illustration showing a car on a table and a paintbrush touching its surface (no text or symbols)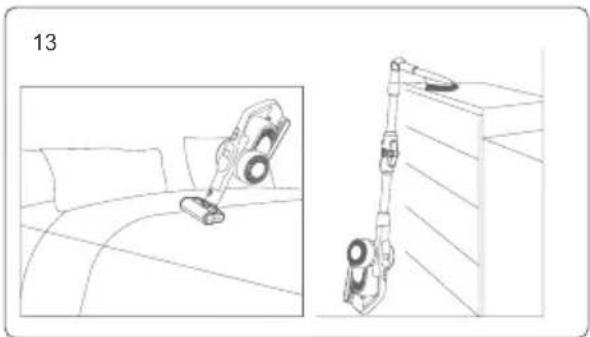
natural_image
Line drawing of a vacuum cleaner on a bed and a mounted device on a cabinet (no text or symbols)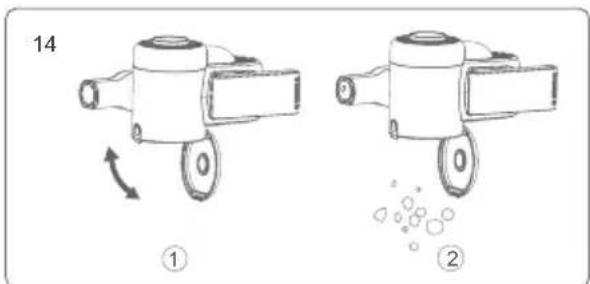
natural_image
Simple line drawing of a screw with a pin, no text or symbols present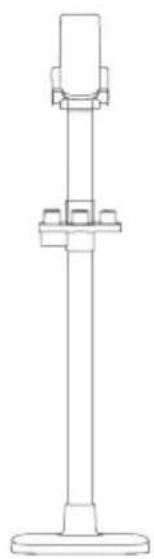
natural_image
Line drawing of a vertical mechanical device with a cylindrical top and base (no text or symbols)Liste de colisage
natural_image
Diagram of two different vacuum cleaner designs with arrows indicating motion (no text or symbols)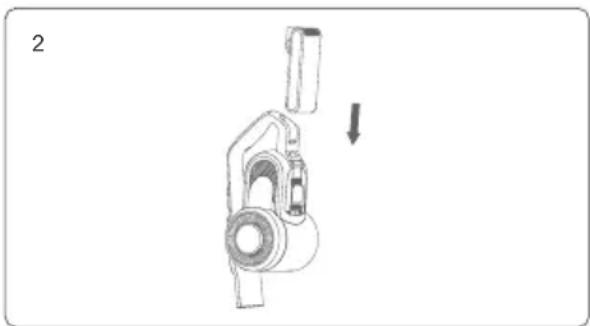
natural_image
Technical line drawing of a mechanical device with a downward arrow indicating motion (no text or symbols)natural_image
Line drawing of a vacuum cleaner with a directional arrow indicating motion (no text or symbols)natural_image
Line drawing of a handheld device with a small box and connected tubing (no text or symbols)natural_image
Technical line drawing of a mechanical device with no visible text or symbols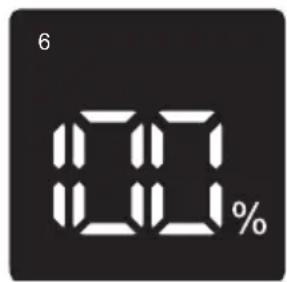
natural_image
Technical line drawing of two mechanical components with no visible text or symbols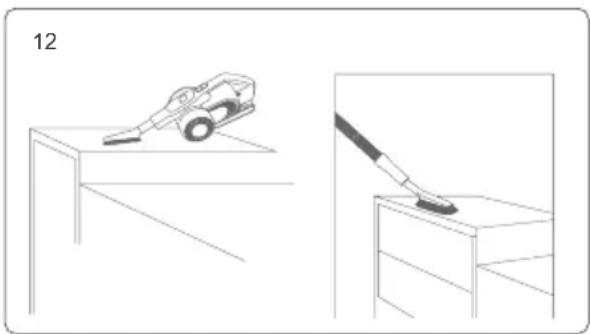
natural_image
Illustration showing a car on a table and a brush applying paint to a shelf, both without any text or symbols.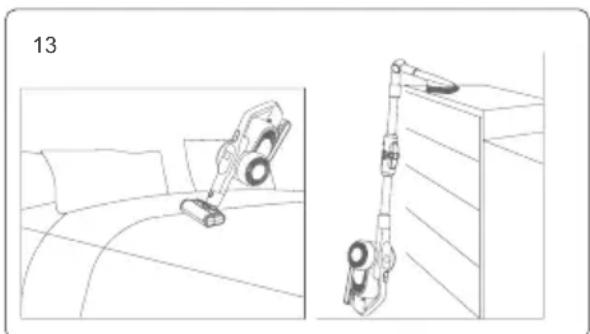
natural_image
Line drawing of a washing machine on a bed and a wall-mounted device (no text or symbols)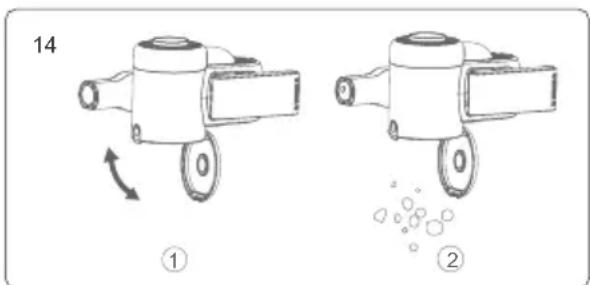
| Fabricant Kingclean Electric Co., Ltd | |
| Adresse | No.1 Xiangyang road, Suzhou New District,Jiangsu province, 215009, China |
CE EAC
Mise au rebut
natural_image
Simple line drawing of a screw with a pin, no text or symbols present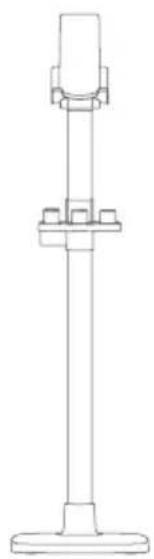
natural_image
Technical line drawing of a vertical mechanical assembly with mounting base (no text or symbols)Lista imballaggio
natural_image
Diagram of two different vacuum cleaner designs with arrows indicating motion (no text or symbols)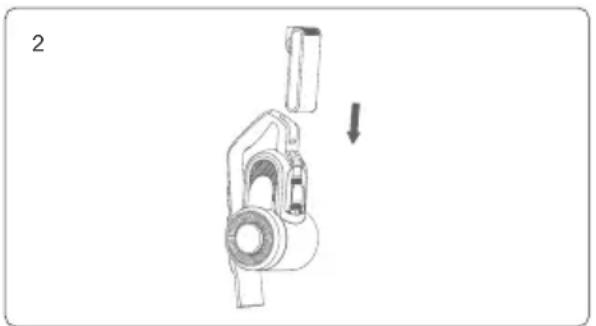
natural_image
Mechanical component diagram showing a lever mechanism with a downward arrow indicating motion (no text or symbols)natural_image
Line drawing of a vacuum cleaner with a directional arrow indicating motion (no text or symbols)natural_image
Line drawing of a handheld device with a small box and connected tubing (no text or symbols)natural_image
Line drawing of a mechanical device with no visible text or symbols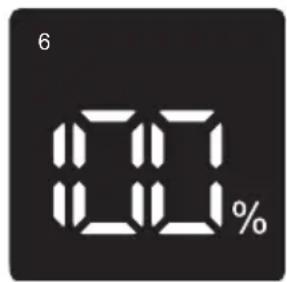
8
The product is equipped with dust content sensor. On LED screen bottom there is a light strip to display the dust content. As dust content decreases from high to low, the red colour decreases and blue colour increases. When the strip is completely blue, the cleaning surface is clean. Cleanness of the cleaning surface can be visually displayed through LED screen.
Flexible crevice tool : The crevice tool can be bent into angle with LED light in the head.
Suitable for cleaning crevice, door, window corners and other narrow gap as well as hard to reach areas.
natural_image
Technical line drawing of two mechanical components with no visible text or symbols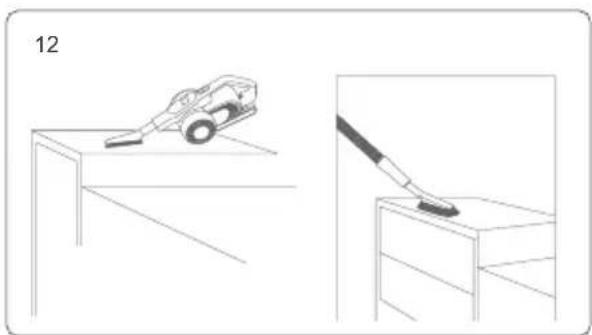
natural_image
Illustration showing a car on a lift and a brush applying paint to a surface, both without any text or symbols.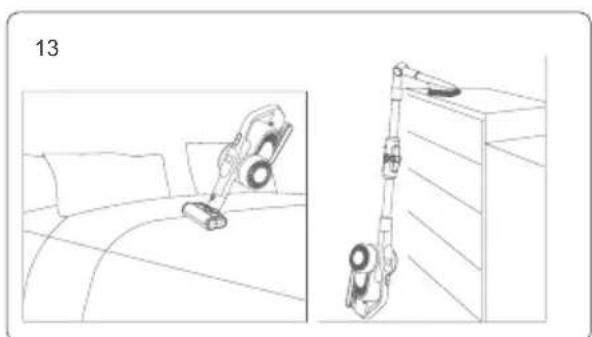
natural_image
Line drawing of a washing machine on a bed and a handbar on a cabinet (no text or symbols)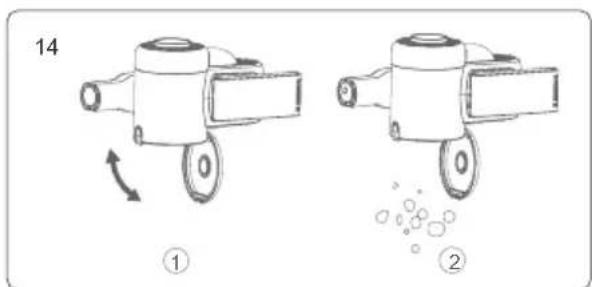
natural_image
Simple line drawing of a screw with a pin, no text or symbols present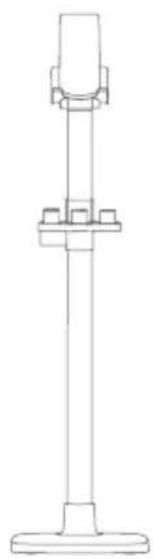
natural_image
Technical line drawing of a vertical mechanical assembly with mounting base (no text or symbols)Lista de embalaje
natural_image
Diagram of two different vacuum cleaner designs with arrows indicating motion (no text or symbols)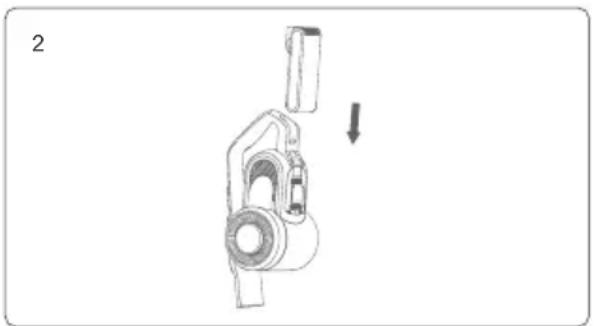
natural_image
Mechanical component diagram showing a lever mechanism with a downward arrow indicating motion (no text or symbols)natural_image
Line drawing of a vacuum cleaner with a directional arrow indicating motion (no text or symbols)natural_image
Line drawing of a handheld device with a small box and connected tubing (no text or symbols)natural_image
Technical line drawing of a mechanical device with no visible text or symbols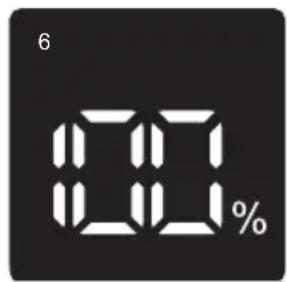
natural_image
Technical line drawing of two mechanical components with no visible text or symbols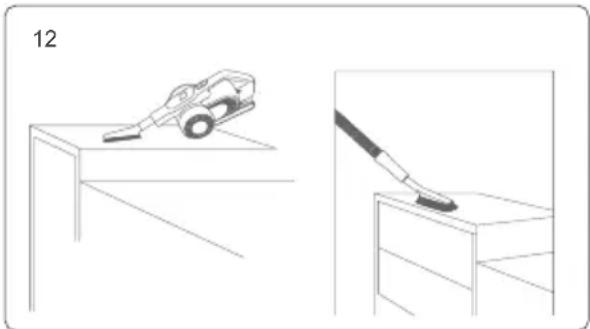
natural_image
Illustration showing a car on a table and a brush applying paint to a box (no text or symbols)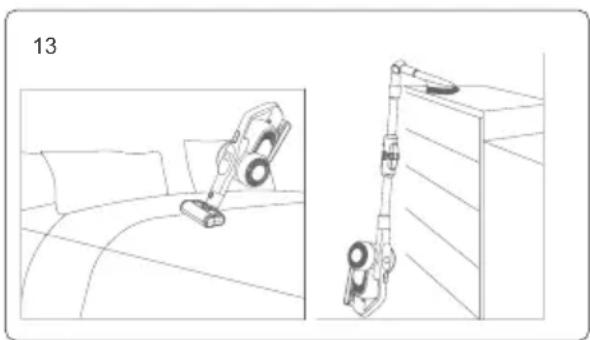
natural_image
Line drawing of a washing machine on a bed and a wall-mounted device, both shown in technical line drawings without any text or symbols.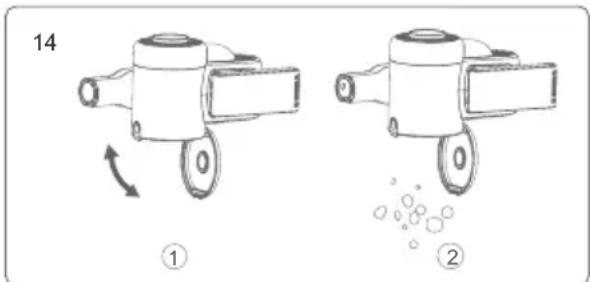
natural_image
Simple line drawing of a tool or connector with a numbered label '7' (no text or symbols on the object itself)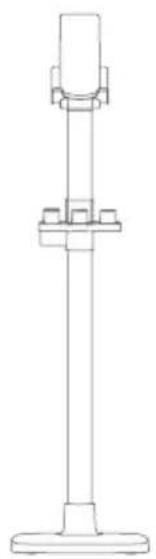
natural_image
Technical line drawing of a vertical support structure with mounting base (no text or symbols)Комплектация
natural_image
Diagram of two different vacuum cleaner designs with arrows indicating motion (no text or symbols)natural_image
Diagram of a mechanical device with a downward arrow indicating motion or force (no text or symbols present)natural_image
Line drawing of a vacuum cleaner with a directional arrow indicating motion (no text or symbols)Сборка аксессуаров
natural_image
Line drawing of a handheld device with a small box and connected tubing (no text or symbols)natural_image
Technical line drawing of a mechanical device with no visible text or symbols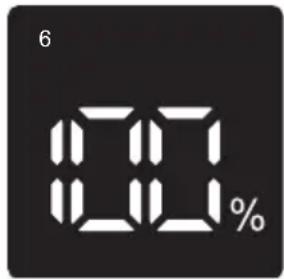
8
natural_image
Technical line drawing of two mechanical components with no visible text or symbolsnatural_image
Illustration showing a car on a platform and a brush applying paint to a surface, both without any text or symbols.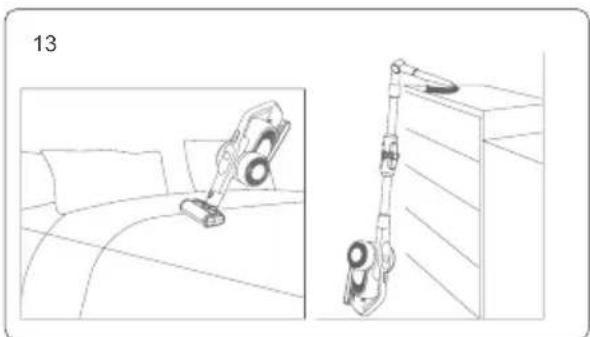
natural_image
Line drawing of a washing machine on a bed and a cabinet, with no text or symbols present.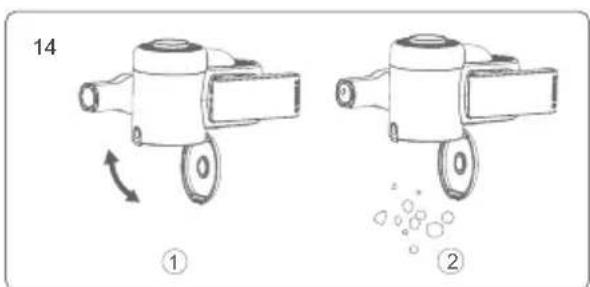
Contact us -we'll get back within 1 business day.

Web:www.jimmyglobal.com Email:support@jimmyglobal.com
- Contents
- Parts Name
- Storage holder parts name
- Accessories storage holder assembly
- Packing List
- Machine assembly
- Assembly of accessories
- Accessories Connection List
- Use of vacuum cleaner
- Charging
- The product can be charged in two ways:
- Attention:
- Use of handheld vacuum and LED screen contents
- Use of flexible metal tube
- Use of electric floor head
- Use of accessories
- Cleaning and Replacing Parts
- Clean dust cup and filters
- Clean brushroll
- Vacuum cleaner storage
- Battery pack disassembly
- Product storage
- Safety Notes
- Trouble Shooting
- Warning reminding
- CE EAC
- Disposal
- Only for EC countries:
- Battery packs/batteries:
- Warranty Information
- Elementy produktu
- Montaż akcesoriów
- Packliste
- Liste de colisage
- Mise au rebut
- Lista imballaggio
- Lista de embalaje
- Комплектация
- Сборка аксессуаров
Brand : JIMMY
Model : H11 Pro
Category : Vacuum Cleaner